
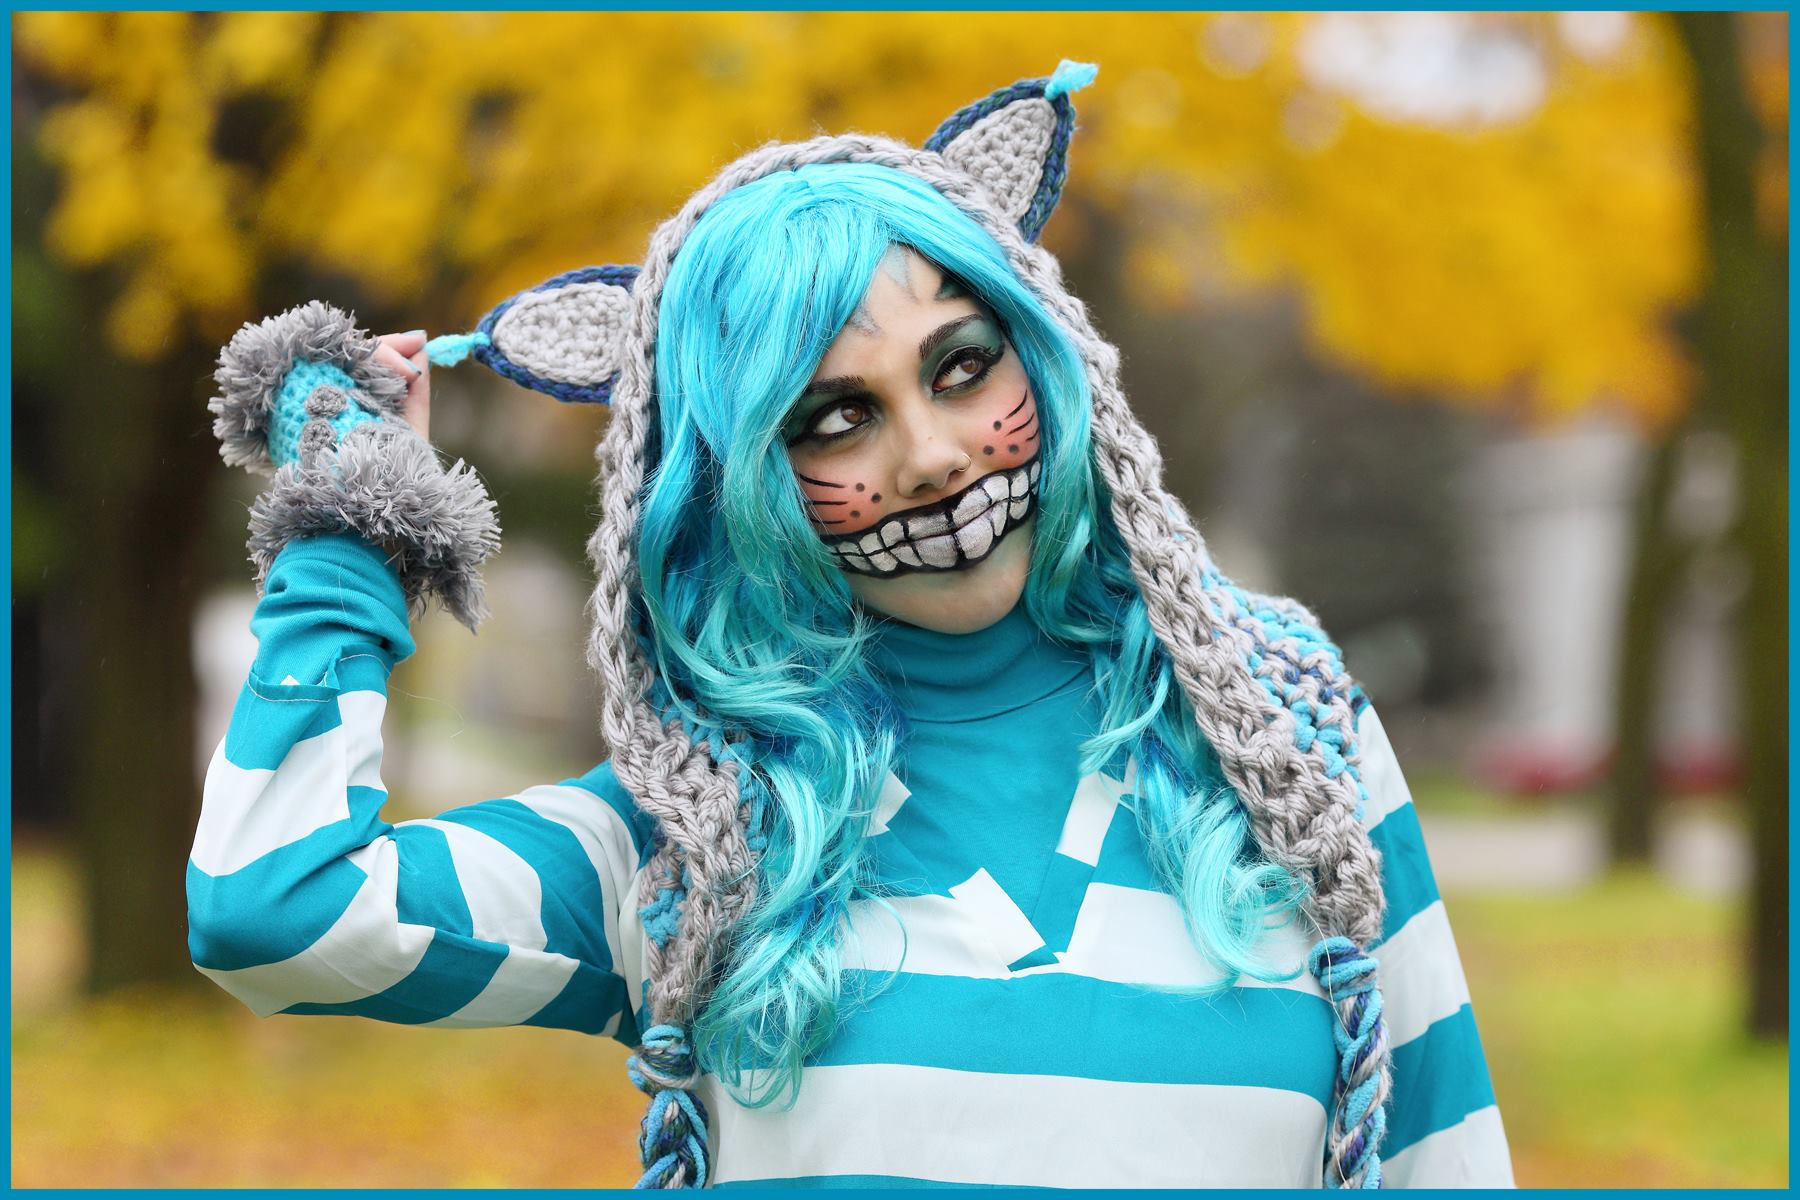
As winter approaches, the need to bundle up becomes more prevalent. From top to bottom, we pile on layers to keep ourselves from the bitter cold. Although I made this particular hood for my costume this Halloween, once made, I realized how warm this actually is (since I wore it all night long).

Many of my blog followers on Facebook and Instagram inquired about me making a video tutorial for this project. It occurred to me that this would be perfect for the season as winter apparel. It offers a very stylish option, and it is very different than your average winter hat or scarf.


This is a cat hoodie of course, however, it is also very versatile. You do not have to put on the ears, or you can replace the ears with bear ears or fox ears. Custom make this to any animal of your choice! The creativity that is in this project knows no bounds! You could take it to a different level and line the face with fur around row 1. I’m sure you will find this to be a very fun and easy project. These make great gifts, and they are incredibly warm to wear!

When I was looking up inspiration online for the Cheshire Cat, I came across this photo. I could NOT find a pattern, but knew I could make one myself. This photo served as the inspiration to the hood I made. The original designer for this hood shown below is Archaical. You can find her work here on here website or here on her Facebook.

Below are some more photos from this Halloween. You can see Nate and my full length costumes as well as a close-up. I tried to pay attention to the details in creating both ensembles to emulate the characters from Alice in Wonderland.

If you are interested in making the full costume, You can find the Leg Warmers pattern here. You can find the Hand warmer Paws Pattern here. You can find the Cheshire Cat Tail pattern here. And you can find the Top Hat that Nate is wearing right here! Enjoy!


Follow along with this video to learn how to make the Cat Hood:
My dad will continue to be the videographer, editor, and photographer for our videos when I move away.
Support YARNutopia today so we can continue to bring you clear, quality crochet tutorials even after I move into my new home!
There will be an added expense of more travel and hopefully this won’t deter our ability to provide consistent videos on a weekly basis.


Pattern:
Designed by Nadia Fuad
Questions? Leave a comment!
You may sell items made from my pattern, but please reference my name and Etsy Shop (YARNutopia).
Please do not copy and post this pattern and claim it as your own.
Materials:
**Click here to get the crochet kit to make this Hoodie**
–Lion Brand Hometown USA in Dallas Grey (162 Yards)
–Lion Brand Hometown USA in Lake Tahoe Blue (64 yards)
–Lion Brand Homespun Yarn in Windsor (less than 50 yards)
–Bernat Baby Blanket Yarn in Baby Teal (80 yards)
–Size Q-15.75mm crochet hook (Lazy Hook)
–Size P-11.50mm crochet hook
–Size L-8mm crochet hook
–Yarn Needle
–Scissors
NOTES:
Ch: chain
St(s): Stitch(es)
Sl st: slip stitch
SC: Single Crochet
SC2TOG: Single Crochet Decrease
DC: Double Crochet

Hood
Row 1: With Dallas Gray, FDC 40 (or ch 42, dc in 2nd ch from hook and across) (40 DC)
Row 2: Ch 2, turn, *FPDC around next st, BPDC around next st, repeat from * across. Change to Baby Teal, (40 DC)
Row 3: Ch 2, Turn, HDC across
Row 4: With Dallas Gray, Repeat row 3
Row 5: With Lake Tahoe Blue, Repeat row 3
Row 6: With Dallas Gray, Repeat row 3
Row 7: With Baby Teal, Repeat row 3
Row 8: With Windsor, Repeat row 3
Row 9: With Dallas Gray, Repeat row 3
Row 10: With Baby Teal, Repeat row 3
Row 11: With Dallas Gray, Repeat row 3
Row 12: With Lake Tahoe Blue, Repeat row 3
Row 13: With Dallas Gray, Repeat row 3
Row 14: With Baby Teal, Repeat row 3
Row 15: With Windsor, Repeat row 3
Rows 16 & 17: With Dallas Gray, Repeat row 3
Fasten off, weave in all ends.

Lace in the back of hoodie: With P Hook
With Lake Tahoe Blue, Ch 200, fasten off. Use the long chain to lace up the back of the hood. (see video for visual instructions)
Front Tassels:
Take 3 strands of each color (total of 12 strands) that measure 48 inches. Attach to each end of the front of the hood and create braids. (See video for visual instructions)
Ears: Make 2 (Optional) With L hook
Outer Ear:
With Lake Tahoe Blue, Ch 7
Row 1: sc in 2nd ch from hook and across, ch 1, turn (6)
Row 2: Sc across (6)
Row 3: sc2tog, sc in next 2 sts, sc2tog, ch 1, turn (4)
Row 4: sc across (4)
Row 5: sc2tog twice, ch 1, turn (2)
Row 6: sc2tog, ch 1, turn (1)
Continue to single crochet all the way around the triangle, fasten off with long tail for sewing.

Inner ear:
With Dallas Gray, Ch 5
Row 1: sc in 2nd ch from hook and across, ch 1, turn (4)
Row 2: sc across, ch 1, turn (4)
Row 3: sc2tog twice, ch 1, turn (2)
Row 4: sc across, ch 1, turn (2)
Row 5: Sc2tog, ch 1, turn (1)
Continue to single crochet all the way around triangle, fasten off with long tail for sewing
Attach gray part of ear to blue part of ear, sew ears to hoodie between rows 2 & 3, weave in all ends.
Tail:
Change color every 10 Rounds. Work In continuous Rounds, moving stitch marker up each round. Add stuffing as you go, I found it easier to stuff after every 10 rounds.
Ch 2,
Rnd 1: 6 sc in 2nd ch from hook (6)
Rnd 2: Sc in each st around. (6)
Rnd 3: 2 sc in each st around. (12)
Rnd 4: Sc in each st around. (12)
Rnd 5: [2 sc in next st, 1 sc in next st] 6 times. (18)
Rnd 6: Sc in each st around. (18)
Rnd 7: [2 sc in next st, 1 sc in next 2 sts] 6 times. (24)
Rnd 8-60 (or however long you want to make it): Sc in each st around, change color after rounds 10, 20, 30, 40, and 50.
Apply fur at the tip of the tail by sewing it on.
Sew end closed and weave elastic through and wear around your waist, or sew the end closed and pin it to your pants!
Weave in all ends

Enjoy!!
***You can always contact me if you have any problems with the pattern. I am happy to help if you have any questions along the way.
***These patterns are copyright YARNutopia © so PLEASE DO NOT COPY, SHARE, ADJUST OR RESELL MY PATTERN. I wrote and tested this pattern myself, from beginning to end. It took a lot of time and work, and I would really like to have it remain “my pattern.”
***You can sell anything you make from my patterns, please just link back to my website YARNutopia.com. Thank you!
Teacher: Nadia Fuad
Video and Editing: Fuad Azmat (My Daddy)
Add me on Snapchat: YARNutopia
Visit My Ravelry Store and add this to your Favorites!
Follow me on Twitter: @YARNutopia
Enjoy this video and subscribe to my channel on YouTube for more tutorials on how to crochet!
Leave a comment, and share with your friends!
“If you don’t know where you’re going, any road will get you there.” ~Cheshire Cat (Alice in Wonderland)
~Nadia
This post contains affiliate links, which I may be compensated for when you make a purchase. That means if you click on any link and buy from the linked websites, I will receive a small percentage of the value of your order. The amount you pay is not changed. Thank you for all your support in clicking the links in my blog!! You all are so amazing!! ~Nadia


Pingback: Ahri Inspired Kitty Ear Warmers | Heart of the Healer
Pingback: Cat Hoodie Cowl for Sale | Heart of the Healer
Hi, i love the hood and really want to make it but cannot get the yarn you’ve referenced here in England. Did you use super bulky yarn? If not what types of yarn did you use? Thanks.
Reblogged this on Hooked to the left and commented:
Super Cute Tutorial that I will be giving a try here in the next month or so.
Pingback: Cheshire Cat Crochet hood – Tazz Talks
Thank you so much for this pattern, I’ve just done (not the ears yet) and I LOVE it!
I used a thinner yarn for two of my colors, but I either doubled it up or I used it as a single and found it just added texture to my hood. Love love love! Thank you
Pingback: Crochet Tutorial: Link to the Past Stocking Cap « YARNutopia by Nadia Fuad
Thank You for the pattern,
Love, love, looooove this pattern! I used slightly different yarns for variety but it still came out looking perfect! Thanks so much for sharing your pattern!
Nadia, I really enjoyed working this pattern. I was hoping you could help me with a small problem. I made the sides tgat hang down to your armpits a bit too long i was just wandering if you may have a solution other than starting over or re working the rows. Thankyou
Pingback: Ahri Inspired Ear Warmers – cat ear warmers pattern – Daisy Chain Crochet
Love, love, looooove this pattern! I used slightly different yarns for variety but it still came out perfect. Thank you so much for sharing such a fun pattern!
Pingback: Free Crochet Hood & Balaclava Patterns • Salty Pearl Crochet