This is the 4th piece of the Cheshire Cat costume. It is a very simple pattern. There is no video tutorial since this is a continuous repeat pattern. This particular tail was made for the Cheshire Cat costume, however, this can be modified to be crocheted for any type of tail for any costume! The length can be changed to accommodate any size. It can be made short or long.
Enjoy this pattern and leave a comment!


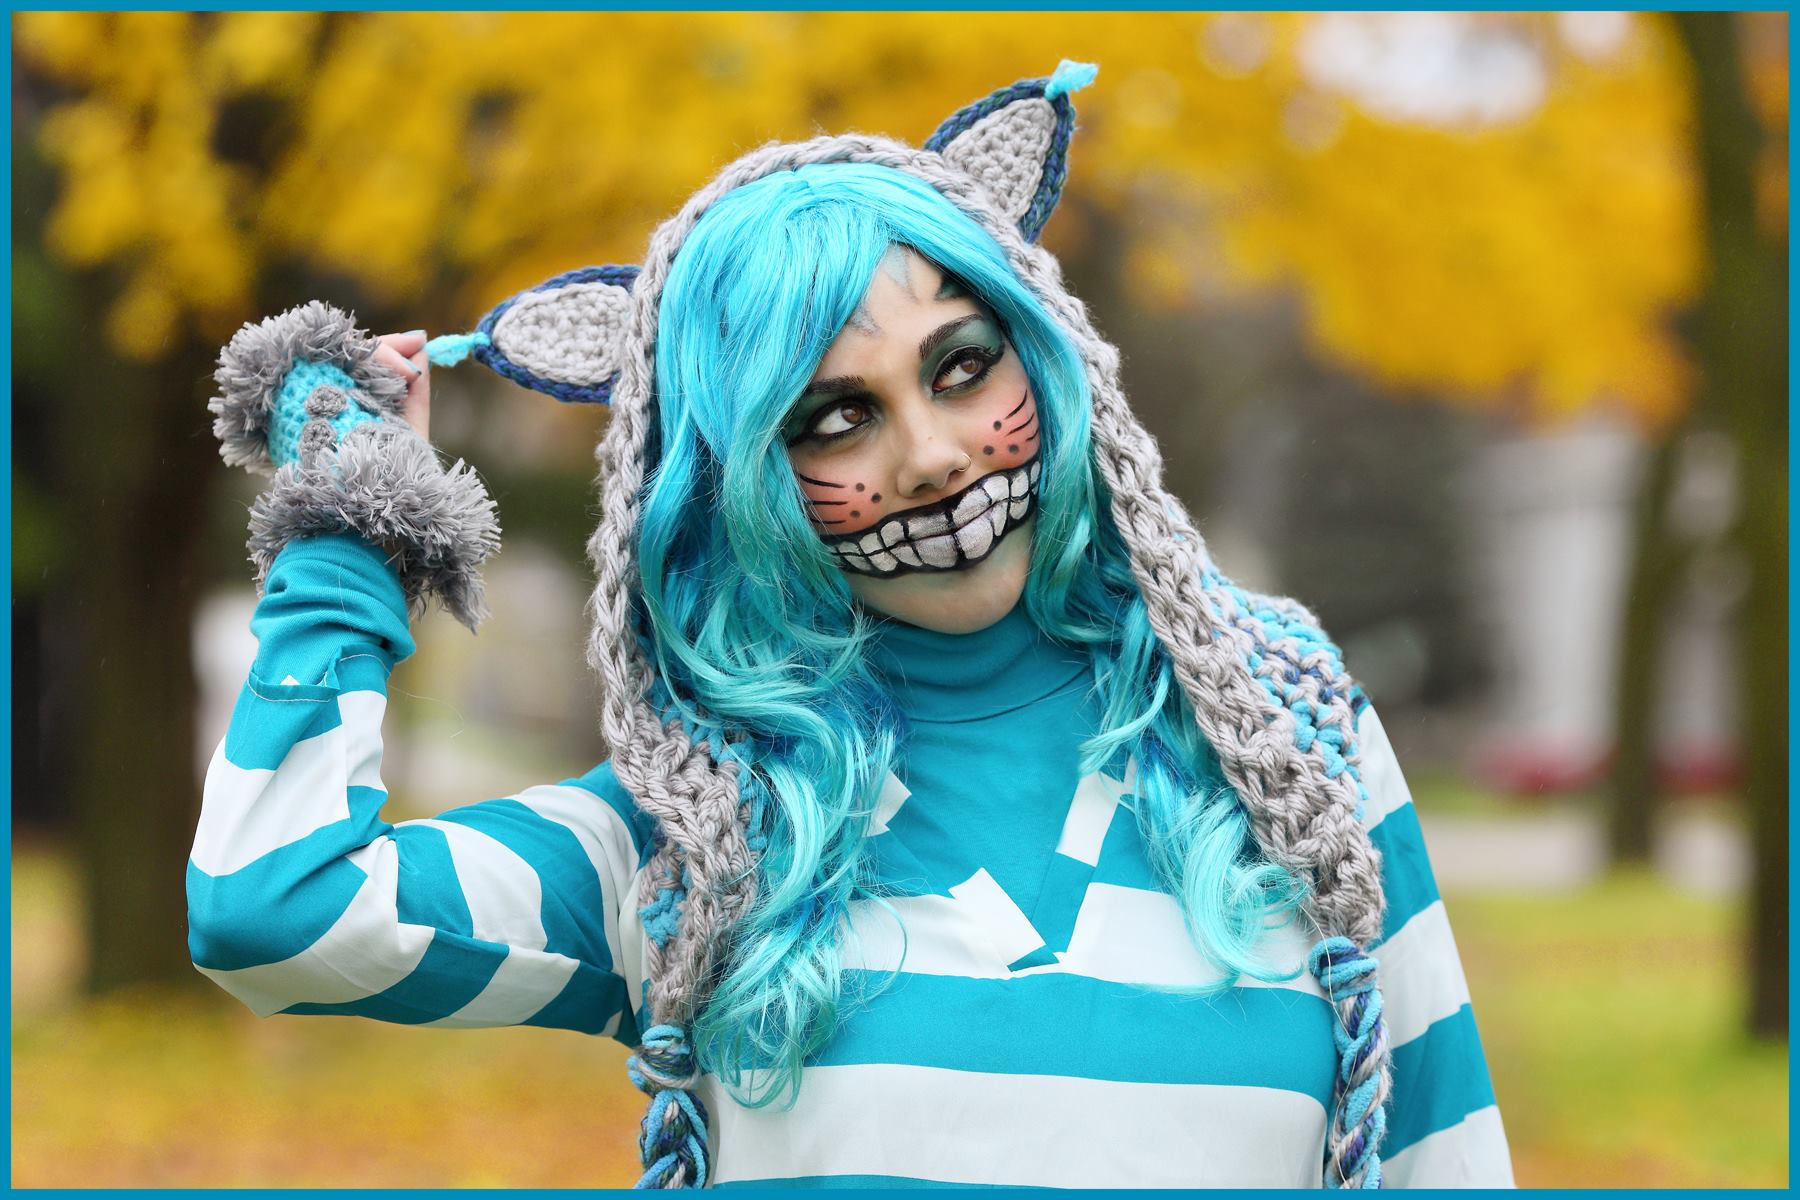
If you are interested in making the full costume, You can find the Leg Warmers pattern here. You can find the Hand warmer Paws Pattern here. And you can find the Top Hat that Nate is wearing right here! Enjoy!
Written Pattern:
Designed by Nadia Fuad
Questions? Leave a comment!
You may sell items made from my pattern, but please reference my name and Etsy Shop (YARNutopia).
Please do not copy and post this pattern and claim it as your own.
Materials:
-Red Heart Yarns (Less than 300 yards)
-Fun Fur (scraps)
-Size H-5.00mm crochet hook
-Yarn Needle
-Scissors
-Stuffing
-Elastic (optional)
-Safety Pin (optional)
NOTES:
Ch: chain
St(s): Stitch(es)
Sl st: slip stitch
SC: Single Crochet
Tail:
Change color every 10 Rounds. Work In continuous Rounds, moving stitch marker up each round. Add stuffing as you go, I found it easier to stuff after every 10 rounds.
Ch 2,
Rnd 1: 6 sc in 2nd ch from hook (6)
Rnd 2: Sc in each st around. (6)
Rnd 3: 2 sc in each st around. (12)
Rnd 4: Sc in each st around. (12)
Rnd 5: [2 sc in next st, 1 sc in next st] 6 times. (18)
Rnd 6: Sc in each st around. (18)
Rnd 7: [2 sc in next st, 1 sc in next 2 sts] 6 times. (24)
Rnd 8-60 (or however long you want to make it): Sc in each st around, change color after rounds 10, 20, 30, 40, and 50.
Apply fur at the tip of the tail by sewing it on.
Sew end closed and weave elastic through and wear around your waist, or sew the end closed and pin it to your pants!
Weave in all ends
Enjoy!!
***You can always contact me if you have any problems with the pattern. I am happy to help if you have any questions along the way.
***These patterns are copyright YARNutopia © so PLEASE DO NOT COPY, SHARE, ADJUST OR RESELL MY PATTERN. I wrote and tested this pattern myself, from beginning to end. It took a lot of time and work, and I would really like to have it remain “my pattern.”
***You can sell anything you make from my patterns, please just link back to my website YARNutopia.com. Thank you!
Click this photo to learn how to make the paws!

Click this photo to learn how to make the Cheshire Cat Hoodie

Click here to learn how to make the Leg Warmers

Teacher: Nadia Fuad
Video and Editing: Fuad Azmat (My Daddy)
Add me on Snapchat: YARNutopia
Visit My Ravelry Store and add this to your Favorites!
Follow me on Twitter: @YARNutopia
Enjoy this video and subscribe to my channel on YouTube for more tutorials on how to crochet!
Leave a comment, and share with your friends!
“If you don’t know where you’re going, any road will get you there.” ~Cheshire Cat (Alice in Wonderland)
~Nadia

Pingback: Crochet Tutorial: Cheshire Cat Hoodie | YARNutopia by Nadia Fuad
You are hilarious. Really made me smile when I saw the photo. I just might try those hand warms. Lol
I love this , I will be making these for my daughter to uses this October thank you for creating such beautiful things
Hey I was just wondering if you would be able to make a video on how to make the tail, I tried to follow the written pattern but it got a bit confusing to understand what I was to be doing when I got to the length I wanted it to be.
I’m sorry it got confusing. Unfortunately I do not have a video tutorial. When I finished, I just sewed up the back and then pinned it to an elastic band that fit around my waist. I hope you aren’t too confused and are able to make it. The whole outfit is awesome. ~Nadia
Pingback: 24 DIY Creative Crochet Costume Ideas « YARNutopia by Nadia Fuad
Hi, can you clear up how to start off the tail? I am a bit confused. How many do I initially chain? Also, at the end of each round, do I slip stitch to the beginning of the round to create the circle shape?
Pingback: How to Crochet Tutorial: Steampunk Cardigan « YARNutopia by Nadia Fuad