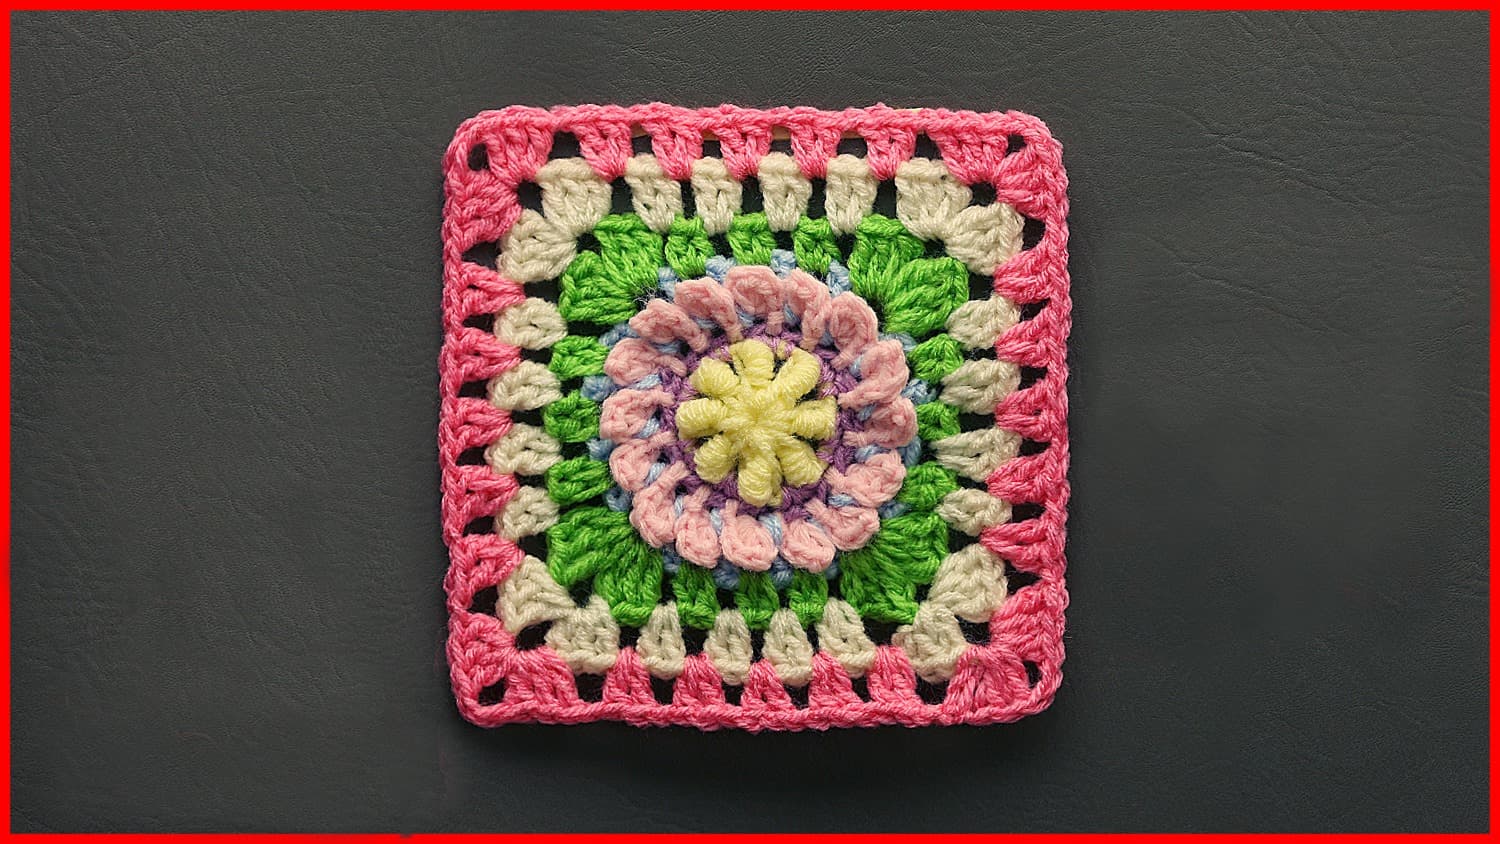
I created this design to add to our 365 Days of Granny Squares project. It uses variety of crochet stitches to create a look that reminds me of a flower found in a bouquet. It inspired me to name it “Hey Daisy Bouquet.” I hope you enjoy making your square!
A couple disclaimers before you start: Be sure to check your tension and use the correct size hook for your square. I demonstrate with an H-5.00mm crochet hook in the video tutorial, but you can make yours bigger or smaller by using a bigger or smaller hook. Also, if yours turns out wonky when you are finished, you may need to block this square to make it nice and flat.

Watch this video tutorial to learn how to make this square:

**You can always contact me via Facebook if you have any problems with the pattern. I am happy to help if you have any questions along the way.
***These patterns are copyright YARNutopia © so PLEASE DO NOT COPY, SHARE, ADJUST OR RESELL MY PATTERN. I wrote and tested this pattern myself, from beginning to end. It took a lot of time and work, and I would really like to have it remain “my pattern.”
***You can sell anything you make from my patterns, please just link back to my website YARNutopia.com. Thank you!

Teacher: Nadia Fuad
Video and Editing: Fuad Azmat (My Daddy)
Share your work on Facebook!
Add me on Snapchat: YARNutopia
Follow me on Instagram
Visit My Ravelry Store and add this to your Favorites!
Follow me on Twitter: @YARNutopia
Enjoy this video and subscribe to my channel on YouTube for more tutorials on how to crochet!
Leave a comment, and share with your friends!

Pattern:
Designed by Nadia Fuad
You may sell items made from my pattern, but please reference my website YARNutopia.com.
Please do not copy, sell, and/or post this pattern and claim it as your own.
Materials:
-Red Heart Super Saver Yarn in as many colors as you want. I just used scrap yarn.
-H-5.00mm Crochet Hook
-Yarn Needle
-Scissors
NOTES:
-You can use a smaller or larger hook to make this square depending on your tension.
-The finished square measures 7 inches (approx. 18 cm)

Special stitches:
Ch(s): chain(s)
YO: Yarn Over
St(s): Stitch(es)
Sl st: slip stitch
SK: Skip
SC: Single Crochet
HDC: Half-Double Crochet
DC: Double Crochet
TR: Treble Crochet
SC4TOG: pull up a loop in each of the next 4 chs and then y/o and pull through all 5 of the loops on your hook
Bullion Stitch: wrap 6 times around hook, insert hook into stitch, y/o, pull through, y/o pull through all 8 loops on hook.

Pattern:
If you have any confusion or difficulty with reading this pattern, please watch the video tutorial to have visual instructions.
Start with Magic Ring or ch 5 and sl st to beginning to form ring.
Rnd 1: ch 1, [Bullion, ch 1] 8 times in ring. sl st to 1st Bullion Stitch (8 sts, 8 ch 1 sps)
Rnd 2: In any Ch 1 sp, ch 1, 2 sc in each ch sp around. sl st to beginning. (16 sc)
Rnd 3: in any stitch, * ch 5, work a sc4tog down the ch (see video tutorial for visual instructions), ch 1, sl st to next st, repeat from * around. (16 petals)
Rnd 4: In any ch 1 sp, ch 5 (counts as dc and ch 2 sp), * DC in next ch 1 sp, ch 2, repeat from * around (16 dc and ch 2 sps)
Rnd 5: In any ch 2 sp, ch up 3, [2dc, ch 2, 3 dc] in same ch sp, *ch 1, [2 hdc in next ch sp, ch 1] 3 times, [3dc, ch 2, 3dc] in next sp, repeat from * all around. (see video tutorial for visual instructions)
Rnd 6: In any ch 2 corner sp, ch up 3, [2dc, ch 2, 3 dc] in same ch sp, *ch 1, [2 dc in next ch sp, ch 1] 4 times, [3dc, ch 2, 3dc] in next sp, repeat from * all around. (see video tutorial for visual instructions)
Rnd 7: (Optional) In any ch 2 corner sp, ch up 3, [2dc, ch 2, 3 dc] in same ch sp, *ch 1, [2 dc in next ch sp, ch 1] 5 times, [3dc, ch 2, 3dc] in next sp, repeat from * all around. (see video tutorial for visual instructions)
Fasten off,
Weave in all ends.
Enjoy!
~Nadia Fuad


