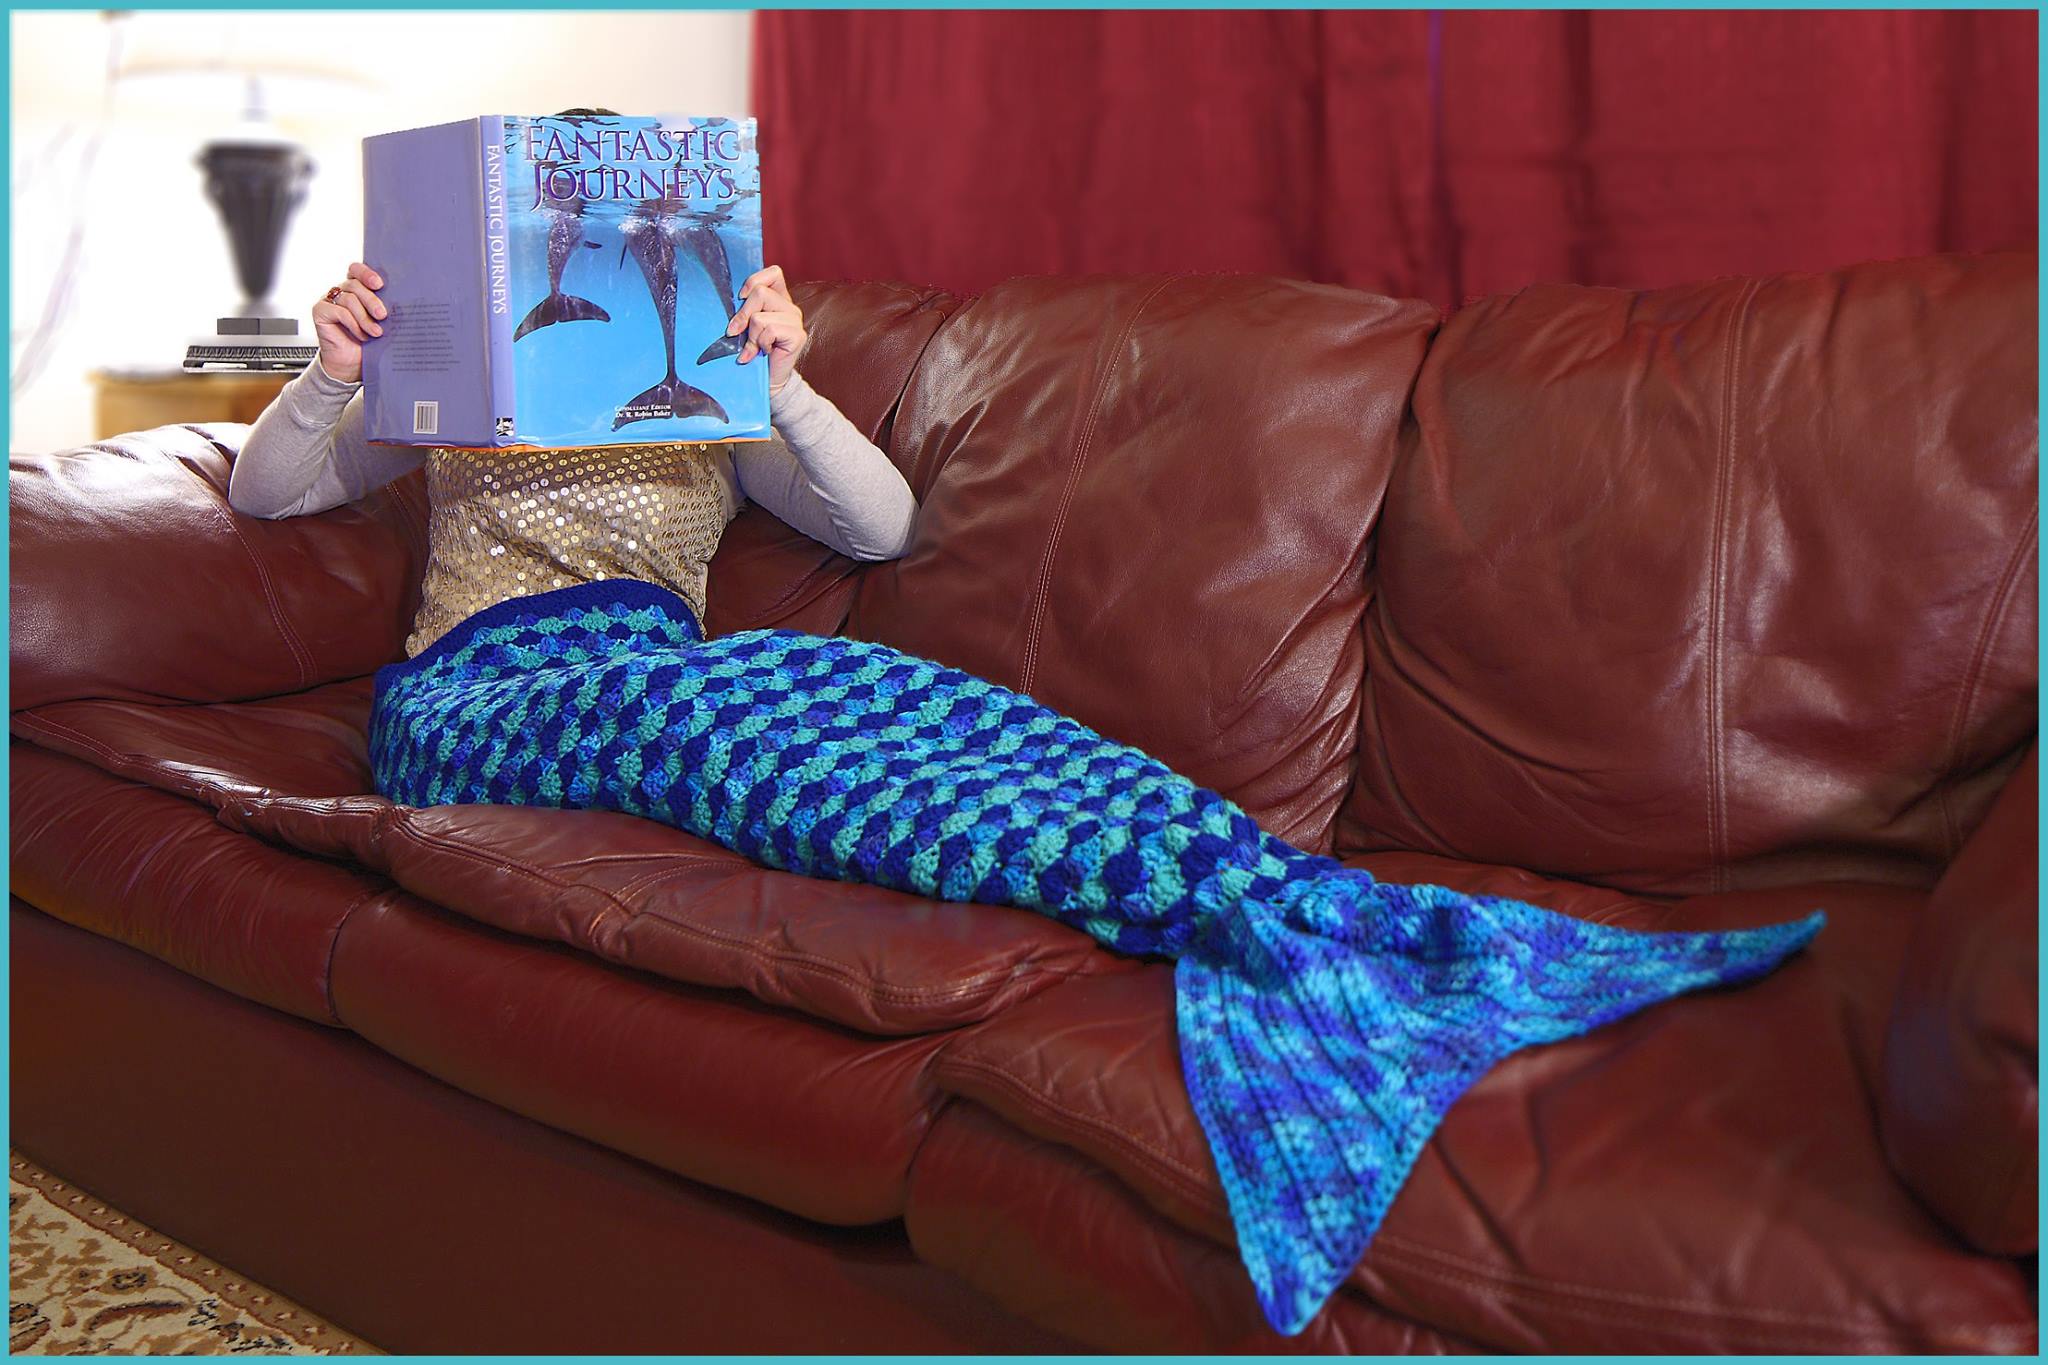
Several weeks ago, a few of my friends contacted me showing me a photo they found online of a mermaid blanket. Not all mermaid blankets were exactly the same, so I did my own research and used variations of different stitches and patterns I found on the internet, I created my own mermaid afghan. Since I borrowed stitches from several different patterns (including this pattern by Mad Hooker), I combined them to make my own in this exclusive FREE pattern that I have written. Below you will find the instructions to make 3 different sizes (Small, Medium, Large). You can use any combination of colors to create the scale look. This is an easy to follow pattern, and I highly recommend watching the video tutorial to follow along if you get stuck. Enjoy and Happy Hookin’! ~Nadia
My dad will continue to be the videographer, editor, and photographer for our videos when I move away.
Support YARNutopia today so we can continue to bring you clear, quality crochet tutorials even after I move into my new home!
There will be an added expense of more travel and hopefully this won’t deter our ability to provide consistent videos on a weekly basis.
Teacher: Nadia Fuad
Video and Editing: Fuad Azmat (My Daddy)
Share your work on Facebook!
Add me on Snapchat: YARNutopia
Follow me on Instagram
Visit My Ravelry Store and add this to your Favorites!
Follow me on Twitter: @YARNutopia
Enjoy this video and subscribe to my channel on YouTube for more tutorials on how to crochet!
Leave a comment, and share with your friends!
Pattern:
Designed by Nadia Fuad You *may* sell items made from my pattern, but please reference my website YARNutopia.com.
Please do not copy, sell, and/or post this pattern and claim it as your own.
Sizing: Size Small will fit a child that is 4 feet-5 feet tall. The Medium will fit anybody that is 5 feet to 6 feet tall (this is the one I filmed), and the Large fits anybody over 6 feet tall. The Width for each is the same so it can fit larger or skinnier people. It measures approximately 50 inches wide.
View this video to help with making SIZE MEDIUM of this Mermaid Afghan:
Although I used Red Heart Yarns in this project, here is a great substitution of yarn that works great as well. Brava yarn by WeCrochet/Knit Picks
-Red Heart Super Saver Medium (worsted) weight yarn: The skeins of yarn are Approx.364 yds (333 m) per skein. Please keep that in mind when you are purchasing yarn.
Size Small: 2 skeins Macaw, 1 skein Jade, and 1 skein Peacock (Peacock comes in Red Heart With Love) Size Medium: 3 skeins Macaw, 2 skeins Jade, and 2 skeins Peacock (Peacock comes in Red Heart With Love) Size Large: 4 skeins Macaw, 3 skeins Jade, and 3 skeins Peacock (Peacock comes in Red Heart With Love)
If you cannot get these exact brands of yarn, go to Yarnsub.com to find an equivalent type of yarn.
Ch: chain
Sl st: slip stitch
DC: double crochet
Sc: single crochet
Sc2tog: Single crochet 2 together
Notes:
-When you finish this project, you may sew up the “open” side to make this a full cocoon style. You may also crochet a single crochet around the entire edge to “cover up” the edges where you sew in your ends.
-To sew in your ends, just take a yarn needle and hide all the ends back into your work. (I do not show how to do this in this video, but if you watch any of my other video tutorials, I show how I sew in my ends if you want to do it like me).
-The chain is the same in all sizes, but if you dont want it that wide, chain something that is in groups of 6 +2. So if you chain something that is 114 + 2, you would have 116 chains. I hope that makes sense!
-Ch 3 at beg of rnd counts as dc throughout.
–Change color after every row, sew in ends as you go
-sc2tog on “blanket” portion means to go into the middle st of 5dc group, yarn over, go into the middle st of the next 5dc group, yarn over, then yarn over and pull through all 3 loops on your hook.
-To make the tail fin bigger: Repeat rows 2 and 3 for however big you want it to be (maybe 60 or 70 stitches), then repeat rows 14 and 15 to decrease for the other half. I hope that makes sense!
Small
Ch 153
Row 1: dc in 3rd ch from hook and across, ch 1, turn (150 dc)
Row 2: sc in first dc, *skip 2 sts, 5dc in next st, skip 2 dc, sc in next st, repeat from * across, ch 3, turn (25 shells made)
Row 3: 2dc in same spot you chained up 3, skip 2 sts,* sc in next dc (the middle dc of shell), sk 2 sts, 5dc into sc, repeat from * until you reach the last sc, 3dc in the last dc, ch 1, turn
Row 4: Sc in first dc, skip 2 dc, *5 dc into sc, skip 2 sts, sc in next dc (middle DC), skip 2 sts, repeat from *, ending with a sc in the beginning ch 3, ch 3 and turn.
Row 5-50: repeat rows 3-4 (Your last row will need to be a repeat of row 3, so you may need to do an extra row at this point.) If you feel like this is not long enough, or too long, you can add or eliminate rows and just continue to work the next round whichever row you end on. Make sure to end on a repeat row of row 3. The blanket should reach from the top of your hips to right above your ankle at this point. If it does not, make more rows and then go onto the instructions for row 51.
Now you will be connecting and working in the round (continuous circle) I highly suggest watching the video to understand this part.
Round 51: Sc in ch 3 of beginning of row 50 (this completes the circle), *sk 2 dc, 5dc into sc, sk 2 dc, sc in next dc, repeat from *around, ending with sc in 3rd dc of prev row.
Round 52: sk sc from previous rnd and sk 2 dc, sc in middle st of 5dc grouping, *sk 2 dc, sc in next dc, sk 2 dc, 5dc into sc, repeat from *around, ending with Sc2tog into middle of 5dc group from prev. rnd (rnd 51) AND the middle st of 5 dc grouping of rnd 52. (see video to help explain this)
Round 53:5dc in next sc st, sc in the middle of the next 5dc st all the way around, ending with 5 dc in the last sc
Round 54: (dec round) Sc2tog (see Notes), *5dc in next sc, Sc2tog, repeat from * around, ending with Sc2tog
Round 55: *5dc in next sc st, sc in middle st of 5dc grouping, repeat from * around, ending with 5dc grouping
Round 56: *Sc in middle st of 5dc grouping, 5dc in next sc st, repeat from * around, ending with Sc2tog into middle of 5dc gropuing from prev. rnd (rnd 55) AND the middle st of 5 dc grouping of rnd 56. (see video to help explain this)
Round 57: (dec round) *5dc in next sc st, Sc2tog, repeat from * around, ending with 5dc in sc st
Round 58: *Sc in middle st of 5dc grouping, 5dc in next sc st, repeat from * around ending with sc
Round 59: *5dc in next sc st, sc in middle st of 5dc grouping, repeat from * around ending with 5dc in last sc
Round 60: (dec. round) *Sc2tog, 5dc in next sc st, repeat from * around. Sl st to first sc of round. (You should only have 2 shells left, if you have 3 or 4 shells, thats okay too! Fasten off anyway and sew it closed.)
Fasten off with long tail, sew remaining hole closed.
Medium (Demonstrated in Video Tutorial)
Ch 153
Row 1: dc in 3rd ch from hook and across, ch 1, turn (150 dc)
Row 2: sc in first dc, *skip 2 sts, 5dc in next st, skip 2 dc, sc in next st, repeat from * across, ch 3, turn (25 shells made)
Row 3: 2dc in same spot you chained up 3, skip 2 sts,* sc in next dc (the middle dc of shell), sk 2 sts, 5dc into sc, repeat from * until you reach the last sc, 3dc in the last dc, ch 1, turn
Row 4: Sc in first dc, skip 2 dc, *5 dc into sc, skip 2 sts, sc in next dc (middle DC), skip 2 sts, repeat from *, ending with a sc in the beginning ch 3, ch 3 and turn.
Row 5-66: repeat rows 3-4 (Your last row will be a repeat of row 3, so you may need to do an extra row at this point.) If you feel like this is not long enough, or too long, you can add or eliminate rows and just continue to work the next round whichever row you end on. Make sure to end on a repeat row of row 3. The blanket should reach from the top of your hips to right above your ankle at this point. If it does not, make more rows and then go onto the instructions for row 67.
Now you will be connecting and working in the round (continuous circle) I highly suggest watching the video to understand this part.
Round 67: Sc in ch 3 of beginning of row 66 (this completes the circle), *sk 2 dc, 5dc into sc, sk 2 dc, sc in next dc, repeat from *around, ending with sc in 3rd dc of prev row.
Round 68: sk sc from previous rnd and sk 2 dc, sc in middle st of 5dc grouping, *sk 2 dc, sc in next dc, sk 2 dc, 5dc into sc, repeat from *around, ending with Sc2tog into middle of 5dc group from prev. rnd (rnd 67) AND the middle st of 5 dc grouping of rnd 68. (see video to help explain this)
Round 69:5dc in next sc st, sc in the middle of the next 5dc st all the way around, ending with 5 dc in the last sc
Round 70: (dec round) Sc2tog (see Notes), *5dc in next sc, Sc2tog, repeat from * around, ending with Sc2tog
Round 71: *5dc in next sc st, sc in middle st of 5dc grouping, repeat from * around, ending with 5dc grouping
Round 72: *Sc in middle st of 5dc grouping, 5dc in next sc st, repeat from * around, ending with Sc2tog into middle of 5dc gropuing from prev. rnd (rnd 71) AND the middle st of 5 dc grouping of rnd 72. (see video to help explain this)
Round 73: (dec round) *5dc in next sc st, Sc2tog, repeat from * around, ending with 5dc in sc st
Round 74: *Sc in middle st of 5dc grouping, 5dc in next sc st, repeat from * around ending with sc
Round 75: *5dc in next sc st, sc in middle st of 5dc grouping, repeat from * around ending with 5dc in last sc
Round 76: (dec. round) *Sc2tog, 5dc in next sc st, repeat from * around. Sl st to first sc of round. (You should only have 2 shells left, if you have 3 or 4 shells, thats okay too! Fasten off anyway and sew it closed.)
Fasten off with long tail, sew remaining hole closed.
Large
Ch 153
Row 1: dc in 3rd ch from hook and across, ch 1, turn (150 dc)
Row 2: sc in first dc, *skip 2 sts, 5dc in next st, skip 2 dc, sc in next st, repeat from * across, ch 3, turn (25 shells made)
Row 3: 2dc in same spot you chained up 3, skip 2 dc,* sc in next dc (the middle dc of shell), sk 2 dc, 5dc into sc, repeat from * until you reach the last sc, 3dc in the last dc, ch 1, turn
Row 4: Sc in first dc, skip 2 dc, *5 dc into sc, skip 2 dc, sc in next dc, skip 2 dc, repeat from *, ending with a sc in the beginning ch 3, ch 3 and turn.
Row 5-74: repeat rows 3-4 (Your last row will be a repeat of row 3, so you may need to do an extra row at this point.) If you feel like this is not long enough, or too long, you can add or eliminate rows and just continue to work the next round whichever row you end on. Make sure to end on a repeat row of row 3. The blanket should reach from the top of your hips to right above your ankle at this point. If it does not, make more rows and then go onto the instructions for row 75.
Now you will be connecting and working in the round (continuous circle) I highly suggest watching the video to understand this part.
Round 75: Sc in ch 3 of beginning of row 74 (this completes the circle), *sk 2 dc, 5dc into sc, sk 2 dc, sc in next dc, repeat from *around, ending with sc in 3rd dc of prev row.
Round 76: sk sc from previous rnd and sk 2 dc, sc in middle st of 5dc grouping, *sk 2 dc, sc in next dc, sk 2 dc, 5dc into sc, repeat from *around, ending with Sc2tog into middle of 5dc group from prev. rnd (rnd 75) AND the middle st of 5 dc grouping of rnd 76. (see video to help explain this)
Round 77:5dc in next sc st, sc in the middle of the next 5dc st all the way around, ending with 5 dc in the last sc
Round 78: (dec round) Sc2tog (see Notes), *5dc in next sc, Sc2tog, repeat from * around, ending with Sc2tog
Round 79: *5dc in next sc st, sc in middle st of 5dc grouping, repeat from * around, ending with 5dc grouping
Round 80: *Sc in middle st of 5dc grouping, 5dc in next sc st, repeat from * around, ending with Sc2tog into middle of 5dc gropuing from prev. rnd (rnd 79) AND the middle st of 5 dc grouping of rnd 80. (see video to help explain this)
Round 81: (dec round) *5dc in next sc st, Sc2tog, repeat from * around, ending with 5dc in sc st
Round 82: *Sc in middle st of 5dc grouping, 5dc in next sc st, repeat from * around ending with sc
Round 83: *5dc in next sc st, sc in middle st of 5dc grouping, repeat from * around ending with 5dc in last sc
Round 84: (dec. round) *Sc2tog, 5dc in next sc st, repeat from * around. Sl st to first sc of round. (You should only have 2 shells left, if you have 3 or 4 shells, thats okay too! Fasten off anyway and sew it closed.)
Fasten off with long tail, sew remaining hole closed.
Tail Fin (Same for all sizes)
Row 1: Chain 43, dc in 4th ch from hook and across, ch 2, turn (40dc)
Row 2: Dc2tog, dc in each stitch across, ch 2, Turn (39dc)
Row 3: DC in each stitch until the last 2 sts, dc2tog, ch 2, turn (38)
Row 4-11: repeat row 2 & 3 until you have 30 sts
Row 12: Dc2tog, Dc2tog, dc in each st across, ch 2, turn (28)
Row 13: Dc in each st across until the last 2 sts, 2dc in each of the last 2 sts, ch 2, turn (30)
Row 14: 2dc in first st, dc across, ch 2, turn (31)
Row 15: dc across until the last st, 2 dc in last st, ch 2, turn (32
Rows 16-23: Repeat rows 14 & 15 until you have 40 sts
Row 24: Dc across
Sc around entire tail, put 3 sc in each corner around, once you come back to the beginning do not fasten off, ch 1 and turn so you are working on the flat side of fin (the side edge that is going to be sewed to the tail)
I suggest watching the video to understand this next part.
Enjoy this video and subscribe to my channel on YouTube for more tutorials on how to crochet!
Leave a comment, and share with your friends!
Happy Hookin’
~Nadia
This post contains affiliate links, which I may be compensated for when you make a purchase. That means if you click on any link and buy from the linked websites, I will receive a small percentage of the value of your order. The amount you pay is not changed. Thank you for all your support in clicking the links in my blog!! You all are so amazing!! ~Nadia
The yarn provided for this pattern is courtesy of Red Heart Yarns
We all adapt patterns, but it is just good form to give original credit, especially when you use over half the pattern (original: https://www.madhooker.com/mermaid-lapghan/).. Also, dropping the yarn at every row and picking up the next color fixes the weaving in problem.
Hi I was wanting to know what colors come close to the colors you used in this video as I do not have any of those colors I tried the site you posted it won’t tell me I have Caron one pound in sage,I also have Bernet in aquamarine,and navy blue would those colors work I was also wanting to know if you could email me the pattern seems like everyone on here is saying there is something wrong with the written pattern on here thanks! My email is k.heather2005@gmail.com
Thank you so much for the video! I would never have been able to make my blanket without watching you! (I can’t do patterns, esp. since I didn’t know how to increase or decrease!) My blanket came out beautifully. 🙂 Do you still have a facebook page to share to?
Size Small will fit a child that is 4 feet-5 feet tall. The Medium will fit anybody that is 5 feet to 6 feet tall (this is the one I filmed), and the Large fits anybody over 6 feet tall. I hope that helps. ~Nadia
The video tutorial is the medium sized blanket and will fit anybody up to 5.5 feet. The written pattern has a larger size (Large) that will fit someone 6 feet or taller. I’m sorry it did not fit, but making it a little longer will definitely fit a taller person. ~Nadia
Loading…
T. C
Hi there. I absolutely love this, thank you for the pattern. I do have one problem, I have made the large size but it only measures 32inches, without the fin. Any ideas how to make it longer without taking it apart. Thank you. X
I am not sure how to make this longer without taking it apart. As a suggestion, you may be able to attach the yarn at the top of the blanket and work the opposite way. ~Nadia
Loading…
rebecca
Same here. I made the blanket as per the. Video and there’s no way it fits a teenager up to 5’5
But she does love it anyhow..
Nadia , I want to thank you for your pattern. I have been looking for one for my great niece.
Do you think you can use an crocodile stitch in this pattern, and make it like a cocoon.
Ann you can sew up the back if you like, some people have done that so it is like a cocoon. Hope that helps
Loading…
Miranda
Thank you so much for this pattern!!! It is awesome. I’ve been searching for one since a friend asked for a toddler sized mermaid tail for her niece but I just didn’t like any of the other patterns I found and I hate the crocodile stitch ones (so time consuming!) and all the others were just baby sized ones. Thank you thank you for a simple and beautiful pattern!!
If you wish to have the printed pattern, please email me at nadiafdeane@yahoo.com and I can send you the PDF file. Please use subject “Mermaid Blanket” Thank you! ~Nadia
is there some way that this could be make into a blanket with the fin ? I mean without the bunching up at the bottom and attaching the fin. Like the orginial one. that has the crocodile stitch. Diane
Yes, you could just sc around the entire piece and then fasten off, then fold it like you would to the baby mermaid outfit and sew it on that way. That would be perfectly fine! That’s actually a great idea! Share yours on Facebook so others (and myself) can see how you sewed on the tail differently! Thanks for your comment! ~Nadia
Loading…
dilam13
I keep asking for the printout for the mermaid blanket.. are you not getting them ? this is the 3rd time I wrote you at your address above..
I must not be getting your emails.. So sorry! If you contact me through the Facebook Page (How to Crochet Tutorials) I can send it through Facebook. Thank you for your patience!
Loading…
lisa rimer
So on madhooker.com people posted pictures of their finished products and in all pictures everyone else’s tail fin looks bigger but mine looks smaller?
Hmm.. I’m not sure what happened. Maybe trying a larger hook to make the tail a little bigger may help. I’m sorry you’re having some trouble with the tail..
Nadia,
Could you explain ….. Row 51 to join but you reference row 66 at that time.
This is the small mermaid afghan…..there is no 66.
Explain please…
Thanks,
Sandy
[…] Crochet Video Tutorial: Mermaid Tail Afghan Pattern—3 Sizes http://yarnutopia.com/Designed by Nadia Fuad. Questions? Email: nadiafdeane@yahoo.com put “Mermaid Afghan” in subject line. You may sell items made from my pattern, but please reference my name and Etsy Shop (YARNutopia). Please do … […]
I don’t understand why all sizes have the same chain to start.
I’m going to make one for my granddaughter who is 4yrs old and think I should have less chains
Jen, THANK YOU so much for making me feel like I’m not the only person who has a BIG mermaid afghan!! I am using Bernat Chunky (NOT Softee) and the 153 with 25 shells is big enough for my queen size bed. NOW I realize that when I started the blanket I should have gone with my instincts and held it up to me, but I wanted to do this step by step exactly. It’s an awesome and easy to understand pattern, but now BOTH nieces can fit in one!!! I have 1 more to make, so I might just start on that one and feel like I’m getting somewhere. I WILL NOT be frogging (ripping out) the 18 rows I just did though. I may just finish it as a blanket and give it to their Mom!!!
Loading…
Dianne Smith
I read the repeat is a multiple of 6 plus 2 on this site & the Madhooker site that Nada posted a link for.
So is it a multiple of 6 plus 2 or 6 plus 3?
[…] If you want to check out the free mermaid afghan pattern , which is designed by Nadia Fuad . She has also released a video for the pattern which walks […]
I am totally over joyed with the pattern, I have made all three for granddaughters, nieces, when one seen the first one I got 4 order’s, everyone turned out perfect size’s too. I have enjoyed doing everyone, as they have been all different colour’s, . The only thing different I did after the first row was I joined it
just used marker so I knew the beginning, and it turned out the same. I would like to thank you so much for making 4 girls happy , and I have certainly enjoyed making them. Now to start my 5th one, and no doubt more. My youngest was 2 years, 4 year, 7 year, and my daughter single 30 year old. All been good.
If you don’t mind me asking, how do I join in continuous rounds? I’ve tried a couple of ways and it isn’t working out. Any and all help/suggestions would be greatly appreciated.
Hi Linda,
I’m getting ready to start this project for my 3 year old. I want her to be able to grow into it but do you think the medium would be too large? She’s pretty long but lean.
I am also wanting to try making it a cocoon like you did. Did you join your rows with a slip stitch & continue in the round? Or just follow the pattern in a continuous round? How did you change colors at the ends of the rows? Did you cut your yarn & weave in ends or carry your yarn along?
Size Small will fit a child that is 4 feet-5 feet tall. The Medium will fit anybody that is 5 feet to 6 feet tall (this is the one I filmed), and the Large fits anybody over 6 feet tall. The Width for each is the same so it can fit larger or skinnier people. It measures approximately 50 inches wide. I show in the video when and how I join in the round to work continuously. I also show how to change color in the video after every row and also in the round. I cut my yarn and sewed it in after every row. I show that in the video as well. I hope that helps. ~Nadia
Loading…
Linda Waterman
Yes I have made now 5, and being asked to do more for friends friends friends. Goes on and on. They love it is the easiest pattern I have crochet different colour s . So pleased. Xx
Linda, when you say after the first row you just joined it? Do you mean you started making it in the rounds – made the entire mermaid blanket into a cocoon? Thank you.
I’m still wondering if someone could please help me with joining in continuous rounds? I would like to try and make a cocoon with this beautiful project. I’ve tried a couple of ways and it isn’t working out. Any and all help/suggestions would be greatly appreciated.
I’m wondering if you couldn’t make two of them and sew them together. You’d probably only need one fin though. I haven’t started yet but that’s what I’m planning to do.
I also loved the Mermaid afghan thanks so much for sharing it, do you have a video for the small and medium mermaid afghan, I want to make one for a 9 yr old and a three year old please let me know , and thaks again
Thanks for this lovely pattern, I am attempting this for my niece who wants a mermaid lapghan, and your tutorial looks easy to follow for a novice like me! Have a blessed Eid!
This took me approximately 3 weeks to complete. I did not work on it constantly though. Others may tell you it took them 1 week some may say it took them a month. I wish you luck! ~Nadia
It says 2 (3) of macaw yarn, Im doing the child size do I only need 2 or do I need 3? I have to order it online because I can’t find it anywhere but LOVE the color scheme so I wanted to be sure.
For the child size, I would recommend 3 skeins of Macaw, there isn’t a whole lot of yarn in the skein and if you are going to make it exactly like mine, I recommend 3 of that color. 2 skeins for the other colors is fine. Thanks for watching my videos!! ~Nadia
What were your end measurements (specifically the width of top and the length from top of the tail to the top of the fin) for the size you did in the video? I’m really looking forward to making one but I want to make sure it will be big enough.
Thanks
Size Small will fit a child that is 4 feet-5 feet tall. The Medium will fit anybody that is 5 feet to 6 feet tall (this is the one I filmed), and the Large fits anybody over 6 feet tall. The Width for each is the same so it can fit larger or skinnier people. It measures approximately 50 inches wide. I hope that helps. ~Nadia
Love this pattern – but I’m confused. I cast on 153, did 150 double crochets – but next row ended up with 50 shells instead of 25. It’s making it pretty wide. Help! 🙂
Susan, maybe you can help me. I am making size Small and have the same problem. I have 50 shells in Round 2, but can figure out what I am doing wrong. HELP!
Loading…
S.L.M.
Are you skipping 2DC sts, or just one? That’s all I can think.
Loading…
Monica
The pattern is incorrect. Look at the video at about minute 11 and she says the pattern is wrong and tells how to do it the right way. I’ve spent a good hour or so re-doing it this was that and finally watched the video.
Loading…
Chellsie
Hi! I love this pattern! I was just wondering if you could help me figure out how to make it to fit a toddler?
Size Small will fit a child that is 4 feet-5 feet tall. The Medium will fit anybody that is 5 feet to 6 feet tall (this is the one I filmed), and the Large fits anybody over 6 feet tall. The Width for each is the same so it can fit larger or skinnier people. It measures approximately 50 inches wide. I hope that helps. ~Nadia
I am having trouble making continuous rounds. I’ve startedone joining the rows early (on row 19) in order to have more of a cocoon like blanket. My only problem is that my 5dc shell count doesn’t work out like yours does. If I skip two from where I sc together, my shells end up shifted and uneven from the rest of the blanket. Is anyone else having this problem, and does anyone know how to fix it?
Ok I have a new question. If I want to continue my blanket like a cocoon, how do I continue to go about crocheting in the rounds continuously without increasing or decreasing? I’ve never done rounds before.
Hi Keena – I’m interested to know if you figured out how to work this pattern in the round and would you mind sharing with me. I’ve only done simple dc in the round and used only 1 colour – this seems more tricky to do.
Many thanks
Denise
I think you made a mistake. In mentioning how to resize the chain in the beginning, you say it is chain 6 plus 2. Someone commented on here that it is 6 plus 3, which is correct. So in your example of 114 + 2 = 116, it should be 114 + 3 = 117. And of course I forgot that when I was doing FDC that I didn’t need the plus 2, so I had one too many DC and had to undo the whole first row of shells. I am starting with 97 FDC for my 6 year olds blanket. My first row is about 38″ long, which is enough to wrap around me.
I’ve done the ch153 for a child and it seems massive!!! Can I ask why it’s not a full mermaid tail and worked in the round? Is there a smaller ch you can recommend for child size?
Question: Do you think I could just add the new yarn at the end of the row and crochet over both ends for 4-5 stitches instead of weaving in, or would it be really obvious? I HATE WEAVING IN THE ENDS!!! Thanks for a great pattern!
I tried it and it is a little obvious in my project, but you could try it and determine that for yourself. I usually did 5-6 rows and then paused to weave in those ends, and then continued my work. I know it’s a pain, I was beating myself up when I didn’t weave them in on one project and had to sit for a whole day just sewing in ends! Good luck!! ~Nadia
I was hoping to show you a picture, I finally finished. I had some similar colors and even the Macaw! I want to think you so much for sharing this pattern. I consider myself a novice, but this was so easy. I am going to make another one with other colors.
I have a quick question…i am making the small one with this pattern i am on row 31 and so far there is no way by row 50 its going to reach from hip to ankle (yes this blanket is for a child) however i am just over 5 feet and the small version is suppsoed to be 4 to 5 feet. I have the right hook and im using a worsted weight yarn…so im not sure what i am doing wrong…any insight would be great
It’s a very versatile pattern so if it is coming out too short, you can do a few more rows to have it be the length you like. Maybe making the size medium instead of the size small might work. The portion of the blanket that starts working in rounds is only a few rounds so the foot pocket is small. If you need it to be longer, my only suggestion I would have is to make a few more rows until you are satisfied with the length. I hope that helps a little!! When you finish I’d like to see your work if you are able to take a pic and post it to the Facebook page! ~Nadia
I am an adult who is 4″6 (I know, I am super short. Lol) Should I make a lapghan that is size small or medium? Also, would this pattern accommodate a zipper? I always have problems with my lapghans falling away from my body and making me cold. Plus, I am thinking ahead for Halloween. 🙂
Thank you so much for this pattern so cute! I can’t wait to get started on this my little girl will love it..hopefully I can get it done by Christmas lol gotta hide this project from her 🙂
I was trying to follow another pattern. However, I am fairly new to crochet and needed more. Your numbers of stitches and shells per line helped, plus the video…AWESOME! Thanks so much!
Hi there! Thanks so much for your video! I would never have been able to make it without your instruction! (I cannot follow patterns very well, esp. since I had no idea how to increase or decrease before watching.) My blanket came out beautifully, is there still a facebook page to post pictures on?
LOVE this fun pattern!! Thank you so much! Ive gotten through the entire pattern without needing help up until now. Can anyone help me with attaching the fin to the tail? I’m mobile and I’ve been trying to view the video all day and it keeps throwing me out :/ Does it just attach straight across or is it sewn around? If anyone has a close-up shot if it I’d appreciate it! You can email me at theloopymamacc@gmail.com Thanks!
I used your fin pattern, but I crocheted in the back loops only and it gave it a great texture. Just wanted to share! Thank you so much for the pattern!