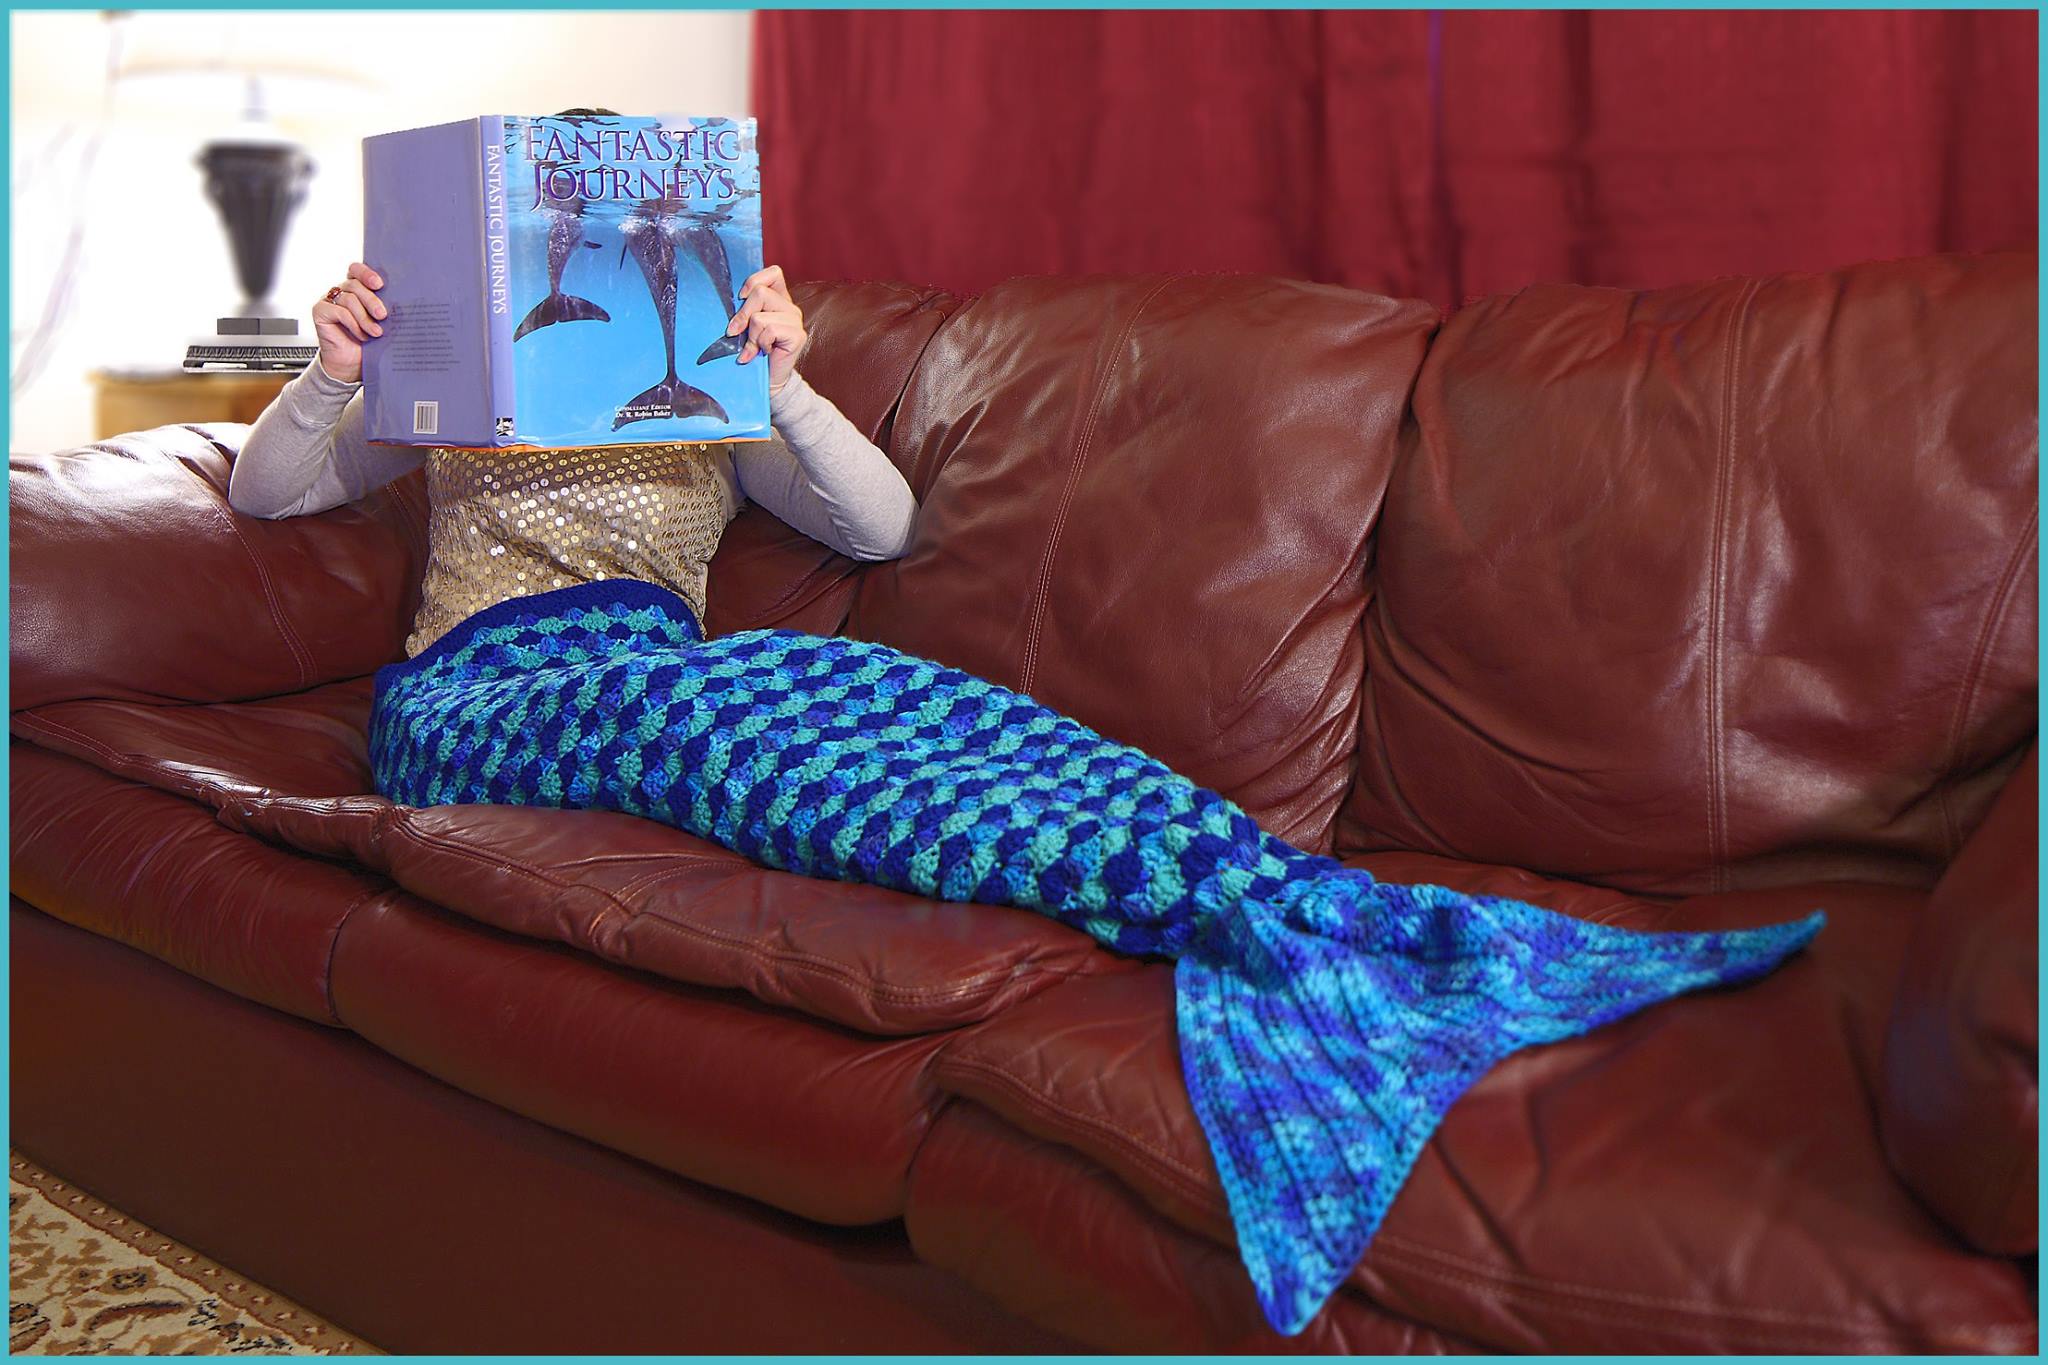
Several weeks ago, a few of my friends contacted me showing me a photo they found online of a mermaid blanket. Not all mermaid blankets were exactly the same, so I did my own research and used variations of different stitches and patterns I found on the internet, I created my own mermaid afghan. Since I borrowed stitches from several different patterns (including this pattern by Mad Hooker), I combined them to make my own in this exclusive FREE pattern that I have written. Below you will find the instructions to make 3 different sizes (Small, Medium, Large). You can use any combination of colors to create the scale look. This is an easy to follow pattern, and I highly recommend watching the video tutorial to follow along if you get stuck. Enjoy and Happy Hookin’! ~Nadia
My dad will continue to be the videographer, editor, and photographer for our videos when I move away.
Support YARNutopia today so we can continue to bring you clear, quality crochet tutorials even after I move into my new home!
There will be an added expense of more travel and hopefully this won’t deter our ability to provide consistent videos on a weekly basis.
Teacher: Nadia Fuad
Video and Editing: Fuad Azmat (My Daddy)
Share your work on Facebook!
Add me on Snapchat: YARNutopia
Follow me on Instagram
Visit My Ravelry Store and add this to your Favorites!
Follow me on Twitter: @YARNutopia
Enjoy this video and subscribe to my channel on YouTube for more tutorials on how to crochet!
Leave a comment, and share with your friends!
Pattern:
Designed by Nadia Fuad You *may* sell items made from my pattern, but please reference my website YARNutopia.com.
Please do not copy, sell, and/or post this pattern and claim it as your own.
Sizing: Size Small will fit a child that is 4 feet-5 feet tall. The Medium will fit anybody that is 5 feet to 6 feet tall (this is the one I filmed), and the Large fits anybody over 6 feet tall. The Width for each is the same so it can fit larger or skinnier people. It measures approximately 50 inches wide.
View this video to help with making SIZE MEDIUM of this Mermaid Afghan:
Although I used Red Heart Yarns in this project, here is a great substitution of yarn that works great as well. Brava yarn by WeCrochet/Knit Picks
-Red Heart Super Saver Medium (worsted) weight yarn: The skeins of yarn are Approx.364 yds (333 m) per skein. Please keep that in mind when you are purchasing yarn.
Size Small: 2 skeins Macaw, 1 skein Jade, and 1 skein Peacock (Peacock comes in Red Heart With Love) Size Medium: 3 skeins Macaw, 2 skeins Jade, and 2 skeins Peacock (Peacock comes in Red Heart With Love) Size Large: 4 skeins Macaw, 3 skeins Jade, and 3 skeins Peacock (Peacock comes in Red Heart With Love)
If you cannot get these exact brands of yarn, go to Yarnsub.com to find an equivalent type of yarn.
Ch: chain
Sl st: slip stitch
DC: double crochet
Sc: single crochet
Sc2tog: Single crochet 2 together
Notes:
-When you finish this project, you may sew up the “open” side to make this a full cocoon style. You may also crochet a single crochet around the entire edge to “cover up” the edges where you sew in your ends.
-To sew in your ends, just take a yarn needle and hide all the ends back into your work. (I do not show how to do this in this video, but if you watch any of my other video tutorials, I show how I sew in my ends if you want to do it like me).
-The chain is the same in all sizes, but if you dont want it that wide, chain something that is in groups of 6 +2. So if you chain something that is 114 + 2, you would have 116 chains. I hope that makes sense!
-Ch 3 at beg of rnd counts as dc throughout.
–Change color after every row, sew in ends as you go
-sc2tog on “blanket” portion means to go into the middle st of 5dc group, yarn over, go into the middle st of the next 5dc group, yarn over, then yarn over and pull through all 3 loops on your hook.
-To make the tail fin bigger: Repeat rows 2 and 3 for however big you want it to be (maybe 60 or 70 stitches), then repeat rows 14 and 15 to decrease for the other half. I hope that makes sense!
Small
Ch 153
Row 1: dc in 3rd ch from hook and across, ch 1, turn (150 dc)
Row 2: sc in first dc, *skip 2 sts, 5dc in next st, skip 2 dc, sc in next st, repeat from * across, ch 3, turn (25 shells made)
Row 3: 2dc in same spot you chained up 3, skip 2 sts,* sc in next dc (the middle dc of shell), sk 2 sts, 5dc into sc, repeat from * until you reach the last sc, 3dc in the last dc, ch 1, turn
Row 4: Sc in first dc, skip 2 dc, *5 dc into sc, skip 2 sts, sc in next dc (middle DC), skip 2 sts, repeat from *, ending with a sc in the beginning ch 3, ch 3 and turn.
Row 5-50: repeat rows 3-4 (Your last row will need to be a repeat of row 3, so you may need to do an extra row at this point.) If you feel like this is not long enough, or too long, you can add or eliminate rows and just continue to work the next round whichever row you end on. Make sure to end on a repeat row of row 3. The blanket should reach from the top of your hips to right above your ankle at this point. If it does not, make more rows and then go onto the instructions for row 51.
Now you will be connecting and working in the round (continuous circle) I highly suggest watching the video to understand this part.
Round 51: Sc in ch 3 of beginning of row 50 (this completes the circle), *sk 2 dc, 5dc into sc, sk 2 dc, sc in next dc, repeat from *around, ending with sc in 3rd dc of prev row.
Round 52: sk sc from previous rnd and sk 2 dc, sc in middle st of 5dc grouping, *sk 2 dc, sc in next dc, sk 2 dc, 5dc into sc, repeat from *around, ending with Sc2tog into middle of 5dc group from prev. rnd (rnd 51) AND the middle st of 5 dc grouping of rnd 52. (see video to help explain this)
Round 53:5dc in next sc st, sc in the middle of the next 5dc st all the way around, ending with 5 dc in the last sc
Round 54: (dec round) Sc2tog (see Notes), *5dc in next sc, Sc2tog, repeat from * around, ending with Sc2tog
Round 55: *5dc in next sc st, sc in middle st of 5dc grouping, repeat from * around, ending with 5dc grouping
Round 56: *Sc in middle st of 5dc grouping, 5dc in next sc st, repeat from * around, ending with Sc2tog into middle of 5dc gropuing from prev. rnd (rnd 55) AND the middle st of 5 dc grouping of rnd 56. (see video to help explain this)
Round 57: (dec round) *5dc in next sc st, Sc2tog, repeat from * around, ending with 5dc in sc st
Round 58: *Sc in middle st of 5dc grouping, 5dc in next sc st, repeat from * around ending with sc
Round 59: *5dc in next sc st, sc in middle st of 5dc grouping, repeat from * around ending with 5dc in last sc
Round 60: (dec. round) *Sc2tog, 5dc in next sc st, repeat from * around. Sl st to first sc of round. (You should only have 2 shells left, if you have 3 or 4 shells, thats okay too! Fasten off anyway and sew it closed.)
Fasten off with long tail, sew remaining hole closed.
Medium (Demonstrated in Video Tutorial)
Ch 153
Row 1: dc in 3rd ch from hook and across, ch 1, turn (150 dc)
Row 2: sc in first dc, *skip 2 sts, 5dc in next st, skip 2 dc, sc in next st, repeat from * across, ch 3, turn (25 shells made)
Row 3: 2dc in same spot you chained up 3, skip 2 sts,* sc in next dc (the middle dc of shell), sk 2 sts, 5dc into sc, repeat from * until you reach the last sc, 3dc in the last dc, ch 1, turn
Row 4: Sc in first dc, skip 2 dc, *5 dc into sc, skip 2 sts, sc in next dc (middle DC), skip 2 sts, repeat from *, ending with a sc in the beginning ch 3, ch 3 and turn.
Row 5-66: repeat rows 3-4 (Your last row will be a repeat of row 3, so you may need to do an extra row at this point.) If you feel like this is not long enough, or too long, you can add or eliminate rows and just continue to work the next round whichever row you end on. Make sure to end on a repeat row of row 3. The blanket should reach from the top of your hips to right above your ankle at this point. If it does not, make more rows and then go onto the instructions for row 67.
Now you will be connecting and working in the round (continuous circle) I highly suggest watching the video to understand this part.
Round 67: Sc in ch 3 of beginning of row 66 (this completes the circle), *sk 2 dc, 5dc into sc, sk 2 dc, sc in next dc, repeat from *around, ending with sc in 3rd dc of prev row.
Round 68: sk sc from previous rnd and sk 2 dc, sc in middle st of 5dc grouping, *sk 2 dc, sc in next dc, sk 2 dc, 5dc into sc, repeat from *around, ending with Sc2tog into middle of 5dc group from prev. rnd (rnd 67) AND the middle st of 5 dc grouping of rnd 68. (see video to help explain this)
Round 69:5dc in next sc st, sc in the middle of the next 5dc st all the way around, ending with 5 dc in the last sc
Round 70: (dec round) Sc2tog (see Notes), *5dc in next sc, Sc2tog, repeat from * around, ending with Sc2tog
Round 71: *5dc in next sc st, sc in middle st of 5dc grouping, repeat from * around, ending with 5dc grouping
Round 72: *Sc in middle st of 5dc grouping, 5dc in next sc st, repeat from * around, ending with Sc2tog into middle of 5dc gropuing from prev. rnd (rnd 71) AND the middle st of 5 dc grouping of rnd 72. (see video to help explain this)
Round 73: (dec round) *5dc in next sc st, Sc2tog, repeat from * around, ending with 5dc in sc st
Round 74: *Sc in middle st of 5dc grouping, 5dc in next sc st, repeat from * around ending with sc
Round 75: *5dc in next sc st, sc in middle st of 5dc grouping, repeat from * around ending with 5dc in last sc
Round 76: (dec. round) *Sc2tog, 5dc in next sc st, repeat from * around. Sl st to first sc of round. (You should only have 2 shells left, if you have 3 or 4 shells, thats okay too! Fasten off anyway and sew it closed.)
Fasten off with long tail, sew remaining hole closed.
Large
Ch 153
Row 1: dc in 3rd ch from hook and across, ch 1, turn (150 dc)
Row 2: sc in first dc, *skip 2 sts, 5dc in next st, skip 2 dc, sc in next st, repeat from * across, ch 3, turn (25 shells made)
Row 3: 2dc in same spot you chained up 3, skip 2 dc,* sc in next dc (the middle dc of shell), sk 2 dc, 5dc into sc, repeat from * until you reach the last sc, 3dc in the last dc, ch 1, turn
Row 4: Sc in first dc, skip 2 dc, *5 dc into sc, skip 2 dc, sc in next dc, skip 2 dc, repeat from *, ending with a sc in the beginning ch 3, ch 3 and turn.
Row 5-74: repeat rows 3-4 (Your last row will be a repeat of row 3, so you may need to do an extra row at this point.) If you feel like this is not long enough, or too long, you can add or eliminate rows and just continue to work the next round whichever row you end on. Make sure to end on a repeat row of row 3. The blanket should reach from the top of your hips to right above your ankle at this point. If it does not, make more rows and then go onto the instructions for row 75.
Now you will be connecting and working in the round (continuous circle) I highly suggest watching the video to understand this part.
Round 75: Sc in ch 3 of beginning of row 74 (this completes the circle), *sk 2 dc, 5dc into sc, sk 2 dc, sc in next dc, repeat from *around, ending with sc in 3rd dc of prev row.
Round 76: sk sc from previous rnd and sk 2 dc, sc in middle st of 5dc grouping, *sk 2 dc, sc in next dc, sk 2 dc, 5dc into sc, repeat from *around, ending with Sc2tog into middle of 5dc group from prev. rnd (rnd 75) AND the middle st of 5 dc grouping of rnd 76. (see video to help explain this)
Round 77:5dc in next sc st, sc in the middle of the next 5dc st all the way around, ending with 5 dc in the last sc
Round 78: (dec round) Sc2tog (see Notes), *5dc in next sc, Sc2tog, repeat from * around, ending with Sc2tog
Round 79: *5dc in next sc st, sc in middle st of 5dc grouping, repeat from * around, ending with 5dc grouping
Round 80: *Sc in middle st of 5dc grouping, 5dc in next sc st, repeat from * around, ending with Sc2tog into middle of 5dc gropuing from prev. rnd (rnd 79) AND the middle st of 5 dc grouping of rnd 80. (see video to help explain this)
Round 81: (dec round) *5dc in next sc st, Sc2tog, repeat from * around, ending with 5dc in sc st
Round 82: *Sc in middle st of 5dc grouping, 5dc in next sc st, repeat from * around ending with sc
Round 83: *5dc in next sc st, sc in middle st of 5dc grouping, repeat from * around ending with 5dc in last sc
Round 84: (dec. round) *Sc2tog, 5dc in next sc st, repeat from * around. Sl st to first sc of round. (You should only have 2 shells left, if you have 3 or 4 shells, thats okay too! Fasten off anyway and sew it closed.)
Fasten off with long tail, sew remaining hole closed.
Tail Fin (Same for all sizes)
Row 1: Chain 43, dc in 4th ch from hook and across, ch 2, turn (40dc)
Row 2: Dc2tog, dc in each stitch across, ch 2, Turn (39dc)
Row 3: DC in each stitch until the last 2 sts, dc2tog, ch 2, turn (38)
Row 4-11: repeat row 2 & 3 until you have 30 sts
Row 12: Dc2tog, Dc2tog, dc in each st across, ch 2, turn (28)
Row 13: Dc in each st across until the last 2 sts, 2dc in each of the last 2 sts, ch 2, turn (30)
Row 14: 2dc in first st, dc across, ch 2, turn (31)
Row 15: dc across until the last st, 2 dc in last st, ch 2, turn (32
Rows 16-23: Repeat rows 14 & 15 until you have 40 sts
Row 24: Dc across
Sc around entire tail, put 3 sc in each corner around, once you come back to the beginning do not fasten off, ch 1 and turn so you are working on the flat side of fin (the side edge that is going to be sewed to the tail)
I suggest watching the video to understand this next part.
Enjoy this video and subscribe to my channel on YouTube for more tutorials on how to crochet!
Leave a comment, and share with your friends!
Happy Hookin’
~Nadia
This post contains affiliate links, which I may be compensated for when you make a purchase. That means if you click on any link and buy from the linked websites, I will receive a small percentage of the value of your order. The amount you pay is not changed. Thank you for all your support in clicking the links in my blog!! You all are so amazing!! ~Nadia
The yarn provided for this pattern is courtesy of Red Heart Yarns
I’ve made 4 mermaid tails from your pattern so far and I’ve had no issues. Your video I easy to follow and it’s nice to hAve the visual aid on parts I’m unsure of 🙂
How long would you say it took you to make the mermaid tails? A friend asked me to make her a few and I am trying to figure out if it’s reasonable for me to do it or not.
Depending on the size you are making, it took me about a week for a medium size blanket. I worked on it consistently for about 3 hours per day. So all in all, about 21 hours. Good luck to you, these make fantastic gifts!
Loading…
Sherry
I made the medium size but the fin tail is way too small. How do you make it bigger so that it is the correct size for the blanket?
Loading…
kendra
the written pattern is wrong. on row two, it forgets the single crochet between shells, if i hadn’t watched the video to figure out how you got 25 shells instead of 50, i never would have figured it out. Please correct this, thanks!
I often run into this issue when working large projects with many repeats. Clover stitch markers are my friend. I prefer the aqua and peach colored ones shaped like safety pins. There are cheaper versions available, but reviewers say they break. Anyway, depending on how many repeats/rows are required, I place a stitch marker evey 5 or 10 rows as I complete them, or as often as seems most helpful. If it’s really complicated, I print the pattern out if possible, and if not already on the pattern, I write down each row #, and using a pencil place a check mark next to each row # as I complete it. Hope this helps. (-:
I apologize as I have not received any emails regarding this concern. I can let you know though, you should end on a repeat of row 3, so that would probably get you to row 67. You can basically make this as long as you want and then go on to attaching each side and working in the round. I hope this helps! Thank you for your comment! ~Nadia
I’ve made one of these for a child and I would like to make one for a newborn. What is your suggestion for number of stitches, rows, etc. I’m not good at adjusting patterns. Thanks so muxh for this pattern. Love it!
I do not have this specific pattern for a newborn, but I do have a baby mermaid outfit you can search for on my website. It is using the crocodile stitch and will fit a baby up to a year old. I hope you are able to find what you are looking for. ~Nadia
Do you have any tips for sewing in the ends? I’m finding this difficult with so many color changes, and I cut my ends shorter like yours in the video. Makes it difficult to weave in. Thanks!
I usually insert my needle into the stitches and then “yarn my needle” and then pull that stragler in underneath the stitches. I hope that helps! If not, check out my 365 Days of Granny Squares videos, and in each video, I show how to sew in ends. ~Nadia
You can definitely use variegated yarn. Some people have been using 1 color. You can use as many colors as you’d like. The variegated color may make its own beautiful pattern in the design! Good luck!! ~Nadia
The best way I would recommend would be to follow the video tutorial. It demonstrates step by step what you need to do in order to make this mermaid tail. Enjoy!
I am about to start this project! I’ve read comments about the 1st sc row. Is 153 the correct number? Do you go into the 3rd or 4th sc when starting the dc row? I haven’t crocheted in a long time and want to get it right. Thank you.
153 is correct but you do the first dc in the 4th chain not the 3rd. You skip the 3 chains and it counts as a dc. I figured out the hard way! Hope this helps!
When joining in the round there was a change how the pattern looked. It was laying flatter than the afghan part. Do I join with the wrong side facing so it doesn’t show a change? I hope you understand what iam trying to say.
I just finished making this, and I noticed the same thing. It’s because you’re working in the round and only seeing the “right side” stitches. When you’re working back and forth in rows, you see both right side and wrong side, which is what makes it look puffier. Do not join the round inside out though. Once it’s done and the tail is sewn on, you won’t even notice the difference.
Okay – what am I doing wrong??!! Can’t get past row 2 – my count is t coming out correctly. I followed the written and video. Is it not a starting chain of 153??
Chain 153 and then start your first double crochet in the 4th chain. I didn’t do this at first and had to pull out my whole row. This will ensure that you have 149 double crochets since she says in the video that the chains you skip count as a double crochet. Does that make sense?
I am in the process of making this and am thinking about making 2 more for my nieces. Does anyone have ideas on other colors I could use for this so that each of their is unique?
I usually ask what the persons favorite colors are find a variegated yarn in those colors. I used Red Heart Parade for my grandaughter’s tail and chose 2 solid colors that went with it.
Hi, I have just finished this project and wanted to say that your video is so helpful, thank you. I am in England so kept having to think about ‘translating’ the crochet terms, haha, but got there and it’s lovely!
For size medium in the wriiten pattern it says you need 3 skeins of macaw, 2 skeins jade and 2 skeins peacock. But in the video it was mentioned you need 6 skeins of yarn. So do i need 7 skeins or 6 skeins?
thanks so much for the quick reply. but for further clarification for the size small i would need 1 skein macaw; 1 skein jade and 1 skein peacock and another 1 skein macaw for tail, right?
thanks again. you are so helpful. sorry for so many questions. i just recently picked up crocheting but when i saw your video i know i had to make it for my daughters. once again thanks.
Loading…
karen bartholomew
Help!!!! i cant find a definitive answer. do i need english double knitting or aran weight wool please
The tail attachment is just sewn to the bottom of the last 2 rows. I am sorry the video isn’t loading for you. I just sewed the fin using a whip stitch to the bottom of the tail. I hope that makes sense. ~Nadia
So an additional question re the color sequence. Is the body alternating the three colors every row – then the extra skein of Macaw is for the tail? Is the tail one solid color?
Yes, I change color every row for the tail and then the fin is one solid color. I used the variegated yarn for the fin. I hope this makes sense. ~Nadia
[…] talk about their projects and plans, including Savvy Mom’s mermaid tail afghan. They also bring back a word: mither. Use it in a sentence and tell us about […]
[…] also took up a yarn project during May that cost me about $35, including needles. I made a mermaid tail blanket as a gift for someone. It took me about three weeks, on and off, for about 1-2 hours each day, to […]
Error in written pattern for small size on row 52. Presuming you continue the pattern as usual after skipping the first sc from previous round, after the * it should say *sk 2 dc, 5dc into sc… As it is currently written you sk 2 dc and sc in the middle of the dc grouping twice. This would be a deviation from the pattern and make the shells misaligned.
Thank you for that! It was quite difficult for me to explain it, so I filmed the tutorial on how I did it to give a better understanding and a visual guide for instructions. Thanks again!! ~Nadia
My tail fin came out way to small. Is there anyway to get a bigger one for the medium blanket? I tried adding more chains and more rows of the Dc but I couldn’t keep my straight end all the same length
Hi. I’m having exactly the same issue! Blankets all made, looks amazing but it says it’s the same size fin for a small medium and large blanket, that doesn’t make sense the tail has to be in proportion…. can anyone offer some advice please… I’m on a tight deadline!!
Suggestion: You can make this blanket without all the tails to weave in – you will just have all three colors going at the same time, which may cause some tangling, but will save you hours of time weaving in tails. Simply drop the 1st color without cutting the yarn. Continue with 2nd color, do the same. Do the same for third color. At this point you are at the same side that your 1st color ended on. Pick up your first color and carry on. You will have a long piece of the color at the end of the rows, but I would finish the raw edges with a single crochet row anyway. You can cover up these long pieces while doing the single crochet.
That was my thought, too. You’re not wasting all the yarn in the cuttings, either. I wrap the working colour around the off-colour when I’m starting/finishing the rows, which keeps it from laying loose.
Did you end up using all of the yarn? My friend and I are trying to make some that are cost effective and we don’t want to buy too much for the medium or large size. Thanks!
Is 25 shells the correct count for Row 2? I’ve got 150 DC from previous round so the count should be much higher than 25 shells. Am I missing something? Thanks!!
Sk means Skip. So you would skip the 2 double crochets and single crochet in the middle double crochet of the shell. I hope that makes sense and you are able to make your mermaid tail! Enjoy! ~Nadia
the width of the blanket seems awfully big, is it 50 inches across, or 50 inches around, does that make any difference?
im making 2 for my nieces and they are both tiny waisted
Hi Nadia this is only my second project, all looks good but wondering how you sewed on the tail, what stitch you used etc. do you have another video that show this? Thanks Angie