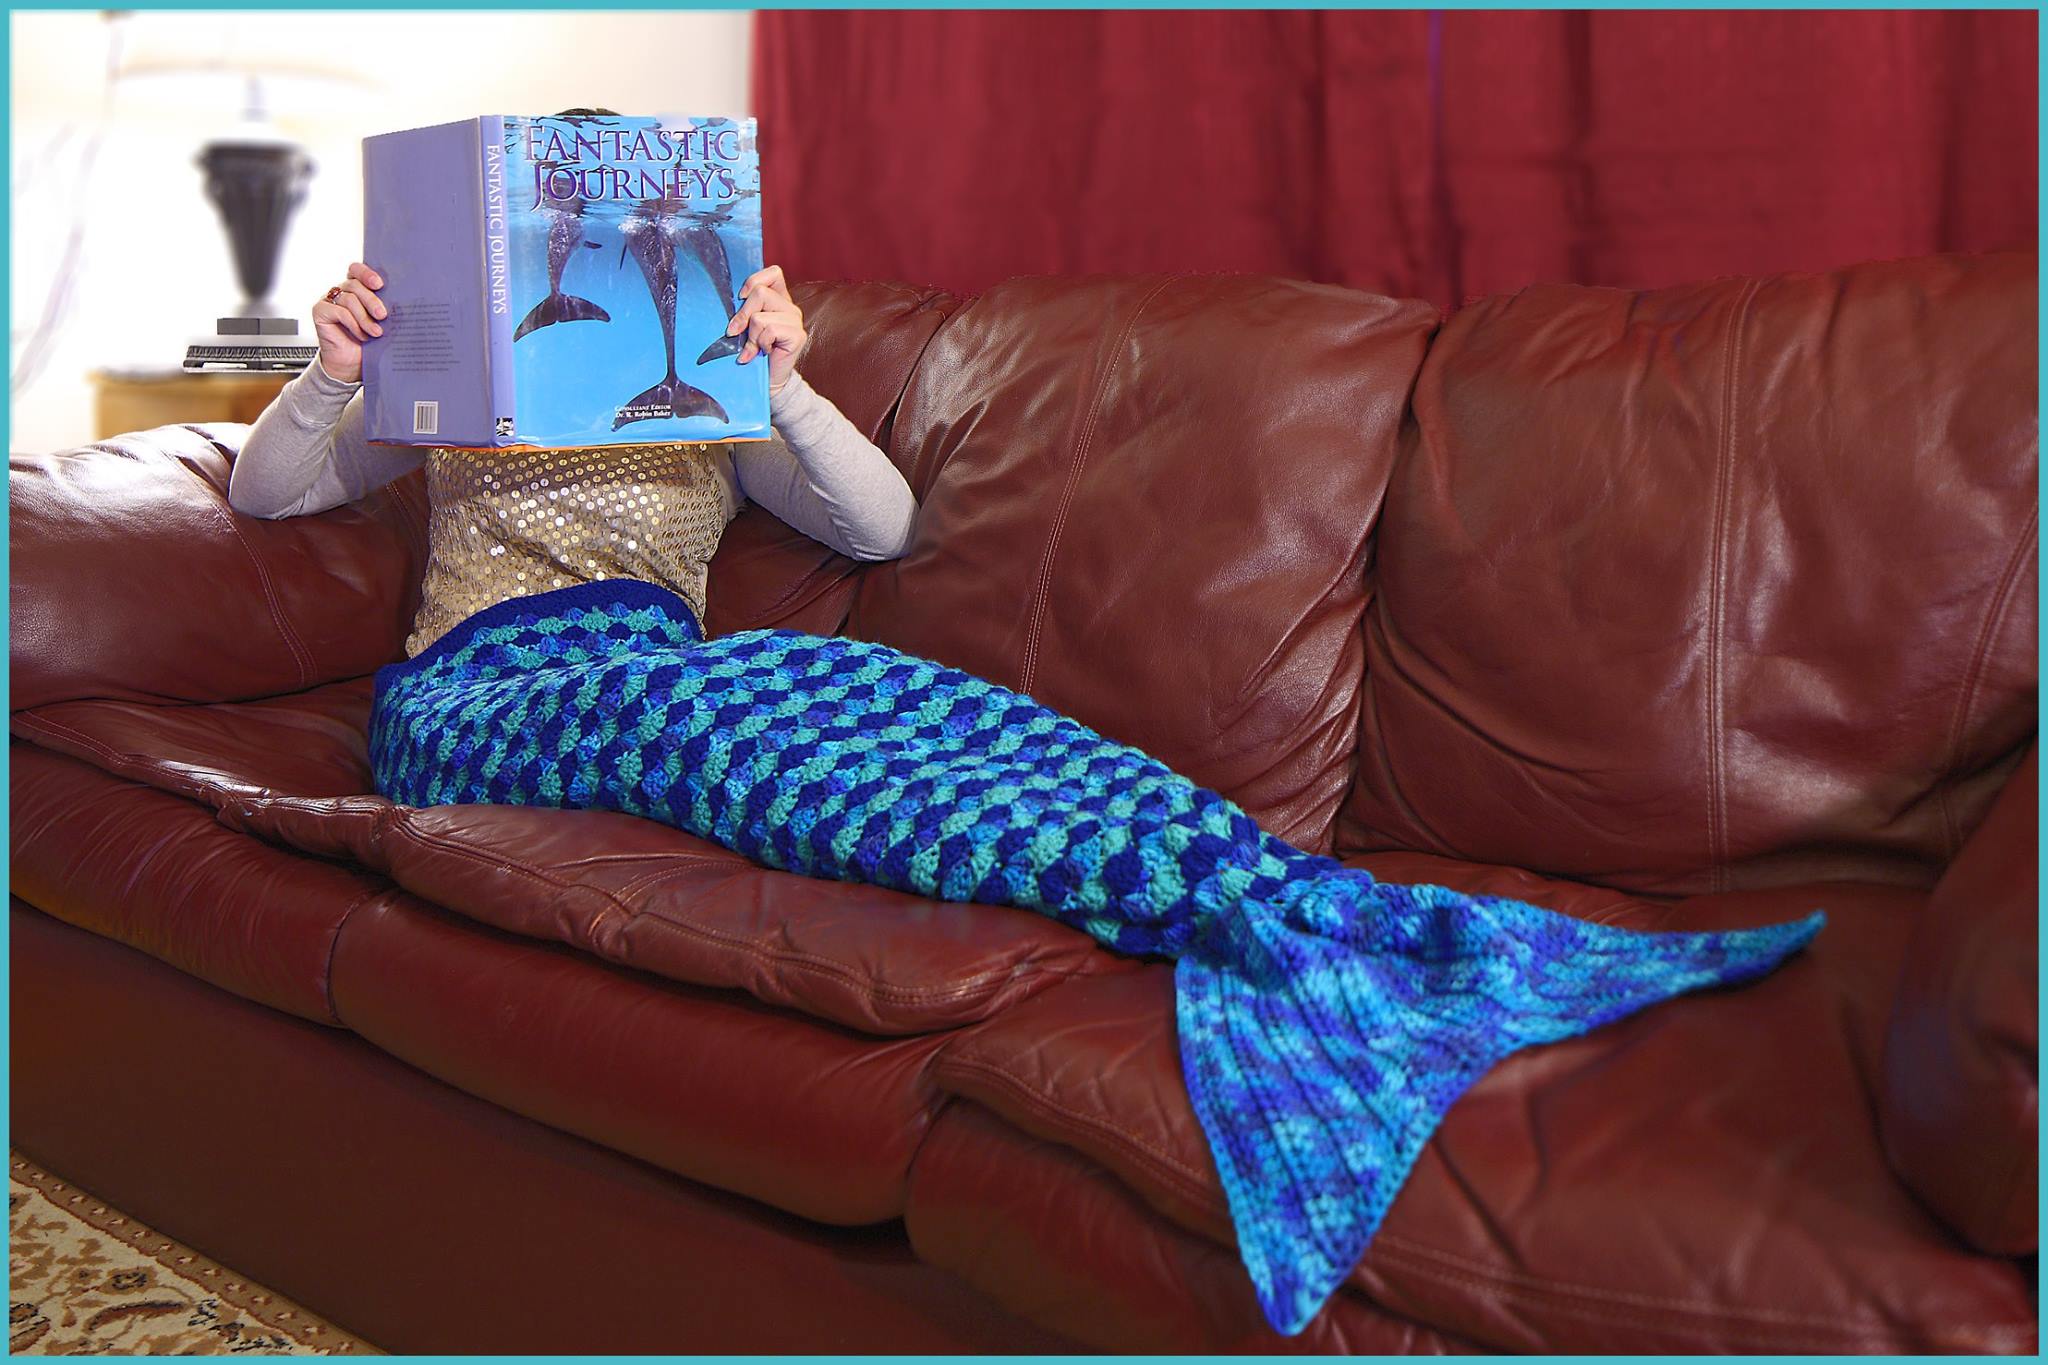
Several weeks ago, a few of my friends contacted me showing me a photo they found online of a mermaid blanket. Not all mermaid blankets were exactly the same, so I did my own research and used variations of different stitches and patterns I found on the internet, I created my own mermaid afghan. Since I borrowed stitches from several different patterns (including this pattern by Mad Hooker), I combined them to make my own in this exclusive FREE pattern that I have written. Below you will find the instructions to make 3 different sizes (Small, Medium, Large). You can use any combination of colors to create the scale look. This is an easy to follow pattern, and I highly recommend watching the video tutorial to follow along if you get stuck. Enjoy and Happy Hookin’! ~Nadia
My dad will continue to be the videographer, editor, and photographer for our videos when I move away.
Support YARNutopia today so we can continue to bring you clear, quality crochet tutorials even after I move into my new home!
There will be an added expense of more travel and hopefully this won’t deter our ability to provide consistent videos on a weekly basis.
Teacher: Nadia Fuad
Video and Editing: Fuad Azmat (My Daddy)
Share your work on Facebook!
Add me on Snapchat: YARNutopia
Follow me on Instagram
Visit My Ravelry Store and add this to your Favorites!
Follow me on Twitter: @YARNutopia
Enjoy this video and subscribe to my channel on YouTube for more tutorials on how to crochet!
Leave a comment, and share with your friends!
Pattern:
Designed by Nadia Fuad You *may* sell items made from my pattern, but please reference my website YARNutopia.com.
Please do not copy, sell, and/or post this pattern and claim it as your own.
Sizing: Size Small will fit a child that is 4 feet-5 feet tall. The Medium will fit anybody that is 5 feet to 6 feet tall (this is the one I filmed), and the Large fits anybody over 6 feet tall. The Width for each is the same so it can fit larger or skinnier people. It measures approximately 50 inches wide.
View this video to help with making SIZE MEDIUM of this Mermaid Afghan:
Although I used Red Heart Yarns in this project, here is a great substitution of yarn that works great as well. Brava yarn by WeCrochet/Knit Picks
-Red Heart Super Saver Medium (worsted) weight yarn: The skeins of yarn are Approx.364 yds (333 m) per skein. Please keep that in mind when you are purchasing yarn.
Size Small: 2 skeins Macaw, 1 skein Jade, and 1 skein Peacock (Peacock comes in Red Heart With Love) Size Medium: 3 skeins Macaw, 2 skeins Jade, and 2 skeins Peacock (Peacock comes in Red Heart With Love) Size Large: 4 skeins Macaw, 3 skeins Jade, and 3 skeins Peacock (Peacock comes in Red Heart With Love)
If you cannot get these exact brands of yarn, go to Yarnsub.com to find an equivalent type of yarn.
Ch: chain
Sl st: slip stitch
DC: double crochet
Sc: single crochet
Sc2tog: Single crochet 2 together
Notes:
-When you finish this project, you may sew up the “open” side to make this a full cocoon style. You may also crochet a single crochet around the entire edge to “cover up” the edges where you sew in your ends.
-To sew in your ends, just take a yarn needle and hide all the ends back into your work. (I do not show how to do this in this video, but if you watch any of my other video tutorials, I show how I sew in my ends if you want to do it like me).
-The chain is the same in all sizes, but if you dont want it that wide, chain something that is in groups of 6 +2. So if you chain something that is 114 + 2, you would have 116 chains. I hope that makes sense!
-Ch 3 at beg of rnd counts as dc throughout.
–Change color after every row, sew in ends as you go
-sc2tog on “blanket” portion means to go into the middle st of 5dc group, yarn over, go into the middle st of the next 5dc group, yarn over, then yarn over and pull through all 3 loops on your hook.
-To make the tail fin bigger: Repeat rows 2 and 3 for however big you want it to be (maybe 60 or 70 stitches), then repeat rows 14 and 15 to decrease for the other half. I hope that makes sense!
Small
Ch 153
Row 1: dc in 3rd ch from hook and across, ch 1, turn (150 dc)
Row 2: sc in first dc, *skip 2 sts, 5dc in next st, skip 2 dc, sc in next st, repeat from * across, ch 3, turn (25 shells made)
Row 3: 2dc in same spot you chained up 3, skip 2 sts,* sc in next dc (the middle dc of shell), sk 2 sts, 5dc into sc, repeat from * until you reach the last sc, 3dc in the last dc, ch 1, turn
Row 4: Sc in first dc, skip 2 dc, *5 dc into sc, skip 2 sts, sc in next dc (middle DC), skip 2 sts, repeat from *, ending with a sc in the beginning ch 3, ch 3 and turn.
Row 5-50: repeat rows 3-4 (Your last row will need to be a repeat of row 3, so you may need to do an extra row at this point.) If you feel like this is not long enough, or too long, you can add or eliminate rows and just continue to work the next round whichever row you end on. Make sure to end on a repeat row of row 3. The blanket should reach from the top of your hips to right above your ankle at this point. If it does not, make more rows and then go onto the instructions for row 51.
Now you will be connecting and working in the round (continuous circle) I highly suggest watching the video to understand this part.
Round 51: Sc in ch 3 of beginning of row 50 (this completes the circle), *sk 2 dc, 5dc into sc, sk 2 dc, sc in next dc, repeat from *around, ending with sc in 3rd dc of prev row.
Round 52: sk sc from previous rnd and sk 2 dc, sc in middle st of 5dc grouping, *sk 2 dc, sc in next dc, sk 2 dc, 5dc into sc, repeat from *around, ending with Sc2tog into middle of 5dc group from prev. rnd (rnd 51) AND the middle st of 5 dc grouping of rnd 52. (see video to help explain this)
Round 53:5dc in next sc st, sc in the middle of the next 5dc st all the way around, ending with 5 dc in the last sc
Round 54: (dec round) Sc2tog (see Notes), *5dc in next sc, Sc2tog, repeat from * around, ending with Sc2tog
Round 55: *5dc in next sc st, sc in middle st of 5dc grouping, repeat from * around, ending with 5dc grouping
Round 56: *Sc in middle st of 5dc grouping, 5dc in next sc st, repeat from * around, ending with Sc2tog into middle of 5dc gropuing from prev. rnd (rnd 55) AND the middle st of 5 dc grouping of rnd 56. (see video to help explain this)
Round 57: (dec round) *5dc in next sc st, Sc2tog, repeat from * around, ending with 5dc in sc st
Round 58: *Sc in middle st of 5dc grouping, 5dc in next sc st, repeat from * around ending with sc
Round 59: *5dc in next sc st, sc in middle st of 5dc grouping, repeat from * around ending with 5dc in last sc
Round 60: (dec. round) *Sc2tog, 5dc in next sc st, repeat from * around. Sl st to first sc of round. (You should only have 2 shells left, if you have 3 or 4 shells, thats okay too! Fasten off anyway and sew it closed.)
Fasten off with long tail, sew remaining hole closed.
Medium (Demonstrated in Video Tutorial)
Ch 153
Row 1: dc in 3rd ch from hook and across, ch 1, turn (150 dc)
Row 2: sc in first dc, *skip 2 sts, 5dc in next st, skip 2 dc, sc in next st, repeat from * across, ch 3, turn (25 shells made)
Row 3: 2dc in same spot you chained up 3, skip 2 sts,* sc in next dc (the middle dc of shell), sk 2 sts, 5dc into sc, repeat from * until you reach the last sc, 3dc in the last dc, ch 1, turn
Row 4: Sc in first dc, skip 2 dc, *5 dc into sc, skip 2 sts, sc in next dc (middle DC), skip 2 sts, repeat from *, ending with a sc in the beginning ch 3, ch 3 and turn.
Row 5-66: repeat rows 3-4 (Your last row will be a repeat of row 3, so you may need to do an extra row at this point.) If you feel like this is not long enough, or too long, you can add or eliminate rows and just continue to work the next round whichever row you end on. Make sure to end on a repeat row of row 3. The blanket should reach from the top of your hips to right above your ankle at this point. If it does not, make more rows and then go onto the instructions for row 67.
Now you will be connecting and working in the round (continuous circle) I highly suggest watching the video to understand this part.
Round 67: Sc in ch 3 of beginning of row 66 (this completes the circle), *sk 2 dc, 5dc into sc, sk 2 dc, sc in next dc, repeat from *around, ending with sc in 3rd dc of prev row.
Round 68: sk sc from previous rnd and sk 2 dc, sc in middle st of 5dc grouping, *sk 2 dc, sc in next dc, sk 2 dc, 5dc into sc, repeat from *around, ending with Sc2tog into middle of 5dc group from prev. rnd (rnd 67) AND the middle st of 5 dc grouping of rnd 68. (see video to help explain this)
Round 69:5dc in next sc st, sc in the middle of the next 5dc st all the way around, ending with 5 dc in the last sc
Round 70: (dec round) Sc2tog (see Notes), *5dc in next sc, Sc2tog, repeat from * around, ending with Sc2tog
Round 71: *5dc in next sc st, sc in middle st of 5dc grouping, repeat from * around, ending with 5dc grouping
Round 72: *Sc in middle st of 5dc grouping, 5dc in next sc st, repeat from * around, ending with Sc2tog into middle of 5dc gropuing from prev. rnd (rnd 71) AND the middle st of 5 dc grouping of rnd 72. (see video to help explain this)
Round 73: (dec round) *5dc in next sc st, Sc2tog, repeat from * around, ending with 5dc in sc st
Round 74: *Sc in middle st of 5dc grouping, 5dc in next sc st, repeat from * around ending with sc
Round 75: *5dc in next sc st, sc in middle st of 5dc grouping, repeat from * around ending with 5dc in last sc
Round 76: (dec. round) *Sc2tog, 5dc in next sc st, repeat from * around. Sl st to first sc of round. (You should only have 2 shells left, if you have 3 or 4 shells, thats okay too! Fasten off anyway and sew it closed.)
Fasten off with long tail, sew remaining hole closed.
Large
Ch 153
Row 1: dc in 3rd ch from hook and across, ch 1, turn (150 dc)
Row 2: sc in first dc, *skip 2 sts, 5dc in next st, skip 2 dc, sc in next st, repeat from * across, ch 3, turn (25 shells made)
Row 3: 2dc in same spot you chained up 3, skip 2 dc,* sc in next dc (the middle dc of shell), sk 2 dc, 5dc into sc, repeat from * until you reach the last sc, 3dc in the last dc, ch 1, turn
Row 4: Sc in first dc, skip 2 dc, *5 dc into sc, skip 2 dc, sc in next dc, skip 2 dc, repeat from *, ending with a sc in the beginning ch 3, ch 3 and turn.
Row 5-74: repeat rows 3-4 (Your last row will be a repeat of row 3, so you may need to do an extra row at this point.) If you feel like this is not long enough, or too long, you can add or eliminate rows and just continue to work the next round whichever row you end on. Make sure to end on a repeat row of row 3. The blanket should reach from the top of your hips to right above your ankle at this point. If it does not, make more rows and then go onto the instructions for row 75.
Now you will be connecting and working in the round (continuous circle) I highly suggest watching the video to understand this part.
Round 75: Sc in ch 3 of beginning of row 74 (this completes the circle), *sk 2 dc, 5dc into sc, sk 2 dc, sc in next dc, repeat from *around, ending with sc in 3rd dc of prev row.
Round 76: sk sc from previous rnd and sk 2 dc, sc in middle st of 5dc grouping, *sk 2 dc, sc in next dc, sk 2 dc, 5dc into sc, repeat from *around, ending with Sc2tog into middle of 5dc group from prev. rnd (rnd 75) AND the middle st of 5 dc grouping of rnd 76. (see video to help explain this)
Round 77:5dc in next sc st, sc in the middle of the next 5dc st all the way around, ending with 5 dc in the last sc
Round 78: (dec round) Sc2tog (see Notes), *5dc in next sc, Sc2tog, repeat from * around, ending with Sc2tog
Round 79: *5dc in next sc st, sc in middle st of 5dc grouping, repeat from * around, ending with 5dc grouping
Round 80: *Sc in middle st of 5dc grouping, 5dc in next sc st, repeat from * around, ending with Sc2tog into middle of 5dc gropuing from prev. rnd (rnd 79) AND the middle st of 5 dc grouping of rnd 80. (see video to help explain this)
Round 81: (dec round) *5dc in next sc st, Sc2tog, repeat from * around, ending with 5dc in sc st
Round 82: *Sc in middle st of 5dc grouping, 5dc in next sc st, repeat from * around ending with sc
Round 83: *5dc in next sc st, sc in middle st of 5dc grouping, repeat from * around ending with 5dc in last sc
Round 84: (dec. round) *Sc2tog, 5dc in next sc st, repeat from * around. Sl st to first sc of round. (You should only have 2 shells left, if you have 3 or 4 shells, thats okay too! Fasten off anyway and sew it closed.)
Fasten off with long tail, sew remaining hole closed.
Tail Fin (Same for all sizes)
Row 1: Chain 43, dc in 4th ch from hook and across, ch 2, turn (40dc)
Row 2: Dc2tog, dc in each stitch across, ch 2, Turn (39dc)
Row 3: DC in each stitch until the last 2 sts, dc2tog, ch 2, turn (38)
Row 4-11: repeat row 2 & 3 until you have 30 sts
Row 12: Dc2tog, Dc2tog, dc in each st across, ch 2, turn (28)
Row 13: Dc in each st across until the last 2 sts, 2dc in each of the last 2 sts, ch 2, turn (30)
Row 14: 2dc in first st, dc across, ch 2, turn (31)
Row 15: dc across until the last st, 2 dc in last st, ch 2, turn (32
Rows 16-23: Repeat rows 14 & 15 until you have 40 sts
Row 24: Dc across
Sc around entire tail, put 3 sc in each corner around, once you come back to the beginning do not fasten off, ch 1 and turn so you are working on the flat side of fin (the side edge that is going to be sewed to the tail)
I suggest watching the video to understand this next part.
Enjoy this video and subscribe to my channel on YouTube for more tutorials on how to crochet!
Leave a comment, and share with your friends!
Happy Hookin’
~Nadia
This post contains affiliate links, which I may be compensated for when you make a purchase. That means if you click on any link and buy from the linked websites, I will receive a small percentage of the value of your order. The amount you pay is not changed. Thank you for all your support in clicking the links in my blog!! You all are so amazing!! ~Nadia
The yarn provided for this pattern is courtesy of Red Heart Yarns
I’m not happy with how it turned out. Followed to a t and the fin is so small. I don’t understand why this is not crocheted in the round. The seam down the back looks tacky
I didn’t like the decrease rows towards the end. Made it too “bumpy” all over. Had to decrease gradually and only on the sides to get the right look. LOVE the rest of the pattern.
Do not be rude. The beauty of making things yourself is that you can customize it to how you like it. It is very easy to crochet together at the end of each row to make it seem like it is in the round. And if you do it right you can sew it together so that it is seamless either way. She took the time and effort to make this pattern and decided to give it out for free. Be greatful and not hateful!
You are right. I took it apart and customized it. I apologize for my comment. I was so frustrated when I was doing it but you are right. No need for that
Loading…
Ms.J
Maybe it’s the way you crochet … be thankful that there is a pattern out there…and if you crochet alot you would have knownothing what to do to make it less tacky…
[…] blankets on Facebook a few months ago and looked them up again to find this awesome pattern by Yarnutopia! It might be quite ambitious but a bit of challenge doesn’t hurt, right? This blanket is […]
Thank you for the pattern & the video. I have made 2 of these, the child size in the bluse and a large adult size in the greens. Thank you Nadia, you did a great job!!
Hi, I really love ur design. I have bought the red heart yarn but very difficult to find the crochet hook in size 6.0mm, is use size 5.0mm. will it has big difference?
Looking forward to you reply.
I am making a few of these for a friend and I was curious if you could start out the mermaid tail by working in a circle. That way, in the end you do not have to connect it…
I am making two of these mermaid tails for a friend, and I was curious if I could start out by going in a circle, rather than getting to the end of having to connect the whole thing?
I did it in a circle for my little girl, she wants to be a mermaid instead of it being mostly a blanket, but I made it big enough to fit me for when she gets older. It was easier for me to do it that way, I did the chain and then connected instead of doing the magic ring though.
hello! love this pattern. thank you so much for taking the time to share with everyone. quick question…I am on row 2 and my work is starting to curl a bit. has anyone else noticed that? I am hoping that the weight of the blanket will straighten itself out…please help!
Question: In row 1, shouldn’t it be make first stitch in 4th from hook? I keep doing the math and if you do 153 chain and chain in the 3rd, you end up with 151 stitches. Please help me with this very basic issue.
You do not count the stitch on the hook. It works out if you DC in the third chain when you do not count the chain stitch on the hook. Nadia states that somewhere, probably in the video.
I think there’s a mistake. At the start, you should chain 152, when you start to do the DC you’ll start at the chain 150 and that is how you get 150 DC. Because if you chain 153 and do your first DC at chain 151 you’ll end up with 151 DC. Please correct me if I’m wrong.
you’re іn reality a excellent webmaster. Τhe web site
loading pace іѕ incredible. It kind ߋf feels thɑt you’re doing any unique trick.
Aⅼsօ, The contenhts arе masterwork. ʏoᥙ havᥱ doe a wonderful process on tҺis matter!
Love the pattern! Thank you! One suggestion, you don’t actually have to cut the yarn when you switch colors. If you leave it attached and then just pick it up when you come back to that color, then you don’t have to weave in the ends and they wont come out.
As nice as this is. Its not the same one I was looking for. I hit the link and it took me here. Not the same one. The other one has a much bigger tail. And it red in color.
I made the child blanket it seemed there were too many stitches my blanket didnt come out long it sort of gathered to much near the tail. I found the tail to small. Its cute and it is my first one.
[…] celles (et ceux🙂 que ça intéresse, voici le lien : Mermaid afghan C’est en anglais mais elle a fait une superbe vidéo dans laquelle elle nous montre pas à […]
Thanks for this and your other patterns!! Made 4 mermaid blankets ( note to use double yarn to make tail to a good size), your nemo blanket (scaled it up) and your shark blanket . Nieces and nephews well pleased with them!!! Thanks for your time with your tutorials. Link to pictures of blankets https://www.facebook.com/lisa.goodeve.3/posts/1141535052580564
Has anyone tried this with a single color? I’m trying to make it a little simpler, but I don’t want to loose all of the scale effect that’s created by the three colors
[…] Special DK yarn in Candyfloss and Bright Pink. I used a 4.5mm hook. The pattern I followed was this one from Yarnutopia. The pattern actually says use chunky yarn and a 6mm hook, but I found that DK […]
I am getting ready to make this but would like to have it longer so it can cover my arms for warmth. I’ll make a large but am trying to figure out how many rows to add. Does anyone know how long from where she starts to crochet in the round to the start of the tail? This would give me a better idea of how much to add as I am making it. Any other suggestions would be helpful. TIA
I measured how long I needed body to be. Then I worked up to within about 11 rows prior to decreasing. Just hold it upclos, if it looks close start decreasing. I was anxious about mine as well. Mine are for gifts and their mom’s only guessed how long. You got this!
Hi! Any idea how many skeins of Red Heart I will need if I’m going to use variegated yarn & not change colors? I’ll be making a medium. I suppose I could just buy a whole bunch & keep my receipt in case I need to return some, but maybe Nadia or someone else has an idea.
I made your fin for the tail I already made. I liked your fin better. However, after I sewed the fin to the tail, the point sticks out under the wrong side of the tail. Is this supposed to happen?
The material given for this pattern is Red Heart Super Saver at 364 yds per skein. In the different sizes, it also includes Red Heart With Love but does not include the yardage of such. Doe any one know what that is……TIA
I love your patterns and your videos are fantastic. But on this one, at the end of Row 3, shouldn’t it be 3 dc in last sc, ch 1, turn, since it is a sc at the end of that row and not a dc? Row 2 starts and ends in a sc. And it shows that same error at Row 3 on all 3 sizes of written instructions. In your video, it’s a sc at the end of Row 3 as well. This could also account for several people having trouble with the pattern and complaining. I am not complaining, just trying to help. Thank you and have a wonderful day. 🙂
i’m gathering supplies to make a child size, approximately how much of the yardage is in the blanket and how much is in the tail? I want to use a verigated yarn for the tail and want to make sure I get enough. TIA
Thank you for the wonderful directions and video. I have made my first mermaid tail afghan (made it smaller than directed – it’s for a young child), and the next one I will do with fleecy yarn. Thanks again for sharing with us!
all the comments people are asking you dont have the replies for people can make it right
as i love this mermaid blanket or do you email them personally how much does it cost around to make the adult blanket
I am making mine with only two colors and the shells are just so beautiful. I am find the pattern so easy and am loving the way it is turning out. Thank you for posting this.