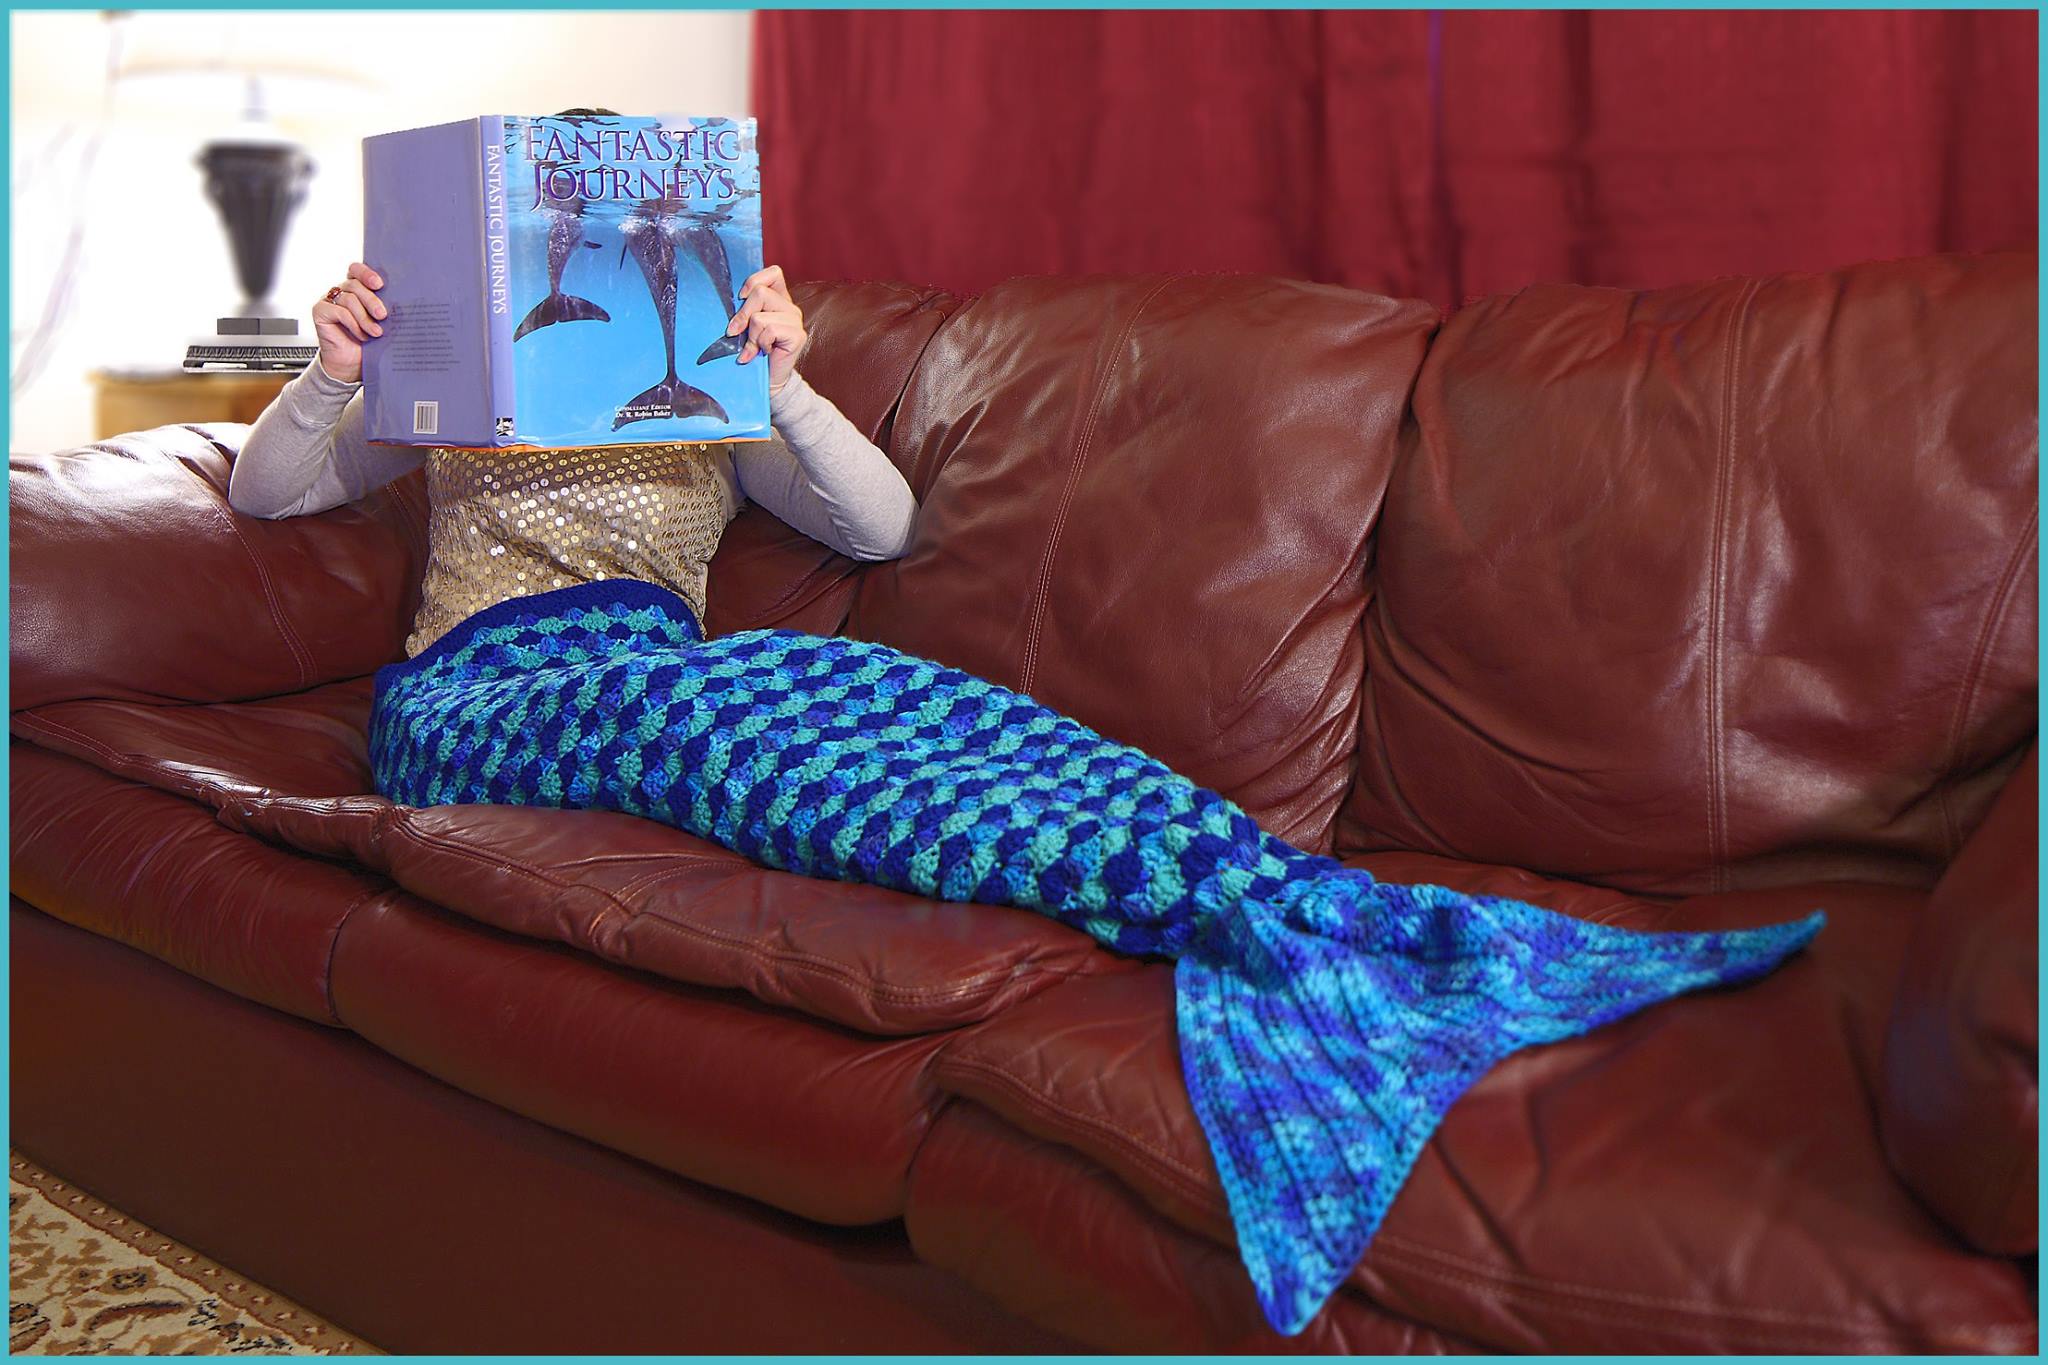
Several weeks ago, a few of my friends contacted me showing me a photo they found online of a mermaid blanket. Not all mermaid blankets were exactly the same, so I did my own research and used variations of different stitches and patterns I found on the internet, I created my own mermaid afghan. Since I borrowed stitches from several different patterns (including this pattern by Mad Hooker), I combined them to make my own in this exclusive FREE pattern that I have written. Below you will find the instructions to make 3 different sizes (Small, Medium, Large). You can use any combination of colors to create the scale look. This is an easy to follow pattern, and I highly recommend watching the video tutorial to follow along if you get stuck. Enjoy and Happy Hookin’! ~Nadia
My dad will continue to be the videographer, editor, and photographer for our videos when I move away.
Support YARNutopia today so we can continue to bring you clear, quality crochet tutorials even after I move into my new home!
There will be an added expense of more travel and hopefully this won’t deter our ability to provide consistent videos on a weekly basis.
Teacher: Nadia Fuad
Video and Editing: Fuad Azmat (My Daddy)
Share your work on Facebook!
Add me on Snapchat: YARNutopia
Follow me on Instagram
Visit My Ravelry Store and add this to your Favorites!
Follow me on Twitter: @YARNutopia
Enjoy this video and subscribe to my channel on YouTube for more tutorials on how to crochet!
Leave a comment, and share with your friends!
Pattern:
Designed by Nadia Fuad You *may* sell items made from my pattern, but please reference my website YARNutopia.com.
Please do not copy, sell, and/or post this pattern and claim it as your own.
Sizing: Size Small will fit a child that is 4 feet-5 feet tall. The Medium will fit anybody that is 5 feet to 6 feet tall (this is the one I filmed), and the Large fits anybody over 6 feet tall. The Width for each is the same so it can fit larger or skinnier people. It measures approximately 50 inches wide.
View this video to help with making SIZE MEDIUM of this Mermaid Afghan:
Although I used Red Heart Yarns in this project, here is a great substitution of yarn that works great as well. Brava yarn by WeCrochet/Knit Picks
-Red Heart Super Saver Medium (worsted) weight yarn: The skeins of yarn are Approx.364 yds (333 m) per skein. Please keep that in mind when you are purchasing yarn.
Size Small: 2 skeins Macaw, 1 skein Jade, and 1 skein Peacock (Peacock comes in Red Heart With Love) Size Medium: 3 skeins Macaw, 2 skeins Jade, and 2 skeins Peacock (Peacock comes in Red Heart With Love) Size Large: 4 skeins Macaw, 3 skeins Jade, and 3 skeins Peacock (Peacock comes in Red Heart With Love)
If you cannot get these exact brands of yarn, go to Yarnsub.com to find an equivalent type of yarn.
Ch: chain
Sl st: slip stitch
DC: double crochet
Sc: single crochet
Sc2tog: Single crochet 2 together
Notes:
-When you finish this project, you may sew up the “open” side to make this a full cocoon style. You may also crochet a single crochet around the entire edge to “cover up” the edges where you sew in your ends.
-To sew in your ends, just take a yarn needle and hide all the ends back into your work. (I do not show how to do this in this video, but if you watch any of my other video tutorials, I show how I sew in my ends if you want to do it like me).
-The chain is the same in all sizes, but if you dont want it that wide, chain something that is in groups of 6 +2. So if you chain something that is 114 + 2, you would have 116 chains. I hope that makes sense!
-Ch 3 at beg of rnd counts as dc throughout.
–Change color after every row, sew in ends as you go
-sc2tog on “blanket” portion means to go into the middle st of 5dc group, yarn over, go into the middle st of the next 5dc group, yarn over, then yarn over and pull through all 3 loops on your hook.
-To make the tail fin bigger: Repeat rows 2 and 3 for however big you want it to be (maybe 60 or 70 stitches), then repeat rows 14 and 15 to decrease for the other half. I hope that makes sense!
Small
Ch 153
Row 1: dc in 3rd ch from hook and across, ch 1, turn (150 dc)
Row 2: sc in first dc, *skip 2 sts, 5dc in next st, skip 2 dc, sc in next st, repeat from * across, ch 3, turn (25 shells made)
Row 3: 2dc in same spot you chained up 3, skip 2 sts,* sc in next dc (the middle dc of shell), sk 2 sts, 5dc into sc, repeat from * until you reach the last sc, 3dc in the last dc, ch 1, turn
Row 4: Sc in first dc, skip 2 dc, *5 dc into sc, skip 2 sts, sc in next dc (middle DC), skip 2 sts, repeat from *, ending with a sc in the beginning ch 3, ch 3 and turn.
Row 5-50: repeat rows 3-4 (Your last row will need to be a repeat of row 3, so you may need to do an extra row at this point.) If you feel like this is not long enough, or too long, you can add or eliminate rows and just continue to work the next round whichever row you end on. Make sure to end on a repeat row of row 3. The blanket should reach from the top of your hips to right above your ankle at this point. If it does not, make more rows and then go onto the instructions for row 51.
Now you will be connecting and working in the round (continuous circle) I highly suggest watching the video to understand this part.
Round 51: Sc in ch 3 of beginning of row 50 (this completes the circle), *sk 2 dc, 5dc into sc, sk 2 dc, sc in next dc, repeat from *around, ending with sc in 3rd dc of prev row.
Round 52: sk sc from previous rnd and sk 2 dc, sc in middle st of 5dc grouping, *sk 2 dc, sc in next dc, sk 2 dc, 5dc into sc, repeat from *around, ending with Sc2tog into middle of 5dc group from prev. rnd (rnd 51) AND the middle st of 5 dc grouping of rnd 52. (see video to help explain this)
Round 53:5dc in next sc st, sc in the middle of the next 5dc st all the way around, ending with 5 dc in the last sc
Round 54: (dec round) Sc2tog (see Notes), *5dc in next sc, Sc2tog, repeat from * around, ending with Sc2tog
Round 55: *5dc in next sc st, sc in middle st of 5dc grouping, repeat from * around, ending with 5dc grouping
Round 56: *Sc in middle st of 5dc grouping, 5dc in next sc st, repeat from * around, ending with Sc2tog into middle of 5dc gropuing from prev. rnd (rnd 55) AND the middle st of 5 dc grouping of rnd 56. (see video to help explain this)
Round 57: (dec round) *5dc in next sc st, Sc2tog, repeat from * around, ending with 5dc in sc st
Round 58: *Sc in middle st of 5dc grouping, 5dc in next sc st, repeat from * around ending with sc
Round 59: *5dc in next sc st, sc in middle st of 5dc grouping, repeat from * around ending with 5dc in last sc
Round 60: (dec. round) *Sc2tog, 5dc in next sc st, repeat from * around. Sl st to first sc of round. (You should only have 2 shells left, if you have 3 or 4 shells, thats okay too! Fasten off anyway and sew it closed.)
Fasten off with long tail, sew remaining hole closed.
Medium (Demonstrated in Video Tutorial)
Ch 153
Row 1: dc in 3rd ch from hook and across, ch 1, turn (150 dc)
Row 2: sc in first dc, *skip 2 sts, 5dc in next st, skip 2 dc, sc in next st, repeat from * across, ch 3, turn (25 shells made)
Row 3: 2dc in same spot you chained up 3, skip 2 sts,* sc in next dc (the middle dc of shell), sk 2 sts, 5dc into sc, repeat from * until you reach the last sc, 3dc in the last dc, ch 1, turn
Row 4: Sc in first dc, skip 2 dc, *5 dc into sc, skip 2 sts, sc in next dc (middle DC), skip 2 sts, repeat from *, ending with a sc in the beginning ch 3, ch 3 and turn.
Row 5-66: repeat rows 3-4 (Your last row will be a repeat of row 3, so you may need to do an extra row at this point.) If you feel like this is not long enough, or too long, you can add or eliminate rows and just continue to work the next round whichever row you end on. Make sure to end on a repeat row of row 3. The blanket should reach from the top of your hips to right above your ankle at this point. If it does not, make more rows and then go onto the instructions for row 67.
Now you will be connecting and working in the round (continuous circle) I highly suggest watching the video to understand this part.
Round 67: Sc in ch 3 of beginning of row 66 (this completes the circle), *sk 2 dc, 5dc into sc, sk 2 dc, sc in next dc, repeat from *around, ending with sc in 3rd dc of prev row.
Round 68: sk sc from previous rnd and sk 2 dc, sc in middle st of 5dc grouping, *sk 2 dc, sc in next dc, sk 2 dc, 5dc into sc, repeat from *around, ending with Sc2tog into middle of 5dc group from prev. rnd (rnd 67) AND the middle st of 5 dc grouping of rnd 68. (see video to help explain this)
Round 69:5dc in next sc st, sc in the middle of the next 5dc st all the way around, ending with 5 dc in the last sc
Round 70: (dec round) Sc2tog (see Notes), *5dc in next sc, Sc2tog, repeat from * around, ending with Sc2tog
Round 71: *5dc in next sc st, sc in middle st of 5dc grouping, repeat from * around, ending with 5dc grouping
Round 72: *Sc in middle st of 5dc grouping, 5dc in next sc st, repeat from * around, ending with Sc2tog into middle of 5dc gropuing from prev. rnd (rnd 71) AND the middle st of 5 dc grouping of rnd 72. (see video to help explain this)
Round 73: (dec round) *5dc in next sc st, Sc2tog, repeat from * around, ending with 5dc in sc st
Round 74: *Sc in middle st of 5dc grouping, 5dc in next sc st, repeat from * around ending with sc
Round 75: *5dc in next sc st, sc in middle st of 5dc grouping, repeat from * around ending with 5dc in last sc
Round 76: (dec. round) *Sc2tog, 5dc in next sc st, repeat from * around. Sl st to first sc of round. (You should only have 2 shells left, if you have 3 or 4 shells, thats okay too! Fasten off anyway and sew it closed.)
Fasten off with long tail, sew remaining hole closed.
Large
Ch 153
Row 1: dc in 3rd ch from hook and across, ch 1, turn (150 dc)
Row 2: sc in first dc, *skip 2 sts, 5dc in next st, skip 2 dc, sc in next st, repeat from * across, ch 3, turn (25 shells made)
Row 3: 2dc in same spot you chained up 3, skip 2 dc,* sc in next dc (the middle dc of shell), sk 2 dc, 5dc into sc, repeat from * until you reach the last sc, 3dc in the last dc, ch 1, turn
Row 4: Sc in first dc, skip 2 dc, *5 dc into sc, skip 2 dc, sc in next dc, skip 2 dc, repeat from *, ending with a sc in the beginning ch 3, ch 3 and turn.
Row 5-74: repeat rows 3-4 (Your last row will be a repeat of row 3, so you may need to do an extra row at this point.) If you feel like this is not long enough, or too long, you can add or eliminate rows and just continue to work the next round whichever row you end on. Make sure to end on a repeat row of row 3. The blanket should reach from the top of your hips to right above your ankle at this point. If it does not, make more rows and then go onto the instructions for row 75.
Now you will be connecting and working in the round (continuous circle) I highly suggest watching the video to understand this part.
Round 75: Sc in ch 3 of beginning of row 74 (this completes the circle), *sk 2 dc, 5dc into sc, sk 2 dc, sc in next dc, repeat from *around, ending with sc in 3rd dc of prev row.
Round 76: sk sc from previous rnd and sk 2 dc, sc in middle st of 5dc grouping, *sk 2 dc, sc in next dc, sk 2 dc, 5dc into sc, repeat from *around, ending with Sc2tog into middle of 5dc group from prev. rnd (rnd 75) AND the middle st of 5 dc grouping of rnd 76. (see video to help explain this)
Round 77:5dc in next sc st, sc in the middle of the next 5dc st all the way around, ending with 5 dc in the last sc
Round 78: (dec round) Sc2tog (see Notes), *5dc in next sc, Sc2tog, repeat from * around, ending with Sc2tog
Round 79: *5dc in next sc st, sc in middle st of 5dc grouping, repeat from * around, ending with 5dc grouping
Round 80: *Sc in middle st of 5dc grouping, 5dc in next sc st, repeat from * around, ending with Sc2tog into middle of 5dc gropuing from prev. rnd (rnd 79) AND the middle st of 5 dc grouping of rnd 80. (see video to help explain this)
Round 81: (dec round) *5dc in next sc st, Sc2tog, repeat from * around, ending with 5dc in sc st
Round 82: *Sc in middle st of 5dc grouping, 5dc in next sc st, repeat from * around ending with sc
Round 83: *5dc in next sc st, sc in middle st of 5dc grouping, repeat from * around ending with 5dc in last sc
Round 84: (dec. round) *Sc2tog, 5dc in next sc st, repeat from * around. Sl st to first sc of round. (You should only have 2 shells left, if you have 3 or 4 shells, thats okay too! Fasten off anyway and sew it closed.)
Fasten off with long tail, sew remaining hole closed.
Tail Fin (Same for all sizes)
Row 1: Chain 43, dc in 4th ch from hook and across, ch 2, turn (40dc)
Row 2: Dc2tog, dc in each stitch across, ch 2, Turn (39dc)
Row 3: DC in each stitch until the last 2 sts, dc2tog, ch 2, turn (38)
Row 4-11: repeat row 2 & 3 until you have 30 sts
Row 12: Dc2tog, Dc2tog, dc in each st across, ch 2, turn (28)
Row 13: Dc in each st across until the last 2 sts, 2dc in each of the last 2 sts, ch 2, turn (30)
Row 14: 2dc in first st, dc across, ch 2, turn (31)
Row 15: dc across until the last st, 2 dc in last st, ch 2, turn (32
Rows 16-23: Repeat rows 14 & 15 until you have 40 sts
Row 24: Dc across
Sc around entire tail, put 3 sc in each corner around, once you come back to the beginning do not fasten off, ch 1 and turn so you are working on the flat side of fin (the side edge that is going to be sewed to the tail)
I suggest watching the video to understand this next part.
Enjoy this video and subscribe to my channel on YouTube for more tutorials on how to crochet!
Leave a comment, and share with your friends!
Happy Hookin’
~Nadia
This post contains affiliate links, which I may be compensated for when you make a purchase. That means if you click on any link and buy from the linked websites, I will receive a small percentage of the value of your order. The amount you pay is not changed. Thank you for all your support in clicking the links in my blog!! You all are so amazing!! ~Nadia
The yarn provided for this pattern is courtesy of Red Heart Yarns
Do you leave the blanket open down the back? Doesn’t say to sew the back together, so I assume that you do leave it open. Such a cute pattern. I did have to use the tutorial, though, on the decrease part of the blanket!
I’m excited about finishing this blanket for my daughter. She’s really into mermaids. I’m working on the tail now. By any chance, is there a way to make the tail a little longer and wider?
Sorry I do not have stitches to make it bigger, but I can tell you if you want to make yours bigger, you can just start with any large chain that is an odd number. Then repeat rows 2 & 3 until you have 30 sts and then go on to making the rest of the pattern repeating the instructions for rows 14 & 15 until you have the original amount of chains you started out with. I hope this makes sense and you are able to make your tail fin bigger. ~Nadia
I tried this and had trouble first time. but then it came out so cool that I had so many people ask me to make one for them. I absolutely love watching your videos and trying to make your stuff. I’ve made a few things you’ve posted. thank you for posting and I only wish you good health and happiness.
I just finished this mermaid tail afghan for my six-year-old daughter. Thank you so much for the pattern. I enjoyed your instructional video. It was very helpful, and you are a lot of fun to watch. Thanks again!!
OK, love this pattern and I am actually making my second one for my niece. I don’t remember having this problem on the first one, but when you get to the first real decrease row and you are supposed to end up with sc2tog, I only have one shell left……please help me! I have unwound this twice and still can’t figure out what is going on! Thanks for the pattern and the video.
Hi First let me share I love you mermaid video….I have made 4. My next project is I would like to make a 6 month old baby cocoon using the same stitches as the mermaid but not to sure how to do the decrease rows as only needing a few… any idea oder suggestions would be appreciated ty val
[…] Precious mermaid afghan for adults, will cause your body stop trembling sweetly! By getting into it, you will only left with the comfort! What’s special? You will appear like a precious mermaid to every onlooker! Duplicate it by following this easy and free pattern guide and video tutorial yarnutopia […]
Finally a pattern I can follow! And I love that there’s a video so I can make sure I did it right. (I’ve been saying for years that patterns should come with videos to better illustrate individual stitches). I’m only on row 3, but it looks exactly the way it should.
Hi I am having an issue with when I get to row 20. This is the second time same problem. One edge starts to go out and then is no longer a straight edge. I have followed the directions exactly and have even written down the row #s and whether it is repeating row 3 or 4. So as if it’s increasing. Do you know what could be happening?
Looove this pattern! Making my daughter a rainbow colored one, she picked her colors for a tail blanket last week. I love how simple and easy to read it is with such a beautiful result. Thank you for sharing it!
I’m assuming it’s a typo, but because it’s repeated in all three sizes, I want to double-check that at the end of Row 3, it’s not in fact supposed to be “chain 3, chain 3 and turn”
Hi, and thank you for posting this great pattern! Quick question: when starting the round on row 67…. Should I fully complete a “row 3” then start the round, or would I be ending a “row 4” and starting the round AS a “row 3”? I had to go longer on my rows, but am still keeping track of my threes and fours. Oh, I’m using Caron Simply Soft Teal Zeal, so no color changes needed. Thanks! Hugs. -Valeri
You need to end with a repeat of Row 3 before going onto the round section. I hope that makes sense! I’m sorry I’m just seeing your comment now. I hope you were able to figure out the pattern and make your lovely mermaid tail!! ~Nadia
Yes, I didn’t need a full 204 yd. skein to do the tail fin. How can I post a picture of my project so you may see how it turned out? I tried to follow the Fb link, but it was broken. I made the “body” much longer than the written pattern required, so my granddaughter may use it as a sleeping bag for now, and as a lap blanket when she grows up. I’d love to show you!
Loading…
Lorraine Jacobson
Hi I just watched your video and hope to make this beautiful blanket very soon. I just wanted to comment and say that you’re a wonderful teacher. Everything you say and do is very clear. It makes for a very fun and relaxing afternoon. Thank you so much again! Lorraine
HI, I am doing the small. I followed the directions and came up with the 25 shells, but it is 46″ wide and at row 25 it is only 12″ (not even to my knee and I am only 4’9″ tall).. Which means at 50 rows it will not be to my ankle. Any suggestions.? I am afraid I will be ripping it out (pain since I have woven my ends) and start over.
Just keep going! You’re shells are the width around the body in a circle, your rows are the height up along the body from feet to waist. I made myself a word doc where i went row 66, 67, 68, 69 all the way to row 97. I made it as sort of a sleeping bag for my 9 year old granddaughter. It is wide enough around to have her snuggle in, and when she is a grownup she will still be able to use it as a lap blanket. When I got done with row 97, I just went on to following the instructions for row 67 like the other rows didn’t even matter. I would just keep track of which is a “3” row and which is a “4” row for your own sanity and ease of counting. Sure, it takes a minute when you are finished with a row to go into Word and mark it complete (I used a little “x”), but it is better than getting confused. If all else fails, rip back and start over. That is a better option than “finishing” something that is fundamentally wrong. I hope this helps! -Valeri (valeripaxtonsteele@gmail.com)
By adding rows I will end up making a medium or large when what I wanted was a small. A mermaid blanket that is wider than it is long looks really off and that is what you get by having the same chain for all 3 sizes. And following your instructions for the small I have run out of yarn already and I am not done. I am disappointed.
Oh, Kelly, I’m so sorry if I goofed you up somehow. My name is Valeri, and I really thought I was helping by advising you. Go back to Nadia’s instructions, double check her video, and see if something is different between her pattern and your work. You may have to frog (rip-it) back and start from the beginning. Please don’t get discouraged. This blanket is super cute and comfortable, and my granddaughter loved it. If all else fails, there is a spot on this blog where it says “contact” and it gives a link to email Nadia directly. She is super sweet and approachable, and can help you try to figure out the best solution. Many hugs. -V
I too have done 25 rows and it is only 12″ long so far and the 25 shells makes it only 42″. I must crochet much tighter than she does.
Does anybody have any suggestions on how to make it wider at this point? I don’t want to try to tear it out because I have weaved all the ends in.
Also any suggestions on how to make the tail bigger since I’m sure mine will be far too small as well.
[…] I may post it in my Etsy shop. If you are interested in learning how to make something similar, this shell stitch mermaid tail blanket pattern from Yarnutopia is available for free online. Wanting to go a step further and make individual […]
Pls. repost the written directions with Row 2 directions as demonstrated in your video. I follow written patterns better than videos & began to watch the video to figure out what I was doing incorrectly on Row 2. I tried various means of following Row 3 though unable to figure it out. Now I need to frog a few rows. Many thanks!
[…] Mermaid Tail Afghan by Nadia Fuad Jillybeenies Mermaid Tail Blanket by Jill Harrison $5.00 Bulky & Quick Shark Blanket by MJ’s Off The Hook Designs $5.99 […]
I’m doing the small and I had a question. What was the approximate yardage for the finished piece? Did you use all the yarn in each of the skeins? I want to use the Caron Cakes, and I’m trying to figure out how much to get since each cake is 254 yards. I was planning on just continuing with the one graduated color. Thanks so much!
My question is about making the fin larger. Did you mean add to the beginning chain up to 60 or 70 or did you mean add to the rows? And, should the new size and number of stitches and/or rows be a multiple of 2 or does it matter?
I just finished making the mermaid blanket from your YouTube video. Just wanted you to know that your video instructions were awesome. They were very clear and helped me tremendously. Also kudos to your video guy, he did a great job too. I have been looking for this pattern for a long time and I’m glad that you had a step-by-step video to help me out because I’m sure I never would’ve gotten through this. Way to go! Thank you very much
Thank you so much for the pattern. I’ve made two of them for my grown daughters. One in black with silver sparkles and one in a teal and pink rainbow yarn. They turned out great. But, it does seem like the fin in the picture of your blue one turned out much larger than mine. Did you do something different?
Thank you so much for this awesome pattern! It is turning out beautifully. Just a suggestion to eliminate a lot of work sewing in ends, if you are using 3 separate colors just drop the one you are finished with and when you get back to that color row it will be there for you to just pick up again! No cutting yarn or sewing in ends.😊 Best wishes…..Terry
first of all thank you soo much for the pattern been looking everywhere for this. I really don’t understand too much for crochet. most of the time I just winged it and they turn out okay. I’ve been making berets and beanie… 1 beanie failed because i don’t have the materials used in the pattern i was following… and i was wondering if you could help me the only available yarns i have are for 4mm hooks and some few mismatched yarns for 5mm hooks would it be possible to make this wonderful thing?
[…] the mermaid blanket that I finished last week, I used the tutorial from yarnutopia. I followed the video which I thought was really pretty well done! I really like the shell stitch. […]
Hello, I have a question on the mermaid, I am using Lion Brand Mandala which is a size 3 with an I hook since the yarn in smaller than what you suggested and am making it for an adult who weighs maybe 180 pounds. I have chained 183 instead of the 153 and was wondering if you think I have adjusted enough for the size of yarn and hook or if it would be better to ch 153 as you suggested?
183 Chains should work out great with a lighter yarn. Let me know how it goes. Good luck in your next crochet project! These mermaid tails make great gifts! ~Nadia
[…] addition to her normal pile o’ books, I decided to make her a mermaid tale blanket based on this pattern. It took ages longer than I planned, and was actually about two months late for her birthday. […]
Hi Nadia, I have gotten down to going in the round, I made it 8 rows longer to get it to go from the hip to the ankle but since I started doing the rounds it doesn’t seem like it will be long enough. I’ve decided to do row 75 for five to ten rows since I do want it to come up higher and then start on the remainder rows. Do you think there will be any problem with that?
I am wondering if there is part of the pattern missing. On Round 68 after the first sc in middle of 5dc grouping,it says to sk 2dc,which is fine,but then it says to sc in next dc.what happens to the sc that is after the 5dc grouping.I have watched the video a number of times and can not get this right.It just doesn’t seem correct.
I am doing round 68 and even after watching the video,I still think there is a mistake in your pattern.After the first sc in middle of 5 dc grouping, shouldn’t it be 5dc in SC.
I have finished the blanket part but when I did the tail fin I am finding the fin looks too small for the blanket. It was suppose to be a size small but I added more rounds so it is really a size med. now.Can the fin be enlarged by doubling the stitches and if so would I just follow the same method as before. Thankyou
Has anyone made this for someone a little bit larger? I’m not trying to be insensitive, I just don’t want to give someone a blanket they can’t wear. Trying to decide if I should make the initial chain longer? if you fold the chain in half that is the width on the opening correct?
I made mine longer, sort of like a sleeping bag for a 9 year old. I also checked, and I fit into it nicely – both width and length were perfect for a grown up. My latest Facebook post shows pictures. Hugs! Valeri Feinbloom
I’m more concerned about the width of the opening? I just want to make sure it will be wide enough so I’m not sure if I should start with a longer chain? Is the chain length folded in half the width the opening will be? Thank you so much for your help!
Yes, you are correct, the shells are created on your foundation chain, and that will be the width around in a circle. So, if you are worried about how snug the opening will be, try wrapping the foundation chain around yourself in the belly/hip area, and see how it fits! Hugs. -V
She says in the notes section it is a multiple of
6+2. But the original 153 is not …151 is not a multiple of six. Do you know how to correctly make the chain a little longer or am I missing something?
Wow, you know, I never noticed that! Talk to Nadia on Facebook, if you need to. I just trusted the pattern. Mine worked out, as far as I remember, with no problems.It was a long time ago that I made this. But if you can’t reach her, and you really want to get started, my thought would be to follow the 6 plus 2. Then, as you get toward the end of the first real row (after your foundation chain row), if you notice a problem, fudge it a little, like maybe skip one or skip three or whatever to make the end stitch actually come out right where it is supposed to…. Hugs!
In the notes section she says that the chain is a multiple of 6+2. But the original 153 is not…151 is not a multiple of 6. Do you know how to correctly make it a little longer or am I missing something? Thanks again!
[…] glitters! Dat maakt zo’n dekentje natuurlijk sowieso geweldig in hun ogen. Ik gebruikte het Engelstalige patroon van Yarnutopia waarbij ook een filmpje zit voor de volledige uitleg. Zelfs als je geen Engels verstaat, kan je op […]