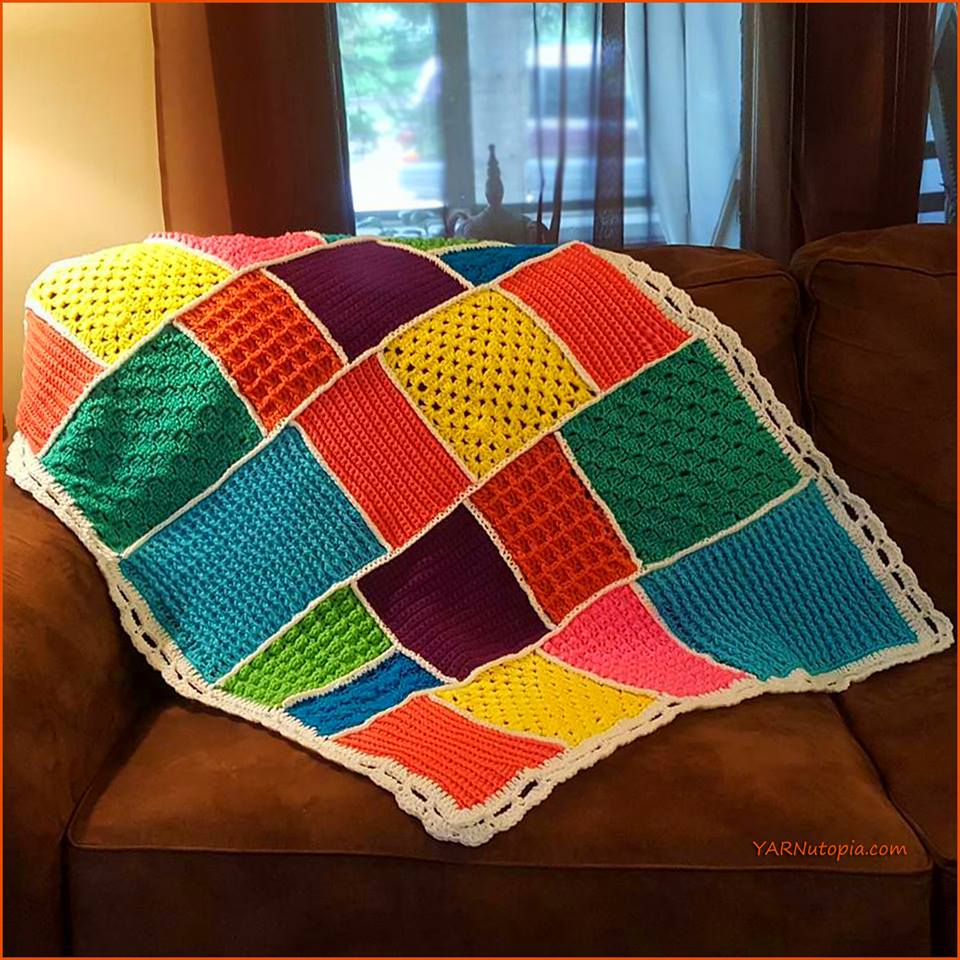
Designing and deciding on a new pattern is always a challenge. The process begins by choosing something that may be a need such as a gift or something that inspires me in the moment, whether it be for a baby, the home, a wearable, or any other pursuit, I look for motivation from many sources. The inspiration for this Dream-Time Mosaic Baby Quilt came from a quilt pattern that showed up in the News Feed on Facebook of a friend who loves quilting!

The patchwork squares of fabric pieced together, each having a different design, was the basis for this latest project. I asked myself how could I create this same variety in crochet? Creating nine different patches in different stitching and colors provided me with the distinction between these pieces. I put them together like a mosaic giving this crochet quilt the look I was going for.

 I used several bold colors, a mixture of different stitches, and a variety of different quadrilateral shapes, to comprise my Dream-Time Mosaic Baby Quilt. This bold and fun piece is sure to add a burst of color to any nursery! Change your colors to match your decor! So much sensory texture in this quilt will provide any wee one loads of comfort!

My biggest obstacle was making sure the measurement of each piece fit within the confines of a reasonable sized baby blanket that did not leave one horizontal row longer or shorter. This arrangement worked out beautifully! Once I laid out all the pieces, assured this mosaic puzzle of crochet pieces would fit, I began the process to attach everything. Finally, I framed my piece in a cute delicate scallop edge.


Follow along with this video tutorial to learn how to make this blanket:
My dad will continue to be the videographer, editor, and photographer for our videos when I move away.
Support YARNutopia today so we can continue to bring you clear, quality crochet tutorials even after I move into my new home!
There will be an added expense of more travel and hopefully this won’t deter our ability to provide consistent videos on a weekly basis.


**You can always contact me via Facebook if you have any problems with the pattern. I am happy to help if you have any questions along the way.
***These patterns are copyright YARNutopia © so PLEASE DO NOT COPY, SHARE, ADJUST OR RESELL MY PATTERN. I wrote and tested this pattern myself, from beginning to end. It took a lot of time and work, and I would really like to have it remain “my pattern.”
***You can sell anything you make from my patterns, please just link back to my website YARNutopia.com. Thank you!
Please check out the new beginning graphic designed and developed by my brother Nabeel. He and his wife own and operate NFD Graphics. Please hop over to their Facebook page and show them some love! For all your graphic and video/logo design needs be sure to contact them today!
www.nfdgraphics.com
Teacher: Nadia Fuad
Video and Editing: Fuad Azmat (My Daddy)
Share your work on Facebook!
Add me on Snapchat: YARNutopia
Follow me on Instagram
Visit My Ravelry Store and add this to your Favorites!
Follow me on Twitter: @YARNutopia
Enjoy this video and subscribe to my channel on YouTube for more tutorials on how to crochet!
Leave a comment, and share with your friends!
Pattern:
Designed by Nadia Fuad
You *may* sell items made from my pattern, but please reference my website YARNutopia.com.
Please do not copy, sell, and/or post this pattern and claim it as your own.
Materials:
***Click here to get the whole KIT!! ***
–Red Heart Super Saver Yarn in White
–Red Heart Super Saver Yarn in Flamingo
–Red Heart Super Saver Yarn in Bright Yellow
–Red Heart Super Saver Yarn in Hot Pink
–Red Heart Super Saver Yarn in Turqua
–Red Heart Super Saver Yarn in Jade
–Red Heart Super Saver Yarn in Carrot
–Red Heart Super Saver Yarn in Dark Orchid
–Red Heart Super Saver Yarn in Spring Green
–Red Heart Super Saver Yarn in Pool
-I-5.50mm Crochet Hook (Find the hook I used in my video tutorial here!)
–Yarn Needle
–Scissors
You can buy any of the items in this kit. Buy all or buy one item. Check it out to see the supplies you can get online to make this baby blanket!
NOTES:
-This project uses approximately 1100 yards of yarn.
-Use a smaller hook to make these smaller
-Use a bigger hook to make these bigger
-Watch the FULL video tutorial for visual instructions for each piece
-Weave in all the ends as you go so you don’t have to weave them all in at the very end.
-This blanket is 44 inches by 34 inches and each piece measurements are below.
Special stitches:
Ch(s): chain(s)
YO: Yarn Over
St(s): Stitch(es)
prev.: Previous
Sl st: slip stitch
SC: Single Crochet
BLO: Back Loop Only
HDC: Half Double Crochet
DC: Double Crochet
FPDC: Front Post Double Crochet
BPDC: Back Post Double Crochet
TR: Treble Crochet
Popcorn: 4 DC in same st, remove hook from loop, insert hook in 1st st of grouping, place loop back on hook and pull through. (see video tutorial for specific instructions)
Shell: 5 DC in same stitch
Pattern:
If you have any confusion or difficulty with reading this pattern, please watch the video tutorial to have visual instructions.

Blanket:
Piece Number 1: (Should measure 8″ x 5″)
**Make 4** (Work in BLO)
With Flamingo:
Ch 29
Row 1: SC in 2nd ch from hook and across. Ch 1, turn. (28)
Rows 2-20: SC across, ch 1, turn.
Fasten off when piece measures 8×5
Weave in ends.
Piece Number 2: Should measure 8″ x 8″
Make 3
With Bright Yellow:
**Make 3**
Ch 4
Rnd 1: 2 DC in 4th Ch from hook, ch 2, [3 DC in same ch, ch 2] 3 times, sl st to 1st ch up 3.
Rnd 2: Ch 3, Turn work, [2DC, ch 2, 3 DC] in same corner sp, *[3DC, ch 2, 3 DC] in next ch sp, repeat from * around, sl st to beg. ch up 3.
Row 3: Sl st to corner, Ch up 3, 2 DC in same sp, 3 DC in next gap, [3DC, ch 2, 3 DC] in next corner, 3 DC in next gap, 3 DC in next corner, turn.
Row 4: Ch 3, 3 DC in each gap to corner, [3 DC, ch 2, 3 DC] in corner, 3 DC in each gap to end of row, DC in very last st, turn.
Row 5: Ch up 3, 2DC in same gap, 3 DC in each gap to corner, [3 DC, ch 2, 3 DC] in corner, 3 DC in each gap, end with 3 DC in last gap.
Row 6: Repeat Row 4
Row 7: Repeat Row 5
Row 8: Repeat Row 4
Row 9: Repeat Row 5
Row 10: Repeat Row 4
Round 11: Ch up 3, 2 DC in same gap, *3 DC in each gap to corner, [3DC, Ch 2, 3 DC] in corner, repeat from * around the entire square.
Fasten off when piece is 8 inches.
Weave in ends.
Piece Number 3: Should measure 5″ x 8″
With Pretty N Pink:
**Make 2**
Ch 30
Row 1: SC in 2nd ch from hook, TR in next, SC in next, Repeat from * across, ending with SC in last st, ch 1, turn. (29)
Row 2: SC across, ch 1, turn. (29)
Row 3: SC in 1st st, *TR in next st, SC in next st, repeat from * across, ch 1, turn.
Rows 4-18: Repeat Rows 2 and 3, ending with a repeat of Row 2.
Fasten off when Piece measures 5 inches by 8 inches.
Piece Number 4: Should measure 12″ x 8″
With Turqua:
**Make 3**
Ch 42
Row 1: DC in 4th ch from hook and across, turn. (40)
Row 2: Ch up 3 (counts as DC), *FPDC on next st, BPDC on next st, repeat from * across, ending with a DC in last st.
Rows 3-17: Repeat Row 2
Continue to SC around entire piece.
See video tutorial for visual instructions.
Piece should measure 12 inches wide and 8 inches tall.

Piece Number 5: Should Measure 10″ x 8″
With Jade:
**Make 2**
Ch 6
Row 1: DC in 4th ch from hook and in next 2 ch; turn (1 block made)
Row 2: Ch 6, DC in 4th ch from hook and in next 2 ch, (Sl st, ch 3, 3 DC) all in ch 3 sp of prev. row, turn. (2 blocks made)
Row 3: Ch 6, DC in 4th ch from hook and in next 2 ch, [(Sl st, ch 3, 3 DC) all in next ch 3 space of prev. row] twice; turn. (3 blocks made)
Row 4: Ch 6, DC in 4th ch from hook and in next 2 ch, [(Sl st, ch 3, 3 DC) all in next ch 3 space of prev. row] 3 times; turn. (4 blocks made)
Continue with the established pattern, increasing 1 block on each row until there are 8 blocks along the side.
Row 10: Sl st across first 3 dc, *Ch 3, 3 dc in next ch 3 space of prev. row, repeat from * to last ch 3 sp; slip st in last sp, Ch 3, 3 DC in same sp, turn. (9 Blocks)
Row 12: Ch 6, DC in 4th Ch from hook and next 2 ch, *(Sl st, ch 3, 3 DC) in next ch 3 sp of prev. row, Repeat from * to last ch 3 sp, turn, do NOT make a block in last sp. (10 Blocks)
Row 13: Sl st across first 3 dc, * (Sl st, ch 3, 3 dc) all in next ch 3 sp of previous row; repeat from * to last ch 3 sp; slip st in last space; turn, do NOT make another block. (9 blocks)
Rows 14-21: Repeat Row 13 until you have 1 block left. (SEE VIDEO TUTORIAL FOR VISUAL INSTRUCTIONS)
Fasten off, weave in all ends.
Piece should measure 10″ x 8″
Piece Number 6: Should Measure 5″ x8″
With Carrot:
**Make 2**
Ch 20
Row 1: DC in 4th Ch from hook and across, turn. (18)
Row 2: Ch 3, *FPDC on next st, DC in next 2 sts, Repeat from * across, ending with DC in last st, turn.
Row 3: Ch 3, *DC in next st, FPDC in next 2 sts, Repeat from * across, ending with DC in last st, turn.
Row 4-14: Repeat Rows 2 and 3, ending with a repeat of Row 2.
Fasten off, weave in ends.
Piece should measure 5 inches by 8 inches.
Piece Number 7: Should Measure 7″ x 8″
With Dark Orchid:
**Make 2**
Ch 25
Row 1: SC in 2nd ch from hook and across, ch 1, turn. (24)
Rows 2-28: SC across, ch 1, turn.
Fasten off.
Weave in ends.
Piece should measure 7 inches by 8 inches.
Piece Number 8: Should Measure 4″ x 8″
With Spring Green:
**Make 2**
Ch 14
Row 1: SC in 2nd ch from hook and across, turn. (13)
Row 2: Ch up 3, (Counts as DC), *Popcorn in next st, DC in next, repeat from * across, ending with DC in last st, turn.
Row 3: Ch 1, SC across, turn. (13)
Rows 4-17: Repeat Rows 2 and 3 ending with a repeat of Row 3, until piece measures 4 inches by 8 inches.
Fasten off, weave in all ends.

Piece Number 9: Should Measure 4″ x 8″
With Pool:
**Make 2**
Ch 26
Row 1: SC in 2nd ch from hook, *Sk 2 chs, 5 DC in next ch, Sk 2 chs, SC in next ch, Repeat from * across, ending with SC in last ch. Turn.
Row 2: Ch 3 (Counts as DC), 2 DC in same st, *SC in middle DC of next shell, Shell in next SC, repeat from * across, ending with 3 DC in last st, turn.
Row 3: Ch 1, SC in same st, * Shell in next SC, SC in middle DC of next Shell, repeat from * across, ending with SC in last st, turn.
Row 4-7: Repeat Rows 2 and 3
Row 8: Ch 1, SC in same st, Ch 2, * SC in middle DC of next shell, Ch 2, SC in next SC, Ch 2, Repeat from * across.
Fasten off, Weave in ends. Piece should measure 4 inches by 8 inches.

Assembly Step:
Using the Single Crochet Method, Attach all the pieces using the photo as a guide for placement. See video tutorial for visual instructions on attaching the pieces. You can also view this video to see how to attach pieces with different methods.
Once you have all the pieces attached, go onto making the border.
Border:
With White:
Round 1: In any corner, CH up 3, (Counts as a DC) 4 DC in same st, DC around putting 5 DC in corners. Sl st to beg. ch up 3.
Round 2: Ch 1, SC in same st, *Ch 4, Sk 4 sts, SC in next st, repeat from * around, sl st to 1st SC.
Round 3: In ch 4 sp, Ch 1, [HDC, 3 DC, HDC] in each ch 4 sp around. Sl st to first HDC. Fasten off, weave in all ends.

Enjoy!!
This post contains affiliate links, which I may be compensated for when you make a purchase. That means if you click on any link and buy from the linked websites, I will receive a small percentage of the value of your order. The amount you pay is not changed. Thank you for all your support in clicking the links in my blog!! You all are so amazing!! ~Nadia
The yarn provided for this pattern is courtesy of Red Heart Yarns
Shop the Red Heart Yarns Clearance Section!
Like this blanket?? Try making the Color Pop Baby Blanket Here!!