It’s been a hot minute since we’ve been actively blogging and sharing about crochet and more. Today’s blog entry is taking us back to the 2024 holiday gift giving season and how I incorporated crochet into three special gifts.
Corner to Corner Delight
I started in August in order to complete three corner-to-corner crochet blankets by Christmas. It was difficult to balance time to crochet with the hectic schedule of our daily life. I struggled to find time in each day to crochet, but I have been trying to prioritize making that happen as often as I can. I knew leading up to the holidays that this would be a big commitment, but I knew the blankets would be special if I could finish them on time. When you give a gift such as a crocheted blanket or any other handmade item, you’re not just giving the physical gift, but you’re giving the gift of your time and the care that it goes into each item you make. I knew in my heart, the effort was going to be well worth it in the end.
It had been such a long time since I’ve made larger projects. I decided to go with a repeat pattern for these three blankets. I chose colors that were special to the person I was gifting them to, and I got to work!
A meaningful gift
A crochet blanket is more than just a cozy covering—it’s a symbol of warmth, love, and creativity. Each stitch holds meaning, whether it’s made by a family member, a friend, or even oneself. Unlike store-bought blankets, crochet blankets are handmade with care, often taking weeks or even months to complete. This dedication makes them unique and deeply personal and that was the reason this idea felt special and right for my niece and nephews.
From the Heart
One of the most special aspects of a crochet blanket is its sentimental value. I, myself, have held on to many things because they hold that sentimental value. Many are passed down through generations, carrying with them stories and memories. Over time, that blanket becomes a treasured keepsake, reminding the recipient of the person who made it.
Beyond sentimentality, crochet blankets are also works of art. They showcase an incredible variety of patterns, colors, and textures. In the case of these gifts, I chose Red Heart Ombre yarn and Stripes yarn that created its own beautiful striping in the colorway.
Wrapping up
Crochet blankets provide comfort, both physically and emotionally. Wrapping up in a handmade blanket feels different from using a machine-made one—it carries a sense of warmth and connection. Many people find comfort in making crochet blankets, too, as the repetitive motion of crocheting can be meditative and soothing.
Like I mentioned earlier, a crochet blanket represents time, effort, and love. Whether it’s given as a gift for a newborn, a wedding, for the holidays, or simply as an act of kindness, it holds deep meaning. It’s not just a blanket—it’s a hug in yarn form, a piece of someone’s heart, and a reminder of the beauty of handmade artistry.
When a good friend is having a baby girl, one must use their skills and create a luxurious way to welcome her into the world. Join me as I share the free crochet pattern and video tutorial for The Cuddle Up Baby Blanket below. I used Vel-Luxe yarn by Lion Brand Yarn and I LOVE it. I want one for myself, it is so soft!
My dad will continue to be the videographer, editor, and photographer for our videos when I move away.
Support YARNutopia today so we can continue to bring you clear, quality crochet tutorials even after I move into my new home!
There will be an added expense of more travel and hopefully this won’t deter our ability to provide consistent videos on a weekly basis.
Teacher: Nadia Fuad
Video and Editing: Fuad Azmat (My Daddy)
Share your work on Facebook!
Add me on Snapchat: YARNutopia
Follow me on Instagram
Visit My Ravelry Store and add this to your Favorites!
Follow me on Twitter: @YARNutopia
Enjoy this video and subscribe to my channel on YouTube for more tutorials on how to crochet!
Leave a comment, and share with your friends!
Designed by Nadia Fuad You *may* sell items made from my pattern, but please reference my website YARNutopia.com.
Please do not copy, sell, and/or post this pattern and claim it as your own.
Materials you will need:
Get the supplies individually by clicking the links below
—Lion Brand Vel-Luxe Yarn in Dusty Pink (240 yards of this color) and Eggplant (492 yards of this color) (you can use 730-760 yards of any color of yarn)
–SizeI-5.50mm Crochet Hook –Yarn Needle
–Scissors
NOTES:
-Use a smaller hook to make these smaller
-Use a bigger hook to make these bigger
-You can use any size 4 medium, worsted weight yarn for this project. 2 contrasting colors look great together, but you can use 1 color or many colors if you’d like!
-You can check out yarnsub.com to see yarn substitutions that are equal to the yarn I used in this project.
-This blanket is a baby blanket size but you can use any multiple of 3 on your foundation chain to make this wider. Continue repeating the same row repeat to make it longer. My blanket measures 36 inches wide by 40 inches long.
Special stitches:
Ch(s): chain(s)
YO: Yarn Over
St(s): Stitch(es)
Sl st: slip stitch
SK: Skip
SC: Single Crochet
DC: Double Crochet
Pattern:
If you have any confusion or difficulty with reading this pattern, please watch the video tutorial that is linked above in this blog post to have visual instructions.
Blanket:
With Main Color (Eggplant)
Ch 78 or any multiple of 3
Row 1: 2 DC in 3rd Ch from hook, *Sk 2 Chs, [SC, 2 DC] in next ch, repeat from * across, ending with SC in last st, Ch 1, Turn.
Row 2: 2 DC in 1st st, *Sk next 2 DC sts, [SC, 2 DC] in next SC st, Repeat from * across ending with SC in last st, Ch 1, Turn.
Rows 3-7: Repeat Row 2
Rows 8-9: Change color to Dusty Pink, repeat Row 2
Rows 10-11: Change color to Eggplant, repeat Row 2
Rows 12-21: Change color to Dusty Pink, Repeat Row 2
Rows 22-23: Change Color to Eggplant, Repeat Row 2
Rows 24-25: Change color to Dusty Pink, Repeat Row 2
Rows 26-47: Change color to Eggplant, Repeat Row 2
Row 48-65: Repeat Rows 8-25
Rows 66-72: With Eggplant, repeat Row 2
Fasten off, weave in all ends.
Border:
Round 1: Attach to any corner of your work, Work between the groupings all around the blanket, Ch 1, SC in same corner, *Ch 3, SC in next gap between grouping of sts, repeat from * around. End with Ch 3, sl st to first SC. Do not turn.
Round 2: Sl st in next Ch 3 sp, Ch 1, SC in same sp, *7 DC in next Ch sp, SC in next ch sp, repeat from * around, sl st to first SC.
Fasten off
Weave in all ends. Enjoy!
This post contains affiliate links, which I may be compensated for when you make a purchase. That means if you click on any link and buy from the linked websites, I will receive a small percentage of the value of your order. The amount you pay is not changed. Thank you for all your support in clicking the links in my blog!! You all are so amazing!! ~Nadia
The yarn provided for this pattern is courtesy of Lion Brand Yarn
Hot off my hook is my Boho Throw! I started filming this week and kept messing up. My camera wasn’t focused or centered, my microphone was off. So many issues. So I scrapped the video and wrote this VERY EASY pattern. I used Lion Brand Yarn Ferris Wheel for the throw and Lion Brand Skein Tones for the border.
My dad will continue to be the videographer, editor, and photographer for our videos when I move away.
Support YARNutopia today so we can continue to bring you clear, quality crochet tutorials even after I move into my new home!
There will be an added expense of more travel and hopefully this won’t deter our ability to provide consistent videos on a weekly basis.
Teacher: Nadia Fuad
Video and Editing: Fuad Azmat (My Daddy)
Share your work on Facebook!
Add me on Snapchat: YARNutopia
Follow me on Instagram
Visit My Ravelry Store and add this to your Favorites!
Follow me on Twitter: @YARNutopia
Enjoy this video and subscribe to my channel on YouTube for more tutorials on how to crochet!
Leave a comment, and share with your friends!
Pattern:
Designed by Nadia Fuad You *may* sell items made from my pattern, but please reference my website YARNutopia.com.
Please do not copy, sell, and/or post this pattern and claim it as your own.
NOTES:
-Use a smaller hook to make these smaller
-Use a bigger hook to make these bigger
-The measurements of this blanket are 40 inches x 50 inches
-You can check out yarnsub.com to see yarn substitutions that are equal to the yarn I used in this project.
Special stitches:
Ch(s): chain(s)
YO: Yarn Over
St(s): Stitch(es)
Sl st: slip stitch
SK: Skip
SC: Single Crochet
DC: Double Crochet
SHELL: 5 DC in same space
Pattern:
Ch 130 or any multiple of 3
Row 1: 2 DC in 3rd ch from hook, *Sk 2 Chs, 3 DC in next Ch, repeat from * across, ending with 3 DC in last Ch, Turn
Row 2: Ch 3 (counts as stitch), *3 DC in next GAP between the 3 DC groupings, repeat from * across, ending with 1 DC in last st, Turn.
Row 3: Ch 3, 2 DC in first gap where the Ch 3 is, *3 DC in next gap between 3 DC groupings, repeat from * across, ending with DC in last st, turn.
Repeat Rows 2 and 3 until your blanket is long enough.
I did 109 rows.
End on an ODD numbered row so it matches Row 1.
Fasten off, weave in ends.
Border:
Attach yarn to first gap after corner on the top right corner of your blanket
Round 1: Ch 3, 2 DC in same gap, 3 DC in next gap and in each gap around, in each corner stitch put [1 DC, Ch 2, 1 DC], continue putting 3DC between groupings. Sl st to beginning ch 3 st. DO NOT TURN.
Round 2: Ch 1, SC in the gap right AFTER the corner (where you sl st’d your work from round 1), Shell in next gap, SC in next gap, repeat from * around, in each corner put 7 DCs. SC before AND after the corners. Sl st to first SC st. Fasten off, Weave in all ends.
Enjoy!
This post contains affiliate links, which I may be compensated for when you make a purchase. That means if you click on any link and buy from the linked websites, I will receive a small percentage of the value of your order. The amount you pay is not changed. Thank you for all your support in clicking the links in my blog!! You all are so amazing!! ~Nadia
The yarn provided for this pattern is courtesy of Lion Brand Yarns
A very close friend of mine recently had her second baby and I wanted to make something special for her. The simplicity of the granny square is given a little remix in this pattern because I use cluster stitches in the corners to make this unique design. I hope you enjoy this pattern. Follow along
My dad will continue to be the videographer, editor, and photographer for our videos when I move away.
Support YARNutopia today so we can continue to bring you clear, quality crochet tutorials even after I move into my new home!
There will be an added expense of more travel and hopefully this won’t deter our ability to provide consistent videos on a weekly basis.
Teacher: Nadia Fuad
Video and Editing: Fuad Azmat (My Daddy)
Share your work on Facebook!
Add me on Snapchat: YARNutopia
Follow me on Instagram
Visit My Ravelry Store and add this to your Favorites!
Follow me on Twitter: @YARNutopia
Enjoy this video and subscribe to my channel on YouTube for more tutorials on how to crochet!
Leave a comment, and share with your friends!
Pattern:
Designed by Nadia Fuad You *may* sell items made from my pattern, but please reference my website YARNutopia.com.
Please do not copy, sell, and/or post this pattern and claim it as your own.
NOTES:
-Use a smaller hook to make these smaller
-Use a bigger hook to make these bigger
-The measurements of this blanket are 36 inches wide but you can make this as big as you want by continuing the repeat.
Special stitches:
Ch(s): chain(s)
YO: Yarn Over
St(s): Stitch(es)
Sl st: slip stitch
SK: Skip
SC: Single Crochet
DC: Double Crochet
4DCCluster: [YO, Insert Hook into st, YO, Pull through, YO, Pull through 2 loops] 4 times, YO pull through all 5 loops on your hook. Cluster made.
Pattern:
If you have any confusion or difficulty with reading this pattern, please watch the video tutorial that is linked above in this blog post to have visual instructions.
Blanket:
Use 2 strands of fingering weight yarn together at the same time, or use one strand of a thicker yarn to create this.
Ch 3
Round 1: 3 DC in 3rd ch from hook, Ch 4, *3 more DC in same Ch as first 3 DC, Ch 4, repeat from * 2 more times, Sl st to first st, Ch 2, Turn.
Rnd 2: In the corner Ch 4 sp: DC in corner, 4 DC Cluster in same corner, Ch 4, 4 DC Cluster in same corner, DC in same corner, *DC in each st until you get to the next corner, [DC, 4DCCluster, Ch 4, 4DCCluster, DC] in corner, Repeat from * around ending with DC in last st, Sl st to first st, Ch 2, Turn.
Rnd 3: *DC in each st until you get to the corner, [DC, 4DCCluster, Ch 4, 4DCCluster, DC] in corner, Repeat from * around ending with DC in last st, Sl st to first st, Ch 2, Turn.
Rnds 4-30: Repeat Round 3.
You can continue to make your blanket larger if you’d like! Just continue the repeat pattern!
Fasten off, Weave in all ends.
This post contains affiliate links, which I may be compensated for when you make a purchase. That means if you click on any link and buy from the linked websites, I will receive a small percentage of the value of your order. The amount you pay is not changed. Thank you for all your support in clicking the links in my blog!! You all are so amazing!! ~Nadia
The yarn provided for this pattern is courtesy of Circulo Yarns
A very close friend of mine recently had her second baby and I wanted to make something special for her. The simplicity of the granny square is given a little remix in this pattern because I use cluster stitches in the corners to make this unique design. I hope you enjoy this pattern. Follow along
Follow along with this video tutorial to learn how to make this blanket:
My dad will continue to be the videographer, editor, and photographer for our videos even if we don’t live together.
Support YARNutopia today so we can continue to bring you clear, quality crochet tutorials even after I move into my new home!
There will be an added expense of more travel and hopefully this won’t deter our ability to provide consistent videos on a weekly basis.
Teacher: Nadia Fuad
Video and Editing: Fuad Azmat (My Daddy)
Share your work on Facebook!
Add me on Snapchat: YARNutopia
Follow me on Instagram
Visit My Ravelry Store and add this to your Favorites!
Follow me on Twitter: @YARNutopia
Enjoy this video and subscribe to my channel on YouTube for more tutorials on how to crochet!
Leave a comment, and share with your friends!
Designed by Nadia Fuad You *may* sell items made from my pattern, but please reference my website YARNutopia.com.
Please do not copy, sell, and/or post this pattern and claim it as your own.
NOTES:
-Use a smaller hook to make these smaller
-Use a bigger hook to make these bigger
-The measurements of this blanket are 36 inches wide but you can make this as big as you want by continuing the repeat.
-You can check out yarnsub.com to see yarn substitutions that are equal to the Lion Brand yarn I used in this project.
Special stitches:
Ch(s): chain(s)
YO: Yarn Over
St(s): Stitch(es)
Sl st: slip stitch
SK: Skip
SC: Single Crochet
DC: Double Crochet
4DCCluster: [YO, Insert Hook into st, YO, Pull through, YO, Pull through 2 loops] 4 times, YO pull through all 5 loops on your hook. Cluster made.
This post contains affiliate links, which I may be compensated for when you make a purchase. That means if you click on any link and buy from the linked websites, I will receive a small percentage of the value of your order. The amount you pay is not changed. Thank you for all your support in clicking the links in my blog!! You all are so amazing!! ~Nadia
The yarn provided for this pattern is courtesy of Circulo Yarns
There many different reasons to be inspired. The Aspen Baby Blanket was inspired by friends celebrating the birth of their baby. The Aspen tree was the foundation for this piece. Created using series of front and back post stitches, it creates a repeat texture leaf pattern. The striking three dimensional profile of this project took my breath away. When you look at this overall piece you would never guess that it is easier than you think! I used Basic Stitch Anti-Pilling yarn by Lion Brand Yarn and it was THE most luxurious fiber giving this blanket the absolute softest feel. Follow my video tutorial or written pattern and get your started today!
My dad will continue to be the videographer, editor, and photographer for our videos even if we don’t live together.
Support YARNutopia today so we can continue to bring you clear, quality crochet tutorials even after I move into my new home!
There will be an added expense of more travel and hopefully this won’t deter our ability to provide consistent videos on a weekly basis.
Teacher: Nadia Fuad
Video and Editing: Fuad Azmat (My Daddy)
Share your work on Facebook!
Add me on Snapchat: YARNutopia
Follow me on Instagram
Visit My Ravelry Store and add this to your Favorites!
Follow me on Twitter: @YARNutopia
Enjoy this video and subscribe to my channel on YouTube for more tutorials on how to crochet!
Leave a comment, and share with your friends!
Pattern:
Designed by Nadia Fuad You *may* sell items made from my pattern, but please reference my website YARNutopia.com.
Please do not copy, sell, and/or post this pattern and claim it as your own.
-Use a smaller hook to make this smaller
-Use a bigger hook to make this bigger
-This is written in US terms
-This took about 2 weeks to make but I did not work on it continuously.
-You can check out yarnsub.com to see yarn substitutions that are equal to the Lion Brand yarn I used in this project.
-This pattern with video tutorial shows the measurement as 35 inches by 35 inches, but you can make it longer by continuing the repeat pattern.
-If you do not want to do a stacked Single Crochet in the first stitch of every row, you can do a half double crochet and that will suffice.
Special stitches:
Ch(s): chain(s)
YO: Yarn Over
St(s): Stitch(es)
Sl st: slip stitch
SK: Skip
SC: Single Crochet
HDC: Half Double Crochet
DC: Double Crochet
V-St aka V-Stitch: (DC, ch 1, DC) in same space
BPDC2TOG: Double Crochet 2 sts together
FPDC2TOG: Double Crochet 3 sts together
BPV-St: Back Post V-Stitch
FPV-St: Front Post V-Stitch
Pattern:
Row 1: FDC 203 or Ch 205, DC in 3rd Ch and each ch across (you need 203 sts for row 1)
Row 2: Stacked SC in 1st st, FPDC in next 2 sts, *BPDC on next 10 sts, FPDC on next 7 sts, repeat from * across until 3 sts remain, FPDC on next 2 sts, HDC in last st, Ch 1, Turn.
Row 3: Stacked SC in 1st st, BPDC on next 2 sts, *FPDC2TOG, FPDC on next 6 sts, FPDC2TOG, BPDC on next 7 sts, repeat from * across, ending with BPDC on next 2 sts, HDC in last st, ch 1, turn.
Row 4: Stacked SC in 1st st, FPDC on next 2 sts *BPDC2TOG, BPDC on next 4 sts, BPDC2TOG, FPDC on next 7 sts, repeat from * across until 3 sts remain, ending with FPDC on next 2 sts, HDC in last st, Ch 1, turn.
Row 5: Stacked SC in 1st st, BPDC on next 2 sts, *FPDC2TOG, FPDC on next 2 sts, FPDC2TOG, BPDC on next 7 sts, repeat from * across until 3 sts remain, ending with BPDC on next 2 sts, HDC in last st, Ch 1, turn.
Row 6: Stacked SC in 1st st, FPDC on next 2 sts, *[BPDC2TOG] twice, FPDC on next 3 sts, BPDC on next st, FPDC on next 3 sts, repeat from * across until 3 sts remain, ending with FPDC on next 2 sts, HDC in last st, Ch 1, turn.
Row 7: Stacked SC in 1st st, BPDC on next 2 sts, *FPDC2TOG, BPDC on next 3 sts, FPDC on next st, BPDC on next 3 sts, repeat from * across until 3 sts remain, ending with BPDC on next 2 sts, HDC in last st, Ch 1, Turn.
Row 8: Stacked SC in 1st st, FPDC on next 6 sts, *BPV-St on next st, FPDC on next 7 sts, repeat from * across until 7 sts remain, ending with FPDC on 6 sts, HDC in last st, Ch 1, Turn.
Row 9: Stacked SC in 1st st, BPDC on next 6 sts, *FPDC on next st, V-St in Ch sp, FDC on next st, BPDC on next 7 sts, repeat from * across until 7 sts remain, ending with BPDC on 6 sts, HDC in last st, Ch 1, turn.
Row 10: Stacked SC in 1st st, FPDC on next 6 sts, *BPDC on next 2 sts, V-st in Ch sp, BPDC on next 2 sts, FPDC on next 7 sts, repeat from * across until 7 sts remain, ending with FPDC on 6 sts, HDC in last st, Ch 1, Turn.
Row 11: Stacked SC in 1st st, BPDC on next 6 sts, *FPDC on next 3 sts, V-st in Ch sp, FPDC on next 3 sts, BPDC on next 7 sts, Repeat from * across until 7 sts remain, ending with BPDC on 6 sts, HDC in last st, Ch 1, Turn.
Row 12: Stacked SC in 1st st, FPDC on next 6 sts, *BPDC on next 4 sts, 2 DC in ch sp, BPDC on next 4 sts, FPDC on next 7 sts, repeat from * across until 7 sts remain, ending with FPDC on next 6 sts, HDC in last st, Ch 1, Turn.
Row 13: Stacked SC in 1st st, BPDC on next 6 sts, *FPDC2TOG, FPDC on next 6 sts, FPDC2TOG, BPDC on next 7 sts, repeat from * across until 7 sts remain, ending with BPDC on next 6 sts, HDC in last st, Ch 1, Turn.
Row 14: Stacked SC in 1st st, FPDC on next 6 sts, *BPDC2TOG, BPDC on next 4 sts, BPDC2TOG, FPDC on next 7 sts, repeat from * across until 7 sts remain, ending with FPDC on next 6 sts, HDC in last st, Ch 1, Turn.
Row 15: Stacked SC in 1st st, BPDC on next 6 sts, *FPDC2TOG, FPDC on next 2 sts, FPDC2TOG, BPDC on next 7 sts, repeat from * across until 7 sts remain, ending with BPDC on next 6 sts, HDC in last st, Ch 1, Turn.
Row 16: Stacked SC in 1st st, FPDC on next 2 sts, *BPDC on next st, FPDC on next 3 sts, [BPDC2TOG] twice, FPDC on next 3 sts, repeat from * across until 7 sts remain, ending with FPDC on next 3 sts, BPDC on next st, FPDC on next 2 sts, HDC in last st, Ch 1, Turn.
Row 17: Stacked SC in 1st st, BPDC on next 2 sts, *FPDC on next st, BPDC on next 3 sts, FPDC2TOG, BPDC on next 3 sts, repeat from * across until 7 sts remain, ending with BPDC on next 3 sts, FPDC on next st, BPDC on next 2 sts, HDC in last st, Ch 1, Turn.
Row 18: Stacked SC in 1st st, FPDC on next 2 sts, *BPV-St on next st, FPDC on next 7 sts, repeat from * across, ending with FPDC on 2 sts before last, HDC in last st, Ch 1, Turn.
Row 19: Stacked SC in 1st st, BPDC on next 2 sts, *FPDC on next st, V-St in Ch sp, FPDC on next st, BPDC on next 7 sts, repeat from * across until 3 sts remain, ending with BPDC on next 2 sts, HDC in last st, Ch 1, turn.
Row 20: Stacked SC in 1st st, FPDC on next 2 sts, *BPDC on next 2 sts, V-St in Ch sp, BPDC on next 2 sts, FPDC on next 7 sts, repeat from * across until 3 sts remain, ending with FPDC on next 2 sts, HDC in last st, Ch 1, Turn.
Row 21: Stacked SC in 1st st, BPDC on next 2 sts, *FPDC on next 3 sts, V-St in Ch sp, FPDC on next 3 sts, BPDC on next 7 sts, repeat from * across until 3 sts remain, ending with BPDC on next 2 sts, HDC in last st, Ch 1, Turn.
Row 22: Stacked SC in 1st st, FPDC on next 2 sts, *BPDC on next 4 sts, 2 DC in Ch sp, BPDC on next 4 sts, FPDC on next 7 sts, Repeat from * across until 3 sts remain, ending with FPDC on next 2 sts, HDC in last st, Ch 1, Turn.
Rows 23-42: Repeat Rows 3-22
Rows 43-62: Repeat Rows 3 to 22
Rows 63-82: Repeat Rows 3-22
Rows 83-92: Repeat Rows 3-12
End on a repeat of Row 12 before fastening off. (SEE video tutorial for visual instructions on ending/fastening off)
Border:
Attach Yarn in a corner
Round 1: Ch 2, DC in each st around and in each row on the side, put 3 DC in corners (See video tutorial for visual instructions), sl st to first st, Ch 2, DO NOT TURN.
Round 2: DC in each st around putting 3 DC in the middle DC of each corner, sl st to first st, Fasten off.
Fasten off, weave in all ends.
Enjoy!!
This post contains affiliate links, which I may be compensated for when you make a purchase. That means if you click on any link and buy from the linked websites, I will receive a small percentage of the value of your order. The amount you pay is not changed. Thank you for all your support in clicking the links in my blog!! You all are so amazing!! ~Nadia
The yarn provided for this pattern is courtesy of Lion Brand Yarn
Very often, I’ll make a list or itinerary of what projects I want to work on or which ones pique my interest. I have no idea how many works in progress I have going on because sometimes the inspiration is so strong to work on something and then a few days later…meh…and there it sits. Yet, there is always something that gets my creative energy charged, and that, my YARNutopians, is the key to picking my next project.
What’s on my hook today?
I started off with the best intentions to work on a few summer projects and started them in hopes to film before the snow flies. Well, all the best intentions are just that, intentions. I have them started, they are not going anywhere, I will finish them, SOMEDAY. Just not today. Instead, my direction has changed because of the most exciting news that a close friend had a baby! So, I guess in the world of crochet, we go with the creative flow. Because I went from hooking up a swimsuit cover-up to a baby blanket all in the matter of minutes! Talk about a 180!
Babies and Blankets, oh my!
This particular blanket is using a new design which is so fun to make! I am using Lion Brand Yarn Basic Stitch in the color Frost to begin this fabulous piece. Look at that texture and softness!
There is just something so alluring about this minty color in a baby layette! I can’t wait to see the impact this is going to make when I am done!
What about you?
What inspires you? Is it personal wants or needs? Is it something you are creating to gift to someone? Is it based on when the inspiration hits, or is it the news of someone having a baby, getting married, a holiday or some event that gets your hook moving???
My Simply Bright Granny Square combines some of the most basic stitches to create this simple but elegant square. A combination of squares would make the perfect afghan, throw, or baby blanket.
Mix it up by doing the opposite colors in each square you make for a more checked look. Any number of color combinations would work up to make a lovely blanket for anyone.
Follow along with this video tutorial to learn how to make this granny square:
My dad will continue to be the videographer, editor, and photographer for our videos when I move away.
Support YARNutopia today so we can continue to bring you clear, quality crochet tutorials even after I move into my new home!
There will be an added expense of more travel and hopefully this won’t deter our ability to provide consistent videos on a weekly basis.
Teacher: Nadia Fuad
Video and Editing: Fuad Azmat (My Daddy)
Share your work on Facebook!
Add me on Snapchat: YARNutopia
Follow me on Instagram
Visit My Ravelry Store and add this to your Favorites!
Follow me on Twitter: @YARNutopia
Enjoy this video and subscribe to my channel on YouTube for more tutorials on how to crochet!
Leave a comment, and share with your friends!
Designed by Nadia Fuad You *may* sell items made from my pattern, but please reference my website YARNutopia.com.
Please do not copy, sell, and/or post this pattern and claim it as your own.
NOTES:
-Use a smaller hook to make these smaller
-Use a bigger hook to make these bigger
-This is a 6 inch square, if you crochet loosely, it will come out to be 6.5inches. You can use a smaller hook if you prefer to have it exactly 6 inches.
Special stitches:
Ch(s): chain(s)
YO: Yarn Over
St(s): Stitch(es)
Sl st: slip stitch
SK: Skip
SC: Single Crochet
DC: Double Crochet
My Simply Bright Granny Square combines some of the most basic stitches to create this simple but elegant square. A combination of squares would make the perfect afghan, throw, or baby blanket.
Mix it up by doing the opposite colors in each square you make for a more checked look. Any number of color combinations would work up to make a lovely blanket for anyone.
My dad will continue to be the videographer, editor, and photographer for our videos when I move away.
Support YARNutopia today so we can continue to bring you clear, quality crochet tutorials even after I move into my new home!
There will be an added expense of more travel and hopefully this won’t deter our ability to provide consistent videos on a weekly basis.
Teacher: Nadia Fuad
Video and Editing: Fuad Azmat (My Daddy)
Share your work on Facebook!
Add me on Snapchat: YARNutopia
Follow me on Instagram
Visit My Ravelry Store and add this to your Favorites!
Follow me on Twitter: @YARNutopia
Enjoy this video and subscribe to my channel on YouTube for more tutorials on how to crochet!
Leave a comment, and share with your friends!
Pattern:
Designed by Nadia Fuad You *may* sell items made from my pattern, but please reference my website YARNutopia.com.
Please do not copy, sell, and/or post this pattern and claim it as your own.
NOTES:
-Use a smaller hook to make these smaller
-Use a bigger hook to make these bigger
-This is a 6 inch square, if you crochet loosely, it will come out to be 6.5inches. You can use a smaller hook if you prefer to have it exactly 6 inches.
Special stitches:
Ch(s): chain(s)
YO: Yarn Over
St(s): Stitch(es)
Sl st: slip stitch
SK: Skip
SC: Single Crochet
DC: Double Crochet
Pattern:
If you have any confusion or difficulty with reading this pattern, please watch the video tutorial that is linked above in this blog post to have visual instructions.
Square:
With Main Color Rnd 1: h 2, [SC, Ch 2] 4 times into the 2nd Ch from hook, Sl st to first SC, Ch 1, Turn.
Rnd 2: *In Ch 2 sp, put [SC, Ch 2, SC] Ch 1, repeat from * around, finishing with Ch 1, Sl st to first SC, Ch 1, Turn.
Rnd 3: *SC in Ch 1 sp, Ch 1, [SC, Ch 2, SC] in corner, Ch 1, Repeat from * around, ending with Ch 1, Sl st to first SC, Ch 1, Turn.
Rnd 4: *[SC, Ch 1] in each Ch sp until you get to the corner, put [SC, Ch 2, SC] in corner, Ch 1, repeat from * around, ending with Ch 1, Sl St to first SC, Ch 1, Turn.
Rnds 5-9: repeat Round 4 (Turn your work after every round)
Fasten off, weave in end.
Attach Accent color to any corner ch 2 sp Rnd 10: Ch 3 (counts as DC), [DC, Ch 2, 2 DC] in same corner sp, *[Ch 1, DC in next Ch 1 sp] until next corner, put [2DC, Ch 2, 2DC] in next corner sp, repeat from * around ending with Ch 1, Sl st to beg. ch 3 st. Fasten off accent color, weave in ends. Turn your work.
Rnd 11: Attach Main color in any ch 2 corner sp, Ch 1, *[SC, Ch 2, SC] in corner sp, Ch 1, SC in first DC on the side, [Ch 1, Sk next DC, SC in Ch 1 sp] 9 times, Ch 1, Sk next DC, SC in last DC on side, Ch 1, repeat from * around ending with a sl st to first SC, Ch 1, Turn.
Rnd 12: *[SC, Ch 1] in each Ch sp until you get to the corner, put [SC, Ch 2, SC] in each corner, Ch 1, repeat from * around, ending with Ch 1, Sl St to first SC.
Fasten off, weave in all ends.
Enjoy!!
This post contains affiliate links, which I may be compensated for when you make a purchase. That means if you click on any link and buy from the linked websites, I will receive a small percentage of the value of your order. The amount you pay is not changed. Thank you for all your support in clicking the links in my blog!! You all are so amazing!! ~Nadia
The yarn provided for this pattern is courtesy of WeCrochet
A very close friend of mine recently had a baby. Prior to the birth, I started this Ombre Striped Baby Blanket, and I finished it in time to leave it on her doorstep as they welcomed this little princess to the world. 😍 The simplicity of the stitch coupled with the surface crochet, make this blanket a fast favorite heirloom for any nursery. Thanks to these lovely photos, we can see it being enjoyed and well loved. Check out the FREE crochet pattern below and the video tutorial linked in this post!
My dad will continue to be the videographer, editor, and photographer for our videos when I move away.
Support YARNutopia today so we can continue to bring you clear, quality crochet tutorials even after I move into my new home!
There will be an added expense of more travel and hopefully this won’t deter our ability to provide consistent videos on a weekly basis.
Teacher: Nadia Fuad
Video and Editing: Fuad Azmat (My Daddy)
Share your work on Facebook!
Add me on Snapchat: YARNutopia
Follow me on Instagram
Visit My Ravelry Store and add this to your Favorites!
Follow me on Twitter: @YARNutopia
Enjoy this video and subscribe to my channel on YouTube for more tutorials on how to crochet!
Leave a comment, and share with your friends!
Pattern:
Designed by Nadia Fuad You *may* sell items made from my pattern, but please reference my website YARNutopia.com.
Please do not copy, sell, and/or post this pattern and claim it as your own.
Materials you will need:
Get the supplies individually by clicking the links below
–Red Heart Super Saver Yarn (I used Aran -With Love, Pale Plum, Orchid, Dark Orchid, Amethyst) You could use Medium Purple too, and I also used Super Saver Ombre in Purple.
-You could also use Red Heart with Love yarn in Eggshell (I showed this in the video tutorial)
–Size K-6.50mm Crochet Hook
–Yarn Needle
–Scissors
NOTES:
-Use a smaller hook to make these smaller
-Use a bigger hook to make these bigger
-The measurements of this blanket are 36 inches wide and 40 inches long but you can make this as big as you want with the stitch counts being more or less and the length being as long as you want it to be. The Moss Stitch allows for tons of versatility.
Special stitches:
Ch(s): chain(s)
YO: Yarn Over
St(s): Stitch(es)
Sl st: slip stitch
SK: Skip
SC: Single Crochet
Pattern:
If you have any confusion or difficulty with reading this pattern, please watch the video tutorial that is linked above in this blog post to have visual instructions.
Blanket:
With Aran (main color)
Ch 124 or any even number that you want the width of your blanket to be.
Row 1: SC in 4th Ch from hook, *Ch 1, Sk 1 ch, SC in next Ch, repeat from * across, ending with SC in last ch. Turn.
Row 2: Ch 2, SC in first Ch 1 sp, *Ch 1, SC in next Ch 1 sp, repeat from * across, ending with SC in last ch sp (see video tutorial for visual instructions), Turn.
Rows 3-109: Repeat Row 2
If you want it bigger or smaller, just do an odd number of rows before fastening off.
Fasten off, weave in ends.
Surface crochet stripes on every other row, weave in ends as you go. (See video tutorial after 10 minutes into the video and it will show you how to do the surface crochet)
Border:
Attach yarn to a corner of the blanket. (If you are following along with the video tutorial, the border starts at minute 19) Round 1 of border: Ch 1, SC in same corner, SC in each st and each ch across to next corner, 3 SC in corner, Work down the side working SC in each row down the side and then put 3 SC in the next corner. Do this concept all around, then Sl st to first St.
Round 2 of border: Start in a MIDDLE SC of a corner, Ch 4 (counts as DC, Ch 1 sp), DC in same st, Ch 2, DC in same corner st, Ch 1, DC in same st, *Sk 3 sts, [2DC, Ch 1, 2 DC] in next st, repeat from * until middle SC of corner, in middle Sc of corner, put [DC, Ch 1, DC, Ch 2, DC, Ch 1, DC], then repeat from * again, all around. Sl st to 3rd ch of beg. ch 4. Fasten off. Weave in all ends.
Enjoy!!
This post contains affiliate links, which I may be compensated for when you make a purchase. That means if you click on any link and buy from the linked websites, I will receive a small percentage of the value of your order. The amount you pay is not changed. Thank you for all your support in clicking the links in my blog!! You all are so amazing!! ~Nadia
The yarn provided for this pattern is courtesy of Yarnspirations
A very close friend of mine recently had a baby. Prior to the birth, I started this Ombre Striped Baby Blanket, and I finished it in time to leave it on her doorstep as they welcomed this little princess to the world. 😍 The simplicity of the stitch coupled with the surface crochet, make this blanket a fast favorite heirloom for any nursery. Thanks to these lovely photos, we can see it being enjoyed and well loved. Check out the video tutorial on how to make this blanket below, and see the link to the FREE written instructions in this post.
Follow along with this video tutorial to learn how to make this beautiful blanket:
My dad will continue to be the videographer, editor, and photographer for our videos when I move away.
Support YARNutopia today so we can continue to bring you clear, quality crochet tutorials even after I move into my new home!
There will be an added expense of more travel and hopefully this won’t deter our ability to provide consistent videos on a weekly basis.
Teacher: Nadia Fuad
Video and Editing: Fuad Azmat (My Daddy)
Share your work on Facebook!
Add me on Snapchat: YARNutopia
Follow me on Instagram
Visit My Ravelry Store and add this to your Favorites!
Follow me on Twitter: @YARNutopia
Enjoy this video and subscribe to my channel on YouTube for more tutorials on how to crochet!
Leave a comment, and share with your friends!
Pattern:
Designed by Nadia Fuad You *may* sell items made from my pattern, but please reference my website YARNutopia.com.
Please do not copy, sell, and/or post this pattern and claim it as your own.
Materials you will need:
Get the supplies individually by clicking the links below
–Red Heart Super Saver Yarn (I used Aran -With Love, Pale Plum, Orchid, Dark Orchid, Amethyst) You could use Medium Purple too, and I also used Super Saver Ombre in Purple.
-You could also use Red Heart with Love yarn in Eggshell (I showed this in the video tutorial)
–Size K-6.50mm Crochet Hook
–Yarn Needle
–Scissors
NOTES:
-Use a smaller hook to make these smaller
-Use a bigger hook to make these bigger
-The measurements of this blanket are 36 inches wide and 40 inches long but you can make this as big as you want with the stitch counts being more or less and the length being as long as you want it to be. The Moss Stitch allows for tons of versatility.
Uptown means of, in, or characteristic of the residential area of a city or town. Which brings us to the perfect setting for The Uptown Blanket Scarf I made!
This piece can be worn anywhere, but definitely has an urban fashion feel that wraps you up and protects you from the hustle and bustle as you brave the cold weather! If you’re on your way to work, classes, outdoor travel, you name it, this scarf will keep you warm. Don’t be left out in the cold! Grab your hooks and 2 skeins of Comfort Yarn by Red Heart Yarns and make one for yourself or someone you love today!
My dad will continue to be the videographer, editor, and photographer for our videos when I move away.
Support YARNutopia today so we can continue to bring you clear, quality crochet tutorials even after I move into my new home!
There will be an added expense of more travel and hopefully this won’t deter our ability to provide consistent videos on a weekly basis.
Teacher: Nadia Fuad
Video and Editing: Fuad Azmat (My Daddy)
Share your work on Facebook!
Add me on Snapchat: YARNutopia
Follow me on Instagram
Visit My Ravelry Store and add this to your Favorites!
Follow me on Twitter: @YARNutopia
Enjoy this video and subscribe to my channel on YouTube for more tutorials on how to crochet!
Leave a comment, and share with your friends!
Pattern:
Designed by Nadia Fuad You *may* sell items made from my pattern, but please reference my website YARNutopia.com.
Please do not copy, sell, and/or post this pattern and claim it as your own.
NOTES:
-Use a smaller hook to make these smaller
-Use a bigger hook to make these bigger
-You can do as many rows of this pattern as you want to make it as long as you want.
-You can do a Single Crochet or a Reverse Single Crochet around the edge to clean it up and make it have a nice finished look
I am often asked if one of my patterns can be resized. I know that it can become frustrating to see a pattern you love and yet, not be able to make it in the size you need. I do try to make most patterns in a variety of sizes to accommodate all, but sometimes, the pattern I design is size specific. I don’t have a variation or the stitch counts to make it in other sizes. Today’s blog is JUST A GUIDELINE to show you how changing your hook size can make a pattern slightly smaller or bigger JUST by changing this one detail.
Experimenting!
I decided to do a quick trial experiment because, not only do I love to crochet, I love to get answers to longstanding questions. The question posed to me quite often is: Can I make this pattern bigger or smaller?
If I don’t have the pattern adapted to various sizes, I have offered the suggestion to try different hook sizes.
Here I give you a better visual on how much changing the hook size does increase or decrease the size of your piece.
In this experiment, I took six different hooks:
1. D-3.25mm crochet hook
2. F-3.75mm crochet hook
3. G-4.25mm crochet hook
4. H-5.00mm crochet hook
5. J-6.00mm crochet hook
6. K-6.50mm crochet hook
I then crocheted THE EXACT SAME granny square using each different hook. (See this pattern here for the granny square pattern)
I used Red Heart With Love yarn in color Jadeite (worsted weight) Size 4 Medium (equal to DK or Aran yarn).
Once I completed each square, I placed all together using a US quarter coin as a point of reference to show proportion.
Each square increased somewhat in size but also, notice the stitching is not as tight as you increase the size.
The difference in size from the first square using a D-3.25mm hook to the last square using the K-6.50mm hook is a difference of 3 inches (~8cm)
Visuals Help!
If you are like me, it is so much easier to have a visual to be able to put into perspective how much change happens just by changing your hook. It helps so much to see it right in front of your eyes rather than trying to picture it in your mind how much difference this will make.
This trick may not work for ALL patterns but for some, this adjustment will be very handy in making something just a bit smaller or larger.
Keep in mind, this doesn’t allow for HUGE variations in size but just enough for some to get the desired result if you want to go a bit up or down on a specific pattern.
Also, remember, the larger you go, the looser and open the stitches will appear.
Share with us your experience if YOU have tried resizing by changing your hook gauge. Let us know how that helped you make a pattern smaller or larger. We’d love to hear from you!
Below are photos of each square by itself using the quarter as a point of reference.
This afghan block is part of the Wedding Blanket CAL that Marly Bird is hosting on her website!! See more details about it here!
My contribution to this crochet-along is the “Where Love Grows Afghan Block.” It has a floral design to it and it is very fitting to a wedding theme of love and growing together in your relationship.
On the Red Heart team we have a wonderful leader of the Joy Creators, named Ally. Ally got married in May and we wanted to do something very special for her. I got the Joy Creators together and we each made a square to put together to make a wedding blanket for Ally and her husband.
Below is a photo of the whole blanket put together! All the crochet designers that were part of this crochet along had our afghan blocks sewn together to make this patchwork quilt into a beautiful wedding gift!
Follow along with this video tutorial to learn how to make this afghan block:
**You can always contact me via Facebook if you have any problems with the pattern. I am happy to help if you have any questions along the way.
***You can sell anything you make from my patterns, please just link back to my website YARNutopia.com. Thank you!
My dad will continue to be the videographer, editor, and photographer for our videos when I move away.
Support YARNutopia today so we can continue to bring you clear, quality crochet tutorials even after I move into my new home!
There will be an added expense of more travel and hopefully this won’t deter our ability to provide consistent videos on a weekly basis.
Teacher: Nadia Fuad
Video and Editing: Fuad Azmat (My Daddy)
Share your work on Facebook!
Add me on Snapchat: YARNutopia
Follow me on Instagram
Visit My Ravelry Store and add this to your Favorites!
Follow me on Twitter: @YARNutopia
Enjoy this video and subscribe to my channel on YouTube for more tutorials on how to crochet!
Leave a comment, and share with your friends!
Pattern:
Designed by Nadia Fuad
You may sell items made from my pattern, but please reference my website YARNutopia.com.
Please do not copy, sell, and/or post this pattern and claim it as your own.
NOTES:
-You can make many of these into a blanket of any size. Use the Afghan Size Guide in this Blog Post
-The measurement for my square came out to be 12 inches
-You can use any colors you want. I used a Worsted Weight, Size 4 Medium Yarn but you can use any Double Knitting Yarn or any Aran Yarn as well.
-You do not have to change color so often, but sewing in those pesky ends is a nightmare. Be sure to sew them in as you go.
Special stitches:
Ch(s): chain(s)
YO: Yarn Over
St(s): Stitch(es)
Sl st: slip stitch
SK/Sk’d: Skip/Skipped
BLO: Back Loop Only
FLO: Front Loop Only
SC: Single Crochet
HDC: Half-Double Crochet
DC: Double Crochet
TR: Treble Crochet
Cluster: [YO, insert hook, YO, pull through, YO pull through 2 loops on your hook] 3 times, YO pull through all 4 loops on your hook
Beg. Cluster: [YO, insert hook, YO, pull through, YO pull through 2 loops on your hook] 2 times, YO pull through all 3 loops on your hook
LHDC: Long Half Double Crochet
LDC: Long Double Crochet
Pattern:
With Suede,
Start with a Magic Ring or Ch 4 and Sl st to first Ch to form a ring Rnd 1: Ch 3 (Counts as DC here and throughout), 7 DC into ring, Sl st to first Ch 3 st. (8 sts)
Rnd 2: Ch 2, Beginning Cluster in same st, *Ch 2, Cluster in next st, repeat from * around, ending with Ch 2, Sl st to first cluster. Fasten off, change color to VIP. (8 cluster sts)
Rnd 3: With VIP, Attach yarn to any Ch 2 sp, Ch 1, * 3 SC in Ch 2 sp, SC in cluster st, repeat from * around, sl st to first SC, Fasten off and change color to Linen. (32 sc sts)
Rnd 4: With Linen, Work in BLO, Attach yarn to any SC, Ch 4 (Counts as DC + Ch 1 sp), *DC in next st, Ch 1, repeat from * around, ending with ch 1, sl st to 3rd ch of beginning ch 4. Fasten off. (32 sts)
Rnd 5: With Linen, Attach yarn to any FRONT LOOP of any st on Round 3 that was not worked into, (See video tutorial for visual instructions), RSC in each st around. Fasten off.
Rnd 6: In any ch sp of Round 4, Attach Suede. Ch 5 (Counts as DC + Ch 2 sp), *DC in next Ch sp, Ch 2, repeat from * around, ending with Ch 2, sl st to 3rd ch of beg. ch 5. Fasten off, change color to Linen. (32 sts)
Rnd 7: With Linen, Attach to any Ch 2 sp, Ch 1, 2 HDC in each Ch 2 sp around, Sl st to first HDC. Fasten off, change color to VIP. (64 sts)
Rnd 8: With VIP, Attach to any st, Ch 1, SC in first 4 sts, * Ch 5, Sk 4 sts, SC in next 4 sts, repeat from * around, ending with Ch 5, Sl st to 1st SC, do NOT fasten off. (8 Ch 5 sps created)
Rnd 9: Continue using VIP color, Sl st into next st and IN BETWEEN the 2 sts of the 4 SC grouping (See video tutorial for specific location), Ch 1, SC in same spot, *[3DC, 3TR, 3DC] in next ch 5 sp, SC between 2 middle SC of next 4 SC grouping, repeat from * around, sl st to first SC. Fasten off, change color to Linen. (If your work is curling at this point do not worry, it will flatten out in the next few rounds) (8 petals made)
Rnd 10: With Linen, Attach to any FIRST DC of a petal, work in BLO for this round, Ch 1, HDC in first 4 sts, *[HDC, Ch 2, HDC] in next st, HDC in next 4 sts, Long HDC in same spot as SC from previous round, HDC in next 4 sts, repeat from * around, ending with LHDC in last st, sl st to first HDC. Fasten off, change color to Suede. (96 sts)
Rnd 11: With Suede, Attach to any LHDC, Work in THIRD LOOP of each st in this round, (See video tutorial for visual instructions), Ch 4 (Counts as TR), [2TR, Ch 2, 3 TR] in same st, * Sk 3 sts, SC in next 2 sts, SC in ch 2 sp, SC in next 2 sts, HDC in next 2 sts, DC in next st, TR in LHDC st, DC in next st, HDC in next 2 sts, SC in next 2 sts, SC in ch 2 sp, SC in next 2 sts, Sk 3 sts, [3TR, Ch 2, 3 TR] in LHDC st, repeat from * around, sl st to first Ch 4 st. do NOT fasten off. (92 sts around)
Rnd 12: Continue using Suede color, work in BOTH LOOPS of sts, In same st as join, Ch 3, DC in next 2 sts, * [2DC, Ch 2, 2 DC] in corner ch 2 sp, DC in next 3 sts, HDC in next 17 sts, DC in next 3 sts, repeat from * around, sl st to beginning ch 3 st. Fasten off, change color to VIP. (108 sts)
Rnd 13: With VIP, Attach yarn to any corner ch 2 sp, Ch 3, [DC, ch 2, 2 DC] in same corner sp, * Ch 1, Sk 1 st, DC in next st, repeat from * until next corner, [2 DC, ch 2, 2 DC] in corner, repeat from * around, sl st to beg. ch 3 st. Fasten off, change color to Suede.
Rnd 14: With Suede, Attach yarn to any corner ch 2 sp, Ch 1, *[SC, Ch 2, SC] in corner, SC in next 2 sts, [LDC in Sk st from previous round, SC in next st on Rnd 13] 14 times, LDC in Sk’d st from Previous Round, SC in next 2 sts, repeat from * around, sl st to first SC. Fasten off, change color to Linen.
Rnd 15: With Linen, attach yarn in any corner ch 2 sp, Ch 1, 3 SC in same corner sp, SC in each st around putting 3 SC in corner ch 2 sps, sl st to first SC, do NOT fasten off. (144 sts)
Rnd 16: Continue using Linen, Ch 1, SC in each st round putting 3 SC in middle SC of corners, sl st to first SC, do NOT fasten off. (152 sts)
Rnd 17: Repeat Round 16 (You can opt out of doing this round if your square is 12 inches after Round 16)
Fasten off, weave in all ends.
Block your square if needed.
Enjoy!!
This post contains affiliate links, which I may be compensated for when you make a purchase. That means if you click on any link and buy from the linked websites, I will receive a small percentage of the value of your order. The amount you pay is not changed. Thank you for all your support in clicking the links in my blog!! You all are so amazing!! ~Nadia
The yarn provided for this pattern is courtesy of Red Heart Yarns
Last week, we took a tour of my new nursery that my mom and I set up. (see it here!!) It was so much fun to see the colors come to life, the artwork get hung, and the crib readied for baby’s arrival.
Today, I am introducing the Happy Hues Sampler Baby Blanket. This luxurious blanket was made in the hues of my nursery. Yours can be made in any combo of color or why not use this project for a great stash buster!? You will love this project so much!
I have provided you instructions on how to expand the size of this blanket to fit any size bed. Whether it be all colorful or just a combination of tones that fit the decor of a specific room, this blanket will make the perfect addition to any home or nursery. Join me and get started today!
Watch this video tutorial to learn how to make this blanket:
**You can always contact me via Facebook if you have any problems with the pattern. I am happy to help if you have any questions along the way.
***You can sell anything you make from my patterns, please just link back to my website YARNutopia.com. Thank you!
My dad will continue to be the videographer, editor, and photographer for our videos when I move away.
Support YARNutopia today so we can continue to bring you clear, quality crochet tutorials even after I move into my new home!
There will be an added expense of more travel and hopefully this won’t deter our ability to provide consistent videos on a weekly basis.
Teacher: Nadia Fuad
Video and Editing: Fuad Azmat (My Daddy)
Share your work on Facebook!
Add me on Snapchat: YARNutopia
Follow me on Instagram
Visit My Ravelry Store and add this to your Favorites!
Follow me on Twitter: @YARNutopia
Enjoy this video and subscribe to my channel on YouTube for more tutorials on how to crochet!
Leave a comment, and share with your friends!
Pattern:
Designed by Nadia Fuad
You may sell items made from my pattern, but please reference my website YARNutopia.com.
Please do not copy, sell, and/or post this pattern and claim it as your own.
NOTES:
-You can make this blanket any size. Use the Afghan Size Guide in this Blog Post
-The measurements for my blanket came out to be approximately 45 inches X 50 Inches
-You can make this blanket any size by making your beginning chain an even number.
-You can use any colors you want. I used a Worsted Weight, Size 4 Medium Yarn but you can use any Double Knitting Yarn or any Aran Yarn as well.
-This blanket took me approximately 3 days to complete.
-You do not have to change color so often, but sewing in those pesky ends is a nightmare. Be sure to sew them in as you go, but if you are not changing color as often as I do in the video tutorial, you can carry your yarn up the rows on the sides because when we make our border, we cover the sides anyway.
-Ch 3 at the beginning of a row counts as a stitch unless otherwise specified (See video tutorial for explanation, especially when working treble crochet rows)
-If you do not have the same exact stitch count as me (if you are off by a few stitches, do not worry about it, it is OK, the border will hide any imperfections on the edges)
Special stitches:
Ch(s): chain(s)
YO: Yarn Over
St(s): Stitch(es)
Sl st: slip stitch
SK: Skip
SC: Single Crochet
HDC: Half-Double Crochet
DC: Double Crochet
TR: Treble Crochet
PS: Puff Stitch: *YO, insert hook into st, YO, pull through, repeat from * until you have 7 loops on your hook. YO pull through all 7 loops.
Pattern:
Change color every row.
With Charcoal Ch 132 Row 1: Dc in 3rd ch from hook and across, turn. (130)
Row 2: With White, Ch 3 (counts as stitch here and throughout), Sk 1 st, *DC in next st, DC in sk’d st working behind the DC you just made, Sk next st, repeat from * across ending with DC in last st, turn. (130)
Row 3: With Denim, Ch 1, SC in same st, *Ch 2, Sk 2 sts, SC in next st, repeat from * across ending with SC in last st, turn. (44 SC, 43 Ch 2 sps)
Row 4: With Dusty Gray, In first SC st, Ch up 3 (counts as st), put 3 DC in each Ch 2 sp across, (if you have 129 sts, add one more stitch at the end) turn. (130 sts)
Row 5: With Country Blue, Attach yarn to first st, Ch 1, SC in same st, *TR in next st, SC in next st, repeat from * across ending with SC in last st, turn. (130 sts)
Row 6: With White, Ch 1, HDC in each st across, Turn. (130 sts)
Row 7: With Charcoal, Ch 1, HDC in 1st st, Puff st in next st, *Ch 1, Puff st in next st, repeat from * across ending with HDC in last st, turn. (66 sts)
Row 8: With Country Blue, Attach yarn to first st, Ch 3 (counts as st), DC in same st, DC in each Ch 1 sp across ending with 2 DC in last st, turn. (130 sts)
Row 9: Repeat Row 2 with color Dusty Grey
Row 10: repeat Row 3 with color Denim
Row 11: repeat Row 4 with Charcoal
Row 12: repeat Row 5 with White (Be sure this round you are looking at the BACK side of your work)
Row 13: repeat Row 6 with Denim
Row 14: repeat Row 7 with Dusty Grey
Row 15: repeat Row 8 with Country Blue
Repeat Rows 2-15 with the same color sequence
End on row 78
or make this blanket as long as you want!
BORDER:
Rnd 1: SC around entire blanket putting 3 sc in each corner. Sl st to first sc.
Rnd 2: Ch 3, 2 DC in same st, *sk 2 sts, 3 DC in next st, repeat from * around putting [3DC, ch 2, 3DC] in corners, sl st to first st when finished with this round.
Rnd 3: sl st in next 2 sts and into gap between groupings, Ch 3, [2DC, ch 2, 3 DC] in same gap, *SC in next gap between groupings, [3DC, ch 2, 3DC] in next gap between groupings, repeat from * around putting [3DC, ch 2, 3DC] in corners, sl st to first st when finished with this round.
That border is amazing and can be put on any blanket!!
Weave in all ends.
Enjoy!
This post contains affiliate links, which I may be compensated for when you make a purchase. That means if you click on any link and buy from the linked websites, I will receive a small percentage of the value of your order. The amount you pay is not changed. Thank you for all your support in clicking the links in my blog!! You all are so amazing!! ~Nadia
The yarn provided for this pattern is courtesy of Red Heart Yarns
“Butterflies can’t see their wings. They cannot see how truly beautiful they are, but everyone else can…”
Today’s project is this darling Butterfly Lovey. I love the three dimensional look of this piece. You can get as creative as you like with this project! I can imagine the variety of vivid hues one can use to make this sweet lovey for a child or adult.
This could be a great scrap yarn project. Make one or more and attach them for a unique 3D blanket or throw by piecing these squares together. Match a nursery or bedroom for your child.
Butterflies bring out something in all of us. Maybe since they are often beyond our grasp. We love to watch them flutter through the air on the lightness of their wings upon which we can send out wishes out into the world.
Watch this video tutorial to learn how to make this lovey:
My dad will continue to be the videographer, editor, and photographer for our videos when I move away.
Support YARNutopia today so we can continue to bring you clear, quality crochet tutorials even after I move into my new home!
There will be an added expense of more travel and hopefully this won’t deter our ability to provide consistent videos on a weekly basis.
**You can always contact me via Facebook if you have any problems with the pattern. I am happy to help if you have any questions along the way.
Designed by Nadia Fuad
You may sell items made from my pattern, but please reference my website YARNutopia.com.
Please do not copy, sell, and/or post this pattern and claim it as your own.
-This lovey is approximately 18 inches wide/long
-Use a bigger hook to make this bigger, and a smaller hook to make it smaller
-This lovey has a lot of pieces to sew together, a good yarn needle is essential to use during this project
Special stitches:
Ch(s): chain(s)
YO: Yarn Over
St(s): Stitch(es)
Sl st: slip stitch
SC: Single Crochet
FLO: Front Loop Only
BLO: Back Loop Only
SC: Single Crochet
SC2TOG: Single Crochet Decrease
HDC: Half Double Crochet
DC: Double Crochet
Pattern:
Lovey Squares: Make 4
With Orange
Ch 4, Sl st to first ch to form a ring (or start with Magic Ring) Rnd 1: Ch 2 (does not count as a stitch), 12 DC in ring, sl st to first st. (12) Rnd 2: Ch 2, 2 DC in each st around, sl st to first st. (24)
Fasten off orange and change color. Rnd 3: Attach new color to any st, Ch up 2, [2DC, ch 2, 2 DC] in same st, *HDC in next 2 sts, SC in next st, HDC in next 2 sts, [2DC, ch 2, 2 DC] in next st, repeat from * around ending with HDC in last st, sl st to first st.
You will be working in Rows now: R0w 4: Sl st into next st and into ch 2 sp. TURN, 2 DC in CH 2 sp, DC in each st to next corner, [2DC, ch 2, 2DC] in corner, DC in each st to next corner, 2 DC in corner, leave rest of the sts unworked. Turn. Row 5: Ch 2 (does not count as st), DC in each st to corner, [2 DC, ch 2, 2 DC] in corner, DC in rest of sts on the row, turn. Rows 6-13: Repeat Row 5, do not fasten off.
Continue to SC down the side, put 3 SC in corner, and work SCs down the next side. (See video tutorial for visual instructions)
Fasten off with a long tail for sewing.
Assembly step:
Sew all 4 squares together (See video tutorial to see how to sew the squares together) Border:
With White: SC around entire lovey. Fasten off.
With Black: SC around entire lovey. Fasten off. Weave in all ends.
Wings: Make 8
Ch 4 Row 1: SC in 2nd Ch and next 2 chs, ch 1, turn. (3) Row 2: 2 SC in 1st st, SC in next 2 sts, Ch 1, turn. (4) Row 3: SC in 1st 3 sts, 2 SC in last st, ch 1, turn. (5) Row 4: 2 SC in 1st st, SC in the rest of the sts on the row, Ch 1, turn. (6)
Row 5: SC in each st to last st, 2 SC in last st, ch 1, turn. (7) Row 6: Repeat Row 4. (8) Row 7: Repeat Row 5. (9) Row 8: Repeat Row 4. (10) Row 9: Repeat Row 5. (11) Row 10: Repeat Row 4. (12) Rows 11-15: SC in each st across, ch 1, turn. (12) Row 16: SC2TOG, SC in 8 sts, SC2TOG, ch 1, turn. (10) Row 17: SC in 8 sts, SC2TOG, ch 1, turn. (9) Row 18: SC2TOG, SC in the next 7 sts, ch 1, turn. (8) Row 19: SC in 6 sts, SC2TOG, ch 1, turn. (7) Row 20: SC2TOG, SC in 5 sts, ch 1, turn. (6) Row 21: SC2TOG, SC in 2 sts, SC2TOG, ch 1, turn. (4) Row 22: [SC2TOG] twice. (2)
Fasten off.
Before attaching the wings together, make the mini circles and embroider the veins
Mini Circles: Make 8
With first color:
Ch 2 Rnd 1: 6 SC in 2nd ch from hook, Sl st to first st, fasten off. Rnd 2: Attach black to any stitch, 2 SC in each st around, sl st to first st. Fasten off with long tail for sewing.
Assembly step:
Sew mini circles in place and embroider the veins with black yarn. (See video tutorial for visual instructions on this part)
After the circles and veins are on the wings, Attach the wings together by Single Crocheting around the wings and stuff them. Fasten off with a long tail for sewing. (See video tutorial for this part too), I know it’s a lot of sewing.
Body:
With Black Yarn
Work in Continuous Rounds and in the BLO
Ch 2 Rnd 1: 4 SC in 2nd ch from hook. (4) Rnd 2: 2 SC in 1st st, SC in the rest of the sts on the round. (5) Rnds 3-9: Repeat Rnd 2 until you have 12 sts. Rnd 10: [2 SC in next st, SC in next st] 6 times. (18) Rnd 11: [2 SC in next st, SC in next 2 sts] 6 times. (24) Rnds 12-13: SC in each st around. (24) Rnd 14: [SC2TOG, SC in next 2 sts] 6 times. (18) Rnd 15: [SC2TOG, SC in next st] 6 times. (12)
Stuff your piece and continue with the next round. Rnd 16: [2 SC in next st, SC in next st] 6 times. (18) Rnd 17: [2 SC in next st, SC in next 2 sts] 6 times. (24) Rnds 18-19: SC in each st around. (24) Rnd 20: [SC2TOG, SC in next 2 sts] 6 times. (18) Rnd 21: [SC2TOG, SC in next st] 6 times. (12)
Stuff your piece and continue with the next round. Rnd 22: [2 SC in next st, SC in next st] 6 times. (18) Rnd 23: [2 SC in next st, SC in next 2 sts] 6 times. (24) Rnds 24-25: SC in each st around. (24) Rnd 26: [SC2TOG, SC in next 2 sts] 6 times. (18) Rnd 27: [SC2TOG, SC in next st] 6 times. (12)
Embroider eyes to body (Optional)
Stuff your piece and continue with the next round. Rnd 28: [SC2TOG] 6 times.
SC 1st and 4th sts together.
Fasten off weave in ends.
Antenna: Make 2
With Black Work in continuous rounds and in BLO
Ch 2
Rnd 1: 6 SC in 2nd ch from hook. (6)
Rnd 2: 2 SC in each st around. (12)
Rnd 3: SC in each st around. (12)
Rnd 4: [SC2TOG] 6 times. (6)
Rnd 5: [SC2TOG, SC in next st] twice. (4)
Rnds 6-7: SC in each st around.
Fasten off with long tail for sewing.
Assembly:
Sew wings to body, sew antenna to body, sew body to lovey in the center.
Weave in all ends.
Enjoy!
This post contains affiliate links, which I may be compensated for when you make a purchase. That means if you click on any link and buy from the linked websites, I will receive a small percentage of the value of your order. The amount you pay is not changed. Thank you for all your support in clicking the links in my blog!! You all are so amazing!! ~Nadia
The yarn provided for this pattern is courtesy of Red Heart Yarns
Stitch:
[Yarn Over, Insert Hook into stitch, Yarn Over, Pull through, Yarn over, pull through 2 loops] 5 times. Yarn Over, pull through all 6 loops on your hook.
Support YARNutopia today so we can continue to bring you clear, quality crochet tutorials
Video and Editing: Fuad Azmat (My Daddy)
Share your work on Facebook!
Add me on Snapchat: YARNutopia Follow me on Instagram Visit My Ravelry Store and add this to your Favorites!
Follow me on Twitter: @YARNutopia
Enjoy this video and subscribe to my channel on YouTube for more tutorials on how to crochet!
Leave a comment, and share with your friends!
This post contains affiliate links, which I may be compensated for when you make a purchase. That means if you click on any link and buy from the linked websites, I will receive a small percentage of the value of your order. The amount you pay is not changed. Thank you for all your support in clicking the links in my blog!! You all are so amazing!! ~Nadia
Stitch:
[Yarn Over, Insert Hook into stitch, Yarn Over, Pull through] 4 times. Yarn Over, pull through all 9 loops on your hook.
OR
[Yarn Over, Insert Hook into stitch, Yarn Over, Pull through] 3 times. Yarn Over, pull through all 7 loops on your hook.
Support YARNutopia today so we can continue to bring you clear, quality crochet tutorials
Video and Editing: Fuad Azmat (My Daddy)
Share your work on Facebook!
Add me on Snapchat: YARNutopia Follow me on Instagram Visit My Ravelry Store and add this to your Favorites!
Follow me on Twitter: @YARNutopia
Enjoy this video and subscribe to my channel on YouTube for more tutorials on how to crochet!
Leave a comment, and share with your friends!
This post contains affiliate links, which I may be compensated for when you make a purchase. That means if you click on any link and buy from the linked websites, I will receive a small percentage of the value of your order. The amount you pay is not changed. Thank you for all your support in clicking the links in my blog!! You all are so amazing!! ~Nadia
Are you looking for the perfect project for a baby shower gift? Do you have a new grandchild on the way or are you expecting a new baby? This is the perfect project for you! I designed the Love and Sunshine Baby Blanket as the perfect accessory to any nursery.
It’s an easy pattern using a repeat of Front and Back Post Double Crochet. I have added a touch of accent color in the pattern as well as complimenting it with a lovely picot border to give it some additional design features. This treasured piece will be a huge hit! The Bunches of Hugs yarn by Red Heart Yarns is the perfect fiber to make it feel luxurious and soft as a cloud. Perfect for cuddling your little one!
Watch this video tutorial to learn how to make this blanket:
My dad will continue to be the videographer, editor, and photographer for our videos when I move away.
Support YARNutopia today so we can continue to bring you clear, quality crochet tutorials even after I move into my new home!
There will be an added expense of more travel and hopefully this won’t deter our ability to provide consistent videos on a weekly basis.
Teacher: Nadia Fuad
Video and Editing: Fuad Azmat (My Daddy)
Share your work on Facebook!
Add me on Snapchat: YARNutopia
Follow me on Instagram
Visit My Ravelry Store and add this to your Favorites!
Follow me on Twitter: @YARNutopia
Enjoy this video and subscribe to my channel on YouTube for more tutorials on how to crochet!
Leave a comment, and share with your friends!
Pattern:
Designed by Nadia Fuad You *may* sell items made from my pattern, but please reference my website YARNutopia.com.
Please do not copy, sell, and/or post this pattern and claim it as your own.
NOTES:
-Use a smaller hook to make these smaller
-Use a bigger hook to make these bigger
-This blanket is 36 inches wide and long but you can continue the repeat to make it as big as you want.
Special stitches:
Ch(s): chain(s)
YO: Yarn Over
BLO: Back Loop Only
St(s): Stitch(es)
RS: Right Side
WS: Wrong Side (Back Side)
Sl st: slip stitch
SK: Skip
SC: Single Crochet
HDC: Half Double Crochet
DC: Double Crochet
FPDC: Front Post Double Crochet
BPDC: Back Post Double Crochet
Picot: Ch 3, sl st into 3rd ch from hook.
Pattern:
If you have any confusion or difficulty with reading this pattern, please watch the video tutorial to have visual instructions.
Blanket:
Ch 4, Sl st to first ch to form a ring. (RS) Rnd 1: Ch up 3 (Counts as DC), 2 DC into ring, [Ch 2, 3 DC into ring] 3 times, Ch 2, sl st to beg ch up 3 st, ch 1, do NOT turn.
(RS) Rnd 2: FPDC on first st, *DC in next, FPDC on next, [2 DC, ch 2, 2 DC] in corner, FPDC on next st, repeat from * around, ending with corner sts, Sl st to first FPDC, ch 1, turn.
(WS) Rnd 3: DC in same st you sl st’d into, [BPDC on next st, DC in next st] until corner, *[2 DC, ch 2, 2 DC] in corner, [DC in next st, BPDC on next st] until corner, repeat from * around, ending with BPDC on last st, Sl st to 1st DC. Ch 1. Do NOT turn.
(WS) Rnd 4: BPDC on same st you sl st’d to, [DC on next st, BPDC on next st] until corner, *[2 DC, ch 2, 2 DC] in corner, [BPDC on next st, DC on next st] until next corner, repeat from * around, ending with DC in last st, Sl st to 1st BPDC, ch 1, turn.
(RS) Rnd 5: DC in same st you sl st’d into, [FPDC on next st, DC in next st] until corner, *[2 DC, Ch 2, 2 DC] in corner, [DC in next st, FPDC on next st] until next corner, Repeat from * around, ending with FPDC on last st, sl st to 1st DC, ch 1, do NOT turn.
(RS) Rnd 6: FPDC on same st you sl st’d to, [DC in next st, FPDC on next st] until next corner, *[2 DC, ch 2, 2 DC] in corner, [FPDC on next st, DC on next st] until next corner, repeat from * around, ending with DC in last st, sl st to 1st FPDC, ch 1, Turn.
Rnds 7-28: [Repeat Rounds 3-6] 5 more times and rounds 3 and 4 another time after that.
If you want your blanket bigger, just repeat rounds 3-6 as many times as you want, but end on a repeat of Round 4 before going onto the next row.
Fasten off Yellow and change color to Grey, attaching yarn where you left off on the last round.
(RS) Rnd 29: With Grey, Repeat Round 5
Fasten off Grey and change color to Yellow, attaching yarn where you left off on the last round.
(RS) Rnd 30: With Yellow, Repeat Round 6
(WS) Rnd 31: Repeat Round 3
Fasten off Yellow, Turn your work to the front side and attach Grey where you left off.
Border (RS) Rnd 32: With Grey, ch up 1, SC in same st, *[Ch 3, Sk 1 st, SC in next st] until corner, SC in last st on side, Ch 3, Sk corner, SC in 1st st on next side, repeat from * around, ending with Ch 3, Sl st to 1st SC. Do NOT turn.
(RS) Rnd 33: Sl st into 1st ch 3 sp, Ch 1, SC in same sp, *[SC, HDC, DC, Picot, DC, HDC, SC] in next ch 3 sp, Sl st in next ch 3 sp, Repeat from * around, ending with [SC, HDC, DC, Picot, DC, HDC, SC] in last ch 3 sp, sl st to first SC.
Fasten off.
Weave in all ends.
Enjoy!!
This post contains affiliate links, which I may be compensated for when you make a purchase. That means if you click on any link and buy from the linked websites, I will receive a small percentage of the value of your order. The amount you pay is not changed. Thank you for all your support in clicking the links in my blog!! You all are so amazing!! ~Nadia
The yarn provided for this pattern is courtesy of Red Heart Yarns
How is everyone on this *boo-tiful* day? For some time, before I release these Punny Valentine projects, I spend a *spooky* amount of time *haunting* around for ideas. A lot of the ideas get the *boo-t*. That whole “what *ghost* up must come down” happens with a lot with my ideas. I get excited for some, and then some fall flat! Many take *float* in my mind and are a *scream*! You can *scare* up inspiration from anywhere and make it a pun. Some things won’t have a *ghost* of a chance, but it *ghost* to show you that many things can!
Follow along with this video tutorial to learn how to make this project:
My dad will continue to be the videographer, editor, and photographer for our videos when I move away.
Support YARNutopia today so we can continue to bring you clear, quality crochet tutorials even after I move into my new home!
There will be an added expense of more travel and hopefully this won’t deter our ability to provide consistent videos on a weekly basis.
Teacher: Nadia Fuad
Video and Editing: Fuad Azmat (My Daddy)
Share your work on Facebook!
Add me on Snapchat: YARNutopia
Follow me on Instagram
Visit My Ravelry Store and add this to your Favorites!
Follow me on Twitter: @YARNutopia
Enjoy this video and subscribe to my channel on YouTube for more tutorials on how to crochet!
Leave a comment, and share with your friends!
Pattern:
Designed by Nadia Fuad You *may* sell items made from my pattern, but please reference my website YARNutopia.com.
Please do not copy, sell, and/or post this pattern and claim it as your own.
NOTES:
-Use a smaller hook to make these smaller
-Use a bigger hook to make these bigger
Special stitches:
Ch(s): chain(s)
YO: Yarn Over
BLO: Back Loop Only
St(s): Stitch(es)
Sl st: slip stitch
SK: Skip
SC: Single Crochet
SC2TOG: Single Crochet Decrease
HDC: Half Double Crochet
DC: Double Crochet
Pattern:
If you have any confusion or difficulty with reading this pattern, please watch the video tutorial to have visual instructions.
Ghost: With White, work in BLO and in continuous rounds.
Ch 2 Rnd 1: 6 SC in 2nd ch from hook. (6) Rnd 2: 2 SC in each st around. (12) Rnd 3: [2 SC in next st, SC in next st] 6 times. (18) Rnd 4: [2 SC in next st, SC in next 2 sts] 6 times. (24) Rnds 5-7: SC in each st around. (24) Rnd 8: [SC2TOG, SC in next 2 sts] 6 times. (18) Rnd 9: [SC2TOG, SC in next st] 6 times. (12) Rnd 10: [2 SC in next st, SC in next st] 6 times. (18) Rnd 11: [2 SC in next st, SC in next 2 sts] 6 times. (24) Rnds 12-15: SC in each st around. (24) Rnd 16: [SC2TOG, SC in next 2 sts] 6 times. (18) Rnds 17-18: SC in each st around. (18)
Stuff the ghost with polyfil Rnd 19: [SC2TOG, SC in next st] 6 times. (12) Rnds 20-21: SC in each st around. (12) Rnd 22: [SC2TOG] 6 times.
Fasten off, weave in ends.
Arms: Make 2 with White. Work in BLO and continuous rounds.
Ch 2 Rnd 1: 6 SC in 2nd ch from hook. (6) Rnds 2-5: SC in each st around. (6)
Fasten off with long tail for sewing.
Assembly:
Sew arms to side of ghost
Glue on Googly Eyes
Enjoy!!
This post contains affiliate links, which I may be compensated for when you make a purchase. That means if you click on any link and buy from the linked websites, I will receive a small percentage of the value of your order. The amount you pay is not changed. Thank you for all your support in clicking the links in my blog!! You all are so amazing!! ~Nadia
The yarn provided for this pattern is courtesy of Red Heart Yarns
I’ve always wanted a blocking unit for my crochet pieces. For someone like me having a handy tool like this makes my work a little easier. Recently, I received The BlocksAll Station from Chetnanigans. Chetnanigans has an Etsy Shop and is definitely worth the look. Today, I had the opportunity to give this product a try. Here is my assessment of this fun tool.
If you are like me, you have practiced many tricks when you are blocking your items. My tried and true way is to spritz a little water on my finished piece, shape it and pin it down on a towel using stick pins or stack my squares on skewers stuck in a Styrofoam block. Then, I leave my piece to dry overnight and wake up the next day to my item blocked, hopefully in the correct form I want. For larger projects this is still the best way I have found to achieve a decent result. However, there are times when making granny square items such as my G.G. Cardigan, my New Beginnings Afghan Block, or we all remember my colossal project the 365 Days of Granny Squares, when blocking single squares become necessary for the best appearance of an overall project. Not everything crochets up as neat and tidy as we hope. That is when the BlocksAllis great option to achieve these results. I set out to give this a test run and was not disappointed!
First, when the item arrived and I opened it, I was very happy to see how well this was packaged. Included were the board, a stand, stainless steel pins, and instructions, all neatly packed and secure on arrival. Seeing it for the first time was thrilling! I always get that excited feeling when a new crochet or craft item arrives at my doorstep. I am like a little child when I see the delivery driver pull up! Once it was opened, I was eager to give it a try!
I decided to give it a test run blocking some squares that I am making for a baby blanket. I sprayed my squares lightly with a bit of water before placing each square on the block. Although I blocked individual squares, you can stack them on the pins and do multiples at the same time. I think approximately 3-5 squares would fit stacked up. There are 50 stainless steel pins included in this set and there are a series of holes on the block. This is important as the placement of the holes make it easy to block items in a variety of sizes! The pins do not rust so if your item is damp, there will be no risk of rust getting on your pieces. It was a bit tough to insert the pins on the first try, but being as this is brand new, I suspect this will become easier the more I use this item. By the same token, the pins were a bit tough to remove once I was finished blocking. Again, with repeated use, this should rectify.
The BlocksAll is very sturdy, durable, and it has some weight to it. The stand has rubber grips for anti-slip if you want to stand it up while blocking your pieces. This is a nice feature when you need to apply a bit of force to either push the pins in or pull them out. Otherwise, there is felt on the back side of the BlocksAll station if you wish to lay it on a flat surface to do your blocking. One detail to point out that many will appreciate as I do, is that the pins are NOT sharp. I can’t tell you how many times when blocking my crochet items the standard way that I jabbed a stick pin into my fingertip or thumb and drew blood! It gives new meaning to putting blood, sweat, and tears into a project and hopefully, having this new item will take those elements out of the equation! There is no risk of that happening while using the BlocksAll pins! Another observation, you will want to store the pins in a small case. Because of the amount of pins included in this set (50), it will be a good idea to have a storage container for these small but important parts.
Once my pieces were blocked overnight, they came out perfectly shaped for my project!! The size of this board allows for pieces up to 12 inches x 12 inches to be blocked easily. I was so happy with the results of each square and they look perfect with the clean straight edge achieved from using this handy device! I love the look and they stack up nicely in piles waiting for me to sew them together! This is exciting stuff!
I love this wonderful gizmo and working with the Chetnanigans crew was a pleasure! Be sure to check out their Etsy site and all the great items they have for knitters and crocheters!! These would make a great gift for any crafter on your list–including yourself!
Also, be sure to use coupon code YARN15 to get a 15% discount on your purchase!!! The discount code is only available until November 19th, 2017 so place your orders soon!! That is an AWESOME deal! You won’t be disappointed! Now back to making more squares and playing with my new toy!
My Solid Tan Chunky Basketweave Blanket is the next project you must add to your to do list! This supremely soft and comfy blanket will make you want to wrap yourself up and not come out for the rest of the season! Grab a good book, a cup of hot tea, and this cozy blanket and you have all the perfect comforts for a fantastic night in!
***You can definitely sell anything you make from my patterns, please just link back to my website YARNutopia.com. Thank you!
Teacher: Nadia Fuad
Video and Editing: Fuad Azmat (My Daddy)
Share your work on Facebook!
Add me on Snapchat: YARNutopia
Follow me on Instagram
Visit My Ravelry Store and add this to your Favorites!
Follow me on Twitter: @YARNutopia
Enjoy this video and subscribe to my channel on YouTube for more tutorials on how to crochet!
Leave a comment, and share with your friends!
Pattern:
Designed by Nadia Fuad You *may* sell items made from my pattern, but please reference my website YARNutopia.com.
Please do not copy, sell, and/or post this pattern and claim it as your own.
NOTES
-Watch the FULL introduction of the video tutorial for frequently asked questions and watch the full video for tips on how to make these smaller or bigger.
-I used Red Heart Sweet Yarn but you can use any bulky size yarn to make this blanket.
-This blanket measures 70 inches wide and 71 inches long
-This blanket uses 1,780 yards of yarn. (I used a total of 20 skeins of Sweet yarn in this project)
–You can get other blanket sizes here (about halfway down the page there’s measurements on different blanket sizes)
-For a baby blanket, my recommendation is to make your foundation chain 64 chains
-For a throw blanket, my recommendation is to make your foundation chain 80 chains
-For a Queen blanket, my recommendation is to make your foundation chain 104 chains
-For a King blanket, my recommendation is to make your foundation chain 144 chains -Learn more about the basketweave stitch here
Special stitches:
Ch(s): chain(s)
YO: Yarn Over
St(s): Stitch(es)
Sl st: slip stitch
SK: Skip
SC: Single Crochet
DC: Double Crochet
Pattern:
If you have any confusion or difficulty with reading this pattern, please watch the video tutorial to have visual instructions.
Pattern:
Chain 104 or any multiple of 8 (see other blanket measurement sizes here) Row 1: DC in 4th ch from hook and across, turn. (102 sts) Row 2: Ch 3 (counts as 1 dc) *FPdc around the post of each of next 4 sts, BPdc around the post of each of next 4 sts, rep from * across, ending with 1 dc in top of turning chain, turn. Row 3: Ch 3 (counts as 1 dc) *BPdc around the post of next 4 sts, FPdc around the post of each of next 4 sts, rep from * ending with 1 dc in top of turning ch, turn. Row 4: Repeat Row 2 Row 5: Repeat Row 2 Row 6: Repeat Row 3 Row 7: Repeat Row 2 Row 8: Repeat Row 3 Row 9: Repeat Row 3 Rows 10-71: Repeat rows 2-9 for however long you want to make your blanket
When you are finished with your last row, SC around the entire blanket to clean up the edges and put 3 SC in each corner.
Sl st to first SC, and fasten off.
Weave in all ends.
Enjoy!!
This post contains affiliate links, which I may be compensated for when you make a purchase. That means if you click on any link and buy from the linked websites, I will receive a small percentage of the value of your order. The amount you pay is not changed. Thank you for all your support in clicking the links in my blog!! You all are so amazing!! ~Nadia
The yarn provided for this pattern is courtesy of Red Heart Yarns
Recently, I was informed that Wal-Mart stores have started selling their own brand of fiber called Mainstays Basic Yarn. At the time I was notified of this new brand on the shelves, I was eager to check it out for myself. Unfortunately, I live in a somewhat rural community and the skeins had not made their way to my local Wal-Mart quite yet.
A short time later, I was able to get my hands on a skein of the Mainstays yarn and decided to do a comparison between Red Heart Super Saver and this new brand by Wal-Mart! This blog is entirely my own opinion, based on my personal observations debating two similar products.
Less money, less quality?
First observation, once I was able to find the product in the store, was the price. A skein of Red Heart Super Saver is $2.88 and the price of the Mainstays Basic Yarn is $1.97, so the obvious difference is the financial aspect. You are saving $0.91 per skein on the basic colors with the Mainstays brand. For those looking at the economic factor, this is a no-brainer. The Mainstays IS obviously less expensive. However, we all know that price is not always reflective of quality, and we all know the saying, “you get what you pay for.” Low prices can mean lower quality products. Keep that in mind when basing your comparison solely on economics – and yes, I do understand the importance of finances as a crafter on a budget, but one must consider other details as well.
Next, the volume of the skeins is equal – Each one weighing 7 oz. However, Red Heart Super Saver has 364 yards and Mainstays Basic Yarn has 397 yards. When we look at another obvious comparison, you get more for your money with Mainstays. I would like to insert a personal observation here: The Mainstays Basic Yarns are definitely a thinner fiber. Although you are getting “more” length in the skein, it actually feels “less.” You can even see when lined side by side, there is a fair amount of difference in how they compare next to one another. Having worked with Red Heart Yarns so frequently, it is hard to explain this, but their fiber has weight and thickness and feels somewhat sturdier versus the Mainstays Basic Yarn, which has a much thinner strand and feels lighter and less substantial. With Red Heart Super Saver, there is ample feel to my piece. The Mainstays yarn has a bit less volume and does not feel as abundant or as sturdy. I hope that makes sense. Both are 100% acrylic.
(Photographed above: Red Heart Super Saver on the Left, Mainstays Yarn on the Right)
Soft but Found
The Mainstays definitely has a soft touch, but, like I mentioned earlier, it tends to lack that feeling of volume when you want something thick and warm or heavy such as a nice blanket, a winter hat, or a scarf, but it has decent softness nonetheless.
I found Mainstays Basic Yarns located ONLY in the Wal-Mart stores. Red Heart Yarns are available in, not only Wal-Mart, but several other craft stores, AND conveniently able to be ordered online. This is important for many who love the ease of online shopping or are unable to get to stores or choose not to shop at large retail shops such as Wal-Mart.
Another fact that I find important point to bring up, is that all Mainstays yarn products are made in China whereas the Red Heart Yarns are ALWAYS made in the USA. To many, this is a VERY important detail to consider when purchasing.
Shrinking options
I made two swatches out of both brands of yarn. I washed each swatch and noticed a slight bit of shrinking in the Mainstays yarn. You will need to keep that in mind when using this brand in sizing your projects. You may get more in a skein yet you may need to use more length in certain projects to adjust for shrinkage. I observed that both fibers have the same amount of stretch to them. I also noticed quite a bit of pilling with the Mainstays Basic Yarn with fuzziness as compared to the Red Heart Super Saver swatch. The Red Heart Super Saver block was also softer after one wash.
(Photo was taken after washed)
(Photo was taken after washed)
It took a while, but my local Wal-Mart recently started stocking this Mainstays yarn product on their shelves this past week; I noticed they are offering an assortment of basic solids in a rainbow of colors. The colors run similar to some of the Red Heart Super Saver yarn hues. Red Heart Yarns offers a MUCH larger selection of color, as well as a variety of other types of yarns and products, whereas the Mainstays offer this one type of yarn. Red Heart Super Saver yarn is not dye lotted which keeps color consistent with each skein of yarn you use. So if you buy a skein of yarn, and 2 months later need the same exact color, you won’t have to worry about it being a different shade. I do not have information if Mainstays yarn does the same thing or not.
I hope this blog helps you as you explore the similarities and differences between these two products. Because of the limitation of the Mainstays yarn, I still find myself preferring the Red Heart Super Saver when choosing an economic and quality yarn product. Have you tried these two products? Leave your thoughts in the comment section!
~Nadia
This post contains affiliate links, which I may be compensated for when you make a purchase. That means if you click on any link and buy from the linked websites, I will receive a small percentage of the value of your order. The amount you pay is not changed. Thank you for all your support in clicking the links in my blog!! You all are so amazing!! ~Nadia
Support YARNutopia today so we can continue to bring you clear, quality crochet tutorials and blog posts!
Row 1: SC into the 2nd CH from hook and the next CH, *skip 1 CH, 2 SC into next ch, repeat from from * to last 2 chains, sk 1 CH, 1 SC into last CH, CH 1, turn. Row 2: SC in 1st st, *sk next st, 2 SC into next SC, rep from * to last 2 sts, SK st, 1 SC in last st, CH 1, turn.
Repeat row 2 until you have reached your desired length.
Support YARNutopia today so we can continue to bring you clear, quality crochet tutorials
Video and Editing: Fuad Azmat (My Daddy)
Share your work on Facebook!
Add me on Snapchat: YARNutopia Follow me on Instagram Visit My Ravelry Store and add this to your Favorites!
Follow me on Twitter: @YARNutopia
Enjoy this video and subscribe to my channel on YouTube for more tutorials on how to crochet!
Leave a comment, and share with your friends!
This post contains affiliate links, which I may be compensated for when you make a purchase. That means if you click on any link and buy from the linked websites, I will receive a small percentage of the value of your order. The amount you pay is not changed. Thank you for all your support in clicking the links in my blog!! You all are so amazing!! ~Nadia
I love receiving parcels in the mailbox! This week was particularly exciting when a close family friend sent clippings from a vintage Women’s Day Magazine dated in the early 1970s. Included in the clippings, and what had her thinking of us, was the vintage crochet patterns she had saved. I love this!
Here I am, as I often do, multitasking on a Saturday! I have a great new project on my hook. I have my wedding planner nearby adding our collected addresses, preparing to send out our Save-the-Dates, I have my rainy day cup of hot chai, and I am perusing these awesome vintage patterns and ads from these 1970s magazines. Some of the articles in these old periodicals have me experiencing quite a few interesting emotions. Things were quite different 40+ years ago, but crochet has remained a strong passion no matter what the decade! Share what’s on your hook and what this weekend has in store for you!
Support YARNutopia today so we can continue to bring you clear, quality crochet tutorials
This post contains affiliate links, which I may be compensated for when you make a purchase. That means if you click on any link and buy from the linked websites, I will receive a small percentage of the value of your order. The amount you pay is not changed. Thank you for all your support in clicking the links in my blog!! You all are so amazing!! ~Nadia
Here is my latest creation!! The Destiny Sampler Baby Blanket. Using lots of fun crochet stitches, I tried this out for the very first time, some fabulous fiber by Deramores. The softness is absolutely delectable! I fell in love with the feel and flow of using this yarn. It’s always fun to try something new!
You get a whole assortment of fun when you make this piece! This pattern has a mixture of different stitches including Clusters, Puffs, Criss-Cross Stitches, V-Stitches and Shell Stitches!
View this video tutorial to learn how to make this blanket:
Support YARNutopia today so we can continue to bring you clear, quality crochet tutorials
Support YARNutopia today so we can continue to bring you clear, quality crochet tutorials
This post contains affiliate links, which I may be compensated for when you make a purchase, which means if you click on the link and buy from the linked websites, I will receive a small percentage of the value of your order, so click away and happy shopping!! The amount you pay is not changed. Thanks for all your support!!
**You can always contact me via Facebook if you have any problems with the pattern. I am happy to help if you have any questions along the way.
***You can definitely sell anything you make from my patterns, please just link back to my website YARNutopia.com. Thank you!
Teacher: Nadia Fuad
Video and Editing: Fuad Azmat (My Daddy)
Share your work on Facebook!
Add me on Snapchat: YARNutopia
Follow me on Instagram
Visit My Ravelry Store and add this to your Favorites!
Follow me on Twitter: @YARNutopia
Enjoy this video and subscribe to my channel on YouTube for more tutorials on how to crochet!
Leave a comment, and share with your friends!
Pattern:
Designed by Nadia Fuad You *may* sell items made from my pattern, but please reference my website YARNutopia.com.
Please do not copy, sell, and/or post this pattern and claim it as your own.
NOTES:
-Watch the FULL introduction of the video tutorial for frequently asked questions and watch the full video for tips on how to make this smaller or bigger.
-I used Deramores yarn, but you can use any DK or worsted weight yarn for your project.
-You will need approximately 1250 yards of yarn for this blanket.
-This blanket measures 35 inches wide and 32 inches long.
–View this blog (about halfway down the page) for other sizes and measurements of blankets
Special stitches:
Ch(s): chain(s)
YO: Yarn Over
St(s): Stitch(es)
Sl st: slip stitch
SK: Skip
SC: Single Crochet
HDC: Half Double Crochet
DC: Double Crochet
Cluster: [YO insert hook, YO, pull through, YO pull through 2 loops] 5 times, YO pull through all 6 loops on hook
Puff: [YO, insert hook into space, YO, pull through] 3 times, YO pull through all 7 loops on hook
Pattern:
If you have any confusion or difficulty with reading this pattern, please watch the video tutorial to have visual instructions.
Pattern:
Ch 84 or any even number
Row 1: 2 DC in 4th Ch from hook, *Sk 1 ch, 2 DC in next ch, repeat from * across, ending with 1 DC in last ch, turn. (82 sts) Row 2: Ch up 3 (Counts as stitch here and throughout), *2 DC between posts of next 2DC grouping, repeat from * across, ending with DC in last stitch. Rows 3-5: Repeat Row 2 Row 6: Ch up 3, *Cluster in the next st, ch 1, DC in next st, repeat from * across, ending with DC in last 2 sts, turn Row 7: Ch up 3, *Sk 1 DC st, DC in Cluster, DC in sk’d DC st, repeat from * across (making criss-cross stitches), ending with DC in last st, turn. Row 8: Ch up 3, *Sk 1 st, DC in next, DC in sk’d st, repeat from * across, ending with DC in last st, Turn. Rows 9-11: Repeat Row 8 Row 12: Repeat Row 6 Row 13: Ch up 3, 2 DC in each DC across (skip working in the Clusters), Ending with DC in last st, turn. Rows 14-47: Repeat Rows 2-13
Use photo and video tutorial for visual instructions and color guide.
You can make your piece as long as you want, repeating Rows 2-13, then go onto border.
Border: Rnd 1: Attach (Color Frost) yarn in any corner Ch 1, SC around putting 3 SC in each corner, sl st to first SC, Fasten off. Turn work to back. Rnd 2: Start in middle SC of 3 SC grouping in a corner. with Blush, Ch up 3 (Counts as st), DC in same st, *Sk 1 st, Cluster in next, ch 1, repeat from * around putting 3 DC in middle SC of 3 SC grouping in corners. Ending with DC in first stitch to have 3 sts total in the first stitch, sl st to first ch up 3. Turn work back to the front side. See video tutorial for visual instructions. Rnd 3: Start in gap to the left of a corner (Right before the cluster), With Blue Velvet, Ch up 3, DC in same sp, *Ch 1, 2 DC in next ch 1 sp, repeat from * to next corner, Ch 3, Sk 3 DC grouping,** repeat from * to * 2 more times, ending with Ch 3, Sl st to first ch up 3. Fasten off. Rnd 4: In any corner, with Burnt Orange, Ch up 3, [DC, ch 2, 2 DC] in same corner space, *2 DC in each ch 1 sp to next corner, [2 DC, ch 2, 2 DC] in corner, repeat from * around. Ending with Sl st to ch up 3. Rnd 5: Ch up 1, SC in each st around putting [2SC, ch 2, 2 SC] in each corner, sl st to first st. Rnd 6: Ch up 3, DC in next st, ch 2, Sk 1 st, *[2 DC, ch 2, 2 DC] in corner, ch 2, sk 1 st, DC in next 2 sts, ch 2, DC in next 2 sts until next corner, repeat from * around, ending with Ch 2, sl st to first ch up 3. Fasten off. Rnd 7: In any corner, with Sky Blue, Ch up 1, *[Puff, ch 2, Puff] in corner, Ch 1, [Puff, ch 2, Puff, ch 1] in next ch 2 sp until next corner, repeat from * around, ending with ch 1, sl st to first puff. Fasten off. Rnd 8: Start in any corner, with Blush Pink, Ch 1, 5 SC in each corner, 1 SC in ch 1, sps, 3 SC in ch 2 sps all the way around. (See video tutorial for visual instructions) Sl st to first st, fasten off. Rnd 9: In middle SC of corner, with Blue Velvet, Ch up 3, 3 DC in same st, *SK 2 sts, SC in next, Sk 1 st, Shell in next, Sk 1 st, SC in next, repeat from* until corner (middle SC of corner) put 7 DC in middle SC of corner, repeat from * around ending with 3 DC in beginning st to finish beginning corner. Sl st to ch up 3. Fasten off.
Over the years, I have found that giving crocheted gifts has been well received. Even my brother has raided my stockpile of crochet items for cowls, hats, scarves, and items to give to his own friends. People love a well-made item. Giving someone something homemade, especially made with love, is priceless.
Here is a quick checklist on what to do when preparing to give a homemade gift of crochet.
Give yourself plenty of time
Start early to avoid stress and pressure of finishing something you are aware has a deadline. Don’t wait until the last minute to start a stack of crochet projects on December 1st for Christmas gifts or a baby blanket two weeks before a baby shower, UNLESS you are a seasoned crochet artist with years of experience and have no worry working under those high pressure deadlines.
Tackle a project or idea that falls within the range of your skill set and time frame, so crochet is a pleasure and not a chore. Even if you want to take on a challenge of something that you have never tried before, having enough time to learn and complete it will remove some of the anxiety of trying something new. That way, if you run into issues experimenting, you will accomplish something doable without the frustration of getting in “over your head” when you have the time to “play around” with a new pattern.
Personally, I have to give myself time. I have good intentions when tackling a project, but I have learned, nothing ever goes quite the way I plan. Even when I give myself time to finish, I find that I am running up to the very last moment of my timeline!
Make Lists
Who is on your gift giving list? Are you tackling a project for one individual or a list of people? Once you answer these questions, make a list of who you are gifting to. Then, decide what you plan to make for each of them. Then, make a list of the supplies needed for each project. Here is where things might get a bit costly. If you have a large list of people you want to make gifts for, breaking down the supplies into smaller purchases takes off some of the financial pressure of doing them all at once. Working on a single or even a couple of projects to completion, and then comprising another list to tackle the rest of your list makes the blow to the pocketbook a little easier to manage.
The next step is to give yourself a REALISTIC and liberal time frame to finish the project. Here is where I always end up in a trap! I always underestimate the time frame I can complete a project. Even as a seasoned crochet artist, I cannot plan for those unpredictable circumstances. It is impossible to prep for the unknown. I can sit down with the best intentions to spend the evening crocheting and friend might drop by, or my best friend who is in the Peace Corp in Africa has an internet connection and wants to have a Skype date! I love crochet, but there are definitely times when my crochet projects take a back burner to other more important things! That is part of life! So always make sure that you allow for those times.
Set goals
When I was making the G.G. Cardigan, I sat down and counted how many squares I needed to make. Then I planned the time frame it would take to reasonably make this coat. My circumstances are different than most, but the principle still applies. I set a goal of how many squares I needed to do in a specific time frame. I took the total number and the time I planned to make it and divided. Example: If I needed 70 squares, I wanted to finish it in 2 weeks, which meant I needed to do 5 squares a day or 10 squares every other day.
Presently, I have been working on my wedding flowers (tutorials to come). I want to make a variety of flowers for different things, my bouquets, boutonnieres, centerpieces, the place cards with coordinating floral details that are color coded for my menu options, etc. This is a HUGE undertaking. I needed to make 2 flowers each day for the year (we got engaged in March 2017 and are getting married in March 2018). Yeah, that isn’t happening. I have a little over 100 flowers done. I have to really amp up my production if I am going to meet this deadline, and I will, but that means changing my expectations. When I miss a day or two, I will sit down and make up a dozen or more flowers to catch up. It has been pretty successful. Again, so much comes in the way of meeting those goals so be sure to account for that!
Homemade gifts will be treasured for years to come, but remember that the goal of giving them with no pressure and stress is our hope and expectation. Try to avoid that last minute pressure and stress that sends you on a stream of made up curse words going off in your head as you crochet like fiends the night before!! I can’t tell you how many times that has happened to me! HAHA! We have all been there and done that!
Are you a plan ahead crochet artist?? Or are you the one that is pulling the all-nighter to finish in time to give a gift? No matter which way you function, I hope crochet continues to bring you joy under every circumstance!
Support YARNutopia today so we can continue to bring you clear, quality crochet tutorials
This post contains affiliate links, which means if you click on the link and buy from the linked websites, I will receive a small percentage of the value of your order. The amount you pay is not changed.
Photos embedded in this blog were found on Google.com.
Support YARNutopia today so we can continue to bring you clear, quality crochet tutorials
What’s your go-to accessory? Everyone should always have a signature scarf, and this is the one for YOU! I am definitely a scarf girl. Summer/winter, it doesn’t matter! There are plenty of ways to showcase this piece, but here is one that is sure to WOW any way you wrap it!!
My Boho Tassel Scarf is such a fun and stylish project for the cold weather! This chunky scarf, can be worn loosely wrapped around your neck to keep you warm. The ends cascade down with tassel details, making this a fashionable and fun wrap for all! Guys, girls, kids, this can be modified for everyone!!
Follow along with this video tutorial to learn how to make this scarf:
My dad will continue to be the videographer, editor, and photographer for our videos when I move away.
Support YARNutopia today so we can continue to bring you clear, quality crochet tutorials even after I move into my new home!
There will be an added expense of more travel and hopefully this won’t deter our ability to provide consistent videos on a weekly basis.
**You can always contact me via Facebook if you have any problems with the pattern. I am happy to help if you have any questions along the way.
***You can definitely sell anything you make from my patterns, please just link back to my website YARNutopia.com. Thank you!
Teacher: Nadia Fuad
Video and Editing: Fuad Azmat (My Daddy)
Share your work on Facebook!
Add me on Snapchat: YARNutopia
Follow me on Instagram
Visit My Ravelry Store and add this to your Favorites!
Follow me on Twitter: @YARNutopia
Enjoy this video and subscribe to my channel on YouTube for more tutorials on how to crochet!
Leave a comment, and share with your friends!
Pattern:
Designed by Nadia Fuad You *may* sell items made from my pattern, but please reference my website YARNutopia.com.
Please do not copy, sell, and/or post this pattern and claim it as your own.
NOTES:
-Watch the FULL introduction of the video tutorial for frequently asked questions and watch the full video for tips on how to make these smaller or bigger.
-You will need 800 yards for this scarf
-This scarf is 9 inches (23 cm) wide and 98 inches long (284 cm)
Special stitches:
Ch(s): chain(s)
YO: Yarn Over
St(s): Stitch(es)
Sl st: slip stitch
SK: Skip
SC: Single Crochet
Spike Stitch: Insert Hook into stitch from previous row, YO pull through and pull up to height of row you are on, YO pull through 2 loops on hook. Spike made.
Pattern:
If you have any confusion or difficulty with reading this pattern, please watch the video tutorial to have visual instructions.
Pattern:
You will use both colors at the same time, trail the “dropped color” under your stitches, to pick it up for the next row. See video tutorial for visual instructions on how to trail along your strands.
Starting with Dusty Gray
Ch 26 Row 1: SC in 2nd ch from hook and across, ch 1, turn. (25 sts) Row 2: SC across, change to Black, ch 1, turn. (25 sts) Row 3: SC in 1st st, *Spike stitch in next stitch, SC in next st, repeat from * across, ending with SC in last st, change back to Dusty Gray, ch 1, turn. Row 4: SC in 1st 2 sts, *Spike stitch in next st, SC in next st, repeat from * across, ending with SC in last 2 sts, change to Black, Ch 1, turn. Rows 5-225: Repeat Rows 3 and 4 ending with a repeat of Row 3 Row 226: With Gray, SC across, Change to Pumpkin orange, ch 1, turn. Row 227: SC across, change to Papaya, Ch 1, turn. Row 228: Spike Stitch in each stitch across (work between the stitches and not in the stitches of row 226 (See video tutorial for visual instructions) ch 1, turn. Row 229: Sc across, change color, ch 1, turn. Row 230-301: repeat rows 228 and 229 (Color combinations listed below)
This post contains affiliate links, which means if you click on the link and buy from the linked websites, I will receive a small percentage of the value of your order. The amount you pay is not changed.
The yarn provided for this pattern is courtesy of Red Heart Yarns
Chain a Multiple of 3+2 Row 1: DC in 4th Ch from hook and across, turn. Row 2: Ch up 3, DC in next st, *FPDC on next 2 sts, DC in next st, repeat from * across, ending with DC in last 2 sts. Turn. Row 3: Ch up 3, DC in first 3 sts, *FPDC on next, DC in next 2 sts, repeat from * across, ending with DC in last 4 sts. Turn.
Repeat Rows 2 and 3 for however long you want your piece to be.
Support YARNutopia today so we can continue to bring you clear, quality crochet tutorials
This post contains affiliate links, which I may be compensated for when you make a purchase. That means if you click on any link and buy from the linked websites, I will receive a small percentage of the value of your order. The amount you pay is not changed. Thank you for all your support in clicking the links in my blog!! You all are so amazing!! ~Nadia
Chain a multiple of 2+1 Row 1: Pull up a loop in 2nd chain from hook and in next 4 chains (6 loops on hook), Yarn over and pull through all loops on hook, chain 1 (this forms eye of star), *pick up a loop in the eye of last star, pick up a loop through the back of last loop of previous star, pick up a loop through same chain as last loop of previous star, pick up a loop in each of next 2 chains (6 loops on hook), yarn over and pull through all 6 loops, ch 1, rep from * across, ending with HDC in last chain, turn. Row 2: Ch 1, 1 SC in HDC, 1 SC in eye of next star stitch, 2 SC in eye of each star stitch across, ending with 1 SC in top of turning chain, turn. Row 3: Ch 2, pick up loop in front strand of 2nd ch from hook, then pick up a loop in the back strand of same chain, pick up loop in each of next 3 sc, yarn over and pull through all 6 loops, ch 1, *pick up a loop in eye of last star, pick up loop in back of last loop of star, pick up loop in same sc as last loop of star, pick up a loop in each of next 2 stitches, yarn over and pull through all 6 loops, ch 1, rep from * across, ending with HDC in last stitch.
Repeat rows 2 and 3 until you have reached your desired length.
Video and Editing: Fuad Azmat (My Daddy)
Share your work on Facebook!
Add me on Snapchat: YARNutopia Follow me on Instagram Visit My Ravelry Store and add this to your Favorites!
Follow me on Twitter: @YARNutopia
Enjoy this video and subscribe to my channel on YouTube for more tutorials on how to crochet!
Leave a comment, and share with your friends!
Support YARNutopia today so we can continue to bring you clear, quality crochet tutorials
This post contains affiliate links, which I may be compensated for when you make a purchase. That means if you click on any link and buy from the linked websites, I will receive a small percentage of the value of your order. The amount you pay is not changed. Thank you for all your support in clicking the links in my blog!! You all are so amazing!! ~Nadia
Chain a Multiple of 10+1 Row 1: 2DC in 6th chain from hook, *Chain 1, Skip 2 chains, DC in next, Chain 1, Skip 2 chains, 2 DC in next chain, repeat from * across, ending with DC in last chain, turn. Row 2: Chain 1, *5 DC around the next DC, work 5 Front Post DC up the post of 2nd DC, Slip Stitch into the next DC, repeat from * across, ending with Slip stitch in last stitch, turn. Row 3: Ch up 3 (counts as DC), DC in same spot as chain up 3 stitch, *Chain 1, DC in eye of crocodile stitch, Chain 1, 2 DC in next slip stitch, repeat from * across, ending with 2 DC in last stitch, Turn. Row 4: Ch 3 (counts as DC of first crocodile stitch), 4 DC around first DC, work 5 Front Post DC up the post of the 2nd DC, Slip stitch to next DC, *5 DC around next DC, work 5 Front Post DC up the post of the next DC, Slip stitch into the next DC, repeat from * across, ending with 5 Front post DC up the last DC, turn. Row 5: Ch 1, Sl st into eye of Crocodile Stitch, Ch up 4 (counts as DC+Chain 1 space), *2 DC in next Slip Stitch, Chain 1, DC in next Crocodile Stitch, chain 1, repeat from * across, ending with DC in last crocodile Stitch. Turn.
Repeat Rows 2-5 as many times as you want!
Video and Editing: Fuad Azmat (My Daddy)
Share your work on Facebook!
Add me on Snapchat: YARNutopia Follow me on Instagram Visit My Ravelry Store and add this to your Favorites!
Follow me on Twitter: @YARNutopia
Enjoy this video and subscribe to my channel on YouTube for more tutorials on how to crochet!
Leave a comment, and share with your friends!
Support YARNutopia today so we can continue to bring you clear, quality crochet tutorials
This post contains affiliate links, which I may be compensated for when you make a purchase. That means if you click on any link and buy from the linked websites, I will receive a small percentage of the value of your order. The amount you pay is not changed. Thank you for all your support in clicking the links in my blog!! You all are so amazing!! ~Nadia
Days turned into weeks, that turned into months, and I finally finished. My crochet hand and arms had a mega workout, but it was so worth the effort. This beautiful chunky yarn blanket using Red Heart Irresistible Yarn is one of the most beautiful pieces I have ever made for the home. Just in time for cold nights and winter winds, it truly is…irresistible.
This blanket is an investment piece. These chunky yarns are not skeins you are going to find in a bargain bin. They can be pricey. This is one of those projects where coupons and sales come in handy!! This is definitely a piece you want to have for your home or for a gift to someone VERY special. Side note–this blanket does shed, and I personally have not felted mine to reduce the shedding, but you can opt to do whatever you feel.
I made my project in stripes, but you can make it in a solid tone. It’s a striking blanket no matter what you decide to do. This afghan is extremely heavy–I would guess about 10-12 pounds, maybe more! This is a very trendy and popular piece that you find in high end home decor.
Watch this video tutorial to learn how to make this fabulous blanket:
Support YARNutopia today so we can continue to bring you clear, quality crochet tutorials
**You can always contact me via Facebook if you have any problems with the pattern. I am happy to help if you have any questions along the way.
***You can definitely sell anything you make from my patterns, please just link back to my website YARNutopia.com. Thank you!
Teacher: Nadia Fuad
Video and Editing: Fuad Azmat (My Daddy)
Share your work on Facebook!
Add me on Snapchat: YARNutopia
Follow me on Instagram
Visit My Ravelry Store and add this to your Favorites!
Follow me on Twitter: @YARNutopia
Enjoy this video and subscribe to my channel on YouTube for more tutorials on how to crochet!
Leave a comment, and share with your friends!
Pattern:
Designed by Nadia Fuad You *may* sell items made from my pattern, but please reference my website YARNutopia.com.
Please do not copy, sell, and/or post this pattern and claim it as your own.
NOTES:
-Watch the FULL introduction of the video tutorial for frequently asked questions and watch the full video for tips on how to make these smaller or bigger.
-You will need 760 Yards of yarn for this whole project.
-You can use any type of Bulky or Jumbo yarn to crochet this blanket. I would recommend using 2 or 3 strands of bulky yarn together to crochet the same thickness as my blanket. You can add as many strands of yarn to your likeness to make a super chunky blanket!! Have fun with it!
-Different Afghan Sizes can be found in the middle of this page here.
Special stitches:
Ch(s): chain(s)
YO: Yarn Over
St(s): Stitch(es)
Sl st: slip stitch
SK: Skip
SC: Single Crochet
Pattern:
If you have any confusion or difficulty with reading this pattern, please watch the video tutorial to have visual instructions.
Pattern:
Work in the BLO
Starting with Grey,
Ch 75 (or any amount for the measurement you want your blanket to be) Row 1: SC in 2nd CH from hook and across, ch 1, turn. (74 sts) Row 2: SC across, ch 1, turn. Rows 3-35: Repeat Row 2.
You can make your blanket as wide as you want, just repeat the pattern to make more rows.
End with Grey yarn (the same color you started with)
Fasten off, weave in any ends.
Assembly step:
I changed color every 5 rows. See video tutorial for visual instructions on changing color and if you run out of yarn during your project.
Enjoy!!
This post contains affiliate links, which means if you click on the link and buy from the linked websites, I will receive a small percentage of the value of your order. The amount you pay is not changed.
The yarn provided for this pattern is courtesy of Red Heart Yarns
Chunky blankets are all the rave lately. Perfect for any decor, be it the bedroom, living room, or cozy sitting area, my Star Stitches and Stripes Chunky Blanket will be the ultimate room accessory. A bold statement that is not only striking in any room of your home but also functional.
Please check out the new beginning graphic designed and developed by my brother Nabeel. He and his wife own and operate NFD Graphics. Please hop over to their Facebook page and show them some love! For all your graphic and video/logo design needs be sure to contact them today! http://www.nfdgraphics.com
Follow along with this video tutorial to make this blanket:
Support YARNutopia today so we can continue to bring you clear, quality crochet tutorials
**You can always contact me via Facebook if you have any problems with the pattern. I am happy to help if you have any questions along the way.
***You can definitely sell anything you make from my patterns, please just link back to my website YARNutopia.com. Thank you!
Teacher: Nadia Fuad
Video and Editing: Fuad Azmat (My Daddy)
Share your work on Facebook!
Add me on Snapchat: YARNutopia
Follow me on Instagram
Visit My Ravelry Store and add this to your Favorites!
Follow me on Twitter: @YARNutopia
Enjoy this video and subscribe to my channel on YouTube for more tutorials on how to crochet!
Leave a comment, and share with your friends!
Pattern:
Designed by Nadia Fuad You *may* sell items made from my pattern, but please reference my website YARNutopia.com.
Please do not copy, sell, and/or post this pattern and claim it as your own.
NOTES:
-Use a smaller hook to make these smaller
-Use a bigger hook to make these bigger
-Watch the FULL introduction of the video tutorial for frequently asked questions and watch the full video for tips on how to make these smaller or bigger.
-You will need 966 Yards of yarn for this whole project.
-You can use any type of Worsted Weight, Aran, or Bulky yarn to crochet this blanket
-Different Afghan Sizes can be found in the middle of this page here.
You can buy any of the items in this kit. Buy all or buy one item. Check it out to see the supplies you can get online to make this project!
Special stitches:
Ch(s): chain(s)
YO: Yarn Over
St(s): Stitch(es)
Sl st: slip stitch
SK: Skip
SC: Single Crochet
HDC: Half Double Crochet
Pattern:
If you have any confusion or difficulty with reading this pattern, please watch the video tutorial to have visual instructions.
Pattern:
Ch 75 or any multiple of 2 +1
Row 1: In the Second Ch from hook, pull up a loop in each of next 5 chs, YO and pull through the 6 loops on hook, ch 1. *Pull a loop through the “eye” formed by the Ch 1 just made, pull a loop through back of last loop of star st, pull a loop through same ch where last loop of star st was made, pull a loop through each of next 2 chs, YO and pull through the 6 loops on hook, ch 1. Repeat from * to the end of the row, HDC in the last ch, Ch 1, turn.
Row 2: SC in HDC, SC in “eye” of next star, 2 SC in the “eye” of each star stitch across, ending with SC in top of the turning Ch, Ch 2, Turn.
Row 3: Pull a loop through front strand of 2nd Ch from hook, pull a loop through back strand of same Ch, Pull a loop through each of the next 3 Sts, YO and pull through the 6 loops on the hook, Ch 1. *Pull a loop through the “eye” formed by the Ch 1 just made, pull a loop through back of last loop of star st, pull a loop through same St where the last loop of star st was made, pull a loop through each of next 2 Sts, YO and pull through the 6 loops on hook, ch 1, repeat from * to end of the row, HDC in last turning Ch. Ch 1, turn.
Rows 4-70: Repeat Rows 2 and 3 ending with a repeat of Row 2 (Single Crochet Row)
Assembly step:
I changed color every 10 rows. See video tutorial for visual instructions on changing color and if you run out of yarn during your project.
Enjoy!!
This post contains affiliate links, which means if you click on the link and buy from the linked websites, I will receive a small percentage of the value of your order. The amount you pay is not changed.
The yarn provided for this pattern is courtesy of Red Heart Yarns
I am a big fan of doing DIY projects and re-purposing or reusing items and breathing new life into something old making it new again. I found this ratty avocado green velvet and tweed ottoman at a garage sale for $1.00. Most people would consider this a piece of junk but to me, I saw so much potential! I brought it home and got to work at designing something that I could cover it with.
Nate and I are in the process of buying a house, and soon we will be moving in and making it a home. Although I plan to live with my parents until our wedding, I will be back and forth between our cities busy getting our home prepared for the two of us to spend our future! I decided to use this ottoman for my first DIY project for our new home.
To make it a perfect square in height and width, I needed to add feet. I glued and then screwed four blocks of wood to the bottom of this piece.
Then, I covered the entire piece in quilt batting to give it some cushion as well as making the entire piece consistent in color hiding all the hideous green.
Once finished, I designed The New Beginnings Afghan Block and replicated and sewed together 5 squares for this slipcover. I named it New Beginnings because that is symbolic of this time in our life…
***You can sell anything you make from my patterns, please just link back to my website YARNutopia.com. Thank you!
Teacher: Nadia Fuad
Video and Editing: Fuad Azmat (My Daddy)
Share your work on Facebook!
Add me on Snapchat: YARNutopia
Follow me on Instagram
Visit My Ravelry Store and add this to your Favorites!
Follow me on Twitter: @YARNutopia
Enjoy this video and subscribe to my channel on YouTube for more tutorials on how to crochet!
Leave a comment, and share with your friends!
Pattern:
Designed by Nadia Fuad You *may* sell items made from my pattern, but please reference my website YARNutopia.com.
Please do not copy, sell, and/or post this pattern and claim it as your own.
NOTES:
-You can use a smaller or larger hook to make this square depending on your tension. I wouldn’t use anything larger than an I-5.5mm Crochet Hook though.
-The finished square measures 14 inches.
-This square is worked from the center outward
Special stitches:
Ch(s): chain(s)
YO: Yarn Over
St(s): Stitch(es)
Sl st: slip stitch
SK: Skip
SC: Single Crochet
HDC: Half-Double Crochet
DC: Double Crochet
TR: Treble Crochet (YO twice)
Beg. Popcorn: ch up 3, 3 DC in same st, remove hook from loop, insert hook in 1st st, put loop back on hook and pull through.
Popcorn: 4 DC in same st, remove hook from loop, insert hook in 1st st, put loop back on hook and pull through.
FPDTR2TOG: Front Post Double Treble 2 Stitches Together
FPDC: Front Post Double Crochet
BPTR: Back Post Treble Crochet
BPDC: Back Post Double Crochet
BPHDC: Back Post Half Double Crochet
BPSC: Back Post Single Crochet
Pattern:
If you have any confusion or difficulty with reading this pattern, please watch the video tutorial to have visual instructions.
Start with Warm Brown:
Ch 4, sl st to beginning to form a ring
Rnd 1: Ch up 3 (Counts as DC here and throughout), 15 DC in ring, sl st to ch up 3. (16 sts)
Rnd 2: With Frosty Green, In any st, Ch up 3, Beg. Popcorn in same st, ch 2, * sk next st, Popcorn st in the next st, Ch 2, repeat from * around, sl st to beg. Popcorn st. (8 popcorn sts, 8 ch 2 sps)
Rnd 3: With Warm Brown, In any ch 2 sp, Ch 1, SC in same sp, *EDC in Sk’d st from Rnd 1, SC in same ch 2 sp, Ch 1, Sk popcorn st, SC in next ch 2 sp, repeat from * around, sl st to 1st SC. (16 SC, 8 EDC)
Rnd 4: With Redwood, In any ch 1 sp, Ch up 3, 4 DC in same sp, * SC in next EDC, 5 DC in next ch 1 sp, repeat from * around, sl st to 1st ch up 3. (8 shells, 8 SC)
Rnd 5: With Buff, BPSC around any SC, *BPSC around next 2 sts, [DC, ch 2, DC] in next st, BPDC on next 2 sts, BPSC around next sc, repeat from * around, sl st to 1st SC. (32 BPDC, 8 BPSC, 8 CH 2 sps)
Rnd 6: With Coffee, In 1st BPDC after a V-Stitch, Ch up 3, DC in next 4 sts, * Ch 2, Sk [DC, Ch2, DC], DC in next 5 sts, repeat from * around, sl st to ch up 3. (40 DC, 8 Ch 2 sps)
Rnd 7: With Gold, In ch 2 sp from Rnd 5 (Work in front of Ch 2 sps from round 6), Ch up 3, [2DC, ch 2, 3 DC] in same ch 2 sp, *BPDC on next 5 sts on round 6, [3DC, ch 2, 3 DC] in next ch 2 sp of Rnd 5, repeat from * around, sl st to 1st ch up 3. (88 sts, 8 ch 2 sps)
Rnd 8: With Buff, Start in ch 2 sp from Round 6. Ch up 3, 3 DC in same sp, *FPTR around next DC from Round 5, sk 1st BPDC, DC in next st, [DC, TR, Ch 2, TR, DC] in next st, DC in next st, Sk next BPDC, FPTR around DC from Round 5, 4 DC in next ch 2 sp from round 6, repeat from * around. Sl st to Ch up 3. (80 DCs, 16 FPTR)
If that round is confusing, please see video tutorial for visual instructions.
Rnd 9: With Flamingo, In any ch 2 sp: Ch up 1, *3 SC in ch 2 sp, BPSC on next st, BPHDC on next st, BPDC on next 2 sts, BPTR on next 4 sts, BPDC on next 2 sts, BPHDC on next st, BPSC on next st, repeat from * around, sl st to first sc. (120 sts)
Rnd 10: With Warm Brown, Start in 1st SC of a 3 sc grouping in a ch 2 sp, Ch up 1, SC in 1st 3 sts, HDC in next 12 sts, *SC in next 3 sts, HDC in next 12 sts, repeat from * around, Sl st to 1st SC. (120 sts)
Rnd 11: With Buff, Working in BLO, Start in a 1st SC of a 3 SC grouping (See video tutorial for specific location), Ch up 1, SC in 9 sts, *FPDTR2TOG on FPTR from Round 8 and next FPTR from Round 8, SC in next 15 sts, repeat from * around, end with SC in last 6 sts, sl st to first SC.
Rnd 12: With Redwood, work in both loops, start in any st, Ch up 1, SC in each st around, sl st to first SC.
Rnd 13: With Frosty Green, Start in 8th St from FPDTR2TOG st, ch up 3, [DC, ch 2, 2DC] in same st, *DC in next 8 sts, HDC in next 4 sts, SC in next 7 sts, HDC in next 4 sts, DC in next 8 sts, [2DC, ch 2, 2 DC] in next st, repeat from * around, sl st to beg ch up 3.
Rnd 14: With Coffee, In any ch 2 sp, Ch up 3, 4 DC in same sp, *BPDC on next 10 sts, BPHDC on next 4 sts, BPSC on next 7 sts, BPHDC on next 4 sts, BPDC on next 10 sts, 5 DC in next ch 2 sp, repeat from * around. Sl st to beg. ch up 3.
Rnd 15: With Gold, Start in Middle DC of corner, Ch up 3, [DC, ch 2, 2 DC] in same st, *DC in each st until middle DC of next corner, [2DC, ch 2, 2DC] in middle DC, Repeat from * around, sl st to beg. ch up 3.
Rnd 16: With Buff, start in ch 2 sp, ch up 3, [DC, ch 2, 2DC] in same sp, *DC in each st until next corner, [2DC, ch 2, 2 DC] in next corner, repeat from * around, sl st to beg ch up 3.
Rnd 17: With Flamingo: start in ch 2 sp, ch up 3, [DC, ch 2, 2DC] in same sp, *DC in each st until next corner, [2DC, ch 2, 2 DC] in next corner, repeat from * around, sl st to beg ch up 3.
Rnd 18: With Coffee: start in ch 2 sp, ch up 3, [DC, ch 2, 2DC] in same sp, *DC in each st until next corner, [2DC, ch 2, 2 DC] in next corner, repeat from * around, sl st to beg ch up 3.
Fasten off. Weave in all ends.
This post contains affiliate links, which I may be compensated for when you make a purchase. That means if you click on any link and buy from the linked websites, I will receive a small percentage of the value of your order. The amount you pay is not changed. Thank you for all your support in clicking the links in my blog!! You all are so amazing!! ~Nadia
Searching for inspiration on a new project practically fell into my lap recently! I ran across a wall hanging/quilt project that popped up on my news feed on Facebook of a Fabric Panda Blanket. I was fixated on it and took a screenshot with the idea that I could somehow replicate it using all crochet. The cute peeking pandas pop right out on this blanket and add a touch of whimsy!!
The shape in the quilting world that was used for the original pieces was called the clam-shell. Seeing that replicating the clam-shell shape was going to be a bit of a challenge in crochet that I didn’t want to take on, I decided to create this project using all full circles and half circles.
Picking out my color palette was my second challenge as the template that I was working off of used many shades of printed fabric. How would I achieve a look similar without it looking too busy? I decided to stick with solids on all the shapes however; a variegated yarn might add some fun texture to this piece. Really anything goes!
After counting out all the pieces needed and arranging the color palette, it was a simple repeat project from there. Just crochet 49 full circles and 22 half circles. I made my original circles approximately six inches across, but feel free to make them larger for a more sizable piece. You can also use the same size circles, just multiply to make it larger if you are going for a bigger blanket. Like I said earlier, anything goes!
Below, find the video tutorial and written pattern for your convenience. I love how this turned out and it can be a darling accent hung on a wall in a nursery or child’s room or used as the quilt it was intended. Also, with a few minor adjustments and a little handy artistry, you could add a stalk of bamboo or change these pandas to emojis, puppies, kitties, silly monsters, or any other fun and whimsical character! Let your imagination run wild! Have fun and be sure to share your work here on Facebook when your project is complete!
Please check out the new beginning graphic designed and developed by my brother Nabeel. He and his wife own and operate NFD Graphics. Please hop over to their Facebook page and show them some love! For all your graphic and video/logo design needs be sure to contact them today! http://www.nfdgraphics.com
Follow along with this video tutorial to make this panda quilt:
Support YARNutopia today so we can continue to bring you clear, quality crochet tutorials
**You can always contact me via Facebook if you have any problems with the pattern. I am happy to help if you have any questions along the way.
***You can definitely sell anything you make from my patterns, please just link back to my website YARNutopia.com. Thank you!
Teacher: Nadia Fuad
Video and Editing: Fuad Azmat (My Daddy)
Share your work on Facebook!
Add me on Snapchat: YARNutopia
Follow me on Instagram
Visit My Ravelry Store and add this to your Favorites!
Follow me on Twitter: @YARNutopia
Enjoy this video and subscribe to my channel on YouTube for more tutorials on how to crochet!
Leave a comment, and share with your friends!
Pattern:
Designed by Nadia Fuad You *may* sell items made from my pattern, but please reference my website YARNutopia.com.
Please do not copy, sell, and/or post this pattern and claim it as your own.
NOTES:
-Use a smaller hook to make these smaller
-Use a bigger hook to make these bigger
-Watch the FULL introduction of the video tutorial for frequently asked questions and watch the full video for tips on how to make these smaller or bigger.
-You will need 1100 Yards of yarn for this whole project.
-My blanket is 32 inches (82 cm) by 37 inches (94 cm)
-You can use any type of Worsted Weight, Aran, or Bulky yarn to crochet this blanket
-Scroll down to see Materials Section for Color Numbers and See written pattern for how many of each Circle and Half Circle you will need.
-My suggestion would be to not use a dark tone behind the panda ears. As you can see, the ears don’t show up really well in front of the Soft Navy yarn. A brighter color may have been better in that location.
-Different Afghan Sizes can be found in the middle of this page here.
Full Circles: Ch 3
Rnd 1: 10 DC in 3rd Ch from hook, sl st to first DC, Ch 2. (10)
Rnd 2: 2 DC in each st around, sl st to first DC, Ch 2. (20)
Rnd 3: [2 DC in next st, DC in next st] 10 times, Sl st to first DC, Ch 2. (30)
Rnd 4: [2 DC in next st, DC in next 2 sts] 10 times, Sl st to first DC, Ch 2. (40)
Rnd 5: [2 DC in next st, DC in next 3 sts] 10 times, Sl st to first DC. (50)
Fasten off with long tail for sewing.
Half Circles:
Ch 3
Row 1: 5 DC in 3rd Ch from hook, ch2, turn. (5)
Row 2: 2 DC in each st across, ch 2, turn. (10)
Row 3: [2DC in next st, DC in next st] 5 times, ch 2, turn. (15)
Row 4: [2DC in next st, DC in next 2 sts] 5 times, ch 2, turn. (20)
Row 5: [2DC in next st, DC in next 3 sts] 5 times. (25)
Continue to SC around entire piece for a clean edge.
Fasten off with long tail for sewing.
Assembly step:
Sew all your pieces together starting from the top down. Use the photo below as a layout guide. (See video tutorial for visual instructions)
Panda Features: Ears: Make 14
With Black work in continuous rounds
Ch 2 Rnd 1: 6 SC in 2nd Ch from hook. (6) Rnd 2: 2 SC in each st around. (12) Rnd 3-4: SC in each st around. (12)
Fasten off with long tail for sewing.
Eye Patches: Make 14
With Black
Ch 4 Row 1: 2 SC in 2nd ch from hook, SC in next ch, 2 SC in last ch, ch 1, turn. (5) Row 2: SC across, ch 1, turn. (5) Row 3: HDC in first 2 sts, Sl st in next st, HDC in last 2 sts, ch 1, turn. Row 4: SC in first 2 sts, sk sl st, SC in last 2 sts and continue to SC around entire piece.
See video tutorial for visual instructions on last row.
White part of eyes:
You can embroider a lot of the eyes, but the white part is:
Ch 2 Rnd 1: 6 SC in 2nd Ch from hook. (6)
Assembly step:
Sew panda ears and eyes to white panda circles
Embroider nose and mouth on each one.
See video tutorial for visual instructions.
Border:
Using Black: SC around entire blanket putting 3 SC in corners.
Fasten off, weave in all ends.
Enjoy!!
This post contains affiliate links, which means if you click on the link and buy from the linked websites, I will receive a small percentage of the value of your order. The amount you pay is not changed.
The yarn provided for this pattern is courtesy of Red Heart Yarns
Save those cute outfits and protect the front of your baby’s clothing with The Blue Whale Baby Bib! This cotton bib uses a graphing technique to create this fun aquatic themed infant accessory! This would be cute in any combination of pastel colors! Makes a great gift for boys and girls!!
Whether you create this for your own little one or for someone special, this is perfect for baby showers, celebration of birth, or just to fill a need when you have a newborn. This bib will be a great addition to any layette!
Watch this video tutorial to learn how to make this bib:
Support YARNutopia today so we can continue to bring you clear, quality crochet tutorials
Please check out the new beginning graphic designed and developed by my brother Nabeel. He and his wife own and operate NFD Graphics. Please hop over to their Facebook page and show them some love! For all your graphic and video/logo design needs be sure to contact them today! http://www.nfdgraphics.com
Pattern:
“Designed by Nadia Fuad You *may* sell items made from my pattern, but please reference my website YARNutopia.com.
Please do not copy, sell, and/or post this pattern and claim it as your own.
You can buy any of the items in this kit. Buy all or buy one item. Check it out to see the supplies you can get online to make this Whale Bib!
NOTES:
-This project uses less than 120 yards of yarn.
-Use a smaller hook to make these smaller
-Use a bigger hook to make these bigger
-Watch the FULL video tutorial for visual instructions for each row and tips on how to make this smaller and bigger.
-Weave in all the ends as you go so you don’t have to weave them all in at the very end.
-If the instructions above are confusing, please message me on Facebook, and I will answer any questions you may have. Please be specific in your questions. Thank you!!
-The measurements for this bib is 9 inches wide and 8 inches long but you can make your straps as long as you’d like!
-The typical circumference of a baby neck is between 10 and 11 inches around.
-Use this awesome guide to learn Graph Pattern Designs
-This pattern does not have a graph available. I just have the written instructions
-I recommend to drop the yarn in the back and not trail it under your stitches when changing color, you won’t see it under your stitches then. (See video tutorial for visual instructions)
Special stitches:
Ch(s): chain(s)
YO: Yarn Over
St(s): Stitch(es)
BLO: Back Loops Only
prev.: Previous
Sl st: slip stitch
SC: Single Crochet
SC2TOG: Single crochet decrease
HDC: Half Double Crochet
DC: Double Crochet
TR: Treble Crochet
Pattern:
If you have any confusion or difficulty with reading this pattern, please watch the video tutorial to have visual instructions.
Bib:
Start with Blue
Ch 22 Row 1: SC in 2nd Ch from hook and across, ch 1, turn. (21)
Row 2: 2SC in 1st st, SC in each st until last st, 2SC in last st, ch 1, turn. (23)
Row 3-5: Repeat Row 2 (After Row 5, you should have 29 sts)
Rows 6-11: SC in each st across, Ch 1, turn. (29)
Row 12: With Blue, continue to SC in 23 sts, Change to White, SC in 3 sts, Change to Blue, SC in 3 sts, Ch 1, turn.
Row 13: With Blue, SC in 4 sts, Change to White, SC in 5 sts, Change to Blue, SC in 19 sts, Change to White, SC in last st, ch 1, turn.
Row 14: With White, SC in 1st st, Change to Blue, SC in 19 sts, Change to White, SC in 6 sts, Change to Blue, SC in last 3 sts, ch 1, turn.
Row 15: With Blue, SC in 3 sts, Change to White, SC in 7 sts, Change to Blue, SC in 18 sts, Change to White, SC in last st, ch 1, turn.
Row 16: With White, SC in 1st st, Change to Blue, SC in 18 sts, Change to White, SC in 7 sts, Change to Blue, SC in last 3 sts, ch 1, turn.
Row 17: With Blue, SC in 4 sts, Change to White, SC in 7 sts, Change to Blue, SC in 17 sts, Change to White, SC in last st, ch 1, turn.
Row 18: With White, SC in 2 sts, Change to Blue, SC in 16 sts, Change to White, SC in 5 sts, Change to Blue, SC in 6 sts, Ch 1, turn.
Row 19: With Blue, SC in 7 sts, Change to White, SC in 5 sts, Change to Blue, SC in 15 sts, Change to White, SC in last 2 sts, ch 1, turn.
Row 20: With White, SC in 3 sts, Change to Blue, SC in 14 sts, Change to White, SC in 4 sts, Change to Blue, SC in 8 sts, Ch 1, turn.
Row 21: With Blue, SC in 8 sts, Change to White, SC in 5 sts, Change to Blue, SC in 12 sts, Change to White, SC in last 4 sts, ch 1, turn.
Row 22: With White, SC in 5 sts, Change to Blue, SC in 10 sts, Change to White, SC in 5 sts, Change to Blue, SC in 9 sts, Ch 1, turn.
Row 23: With Blue, SC in 2 sts, Change to White, SC in 2 sts, Change to Blue, SC in 5 sts, Change to White, SC in 6 sts, Change to Blue, SC in 8 sts, Change to White, SC in last 6 sts ch 1, turn.
Row 24: With White, SC in 7 sts, Change to Blue, SC in 6 sts, Change to White, SC in 7 sts, Change to Blue, SC in 5 sts, Change to White, SC in last 4 sts, Ch 1, turn.
Row 25: With White, SC in 6 sts, Change to Blue, SC in 3 sts, Change to White, SC in last 20 sts, ch 1, turn.
Row 26: With White, SC in 20 sts, Change to Blue, SC in 2 sts, Change to White, SC in last 7 sts, ch 1, turn.
Rows 27-32: SC in each st across, ch 1, turn. (29)
You can continue SC Rows until your bib is as long as you need it to be. End on an Even Numbered row.
At this point, go on to making the straps.
Right Strap: Row 1: SC in 12 sts, leave the rest unworked, ch 1, turn. (12) Row 2: SC2TOG, SC in the rest of the sts on the row, ch 1, turn. (11) Row 3: SC in each st across, ch 1, turn. (11) Rows 4-13: Repeat Rows 2 and 3 until you have 6 sts (See video tutorial for visual and audio instructions) Rows 14-19: SC in each st across, ch 1, turn. (6) Row 20: SC in 2 sts, Ch 2, Sk 2 sts, SC in last 2 sts, ch 1, turn. (Button hole made) Row 21: SC in each st and each ch across.
Fasten off, weave in end
Left Strap:
Sk 5 sts on Row 32 of bib, attach yarn
(Working from inside center of bib to edge) Row 1: SC in each st to end of row, ch 1, turn. (12) Row 2: SC in each st until 2 sts remain, SC2TOG, ch 1, turn. (11) Row 3: SC in each st across, ch 1, turn. (11) Rows 4-13: Repeat Rows 2 and 3 until you have 6 sts (See video tutorial for visual and audio instructions) Rows 14-20: SC in each st across, Ch 1, turn. (6)
Do not fasten off
Continue to SC around entire piece, change color where blue portion starts and then pick back up with white. (SEE VIDEO TUTORIAL TO SEE WHERE TO START AND STOP COLOR CHANGES)
Fasten off, weave in all ends.
Tail fin:
Ch 22
Sl st in 2nd ch from hook, SC in next, HDC in next, DC in next, TR in next 2 Chs, DC in next, HDC in next, SC in next, Sl st in next 3 chs, SC in next, HDC in next, DC in next, TR in next 2 chs, DC in next, HDC in next, SC in next, [Sl st, ch 2, Sl st] in last ch, working on opposite side of foundation ch: SC in next st, HDC in next, DC in next, TR in next 2 sts, DC in next, HDC in next, SC in next, Sl st in next 3 sts, SC in next, HDC in next, DC in next, TR in next 2 sts, DC in next, HDC in next, SC in next, Sl st in last, ch 2, sl st to first sl st. Fasten off with long tail for sewing.
Assembly step:
Sew tail fin to bib using photos as a visual guide.
Sew button on Strap opposite to button hole.
Eye:
Ch 2 Round 1: 6 SC in 2nd ch from hook,
Fasten off with long tail for sewing.
Splashes: Small Splash:
Ch 2, 3 SC in 2nd ch from hook, ch 2, 3 more SC in same ch, sl st to first SC, Fasten off with long tail for sewing.
Larger Splash:
Make 2
Ch 2, 3 HDC in 2nd ch from hook, ch 2, 3 more HDC in same ch, sl st to first HDC, Fasten off with long tail for sewing.
Assembly step:
Sew eye and splashes to the bib.
Weave in all your ends.
Enjoy!!
This post contains affiliate links, which I may be compensated for when you make a purchase. That means if you click on any link and buy from the linked websites, I will receive a small percentage of the value of your order. The amount you pay is not changed. Thank you for all your support in clicking the links in my blog!! You all are so amazing!! ~Nadia
I’m going to “bug” you a little bit to tell you this blog is “crawling” with something new for your crochet hook! This cuddly Caterpillar Lovey project will provide an infant comfort and security! This silly, lovable little guy makes me smile every time I look at him and it’s sure to be a big hit with the lil’ ones!
Make it in as many colors as you’d like!! The possibilities are endless!!
Follow along with this video tutorial to learn how to make this lovey:
Please check out the new beginning graphic designed and developed by my brother Nabeel. He and his wife own and operate NFD Graphics. Please hop over to their Facebook page and show them some love! For all your graphic and video/logo design needs be sure to contact them today! http://www.nfdgraphics.com
Pattern:
“Designed by Nadia Fuad You *may* sell items made from my pattern, but please reference my website YARNutopia.com.
Please do not copy, sell, and/or post this pattern and claim it as your own.
You can buy any of the items in this kit. Buy all or buy one item. Check it out to see the supplies you can get online to make this Lovey!
NOTES:
-This project uses less than 200 yards of yarn.
-Use a smaller hook to make these smaller
-Use a bigger hook to make these bigger
-Watch the FULL video tutorial for visual instructions for each row and tips on how to make this smaller and bigger.
-Weave in all the ends as you go so you don’t have to weave them all in at the very end.
-If the instructions above are confusing, please message me on Facebook, and I will answer any questions you may have. Please be specific in your questions. Thank you!!
-The measurements for this Lovey is 18 inches but you can make yours as big as you’d like!
Special stitches:
Ch(s): chain(s)
YO: Yarn Over
St(s): Stitch(es)
BLO: Back Loops Only
prev.: Previous
Sl st: slip stitch
SC: Single Crochet
SC2TOG: Single crochet decrease
DC: Double Crochet
Pattern:
If you have any confusion or difficulty with reading this pattern, please watch the video tutorial to have visual instructions.
Lovey:
Ch 4
Rnd 1: 2 DC in 4th Ch from hook, [Ch 2, 3 DC in same CH] 3 times, ch 1, SC in beg. ch 3, Ch 2, Turn.
Rnd 2: DC in same corner sp, *DC in each st until next corner, [2DC, ch 2, 2 DC] in corner, repeat from * around put 2 DC around SC from previous round to finish off beg. corner. Ch 1, SC in Ch 2, Ch 2, Turn.
Round 3-15: Repeat Round 2 Change colors after Round 13
See video tutorial for visual instructions
Fasten off, weave in all ends.
Eyes:
With White
Ch 2 Rnd 1: 6 SC in 2nd ch from hook. (6)
Fasten off with long tail for sewing
Embroider Black Dots for the pupils
Antennae: Make 2 With Yellow
Ch 2 Work in BLO and in continuous rounds Rnd 1: 6 SC in 2nd ch from hook. (6) Rnd 2: 2 SC in each st around. (12) Rnd 3: [SC2TOG] 6 times. (6) Rnd 4-8: SC in each st around. (6)
Fasten off with long tail for sewing.
Head:
With Glow Worm
Ch 2 Work in BLO and in continuous rounds Rnd 1: 6 SC in 2nd ch from hook. (6) Rnd 2: 2 SC in each st around. (12) Rnd 3: [2SC in next st, SC in next st] 6 times. (18) Rnd 4: [2SC in next st, SC in next 2 sts] 6 times. (24) Rnds 5-6: SC in each st around. (24) Rnd 7: [2SC in next st, SC in next 3 sts] 6 times. (30) Rnd 8: SC in each st around. (30) Rnd 9: [2SC in next st, SC in next 4 sts] 6 times. (36) Rnds 10-11: SC in each st around. (36) Assembly Step:
Sew on the antennae and the eyes
Continue crocheting the head Rnd 12: [SC2TOG, SC in next 4 sts] 6 times. (30) Rnd 13: [SC2TOG, SC in next 3 sts] 6 times. (24) Rnd 14: [SC2TOG, SC in next 2 sts] 6 times. (18)
Stuff Head Rnd 15: [SC2TOG, SC in next st] 6 times. (12) Rnd 16: [SC2TOG] 6 times. (6)
Fasten off with long tail for sewing.
Feet: Make 6
With Jade
Ch 2 Rnd 1: 6 SC in 2nd ch from hook. (6)
Fasten off with long tail for sewing
Body Circles:
Make 1 in Buff (4 Rounds)
Make 1 in Pumpkin (4 Rounds)
Make 1 in Spring Green (3 Rounds)
Make 1 in Yellow (2 Rounds)
Ch 2 Rnd 1: 6 SC in 2nd ch from hook, sl st to 1st SC, ch 1. (6) Rnd 2: 2 SC in each st around, Sl st to 1st SC, ch 1. (12) Rnd 3: [2SC in next st, SC in next st] 6 times, sl st to 1st SC, ch 1. (18) Rnd 4: [2SC in next st, SC in next 2 sts] 6 times, Sl st to 1st SC. (24)
Fasten off with long tail for sewing
Assembly Step:
Sew Body to Lovey and all the body pieces as well. Use the photos as a guide to sew on your pieces.
Enjoy!!
This post contains affiliate links, which means if you click on the link and buy from the linked websites, I will receive a small percentage of the value of your order. The amount you pay is not changed.
The yarn provided for this pattern is courtesy of Red Heart Yarns
On June 1st, 2017, YARNutopia will launch the summer season by beginning a 30 Day Photo Challenge and invite all crochet, knit, and yarn lovers to join in on this fun and exciting one month photography adventure.
On each day in June, you will find a daily topic that you, the audience, can use for inspiration. Be creative, think outside the box, there is no right or wrong answer!
Simply, take a photo pertaining to the daily topic and post it on Facebook in the comments section after I post my Photo of the Day, and then share your photo on Instagram with the hashtag #YARNutopia30DayChallenge.
You can participate on your own personal photo journey and share privately with your own friends and family or use ourFacebook page or go to Instagram to post your photos and see what others are sharing as well!
This blog provides 30 inspirational guidelines as shown in our info-graphic. I will be posting my very own Photo of the Day to also help inspire you! This activity is a fun way to share our love of that yarn life in a new creative outlet!
This is NOT a competition so there’s NO PRESSURE to finish or participate. There’s NO PRIZE (other than the memories you’re going to make in this month of creativity!) There is NO OBLIGATION. Join in for one day or the entire month! This is purely for enjoyment and entertainment! There are NO RULES other than the *obvious* and it goes without saying, but I will say it anyway, inappropriate content will NOT be acknowledged and will be deleted. I am sure we won’t need to worry about that because this community is THE BEST.
This is just a way for our community to have a month of craft/yarn filled fun and share this fun in another creative way, through PHOTOS! One photo, each day, for 30 days of JUNE!
***Share this blog, join along, share your photos, hashtag #YARNutopia30DayChallenge and lets challenge ourselves to get even more creative than we already are!***
So, to Recap:
• Bookmark this page (or follow us on Facebook or Instagram to see the daily photo).
• Check YARNutopia.com each day in June or follow along on our social media accounts from June 1st to 30th for the daily topic.
• Complete the daily challenge (feel free to join in for a day, a few days, or the entire month) following our topic inspiration take a photo that is inspired by that day’s topic (we hope each day brings fun, happiness, and creativity to your day! I can’t wait to see what you all come up with!).
• Post pictures of the day for everyone to see using the hashtag #YARNutopia30DayChallenge
This 30 Day Photo Challenge is starting on June 1st, 2017. The theme of this 30 Day Challenge is all related to the yarn and crochet life. The topics cover a variety of inspirational
30 Day Challenge List
Day 1: Favorite Yarn
Post a photo your favorite skein of yarn, or your favorite yarn used in a project. Share the name of your favorite yarn!
Without a doubt, Red Heart Treasures has always been my favorite. Just looking at this photo makes me happy! Imagine how bummed I was to learn this is no longer available, but I have been on a search for a similar replacement. In the meantime, my last few skeins are waiting for the perfect project!!
Day 2: Can’t Live Without
A tool, yarn, or item you use or need every day.
This is my Crochet Survival Kit! How can we limit to just one thing? If I had to, it would be my H-5.00mm crochet hook, but in an ideal situation I would grab these essentials! What is your “Can’t Live Without” item? What would be in your “Crochet Survival Kit?”
Day 3: My Stash
Where you store and keep your yarn stash.
In truth, I have yarn stashed all over my house, but this honeycomb shelf unit is where most of my yarn has found a color-coded home. Haha! My rainbow collection!
Day 4: In My Bag
Take a photo of what is in your bag right now.
Presently, my bag is full of wedding preparation supplies including my wedding planner, my patterns notebook, and Aunt Lydia’s Thread for the flowers I am crocheting for my bouquets (future video tutorial) Oh, and my headphones!
Day 5: Current Project/WIP
Show a recent project or current work in progress.
My crochet flowers for my wedding are what’s on my hook at the moment. I have a little more than 9 months to crochet all the bouquets, boutonnieres, corsages, and centerpiece flowers. And YES, I plan on doing some video tutorials along the way. My bridal palette is jewel tones. All the flowers are a reflection of those colors! I’m excited to share this part of my journey with you!
Day 6: The First Letter of Your First Name
Photograph something related to your craft that starts with the first letter of **your** first name. In my case, something starting with the letter N for Nadia.
For me, it’s the letter N. Here are my pattern NOTES full of my stitch NUMBERS!! The latter N was hard to find words related to crochet! Anyone else have luck with the first letter of YOUR name??
Day 7: In the Home
Show something in your home associated with crochet/knit: an afghan over a chair, a blanket on a bed, your yarn pile next to a chair or anything that shows your work at home. The possibilities are endless!
This is my studio space. Here is where all the crochet magic happens. If I’m not curled up crocheting on my couch, this is where you will find me in my home.
Day 8: In the Moment
Take a photo of a moment in your day that crochet is involved. Examples: Crocheting or knitting outside, having coffee while enjoying your craft, your pet tangled in yarn, just a moment captured.
Selfie time!!!! This is me right now working on a new project! Hello from Wisconsin!
Day 9: Something Old
An older item you made, or an antique piece passed on from generations, something you’ve had for years.
I found a stack of vintage crochet books at a thrift sale for 25 cents each. I seriously squealed with delight, did a happy dance, and grabbed an entire stack! It felt like I discovered gold! #crochetgold
Day 10: Something New
A new item you just bought or inherited, a new tool, new yarn, anything brand new you want to share.
This delightful Red Heart Yarns Super Saver Ombré yarn is just waiting for me to sink my hook into it! I’m loving this new yarn! #yarnpyramid
Day 11: Favorite Hook/Needles
A photo of your go-to hook or needle, a favorite hook or set of needles that you find yourself always reaching for.
My favorite crochet hook is this great ergonomic hook made by the Etsy Shop WoodBeFancy. I have arthritic hands, and it helps to have a thick handle to grip. It relieves my hand stress. This gives me longer crocheting times and less stiffness when I take a break and uncurl my fingers. Find the same hook here.
Day 12: Variegated
Variegated yarn that you love, a piece made from variegated yarn, anything that is associated that has gradual or sharp color changes.
Variegated meaning: Having streaks, marks, or patches of a different color or colors; variety.
A while ago, I purchased this Red Heart Boutique Unforgettable Yarn in the color Winery, and while driving home, I saw the sky just before sunset. The changes in the colorway of this beautiful yarn had the same streaks of color variation as the sky! I thought it was pretty remarkable, so I took this side by side shot.
Day 13: Wearable
Something wearable you made, want to make, someone has made for you. If you share someone else’s pattern or photo, be sure to credit the designer!
A stuffed amigurumi toy you made, want to make or someone has made for you. If you share someone else’s pattern or photo, be sure to credit the designer!
Summer is here in the USA and Shenanigans wastes no time to find his way to the pool! This old photo is a perfect reminder to kick back and seize the day! #carpediem Many have asked about this sheep amigurumi. You can find the written pattern here designed by Harugurumi.
Day 15: Favorite Color
Your favorite color of yarn, or a crocheted/knit item made in your favorite color.
Green. Need I say more? I just love the variations in this color. It’s very refreshing!
Day 16: My Happy Place
Somewhere you love to crochet or knit. Examples: In the car on a long ride, in a favorite chair or bed, on your porch, in your backyard, at a park. Anywhere you love to zone out and enjoy your craft.
My Happy Place is being surrounded by Yarn! Yesterday I stopped by the warehouse sale at Herrschners Retail Store for some deals, and I was overcome by delight!! I want ALL THE YARN! Not much can make me this giddy, but the words Yarn and Sale combined in one fantastic place can pretty much guarantee to make me happy!!
Day 17: Scraps
Share a picture of your scrap yarn. What do you do with your scraps? Where do your scraps end up? Share scraps that turn up in unexpected places.
Found all over the house. On tables, on the floor, in the car, and even embedded in my cheek when I doze off working on a project. Where do you keep/find your scraps?
Day 18: Hands
Share a photo of your hands involved in your craft, holding your hook or project.
Happiness is handmade. Our hands create the things we once thought impossible by bringing our yarn and hook together.
Day 19: Texture
Share a close-up photo of stitches and their texture. Zoom in and show a neat close-up of a project, a fun stitch, anything showcasing different texture.
I love playing with yarn to create the richest textures. I love the look of this Woven Stitch pattern. It begs you to reach out and touch it! This is a close-up photo of the Woven Dreams Baby Blanket. Find the full photo here
Day 20: Black and White
Anything you want to share related to our craft in black and white.
Candid Crochet Moment. A typical rainy day. You will find me in pajamas curled up on the couch, hook in hand, working on my next new thing. This is my world. #reallife#candidcrochetmoments
Day 21: Stitches
Show your project and name the stitches you are working on.
Here’s an array of stitches on a past project. Using an eclectic mix of colors and a blend of crochet artistry, you can create this fantastic project! The stitches include Single Crochet (SC), Half Double Crochet (HDC), Double Crochet (DC), and Criss-Cross stitches! Like what you see? Find the free written pattern and video tutorial here.
Day 22: Motivates Me
What gets you motivated? Music? a TV show? A sunny day? comfy clothes? a cup of coffee or tea? a day off? crochet with a friend? Showcase your motivation in a creative photo!
I love Pinterest! I love all the ideas and inspiration I can find all in one place! This website is filled with motivation!
Day 23: Where I Stand
When you sit down to crochet, what does your crochet “spot” look like? Take a photo of where you stand and what your point of view is.
This is my point of view. I’m in the studio right now. Staring down at our next new project. This one has me going “in circles!”
Day 24: Lines
Share a photo of anything that has lines. Lines at the craft store, the yarn aisle and shelves of yarn lined up, lines in a crochet/knit pattern.
Yarn Lines! Everything about this photo makes me happy! The shelves and shelves of yarn LINED up so neatly in rows have me feeling like a kid in a candy store the moment this sight greets my eyes ANDDD that line on my face turns into a big bright smile!!
Day 25: Make it Bright
Bright colored fibers, bright colored project, bright colored yarn bag, a bright sunny day to crochet or knit, a bright idea!
Nothing is brighter than the sun! This is part of a great pattern I found on Ravelry. I hope this brings a ray of sunshine to your day and brightens it right up!
Day 26: Words to Live By
A funny meme, a great quote, a piece of advice from someone,a graphic tee-shirt or yarn bag, a sale sign at the yarn shop
This passage has helped me through some of the most difficult times in my life.
Day 27: Soft
A soft item, yarn, a plushie, a stuffed toy, a baby, a pet, anything soft and cuddly.
Fresh soft, warm blankets straight from the dryer are the bed of choice for our pup Reub today. I guess that afghan will get another washing after Reuben’s nap.
Day 28: Pastel
Soft pastel yarn, a pastel project, crochet at sunset with pastel sky, anything pastel!
I discovered this morning that I don’t have a lot of pastel yarn in my stash. I did have these 2 past projects that I’ve used pastel Soft Essentials yarn in Minty, Jungle Stripes, Purple Reign and Sugar Plum.
Showcase the item you WISH you had. Find a photo of it and share it. Examples: A dream craft room, a book, a hook, a bag, a ball of yarn.
My Wish List is to have a dream craft room. Nate and I are buying a house soon! I will have my own space to create my wish come true! I have a blank canvas to design the perfect work space. Here are a few photos that inspire me!
Day 30: Love Is…
Share something that that describes how much you LOVE your craft.
Love is…
doing what you love, with who you love, using tools you love, EVERY. SINGLE. DAY. Thank you for sharing in this 30 Day Challenge. I enjoyed all the participation across social media! Thank you for all the love and support you always show. Being able to do this brings so much joy to my heart!
Designing and deciding on a new pattern is always a challenge. The process begins by choosing something that may be a need such as a gift or something that inspires me in the moment, whether it be for a baby, the home, a wearable, or any other pursuit, I look for motivation from many sources. The inspiration for this Dream-Time Mosaic Baby Quilt came from a quilt pattern that showed up in the News Feed on Facebook of a friend who loves quilting!
The patchwork squares of fabric pieced together, each having a different design, was the basis for this latest project. I asked myself how could I create this same variety in crochet? Creating nine different patches in different stitching and colors provided me with the distinction between these pieces. I put them together like a mosaic giving this crochet quilt the look I was going for.
I used several bold colors, a mixture of different stitches, and a variety of different quadrilateral shapes, to comprise my Dream-Time Mosaic Baby Quilt. This bold and fun piece is sure to add a burst of color to any nursery! Change your colors to match your decor! So much sensory texture in this quilt will provide any wee one loads of comfort!
My biggest obstacle was making sure the measurement of each piece fit within the confines of a reasonable sized baby blanket that did not leave one horizontal row longer or shorter. This arrangement worked out beautifully! Once I laid out all the pieces, assured this mosaic puzzle of crochet pieces would fit, I began the process to attach everything. Finally, I framed my piece in a cute delicate scallop edge.
Follow along with this video tutorial to learn how to make this blanket:
My dad will continue to be the videographer, editor, and photographer for our videos when I move away.
Support YARNutopia today so we can continue to bring you clear, quality crochet tutorials even after I move into my new home!
There will be an added expense of more travel and hopefully this won’t deter our ability to provide consistent videos on a weekly basis.
Please check out the new beginning graphic designed and developed by my brother Nabeel. He and his wife own and operate NFD Graphics. Please hop over to their Facebook page and show them some love! For all your graphic and video/logo design needs be sure to contact them today! www.nfdgraphics.com
Teacher: Nadia Fuad
Video and Editing: Fuad Azmat (My Daddy)
Share your work on Facebook!
Add me on Snapchat: YARNutopia
Follow me on Instagram
Visit My Ravelry Store and add this to your Favorites!
Follow me on Twitter: @YARNutopia
Enjoy this video and subscribe to my channel on YouTube for more tutorials on how to crochet!
Leave a comment, and share with your friends!
Pattern:
Designed by Nadia Fuad You *may* sell items made from my pattern, but please reference my website YARNutopia.com.
Please do not copy, sell, and/or post this pattern and claim it as your own.
You can buy any of the items in this kit. Buy all or buy one item. Check it out to see the supplies you can get online to make this baby blanket!
NOTES:
-This project uses approximately 1100 yards of yarn.
-Use a smaller hook to make these smaller
-Use a bigger hook to make these bigger
-Watch the FULL video tutorial for visual instructions for each piece
-Weave in all the ends as you go so you don’t have to weave them all in at the very end.
-This blanket is 44 inches by 34 inches and each piece measurements are below.
Special stitches:
Ch(s): chain(s)
YO: Yarn Over
St(s): Stitch(es)
prev.: Previous
Sl st: slip stitch
SC: Single Crochet
BLO: Back Loop Only
HDC: Half Double Crochet
DC: Double Crochet
FPDC: Front Post Double Crochet
BPDC: Back Post Double Crochet
TR: Treble Crochet
Popcorn: 4 DC in same st, remove hook from loop, insert hook in 1st st of grouping, place loop back on hook and pull through. (see video tutorial for specific instructions)
Shell: 5 DC in same stitch
Pattern:
If you have any confusion or difficulty with reading this pattern, please watch the video tutorial to have visual instructions.
Blanket:
Piece Number 1: (Should measure 8″ x 5″)
**Make 4** (Work in BLO)
With Flamingo:
Ch 29
Row 1: SC in 2nd ch from hook and across. Ch 1, turn. (28)
Rows 2-20: SC across, ch 1, turn.
Fasten off when piece measures 8×5
Weave in ends.
Piece Number 2: Should measure 8″ x 8″
Make 3
With Bright Yellow:
**Make 3**
Ch 4 Rnd 1: 2 DC in 4th Ch from hook, ch 2, [3 DC in same ch, ch 2] 3 times, sl st to 1st ch up 3. Rnd 2: Ch 3, Turn work, [2DC, ch 2, 3 DC] in same corner sp, *[3DC, ch 2, 3 DC] in next ch sp, repeat from * around, sl st to beg. ch up 3. Row 3: Sl st to corner, Ch up 3, 2 DC in same sp, 3 DC in next gap, [3DC, ch 2, 3 DC] in next corner, 3 DC in next gap, 3 DC in next corner, turn. Row 4: Ch 3, 3 DC in each gap to corner, [3 DC, ch 2, 3 DC] in corner, 3 DC in each gap to end of row, DC in very last st, turn. Row 5: Ch up 3, 2DC in same gap, 3 DC in each gap to corner, [3 DC, ch 2, 3 DC] in corner, 3 DC in each gap, end with 3 DC in last gap. Row 6: Repeat Row 4 Row 7: Repeat Row 5 Row 8: Repeat Row 4 Row 9: Repeat Row 5 Row 10: Repeat Row 4 Round 11: Ch up 3, 2 DC in same gap, *3 DC in each gap to corner, [3DC, Ch 2, 3 DC] in corner, repeat from * around the entire square.
Fasten off when piece is 8 inches.
Weave in ends.
Piece Number 3: Should measure 5″ x 8″
With Pretty N Pink:
**Make 2**
Ch 30 Row 1: SC in 2nd ch from hook, TR in next, SC in next, Repeat from * across, ending with SC in last st, ch 1, turn. (29) Row 2: SC across, ch 1, turn. (29) Row 3: SC in 1st st, *TR in next st, SC in next st, repeat from * across, ch 1, turn. Rows 4-18: Repeat Rows 2 and 3, ending with a repeat of Row 2.
Fasten off when Piece measures 5 inches by 8 inches.
Piece Number 4: Should measure 12″ x 8″
With Turqua:
**Make 3**
Ch 42 Row 1: DC in 4th ch from hook and across, turn. (40) Row 2: Ch up 3 (counts as DC), *FPDC on next st, BPDC on next st, repeat from * across, ending with a DC in last st. Rows 3-17: Repeat Row 2
Continue to SC around entire piece.
See video tutorial for visual instructions.
Piece should measure 12 inches wide and 8 inches tall.
Piece Number 5: Should Measure 10″ x 8″
With Jade:
**Make 2**
Ch 6 Row 1: DC in 4th ch from hook and in next 2 ch; turn (1 block made)
Row 2: Ch 6, DC in 4th ch from hook and in next 2 ch, (Sl st, ch 3, 3 DC) all in ch 3 sp of prev. row, turn. (2 blocks made)
Row 3: Ch 6, DC in 4th ch from hook and in next 2 ch, [(Sl st, ch 3, 3 DC) all in next ch 3 space of prev. row] twice; turn. (3 blocks made)
Row 4: Ch 6, DC in 4th ch from hook and in next 2 ch, [(Sl st, ch 3, 3 DC) all in next ch 3 space of prev. row] 3 times; turn. (4 blocks made)
Continue with the established pattern, increasing 1 block on each row until there are 8 blocks along the side.
Row 10: Sl st across first 3 dc, *Ch 3, 3 dc in next ch 3 space of prev. row, repeat from * to last ch 3 sp; slip st in last sp, Ch 3, 3 DC in same sp, turn. (9 Blocks)
Row 12: Ch 6, DC in 4th Ch from hook and next 2 ch, *(Sl st, ch 3, 3 DC) in next ch 3 sp of prev. row, Repeat from * to last ch 3 sp, turn, do NOT make a block in last sp. (10 Blocks)
Row 13: Sl st across first 3 dc, * (Sl st, ch 3, 3 dc) all in next ch 3 sp of previous row; repeat from * to last ch 3 sp; slip st in last space; turn, do NOT make another block. (9 blocks)
Rows 14-21: Repeat Row 13 until you have 1 block left. (SEE VIDEO TUTORIAL FOR VISUAL INSTRUCTIONS)
Fasten off, weave in all ends.
Piece should measure 10″ x 8″
Piece Number 6: Should Measure 5″ x8″
With Carrot:
**Make 2**
Ch 20 Row 1: DC in 4th Ch from hook and across, turn. (18) Row 2: Ch 3, *FPDC on next st, DC in next 2 sts, Repeat from * across, ending with DC in last st, turn. Row 3: Ch 3, *DC in next st, FPDC in next 2 sts, Repeat from * across, ending with DC in last st, turn. Row 4-14: Repeat Rows 2 and 3, ending with a repeat of Row 2.
Fasten off, weave in ends.
Piece should measure 5 inches by 8 inches.
Piece Number 7: Should Measure 7″ x 8″
With Dark Orchid:
**Make 2**
Ch 25 Row 1: SC in 2nd ch from hook and across, ch 1, turn. (24) Rows 2-28: SC across, ch 1, turn.
Fasten off.
Weave in ends.
Piece should measure 7 inches by 8 inches.
Piece Number 8: Should Measure 4″ x 8″
With Spring Green:
**Make 2**
Ch 14 Row 1: SC in 2nd ch from hook and across, turn. (13) Row 2: Ch up 3, (Counts as DC), *Popcorn in next st, DC in next, repeat from * across, ending with DC in last st, turn. Row 3: Ch 1, SC across, turn. (13) Rows 4-17: Repeat Rows 2 and 3 ending with a repeat of Row 3, until piece measures 4 inches by 8 inches.
Fasten off, weave in all ends.
Piece Number 9: Should Measure 4″ x 8″
With Pool:
**Make 2**
Ch 26 Row 1: SC in 2nd ch from hook, *Sk 2 chs, 5 DC in next ch, Sk 2 chs, SC in next ch, Repeat from * across, ending with SC in last ch. Turn. Row 2: Ch 3 (Counts as DC), 2 DC in same st, *SC in middle DC of next shell, Shell in next SC, repeat from * across, ending with 3 DC in last st, turn. Row 3: Ch 1, SC in same st, * Shell in next SC, SC in middle DC of next Shell, repeat from * across, ending with SC in last st, turn. Row 4-7: Repeat Rows 2 and 3 Row 8: Ch 1, SC in same st, Ch 2, * SC in middle DC of next shell, Ch 2, SC in next SC, Ch 2, Repeat from * across.
Fasten off, Weave in ends. Piece should measure 4 inches by 8 inches.
Once you have all the pieces attached, go onto making the border.
Border:
With White: Round 1: In any corner, CH up 3, (Counts as a DC) 4 DC in same st, DC around putting 5 DC in corners. Sl st to beg. ch up 3. Round 2: Ch 1, SC in same st, *Ch 4, Sk 4 sts, SC in next st, repeat from * around, sl st to 1st SC. Round 3: In ch 4 sp, Ch 1, [HDC, 3 DC, HDC] in each ch 4 sp around. Sl st to first HDC. Fasten off, weave in all ends.
Enjoy!!
This post contains affiliate links, which I may be compensated for when you make a purchase. That means if you click on any link and buy from the linked websites, I will receive a small percentage of the value of your order. The amount you pay is not changed. Thank you for all your support in clicking the links in my blog!! You all are so amazing!! ~Nadia
The yarn provided for this pattern is courtesy of Red Heart Yarns
This is a great ensemble for any newborn to 6 month baby layette. It is an absolute dream to make! This set is such a lovely gift for a baby shower! These pieces can be made any time of year! Make one or make all four pieces below. Click the links or the photos to be redirected to their written patterns and video tutorials. All crochet patterns in this post are FREE!
My Patchwork Medley Baby Blanket is a variety of crochet stitches and pieces stitched together to make this luxuriously soft quilt. Perfect for snuggling! Using Red Heart Yarns Soft Essentials in Purple Reign Stripes and Sugar Plum, this piece is the perfect accent for any nursery!
My dad will continue to be the videographer, editor, and photographer for our videos when I move away.
Support YARNutopia today so we can continue to bring you clear, quality crochet tutorials even after I move into my new home!
There will be an added expense of more travel and hopefully this won’t deter our ability to provide consistent videos on a weekly basis.
Follow along with this video tutorial to learn how to make this blanket:
**You can always contact me via Facebook if you have any problems with the pattern. I am happy to help if you have any questions along the way.
***You can definitely sell anything you make from my patterns, please just link back to my website YARNutopia.com. Thank you!
Teacher: Nadia Fuad
Video and Editing: Fuad Azmat (My Daddy)
Share your work on Facebook!
Add me on Snapchat: YARNutopia
Follow me on Instagram
Visit My Ravelry Store and add this to your Favorites!
Follow me on Twitter: @YARNutopia
Enjoy this video and subscribe to my channel on YouTube for more tutorials on how to crochet!
Leave a comment, and share with your friends!
Pattern:
Designed by Nadia Fuad You *may* sell items made from my pattern, but please reference my website YARNutopia.com.
Please do not copy, sell, and/or post this pattern and claim it as your own.
NOTES:
-Use a smaller hook to make these smaller
-Use a bigger hook to make these bigger
-Watch the FULL introduction of the video tutorial for frequently asked questions and watch the full video for tips on how to make these smaller or bigger.
-You will need 964 Yards of yarn for this whole project. (4 skeins of each color)
-My blanket is 30 inches (76 cm) by 36 inches (92 cm)
-You can use any type of Worsted Weight, Aran, or Bulky yarn to crochet this blanket
-Different Afghan Sizes can be found in the middle of this page here.
Special stitches:
Ch(s): chain(s)
YO: Yarn Over
St(s): Stitch(es)
Sl st: slip stitch
SK: Skip
SC: Single Crochet
HDC: Half Double Crochet
DC: Double Crochet
Cluster: [YO, Insert Hook, YO, pull through, YO, pull through 2 loops on hook] 3 times, YO, pull through all 4 loops on hook. Cluster made.
Pattern:
If you have any confusion or difficulty with reading this pattern, please watch the video tutorial to have visual instructions.
Pattern:
Bigger Rectangles:
MAKE 2
Ch 43 or any odd number that is 16 inches (40 cm) Row 1: Cluster in 4th Ch from hook, *DC in next ch, Cluster in the next ch, repeat from * across, ending with DC in last ch, ch 1, turn. (41 sts) Row 2: SC in each st across, turn. (41 sts) Row 3: Ch 3 (counts as DC), *Cluster in next st, DC in next st, repeat from * across, ch 1, turn. (41 sts) Rows 4-25: Repeat rows 2 and 3 until your piece is 12 inches long, ending on a repeat of Row 3. (see video tutorial for visual instructions)
Fasten off, Weave in ends.
MAKE 2
Ch 48 or any even number that measures the same width as your first piece Row 1: HDC in 2nd ch from hook, *Sl st i next ch, HDC in next ch, repeat from * across ending with HDC in last ch, ch 1, turn. Row 2: Sl st in 1st st, HDC in next, Sl st in next, repeat from * across, ending with Sl st in last st, ch 1, turn. Row 3: HDC in 1st st, Sl st in next st, HDC in next st, repeat from * across, ending with HDC in last st, ch 1, turn. Rows 4-44: Repeat rows 2 and 3 until your piece is 12 inches long, ending on a repeat of Row 3. (see video tutorial for visual instructions)
Fasten off, weave in ends.
Short Strips:
MAKE 2:
Start one with Solid for the first 8 rows, and change color for the last 8 rows to Stripes color.
Start the second one with Stripes for the first 8 rows, and change color for the last 8 rows to Solid color.
With long tail, make slip knot,
Ch 39 or any amount that measures the length of your bigger rectangle pieces. Row 1: SC in 2nd ch from hook and across. Ch 1, turn. (38) Row 2: SC in BLO of each st across. Ch 1, turn. Rows 3-8: Repeat Row 2
Change color Row 9-16: Repeat Row 2 until your piece is 4 inches wide
Fasten off with long tail for sewing.
Longer Strips:
MAKE 2:
Start one with Solid for the first 8 rows, and change color for the last 8 rows to Stripes color.
Start the second one with Stripes for the first 8 rows, and change color for the last 8 rows to Solid color.
With long tail, make slip knot,
Ch 45 or any amount that measures the Width of your bigger rectangle pieces. Row 1: SC in 2nd ch from hook and across. Ch 1, turn. (44) Row 2: SC in BLO of each st across. Ch 1, turn. Rows 3-8: Repeat Row 2
Change color Row 9-16: Repeat Row 2 until your piece is 4 inches wide
Fasten off with long tail for sewing.
Small Center Squares:
Make 2 in Solid and Make 2 in Stripes
Ch 4 Rnd 1: 2 DC in 4th ch from hook, Ch 2 [3 DC in same ch, ch 2] 3 times, sl st to beginning. Rnd 2: Ch 1, sc in same st and next 2 sts, *[sc, ch 2, sc] in corner, sc in next 3 sts, repeat from * around, ending with corner. Sl st to 1st sc. Fasten off with long tail for sewing.
Assembly step:
Sew all your pieces together using the Whip Stitch Method. (See video tutorial for visual instructions)
Border:
DC around entire blanket putting 3 DC in corners.
Fasten off, weave in all ends.
Enjoy!!
This post contains affiliate links, which means if you click on the link and buy from the linked websites, I will receive a small percentage of the value of your order. The amount you pay is not changed.
The yarn provided for this pattern is courtesy of Red Heart Yarns
This “Woven Dreams Baby Blanket” is my latest design using the newest addition of Red Heart YarnsSoft Essentials in Jungle Stripes and Minty. This fabulous fiber has a thick plush texture and works up beautifully to create this stunning piece!
This yarn is so soft and plush. It’s perfect for making baby blankets. You can continue this pattern to make this blanket larger. I pieced this blanket together with 7 inch squares using front-post and back-post stitches to create a woven look which is a little different than the well-known basket weave stitch. I made a checkerboard design using alternating yarns. I bordered this blanket with a criss-cross stitch.
Follow along with this video tutorial to learn how to make this blanket:
Designed by Nadia Fuad You *may* sell items made from my pattern, but please reference my website YARNutopia.com.
Please do not copy, sell, and/or post this pattern and claim it as your own.
NOTES:
-Use a smaller hook to make these smaller
-Use a bigger hook to make these bigger
-Watch the FULL introduction of the video tutorial for frequently asked questions and watch the full video for tips on how to make these smaller or bigger.
-You will need 964 Yards of yarn for this whole project. (4 skeins of each color)
-My blanket is 36 inches (92 cm)
-Different Afghan Sizes can be found in the middle of this page here.
Special stitches:
Ch(s): chain(s)
YO: Yarn Over
St(s): Stitch(es)
Sl st: slip stitch
SK: Skip
SC: Single Crochet
DC: Double Crochet
RSC: Reverse Single Crochet
BPDC: Back Post Double Crochet
FPDC: Front Post Double Crochet
Pattern:
If you have any confusion or difficulty with reading this pattern, please watch the video tutorial to have visual instructions.
MAKE 5 squares in Minty and 4 squares in Jungle Stripes
Square:
Ch 23 (or any multiple of 3 +2) Row 1: DC in 4th Ch from hook and across (21 sts) Row 2: Ch 2 (Does NOT count as a stitch here and throughout) FPDC on first 3 sts, *BPDC on next 3 sts, FPDC on next 3 sts, repeat from * across, ending with FPDC, turn. (21 sts) Rows 3-14: Repeat Row 2
Single crochet around the entire square (See video tutorial for specific locations to put stitches)
Fasten off.
Assembly Step:
Sew all 9 pieces together (See video tutorial for visual instructions on how to sew your squares together)
Border:
Start in a corner (middle sc) Round 1: SC in each st around putting 3 sc in middle sc’s of the corners, Sl st to beg. sc. Round 2: Starting in a middle SC of a corner, Ch up 3 (Counts as DC), [DC, ch 2, 2DC] in same st, *Sk next st, DC in next st, DC in sk’d st, repeat from * until middle sc of next corner, [2DC, ch 2, 2DC] in corner, repeat around.
IF your stitches do not line up, see video tutorial for a little tip (*wink wink*) Round 3: In any corner ch sp: Ch up 3, [DC, ch 2, 2 DC] in same sp, *[sk next st, DC in next st, DC in sk’d st] across until next corner, [2DC, ch 2, 2DC] in corner, repeat from * around, sl st to ch up 3. Round 4-10: Repeat round 3 changing color every 3 rounds.
Continue working rounds until your blanket is as large as you want it to be.
Reverse single crochet around the entire piece to clean up edge. (See video tutorial for visual instructions)
I received this incredible gift this past weekend from my mom’s cousin, Janez. This blanket was crocheted by my maternal great-grandmother, Rose. I never knew my great-grandmother, so to have a piece of her work knowing we share this bond and love of crochet, leaves me humbled and speechless. Here is a photo of my great-grandmother, Rose in her later years.
There are no words to describe how much this means to me. Thank you, thank you, Janez. I love this so much!
I was told several times how my great-grandmother loved to crochet. Many conversations with my mom revolved around the fact that I must have inherited some of my talents from her. Until I received this gift, did it really hit me that I actually did share this with her. Even though I never knew her, it gave me chills to know that part of her lives on in me.
Having never known her, this gift opened up a discussion about my great grandmother on things I never knew. My mom and her cousin shared photos with me. I was able to see her wedding photos and photos of her youth.
I heard she had crocheted her entire life. That was something she truly enjoyed. Everyone received homemade gifts from her for Christmas and other holidays.
This piece is incredible
First off, I am going to guess the age of this blanket is approximately 40 years old. Upon examining it, I could not identify the exact fiber, but I believe that it is an acrylic blend fiber that is very heavy! The workmanship is impeccable and her squares are perfect. She didn’t turn her work and she slip-stitched the squares together to form the blanket. Each square measures 8 inches and overall, the dimensions are 40 inches X 56 inches. Her granny squares are on point!! After 365 Days of creating granny squares, I feel like I’ve come full circle receiving this granny square blanket that is so special!!
Not only did I spend time learning to read her techniques through her stitches, but knowing that she spent time lovingly constructing this with her own hands was pretty incredible.
It is a treasure that I plan to keep for a lifetime.
Sometimes the smallest gestures mean the most. I can never express how much Janez’s gift means to me. There are no words that relay the magnitude of how special this is.
“The love in our family flows strong and deep, leaving us memories to treasure and keep.” ~Unknown
Expanding my video tutorial library, I continue to explore designing patterns using the Entrelac Stitch. I have these Harlequin Legwarmers for you to try! These are so much fun to wear! Especially with stiletto heels!
But don’t just stop there! Perfect for short boots, shoes, or bare feet during your yoga class, these tubular stockings are a sure way to bring up your fashion game!
Change the colors for your favorite team, monochromatic two tones, or a splash of rainbow, any color combination will work! Think outside the box and use this design for a harlequin costume as well! You will have this stitch mastered in no time and your creativity will be out of this world!
My dad will continue to be the videographer, editor, and photographer for our videos when I move away.
Support YARNutopia today so we can continue to bring you clear, quality crochet tutorials even after I move into my new home!
There will be an added expense of more travel and hopefully this won’t deter our ability to provide consistent videos on a weekly basis.
Follow along with this video tutorial to learn how to make these leg warmers:
Teacher: Nadia Fuad
Video and Editing: Fuad Azmat (My Daddy)
Share your work on Facebook!
Add me on Snapchat: YARNutopia
Follow me on Instagram
Visit My Ravelry Store and add this to your Favorites!
Follow me on Twitter: @YARNutopia
Enjoy this video and subscribe to my channel on YouTube for more tutorials on how to crochet!
Leave a comment, and share with your friends!
Pattern:
Designed by Nadia Fuad You *may* sell items made from my pattern, but please reference my website YARNutopia.com.
Please do not copy, sell, and/or post this pattern and claim it as your own.
NOTES:
-Use a smaller hook to make these smaller
-Use a bigger hook to make these bigger
-Watch the FULL introduction of the video tutorial for frequently asked questions and watch the full video for tips on how to make these smaller or bigger.
-You can adjust the size for measurements.
Special stitches:
Ch(s): chain(s)
YO: Yarn Over
St(s): Stitch(es)
Sl st: slip stitch
SK: Skip
SC: Single Crochet
DC: Double Crochet
TR: Treble Crochet
FPDC: Front Post Double Crochet
Entrelac Stitch
Pattern:
If you have any confusion or difficulty with reading this pattern, please watch the video tutorial to have visual instructions.
Make 2
With Aran:
Ch 55 or any multiple of 11 Round 1: Entrelac Stitch Across Chain starting in 2nd ch from hook (See video tutorial for visual instructions), sl st to 1st st, Fasten off (5 Diamonds made) Round 2: With Black, Enrelac Stitch around starting at the peak of a diamond from the previous round. (See video tutorial for this part), Sl st to first st, Fasten off Round 3: With Aran, Enrelac Stitch around starting at the peak of a diamond from the previous round. (See video tutorial for this part), Sl st to first st, Fasten off Round 4: With Black, Enrelac Stitch around starting at the peak of a diamond from the previous round. (See video tutorial for this part), Sl st to first st, Fasten off Round 5: With Aran, Enrelac Stitch around starting at the peak of a diamond from the previous round. (See video tutorial for this part), Sl st to first st, Fasten off Round 6: With Black, Enrelac Stitch around starting at the peak of a diamond from the previous round. (See video tutorial for this part), Sl st to first st, Fasten off Round 7: With Aran, Enrelac Stitch around starting at the peak of a diamond from the previous round. (See video tutorial for this part), Sl st to first st, Fasten off Round 8: With Black, Enrelac Stitch around starting at the peak of a diamond from the previous round. (See video tutorial for this part), Sl st to first st, Fasten off Round 9: With Aran, Enrelac Stitch around starting at the peak of a diamond from the previous round. (See video tutorial for this part), Sl st to first st, Fasten off
Top of cuff:
With Black Round 1: Triangle Entrelac Stitch around starting at the peak of a diamond, (See video tutorial for visual instructions), Sl st to first st (30 sts around) Round 2: Ch 1, [2 sc in next st, sc in next 2 sts] around, sl st to 1st sc. (40 sts around) Round 3: ch up 2 (does not count as anything), DC in each st around, sl st to 1st DC. (40 sts) Round 4: Ch 2, [FPDC in next st, DC in next st] around, sl st to FPDC Round 5-7: Repeat Round 4
Fasten off, weave in ends.
Bottom part of cuff:
with Black Round 1: Triangle Entrelac Stitch around starting at the peak of a diamond, (See video tutorial for visual instructions), Sl st to first st, ch 2 (30 sts around) Round 2: SC in each st around, sl st to 1st SC. (30 sts) Round 3: ch up 2 (does not count as anything), DC in each st around, sl st to 1st DC. (40 sts) Round 4: Ch 2, [FPDC in next st, DC in next st] around, sl st to FPDC Round 5-6: Repeat Round 4
Fasten off, weave in all ends
Enjoy!!
This post contains affiliate links, which I may be compensated for when you make a purchase. That means if you click on any link and buy from the linked websites, I will receive a small percentage of the value of your order. The amount you pay is not changed. Thank you for all your support in clicking the links in my blog!! You all are so amazing!! ~Nadia
The yarn provided for this pattern is courtesy of Red Heart Yarns
“Inner peace (or peace of mind or inner calmness) refers to a state of being mentally and spiritually at peace, with enough knowledge and understanding to keep oneself strong in the face of discord or stress.”
Finding inner peace is not always easy. Oftentimes, we find ourselves at a crossroads of choices that we need to make to find that path to peacefulness. That is the inspiration for this fourth blanket in our series of charity blankets that I have made using squares from the 365 Days of Granny Squares.
It has only been a few days since we have completed the year of granny squares project, yet, the squares have piled up in stacks in my craft room over the past 12 months. All of these squares will find their way to those in need. This beautiful blanket I just completed will be sent to Project Linus. You can read about this organization here.
Each square was chosen from our vast collection of squares, and I placed them in a frame with an ‘X’ leading to a center PEACE SIGN square. The name and definition makes this very appropriate to send to this charity organization.
I made rows of double crochet in strips and attached each square, then attached the strips using the single crochet method. I did a simple border using double crochet as well. This blanket was a lot of fun to make!
I have spent many, many months in the hospital over the past 9 years. Sometimes, spending more days in the year in the hospital than out. One of the most comforting things I brought from home was my homemade blankets. Snuggling up with that warm piece of home in an otherwise clinical, and sometimes miserable environment, can make all the difference to someone who needs every comfort they can find. I hope this blanket can bring that to someone special and provide a tiny bit of peace at a difficult time. So much love goes into my creations when I make them. It’s my way of putting good out into the world one stitch, one granny square, at a time!
If you are interested in seeing my other projects, check out the links above the video in this blog.
Below is a list of the squares used in this project:
You can click each number and it will take you to its video tutorial
It has been no secret that for the past 8 years, I have been battling severe illness as I continue to fight Crohn’s disease. By the end of 2015, I had spent a good portion of another year hospitalized after having 2 major surgeries. I was determined to go into 2016 with hopes for better health. There was a scary episode at the end of 2015 where I went septic and things were pretty bleak. That experience, and the fact that it brought me too close for comfort to no longer being here on Earth, was what inspired me to take on the challenge of a 365 day project. Yes, I know, nothing like a brush with death to make you want to look forward in life! Seize the day; or, in my case, more than 365 of them!
This was my status on Personal Facebook Account on the very last day of 2015. Thank you for being my stars! I love you all!!
I wanted to start the new year with a project that would chronicle days I could try to stay out of the hospital. Following surgery in December 2015, I remember late night talks with my mom about challenging myself to work toward a long term goal. This particular challenge had to be something that wasn’t too overwhelming. (Note: a 365 day project, no matter how small it seems at the time, can sometimes get overwhelming) I decided on crocheting a single granny square each day with the help of my dad who would record a video tutorial of each afghan block. Each day that I was able to stay out of the hospital was another day that I would work toward health and wellness. Each square represented a step in this journey. I was able to make it nearly 8 months before I ended up in the hospital again, but even then, I was able to continue filming my tutorials from my hospital room. I remember saying often that nothing could happen to me all year because I HAD TO get that daily square filmed and posted! Not only were people counting on me, I was counting on myself!
And so it commenced, we started filming our first granny square on December 31st, 2015 to launch on January 1st, 2016. YARNutopia’s 365 Days of Granny Squares tutorials were born.
Beginning and Near Endings
This project began as a very personal goal, I had a small following on my Facebook page and YouTube channel, and wasn’t sure if this would even be something that would catch on. Would I just be on my own for a year making squares? Honestly, I had zero idea of how this would turn out, and because of that, I failed to foresee a few issues that arose during the process. For the most part, it went quite well right out of the gate. I was keeping up the pace, squares upon squares, one a day with no problem. Until…I had a problem.
In my zeal to get started, I failed to garner the proper permission to film some of the squares that had free patterns available online. I was contacted by some of the designers that I filmed their squares without their OK. They had a totally valid position, and for the most part, handled professionally and successfully. It was my own misunderstanding to not consider going through proper channels, and it resulted in a few squares being removed from the early part of the project. This helped to change my course. I went through the correct procedures moving forward. It forced me to push myself even further to design my own squares. A total of 33 of my own designs were part of this project. It taught me extremely valuable lessons in the process. That can be humbling to go through.
Sometimes, it takes finding yourself in an uncomfortable position to really push yourself to get more creative. I remember considering giving up. That was until one particular keyboard warrior wrote to me with a few intense, nasty, and unnecessary insults to really push me right back up again. To anyone I hurt in this process, my sincerest apologies. For anyone who tried to come at me to hurt me or get me to quit, thanks for everything. It was because of what you did that made me want to finish. That was a turning point. Moving forward things were otherwise very successful and positive.
A Debt of Gratitude
There is no way a project this lofty could have been accomplished solely on my own. As mentioned earlier, I was able to garner permission from a wide array of incredible designers that allowed me the opportunity to use one or many of their patterns in my project. There is a list at the end of this blog linking every designer that contributed their designs. PLEASE, I implore you all to visit their websites, blogs, Ravelry stores, and Facebook pages. “Like” and “Follow” these amazing, creative people. There would be no 365 Days of Granny Squares without their help. I wish I could gather everyone who helped me on this daily endeavor and give these ladies and gentlemen a standing ovation! I owe each of them a debt of deep genuine gratitude. I learned so much from every square. I am literally in tears writing this part of the blog because it is difficult to put into words what this entire process meant to me. I can look at certain squares and remember what they represent in this journey. There is a square on the day I had to have another biopsy. There are squares that represent health victories and squares that represent some rough patches. 2016 brought so many highlights, and there is a square that reflects many of those amazing personal moments. Although this started out as my own journey, it became so much more than I could have ever imagined. These granny squares truly became my journal written in yarn.
The hunt for squares
The process of finding squares for my year long quest was somewhat of a challenge to search online for free patterns from designers. If their written patterns were easy to follow and understand, I would contact them to ask permission to use their design. As I said, were numerous amazing designers that lent their patterns. Up until the very end I was receiving requests and replies to use patterns, but the year ran out of days! Their patterns are an incredible tool for those who are participating in the 365 Days of Granny Squares project. Having the accompanying written instructions to assist with the tutorial has helped tremendously for people wanting to learn how to read patterns, as well as those who prefer that over a video tutorial. At the bottom of the 365 Days of Granny Squares blog, I listed the designers’ links to their written patterns. In my video tutorials, I mention the designer and pattern name for that particular square, and I share a link to the written pattern in the description of each video tutorial on YouTube. I also share a link to their written pattern on social media when I share the square of the day every morning. All of these things help followers network with so many in our crochet community.
Yarn for days!
When taking on a project of this magnitude, planning ahead was a necessity. Thankfully I had scrap yarn to get things started which saved me from having to purchase a bunch of yarn for this monumental project. This ENTIREtask was accomplished using ALL scrap yarns that I have collected in my stash over time. I began the project using Red Heart Yarns in Super Saver and kept that constant through the entire year. There was no waste when using yarn scraps, and it keeps everything consistent by using the same fiber and brand for each square. I tried keeping the supplies for this project as modest as possible.
You can’t plan for everything!
Taking on this mission also meant that I had to plan for all sorts of situations. There was so much concealed when I took on this project that lasted for 365 days. Over the course of the year, we experienced many technical difficulties. We had upload fails, we accidentally released videos in the wrong order, and we mixed up footage. If you can imagine all the possibilities of accidents that could go wrong over an entire year adventure, we probably encountered a majority of them. My dad and I had a very good system worked out, and filming a daily video went fairly smoothly. However, nothing about this was predictable. Filming in the hospital became necessary at one point during this journey. If I was able to keep the squares in order, and not have any breaks, it meant having my dad bring the studio to my hospital room. Again, at this point while feeling so ill, I thought about giving up on this project, but I had gotten so far, so giving up was no longer an option. Sometimes it was necessary to film a few days in advance to bank up some tutorials in case I was unable to be in the studio. Whether I filmed one video a day, or filmed a few in a day to take some time off, I would always add the daily square to the blog, and I posted the new square to my social media sites every single morning when I woke up. Although we had a few mix-ups and personal mishaps, there have been no late granny squares, and I was able to accomplish everything I had hoped for.
To those who participated in the journey
The feedback throughout this process has been unbelievable. Along the way, I was lifted up in ways I cannot put into words. The growing following that came every day to post, discuss, and share their thoughts about the day’s square was incredible.
I want to take a moment to thank every one of you who were here. Even if I didn’t comment on each post every day, I read and saw it all — every single square, every beautiful color combination, and every kind word you said to me and to each other. How do I say thank you for all that you did for me and for one another? I’m so proud of my YARNutopia community! Thank you for showing up every single day. You may not know this, but it was each of YOU who inspired me each day to show up, work hard, and keep going. Every message and kind word went straight to my heart. This project was a collective effort from all of us. WE DID IT! Myself, my dad, the designers, and YOU the crocheters. Thank you from the bottom of my heart for being part of this epic journey. I witnessed something truly remarkable as this year unfolded. It makes me sad to see this project come to an end. I won’t have you here with me every single day for our daily square, but I’m so grateful this brought us together over our mutual love of crochet. I feel like I know all of you as we crocheted together through it all. There are seriously no words. #uglycry
What the future holds
I will be keeping the 365 Days of Granny Squares page up for a while and may replace a few squares here or there at some point. This one year commitment to a project of this magnitude was satisfactory to achieve. Many have asked me to do another year, but I think one year was sufficient to prove to myself that I could do this. I am happy and have no regrets looking back. I learned invaluable things about our crochet community, about myself, about commitment, about the power of positive thinking, about having a passion to pursue a goal, and about how yarn can tie so many across our globe together. I was happy to be the one to share this experience with all of you who came every day or just stopped by for a few favorite squares. This isn’t the end of what I am capable of doing. I look forward to new challenges in 2017 including some fun monthly projects! The work to do this project took a lot of effort not only on my part but also for my dad. We both look forward to a bit of rest and relaxation before we get back in the studio. There is much more to come from us in the future! So stay tuned!
To my Daddy
First and foremost, I could not have done this project without my supportive family, and of course, Nate! I cannot finish this blog without a huge mention of what role my dad played in this yearlong endeavor. Where do I start when it comes to thanking him? How does one encapsulate the gratitude I feel for someone who was with me at every single moment of every single project? He stood tirelessly by my side and filmed 365 squares (plus our bonus square). There he was, right by my side, ready to go each day until the very end! I don’t think anyone could understand what a colossal task this project was other than my daddy. His exemplary video and editing skills made every square come to life on the screen. He was the one who worked tirelessly through the year, late into the nights making our videos, making edits, taking out the bloopers (yes, one day, we will have a blooper reel), corrected me, helped me, supported me, challenged me, encouraged me, energized me, untangled yarn for me, laughed with me, and by indirect means, learned crochet along side me! He never gave up. He never complained. His dedication and commitment to this project cannot go unnoticed. Thank you, Daddy. Your patience and sense of humor made doing this monumental project so much more fun than I could have ever imagined. I love you so much! SHOUT OUT TO MY AMAZING DADDY!
All these squares
Throughout this project, I demonstrated how to make each granny square in a video tutorial. Participants are then on their own to decide what to make using their squares. Some have participated from the beginning of the year making each square, and some jumped in on occasion to make a square that stood out. The creativity of what we’re sharing has been fabulous! Projects that have been made and shared on our Facebook page have left me speechless! You are all so talented!
Throughout the year, I have collected the squares and have been using them in blanket projects. From the start, I planned to pay it forward and make blankets for people in need. So far, I have managed to make 3 blankets using a variety of the squares. Each blanket has found its way to a very special home or charity and will continue to do so as I finish using all the squares in this project. This was my way of giving back for a year of healthier and happier days.
Now the year has come to an end. It will be strange not having a square to post tomorrow morning, but at the same time I am thrilled over a successful goal achieved. Today is so bittersweet! Not many can say they crocheted a granny square every day for an entire year and got healthier doing it! That’s a pretty great ending to 2016 and an even better way to start out another great year! Together we came so far! Here’s to a year ahead of more epic crochet days! HAPPY NEW YEAR EVERYONE! Cheers to 2017 being a wonderful year for all!
~Nadia
Find the list of contributing designers here: (AGAIN, please visit their pages, “Like” their work, and “Follow” them on social media!)
I created this Firework Pop Granny Square design to add to our 365 Days of Granny Squares project. It uses variety of crochet stitches to create an interesting design! I hope you enjoy making your square!
A couple disclaimers before you start: Be sure to check your tension and use the correct size hook for your square. I demonstrate with an H-5.00mm crochet hook in the video tutorial, but you can make yours bigger or smaller by using a bigger or smaller hook. Also, if yours turns out wonky when you are finished, you may need to block this square to make it nice and flat.
Follow along with this video tutorial to learn how to make this square:
My dad will continue to be the videographer, editor, and photographer for our videos when I move away.
Support YARNutopia today so we can continue to bring you clear, quality crochet tutorials even after I move into my new home!
There will be an added expense of more travel and hopefully this won’t deter our ability to provide consistent videos on a weekly basis.
**You can always contact me via Facebook if you have any problems with the pattern. I am happy to help if you have any questions along the way.
***You can sell anything you make from my patterns, please just link back to my website YARNutopia.com. Thank you!
Teacher: Nadia Fuad
Video and Editing: Fuad Azmat (My Daddy)
Share your work on Facebook!
Add me on Snapchat: YARNutopia
Follow me on Instagram
Visit My Ravelry Store and add this to your Favorites!
Follow me on Twitter: @YARNutopia
Enjoy this video and subscribe to my channel on YouTube for more tutorials on how to crochet!
Leave a comment, and share with your friends!
Pattern:
Designed by Nadia Fuad You *may* sell items made from my pattern, but please reference my website YARNutopia.com.
Please do not copy, sell, and/or post this pattern and claim it as your own.
NOTES:
-You can use a smaller or larger hook to make this square depending on your tension. I wouldn’t use anything larger than an I-5.5mm Crochet Hook though.
-The finished square measures 7 inches (18cm)
-This square is worked from the center outward
Special stitches:
Ch(s): chain(s)
YO: Yarn Over
St(s): Stitch(es)
Sl st: slip stitch
SK: Skip
SC: Single Crochet
HDC: Half-Double Crochet
DC: Double Crochet
V-stitch: DC, ch 1, DC in same space
Popcorn stitch: 5 DC in same st, remove hook from loop, insert hook in first st, put loop back on hook and pull through. Popcorn made
Beg. Popcorn: Ch up 3, 4 DC in same st, remove hook from loop, insert hook in first st, put loop back on hook and pull through. Beg. popcorn made
Pattern:
If you have any confusion or difficulty with reading this pattern, please watch the video tutorial to have visual instructions.
Ch 4, sl st to 1st ch to form a ring.
Rnd 2: In any ch 3 sp: [Beg. popcorn, ch 3, popcorn ch 3] in ch 3 sp, [popcorn, ch 3, popcorn, ch 3] in each ch 3 sp, sl st to beg. popcorn. (8 popcorn sts)
Rnd 3: In any ch 3 sp, [Beg. popcorn, ch 3, popcorn ch 3] in ch 3 sp, [popcorn, ch 3, popcorn, ch 3] in each ch 3 sp, sl st to beg. popcorn. (16 popcorn sts)
Rnd 4: In any ch 3 sp: ch 1, sc in same sp, ch 3 *sc in next ch 3 sp, ch 3, repeat from * around. Sl st to first sc. (16 sc, 16 ch 3 sps)
Rnd 5: In any ch 3 sp: Ch 1, sc in same sp, ch 3 *sc in next sp, ch 3, repeat from * around. sl st to first sc. (16 sc, 16 ch 3 sps)
Rnd 6: In ch 3 corner sp (See video tutorial for specific location): ch up 4 (counts as DC + Ch 1 sp), [DC, ch 3, V-stitch] in same sp, *V-stitch in next ch 3 sps, [V-Stitch, ch 3, V-stitch] in next sp (corner made), repeat from * around. Sl st to 3rd ch of beg ch 4.
Rnd 7: In any corner ch 3 sp: [Ch 4, DC, ch 3, V- Stitch] in same sp, ch 2, *[Popcorn in next ch 1 sp, ch 2] 5 times, [V-Stitch, ch 3, V-stitch] in next sp (corner made), repeat from * around, sl st to 3rd ch of beg ch 4.
Rnd 8: 2 SC in each ch sp on sides, [2sc, ch 2, 2 sc] in corners. Sl st to first sc.
Fasten off.
Weave in all ends.
Enjoy!!
This post contains affiliate links, which I may be compensated for when you make a purchase. That means if you click on any link and buy from the linked websites, I will receive a small percentage of the value of your order. The amount you pay is not changed. Thank you for all your support in clicking the links in my blog!! You all are so amazing!! ~Nadia
I created this Berry Giving Granny Square design to add to our 365 Days of Granny Squares project. It uses variety of crochet stitches to create an interesting design! I hope you enjoy making your square!
A couple disclaimers before you start: Be sure to check your tension and use the correct size hook for your square. I demonstrate with an H-5.00mm crochet hook in the video tutorial, but you can make yours bigger or smaller by using a bigger or smaller hook. Also, if yours turns out wonky when you are finished, you may need to block this square to make it nice and flat.
Follow along with this video tutorial to learn how to make this square:
**You can always contact me via Facebook if you have any problems with the pattern. I am happy to help if you have any questions along the way.
***You can sell anything you make from my patterns, please just link back to my website YARNutopia.com. Thank you!
Teacher: Nadia Fuad
Video and Editing: Fuad Azmat (My Daddy)
Share your work on Facebook!
Add me on Snapchat: YARNutopia
Follow me on Instagram
Visit My Ravelry Store and add this to your Favorites!
Follow me on Twitter: @YARNutopia
Enjoy this video and subscribe to my channel on YouTube for more tutorials on how to crochet!
Leave a comment, and share with your friends!
Pattern:
Designed by Nadia Fuad You *may* sell items made from my pattern, but please reference my website YARNutopia.com.
Please do not copy, sell, and/or post this pattern and claim it as your own.
NOTES:
-You can use a smaller or larger hook to make this square depending on your tension. I wouldn’t use anything larger than an I-5.5mm Crochet Hook though.
-The finished square measures 6.5 inches (16cm)
-This square is worked from the center outward
Special stitches:
Ch(s): chain(s)
YO: Yarn Over
St(s): Stitch(es)
Sl st: slip stitch
SK: Skip
SC: Single Crochet
HDC: Half-Double Crochet
DC: Double Crochet
BPDC: Back Post Double Crochet
TR: Treble Crochet
Beg. Cluster: [YO, Insert hook, YO, pull through] 3 times, YO, pull through all 4 loops.
Cluster: [YO, insert hook, YO, pull through] 4 times, YO, pull through all 5 loops.
2DCcluster: [YO, Insert Hook, YO, Pull through] 2 times, YO, pull through 3 loops.
Pattern:
If you have any confusion or difficulty with reading this pattern, please watch the video tutorial to have visual instructions.
Ch 4, sl st to 1st ch to form a ring.
Rnd 1: Ch 2, Beg. Cluster, Ch 4, [Cluster into ring, Ch 4] 5 more times, Sl st to beg. cluster. (6 clusters, 6 ch 4 sps)
Rnd 2: In ch 4 sp: Ch 2 [Counts as HDC], 3 HDC in same sp, 4 HDC in each ch 4 sp, sl st to beg ch 2. (24 HDC)
Rnd 3: In a gap between the groupings (See video tutorial for specific location), Ch up 2, DC in same sp (counts as beg. 2DCcluster, Ch 3, 2DCcluster in Previous DC just made, 2DCcluster in same gap between HDC’s, * Ch 4, 2DCcluster in next gap, Ch 3, 2DCcluster in previous cluster just made, 2DCcluster in same gap, repeat from * around, sl st to beg.
Rnd 4: In a ch 4 sp, ch 1, SC in same sp, *DC into each HDC from round 2 working around the ch 4 sp hiding it in the sts, SC in same ch 4 sp, Ch 2, sc in next ch 4 sp, repeat from * around putting clusters in front of ch 2 sps. Sl st to 1st sc.
Rnd 5: In any ch 2 sp behind a cluster: Ch 3 (counts as DC), 3 DC in same sp, *BPDC in each of the next 6 sts, 4 DC in next ch 2 sp, repeat from * around. Sl st to beg. ch 3.
Rnd 6: Ch 4 (counts as TR), TR in next, *DC in next 2 sts, HDC in next 2 sts, SC in next 3 sts, HDC in next 2 sts, DC in next 2 sts, TR in next 2 sts, Ch 3, TR in next 2 sts, repeat from * around, sl st to beg ch 4.
Rnd 7: ch up 1, SC in all sts around, [2sc, ch 2, 2 sc] in each corner.
Fasten off.
Weave in all ends.
Enjoy!!
This post contains affiliate links, which means if you click on the link and buy from the linked websites, I will receive a small percentage of the value of your order. The amount you pay is not changed.
I created this Frosty Flakes Granny Square design to add to our 365 Days of Granny Squares project. It uses variety of crochet stitches to create an interesting design! I hope you enjoy making your square!
A couple disclaimers before you start: Be sure to check your tension and use the correct size hook for your square. I demonstrate with an H-5.00mm crochet hook in the video tutorial, but you can make yours bigger or smaller by using a bigger or smaller hook. Also, if yours turns out wonky when you are finished, you may need to block this square to make it nice and flat.
Follow along with this video tutorial to learn how to make this Granny Square:
**You can always contact me via Facebook if you have any problems with the pattern. I am happy to help if you have any questions along the way.
***You can sell anything you make from my patterns, please just link back to my website YARNutopia.com. Thank you!
Teacher: Nadia Fuad
Video and Editing: Fuad Azmat (My Daddy)
Share your work on Facebook!
Add me on Snapchat: YARNutopia
Follow me on Instagram
Visit My Ravelry Store and add this to your Favorites!
Follow me on Twitter: @YARNutopia
Enjoy this video and subscribe to my channel on YouTube for more tutorials on how to crochet!
Leave a comment, and share with your friends!
Pattern:
Designed by Nadia Fuad You *may* sell items made from my pattern, but please reference my website YARNutopia.com.
Please do not copy, sell, and/or post this pattern and claim it as your own.
My dad will continue to be the videographer, editor, and photographer for our videos when I move away.
Support YARNutopia today so we can continue to bring you clear, quality crochet tutorials even after I move into my new home!
There will be an added expense of more travel and hopefully this won’t deter our ability to provide consistent videos on a weekly basis.
NOTES:
-You can use a smaller or larger hook to make this square depending on your tension. I wouldn’t use anything larger than an I-5.5mm Crochet Hook though.
-The finished square measures 7 inches
-This square is worked from the center outward
Special stitches:
Ch(s): chain(s)
YO: Yarn Over
St(s): Stitch(es)
Sl st: slip stitch
SK: Skip
SC: Single Crochet
HDC: Half-Double Crochet
DC: Double Crochet
FPDC: Front Post Double Crochet
TR: Treble Crochet
Pattern:
If you have any confusion or difficulty with reading this pattern, please watch the video tutorial to have visual instructions.
With White
Ch 4, sl st to 1st ch to form a ring.
Rnd 1: Ch 1, 12 SC in ring. Sl st to 1st sc (12 sts)
Rnd 2: Ch up 1, SC in same st, *Ch 6, Sk next st, SC in next st, repeat from * around, sl st to 1st sc. (6 ch 6 sps)
Rnd 3: In any ch 6 sp: Ch up 1 [SC, HDC, 2DC, Ch 3, 2DC, HDC, SC] in same sp, Sl St in next SC and in next CH sp, repeat from * around. Sl st to 1st SC of this round. Fasten off
Rnd 4: Starting in a DC before a chain 3 sp: Ch 1, SC in same st, ch 3, SC in same st, * [SC, Ch 5, SC] in middle ch of ch 3 sp, [SC, ch 3, SC] in next DC after Ch 3 sp, Ch 3, [SC, ch 3, SC] in next DC before a Ch 3 sp, repeat from * around, sl st to beginning sc. Fasten off. (See video tutorial for specific locations)
Rnd 5: With blue, In any 3rd ch of ch 5 sp: * Ch 10, Sl st in 3rd ch of next ch 5 sp, repeat from * around, sl st to 1st ch of beg. ch 10.
Rnd 6: Sl st in ch 10 sp, ch up 1, [9SC, ch 3, 4 SC] in same sp, 10 SC in next ch 10 sp, [4SC, ch 3, 9 SC] in next sp, [9SC, ch 3, 4 SC] in next sp, 10 SC in next ch 10 sp, [4 SC, ch 3, 9SC] in next sp, sl st to 1st sc. (18 sc on each side)
Rnd 7: Ch up 1, SC in 1st 5 sts, (working behind your work) TR in the Ch 3 sp of round 4, SC in next 4 sts, [sc, ch 2, sc] in corner, sc in next 9 sts, (working behind your work) TR in the Ch 3 sp of round 4, SC in next 9 sts, [sc, ch 2, sc] in corner, SC in next 4 sts, (working behind your work) TR in the Ch 3 sp of round 4, SC in next 10 sts, TR in ch 3 sp of round 4, SC in next 4 sts, [sc, ch 2, sc] in corner, SC in next 9 sts, TR in Ch 3 sp of round 4, SC in next 9 sts, [SC, ch 2, SC] in corner, SC in next 4 sts, TR in ch 3 Sp of round 4, SC in last 5 sts. Sl st to 1st sc.
Rnd 8: Ch up 2, (counts as HDC) (See video tutorial for visual instructions), HDC in each st, FPDC around each TR working in Ch 10 sp from round 5, and work [SC, ch 2, SC] in corners. Sl st to ch 2 at the beginning.
This post contains affiliate links, which I may be compensated for when you make a purchase. That means if you click on any link and buy from the linked websites, I will receive a small percentage of the value of your order. The amount you pay is not changed. Thank you for all your support in clicking the links in my blog!! You all are so amazing!! ~Nadia
The yarn provided for this pattern is courtesy of Red Heart Yarns
I created this Dynamic Window Granny Square design to add to our 365 Days of Granny Squares project. It uses variety of crochet stitches to create an interesting design! I hope you enjoy making your square!
A couple disclaimers before you start: Be sure to check your tension and use the correct size hook for your square. I demonstrate with an H-5.00mm crochet hook in the video tutorial, but you can make yours bigger or smaller by using a bigger or smaller hook. Also, if yours turns out wonky when you are finished, you may need to block this square to make it nice and flat.
Follow along with this video tutorial to learn how to make this granny square:
My dad will continue to be the videographer, editor, and photographer for our videos when I move away.
Support YARNutopia today so we can continue to bring you clear, quality crochet tutorials even after I move into my new home!
There will be an added expense of more travel and hopefully this won’t deter our ability to provide consistent videos on a weekly basis.
**You can always contact me via Facebook if you have any problems with the pattern. I am happy to help if you have any questions along the way.
***You can sell anything you make from my patterns, please just link back to my website YARNutopia.com. Thank you!
Teacher: Nadia Fuad
Video and Editing: Fuad Azmat (My Daddy)
Share your work on Facebook!
Add me on Snapchat: YARNutopia
Follow me on Instagram
Visit My Ravelry Store and add this to your Favorites!
Follow me on Twitter: @YARNutopia
Enjoy this video and subscribe to my channel on YouTube for more tutorials on how to crochet!
Leave a comment, and share with your friends!
Pattern:
Designed by Nadia Fuad You *may* sell items made from my pattern, but please reference my website YARNutopia.com.
Please do not copy, sell, and/or post this pattern and claim it as your own.
Materials:
-Red Heart Super Saver Yarn in as many colors as you want.
-H-5.00mm Crochet Hook
-Yarn Needle
-Scissors
NOTES:
-You can use a smaller or larger hook to make this square depending on your tension. I wouldn’t use anything larger than an I-5.5mm Crochet Hook though.
-The finished square measures 6.5 inches
-This square is worked from the center outward
Special stitches:
Ch(s): chain(s)
YO: Yarn Over
St(s): Stitch(es)
Sl st: slip stitch
SK: Skip
SC: Single Crochet
HDC: Half-Double Crochet
DC: Double Crochet
BPSC: Back Post Single Crochet
BPHDC: Back Post Half Double Crochet
BPDC: Back Post Double Crochet
BPTR: Back Post Treble Crochet
Beg. Cluster: Ch up 2, [Y/O, Insert Hook, Y/O, Pull through, Y/O Pull through 2 loops] 2 times. Y/O pull through all 3 loops on hook.
3DC Cluster: [Y/O, Insert Hook, Y/O, Pull through, Y/O Pull through 2 loops] 3 times. Y/O pull through all 4 loops on hook.
Pattern:
If you have any confusion or difficulty with reading this pattern, please watch the video tutorial to have visual instructions.
Ch 4, sl st to 1st ch to form a ring.
Rnd 1: Ch 1, 8 SC in ring. Sl st to 1st sc (8 sts)
Rnd 2: Ch up 1, SC in same st, *Ch 2, Sk next st, SC in next st, repeat from * around, sl st to 1st sc. (4 ch 2 sps)
Rnd 3: In any ch 2 sp: Ch up 4 (counts as TR), [DC, HDC, SC, HDC, DC, TR] in same sp, * [TR, ch 3, TR] in sc, [TR, DC, HDC, SC, HDC, DC, TR] in next ch sp, repeat from * around, sl st to ch up 4.
Rnd 4: In any ch 3 corner sp: Ch up 4 (counts as TR), [TR, Ch 3, 2 TR] in same sp, * TR in next st, DC in next 2 sts, HDC in next st, SC in next st, HDC in next st, DC in next 2 sts, TR in next st, [2 TR, ch 3, 2 TR] in corner, repeat from * around, sl st to ch up 4.
Rnd 5: In any corner: Ch 1, *[2SC, ch 2, 2 SC] in corner, BPSC in next 3 sts, BPHDC in next st, BPDC in next st, BPTR in next 3 sts, BPDC in next st, BPHDC in next st, BPSC in next 3 sts, repeat from * around, sl st to beg. sc.
Rnd 6: In any corner: [Beg. Cluster, ch 2, cluster] in corner, * Ch 1, [sk 1 st, Cluster in next st] 8 times, ch 1, [cluster, ch 2, cluster] in corner. repeat from * around, sl st to beg. cluster. Fasten off.
Weave in all ends.
Enjoy!!
This post contains affiliate links, which I may be compensated for when you make a purchase. That means if you click on any link and buy from the linked websites, I will receive a small percentage of the value of your order. The amount you pay is not changed. Thank you for all your support in clicking the links in my blog!! You all are so amazing!! ~Nadia
The yarn provided for this pattern is courtesy of Red Heart Yarns


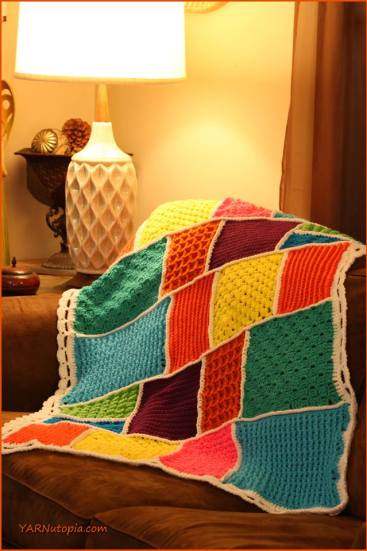


 On June 1st, 2017, YARNutopia will launch the summer season by beginning a 30 Day Photo Challenge and invite all crochet, knit, and yarn lovers to join in on this fun and exciting one month photography adventure.


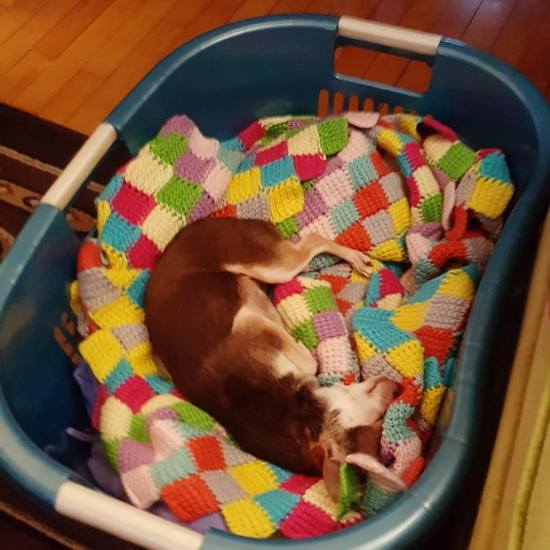


 I used several bold colors, a mixture of different stitches, and a variety of different quadrilateral shapes, to comprise my Dream-Time Mosaic Baby Quilt. This bold and fun piece is sure to add a burst of color to any nursery! Change your colors to match your decor! So much sensory texture in this quilt will provide any wee one loads of comfort!


