Crochet Tutorial: Jewel-Tone Lotus Wrap

Crochet Tutorial: Jewel-Tone Lotus Wrap

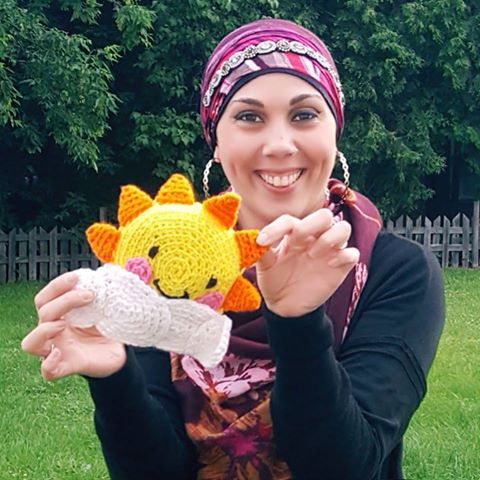
My Jewel-Tone Lotus Wrap is the latest piece hot off my hook! Using Red Heart Yarns Super Saver Stripes in Polo Stripe, I was able to create this rich and vibrant shawl, perfect for staving off the chill on those cool summer evenings.

There are a variety of ways you can wear this, a neck scarf is one of them!

This Jewel-Tone Lotus Wrap is perfect for cooler nights, chilly mornings, and anytime you need to be wrapped up!

This wrap took me about 2 work days to complete. This wrap makes a fabulous gift and would be lovely for bridesmaids in a bridal party! It’s a fast project that you can make for anyone on your gift giving list!


Shop Red Heart, America's Favorite Yarn

Follow along with this video tutorial to learn how to make this wrap:

My dad will continue to be the videographer, editor, and photographer for our videos.
Support YARNutopia today so we can continue to bring you clear, quality crochet tutorials even after I move into my new home!
There will be an added expense of more travel and hopefully this won’t deter our ability to provide consistent videos on a weekly basis.

Donate Button with Credit Cards

**You can always contact me via Facebook if you have any problems with the pattern. I am happy to help if you have any questions along the way.
***These patterns are copyright YARNutopia © so PLEASE DO NOT COPY, SHARE, ADJUST OR RESELL MY PATTERN. I wrote and tested this pattern myself, from beginning to end. It took a lot of time and work, and I would really like to have it remain “my pattern.”
***You can sell anything you make from my patterns, please just link back to my website YARNutopia.com. Thank you!

Please check out the new beginning graphic designed and developed by my brother Nabeel. He and his wife own and operate NFD Graphics. Please hop over to their Facebook page and show them some love! For all your graphic and video/logo design needs be sure to contact them today!
www.nfdgraphics.com

Teacher: Nadia Fuad
Video and Editing: Fuad Azmat (My Daddy)
Share your work on Facebook!
Add me on Snapchat: YARNutopia
Follow me on Instagram
Visit My Ravelry Store and add this to your Favorites!
Follow me on Twitter: @YARNutopia
Enjoy this video and subscribe to my channel on YouTube for more tutorials on how to crochet!
Leave a comment, and share with your friends!

Pattern:

Designed by Nadia Fuad
You *may* sell items made from my pattern, but please reference my website YARNutopia.com.
Please do not copy, sell, and/or post this pattern and claim it as your own.
Shop Red Heart, America's Favorite Yarn

Materials:

***Click here to get the whole KIT!! ***

Shop Super Saver Stripes Today!

Red Heart Super Saver Stripes in Polo Stripe (600 yards)
-J-6.00mm Crochet Hook (Find the hook I used in my video tutorial here!)
Yarn Needle
Scissors

You can buy any of the items in this kit. Buy all or buy one item. Check it out to see the supplies you can get online to make this wrap!

NOTES:

-This project uses approximately 600 yards of yarn.
-Use a smaller hook to make these smaller
-Use a bigger hook to make these bigger
-Watch the FULL video tutorial for visual instructions for each piece
-Weave in all the ends as you go so you don’t have to weave them all in at the very end.
-The finished piece measures 53 inches long and 16 inches wide.
-Watch the video tutorial for visual instructions on how to attach the motifs.


Shop Red Heart, America's Favorite Yarn

Special stitches:
Ch(s): chain(s)
YO: Yarn Over
St(s): Stitch(es)
prev.: Previous
Sl st: slip stitch
SC: Single Crochet
HDC: Half Double Crochet
DC: Double Crochet
TR: Treble Crochet
Puff: [YO, Insert hook, YO, Pull through] 4 times. YO, pull through all 9 loops on the hook.

Pattern:

If you have any confusion or difficulty with reading this pattern, please watch the video tutorial to have visual instructions.

Motif Number 1:

Ch 4, Sl st in 1st ch to form a ring.
Rnd 1: Ch 1, 8 SC in ring, Sl st to 1st SC. (8)

Rnd 2: Ch 1, Puff in same st, Ch 1, *Puff in next st, Ch 1, repeat from * around, Sl st to 1st Puff St. (8 puffs)

Rnd 3: Sl st into ch 1 sp, *Ch 4, Sl st into next ch sp, repeat from * around, sl st into 1st ch of beg. ch 4. (8 ch 4 sps)

Rnd 4: Sl st into ch 4 sp, ch 1, [SC, HDC, DC, ch 2, DC, HDC, SC] in each ch sp around, sl st to first SC. (8 petals made)

Rnd 5: Sl st into each st until you get into the ch 2 sp (point of a petal), Ch 1, SC in same ch sp, *CH 6, SC in next Ch 2 sp, repeat from * around, sl st to first SC. (8 Ch 6 sps)

Rnd 6: Sl st into ch 6 sp, Ch up 3 (Counts as DC), [2DC, TR, Ch 2, TR, 3 DC] in same sp, [3DC, TR, Ch 2, TR, 3 DC] in each ch 6 sp. Sl st to beginning ch up 3.

Rnd 7: Sl st in each st until you get into the Ch 2 sp, ch 1, SC in same sp, *Ch 3, Sk 2 sts, DC2TOG, Ch 6, DC2TOG, Ch 3, Sk 2 sts, SC in next ch 2 sp, Ch 3, sk 2 sts, DC2TOG, Ch 3, DC2TOG, Ch 3, Sk 2 sts, SC in next Ch 2 sp, repeat from * around. Sl st to 1st SC. Fasten off. Weave in ends.

Motif Number 2:

Repeat Rounds 1-6 of Motif Number 1
Round 7: Sl st in each st until you get into the Ch 2 sp, ch 1, SC in same sp, Ch 3, Sk 2 sts, DC2TOG, Ch 3, Remove hook, Insert Hook into Ch 6 sp of piece #1, put loop back on hook, ch 3, DC2TOG, Ch 1, Remove hook, insert hook into ch 3 sp of piece #1, put loop back on hook, ch 2, SC in next ch 2 sp, Ch 1, Remove Hook, Insert hook into ch 3 sp of Piece #1, put loop back on hook, Ch 2, Sk 2 sts, DC2TOG, Ch 1, Remove Hook, Insert hook into ch 3 sp of Piece #1, Ch 2, DC2TOG, Ch 1, Remove Hook, Insert hook into ch 3 sp of Piece #1, Sk 2 sts, SC in ch 2 sp, Ch 1, Remove Hook, Insert hook into ch 3 sp of Piece #1, Ch 2, Sk 2 sts, DC2TOG, Ch 3, Remove Hook, Insert hook into ch 6 sp of Piece #1, put loop back on hook, ch 3, DC2TOG, Ch 3, Sk 2 sts, SC in next ch 2 sp, Ch 3, sk 2 sts, DC2TOG, Ch 3, DC2TOG, Ch 3, Sk 2 sts, SC in next Ch 2 sp, Ch 3, Sk 2 sts, DC2TOG, Ch 6, DC2TOG, Ch 3, Sk 2 sts, SC in next ch 2 sp, Ch 3, sk 2 sts, DC2TOG, Ch 3, DC2TOG, Ch 3, Sk 2 sts, SC in next Ch 2 sp, Ch 3, Sk 2 sts, DC2TOG, Ch 6, DC2TOG, Ch 3, Sk 2 sts, SC in next ch 2 sp, Ch 3, sk 2 sts, DC2TOG, Ch 3, DC2TOG, Ch 3, Sl st to 1st SC. Fasten off. Weave in ends.

Motif Number 3:

Repeat Rounds 1-6 of Motif Number 1
Round 7: Sl st in each st until you get into the Ch 2 sp, ch 1, SC in same sp, Ch 3, Sk 2 sts, DC2TOG, Ch 3, Remove hook, Insert Hook into Ch 6 sp of piece #2, put loop back on hook, ch 3, DC2TOG, Ch 1, Remove hook, insert hook into ch 3 sp of piece #2, put loop back on hook, ch 2, SC in next ch 2 sp, Ch 1, Remove Hook, Insert hook into ch 3 sp of Piece #2, put loop back on hook, Ch 2, Sk 2 sts, DC2TOG, Ch 1, Remove Hook, Insert hook into ch 3 sp of Piece #2, Ch 2, DC2TOG, Ch 1, Remove Hook, Insert hook into ch 3 sp of Piece #2, Sk 2 sts, SC in ch 2 sp, Ch 1, Remove Hook, Insert hook into ch 3 sp of Piece #2, Ch 2, Sk 2 sts, DC2TOG, Ch 3, Remove Hook, Insert hook into ch 6 sp of Piece #2, put loop back on hook, ch 3, DC2TOG, Ch 3, Sk 2 sts, SC in next ch 2 sp, Ch 3, sk 2 sts, DC2TOG, Ch 3, DC2TOG, Ch 3, Sk 2 sts, SC in next Ch 2 sp, Ch 3, Sk 2 sts, DC2TOG, Ch 6, DC2TOG, Ch 3, Sk 2 sts, SC in next ch 2 sp, Ch 3, sk 2 sts, DC2TOG, Ch 3, DC2TOG, Ch 3, Sk 2 sts, SC in next Ch 2 sp, Ch 3, Sk 2 sts, DC2TOG, Ch 6, DC2TOG, Ch 3, Sk 2 sts, SC in next ch 2 sp, Ch 3, sk 2 sts, DC2TOG, Ch 3, DC2TOG, Ch 3, Sl st to 1st SC. Fasten off. Weave in ends.

Motif Number 4:
Repeat Rounds 1-6 of Motif Number 1
Round 7: Sl st in each st until you get into the Ch 2 sp, ch 1, SC in same sp, Ch 3, Sk 2 sts, DC2TOG, Ch 3, Remove hook, Insert Hook into Ch 6 sp of piece #3, put loop back on hook, ch 3, DC2TOG, Ch 1, Remove hook, insert hook into ch 3 sp of piece #3, put loop back on hook, ch 2, SC in next ch 2 sp, Ch 1, Remove Hook, Insert hook into ch 3 sp of Piece #3, put loop back on hook, Ch 2, Sk 2 sts, DC2TOG, Ch 1, Remove Hook, Insert hook into ch 3 sp of Piece #3, Ch 2, DC2TOG, Ch 1, Remove Hook, Insert hook into ch 3 sp of Piece #3, Sk 2 sts, SC in ch 2 sp, Ch 1, Remove Hook, Insert hook into ch 3 sp of Piece #3, Ch 2, Sk 2 sts, DC2TOG, Ch 3, Remove Hook, Insert hook into ch 6 sp of Piece #3, put loop back on hook, ch 3, Remove hook again, Insert it into the Ch 6 sp of Piece Number 1, Pull it through with the yarn on the hook, (see video tutorial for visual instructions), DC2TOG, Ch 1, Remove hook, insert hook into ch 3 sp of piece #1, put loop back on hook, ch 2, SC in next ch 2 sp, Ch 1, Remove Hook, Insert hook into ch 3 sp of Piece #1, put loop back on hook, Ch 2, Sk 2 sts, DC2TOG, Ch 1, Remove Hook, Insert hook into ch 3 sp of Piece #1, Ch 2, DC2TOG, Ch 1, Remove Hook, Insert hook into ch 3 sp of Piece #1, Sk 2 sts, SC in ch 2 sp, Ch 1, Remove Hook, Insert hook into ch 3 sp of Piece #1, Ch 2, Sk 2 sts, DC2TOG, Ch 3, Remove Hook, Insert hook into ch 6 sp of Piece #1, put loop back on hook, ch 3, DC2TOG, Ch 3, Sk 2 sts, SC in next ch 2 sp, Ch 3, sk 2 sts, DC2TOG, Ch 3, DC2TOG, Ch 3, Sk 2 sts, SC in next Ch 2 sp, Ch 3, Sk 2 sts, DC2TOG, Ch 6, DC2TOG, Ch 3, Sk 2 sts, SC in next ch 2 sp, Ch 3, sk 2 sts, DC2TOG, Ch 3, DC2TOG, Ch 3, Fasten off. Weave in ends.

Assembly Step:
Using the video tutorial for visual instructions, Repeat Motif 3 and 4 attaching as you go.

Border: 
Round 1: Starting in a ch 6 corner sp: Ch up 3, [3DC, ch 2, 4 DC] in same sp, 3 DC in each ch 3 sp around and put [4DC, ch 2, 4DC] in each corner, Sl st to 1st Ch up 3.
Round 2: CH up 3, DC in each st around, putting [2DC, ch 2, 2 DC] in each corner, Sl st to 1st Ch up 3.
Fasten off, weave in ends.

Enjoy!!

This post contains affiliate links, which means if you click on the link and buy from the linked websites, I will receive a small percentage of the value of your order. The amount you pay is not changed.

The yarn provided for this pattern is courtesy of Red Heart Yarns

Like this shawl? Try making the Summer Shawl!!

Cricut Gives Your Ultimate Cutting Precision

YARNutopia 30 Day Photo Challenge

YARNutopia 30 Day Photo Challenge

On June 1st, 2017, YARNutopia will launch the summer season by beginning a 30 Day Photo Challenge and invite all crochet, knit, and yarn lovers to join in on this fun and exciting one month photography adventure.

On each day in June, you will find a daily topic that you, the audience, can use for inspiration. Be creative, think outside the box, there is no right or wrong answer!

Simply, take a photo pertaining to the daily topic and post it on Facebook in the comments section after I post my Photo of the Day, and then share your photo on Instagram with the hashtag #YARNutopia30DayChallenge.

You can participate on your own personal photo journey and share privately with your own friends and family or use our Facebook page or go to Instagram to post your photos and see what others are sharing as well!

This blog provides 30 inspirational guidelines as shown in our info-graphic. I will be posting my very own Photo of the Day to also help inspire you! This activity is a fun way to share our love of that yarn life in a new creative outlet!

This is NOT a competition so there’s NO PRESSURE to finish or participate. There’s NO PRIZE (other than the memories you’re going to make in this month of creativity!) There is NO OBLIGATION. Join in for one day or the entire month! This is purely for enjoyment and entertainment! There are NO RULES other than the *obvious* and it goes without saying, but I will say it anyway, inappropriate content will NOT be acknowledged and will be deleted. I am sure we won’t need to worry about that because this community is THE BEST.

This is just a way for our community to have a month of craft/yarn filled fun and share this fun in another creative way, through PHOTOS! One photo, each day, for 30 days of JUNE!

***Share this blog, join along, share your photos, hashtag #YARNutopia30DayChallenge and lets challenge ourselves to get even more creative than we already are!***

So, to Recap:
• Bookmark this page (or follow us on Facebook or Instagram to see the daily photo).
• Check YARNutopia.com each day in June or follow along on our social media accounts from June 1st to 30th for the daily topic.
• Complete the daily challenge (feel free to join in for a day, a few days, or the entire month) following our topic inspiration take a photo that is inspired by that day’s topic (we hope each day brings fun, happiness, and creativity to your day! I can’t wait to see what you all come up with!).
• Post pictures of the day for everyone to see using the hashtag #YARNutopia30DayChallenge

This 30 Day Photo Challenge is starting on June 1st, 2017. The theme of this 30 Day Challenge is all related to the yarn and crochet life. The topics cover a variety of inspirational

30 Day Challenge List

Day 1: Favorite Yarn

Post a photo your favorite skein of yarn, or your favorite yarn used in a project. Share the name of your favorite yarn!

Without a doubt, Red Heart Treasures has always been my favorite. Just looking at this photo makes me happy! Imagine how bummed I was to learn this is no longer available, but I have been on a search for a similar replacement. In the meantime, my last few skeins are waiting for the perfect project!!

Day 2: Can’t Live Without

A tool, yarn, or item you use or need every day.

This is my Crochet Survival Kit! How can we limit to just one thing? If I had to, it would be my H-5.00mm crochet hook, but in an ideal situation I would grab these essentials! What is your “Can’t Live Without” item? What would be in your “Crochet Survival Kit?”

Day 3: My Stash

Where you store and keep your yarn stash.

In truth, I have yarn stashed all over my house, but this honeycomb shelf unit is where most of my yarn has found a color-coded home. Haha! My rainbow collection!

Day 4: In My Bag

Take a photo of what is in your bag right now.

Presently, my bag is full of wedding preparation supplies including my wedding planner, my patterns notebook, and Aunt Lydia’s Thread for the flowers I am crocheting for my bouquets (future video tutorial) Oh, and my headphones!

Day 5: Current Project/WIP

Show a recent project or current work in progress.

My crochet flowers for my wedding are what’s on my hook at the moment. I have a little more than 9 months to crochet all the bouquets, boutonnieres, corsages, and centerpiece flowers. And YES, I plan on doing some video tutorials along the way. My bridal palette is jewel tones. All the flowers are a reflection of those colors! I’m excited to share this part of my journey with you!

Day 6: The First Letter of Your First Name

Photograph something related to your craft that starts with the first letter of **your** first name. In my case, something starting with the letter N for Nadia.

For me, it’s the letter N. Here are my pattern NOTES full of my stitch NUMBERS!! The latter N was hard to find words related to crochet! Anyone else have luck with the first letter of YOUR name??

Day 7: In the Home

Show something in your home associated with crochet/knit: an afghan over a chair, a blanket on a bed, your yarn pile next to a chair or anything that shows your work at home. The possibilities are endless!

This is my studio space. Here is where all the crochet magic happens. If I’m not curled up crocheting on my couch, this is where you will find me in my home.

Day 8: In the Moment

Take a photo of a moment in your day that crochet is involved. Examples: Crocheting or knitting outside, having coffee while enjoying your craft, your pet tangled in yarn, just a moment captured.

Selfie time!!!! This is me right now working on a new project! Hello from Wisconsin!

Day 9: Something Old

An older item you made, or an antique piece passed on from generations, something you’ve had for years.

I found a stack of vintage crochet books at a thrift sale for 25 cents each. I seriously squealed with delight, did a happy dance, and grabbed an entire stack! It felt like I discovered gold! #crochetgold

Day 10: Something New

A new item you just bought or inherited, a new tool, new yarn, anything brand new you want to share.

This delightful Red Heart Yarns Super Saver Ombré yarn is just waiting for me to sink my hook into it! I’m loving this new yarn! #yarnpyramid

Day 11: Favorite Hook/Needles

A photo of your go-to hook or needle, a favorite hook or set of needles that you find yourself always reaching for.

My favorite crochet hook is this great ergonomic hook made by the Etsy Shop WoodBeFancy. I have arthritic hands, and it helps to have a thick handle to grip. It relieves my hand stress. This gives me longer crocheting times and less stiffness when I take a break and uncurl my fingers. Find the same hook here.

Day 12: Variegated

Variegated yarn that you love, a piece made from variegated yarn, anything that is associated that has gradual or sharp color changes.

Variegated meaning: Having streaks, marks, or patches of a different color or colors; variety.

A while ago, I purchased this Red Heart Boutique Unforgettable Yarn in the color Winery, and while driving home, I saw the sky just before sunset. The changes in the colorway of this beautiful yarn had the same streaks of color variation as the sky! I thought it was pretty remarkable, so I took this side by side shot.

Day 13: Wearable

Something wearable you made, want to make, someone has made for you. If you share someone else’s pattern or photo, be sure to credit the designer!

I’m having a lazy start to my Tuesday morning. Feet up, chai in my mug, yarn on my hook, and my Tutti Frutti Crochet Slippers keeping me comfy. Follow this link to find these slippers on my blog.

Day 14: Amigurumi

A stuffed amigurumi toy you made, want to make or someone has made for you. If you share someone else’s pattern or photo, be sure to credit the designer!

Summer is here in the USA and Shenanigans wastes no time to find his way to the pool! This old photo is a perfect reminder to kick back and seize the day! #carpediem Many have asked about this sheep amigurumi. You can find the written pattern here designed by Harugurumi.

Day 15: Favorite Color

Your favorite color of yarn, or a crocheted/knit item made in your favorite color.

Green. Need I say more? I just love the variations in this color. It’s very refreshing!

Day 16: My Happy Place

Somewhere you love to crochet or knit. Examples: In the car on a long ride, in a favorite chair or bed, on your porch, in your backyard, at a park. Anywhere you love to zone out and enjoy your craft.

My Happy Place is being surrounded by Yarn! Yesterday I stopped by the warehouse sale at Herrschners Retail Store for some deals, and I was overcome by delight!! I want ALL THE YARN! Not much can make me this giddy, but the words Yarn and Sale combined in one fantastic place can pretty much guarantee to make me happy!!

Day 17: Scraps

Share a picture of your scrap yarn. What do you do with your scraps? Where do your scraps end up? Share scraps that turn up in unexpected places.

Found all over the house. On tables, on the floor, in the car, and even embedded in my cheek when I doze off working on a project. Where do you keep/find your scraps?

Day 18: Hands

Share a photo of your hands involved in your craft, holding your hook or project.

Happiness is handmade. Our hands create the things we once thought impossible by bringing our yarn and hook together.

Day 19: Texture

Share a close-up photo of stitches and their texture. Zoom in and show a neat close-up of a project, a fun stitch, anything showcasing different texture.

I love playing with yarn to create the richest textures. I love the look of this Woven Stitch pattern. It begs you to reach out and touch it! This is a close-up photo of the Woven Dreams Baby Blanket. Find the full photo here

Day 20: Black and White

Anything you want to share related to our craft in black and white.

Candid Crochet Moment. A typical rainy day. You will find me in pajamas curled up on the couch, hook in hand, working on my next new thing. This is my world. #reallife #candidcrochetmoments

Day 21: Stitches

Show your project and name the stitches you are working on.

Here’s an array of stitches on a past project. Using an eclectic mix of colors and a blend of crochet artistry, you can create this fantastic project! The stitches include Single Crochet (SC), Half Double Crochet (HDC), Double Crochet (DC), and Criss-Cross stitches! Like what you see? Find the free written pattern and video tutorial here.

Day 22: Motivates Me

What gets you motivated? Music? a TV show? A sunny day? comfy clothes? a cup of coffee or tea? a day off? crochet with a friend? Showcase your motivation in a creative photo!

I love Pinterest! I love all the ideas and inspiration I can find all in one place! This website is filled with motivation!

Day 23: Where I Stand

When you sit down to crochet, what does your crochet “spot” look like? Take a photo of where you stand and what your point of view is.

This is my point of view. I’m in the studio right now. Staring down at our next new project. This one has me going “in circles!”

Day 24: Lines

Share a photo of anything that has lines. Lines at the craft store, the yarn aisle and shelves of yarn lined up, lines in a crochet/knit pattern.

Yarn Lines! Everything about this photo makes me happy! The shelves and shelves of yarn LINED up so neatly in rows have me feeling like a kid in a candy store the moment this sight greets my eyes ANDDD that line on my face turns into a big bright smile!!

Day 25: Make it Bright

Bright colored fibers, bright colored project, bright colored yarn bag, a bright sunny day to crochet or knit, a bright idea!

Nothing is brighter than the sun! This is part of a great pattern I found on Ravelry. I hope this brings a ray of sunshine to your day and brightens it right up!

Day 26: Words to Live By

A funny meme, a great quote, a piece of advice from someone,a graphic tee-shirt or yarn bag, a sale sign at the yarn shop

This passage has helped me through some of the most difficult times in my life.

Day 27: Soft

A soft item, yarn, a plushie, a stuffed toy, a baby, a pet, anything soft and cuddly.

Fresh soft, warm blankets straight from the dryer are the bed of choice for our pup Reub today. I guess that afghan will get another washing after Reuben’s nap.

Day 28: Pastel

Soft pastel yarn, a pastel project, crochet at sunset with pastel sky, anything pastel!

I discovered this morning that I don’t have a lot of pastel yarn in my stash. I did have these 2 past projects that I’ve used pastel Soft Essentials yarn in Minty, Jungle Stripes, Purple Reign and Sugar Plum.

Find the written pattern and video tutorial for the Woven Dreams Baby Blanket here.
Find the written pattern and video tutorial for the Patchwork Medley Baby Blanket here.

Day 29: My Wish List

Showcase the item you WISH you had. Find a photo of it and share it. Examples: A dream craft room, a book, a hook, a bag, a ball of yarn.

My Wish List is to have a dream craft room. Nate and I are buying a house soon! I will have my own space to create my wish come true! I have a blank canvas to design the perfect work space. Here are a few photos that inspire me!

Day 30: Love Is…

Share something that that describes how much you LOVE your craft.

Love is…
doing what you love, with who you love, using tools you love, EVERY. SINGLE. DAY. Thank you for sharing in this 30 Day Challenge. I enjoyed all the participation across social media! Thank you for all the love and support you always show. Being able to do this brings so much joy to my heart!

We Did It!

We Did It!

When you have a channel and reach certain milestones as a YouTuber, you are rewarded in a variety of ways that recognizes that accomplishment. Today, YouTube sent us our first milestone award The Silver Play Button recognizing 100,000 subscribers to our channel!

Although we reached that goal in October 2016, and our channel now has 147,300 subscribers, it still holds immense thrill to receive this award and to know our hard work continues to be appreciated by so many! YARNutopia.com is what it is first and foremost because of EACH of YOU that show up to watch my videos, subscribe and follow me on social media! We hope to continue to provide great content and crochet videos so that we reach each milestone together! Your support means more that you will ever know!


So, thank you for helping us reach this goal. Thank you for sharing my videos and believing in us. It feels like a myriad of emotions all balled up like a ball of yarn! Humbling, thrilling, exhilarating are all the feels going on right now!!

Before closing this blog, special attention has to go to my wonderful parents. There are no words to express how much each of them do behind the scenes. My dad is the best cameraman ever and without those mad skills, we would not be who we are. My mom’s creativity is out of this world! There are no words. I am so grateful for the ongoing support of amazing parents, my brothers, my sister-in-law (and future Matron of Honor), my nephew (who makes the best model ever), my Nate who walked in to the life of a YouTuber no questions asked and embraced what it all entails, and to each one of you that invite me into your home each day, thank you, thank you! This award belongs to all of us! We are looking forward to our next milestone!

A special thanks to YouTube for recognizing our accomplishments with this very cool shadowbox plaque.

~Nadia

Crochet Tutorial: Butterfly Scrubby Washcloth

Crochet Tutorial: Butterfly Scrubby Washcloth

Ooooh I just tried out the new Scrubby Cotton Yarn by Red Heart Yarns and made these fun Butterfly Scrubby Washcloths. This yarn provides a unique texture that makes it perfect for household and bath! What a fun and easy gift this would make all-year-round for anyone on your gift giving list! Make a set Scrubby Butterflies and pair them with nice soaps for a fun homemade gift that comes right from the hands and heart!

The texture appears to be abrasive, but it has a soft feel. The fibers provide a bit of exfoliating characteristics but it becomes softer when wet! You will enjoy this yarn for your household needs. You may find this yarn poses a couple challenges in the video tutorial, and it was a bit of an issue showcasing the stitches. Hopefully you can follow along and make these great washcloths today!

Sew two of these washcloths together and keep an opening at the bottom to create a unique wash mitt. So many creative ideas are provided by one great product! If you are going for the ultimate crafting project, not only can you make these washcloths, but you can try making your very own soap or soap products to go with this homemade gift theme!


Not a fan of scrubby yarn? Try this pattern using 100% cotton for fun washcloths without the texture! No matter what type of yarn you choose, these cloths are sure to be a big hit!

Watch this video tutorial to learn how to make this Scrubby:

My dad will continue to be the videographer, editor, and photographer for our videos when I move away.
Support YARNutopia today so we can continue to bring you clear, quality crochet tutorials even after I move into my new home!
There will be an added expense of more travel and hopefully this won’t deter our ability to provide consistent videos on a weekly basis.

Donate Button with Credit Cards

**You can always contact me via Facebook if you have any problems with the pattern. I am happy to help if you have any questions along the way.
***These patterns are copyright YARNutopia © so PLEASE DO NOT COPY, SHARE, ADJUST OR RESELL MY PATTERN. I wrote and tested this pattern myself, from beginning to end. It took a lot of time and work, and I would really like to have it remain “my pattern.”
***You can sell anything you make from my patterns, please just link back to my website YARNutopia.com. Thank you!

Please check out the new beginning graphic designed and developed by my brother Nabeel. He and his wife own and operate NFD Graphics. Please hop over to their Facebook page and show them some love! For all your graphic and video/logo design needs be sure to contact them today!
www.nfdgraphics.com

Teacher: Nadia Fuad
Video and Editing: Fuad Azmat (My Daddy)
Share your work on Facebook!
Add me on Snapchat: YARNutopia
Follow me on Instagram
Visit My Ravelry Store and add this to your Favorites!
Follow me on Twitter: @YARNutopia
Enjoy this video and subscribe to my channel on YouTube for more tutorials on how to crochet!
Leave a comment, and share with your friends!

Francesca’s Collections”

Pattern:

Designed by Nadia Fuad
You *may* sell items made from my pattern, but please reference my website YARNutopia.com.
Please do not copy, sell, and/or post this pattern and claim it as your own.

Materials:

***Click here to get the whole KIT!! ***

Get Red Heart Yarns Scrubby Cotton in all kinds of colors here!

Red Heart Yarns Scrubby Cotton in Denim
Red Heart Yarns Scrubby Cotton in Jade
Red Heart Yarns Scrubby Cotton in Lavender
-I-5.50mm Crochet Hook (Find the hook I used in my video tutorial here!)
Yarn Needle
Scissors

You can buy any of the items in this kit. Buy all or buy one item. Check it out to see the supplies you can get online to make this scrubby!

NOTES:

-This project uses approximately 100 yards of yarn.
-Use a smaller hook to make these smaller
-Use a bigger hook to make these bigger
-Watch the FULL video tutorial for visual instructions for each piece
-Weave in all the ends as you go so you don’t have to weave them all in at the very end.
-This cloth is 10 inches at the widest point and 7 inches at the tallest point
-Use 2 strands of yarn at the same time in this project!!


Shop Red Heart, America's Favorite Yarn

Special stitches:
Ch(s): chain(s)
YO: Yarn Over
St(s): Stitch(es)
prev.: Previous
Sl st: slip stitch
SC: Single Crochet
HDC: Half Double Crochet
DC: Double Crochet
TR: Treble Crochet
Beg. Popcorn: Ch up 3, 3 DC in same sp, remove hook from loop, insert hook in 1st ch up 3 of grouping, place loop back on hook and pull through. (see video tutorial for specific instructions)
Popcorn: 4 DC in same st, remove hook from loop, insert hook in 1st st of grouping, place loop back on hook and pull through. (see video tutorial for specific instructions)
macys.com

Pattern:

If you have any confusion or difficulty with reading this pattern, please watch the video tutorial to have visual instructions.

Butterfly: With 2 Strands of yarn at the same time

Piece Number 1:
**Make 2**
With Jade:
Ch 10
Row 1: SC in 2nd ch from hook, HDC in next, DC in next 5 chs, HDC in next ch, 3 SC in last ch, working on opposite side of foundation ch, HDC in next st, HDC in next 5 sts, HDC in next, 2 SC in last st, Sl st to 1st SC, turn. (20 sts)

Row 2: Ch 1, 2 SC in middle SC of 3SC grouping, [TR in next st, SC in next st] 5 times, TR in next st, 2SC in middle SC of point, [TR in next st, SC in next st] 5 times. Sl st to 1st SC. Turn.

Row 3: Ch 3 (counts as DC), DC in next st, 2 DC in each TR, 1 DC in each SC around. Put 2 DC in each SC of the point, Sl st to ch up 3. (See video tutorial for visual instructions)
Fasten off with long tail for sewing.

Piece Number 2:
**Make 2**
With Denim:
Ch 2
Rnd 1: 6 SC in 2nd Ch from hook, sl st to 1st SC (Sl st counts as a stitch). (7)

Rnd 2: Ch 3, Beg. Popcorn in same st, ch 2, *Popcorn in next, ch 2, Repeat from * around working last popcorn in Sl st from last round. (See video tutorial for visual instructions) (7 popcorn sts made)

Row 3: Sl st into Ch 2 sp, Ch up 3, 3 DC in same sp, 4 DC in each Ch 2 sp around. Sl st to beg. ch up 3. (28 DC)
Fasten off with long tail for sewing.

Piece Number 3:
With Lavender:
**Make 1**
Ch 16
Row 1: SC in 2nd ch from hook, HDC in next, DC in next 5 chs, SC in next, DC in next 5 chs, HDC in next ch, SC in next ch, (Make loop next), Ch 4, Sl st back into the base of last SC made, Turn work, 5 SC in loop, Sl st to last SC made. Fasten off, Weave in all ends, closing any gaps. (See video tutorial)

Assembly Step:
Using the video tutorial for visual instructions, Sew all the pieces together to look like a butterfly. Weave in all ends

Enjoy!!

This post contains affiliate links, which I may be compensated for when you make a purchase. That means if you click on any link and buy from the linked websites, I will receive a small percentage of the value of your order. The amount you pay is not changed. Thank you for all your support in clicking the links in my blog!! You all are so amazing!! ~Nadia

The yarn provided for this pattern is courtesy of Red Heart Yarns

Like this cloth? Try making the Butterfly Effect Granny Square here!


Shop Red Heart, America's Favorite Yarn

Cinema Light Box

Find 1000's of uncommon items great for the home, giving as gifts and more!


Crochet Tutorial: Dream-Time Mosaic Baby Quilt

Crochet Tutorial: Dream-Time Mosaic Baby Quilt

Designing and deciding on a new pattern is always a challenge. The process begins by choosing something that may be a need such as a gift or something that inspires me in the moment, whether it be for a baby, the home, a wearable, or any other pursuit, I look for motivation from many sources. The inspiration for this Dream-Time Mosaic Baby Quilt came from a quilt pattern that showed up in the News Feed on Facebook of a friend who loves quilting!

The patchwork squares of fabric pieced together, each having a different design, was the basis for this latest project. I asked myself how could I create this same variety in crochet? Creating nine different patches in different stitching and colors provided me with the distinction between these pieces. I put them together like a mosaic giving this crochet quilt the look I was going for.


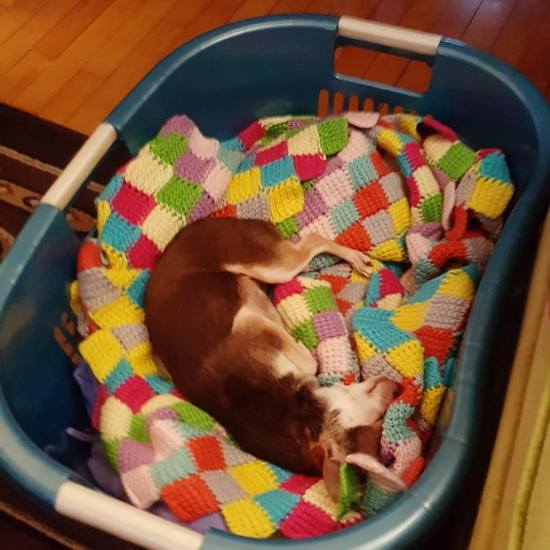
I used several bold colors, a mixture of different stitches, and a variety of different quadrilateral shapes, to comprise my Dream-Time Mosaic Baby Quilt. This bold and fun piece is sure to add a burst of color to any nursery! Change your colors to match your decor! So much sensory texture in this quilt will provide any wee one loads of comfort!

My biggest obstacle was making sure the measurement of each piece fit within the confines of a reasonable sized baby blanket that did not leave one horizontal row longer or shorter. This arrangement worked out beautifully! Once I laid out all the pieces, assured this mosaic puzzle of crochet pieces would fit, I began the process to attach everything. Finally, I framed my piece in a cute delicate scallop edge.


Follow along with this video tutorial to learn how to make this blanket:

My dad will continue to be the videographer, editor, and photographer for our videos when I move away.
Support YARNutopia today so we can continue to bring you clear, quality crochet tutorials even after I move into my new home!
There will be an added expense of more travel and hopefully this won’t deter our ability to provide consistent videos on a weekly basis.

Donate Button with Credit Cards


**You can always contact me via Facebook if you have any problems with the pattern. I am happy to help if you have any questions along the way.
***These patterns are copyright YARNutopia © so PLEASE DO NOT COPY, SHARE, ADJUST OR RESELL MY PATTERN. I wrote and tested this pattern myself, from beginning to end. It took a lot of time and work, and I would really like to have it remain “my pattern.”
***You can sell anything you make from my patterns, please just link back to my website YARNutopia.com. Thank you!

Please check out the new beginning graphic designed and developed by my brother Nabeel. He and his wife own and operate NFD Graphics. Please hop over to their Facebook page and show them some love! For all your graphic and video/logo design needs be sure to contact them today!
www.nfdgraphics.com

Teacher: Nadia Fuad
Video and Editing: Fuad Azmat (My Daddy)
Share your work on Facebook!
Add me on Snapchat: YARNutopia
Follow me on Instagram
Visit My Ravelry Store and add this to your Favorites!
Follow me on Twitter: @YARNutopia
Enjoy this video and subscribe to my channel on YouTube for more tutorials on how to crochet!
Leave a comment, and share with your friends!

Pattern:

Designed by Nadia Fuad
You *may* sell items made from my pattern, but please reference my website YARNutopia.com.
Please do not copy, sell, and/or post this pattern and claim it as your own.
Shop Red Heart, America's Favorite Yarn

Materials:

***Click here to get the whole KIT!! ***

Red Heart Super Saver Yarn in White
Red Heart Super Saver Yarn in Flamingo
Red Heart Super Saver Yarn in Bright Yellow
Red Heart Super Saver Yarn in Hot Pink
Red Heart Super Saver Yarn in Turqua
Red Heart Super Saver Yarn in Jade
Red Heart Super Saver Yarn in Carrot
Red Heart Super Saver Yarn in Dark Orchid
Red Heart Super Saver Yarn in Spring Green
Red Heart Super Saver Yarn in Pool
-I-5.50mm Crochet Hook (Find the hook I used in my video tutorial here!)
Yarn Needle
Scissors

You can buy any of the items in this kit. Buy all or buy one item. Check it out to see the supplies you can get online to make this baby blanket!

NOTES:

-This project uses approximately 1100 yards of yarn.
-Use a smaller hook to make these smaller
-Use a bigger hook to make these bigger
-Watch the FULL video tutorial for visual instructions for each piece
-Weave in all the ends as you go so you don’t have to weave them all in at the very end.
-This blanket is 44 inches by 34 inches and each piece measurements are below.


Shop Red Heart, America's Favorite Yarn

Special stitches:
Ch(s): chain(s)
YO: Yarn Over
St(s): Stitch(es)
prev.: Previous
Sl st: slip stitch
SC: Single Crochet
BLO: Back Loop Only
HDC: Half Double Crochet
DC: Double Crochet
FPDC: Front Post Double Crochet
BPDC: Back Post Double Crochet
TR: Treble Crochet
Popcorn: 4 DC in same st, remove hook from loop, insert hook in 1st st of grouping, place loop back on hook and pull through. (see video tutorial for specific instructions)
Shell: 5 DC in same stitch

Pattern:

If you have any confusion or difficulty with reading this pattern, please watch the video tutorial to have visual instructions.

Blanket:

Piece Number 1: (Should measure 8″ x 5″)
**Make 4**  (Work in BLO)
With Flamingo:
Ch 29
Row 1: SC in 2nd ch from hook and across. Ch 1, turn. (28)
Rows 2-20: SC across, ch 1, turn.
Fasten off when piece measures 8×5
Weave in ends.


Piece Number 2: Should measure 8″ x 8″
Make 3
With Bright Yellow:
**Make 3**
Ch 4
Rnd 1: 2 DC in 4th Ch from hook, ch 2, [3 DC in same ch, ch 2] 3 times, sl st to 1st ch up 3.
Rnd 2: Ch 3, Turn work, [2DC, ch 2, 3 DC] in same corner sp, *[3DC, ch 2, 3 DC] in next ch sp, repeat from * around, sl st to beg. ch up 3.
Row 3: Sl st to corner, Ch up 3, 2 DC in same sp, 3 DC in next gap, [3DC, ch 2, 3 DC] in next corner, 3 DC in next gap, 3 DC in next corner, turn.
Row 4: Ch 3, 3 DC in each gap to corner, [3 DC, ch 2, 3 DC] in corner, 3 DC in each gap to end of row, DC in very last st, turn.
Row 5: Ch up 3, 2DC in same gap, 3 DC in each gap to corner, [3 DC, ch 2, 3 DC] in corner, 3 DC in each gap, end with 3 DC in last gap.
Row 6: Repeat Row 4
Row 7: Repeat Row 5
Row 8: Repeat Row 4
Row 9: Repeat Row 5
Row 10: Repeat Row 4
Round 11: Ch up 3, 2 DC in same gap, *3 DC in each gap to corner, [3DC, Ch 2, 3 DC] in corner, repeat from * around the entire square.
Fasten off when piece is 8 inches.
Weave in ends.


Piece Number 3: Should measure 5″ x 8″
With Pretty N Pink:
**Make 2**
Ch 30
Row 1: SC in 2nd ch from hook, TR in next, SC in next, Repeat from * across, ending with SC in last st, ch 1, turn. (29)
Row 2: SC across, ch 1, turn. (29)
Row 3: SC in 1st st, *TR in next st, SC in next st, repeat from * across, ch 1, turn.
Rows 4-18: Repeat Rows 2 and 3, ending with a repeat of Row 2.
Fasten off when Piece measures 5 inches by 8 inches.

macys.com

Piece Number 4: Should measure 12″ x 8″
With Turqua:
**Make 3**
Ch 42
Row 1: DC in 4th ch from hook and across, turn. (40)
Row 2: Ch up 3 (counts as DC), *FPDC on next st, BPDC on next st, repeat from * across, ending with a DC in last st.
Rows 3-17: Repeat Row 2
Continue to SC around entire piece.
See video tutorial for visual instructions.
Piece should measure 12 inches wide and 8 inches tall.

Wal-Mart.com USA, LLC

Piece Number 5: Should Measure 10″ x 8″
With Jade:
**Make 2**
Ch 6
Row 1: DC in 4th ch from hook and in next 2 ch; turn (1 block made)

Row 2: Ch 6, DC in 4th ch from hook and in next 2 ch, (Sl st, ch 3, 3 DC) all in ch 3 sp of prev. row, turn. (2 blocks made)

Row 3: Ch 6, DC in 4th ch from hook and in next 2 ch, [(Sl st, ch 3, 3 DC) all in next ch 3 space of prev. row] twice; turn. (3 blocks made)

Row 4: Ch 6, DC in 4th ch from hook and in next 2 ch, [(Sl st, ch 3, 3 DC) all in next ch 3 space of prev. row] 3 times; turn. (4 blocks made)

Continue with the established pattern, increasing 1 block on each row until there are 8 blocks along the side.

Row 10:  Sl st across first 3 dc, *Ch 3, 3 dc in next ch 3 space of prev. row, repeat from * to last ch 3 sp; slip st in last sp, Ch 3, 3 DC in same sp, turn. (9 Blocks)

Row 12: Ch 6, DC in 4th Ch from hook and next 2 ch, *(Sl st, ch 3, 3 DC) in next ch 3 sp of prev. row, Repeat from * to last ch 3 sp, turn, do NOT make a block in last sp. (10 Blocks)

Row 13: Sl st across first 3 dc, * (Sl st, ch 3, 3 dc) all in next ch 3 sp of previous row; repeat from * to last ch 3 sp; slip st in last space; turn, do NOT make another block. (9 blocks)

Rows 14-21: Repeat Row 13 until you have 1 block left. (SEE VIDEO TUTORIAL FOR VISUAL INSTRUCTIONS)
Fasten off, weave in all ends.
Piece should measure 10″ x 8″


Piece Number 6: Should Measure 5″ x8″
With Carrot:
**Make 2**
Ch 20
Row 1: DC in 4th Ch from hook and across, turn. (18)
Row 2: Ch 3, *FPDC on next st, DC in next 2 sts, Repeat from * across, ending with DC in last st, turn.
Row 3: Ch 3, *DC in next st, FPDC in next 2 sts, Repeat from * across, ending with DC in last st, turn.
Row 4-14: Repeat Rows 2 and 3, ending with a repeat of Row 2.
Fasten off, weave in ends.
Piece should measure 5 inches by 8 inches.


Shop World Market

Piece Number 7: Should Measure 7″ x 8″
With Dark Orchid:
**Make 2**
Ch 25
Row 1: SC in 2nd ch from hook and across, ch 1, turn. (24)
Rows 2-28: SC across, ch 1, turn.
Fasten off.
Weave in ends.
Piece should measure 7 inches by 8 inches.


Piece Number 8: Should Measure 4″ x 8″
With Spring Green:
**Make 2**
Ch 14
Row 1: SC in 2nd ch from hook and across, turn. (13)
Row 2: Ch up 3, (Counts as DC), *Popcorn in next st, DC in next, repeat from * across, ending with DC in last st, turn.
Row 3: Ch 1, SC across, turn. (13)
Rows 4-17: Repeat Rows 2 and 3 ending with a repeat of Row 3, until piece measures 4 inches by 8 inches.
Fasten off, weave in all ends.

Online Quilting Class

Piece Number 9: Should Measure 4″ x 8″
With Pool:
**Make 2**
Ch 26
Row 1: SC in 2nd ch from hook, *Sk 2 chs, 5 DC in next ch, Sk 2 chs, SC in next ch, Repeat from * across, ending with SC in last ch. Turn.
Row 2: Ch 3 (Counts as DC), 2 DC in same st, *SC in middle DC of next shell, Shell in next SC, repeat from * across, ending with 3 DC in last st, turn.
Row 3: Ch 1, SC in same st, * Shell in next SC, SC in middle DC of next Shell, repeat from * across, ending with SC in last st, turn.
Row 4-7: Repeat Rows 2 and 3
Row 8: Ch 1, SC in same st, Ch 2, * SC in middle DC of next shell, Ch 2, SC in next SC, Ch 2, Repeat from * across.
Fasten off, Weave in ends. Piece should measure 4 inches by 8 inches.

Art of Tea Organics

Assembly Step:
Using the Single Crochet Method, Attach all the pieces using the photo as a guide for placement. See video tutorial for visual instructions on attaching the pieces. You can also view this video to see how to attach pieces with different methods.

Once you have all the pieces attached, go onto making the border.

Border:
With White:
Round 1: In any corner, CH up 3, (Counts as a DC) 4 DC in same st, DC around putting 5 DC in corners. Sl st to beg. ch up 3.
Round 2: Ch 1, SC in same st, *Ch 4, Sk 4 sts, SC in next st, repeat from * around, sl st to 1st SC.
Round 3: In ch 4 sp, Ch 1, [HDC, 3 DC, HDC] in each ch 4 sp around. Sl st to first HDC. Fasten off, weave in all ends.

Enjoy!!

This post contains affiliate links, which I may be compensated for when you make a purchase. That means if you click on any link and buy from the linked websites, I will receive a small percentage of the value of your order. The amount you pay is not changed. Thank you for all your support in clicking the links in my blog!! You all are so amazing!! ~Nadia

The yarn provided for this pattern is courtesy of Red Heart Yarns


Shop Red Heart, America's Favorite Yarn

Shop the Red Heart Yarns Clearance Section!

Like this blanket?? Try making the Color Pop Baby Blanket Here!!


Shop Red Heart, America's Favorite Yarn


Wal-Mart.com USA, LLC

Online Crochet Class

Saving Bundle - Hand Bended Silk Yarn


CLICK.BUY. CREATE. Shop Michaels.com today!

Hand Beaded Silk Yarn - 7 Pack


Logo - 300x250


macys.com

No Colon, Still Rollin’: World IBD Day

No Colon, Still Rollin’: World IBD Day

**Sensitive Content**

18578720_10207377405312833_531887997_n

If I could crochet a colon for myself and anyone else who has lost their intestines due to Crohn’s disease or ulcerative colitis, I would. If only it was that easy. I would stitch until my fingers fell off!! Unfortunately, I would have to crochet for millions of people who sadly have had total proctocolectomy surgery due to the devastation of inflammatory bowel disease. Today, May 19th, is World IBD Day. It is a day to recognize the millions of people worldwide who suffer from these debilitating diseases.

18601590_10207376665694343_1516526915_n

I crocheted this colon (large intestine) as a symbol of loss. Crohn’s disease claimed my large intestine in 2008, only one week before my 18th birthday. On the very cusp of colon cancer, my disease was extremely progressive and surgery was my only option. The fight never ends because sadly, there is no cure. Ulcerative colitis and Crohn’s disease are the most common types of inflammatory bowel disease. Ulcerative colitis affects only the colon and rectum. Crohn’s disease can affect any part of the digestive tract from mouth to anus.
18579282_10155452668827845_996910336_n
This colon represents each major surgery; each stitch stands for each procedure, x-ray, scan, or test that I have undergone. This may seem like an unusual analogy to represent an organ or diseases that most people rarely, if ever, think about. To me, this disease changed my entire life and those changes led me here, crocheting my very own colon, and using my voice and skills to advocate for others who don’t have a platform to help spread awareness. Many of whom are no longer with us. Our diseases may appear invisible, but we are not!

18578800_10207376666014351_1013331657_n
Silly, strange, serious, or an obnoxiously bold statement, however you view this piece I created, hopefully it will generate conversation for inflammatory bowel diseases. Not just on May 19th, World IBD Day, but every day of every year until we find a cure.

Please *share* this blog post and you may be surprised to find how many people YOU know are silently suffering. There is NO CURE. Help raise more awareness so that I never have to type those words again.

To learn more please visit ccfa.org

18601275_10155452668937845_40431311_n

Thank you!
~Nadia

(Some of the photos used in this blog post were found on Google.com Image Search)


Shop Red Heart, America's Favorite Yarn

Broken Roads Point the Way

Broken Roads Point the Way

Yesterday, I had a follow up physical and doctor appointment after having a bit of a health scare last week where I ended up in the ER. After going through a number of tests and scans, it was determined that we will postpone any surgery for now, and I will undergo additional testing and possibly a HIDA scan, for newly discovered issues that are affecting my gall bladder and other organs. Other than that, things were looking pretty “Normal for Nadia” as my doctors like to say! I’ll take that!

hospitalclinic

During this appointment, I was telling my doctor about my recent engagement and how Nate proposed on our trip to Europe. She was so genuinely excited for us. She hugged me three times and was overjoyed because she has seen me through so much. She also asked about how the transition will be as I prepare to transfer some of my medical care to a new city. Although it is far down the line, I will need to find a new physician and leave her behind. That’s a very difficult thing for me to do. It began to hit me how many changes are about to take place not only in my health journey, but life and business as well! Oh Boy!

nateandnadia


Support goes a long way

My entire life has been spent with my parents; it is no secret that my Mom is my best friend. Although I did spend a short time away from home attending university, illness/surgeries impeded my ability to continue. After 6 separate attempts at going back to college, I decided to postpone it indefinitely. Illness won that battle. (I am still winning the war) I may consider going back one day, but for now, it was the best decision.

mom3

During those struggling years, my parents encouraged me to start a small Etsy shop and website to showcase my crocheted items. It was also during those times that, while in the hospital, so many nurses, nursing assistants, and doctors asked for help learning how to crochet. I began showing them basic techniques and taught while I was in the hospital. Teaching crochet in that setting helped me SO much. It also gave me a great idea!

Planting the seeds to grow a dream

I will always be grateful to my mom for her insight to give me yarn and a hook so long ago. She pushed me to do something constructive during those long months when I was in isolation or just spending a month hospitalized for whatever health problem I was having that kept me there.

When you are isolated and feel alone, having a skill or hobby to pass the time becomes invaluable. It becomes a lifeline that keeps your mind occupied and stops it from wandering straight into depressing thoughts. Thankfully, I was able to take that time to hone my skills in crochet and develop my craft into such a blooming network and community. It helped to open a platform that I could teach others my craft. My dad helped me start a YouTube channel, and I could reach others with my video tutorials. Having that connection to others quite literally SAVED me. There, an idea born out of a desperate situation, became the seed to grow this dream.

daddy

Challenges ahead

Looking forward to next year (2018), I am excited to be getting married and starting my life with Nate. Out of respect for my Pakistani culture and my personal beliefs, I will not live with Nate before we get married. What has me feeling a bit anxious is how my life will be structured to continue YARNutopia from a distance. I will not only have a new marriage, new doctors, a new home, and a business to balance, but an entire change from everything I know. Moving even a few hours away from home hits me at times that is both exciting and scary. This weekend, while celebrating Mother’s Day, we sat down to discuss this.

Structure and Discipline

Presently, we try to film 2-3 videos a week. Prior to filming, my mom and I design several items that I create off camera. I perfect and refine the pattern and then proceed to head into the studio for filming. It is in the filming process that we decide what videos to keep, what projects will be popular, or what ends up on the cutting room floor. Sometimes only one video will make it to our channel. This process is lengthy and tedious. It requires many hours invested and a lot of trial and error. Our days are planned, structured, scheduled. We each execute our particular tasks and responsibilities. My mom handles a majority as she also takes care of our home on top of everyone in our family as well as running and managing our business.

studio

Having the structure and discipline of working with parents who have built a photography/videography business from the ground up so many years ago has been priceless. I just hope when I move away into my own home and start my life with Nate, the lessons they taught me will carry over into our life. I have never had the opportunity to work outside the home and this will be a big challenge to maintain this work ethic on my own, which incidentally, I never have had to be alone. Nate’s career has him working 8-12 hours a day. That is another idea that will take some getting used to.


Nothing Can Stop Us

Recently, Nate and I have begun to search for our “build a dream” home. We have been scouring the listings for a house that can accommodate our must have list. We sat down and made a checklist of things we want in a forever home.

forsale

My top priority is a place for a craft room/studio (and a dishwasher, but that’s another story!) We have gone through several places that have potential. Let’s see if we are able to find a place where we can create our life and provide me with the ultimate craft room! (That will be a future blog post of its own).


My dad will set us up with an in-home studio, and his plan will be to travel and film at our home. My mom and I plan to design, create, and work remotely via Skype. So many fun and exciting changes to come in the next 300 days as we plan out this move! As much as I look forward to all these changes, leaving my old life behind and starting over feels a bit daunting and overwhelming at times. I’m just eternally grateful for the support of a wonderful man, my parents, and all of YOU, who will continue to accommodate all these changes in order to see YARNutopia through this growth and transition.

Oh song lyrics, you give me the feels!

When I look back and reflect over the past nearly nine years of health challenges and life detours, I never pictured this being the way my life would turn out. I honestly wasn’t sure I would ever meet anyone willing to accept not only the voluminous health issues I came with, but also accept that I would need to manage a job that would fit my abilities and challenges. I could not ask for more in anyone and somehow through God, or destiny, it led me down this path. There is a song lyric that says, “This much I know is true, that God blessed the broken road, that led me straight to you.” No words could ever be truer to describe how I arrived to this place in my life. At times when I faced another health challenge, I always asked “Why!??” maybe this was always the answer.

~Nadia

“What is meant to be will always find a way” ~Trisha Yearwood

hospitalhands

Happy Mother’s Day

Happy Mother’s Day

When I arrived in this world, I am told, I was born with a paralyzed side of my face and the inability to open my left eye. From early photos, I always was the one with the very strange expressions and an odd look on my face. My mom always told me how beautiful I am and said it didn’t matter that my eye wouldn’t open, and God made me that way so everyone would think I am giving them a *wink* and fall in love with me. That is how my mom is. She sees the bright side in things. She is looking for the good in every situation–the silver lining–no matter how difficult life could be, she taught my brothers and me the same. Imperfections and differences make you beautiful, and that same thought applies to each piece I make by adding some “imperfect” characteristic.

We never had much, but we always had enough, and we always appreciated everything my parents were able to give us and make happen for us. I was given a strong work ethic, and that is why I do what I do by pouring my heart into each stitch of every piece I create. I could easily be doing any job and the same ethic would apply because it has been instilled in us by a mother that insisted we do the work. We learned how to cook, clean, pick up after ourselves and do laundry from a young age so we could appreciate how hard it is and never take people or things for granted; to have pride in doing and completing a job right from the beginning so we didn’t have to do it again and again.

My mom has walked with me through my journey with Crohn’s disease, and with each step, she has promised that I will never be alone as long as she can draw breath. She is responsible for my love of crochet when she handed me my first crochet hook and ball of yarn and taught me this craft. Little did she know how much this would mold my life and become a lifeline and a form of therapy for long hospital stays. To have the support and love is a gift I shall always cherish. But more than that, I realize I will never be lonely with her by my side, to look for the good and positive no matter what the situation, never feel sorry for myself, and that I always have a forever friend.


My mom is not like other moms. She and I have been through so much in this life. Whenever my brothers and I have troubles or burdens, it’s easier to bring them to my mom and she takes them away and makes everything better. My mom has been by my side at every hospital stay, every doctor visit, every medical test, even when doctors couldn’t help me, she helped me get through it all. I will never be able to thank my mom enough for all that she has done, is doing, and will do for me.

My mom is my best friend.

I wouldn’t be who I am today if it weren’t for her.

My mom never gave me any idea that I couldn’t do what I wanted to do, or be who I wanted to be.
She has taught me to have appreciation in everything I have and never take anything for granted. She has taught me how to love unconditionally, and she inspires me every day to make a difference in this world, even if it’s to help few or many. She is my biggest fan, and she is the closest thing to Superwoman anybody could ever be.
Please join me in wishing her and all the other moms (and dads or role models who fill those shoes) a fantastic day! It’s a thankless job sometimes, and you deserve more than one day of recognition.

Crochet Tutorial: Spring Sun Mandala Vest

Crochet Tutorial: Spring Sun Mandala Vest

You asked. I answered. I hear you! My Spring Sun Mandala Vest is complete! Yes, this makes me as happy as it will you! This was made with Red Heart Yarns Super Saver Ombre in the color Cocoa. Can I say I am completely in love with this yarn without making my fiancé jealous? Let’s hope, because I am!

I made this to fit me. I am 5′ 2″ and I generally wear a size Small/Medium. I have given instructions in the Notes Section and in the video tutorial to alter this pattern to make it larger.


Something you may not know about my work process, is that I design my pieces off camera first, perfect the pattern, fix all the quirks, and get all my mistakes ironed out before filming my final piece in my tutorials. I first designed my Spring Sun Mandala Vest pattern using Caron Cakes in the color Macaron. This was my original prototype for testing the pattern. I filmed the video in the Red Heart Yarns Super Saver Ombre that I posted above, but if you are interested in seeing how the Cakes work for this piece, this should give you a pretty good idea! No matter what yarn is used, this piece is sure to be a big hit!

Follow along with this video tutorial to learn how to make this Mandala Vest:

**You can always contact me via Facebook if you have any problems with the pattern. I am happy to help if you have any questions along the way.
***These patterns are copyright YARNutopia © so PLEASE DO NOT COPY, SHARE, ADJUST OR RESELL MY PATTERN. I wrote and tested this pattern myself, from beginning to end. It took a lot of time and work, and I would really like to have it remain “my pattern.”
***You can sell anything you make from my patterns, please just link back to my website YARNutopia.com. Thank you!

Please check out the new beginning graphic designed and developed by my brother Nabeel. He and his wife own and operate NFD Graphics. Please hop over to their Facebook page and show them some love! For all your graphic and video/logo design needs be sure to contact them today!
www.nfdgraphics.com

Teacher: Nadia Fuad
Video and Editing: Fuad Azmat (My Daddy)
Share your work on Facebook!
Add me on Snapchat: YARNutopia
Follow me on Instagram
Visit My Ravelry Store and add this to your Favorites!
Follow me on Twitter: @YARNutopia
Enjoy this video and subscribe to my channel on YouTube for more tutorials on how to crochet!
Leave a comment, and share with your friends!

Pattern:

Designed by Nadia Fuad
You *may* sell items made from my pattern, but please reference my website YARNutopia.com.
Please do not copy, sell, and/or post this pattern and claim it as your own.

Materials:

***Click here to get the whole KIT!! ***

Although I used Red Heart Yarns in this project, here is a great substitution of yarn that works great as well. Brava yarn by WeCrochet/Knit Picks
You can also use Lion Brand Mandala Yarn here

Red Heart Super Saver Ombre in the color Cocoa
Red Heart Super Saver Yarn in Cafe Latte
-J-6.00mm Crochet Hook (Find the hook I used in my video tutorial here!)
Yarn Needle
Scissors
Brooch Pin

You can buy any of the items in this kit. Buy all or buy one item. Check it out to see the supplies you can get online to make this mandala vest!

NOTES:

-This project uses 1100 yards of yarn.
-Use a smaller hook to make these smaller
-Use a bigger hook to make these bigger
-Watch the FULL video tutorial for visual instructions for each round and to learn how to make this BIGGER
-Weave in all the ends as you go so you don’t have to weave them all in at the very end.
-This Mandala is 43 inches across (112 cm), Arm Holes are 18″ around (46cm), and Shoulders across are 15″ (38cm)
-This project took me approximately 20 hours to complete.
-To make this bigger, you can repeat Round 16 when you get to that point, you can also repeat Round 18 when you get to that point, you can repeat Round 26 when you get to that point, you can repeat Round 28 when you get to that point, and you can repeat Round 31 when you get to that point.
-I used 2 full Caron Cakes, but I was unable to finish the last 2 rounds of the pattern, so I would suggest about 3 Caron Cakes to finish the pattern.

Darn Good Yarn Handmade Yarn Bowls Buy Now

Special stitches:
Ch(s): chain(s)
YO: Yarn Over
St(s): Stitch(es)
prev.: Previous
Sl st: slip stitch
SC: Single Crochet
HDC: Half Double Crochet
DC: Double Crochet
DC3TOG: Double Crochet 3 Stitches Together
DC4TOG: Double Crochet 4 Stitches Together
V-Stitch: [Double Crochet, Chain 2, Double Crochet] in indicated space
BPSC: Back Post Single Crochet
FPDC: Front Post Double Crochet
BPDC: Back Post Double Crochet
FDC: Foundation Double Crochet (See video tutorial for visual instructions)


Michaels Knitting & Crochet

Pattern:

If you have any confusion or difficulty with reading this pattern, please watch the video tutorial to have visual instructions.

Mandala Vest:

Start with Magic Ring or Ch 6, Sl st in 1st ch to form a ring
Rnd 1: Ch up 2 (Counts as HDC here and throughout), 15 HDC into ring. Sl st to beg ch up 2. (16)

Rnd 2: Ch 3 (Counts as DC here and throughout), DC in same st, * CH 2, SK 1 st, 2 DC in next st, repeat from * around. Sl st to beg ch up 3. (8 ch 2 sps, 16 sts)

Rnd 3: Sl st into ch 2 sp, Ch 2, 2 HDC in same sp, *Ch 3, 3 HDC in next ch sp, repeat from * around, sl st to ch up 2. (24 HDC, 8 Ch 3 sps)

Rnd 4: Sl st into Ch 3 sp, Ch 1, [SC, HDC, 3 DC, HDC, SC] in ch 3 sp, * Ch 2, [SC, HDC, 3 DC, HDC, SC] in next Ch 3 sp, Repeat from * around. Sl st to 1st SC. (8 petals made)

Rnd 5: Sl st to middle DC of a petal, Ch 1, SC in same st, *Ch 2, V-Stitch in next Ch 2 sp, Ch 2, SC in middle DC of next petal, repeat from * around, Sl st to 1st SC. (8 SC, 16 DC, 24 Ch 2 sps)

Rnd 6: In SC, Ch 1, SC in same st, *Sk ch 2 sp, [4 DC, ch 2, 4 DC] in next V-Stitch, Sk ch 2 sp, SC in next SC, repeat from * around, sl st to first SC. (8 Ch 2 sps, 64 DC, 8 SC)

Rnd 7: Ch 1, BPSC around 4 sts, *[2 SC, ch 2, 2 SC] in ch 2 sp, BPSC around next 9 sts, Repeat from * around, sl st to first BPSC.

Rnd 8: Ch up 3, DC in next 2 sts, *Ch 2, SC in next Ch 2 sp, Ch 2, Sk 2 sts, DC in next 3 sts, Ch 3, Sk 3 sts, DC in next 3 sts, repeat from * around, sl st to beg ch up 3. (48 sts)

Rnd 9: Sl st in each st to get to next ch 2 sp before a SC, Ch 1, 3 SC in ch sp, *SC in next SC, 3 SC in next ch sp, SC in next 3 sts, (Working BEHIND ch sp) DC in next 3 sts sk’d from Previous round, SC in next 3 sts on current round, 3 SC in next ch sp, repeat from * around, sl st to first SC.

Rnd 10: Sl st to middle SC that’s in a SC from prev. round (See video tutorial for specific location), Ch 1, SC in same st, Ch 3, * [3DC, 3TR, 3DC] in ch 3 sp from Rnd 8, Ch 3, Sk 6 sts, SC in next st, Ch 3, Sk 6 sts, repeat from * around, sl st to first SC. (8 Petals, 8 SC, 16 ch 3 sps)

Rnd 11: Ch 1, SC in same st, *Ch 7 SC in middle TR of Petal, Ch 7, SC in next SC, repeat from * around, Sl st to first SC if you are changing color. If you are not changing color, End with Ch 3, TR in first SC of round. (16 ch 7 sps)

Rnd 12: In Ch sp, Ch up 1, SC in same sp, *Ch 7, SC in next Ch sp, repeat from * around, end with Ch 3, TR in first SC. (16 ch 7 sps)

Rnd 13: Ch 1, SC in same sp, *Ch 8, SC in next ch sp, repeat from * around, Sl st to first SC. (16 ch 8 sps)

Rnd 14: Sl st into Ch 8 sp, Ch up 3 (counts as DC), 9 DC in same sp, *10 DC in next ch sp, Repeat from * around, Sl st to beg. ch up 3. (160 DC)

Rnd 15: Ch 1, FPDC around 1st st, *BPDC on next st, FPDC on next st, repeat from * around, sl st to first FPDC. (160 sts)

Rnd 16: Ch 1, FPDC around 1st FPDC, *BPDC on next st, FPDC on next st, repeat from * around, Sl st to first FPDC. (160 Sts)

Larger Sizes: **Repeat Round 16 for 2-3 more rounds if you need to make this larger, then go onto the instructions for Round 17.

Rnd 17: Ch 5 (Counts as DC + Ch 2 sp), DC in same st, *Sk 1 st, [DC, ch 2, DC] in next st, repeat from * around, Sl st to 3rd ch of beg. ch 5. (80 V-stitches)

Rnd 18: Sl st into V-Stitch, Ch 5, DC in same sp, V-Stitch in each V-Stitch around, sl st to 3rd ch of beg. ch 5. (80 V-Stitches)

Rnd 19-20: Repeat Round 18

Larger Sizes: **Repeat Round 18 for 2-3 more rounds if you need to make this larger, then go onto the instructions for Round 21.

Rnd 21: Sl st into Ch 2 sp, Ch up 3 (Counts as DC), 2 DC in same sp, *3 DC in next V-Stitch, repeat from * around, Sl st to beg. ch up 3. (240 sts)

Rnd 22: In gap between 3DC grouping, Ch 1, SC in same gap, Ch 4, Sk 3 sts, SC in next gap, repeat from * around, Sl st to first SC. (80 Ch 4 sps)

Rnd 23: Sl st in Ch 4 sp, Ch 1, [SC, HDC, 3 DC, HDC, SC] in each ch 4 sp around, sl st to first SC. (80 petals)

Rnd 24: Start in the middle DC of a petal (See video tutorial for specific location), Ch 6 (Counts as DC + Ch 3 Sp), DC in middle DC of next petal, *Ch 3, DC in middle DC of next petal, repeat from * around, Sl st to 3rd Ch of beg. ch 6. (80 DC, 80 Ch 3 sps)

Rnd 25: in Ch 3 sp, Ch up 3 (Counts as DC), 5 DC in same ch sp, * 6 DC in next ch sp, repeat from * around, sl st to beg. ch up 3. (480 sts)

Rnd 26: Ch up 3, DC in each st around. Sl st to beg. ch up 3. (480 sts)

Larger Sizes: Repeat Round 26 for 2-3 more rounds if you need to make this larger, then go onto the instructions for Round 27.

Rnd 27: Making the Armholes: Ch 3, DC in next 9 sts, Ch 2, FDC 25, Sk 20 sts, DC in next 40 sts, Ch 2, FDC 25, Sk 20 sts, DC in the rest of the sts on this round, sl st to beg. ch up 3. (490 sts)

Larger Sizes: **If you need the armholes to be bigger or smaller, just FDC more or less and skip more or less stitches**

Rnd 28: Ch 3, DC in each st around, Sl st to beg. ch up 3. (490 sts)

Larger Sizes: Repeat Round 28 for 2-3 more rounds if you need to make this larger, then go onto the instructions for Round 29.

Rnd 29
: Ch up 3, DC3TOG, *Ch 4, DC4TOG, repeat from * around, Sl st to beg DC3TOG stitch.

Rnd 30: In ch 4 sp: Ch up 3, 4 DC in same sp, *5 DC in next Ch 4 sp, repeat from * around, sl st to beg ch up 3. (610 sts)

Rnds 31- 35: Ch up 3, DC in Each St around, Sl st to beg ch up 3. (610 sts)

Larger Sizes: Repeat Round 31 for 2-3 more rounds if you need to make this larger.

Fasten off.

Weave in all ends.

Enjoy!!

This post contains affiliate links, which means if you click on the link and buy from the linked websites, I will receive a small percentage of the value of your order. The amount you pay is not changed.

The yarn provided for this pattern is courtesy of Red Heart Yarns

Follow this link to see a great mandala design! Click on this Henna Inspired Mandala to make this beautiful project today!!


Shop at Michaels


Coloring Books 725

Crochet Tutorial: Feline Rested Sleep Mask

Crochet Tutorial: Feline Rested Sleep Mask

For any mother who needs a day of rest and relaxation this coming Mother’s Day, this is the “purrrrfect” gift!! My Feline Rested Sleep Mask is a very simple, yet novelty item to make in time to give to mom on her special day! Pamper her or anyone who just “kneads” sleep right “meow”!!! This is such a “PAW-some” project!!


Follow along with this video tutorial to learn how to make this mask:

My dad will continue to be the videographer, editor, and photographer for our videos when I move away.
Support YARNutopia today so we can continue to bring you clear, quality crochet tutorials even after I move into my new home!
There will be an added expense of more travel and hopefully this won’t deter our ability to provide consistent videos on a weekly basis.

Donate Button with Credit Cards


**You can always contact me via Facebook if you have any problems with the pattern. I am happy to help if you have any questions along the way.
***These patterns are copyright YARNutopia © so PLEASE DO NOT COPY, SHARE, ADJUST OR RESELL MY PATTERN. I wrote and tested this pattern myself, from beginning to end. It took a lot of time and work, and I would really like to have it remain “my pattern.”
***You can sell anything you make from my patterns, please just link back to my website YARNutopia.com. Thank you!Teacher: Nadia Fuad
Video and Editing: Fuad Azmat (My Daddy)
Share your work on Facebook!
Add me on Snapchat: YARNutopia
Follow me on Instagram
Visit My Ravelry Store and add this to your Favorites!
Follow me on Twitter: @YARNutopia
Enjoy this video and subscribe to my channel on YouTube for more tutorials on how to crochet!
Leave a comment, and share with your friends!

Pattern
:

“Designed by Nadia Fuad
You *may* sell items made from my pattern, but please reference my website YARNutopia.com.
Please do not copy, sell, and/or post this pattern and claim it as your own.

Materials:
***Click here to get the whole KIT!!***

Red Heart Super Saver in Perfect Pink
Red Heart Super Saver in Black
Red Heart Super Saver in White
Elastic
Felt
-G-4.25mm Crochet Hook (Find the hook I used in my video tutorial here!)
Yarn Needle
Scissors

You can buy any of the items in this kit. Buy all or buy one item. Check it out to see the supplies you can get online to make this mask!

NOTES:

-This project uses less than 100 yards of yarn.
-Use a smaller hook to make these smaller
-Use a bigger hook to make these bigger
-Watch the FULL video tutorial for visual instructions for each row and tips on how to make this smaller and bigger.
-Weave in all the ends as you go so you don’t have to weave them all in at the very end.
-If the instructions above are confusing, please message me on Facebook, and I will answer any questions you may have. Please be specific in your questions. Thank you!!

Special stitches:
Ch(s): chain(s)
YO: Yarn Over
St(s): Stitch(es)
BLO: Back Loops Only
prev.: Previous
Sl st: slip stitch
SC: Single Crochet
SC2TOG: Single crochet decrease
SC3TOG: Single Crochet 3 Stitches Together


Pattern:

If you have any confusion or difficulty with reading this pattern, please watch the video tutorial to have visual instructions.

Mask

Ch 5
Row 1: 2SC in 2nd ch from hook, SC in next 2 chs, 2 SC in last ch, ch 1, turn. (6)
Row 2: SC in each st across, ch 1, turn. (6)
Row 3: 2SC in 1st st, SC in next 4 sts, 2SC in last st, ch 1, turn. (8)
Row 4: SC in each st across, ch 1, turn. (8)
Row 5: 2SC in 1st st, SC in next 6 sts, 2 SC in last st, ch 1, turn. (10)
Rows 6-10: SC in each st across, ch 1, turn. (10)
Row 11: SC in 8 sts, SC2TOG, ch 1, turn. (9)
Row 12: SC2TOG, SC in 7 sts, ch 1, turn. (8)
Row 13: SC in 6 sts, SC2TOG, ch 1, turn. (7)
Row 14: SC2TOG, SC in 5 sts, ch 1, turn. (6)
Row 15: SC in 5 sts, 2SC in last st, ch 1, turn. (7)
Row 16: 2SC in 1st st, SC in 6 sts, ch 1, turn. (8)
Row 17: SC in 7 sts, 2 SC in last st, ch 1, turn. (9)
Row 18: 2SC in 1st st, SC in 8 sts, ch 1, turn. (10)
Rows 19-23: SC in each st across, ch 1, turn. (10)
Row 24: SC2TOG, SC in 6 sts, SC2TOG, ch 1, turn. (8)
Row 25: SC in each st across, ch 1, turn. (8)
Row 26: SC2TOG, SC in 4 sts, SC2TOG, ch 1, turn. (6)
Row 27: SC in each st across, ch 1, turn. (6)
Row 28: SC2TOG, SC in 2 sts, SC2TOG, ch 1, turn. (4)
Continue to SC around entire piece.
Fasten off, weave in ends.

PetSmart

Ears: With Black Make 2
Ch 6
Row 1: SC in 2nd ch and across. ch 1, turn. (5)
Row 2: SC2TOG, SC in next, SC2TOG, ch 1, turn. (3)
Row 3: SC across, ch 1, turn. (3)
Row 4: SC3TOG.
Continue to SC around entire piece.
Fasten off with long tail for sewing.

Nose
Ch 6
Row 1: SC in 2nd ch from hook, SC in next, 2 SC in next 2 Chs, SC in last 2 chs, ch 1, turn. (8)
Row 2: SC in 1st 3 sts, 2 SC in next 2 sts, SC in last 3 sts continue to SC around piece. (See video tutorial for visual instructions on where to stop)
Fasten off with long tail for sewing.

Eyes:
Make 2
Ch 11, Fasten off, Sew to Mask

Assembly Step:
Embroider Whiskers, Mouth, and Nose on Mask, see video tutorial for visual instructions.
Attach Elastic and Felt on back of Mask. Add felt inside ears.

Enjoy!!

This post contains affiliate links, which I may be compensated for when you make a purchase. That means if you click on any link and buy from the linked websites, I will receive a small percentage of the value of your order. The amount you pay is not changed. Thank you for all your support in clicking the links in my blog!! You all are so amazing!! ~Nadia

The yarn provided for this pattern is courtesy of Red Heart Yarns


Shop Red Heart, America's Favorite Yarn

JCPenney

Art of Tea Organics


CLICK.BUY. CREATE. Shop Michaels.com today!

Crochet Tutorial: Whale-y Awesome Baby Booties

Crochet Tutorial: Whale-y Awesome Baby Booties

Whale, Whale, Whale, what do we have here??!

Recently, a catalog arrived in my mailbox with a unique selection of gift items for all ages. In typical fashion, I often find myself thinking about how to make similar items using crochet.

I fell in love with these darling booties that were similarly made out of fabric and set out to create a crochet pair designed only using yarn!

We all derive inspiration from various sources, but it isn’t always possible to recreate each design substituting yarn as fiber of choice but thankfully, this adorable pair of booties turned out to be quite the exception!

I hope you enjoy making your very own for a special infant. I give tips for increasing the sizing for any age in the video tutorial.


Follow along with this video tutorial to learn how to make these booties:

My dad will continue to be the videographer, editor, and photographer for our videos when I move away.
Support YARNutopia today so we can continue to bring you clear, quality crochet tutorials even after I move into my new home!
There will be an added expense of more travel and hopefully this won’t deter our ability to provide consistent videos on a weekly basis.

Donate Button with Credit Cards

**You can always contact me via Facebook if you have any problems with the pattern. I am happy to help if you have any questions along the way.
***These patterns are copyright YARNutopia © so PLEASE DO NOT COPY, SHARE, ADJUST OR RESELL MY PATTERN. I wrote and tested this pattern myself, from beginning to end. It took a lot of time and work, and I would really like to have it remain “my pattern.”
***You can sell anything you make from my patterns, please just link back to my website YARNutopia.com. Thank you!Teacher: Nadia Fuad
Video and Editing: Fuad Azmat (My Daddy)
Share your work on Facebook!
Add me on Snapchat: YARNutopia
Follow me on Instagram
Visit My Ravelry Store and add this to your Favorites!
Follow me on Twitter: @YARNutopia
Enjoy this video and subscribe to my channel on YouTube for more tutorials on how to crochet!
Leave a comment, and share with your friends!

Logo - Busy - 300 x 250

Pattern
:

“Designed by Nadia Fuad
You *may* sell items made from my pattern, but please reference my website YARNutopia.com.
Please do not copy, sell, and/or post this pattern and claim it as your own.

Materials:
***Click here to get the whole KIT!!***

Red Heart Super Saver in Pool
Red Heart Super Saver in Black
Red Heart Super Saver in White
Red Heart Super Saver in Light Blue
-G-4.25mm Crochet Hook (Find the hook I used in my video tutorial here!)
Yarn Needle
Scissors


CLICK.BUY. CREATE. Shop Michaels.com today!

You can buy any of the items in this kit. Buy all or buy one item. Check it out to see the supplies you can get online to make these booties!

NOTES:

-This project uses less than 200 yards of yarn.
-Use a smaller hook to make these smaller
-Use a bigger hook to make these bigger
-Watch the FULL video tutorial for visual instructions for each row and tips on how to make this smaller and bigger.
-Weave in all the ends as you go so you don’t have to weave them all in at the very end.
-If the instructions above are confusing, please message me on Facebook, and I will answer any questions you may have. Please be specific in your questions. Thank you!!
-The measurements for these booties are 5 inches (13 cm) long and will fit a 3-6 month old baby. (find other sole measurements here)

KissMe Sweeter Days Collection

Special stitches:
Ch(s): chain(s)
YO: Yarn Over
St(s): Stitch(es)
BLO: Back Loops Only
prev.: Previous
Sl st: slip stitch
SC: Single Crochet
HDC: Half Double Crochet
SC2TOG: Single crochet decrease
DC: Double Crochet
DC2TOG: Double Crochet Decrease

Online Crochet Class

Pattern:

If you have any confusion or difficulty with reading this pattern, please watch the video tutorial to have visual instructions.

Sole: Make 2
Chain 10
Rnd 1: 2 SC into 2nd ch from hook. SC in next 5 chs, HDC in next 2 sts, 8 DC in last ch, Working on other side of foundation, HDC in next 2 sts, SC in next 5 sts, 2 SC in last stitch where beginning 2 SC are. Don’t join. (26 sts)

Rnd 2: 2 SC in 1st st, 2 SC in next. SC 7, HDC in next, 2 HDC in each of the next 6 stitches, HDC in next, SC 7, 2 SC in last 2 sts. Do not join (36 sts)

Rnd 3: SC in next 2 stitches, 2 SC in next, SC in next 10 sts, 2 SC in next 2 stitches, SC in next 6 sts, 2 SC in next 2 sts. SC in next 10 sts, 2SC in next st. SC in last 2 sts. Sl st in next st. Turn. (42 sts)

Rnd 4: Ch 1, turn, Sl St in each st around. Fasten off. (42 sts)


Hand Beaded Silk Yarn - 7 Pack


Top of shoe: Make 2
Ch 2
Row 1: 2 SC in 2nd ch from hook, ch 1, turn. (2)
Row 2-3: SC across, ch 1, turn. (2)
Row 4: 2 SC in each st across, ch 1, turn. (4)
Rows 5-6: SC across, ch 1, turn. (4)
Row 7: 2 SC in 1st st, SC in next 2 sts, 2 SC in last st, ch 1, turn. (6)

Row 8: 2 SC in 1st st, SC in next 4 sts, 2 SC in last st, ch 1, turn. (8)
Row 9: SC across, ch 1, turn. (8)
Row 10: 2 SC in 1st st, SC in next 6 sts, 2 SC in last st, ch 1, turn. (10)
Rows 11-34: SC in each st across, ch 1, turn. (10)
Row 35: SC2TOG, SC in next 6 sts, SC2TOG, ch 1, turn. (8)
Row 36: SC across, ch 1, turn. (8)
Row 37: SC2TOG, SC in 4 sts, SC2TOG, ch 1, turn. (6)
Row 38: SC2TOG, SC in next 2 sts, SC2TOG, ch 1, turn. (4)
Rows 39-40: SC across, ch 1, turn. (4)
Row 41: [SC2TOG] 2 times, ch 1, turn. (2)
Rows 42-43: SC across, ch 1, turn. (2)
Fasten off with super long tail for sewing.

Assembly Step:
Sew Top of Bootie to Sole. (See video tutorial for visual instructions)

Shop the costume tee collection at DesignByHumans.com.

Eyes:
With White: Make 4
Ch 2
Rnd 1: 8HDC in 2nd ch from hook
Fasten off with long tail for sewing.
With Black: Make 4
Ch 2
Rnd 1: 6SC in 2nd ch from hook
Fasten off with long tail for sewing.

Assembly Step:
Sew black part to white part and sew to booties
Add white embellishments along sides of booties

Mouth: Make 2
Ch 21
Row 1: Sl st in 2nd ch from hook, SC in next 2 chs, HDC in next 2 chs, DC in next 10 chs, HDC in next 2 chs, SC in next 2 chs, Sl st in last ch. Fasten off. Weave in ends.

Assembly Step:
Sew Mouth to Booties using the blue yarn. (See video tutorial for visual instructions)

Tail fin: Make 2
Ch 26
Row 1: Sl st in 2nd ch from hook, SC in next, HDC in next, DC in next, TR in next, DC in next, HDC in next, SC in next, Sl st in next 9 chs, SC

in next, HDC in next, DC in next, TR in next, DC in next, HDC in next, SC in next, Sl st in last. Fasten off with long tail for sewing.

Assembly Step:
Sew Tail to booties. (See video tutorial for visual instructions)

Enjoy!!

This post contains affiliate links, which I may be compensated for when you make a purchase. That means if you click on any link and buy from the linked websites, I will receive a small percentage of the value of your order. The amount you pay is not changed. Thank you for all your support in clicking the links in my blog!! You all are so amazing!! ~Nadia


The yarn provided for this pattern is courtesy of Red Heart Yarns


Shop Red Heart, America's Favorite Yarn


JCPenney

Wal-Mart.com USA, LLC


macys.com