How often have you ever been dressed for a night out only to find yourself searching for the perfect accessory to top off the perfect outfit?
A bold statement necklace that adds the final touch and bolsters your confidence is all you need! This custom designed piece can be made in a variety of ways. You can change the color of the spikes to match any top, add beads to make it pop, you can work on a longer or shorter chain for various looks, and you can use this same technique to enhance other accessories such as chain belts, lariats, wrap bracelets, or even chains in decorative items.
This crochet detail is a great way to dress up something ordinary and make it extraordinary! Next time you are looking for a piece to boost your confidence and turn heads, create your own statement with a bit of crochet and a lot of attitude!
Watch this video tutorial to learn how to make this beautiful necklace:
**You can always contact me via Facebook if you have any problems with the pattern. I am happy to help if you have any questions along the way.
***You can sell anything you make from my patterns, please just link back to my website YARNutopia.com. Thank you!
Teacher: Nadia Fuad
Video and Editing: Fuad Azmat (My Daddy)
Share your work on Facebook!
Add me on Snapchat: YARNutopia
Follow me on Instagram
Visit My Ravelry Store and add this to your Favorites!
Follow me on Twitter: @YARNutopia
Enjoy this video and subscribe to my channel on YouTube for more tutorials on how to crochet!
Leave a comment, and share with your friends!
Pattern:
Designed by Nadia Fuad
You may sell items made from my pattern, but please reference my website YARNutopia.com.
Please do not copy, sell, and/or post this pattern and claim it as your own.
NOTES:
-You can use any type of chain for this project. I used a 22 inch gold chain.
-You can use any size crochet hook for this project, as long as it fits through your chain links.
Special stitches:
Ch(s): chain(s)
YO: Yarn Over
St(s): Stitch(es)
Sl st: slip stitch
SK: Skip
SC: Single Crochet
DC: Double Crochet
TC: Treble Crochet
Picot: (Ch 3, sc in last TC made)
Pattern:
If you have any confusion or difficulty with reading this pattern, please watch the video tutorial to have visual instructions.
Before starting: Mark each end equally where you want to start your pattern and where you want to end. There should be equal amount of chains on each end. (See video tutorial for visual instructions)
Row 1: Sl st into a chain. Ch 1, sc in same ch, *ch 5, sk 2 chs, sc in next ch, repeat from * across until your stitch marker.
Row 2: Turn your work, sl st into the first ch5 sp, ch 1, [sc, 3dc, 2tc, picot, tc, 3dc, sc] in each ch 5 sp across. Fasten off, weave in ends.
If you need to add a clasp, watch the video tutorial for instructions on how to add a lobster clasp closure.
Every once in a while, I’m inspired by a fashionable clothing piece that I see online or in the store, and I’m struck by the possibility that I could make something like that. Has that ever happened to you?
Recently, I ran across a cute shrug on Pinterest that inspired me for this project. Although the item was knit, I felt I could create something similar using crochet. Best intentions often go astray because this project was more challenging than I anticipated when I sat down to design it in the studio.
Earlier this year, I purchased a beautiful Peruvian Pima Cotton from Wool and the Gang and had a summer clothing piece in mind when I chose this yarn. They had a sale on their Shiny Happy Cotton in Hot Pink, and when I bought it, I thought it would be cute for a summer top or a handbag. It was my textile of choice when creating this crop top. I was not disappointed. It worked up beautifully, even if the direction I started out in wasn’t where I ended up.
My design took on a life of its own, and in the process, I created this adorable lacy piece that I christened the name “The Sun-Kissed Crop Top” because of it’s openness in its pattern.
This top is perfect for wearing over a sundress, tank top, or it can make any fashion statement that you desire! You can continue to increase the bodice to create a swimsuit cover-up or longer tunic top. Also, please note, the dolman sleeves can be made longer. Below you will find the instructional video with a step-by-step demonstration on how to make your very own! Do you like reading a pattern better?? Scroll down even more to see the written instructions!
I can’t wait to see your designs and color choices! Let’s all get sun-kissed!!
Watch this video tutorial to learn how to make this crop top:
My dad will continue to be the videographer, editor, and photographer for our videos when I move away.
Support YARNutopia today so we can continue to bring you clear, quality crochet tutorials even after I move into my new home!
There will be an added expense of more travel and hopefully this won’t deter our ability to provide consistent videos on a weekly basis.
**You can always contact me via Facebook if you have any problems with the pattern. I am happy to help if you have any questions along the way.
***You can sell anything you make from my patterns, please just link back to my website YARNutopia.com. Thank you!
Teacher: Nadia Fuad
Video and Editing: Fuad Azmat (My Daddy)
Share your work on Facebook!
Add me on Snapchat: YARNutopia
Follow me on Instagram
Visit My Ravelry Store and add this to your Favorites!
Follow me on Twitter: @YARNutopia
Enjoy this video and subscribe to my channel on YouTube for more tutorials on how to crochet!
Leave a comment, and share with your friends!
Pattern:
Designed by Nadia Fuad
You may sell items made from my pattern, but please reference my website YARNutopia.com.
Please do not copy, sell, and/or post this pattern and claim it as your own.
NOTES:
-This pattern is made working 2 panels and sewing them together and then creating the sleeves.
-The video tutorial demonstrates a size Small/Medium but if you do more chains you can make this bigger. The video tutorial shares how to make this wider.
-To make this longer, just repeat rows 2-5 as many times as you want.
-To make sleeves longer, just repeat the ribbing pattern until you are satisfied with the length.
-Mine measured 41 inches across (106cm) unstretched and 15 inches long (38cm) unstretched.
-Before making this piece, measure your waist, your neck line, and the length you want to make this so you can mark your stitches for sewing your pieces together.
-This took me about 2 days to make, but you could make this in one day if you work on it constantly.
-The beginning chain length is explained below in the pattern.
-You can use any type of cotton or cotton blend yarn to achieve this style.
Special stitches:
Ch(s): chain(s)
YO: Yarn Over
St(s): Stitch(es)
Sl st: slip stitch
SK: Skip
SC: Single Crochet
HDC: Half-Double Crochet
DC: Double Crochet
Shell: [3DC, Ch 1, 3DC] in same stitch
DC2TOG: Double Crochet Decrease
FPDC: Front Post Double Crochet
BPDC: Back Post Double Crochet
Pattern:
If you have any confusion or difficulty with reading this pattern, please watch the video tutorial to have visual instructions.
Front and back panel:MAKE 2
Chain 99, 111, 123, 135 (if these chain amounts are not long enough, just add 12 chains to your piece until it measures the length you want it to be. Ex: chain 147, 159, 171)
Row 1: DC in 4th ch from hook and in next 2 chs, *ch 3, sk 3 chs, dc in next st, ch 3, sk 3 chs, dc in next 5 sts, repeat from * across ending with 3 dc, Turn.
Row 2: Ch 5 (counts as dc + Ch 2), Sk the first 3 sts, *Shell in the next DC, ch 5, sk 5 dc, repeat from * across, ending with ch 2, dc in last st, Turn.
Row 3: Ch 6 (counts as dc + ch 3), *5 DC in next ch 1 sp, ch 3, dc in center ch of ch 5 sp, ch 3, repeat from * across, ending with ch 3, dc in last st, Turn.
Row 4: Ch 3 (counts as dc), 3dc in same st as ch up 3, *ch 5, sk 5 dc, shell in next dc, repeat from * ending with 4dc in last st.
Row 5: Ch 3 (counts as dc), 2 DC in same st as ch up 3, *Ch 3, sk 3 sts, DC in center ch of ch 5 sp, ch 3, 5 DC in ch 1 sp of shell, repeat from * ending with 3 dc in last st.
Rows 6-13: Repeat rows 2-5 twice (You can repeat rows 2-5 as many times as you want to make this as long as you want, I just did 2 repeats to make it the length you see in the photos)
Fasten off with long tail for sewing.
Once you have your two panels made, sew them together. Watch the video tutorial at 33 minutes and 15 seconds for measurements and how to make it centered so one sleeve isn’t longer than the other.
Once your pieces are sewn together, you can work on the sleeves:
Rnd 1: Attach yarn to under side of sleeve, ch 3, (counts as dc), DC an odd number around (including ch 3 in this count), I DC’d 28 sts so I had a total of 29 DC’s on this round. Sl st to ch 3 to join.
Rnd 2: Ch 3, DC2TOG all around, sl st to ch up 3 to join. (14 sts and a ch up 3)
Repeat this round if your sleeve isn’t tight enough around your arm. Then go on to rnd 3.
Rnd 3: Ch 3, DC in each st around, sl st to ch up 3 to join.
Rnd 4-8: Ch 3, FPDC in next st, BPDC in next st, repeat from * around. Sl st to ch up 3 to join.
Repeat this round as many times as you want to make your sleeve as long as you want.
Fasten off when you are satisfied with the length.
Repeat this step for other sleeve.
Weave in all ends.
Next steps are optional:
SC around neck and waist openings. (see video tutorial at 1 hour 4 minutes for visual instructions)
Weave in all ends.
Enjoy!
“Keep your face to the sunshine and you will not see the shadows.” ~Helen Keller
~Nadia
This post contains affiliate links, which I may be compensated for when you make a purchase. That means if you click on any link and buy from the linked websites, I will receive a small percentage of the value of your order. The amount you pay is not changed. Thank you for all your support in clicking the links in my blog!! You all are so amazing!! ~Nadia
This summer heatwave has me and many others longing for the beach! For that reason, I have gotten a lot of requests for a swimsuit crochet video tutorial. Here is my Sassy Summer Bikini hot off the hook!! This full coverage two-piece suit can be made to fit any size!
This two-piece swimsuit has a nice repeat pattern that is easy to follow for any crocheter. Please read the NOTES section for all the information and follow along with the video tutorial if you get stuck! Enjoy!!
To learn how to make this bikini, follow this video tutorial:
**You can always contact me via Facebook if you have any problems with the pattern. I am happy to help if you have any questions along the way.
***You can sell anything you make from my patterns, please just link back to my website YARNutopia.com. Thank you!
Teacher: Nadia Fuad
Video and Editing: Fuad Azmat (My Daddy)
Share your work on Facebook!
Add me on Snapchat: YARNutopia
Follow me on Instagram
Visit My Ravelry Store and add this to your Favorites!
Follow me on Twitter: @YARNutopia
Enjoy this video and subscribe to my channel on YouTube for more tutorials on how to crochet!
Leave a comment, and share with your friends!
Pattern:
Designed by Nadia Fuad
You may sell items made from my pattern, but please reference my website YARNutopia.com.
Please do not copy, sell, and/or post this pattern and claim it as your own.
NOTES:
-You can make this bikini any size just by continuing or stopping your increases and making the straps/strings longer or shorter.
–To see the measurements, watch the intro of the video tutorial at 7 minutes in to the video.
-You can use any colors you want. I used a cotton blend yarn, Size 4 Medium Yarn but you can use any Double Knitting Yarn or any Aran Yarn as well. I highly recommend using a cotton yarn or cotton blend yarn.
-This bikini took me 2 days to make.
-Ch 3 at the beginning of a row counts as a stitch unless otherwise specified (See video tutorial for explanation)
-TIP: Maybe adding a single crochet around the entire bottom will give it a better shape and more form fitting.
Special stitches:
Ch(s): chain(s)
YO: Yarn Over
St(s): Stitch(es)
Sl st: slip stitch
SK: Skip
SC: Single Crochet
HDC: Half-Double Crochet
DC: Double Crochet
Pattern:
Top of Bikini: Make 2
Ch 20
Row 1: DC in 5th ch from hook and across, 3 DC in last ch, ch 1, 3 DC in same ch. Working on opposite side of foundation row, DC in each ch across. Ch 3, turn. (38 DC)
Row 2: DC in each st across to ch-1 space, [2 DC, ch-1, 2 DC] in ch-1 space, DC in each st to the end of the row. Ch 3, turn.
Rows 3-10: Repeat Row 2 or however many times as you need to get full coverage.
Last row:
After your last row, ch 1, turn, sc in each st until you get to the ch-1 sp. sc in ch-1 sp, ch 101, sc in 2nd ch from hook and across until you get back down to the ch-1 sp. sc in the same ch 1 sp. sc in each st until the end of the row. (see video tutorial to have visual instructions)
Once you have both triangles made, line the inside with your fabric and sew that on. (See video tutorial for visual instructions).
For back strap: Ch 301, sc in 2nd ch from hook and across. (300 sc) Fasten off, weave in ends. Weave the strand through the bottom of the triangles. (See video tutorial for visual instructions)
Bottoms: Starts at 49 minutes into video tutorial Back side:
Ch 16
Row 1: DC in 4th ch from hook and across. ch 3, turn. (14 DC)
Row 2: DC in each st across. Ch 3, turn. (14 DC)
Row 3: DC in first st (same st as ch-3), DC in each st across until the last st, 2 DC in last st. Ch 3, turn. (16 DC)
Row 4-33: Repeat row 3
You can repeat row 3 as many times as you need to, to make the backside as big as you need to have full coverage. I ended when I had 76 DC on row 33.
Row 34-38: DC in each st across. Ch 3, turn. (76 DC)
You can repeat these rows to make your waist as high as you need it to be. Fasten off, weave in ends.
Front side of the Bottoms:
Turn your backside piece upside down so you work on the foundation row. (see video tutorial for visual instructions)
Attach yarn to beginning,
Row 1: Ch 3, DC in each st across, ch 3, turn. (14 DC)
Row 2-6: DC in each st across. Ch 3, turn. (14 DC)
Row 7: DC in first st (same st as ch-3), DC in each st across until the last st, 2 DC in last st. Ch 3, turn. (16 DC)
Rows 8-23: Repeat row 7
You can repeat row 7 as many times as you need to, to make the front-side as big as you need to have full coverage. I ended when I had 48 DC on row 23.
Row 24-28: DC in each st across. Ch 3, turn.
You can repeat these rows to make your waist as high as you need it to be. Fasten off, weave in ends.
Before tying the sides, line the inside with your fabric and sew that on. (See video tutorial for visual instructions).
Ties for the side of the bottoms: (Skip ahead in the video tutorial to 1 hour and 10 minutes for this part)
Ch 201 (or as many as you want), sc in 2nd ch from hook and across. Fasten off, weave in ends.
See video tutorial for tips/tricks.
My Adult Mermaid Tail Afghan is such a fun project and has become wildly popular in the crochet community! I was contacted by the editor of Craft Ideas Magazine to be a contributor in their summer issue. They recently published my Mermaid Tail Afghan along with links to my blog and social media.
This is an exciting turning point for YARNutopia as this is my very first print publication for crochet. As a personal side note, getting this recognition and seeing this in print has filled me with a profound thrill. Knowing that this will be on newsstands across America is pretty epic for me! As I make these steps in my crochet career, this helps validate that I’m doing *something* right. It truly has humbled me to receive such positive feedback for this pattern. I’m very excited to realize this hard work has earned me some merit. I may have squealed something high pitched and danced around my living room when I received the email from the magazine editor asking me to participate in this issue.
This issue will hit newsstands on June 21st, 2016, but I was recently sent the digital copy to share with all my YARNutopians. Browse through the issue and flip to page 38 to see yours truly! Tell me what you think!
Click the Magazine Cover to read the Online Version.
You will see my publication on pages 38 & 39.
For more information about this mermaid tail and to make larger sizes, follow this link or click the photo below.
~Nadia
Update: It’s on the shelves!! (Date: June 23, 2016)
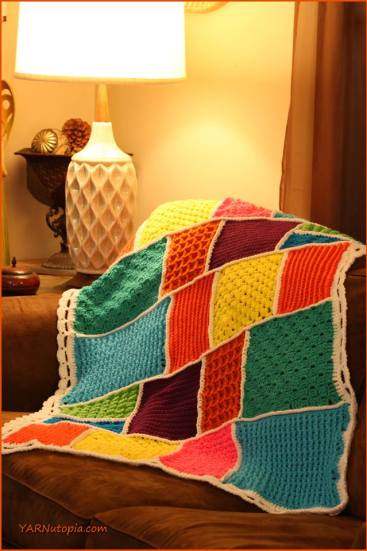
I wanted to create an unconventional piece for a baby. I have somebody close to me that is having a baby soon and I was inspired to think outside the box with this amazing Color Pop Baby Blanket. Steering away from the “traditional” pastel colors or pinks and blues for gender specifications, I wanted to create something that is gender neutral as the mother and father do not know the baby’s gender.
Using that inspiration and that element of surprise, I wanted to make something that just WOW’s the nursery and the arrival of this new baby. This amazing piece started to form from a small creative idea that I had.
This bright and colorful blanket combines a variety of stitches to give rich texture with a cheerful *pop* of color in the stripes! I framed the entire piece with a crocheted pom border as well. This border is very reminiscent of the 1970’s trend, but I have added new life to the retro look. It is fabulous!
Not only will this be a great addition to any nursery, but it would serve as a secondary purpose of being a great play throw to have to crawl around on the floor with. There are so many sensory textures.
In this baby blanket, I used popcorn stitches, granny stitches, double crochets, single crochets, cluster stitches, puff stitches, and treble crochets. You can even make this blanket bigger to make an afghan or even a full bedspread! Get creative!
You can use any colors you like, so if you know the gender of the baby, you could make this in a variety of hues of one color or make this in one solid color. The possibilities are endless! I can’t wait to see what you create! This was such a fun project!
Follow along with this video tutorial to learn how to crochet this blanket:
**You can always contact me via Facebook if you have any problems with the pattern. I am happy to help if you have any questions along the way.
***You can sell anything you make from my patterns, please just link back to my website YARNutopia.com. Thank you!
My dad will continue to be the videographer, editor, and photographer for our videos when I move away.
Support YARNutopia today so we can continue to bring you clear, quality crochet tutorials even after I move into my new home!
There will be an added expense of more travel and hopefully this won’t deter our ability to provide consistent videos on a weekly basis.
Teacher: Nadia Fuad
Video and Editing: Fuad Azmat (My Daddy)
Share your work on Facebook!
Add me on Snapchat: YARNutopia
Follow me on Instagram
Visit My Ravelry Store and add this to your Favorites!
Follow me on Twitter: @YARNutopia
Enjoy this video and subscribe to my channel on YouTube for more tutorials on how to crochet!
Leave a comment, and share with your friends!
Pattern:
Designed by Nadia Fuad
You may sell items made from my pattern, but please reference my website YARNutopia.com.
Please do not copy, sell, and/or post this pattern and claim it as your own.
NOTES:
-You can make this blanket any size. Use the Afghan Size Guide in this Blog Post
-The measurements for my blanket came out to be approximately 47 inches X 45 Inches
-You can make this blanket any size by making your beginning chain an even number.
-You can use any colors you want. I used a Worsted Weight, Size 4 Medium Yarn but you can use any Double Knitting Yarn or any Aran Yarn as well.
-This blanket took me approximately 1 month to complete (But I did not work on it continuously)
-You do not have to change color so often, but sewing in those pesky ends is a nightmare. Be sure to sew them in as you go, but if you are not changing color as often as I do in the video tutorial, you can carry your yarn up the rows on the sides because when we make our border, we cover the sides anyway.
-Ch 3/Ch4 at the beginning of a row counts as a stitch unless otherwise specified (See video tutorial for explanation, especially when working treble crochet rows)
-If you do not have the same exact stitch count as me (if you are off by a few stitches, do not worry about it, it is OK, the border will hide any imperfections on the edges)
Special stitches:
Ch(s): chain(s)
YO: Yarn Over
St(s): Stitch(es)
Sl st: slip stitch
SK: Skip
SC: Single Crochet
HDC: Half-Double Crochet
DC: Double Crochet
TR: Treble Crochet
LDC2TOG: Long Double Crochet Decrease (Work a Double Crochet Decrease in the previous row, working around chain space)
PC: Popcorn (4 DC in st, remove hook from loop, insert hook in 1st dc of grouping, put loop back on hook and pull through stitch. Popcorn made)
PS: Puff Stitch: *YO, insert hook into st, YO, pull through, repeat from * until you have 7 loops on your hook. YO pull through all 7 loops.
Pattern: Change color every row.
Ch 128
Row 1: Dc in 3rd ch from hook and across, ch 3, turn. (127)
Row 2: *PC in next st, ch 1, DC in next st, repeat from * across, ending with DC in last st, ch 1, turn. (64 DC, 63 PC, 63 Ch 1 sps)
Row 3: SC in each dc and in each ch 1 sp. Do NOT sc in the PC’s, ch 3, turn (127)
Row 4: 2DC in same st as ch up3, *ch 1, sk 2 sts, 3 dc in next st, repeat from * ending with 3 dc in last st, ch 1, turn. (43 groups of dc)
Row 5: sc in same st as ch 1 and in next 2 sts, *LDC2TOG working around ch 1 sp into sts from Row 3, sc in next 2 sts, sk next st, Repeat from * across, ch 4, turn. (see video tutorial for visual instructions) (129 sts)
Row 6: * Sk next st, TR in next st, TR in skipped st (cross stitch made), repeat from * across ending with TR in last st, ch 1, turn. (129 TR)
Row 7: SC across, ch 1, turn. (125 sc–if you end up with 129 sc, that’s okay too!)
Row 8: sc in same st as ch 1, *ch 2, sk 2 sts, sc in next st, repeat from * turn. (43 sc, 42 ch 2 sps)
Row 9: 3 DC in each ch 2 sp (AKA Granny Stitch), skipping sc’s. ch 3, turn. (126 dc)
Row 10: DC in next st, PS in next st (middle st of Granny Stitch), DC in next 2 sts, repeat from * across, ch 3, turn.
Rows 11-40: repeat rows 1-10 (see video tutorial for visual instructions)
Row 41: Repeat Row 9
Row 42: Repeat Row 8
Row 43: Repeat Row 7
Row 44: repeat row 6
Row 45: Repeat Row 3
Row 46: Repeat Row 4
Row 47: Repeat Row 5
Row 48: Repeat Row 2
Row 49: Repeat Row 1
Row 50: Repeat Row 10
Rows 51-79: Repeat Rows 41-50
Fasten off and start border:
BORDER:
Rnd 1: SC around entire blanket putting 3 sc in each corner. Sl st to first sc.
Rnd 2: Ch 6, 3DC cluster in 3rd ch from hook, Ch 3, 3 dc cluster in 3rd ch from hook. Sl st in ch where 1st cluster was made, ch 3, sk 3 sts, sc in next st. (see video tutorial for visual instructions) Sl st to beginning and fasten off!
That border is amazing and can be put on any blanket!!
Weave in all ends.
Enjoy!
This post contains affiliate links, which I may be compensated for when you make a purchase. That means if you click on any link and buy from the linked websites, I will receive a small percentage of the value of your order. The amount you pay is not changed. Thank you for all your support in clicking the links in my blog!! You all are so amazing!! ~Nadia
The yarn provided for this pattern is courtesy of Red Heart Yarns


