If you crochet as much as I do, there are going to be days that you push those hand and wrist muscles to their limits! Combine that with the fact that I have auto-immune issues including swollen joints from arthritis, there will be days when I wake up and my hands hardly function.
Today is one of those days.
Even typing this blog has forced me to take breaks because the muscle in my hand going into my wrist is causing a lot of discomfort. That discomfort is impairing my ability to do what I love!
Have you experienced something similar?
From time to time, I switch using a standard crochet hook to using an ergonomic handled hook to alleviate some of the tension and pressure in my wrist. There are points in time where even that doesn’t do enough to help my issue. After talking to my best friend, Nida, about my concerns, she sent me a pair of these fabulous gloves by Copper Joint.
Nida works in the medical field, so I trust her guidance and I decided to give these a try. I wasn’t disappointed. Although my pain can be far beyond the scope of what most things can help, these Copper Joint Gloves have been a crochet life-saver! Today I’ll be wearing them throughout the day as I work on my latest designs.
I know that I’m not alone in this experience, so I ask you, my YARNutopians to share with me your methods of finding relief for your tired and aching joints! Maybe your technique will help others who suffer the laborious tasks of chronic crochet syndrome! 😉
On a serious note, this truly is an issue that many can relate to. I’m looking forward to hearing your suggestions!
You can get the same gloves that Nida gave me by clicking here!
This sweet little fella will hop right into your heart this season! This Bunny Amigurumi in a Carrot Cocoon is a darling project and easy enough to have done in time to make it in those baskets this Easter! For those of you who love bunnies, this is a 10 on the adorable scale!!
When I was a little girl, my maternal grandma LOVED bunnies! I remember every Easter we would go to her house and she had a basket full of bunnies. I remember playing with them! Because of her, I developed a love for stuffed bunny rabbits and it has carried into my adulthood! It has inspired me to share it with all of you!!
Follow along with this video tutorial to make this cute project:
My dad will continue to be the videographer, editor, and photographer for our videos when I move away.
Support YARNutopia today so we can continue to bring you clear, quality crochet tutorials even after I move into my new home!
There will be an added expense of more travel and hopefully this won’t deter our ability to provide consistent videos on a weekly basis.
Teacher: Nadia Fuad
Video and Editing: Fuad Azmat (My Daddy)
Share your work on Facebook!
Add me on Snapchat: YARNutopia
Follow me on Instagram
Visit My Ravelry Store and add this to your Favorites!
Follow me on Twitter: @YARNutopia
Enjoy this video and subscribe to my channel on YouTube for more tutorials on how to crochet!
Leave a comment, and share with your friends!
Pattern:
Designed by Nadia Fuad You *may* sell items made from my pattern, but please reference my website YARNutopia.com.
Please do not copy, sell, and/or post this pattern and claim it as your own.
You can buy any of the items in this kit. Buy all or buy one item. Check it out to see the supplies you can get online to make this project!!
NOTES:
-This project uses less than 300 yards of yarn.
-Use a smaller hook to make these smaller
-Use a bigger hook to make these bigger
-Watch the FULL video tutorial for visual instructions for each round.
-Weave in all the ends as you go so you don’t have to weave them all in at the very end.
-Work in continuous rounds by inserting a stitch marker to mark the beginning of your rounds
-Work in BACK LOOPS ONLY for the whole project
Special stitches:
Ch(s): chain(s)
YO: Yarn Over
St(s): Stitch(es)
prev.: Previous
Sl st: slip stitch
SC: Single Crochet
BLO: BACK LOOPS ONLY
DC: Double Crochet
Pattern:
If you have any confusion or difficulty with reading this pattern, please watch the video tutorial to have visual instructions.
Bunny:
Leg: Make 2 (fasten off the first one, do not fasten off the second one)
Ch 2 (WORK IN BLO) Rnd 1: 6 SC in 2nd ch from hook. (6) Rnd 2: 2 SC in each st around. (12) Rnds 3-7: SC in each st around. (12)
Fasten off for the first leg, Do not fasten off for the second leg.
See video tutorial for visual instructions
Attach legs: WORK IN BLO Rnd 8: SC in each st of the first leg, SC in each st of the 2nd leg attaching the two pieces. (24) Rnds 9-11: SC in each st around. (24) Rnd 12: [2 SC in next st, SC in next 3 sts] 6 times. (30) Rnds 13-16: SC in each st around. (30) Rnd 17: [SC2TOG, SC in next 3 sts] 6 times. (24) Rnd 18: [SC2TOG, SC in next 2 sts] 6 times. (18) Stuff Body Rnd 19: [SC2TOG, SC in next st] 6 times. (12) Rnd 20: [2SC in next st, SC in next st] 6 times. (18) Rnd 21: [2SC in next st, SC in next 2 sts] 6 times. (24) Rnd 22: [2SC in next st, SC in next 3 sts] 6 times. (30) Rnd 23: [2SC in next st, SC in next 4 sts] 6 times. (36) Rnd 24-26: SC in each st around. (36) Rnd 27: [SC2TOG, SC in next 4 sts] 6 times. (30) Rnd 28: [SC2TOG, SC in next 3 sts] 6 times. (24) Rnd 29: [SC2TOG, SC in next 2 sts] 6 times. (18) Stuff Head Rnd 30: [SC2TOG, SC in next st] 6 times. (12) Rnd 31: [SC2TOG] 6 times. (6)
Fasten off, weave in ends.
Ears: Make 2 WORK IN BLO
Ch 2 Rnd 1: 6 SC in 2nd Ch from hook. (6) Rnd 2: 2 SC in each st around. (12) Rnd 3: [2SC in next st, SC in next st] 6 times. (18) Rnds 4-5: SC in each st around. (18) Rnd 6: SC2TOG, SC in each st around. (17) Rnd 7: SC2TOG, SC in each st around. (16) Rnd 8: SC2TOG, SC in each st around. (15) Rnd 9: SC2TOG, SC in each st around. (14) Rnd 10: SC2TOG, SC in each st around. (13) Rnd 11: SC2TOG, SC in each st around. (12) Rnd 12: [SC2TOG] 6 times. (6)
Fasten off with long tail for sewing.
Assembly step: Flatten Ears and Sew them to head. Cut out Pieces of Felt and Glue them to the ears. Embroider Eyes and Nose and Mouth on face. (See video tutorial for visual instructions on all these parts) Add some blush to the cheeks for a little extra detail!
Arms: WORK IN BLO
Ch 2 Rnd 1: 6 SC in 2nd ch from hook Rnds 2-6: SC in each st around.
Stuff arms. Attach them to body
Add ribbon around neck and tie in a bow.
Carrot Cocoon:
With Orange: WORK IN BLO
Ch 2 Rnd 1: 6 SC in 2nd Ch from hook (6) Rnd 2: SC in each st around. (6) Rnd 3: 2 SC in each st around. (12) Rnds 4-5: SC in each st around. (12) Rnd 6: [2SC in next st, SC in next st] 6 times. (18) Rnds 7-8: SC in each st around. (18) Rnd 9: [2SC in next st, SC in next 2 sts] 6 times. (24) Rnd 10: 2 SC in next st, SC in the rest of the sts around. (25) Rnd 11: 2 SC in next st, SC in the rest of the sts around. (26) Rnd 12: 2 SC in next st, SC in the rest of the sts around. (27) Rnd 13: 2 SC in next st, SC in the rest of the sts around. (28) Rnd 14: 2 SC in next st, SC in the rest of the sts around. (29) Rnd 15: 2 SC in next st, SC in the rest of the sts around. (30) Rnd 16: 2 SC in next st, SC in the rest of the sts around. (31) Rnd 17: 2 SC in next st, SC in the rest of the sts around. (32) Rnd 18: 2 SC in next st, SC in the rest of the sts around. (33) Rnd 19: 2 SC in next st, SC in the rest of the sts around. (34) Rnd 20: 2 SC in next st, SC in the rest of the sts around. (35) Rnd 21: 2 SC in next st, SC in the rest of the sts around. (36) Rnd 22: 2 SC in next st, SC in the rest of the sts around. (37) Rnd 23: 2 SC in next st, SC in the rest of the sts around. (38) Rnd 24: 2 SC in next st, SC in the rest of the sts around. (39) Rnd 25: 2 SC in next st, SC in the rest of the sts around. (40) Rnd 26: 2 SC in next st, SC in the rest of the sts around. (41) Rnd 27: 2 SC in next st, SC in the rest of the sts around. (42) Rnds 28-30: Sc in each st around. (42)
Fasten off Orange and change to Spring Green Rnd 31: SC in each st around. (42)
fasten off, weave in ends.
Leaf: Make 2 (WORK IN BLO)
Ch 14 Row 1: DC in 4th Ch from hook and across. (12 DC) Row 2: Ch 3 (Counts as DC), DC across, 2 DC in last Ch, 2 DC in each ch of Ch 3, DC across bottom side of Foundation Ch. (28 DC) Row 3: Ch 3 (counts as DC), DC in next 10 sts, [2DC in next st, DC in next st] 3 times, DC in last 11 sts. Row 4: Ch 3 (Counts as DC), DC in next 11 sts, [2 DC in next st, DC in next 2 sts] 3 times, DC in last 10 sts. (34 sts) Row 5: Ch 3, DC in same st as ch up 3, 2 DC in each st across. (68 DC) Row 6: Ch 3, DC in same st as ch up 3, 2 DC in each st across. (136 DC)
Fasten off with long tail for sewing.
Assembly Step:
Sew both sides of leaf together and stuff with polyfil. Attach to carrot. (See video tutorial for visual instructions). Weave in the rest of your loose ends!
Stuff bunny inside cocoon!
Enjoy!!
This post contains affiliate links, which I may be compensated for when you make a purchase. That means if you click on any link and buy from the linked websites, I will receive a small percentage of the value of your order. The amount you pay is not changed. Thank you for all your support in clicking the links in my blog!! You all are so amazing!! ~Nadia
The yarn provided for this pattern is courtesy of Red Heart Yarns
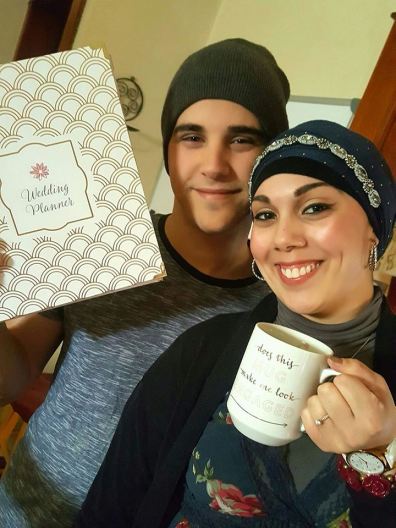
I have a year to plan for a wedding and I have all kinds of ideas to incorporate crochet. One of the first things that came to mind when I viewed our venue was to match the jewel tones of our color scheme with the jewel tones of the hall. I came up with this mandala idea to use as table accents for either our memory table, gift table, or to place underneath our cake. If I get really inspired, I may use these on the dinner tables as center pieces, but that’s a long-shot! I have a lot of ambition, but only a year. This isn’t my only idea to have crochet in our wedding, so many more crochet projects are to come!
This mandala was inspired by the henna design on my hands that I had done for our engagement photos. This photo shows my first trial attempt at creating the pattern before filming the tutorial. I used different colors for both of them, but they are stunning!
Follow along with this video tutorial to learn how to make this Henna Inspired Mandala:
Designed by Nadia Fuad You *may* sell items made from my pattern, but please reference my website YARNutopia.com.
Please do not copy, sell, and/or post this pattern and claim it as your own.
You can buy any of the items in this kit. Buy all or buy one item. Check it out to see the supplies you can get online to make this mandala!
NOTES:
-This project uses less than 600 yards of yarn.
-Use a smaller hook to make these smaller
-Use a bigger hook to make these bigger
-Watch the FULL video tutorial for visual instructions for each round.
-Weave in all the ends as you go so you don’t have to weave them all in at the very end.
-This Mandala is 33 inches across (84 cm)
Special stitches:
Ch(s): chain(s)
YO: Yarn Over
St(s): Stitch(es)
prev.: Previous
Sl st: slip stitch
SC: Single Crochet
HDC: Half Double Crochet
DC: Double Crochet
TR: Treble Crochet
TR2TOG: Treble Crochet 2 Together (Decrease)
DTR: Double Treble
Picot: Ch 3, Sl st to 3rd ch from hook
Pattern:
If you have any confusion or difficulty with reading this pattern, please watch the video tutorial to have visual instructions.
Mandala:
With Cobalt Blue
Start with Magic Ring or Ch 4, Sl st in 1st ch to form a ring Rnd 1: Ch up 3 (Counts as DC here and throughout), 11 DC into ring. Sl st to beg ch up 3. Fasten off. (12)
Rnd 2: In any st around, Attach Fuchsia, Ch 1, SC in same st, * CH 3, SK 1 st, SC in next st, repeat from * around. Sl st to 1st sc. (6 ch 3 sps)
Rnd 3: Sl st into ch 3 sp, Ch 1, *[SC, HDC, DC, HDC,TR, HDC, DC, HDC, SC] in ch 3 sp, Sl st in SC, repeat from * around, sl st to first SC, Fasten off. (6 petals total)
Rnd 4: Attach Kelly Green to any TR of any petal, Ch 1, SC in same st, *Ch 5, SC in middle TR of next Petal, Repeat from * around, sl st to 1st sc.
Rnd 5: Sl st in ch 5 sp, Ch up 3, 6 DC in same ch 5 sp, 7 DC in each ch 5 sp around. Sl st to ch up 3. Fasten off. (42 sts)
Rnd 6: Attach Royal Blue in any st. Ch 1, SC in same st, *Ch 3, Sk next st, SC in next st, repeat from * around, finishing with ch 1, HDC in 1st sc (so you start next round in the center of the ch sp–see video tutorial) (21 ch 3 sps)
Rnd 7: Ch 1, SC around the HDC from the previous round, *Ch 3, SC in next ch 3 sp, repeat from * around, sl st to 1st sc. Fasten off. (21 Ch 3 sps)
Rnd 8: Attach Cobalt Blue to any ch 3 sp, CH up 1, 3 SC in ch 3 sp, *Ch 1, 3 SC in next ch 3 sp, repeat from * around, sl st to 1st sc. Fasten off.
Rnd 9: Attach Plum Purple to any ch 1 sp, ch up 3, 5 DC in same sp, * Sl st in middle SC of 3 SC grouping, 5 DC in next ch 1 sp, repeat from * around, sl st to beg ch up 3. Fasten off.
Rnd 10: Attach Robins Egg to any middle DC of any shell, Ch 1, SC in same st, *Ch 6, SC in middle DC of next shell, repeat from * around, Sl st to beg sc. (21 ch 6 sps)
Rnd 11: Sl st in ch 6 sp, ch up 1, [SC, HDC, DC, HDC, TR, DTR, TR, HDC, DC, HDC, SC] in each ch 6 sp around. Sl st to beg. sc. Fasten off. (21 petals)
Rnd 12: Attach Pagoda to any DTR of any petal, Ch 1, SC in same st, *Ch 7, SC in DTR of next petal, repeat from * around, sl st to 1st SC. (21 ch 7 sps)
Rnd 13: Sl st in ch 7 sp, Ch up 3, 9 DC in same sp, 10 DC in each ch sp around, sl st to beg. ch 3. Fasten off (210 DC)
Rnd 14: Attach Kelly Green to any gap between the 10 DC grouping (See video tutorial for specific location), Ch 1, SC in same gap, *Ch 6, Sk 5 sts, SC BETWEEN 5th and 6th DC of the grouping, Ch 6, sk 5 sts, DC in the gap between the groupings, repeat from * around, ending with Ch 3, DC in beg. SC (so you start the next round in the center of the ch sp) (42 Ch 6 sps)
Rnd 15: Ch 1, SC around DC of prev. round. *Ch 6, SC in next ch sp, repeat from * around ending with Ch 3, DC in beg. SC. (42 Ch 6 sps)
Rnd 16: Repeat Round 15
Rnd 17: Ch 1, SC around DC of prev. round, *Ch 7, SC in next ch sp, Ch 3, SC in next ch sp, repeat from * around, sl st to beg. SC. Fasten off. (21 Ch 7 sps, 21 Ch 3 sps)
Rnd 18: Attach Robins Egg to any Ch 3 sp, Ch 1, SC in same sp, *Ch 1, [5 DC, ch 2, 5 DC] in ch 7 sp, Ch 1, SC in next ch 3 sp, Repeat from * around, sl st to beg. sc. Fasten off. (210 SC)
Rnd 19: Attach Fuchsia to any ch 2 sp between the 5 DC groupings, Ch 1, SC in same sp, *Ch 2, 7 DC in the next SC, Ch 2, SC in next ch 2 sp, repeat from * around, sl st to first sc. Fasten off.
Rnd 20: Attach Royal Blue to any ch 2 sp, Ch up 1, *2 SC in Ch 2 sp, SC in SC, 2 SC in Ch 2 sp, SC in each st, repeat around. Sl st to first SC. (252 SC)
Rnd 21: Working in BLO, ch up 1, SC in each st around. (252 sc) Fasten off.
Rnd 22: Attach Plum Perfect to any st, Ch 5 (Counts as DC + Ch 2), DC in same st, *SK 2 Sts, V-Stitch in next st, repeat from * around, sl st to the 3rd ch of the beg. ch 5. Fasten off. (268 DC–134 V-stitches)
Rnd 23: Attach Cobalt Blue to any ch 2 sp, ch up 3, 2 DC in same sp, *Ch 1, 3 DC in next ch 2 sp, repeat from * around, sls t to beg. ch 3. Fasten off. (84 groups of 3 DC–252 DC)
Rnd 24: Attach Kelly Green to any ch 1 sp, Ch up 3, 2 DC in same sp, *Ch 1, 3 DC in next ch 1 sp, repeat from * around, sls t to beg. ch 3. Fasten off. (84 groups of 3 DC–252 DC)
Rnd 25: Attach Fuchsia to any ch 1 sp, Ch 1, SC in same sp, *[4TR, DC, DCT, Picot, DTR, DC, 4TR] in next ch 1 sp, SC in next ch 1 sp, repeat from * around, sl st to beg sc. Fasten off. (42 petals)
Rnd 26: Attach Robins Egg to any picot, ch 1, sc in same picot, *Ch 12, SC in next picot, repeat from * around, Sl st to 1st SC. (42 ch 12 sps)
Rnd 27: Ch 1, SC in same st, *[8 SC, ch 3, 8 SC] in ch 12 sp, sc in next sc, Repeat from * around, sl st to 1st SC. Fasten off. (714 SC)
Rnd 28: Attach Plum Perfect to any Ch 3 sp, ch 1, SC in same sp, *Ch 6, Sk 4 sts, TR2TOG (skipping 7 sts in between this decrease stitch–see video tutorial for visual instructions), Ch 6, SC in next ch 3 sp, Repeat from * around, sl st to first SC.
Rnd 29: Ch up 2 (does not count as anything), DC in first st, *6 DC in ch 6 sp, DC in TR2TOG st, 6 DC in ch 6 sp, DC in SC, repeat from * around, sl st to first DC. Fasten off. (588 DC)
Weave in all ends.
Assembly Step:
Be sure to block this piece flat on a surface. Just pin it down to the shape and spray it with water and let it dry.
Enjoy!!
This post contains affiliate links, which I may be compensated for when you make a purchase. That means if you click on any link and buy from the linked websites, I will receive a small percentage of the value of your order. The amount you pay is not changed. Thank you for all your support in clicking the links in my blog!! You all are so amazing!! ~Nadia
This is a very practical project! My Make-Up Brush Case is a very easy and fun item that is compact to transport and keeps your brushes organized. This also makes a great gift for a makeup artist! Contouring, highlighting, and wings are all the rave in makeup artistry! I demonstrate in a video tutorial how to make this holder that can be modified to hold other items if make-up brushes are not your thing.
Instead, make one for your paint brushes, art supplies, utensils, crochet hooks, pens or other sets of tools. Many things can be placed in this convenient holder, making this a must have in keeping important items organized and clutter to a minimum!
Follow along with this video tutorial to learn how to make this case:
Designed by Nadia Fuad You *may* sell items made from my pattern, but please reference my website YARNutopia.com.
Please do not copy, sell, and/or post this pattern and claim it as your own.
You can buy any of the items in this kit. Buy all or buy one item. Check it out to see the supplies you can get online to make this makeup brush case!
NOTES:
-Use a smaller hook to make these smaller
-Use a bigger hook to make these bigger
-Watch the FULL introduction of the video tutorial for frequently asked questions and watch the full video for tips on how to make this smaller or bigger.
-This makeup case is 20 inches (51 cm) long and 11 inches (28 cm)
Special stitches:
Ch(s): chain(s)
YO: Yarn Over
St(s): Stitch(es)
Sl st: slip stitch
SC: Single Crochet
SC2TOG: Single Crochet 2 Stitches Together
SC3TOG: Single Crochet 3 Stitches Together
DC: Double Crochet
FPDC: Front Post Double Crochet
Pattern:
If you have any confusion or difficulty with reading this pattern, please watch the video tutorial to have visual instructions.
Case:
Ch 50 Row 1: SC in 4th Ch from hook, *ch 1, sk 1 ch, sc in next, repeat from * across, turn. (25 sc)
Row 2: Ch 2 (Does NOT count as a stitch), SC in 1st ch 1 sp, * Ch 1, sc in next ch 1 sp, repeat from * across. Turn.
Rows 3-9: Repeat Row 2
Row 10: Ch up 3 (counts as st), DC in ch 1 sp, *FPDC around next SC, DC in next ch 1 sp, repeat from * across ending with DC in last ch 1 sp. (49 sts) (See video tutorial for visual instructions)
Row 11: Ch 2, SC in first st, * Ch 1, sk 1 st, SC in next st, repeat from * across, turn. (25 sc)
Rows 12-15: Repeat Row 2
Repeat Rows 10-15 6 more times or however many times you want and then go onto instructions for Row 52
Row 52: Ch 1, SC in each st and each Ch 1 sp across. Turn. (Don’t forget the ch 2 at the end of the row!) (49 sc)
Row 53: SC2TOG, SC in each st until 2 sts remain, SC2TOG, ch 1, turn. (47 sts)
Rows 54-75: Repeat row 53 until there are 3 sts left.
Ch 3 and sl st in 1st st, to create button hole. Fasten off. Weave in all ends.
Attach Accent color in any corner. SC around entire piece.
Pockets: Make 7 or as many as you’d like
Ch 4 Row 1: SC in 2nd ch from hook and across. (3 sc) Rows 2-16: SC in each st across, ch 1, turn. (3 sc) Row 17: SC3TOG, ch 1, turn
SC around entire piece.
Fasten off, weave in ends.
Larger Pocket:
Ch 6 Row 1: SC in 2nd ch from hook and across. (5 sc) Rows 2-15: SC in each st across, ch 1, turn. (5 sc) Row 16: SC2TOG, SC in next, SC2TOG. (3 sts) Row 17: SC3TOG, ch 1, turn
SC around entire piece.
Fasten off, weave in ends.
Assembly Step:
Sew Pockets to the case. See video tutorial for visual instructions to see exactly where to put everything.
Sew button on case AFTER makeup brushes are inserted to know exactly where to put the button.
Enjoy!!
This post contains affiliate links, which means if you click on the link and buy from the linked websites, I will receive a small percentage of the value of your order. The amount you pay is not changed.
On March 4th, 2017, while traveling through Europe, Nate surprised me with a spontaneous proposal in the Amsterdam Schipol Airport. As we were heading to the bathrooms (haha!) he got down on one knee and asked me to marry him!
He was shaking, I was shaking, I was crying, and of course, I said YES! We’ve been talking about it for some time now and all the plans we were making were leading to this exciting event.
It was very fitting that we had this private moment that included the two of us, my brother and my mom who was able to capture these lovely photos.
No matter how tired we were from all the traveling, our joy carried us through our 13 hour layover where we ventured into Amsterdam city for a celebration dinner.
Upon arrival back to the United States, and of course after letting my close friends and family know this exciting news, we started making immediate plans for our wedding.
We are looking ahead and planning an early 2018 wedding celebration. We recently had some engagement photos taken and made our formal announcement on our personal social media accounts. We now wish to share it with all the YARNutopians!
Photo credit: Fuad Azmat (My daddy!)
As we journey ahead in the next year planning our event, we are excited to tie in elements of our cultures and OF COURSE, elements of crochet! I am going a different route on my dress, as many have already asked me if I was going to crochet my wedding gown, but I am absolutely 100% going to incorporate other small details of crochet for this special day.
I’m excited to share this year-long journey with my amazing YARNutopia family and I will be creating tutorials of fun elements that I plan to use on the big day!
I am excited to hear suggestions on crochet projects that you have used for your special events! I’m always open to hearing, so please feel free to share your ideas!! This will be a fun way to share this together!
Please join us in sharing our joy and happiness as we move onto this new and exciting chapter of our lives!
A late season snowstorm swept in overnight just in time for the release of my Something Blue Cowl. Wear it with attitude and rock that winter look no matter what time of the season! You can make this piece as a scarf with fringe or make it a mobius cowl by twisting the scarf before sewing it closed. Have fun with this design and stay warm out there!
My dad will continue to be the videographer, editor, and photographer for our videos when I move away.
Support YARNutopia today so we can continue to bring you clear, quality crochet tutorials even after I move into my new home!
There will be an added expense of more travel and hopefully this won’t deter our ability to provide consistent videos on a weekly basis.
Watch this video tutorial to learn how to make this cowl:
Designed by Nadia Fuad You *may* sell items made from my pattern, but please reference my website YARNutopia.com.
Please do not copy, sell, and/or post this pattern and claim it as your own.
NOTES:
-Use a smaller hook to make these smaller
-Use a bigger hook to make these bigger
-Watch the FULL introduction of the video tutorial for frequently asked questions and watch the full video for tips on how to make this smaller or bigger.
-This scarf is 9 inches wide (23 cm) and 62 inches long (~160cm)
Special stitches:
Ch(s): chain(s)
YO: Yarn Over
St(s): Stitch(es)
Sl st: slip stitch
DC: Double Crochet
BPDC: Back Post Double Crochet
FPDC: Front Post Double Crochet
Pattern:
If you have any confusion or difficulty with reading this pattern, please watch the video tutorial to have visual instructions.
Cowl:
Ch 35 (or any multiple of 3 +2) Row 1: DC in 4th Ch from hook and across (33 sts) Row 2: Ch 2 (Does NOT count as a stitch here and throughout) FPDC on first 3 sts, *BPDC on next 3 sts, FPDC on next 3 sts, repeat from * across, ending with FPDC, turn. (33 sts) Rows 3-132: Repeat Row 2 (you can make this longer if you wish)
Fasten off with long tail.
Assembly Step:
Sew ends together to make infinity scarf style. Weave in all ends.
Enjoy!!
This post contains affiliate links, which I may be compensated for when you make a purchase. That means if you click on any link and buy from the linked websites, I will receive a small percentage of the value of your order. The amount you pay is not changed. Thank you for all your support in clicking the links in my blog!! You all are so amazing!! ~Nadia
The yarn provided for this pattern is courtesy of Red Heart Yarns
I returned from vacation, and I’m right back to work in the studio with the latest hat design I just created. My Fur Chapeau is inspired by my trip to Paris! Perfect for the windy weather and to keep the chills away!!
It was a little chilly in Europe, and when I returned, there were heavy winds, and it was cold in Wisconsin. Although spring is around the corner, this hat can keep the cold away any time of year. In other parts of the world, it will be winter soon, so it will be perfect for any time, any place to warm you up!
Watch this video tutorial to learn how to make this Fur Chapeau:
My dad will continue to be the videographer, editor, and photographer for our videos when I move away.
Support YARNutopia today so we can continue to bring you clear, quality crochet tutorials even after I move into my new home!
There will be an added expense of more travel and hopefully this won’t deter our ability to provide consistent videos on a weekly basis.
***You can sell anything you make from my patterns, please just link back to my website YARNutopia.com. Thank you!
Teacher: Nadia Fuad
Video and Editing: Fuad Azmat (My Daddy)
Share your work on Facebook!
Add me on Snapchat: YARNutopia
Follow me on Instagram
Visit My Ravelry Store and add this to your Favorites!
Follow me on Twitter: @YARNutopia
Enjoy this video and subscribe to my channel on YouTube for more tutorials on how to crochet!
Leave a comment, and share with your friends!
Designed by Nadia Fuad
You may sell items made from my pattern, but please reference my website YARNutopia.com.
Please do not copy, sell, and/or post this pattern and claim it as your own.
-This took me approximately 3 Hours total to make this piece.
-To make this smaller or bigger, use a smaller or bigger hook size.
-The one I show in the video tutorial will fit an adult person and measures 22 Inches around and 9 inches long. You can watch the video tutorial to learn how to make this different sizes.
-The Ch 2 at the beginning of the round DOES NOT count as a stitch.
Special stitches:
Ch(s): chain(s)
St(s): Stitch(es)
Sl st: slip stitch
Sk: Skip
SC: Single Crochet
DC: Double Crochet
DC2TOG: Double Crochet 2 Together
Pattern: With all 3 strands at the same time Ch 3
Round 1: 9 DC in 3rd ch from hook, sl st to 1st DC, Ch 2. (9 DC)
Rnd 2: 2 DC in each st around. Sl st to 1st DC, ch 2. (18 DC)
Rnd 3: *2 DC in next st, 1 DC in next st, repeat from * around, sl st to 1st DC, ch 2. (27 DC)
Rnd 4: *2 DC in next st, 1 DC in next 2 sts, repeat from * around, sl st to 1st DC, ch 2. (36 DC)
Rnd 5: Working in BLO, DC in each st around. Sl st to 1st DC, ch 2. (36 DC)
Rnd 6-10: Working in Both Loops, DC in each st around. Sl st to 1st DC, ch 2. (36 DC)
Do not fasten off. Go on to making the ear flaps
First Earflap:
Row 1: DC in 8 sts, Leave the rest unworked, Ch up 2, turn. (8)
Row 2: DC2TOG, DC in 4 sts, DC2TOG, Ch up 2, turn. (6)
Row 3: DC2TOG, DC in 2 sts, DC2TOG, ch up 2, turn. (4)
Row 4: [DC2TOG] twice. Fasten off, weave in ends.
Skip approximately 10 sts on round 10 of hat, then go on to making the second earflap
Second Earflap:
Attach yarn to other side of hat (See video tutorial for specific location)
Row 1: Ch up 2, DC in 8 sts, Leave the rest unworked, Ch up 2, turn. (8)
Row 2: DC2TOG, DC in 4 sts, DC2TOG, Ch up 2, turn. (6)
Row 3: DC2TOG, DC in 2 sts, DC2TOG, ch up 2, turn. (4)
Row 4: [DC2TOG] twice. Fasten off, weave in ends.
Assembly Step:
Make braided tassels on each earflap (See video tutorial)
Make pom and sew to the top of hat. (Again, see video tutorial for visual instructions)
Weave in all ends.
Enjoy!
This post contains affiliate links, which means if you click on the link and buy from the linked websites, I will receive a small percentage of the value of your order. The amount you pay is not changed.
This post contains affiliate links, which I may be compensated for when you make a purchase. That means if you click on any link and buy from the linked websites, I will receive a small percentage of the value of your order. The amount you pay is not changed. Thank you for all your support in clicking the links in my blog!! You all are so amazing!! ~Nadia