FREE Written Crochet Pattern: Ghost Hat

FREE Written Crochet Pattern: Ghost Hat

Boo! Don’t be scared, it’s just Nasir wishing you a Spook-tacular Halloween!

This year was HARD! Each year I set my bar high to create a new family Halloween costume. It’s tradition. I plan it early on, start it early in the summer, order yarn months in advance… the whole nine yards. Life got in the way. I had another surgery this year in May, of course with complications. Was down all summer recovering. Nas started pre-school on top of his ABA therapy program. It all was a lot. So when the time came this year, I was only able to get one costume completed and it was this sweet ghost.

Nas has been telling me that he wants to be a ghost for Halloween for two months now. I finally found time to make him a costume. As simple as it is, he added his ever so subtle touches with his scary stance and silly poses! He’s fully committed to being the best ghost possible!

Below, please find the full instructions for this free crochet ghost hat pattern:

Make your own version just in time to scare your friends and family this spooky season!

**You can always contact me via Facebook if you have any problems with the pattern. I am happy to help if you have any questions along the way.
***These patterns are copyright YARNutopia © so PLEASE DO NOT COPY, SHARE, ADJUST OR RESELL MY PATTERN. I wrote and tested this pattern myself, from beginning to end. It took a lot of time and work, and I would really like to have it remain “my pattern.”
***You can sell anything you make from my patterns, please just link back to my website YARNutopia.com. Thank you!Teacher: Nadia Fuad
Video and Editing: Fuad Azmat (My Daddy)
Share your work on Facebook!
Add me on Snapchat: YARNutopia
Follow me on Instagram
Visit My Ravelry Store and add this to your Favorites!
Follow me on Twitter: @YARNutopia
Enjoy this video and subscribe to my channel on YouTube for more tutorials on how to crochet!
Leave a comment, and share with your friends!Designed by Nadia Fuad
You *may* sell items made from my pattern, but please reference my website YARNutopia.com.
Please do not copy, sell, and/or post this pattern and claim it as your own.
Materials you will need:
Get the supplies individually by clicking the links below

-White yarn (less than 500 yds) – I used Lion Brand Vanna’s Choice
-Black yarn (less than 50 yards)
Size 4.25mm Crochet Hook
Yarn Needle
Scissors

NOTES:
-Use a smaller hook to make these smaller
-Use a bigger hook to make these bigger
-You can use any size 4 medium, worsted weight yarn for this project
-You can check out yarnsub.com to see yarn substitutions that are equal to the yarn I used in this project.
-There is no video tutorial for this pattern.


Special stitches:
Ch(s): chain(s)
YO: Yarn Over
St(s): Stitch(es)
Sl st: slip stitch
SK: Skip
SC: Single Crochet
HDC: Half Double Crochet
DC: Double Crochet

Pattern:

There is no video tutorial to follow along with this pattern.

Hat:

Do not turn your work with this hat pattern.

With White or your main ghost color, Ch 2 or make magic circle

Rnd 1: 8 HDC in 2nd ch from hook or in magic circle, Sl st to first st, Ch 1, DO NOT TURN. (8)

Rnd 2: HDC in each st around, Sl st to first st, Ch 1

Rnd 3: 2 HDC in first st, 2 HDC in next st, HDC in next 4 sts, 2 HDC in last 2 sts, Sl st to first st, Ch 1. (12)

Rnd 4: 2 HDC in first st, 2 HDC in next st, HDC in next 8 sts, 2 HDC in last 2 sts, Sl st to first st, Ch 1. (16)

Rnd 5: 2 HDC in first st, 2 HDC in next st, HDC in next 12 sts, 2 HDC in last 2 sts, Sl st to first st, Ch 1. (20)

Rnds 6: 2 HDC in first st, 2 HDC in next st, HDC in next 16 sts, 2 HDC in last 2 sts, Sl st to first st, Ch 1. (24)

Rnd 7: HDC in each st around, Sl st to first st, Ch 1. (24)

Rnd 8: 2 HDC in first st, 2 HDC in each of the next 5 sts, HDC in next 12 sts, 2 HDC in each of the last 6 sts, Sl st to first st, Ch 1. (36)

Rnd 9:HDC in each st around, Sl st to first st, Ch 1. (36)

Rnd 10: 2 HDC in first st, 2 HDC in each of the next 8 sts, HDC in next 18 sts, 2 HDC in each of the last 9 sts, Sl st to first st, Ch 1. (54)

Rnd 11: HDC in each st around, Sl st to first st, Ch 1. (54)

Rnd 12: [2 HDC in first st, HDC in next 8 sts] 6 times, sl st to first st, Ch 1. (60)

Rnd 13: HDC in each st around, sl st to first st, Ch 1. (60)

Rnd 14: [2 HDC in first st, HDC in next 9 sts] 6 times, sl st to first st, Ch 1. (66)

Rnd 15: HDC in each st around, Sl st to first st, Ch 1. (66)

Rnd 16: [2 HDC in first st, HDC in next 10 sts] 6 times, sl st to first st, Ch 1. (72)

Rnds 17-28: HDC in each st around, Sl st to first st, Ch 1. (72)

Fasten off, weave in all ends.

Go on to making the eyes and mouth for the ghost

Eyes:

With black, Make 2.

Ch 2 or make magic circle

Rnd 1: 8 SC in 2nd ch from hook or in magic circle, sl st to first sc, do not turn. (8)

Rnd 2: Ch 2 (does not count as st), 2 DC in same st, [DC, HDC] in next st, 1 SC in next st, [HDC, DC] in next st, 2 DC in next st, [DC, HDC] in next st, 1 SC in next st, [HDC, DC] in next st, sl st to first st. Fasten off with long tail for sewing. (14)

Put a fleck of white in the eye using white yarn.

Make 2 eyes and sew them to the hat. Weave in all ends.

Mouth:

With Black, Make 1.

Ch 2 or make magic circle

Rnd 1: 8 SC in 2nd ch from hook or in magic circle, sl st to first sc, do not turn. (8)

Rnd 2: Ch 2 (does not count as st), 2 DC in same st, [DC, HDC] in next st, 2 SC in next st, [HDC, DC] in next st, 2 DC in next st, [DC, HDC] in next st, 2 SC in next st, [HDC, DC] in next st, sl st to first st. (14)

Rnd 3: [2 SC in next st, SC in next st] around, sl st to first st. Fasten off with long tail for sewing.

Sew to hat.

Weave in all ends.

Enjoy!


This post contains affiliate links, which I may be compensated for when you make a purchase. That means if you click on any link and buy from the linked websites, I will receive a small percentage of the value of your order. The amount you pay is not changed. Thank you for all your support in clicking the links in my blog!! You all are so amazing!! ~Nadia

The yarn provided for this pattern is courtesy of Lion Brand Yarn

FREE Written Crochet Pattern: Doll Clothes

FREE Written Crochet Pattern: Doll Clothes
There’s a movie out, there’s hype, and there’s also some great fun when it comes to the doll industry! I had to jump on the bandwagon for a moment and try my hand at doll clothes! Here are two simple outfits for you to try. My free patterns are both in this one blog so have fun!
I purchased my dolls from Amazon and here are the links if you want to purchase them too!

Barbie Doll

Ken Doll

**You can always contact me via Facebook if you have any problems with the pattern. I am happy to help if you have any questions along the way.
***These patterns are copyright YARNutopia © so PLEASE DO NOT COPY, SHARE, ADJUST OR RESELL MY PATTERN. I wrote and tested this pattern myself, from beginning to end. It took a lot of time and work, and I would really like to have it remain “my pattern.”
***You can sell anything you make from my patterns, please just link back to my website YARNutopia.com. Thank you!Teacher: Nadia Fuad
Video and Editing: Fuad Azmat (My Daddy)
Share your work on Facebook!
Add me on Snapchat: YARNutopia
Follow me on Instagram
Visit My Ravelry Store and add this to your Favorites!
Follow me on Twitter: @YARNutopia
Enjoy this video and subscribe to my channel on YouTube for more tutorials on how to crochet!
Leave a comment, and share with your friends!Designed by Nadia Fuad
You *may* sell items made from my pattern, but please reference my website YARNutopia.com.
Please do not copy, sell, and/or post this pattern and claim it as your own.
Materials you will need:
Get the supplies individually by clicking the links below
Cotlin DK Weight in color Cyan by KnitPicks/WeCrochet
Willow Summer yarn in Geranium
NOTES:
-Use a smaller hook to make these smaller
-Use a bigger hook to make these bigger
-You can use any size 4 medium, worsted weight yarn for this project
-You can check out yarnsub.com to see yarn substitutions that are equal to the yarn I used in this project.
-There is no video tutorial for this pattern.


Special stitches:
Ch(s): chain(s)
YO: Yarn Over
St(s): Stitch(es)
Sl st: slip stitch
SK: Skip
SC: Single Crochet
HDC: Half Double Crochet
DC: Double Crochet

Pattern:

There is no video tutorial to follow along with this pattern.

Dress:

Ch 27, sl st to first ch to form a ring, Ch 1

Rnd 1: HDC in each ch around, Sl st to first st, Ch 1, TURN. (26)

Rnd 2: [2 HDC in next st, HDC in next 4 sts] 5 times, HDC in last st, Sl st to first st, Ch 1, Turn. (31)

Rnd 3: [2 HDC in next st, HDC in next 5 sts] 5 times, HDC in last st, Sl st to first st, Ch 1, Turn. (36)

Rnd 4: [2 HDC in next st, HDC in next 6 sts] 5 times, HDC in last st, Sl st to first st, Ch 1, Turn. (41)

Rnd 5: [2 HDC in next st, HDC in next 7 sts] 5 times, HDC in last st, Sl st to first st, Ch 1, Turn. (46)

Rnds 6-12: HDC in each st around, Sl st to first st, Ch 1, Turn. (46)

Fasten off after Rnd 12 or continue to repeat to make the dress longer and fasten off when the dress is as long as you want it to be.
Flip the skirt over and work on the foundation row of the base of Rnd 1 to make the top part of the dress.

Attach yarn to any st on the base of Rnd 1 on your foundation row of your work.

Row 1: HDC in first st where you attached your yarn, HDC2TOG, HDC in each st until 3 sts remain, HDC2TOG, HDC in last st, CH 3, Do not Sl st, Turn. (24)

Row 2: HDC in 2nd Ch from hook and next ch, HDC in each st across, Ch 1, Turn. (26)

Rows 3-6: HDC in each st across, Ch 1, Turn. (26)

Row 7: (Making the arm holes), HDC in first 4 sts, Ch 3, Sk 3 sts, HDC in next 10 sts, Ch 3, Sk 3 sts, HDC in last 6 sts, Ch 1, Turn. (20 sts, 2 ch 3 sps)

Row 8: HDC in each St and each ch across. Fasten off, Weave in all ends. (26)

Sew velcro on the back opening of the dress for closure.


Shirt:

Ch 20

Row 1: HDC in 2nd Ch and each ch across, Ch 1, Turn. (19)
Rows 2-4: HDC in each St across, Ch 1, Turn. (19)
Row 5: HDC in 12 sts, Ch 4, Sk 4 sts, HDC in last 3 sts, Ch 1, Turn. (15 sts, 1 Ch 4 sp)
Row 6: HDC in each st and each ch across, Ch 1, Turn. (19)
Rows 7-15: HDC in each st across, Ch 1, Turn. (19)
Row 16: HDC in 3 sts, Ch 4, Sk 4 sts, HDC in last 12 sts, Ch 1, Turn. (15 sts, 1 Ch 4 sp)
Row 17: Repeat Row 6
Rows 18-23: HDC in each st across, Ch 1, Turn.
Fasten off after Row 23.
Weave in all ends.
Add Velcro to back flap to close back of shirt.

Enjoy!

This post contains affiliate links, which I may be compensated for when you make a purchase. That means if you click on any link and buy from the linked websites, I will receive a small percentage of the value of your order. The amount you pay is not changed. Thank you for all your support in clicking the links in my blog!! You all are so amazing!! ~Nadia

The yarn provided for this pattern is courtesy of Knitpicks/WeCrochet and Herrschner’s (Willow Yarns)

FREE Crochet Video Tutorial: Beach Vibes Bucket Hat

FREE Crochet Video Tutorial: Beach Vibes Bucket Hat
Hot off my hook is my Beach Vibes Bucket Hat! Just in time for the best days of summer! Lazy days at the beach, lounging poolside, or cruising around with the windows down, this hat brings all the vibes!
It’s the perfect boho-style fashion headwear to bring your warm weather wardrobe up a cool 😎 trendy notch. My easy to make Beach Vibes Bucket Hat is your accessory passport to a fun energy summer, and you can pick colors that reflect your spirit and flair! I chose fibers in polyester and cotton by Lion Brand Yarn and Willow Yarns to bring mine to life. Are you ready to do the same!? Go grab your hook and get started on yours now! Can’t wait to see them all!
Follow along to this video tutorial to learn how to make this hat:

My dad will continue to be the videographer, editor, and photographer for our videos when I move away.
Support YARNutopia today so we can continue to bring you clear, quality crochet tutorials even after I move into my new home!
There will be an added expense of more travel and hopefully this won’t deter our ability to provide consistent videos on a weekly basis.

Donate Button with Credit Cards
**You can always contact me via Facebook if you have any problems with the pattern. I am happy to help if you have any questions along the way.
***These patterns are copyright YARNutopia © so PLEASE DO NOT COPY, SHARE, ADJUST OR RESELL MY PATTERN. I wrote and tested this pattern myself, from beginning to end. It took a lot of time and work, and I would really like to have it remain “my pattern.”
***You can sell anything you make from my patterns, please just link back to my website YARNutopia.com. Thank you!
Teacher: Nadia Fuad
Video and Editing: Fuad Azmat (My Daddy)
Share your work on Facebook!
Add me on Snapchat: YARNutopia
Follow me on Instagram
Visit My Ravelry Store and add this to your Favorites!
Follow me on Twitter: @YARNutopia
Enjoy this video and subscribe to my channel on YouTube for more tutorials on how to crochet!
Leave a comment, and share with your friends!Designed by Nadia Fuad
You *may* sell items made from my pattern, but please reference my website YARNutopia.com.
Please do not copy, sell, and/or post this pattern and claim it as your own.
Materials you will need:
Get the supplies individually by clicking the links below
–Size 4 Medium Worsted Weight yarn (I used Lion Brand Yarn Basic Stitch  color: Baby Pink (Rnd 2 of square), Lion Brand Vanna’s Choice Pink Grapefruit (Rnd 3 of the square), Willow Yarns Summer in Waterfall (main color), and Lion Brand Yarn Modern Baby color: Yellow (middle of square))
Size H-5.00mm Crochet Hook
Yarn Needle
Scissors
NOTES:
-Use a smaller hook to make these smaller
-Use a bigger hook to make these bigger
-You can use any size 4 medium, worsted weight yarn for this project
-You can check out yarnsub.com to see yarn substitutions that are equal to the yarn I used in this project.
-There is no video tutorial for this pattern yet.
-To make this hat smaller, I would recommend leaving off the last round of the square and sewing the squares together after round 3 of the squares are done. OR you could use a smaller crochet hook to make the stitching tighter and smaller.Special stitches:
Ch(s): chain(s)
YO: Yarn Over
St(s): Stitch(es)
Sl st: slip stitch
SK: Skip
SC: Single Croche
DC: Double Crochet
3 DC cluster: [YO, insert hook, YO, pull through, YO pull through 2 loops] 3 times, YO pull through all loops on hook. Stitch made.

This post contains affiliate links, which I may be compensated for when you make a purchase. That means if you click on any link and buy from the linked websites, I will receive a small percentage of the value of your order. The amount you pay is not changed. Thank you for all your support in clicking the links in my blog!! You all are so amazing!! ~Nadia

The yarn provided for this pattern is courtesy of Lion Brand Yarn and Herrschner’s (Willow Yarns)

FREE Written Crochet Pattern: Beach Vibes Bucket Hat

FREE Written Crochet Pattern: Beach Vibes Bucket Hat
Hot off my hook is my Beach Vibes Bucket Hat! Just in time for the best days of summer! Lazy days at the beach, lounging poolside, or cruising around with the windows down, this hat brings all the vibes!
It’s the perfect boho-style fashion headwear to bring your warm weather wardrobe up a cool 😎 trendy notch. My easy to make Beach Vibes Bucket Hat is your accessory passport to a fun energy summer, and you can pick colors that reflect your spirit and flair! I chose fibers in polyester and cotton by Lion Brand Yarn and Willow Yarns to bring mine to life. Are you ready to do the same!? Go grab your hook and get started on yours now! Can’t wait to see them all!
My dad will continue to be the videographer, editor, and photographer for our videos when I move away.
Support YARNutopia today so we can continue to bring you clear, quality crochet tutorials even after I move into my new home!
There will be an added expense of more travel and hopefully this won’t deter our ability to provide consistent videos on a weekly basis.

Donate Button with Credit Cards
**You can always contact me via Facebook if you have any problems with the pattern. I am happy to help if you have any questions along the way.
***These patterns are copyright YARNutopia © so PLEASE DO NOT COPY, SHARE, ADJUST OR RESELL MY PATTERN. I wrote and tested this pattern myself, from beginning to end. It took a lot of time and work, and I would really like to have it remain “my pattern.”
***You can sell anything you make from my patterns, please just link back to my website YARNutopia.com. Thank you!Teacher: Nadia Fuad
Video and Editing: Fuad Azmat (My Daddy)
Share your work on Facebook!
Add me on Snapchat: YARNutopia
Follow me on Instagram
Visit My Ravelry Store and add this to your Favorites!
Follow me on Twitter: @YARNutopia
Enjoy this video and subscribe to my channel on YouTube for more tutorials on how to crochet!
Leave a comment, and share with your friends!Designed by Nadia Fuad
You *may* sell items made from my pattern, but please reference my website YARNutopia.com.
Please do not copy, sell, and/or post this pattern and claim it as your own.
Materials you will need:
Get the supplies individually by clicking the links below
–Size 4 Medium Worsted Weight yarn (I used Lion Brand Yarn Basic Stitch  color: Baby Pink (Rnd 2 of square), Lion Brand Vanna’s Choice Pink Grapefruit (Rnd 3 of the square), Willow Yarns Summer in Waterfall (main color), and Lion Brand Yarn Modern Baby color: Yellow (middle of square))
Size H-5.00mm Crochet Hook
Yarn Needle
Scissors
NOTES:
-Use a smaller hook to make these smaller
-Use a bigger hook to make these bigger
-You can use any size 4 medium, worsted weight yarn for this project
-You can check out yarnsub.com to see yarn substitutions that are equal to the yarn I used in this project.
-There is no video tutorial for this pattern yet.
-To make this hat smaller, I would recommend leaving off the last round of the square and sewing the squares together after round 3 of the squares are done. OR you could use a smaller crochet hook to make the stitching tighter and smaller.

Special stitches:
Ch(s): chain(s)
YO: Yarn Over
St(s): Stitch(es)
Sl st: slip stitch
SK: Skip
SC: Single Croche
DC: Double Crochet
3 DC cluster: [YO, insert hook, YO, pull through, YO pull through 2 loops] 3 times, YO pull through all loops on hook. Stitch made.


Pattern:

There is no video tutorial to follow along with this pattern.

Square:

I changed color every row but you do not have to. I am not writing the pattern with the color changes.
Make 5 of the squares

Start with a Magic Circle OR Ch 3

Rnd 1: 12 DC in MC or 12 DC in 3rd Ch from hook, Sl st to first st, fasten off, change color. (12)

Rnd 2: Attach yarn to any stitch, Ch 2, 3 DC cluster in same st, * Ch 2, 3 DC cluster in next st, repeat from * around ending with Ch 2, Sl st to first st, fasten off, change color. (12)

Rnd 3: In any Ch sp, Ch 2, [3DC, Ch 2, 3 DC] in same sp, * Ch 1, 3 DC in next ch sp, Ch 1, 3 DC in next ch sp, Ch 1, [3 DC, ch 2, 3 DC] in next ch sp, repeat from * around, sl st to first st, fasten off, change color.

Rnd 4: Attach yarn to Ch 2 corner sp, Ch 2, [3 DC, Ch 2, 3 DC] in same sp, * [Ch 1, 3 DC in next Ch sp] 3 times, Ch 1, [3 DC, Ch 2, 3 DC] in next corner sp, repeat from * around, sl st to first st, fasten off.

Make sure to make 5 squares, then sew them all together with 1 square in the middle and 1 square on each side of the middle square, then sew down the sides to make a bucket hat shape. Sew with the Whip Stitch using a contrasting color for the sewing.

Brim:

Attach yarn to a RIGHT corner ch 2 sp of any square on the edge to start the brim.

Ch 2 (does not count as stitch)

Rnd 1: 3 DC in same sp, * Ch 1, 3 DC in next ch sp, repeat from * around, sl st to first st, Ch 2, do not turn.

Rnd 2: 3 DC in same sp, Ch 1, 3 DC in SAME sp, * [Ch 1, 3 DC in next ch sp] 5 times, Ch 1, [3 DC, Ch 1, 3 DC] in next sp, repeat from * around, sl st to first st, Ch 2. (increase made)

Rnd 3: 3 DC in same sp, * Ch 1, 3 DC in next ch sp, repeat from * around, sl st to first st, Ch 2, do not turn.

Rnds 4-5: Repeat Rnd 3.

Fasten off, weave in all ends.

Enjoy!

This post contains affiliate links, which I may be compensated for when you make a purchase. That means if you click on any link and buy from the linked websites, I will receive a small percentage of the value of your order. The amount you pay is not changed. Thank you for all your support in clicking the links in my blog!! You all are so amazing!! ~Nadia

The yarn provided for this pattern is courtesy of Lion Brand Yarn and Herrschner’s (Willow Yarns)

FREE Written Crochet Pattern: Starburst Garden Headband

FREE Written Crochet Pattern: Starburst Garden Headband
This cute look is perfect for the free spirit and lover of beaches! It gives you that laid-back style but can also be that dressy accessory to a free-flow style. Guaranteed to liven up the tropical sundress, your graphic tees, or a flowing kaftan…no matter what your style, adding a Starburst Garden Headband will elevate every outfit you wear!
My dad will continue to be the videographer, editor, and photographer for our videos when I move away.
Support YARNutopia today so we can continue to bring you clear, quality crochet tutorials even after I move into my new home!
There will be an added expense of more travel and hopefully this won’t deter our ability to provide consistent videos on a weekly basis.

Donate Button with Credit Cards
**You can always contact me via Facebook if you have any problems with the pattern. I am happy to help if you have any questions along the way.
***These patterns are copyright YARNutopia © so PLEASE DO NOT COPY, SHARE, ADJUST OR RESELL MY PATTERN. I wrote and tested this pattern myself, from beginning to end. It took a lot of time and work, and I would really like to have it remain “my pattern.”
***You can sell anything you make from my patterns, please just link back to my website YARNutopia.com. Thank you!Teacher: Nadia Fuad
Video and Editing: Fuad Azmat (My Daddy)
Share your work on Facebook!
Add me on Snapchat: YARNutopia
Follow me on Instagram
Visit My Ravelry Store and add this to your Favorites!
Follow me on Twitter: @YARNutopia
Enjoy this video and subscribe to my channel on YouTube for more tutorials on how to crochet!
Leave a comment, and share with your friends!Designed by Nadia Fuad
You *may* sell items made from my pattern, but please reference my website YARNutopia.com.
Please do not copy, sell, and/or post this pattern and claim it as your own.Materials you will need:
Get the supplies individually by clicking the links below
–Size 4 Medium Worsted Weight yarn (I used Lion Brand Yarn Basic Stitch Anti-Pilling color: Grass, Baby Soft color: Sweet Pea, and Modern Baby color: Yellow)
Size E-3.50mm Crochet Hook
Yarn Needle
Scissors

NOTES:
-Use a smaller hook to make these smaller
-Use a bigger hook to make these bigger
-You can use any size 4 medium, worsted weight yarn for this project
-You can check out yarnsub.com to see yarn substitutions that are equal to the yarn I used in this project.
-There is no video tutorial for this pattern

Special stitches:
Ch(s): chain(s)
YO: Yarn Over
St(s): Stitch(es)
Sl st: slip stitch
SK: Skip
SC: Single Crochet
HDC: Half Double Crochet
DC: Double Crochet
DC2TOG: Double Crochet 2 sts together
DC3TOG: Double Crochet 3 sts together


Pattern:

There is no video tutorial to follow along with this pattern.

Square:

I changed color every row but you do not have to. I am not writing the pattern with the color changes.
Make 5 of the squares

Start with a Magic Circle OR Ch 3

Rnd 1: 24 DC in MC or 24 DC in 3rd Ch from hook, Sl st to first st, fasten off, change color.

Rnd 2: Attach yarn to any stitch, Ch 2, [DC3TOG, Ch 2] 8 times, Sl st to first st. Fasten off, change color.

Rnd 3: In any Ch sp, Ch 2, [3DC, Ch 2, 3 DC] in same sp, * 5 DC in next Ch sp, [3 DC, Ch 2, 3 DC] in next ch sp, repeat from * around, sl st to first st, Fasten off, weave in all ends.

Make sure to make 5 squares, then sew them all together in a line.

Attach yarn to short side of one side of headband to make the strap

Attach yarn to the first stitch on one side of the square, Ch 2 (does not count as a stitch)

Row 1: DC in each st across, Ch 2, Turn. (11 sts)

Row 2: DC2TOG, DC in each st until 2 sts remain, DC2TOG, Ch 2, Turn. (9)

Row 3: Repeat Row 2. (7)

Row 4: Repeat Row 2. (5)

Row 5: Repeat Row 2. (3)

Row 6: DC3TOG, Continue to Ch 31
Fasten off and cut tail short after pulling knot tight.

Repeat same concept for other side of headband.
Fasten off and weave in all ends.
See photo below to see stitches.


Enjoy!

This post contains affiliate links, which I may be compensated for when you make a purchase. That means if you click on any link and buy from the linked websites, I will receive a small percentage of the value of your order. The amount you pay is not changed. Thank you for all your support in clicking the links in my blog!! You all are so amazing!! ~Nadia

The yarn provided for this pattern is courtesy of Lion Brand Yarn.

FREE Written Crochet Pattern: Rainbow Summer Shorts

FREE Written Crochet Pattern: Rainbow Summer Shorts
June is Pride Month, and in honor of this annual occasion, I have created Rainbow Shorts!! This pair of shorts is perfect for wearing as a swimsuit bottom cover-up or cute plain shorts paired with a summer top. I have seen increased crochet trends, and one of the most fun patterns I have seen is crocheted shorts. These shorts follow a simple pattern to create this rainbow look. You can apply this same pattern to your favorite colors and create stripes in whatever fits your vibe. You can also use one solid color which can also be fun!
I have provided patterns in sizes from adult children so you can make a “Mommy and Me” or “Daddy and Me” set! I used Worsted Weight (size 4 medium) scrap yarns to create these fabulous shorts, but you can use any yarn to make yours. These are quite versatile and very fashionable! Check out my written pattern and make sure to also follow the video tutorial to make your pair today! Be sure to post and tag me when you make yours! I cannot wait to see what everyone creates! We at YARNutopia are an ally and work to achieve a world where every person in our LGBTQ+ community can live freely and safely. Hatred and bigotry will not be tolerated. For us, Pride is every day.
My dad will continue to be the videographer, editor, and photographer for our videos when I move away.
Support YARNutopia today so we can continue to bring you clear, quality crochet tutorials even after I move into my new home!
There will be an added expense of more travel and hopefully this won’t deter our ability to provide consistent videos on a weekly basis.

Donate Button with Credit Cards
**You can always contact me via Facebook if you have any problems with the pattern. I am happy to help if you have any questions along the way.
***These patterns are copyright YARNutopia © so PLEASE DO NOT COPY, SHARE, ADJUST OR RESELL MY PATTERN. I wrote and tested this pattern myself, from beginning to end. It took a lot of time and work, and I would really like to have it remain “my pattern.”
***You can sell anything you make from my patterns, please just link back to my website YARNutopia.com. Thank you!Teacher: Nadia Fuad
Video and Editing: Fuad Azmat (My Daddy)
Share your work on Facebook!
Add me on Snapchat: YARNutopia
Follow me on Instagram
Visit My Ravelry Store and add this to your Favorites!
Follow me on Twitter: @YARNutopia
Enjoy this video and subscribe to my channel on YouTube for more tutorials on how to crochet!
Leave a comment, and share with your friends!

Designed by Nadia Fuad
You *may* sell items made from my pattern, but please reference my website YARNutopia.com.
Please do not copy, sell, and/or post this pattern and claim it as your own.

Materials you will need:
Get the supplies individually by clicking the links below
–Size 4 Medium Worsted Weight yarn (I used scrap yarns for this project)
Size H-5.00mm Crochet Hook
Yarn Needle
Scissors

NOTES:
-Use a smaller hook to make these smaller
-Use a bigger hook to make these bigger
-You can use any size 4 medium, worsted weight yarn for this project
-You can check out yarnsub.com to see yarn substitutions that are equal to the yarn I used in this project.
-The shorts I demonstrate in the video tutorial and what I’ve written the pattern for are for a US size 4 Toddler. The stitch counts don’t necessarily matter as long as you do measurements as you go.


Special stitches:
Ch(s): chain(s)
YO: Yarn Over
St(s): Stitch(es)
Sl st: slip stitch
SK: Skip
SC: Single Crochet
DC: Double Crochet
FPDC: Front Post Double Crochet
BPDC: Back Post Double Crochet


Pattern:

If you have any confusion or difficulty with reading this pattern, please watch the video tutorial that is linked above in this blog post to have visual instructions.

Shorts:

I changed color every row but you do not have to. I am not writing the pattern with the color changes.

Ch any EVEN number that measures around the hips and waist of the subject you are making these for
I chained 70 for the small toddler size and I chained 100 for the mommy size for myself.

Without twisting chain, sl st to first ch to form a large circle.

Rnd 1: (RS) Ch 2 (does not count as anything), DC in each Ch around, Sl st to first st. TURN (70)

Rnd 2: (WS) Ch 2, * FPDC on next st, BPDC on next st, repeat from * around, Sl st to first st. TURN

Rnd 3: Repeat Rnd 2

Rnd 4: Ch 2, DC in each st around, Sl st to first DC, TURN.

Rnd 5: Ch 2, 2 DC in first st, DC in each st until 1 st remains, 2 DC in last st, sl st to first st. TURN. (72)

Rnd 6-13 or however long you need to cover the backside (butt): Repeat Rnd 5 (increase repeating Rnd 5 until your piece comes to the base of the backside of your subject) for the Mommy size I made, I did 20 rnds of Rnd 5, for the Toddler size, I did 9 total increase rnds. Once your piece is as long as you want and you’re ready to make the leg holes, go onto Rnd 14 instructions.

First Leg Hole:

Rnd 14: Mark the halfway point from the back of your work to the front so you know where each leg hole goes (see video tutorial for visual instructions on location) Ch 12, Sl st to the st that the Stitch Marker is in, Ch 2, DC in each st around and in each Ch of the first leg hole, sl st to first st, TURN.

Rnd 15: Ch 2, DC in each st around leg hole, Sl st to first st. TURN.

Rnds 16-18: Repeat Rnd 15 for however long you want your leg to be.

Fasten off, weave in ends. Move onto 2nd Leg hole.

2nd Leg Hole

Rnd 14: Attach yarn to any st, Ch 2, DC in each st around and at the base of each foundation chain between leg holes (see video tutorial for visual instructions), Sl st to first st, TURN.

Rnd 15: Ch 2, DC in each st around leg hole, Sl st to first st. TURN.

Rnds 16-18: Repeat Rnd 15 for however long you want your leg to be.

Fasten off, weave in ends.

Drawstring:

Chain an amount that is DOUBLE your original chain length for the waistband of your shorts. Weave it in and out of Rnd 1.

Enjoy!

This post contains affiliate links, which I may be compensated for when you make a purchase. That means if you click on any link and buy from the linked websites, I will receive a small percentage of the value of your order. The amount you pay is not changed. Thank you for all your support in clicking the links in my blog!! You all are so amazing!! ~Nadia

The yarn provided for this pattern is courtesy of Lion Brand Yarn, WeCrochet, and Paintbox Yarns


FREE Crochet Video Tutorial: Rainbow Summer Shorts

FREE Crochet Video Tutorial: Rainbow Summer Shorts
June is Pride Month, and in honor of this annual occasion, I have created Rainbow Shorts!! This pair of shorts is perfect for wearing as a swimsuit bottom cover-up or cute plain shorts paired with a summer top. I have seen increased crochet trends, and one of the most fun patterns I have seen is crocheted shorts. These shorts follow a simple pattern to create this rainbow look. You can apply this same pattern to your favorite colors and create stripes in whatever fits your vibe. You can also use one solid color which can also be fun!
I have provided patterns in sizes from adult children so you can make a “Mommy and Me” or “Daddy and Me” set! I used Worsted Weight (size 4 medium) scrap yarns to create these fabulous shorts, but you can use any yarn to make yours. These are quite versatile and very fashionable! Check out my written pattern and make sure to also follow the video tutorial to make your pair today! Be sure to post and tag me when you make yours! I cannot wait to see what everyone creates! We at YARNutopia are an ally and work to achieve a world where every person in our LGBTQ+ community can live freely and safely. Hatred and bigotry will not be tolerated. For us, Pride is every day.


Follow along with this video tutorial to learn how to make these shorts:


My dad will continue to be the videographer, editor, and photographer for our videos even if we don’t live together.
Support YARNutopia today so we can continue to bring you clear, quality crochet tutorials even after I move into my new home!
There will be an added expense of more travel and hopefully this won’t deter our ability to provide consistent videos on a weekly basis.

Donate Button with Credit Cards

**You can always contact me via Facebook if you have any problems with the pattern. I am happy to help if you have any questions along the way.
***These patterns are copyright YARNutopia © so PLEASE DO NOT COPY, SHARE, ADJUST OR RESELL MY PATTERN. I wrote and tested this pattern myself, from beginning to end. It took a lot of time and work, and I would really like to have it remain “my pattern.”
***You can sell anything you make from my patterns, please just link back to my website YARNutopia.com. Thank you!

Teacher: Nadia Fuad
Video and Editing: Fuad Azmat (My Daddy)
Share your work on Facebook!
Add me on Snapchat: YARNutopia
Follow me on Instagram
Visit My Ravelry Store and add this to your Favorites!
Follow me on Twitter: @YARNutopia
Enjoy this video and subscribe to my channel on YouTube for more tutorials on how to crochet!
Leave a comment, and share with your friends!

Designed by Nadia Fuad
You *may* sell items made from my pattern, but please reference my website YARNutopia.com.
Please do not copy, sell, and/or post this pattern and claim it as your own.

Materials you will need:
Get the supplies individually by clicking the links below
–Size 4 Medium Worsted Weight yarn (I used scrap yarns for this project
-Stitch Marker
Size H-5.00mm Crochet Hook
Yarn Needle
Scissors

NOTES:
-Use a smaller hook to make these smaller
-Use a bigger hook to make these bigger
-You can use any size 4 medium, worsted weight yarn for this project
-You can check out yarnsub.com to see yarn substitutions that are equal to the yarn I used in this project.
-The shorts I demonstrate in the video tutorial and what I’ve written the pattern for are for a US size 4 Toddler. The stitch counts don’t necessarily matter as long as you do measurements as you go. Size 4 Toddler is 24 inches around hips/waist. Size XL Mommy size is about 40 inches around hips/waist

Special stitches:
Ch(s): chain(s)
YO: Yarn Over
St(s): Stitch(es)
Sl st: slip stitch
SK: Skip
SC: Single Crochet
DC: Double Crochet
FPDC: Front Post Double Crochet
BPDC: Back Post Double Crochet


This post contains affiliate links, which I may be compensated for when you make a purchase. That means if you click on any link and buy from the linked websites, I will receive a small percentage of the value of your order. The amount you pay is not changed. Thank you for all your support in clicking the links in my blog!! You all are so amazing!! ~Nadia

The yarn provided for this pattern is courtesy of Lion Brand Yarn, WeCrochet, and Paintbox Yarns


FREE Written Crochet Pattern: Off to the Market Bag

FREE Written Crochet Pattern: Off to the Market Bag

I love this season! The season of fresh flowers and farmer’s markets. The time of the year when we can casually stroll through the booths of fresh veggies and locally grown produce and fill ourselves up with their goodness. I made my Off To The Market Bag for this exact reason. It’s roomy and airy making it perfect to handle lots of goodies you find-long enough for zucchini and cucumber and a pattern perfect for keeping in berries and other small items as you breeze through the market. I added a cross-body strap to help with bearing the weight of all your finds. Besides, it looks awesome, too! Now, before you hit the farmer’s markets in your area, why not make yourself one of these today?

My dad will continue to be the videographer, editor, and photographer for our videos when I move away.

Support YARNutopia today so we can continue to bring you clear, quality crochet tutorials even after I move into my new home!
There will be an added expense of more travel and hopefully this won’t deter our ability to provide consistent videos on a weekly basis.

Donate Button with Credit Cards

**You can always contact me via Facebook if you have any problems with the pattern. I am happy to help if you have any questions along the way.
***These patterns are copyright YARNutopia © so PLEASE DO NOT COPY, SHARE, ADJUST OR RESELL MY PATTERN. I wrote and tested this pattern myself, from beginning to end. It took a lot of time and work, and I would really like to have it remain “my pattern.”
***You can sell anything you make from my patterns, please just link back to my website YARNutopia.com. Thank you!

Teacher: Nadia Fuad
Video and Editing: Fuad Azmat (My Daddy)
Share your work on Facebook!
Add me on Snapchat: YARNutopia
Follow me on Instagram
Visit My Ravelry Store and add this to your Favorites!
Follow me on Twitter: @YARNutopia
Enjoy this video and subscribe to my channel on YouTube for more tutorials on how to crochet!
Leave a comment, and share with your friends!

Designed by Nadia Fuad
You *may* sell items made from my pattern, but please reference my website YARNutopia.com.
Please do not copy, sell, and/or post this pattern and claim it as your own.

Materials you will need:

Get the supplies individually by clicking the links below
-Any cotton yarn (use 2 strands held together) or use 1 strand of bulky yarn
Size J-6.00mm Crochet Hook
Yarn Needle
Scissors

NOTES:
-Use a smaller hook to make these smaller
-Use a bigger hook to make these bigger
-You can use any size 4 medium, worsted weight yarn for this project (Use 2 strands held together to make it thicker, or use size 5 bulky yarn to make this bag)
-This bag is approximately 12 inches wide and 16 inches deep.
-You can check out yarnsub.com to see yarn substitutions that are equal to the yarn I used in this project.

Special stitches:
Ch(s): chain(s)
YO: Yarn Over
St(s): Stitch(es)
Sl st: slip stitch
SC: Single Crochet
DC: Double Crochet


Pattern:

There is no video tutorial for this pattern.

Using 2 strands of yarn held together to make a bulky yarn, OR use bulky yarn

Start with ch 3, DO NOT turn your work after each round.

Rnd 1:  [DC, Ch 1] 6 times in 3rd Ch from hook, sl st to first st. (6)

Rnd 2:  sl st into ch 1 sp, Ch 2 (does not count as st), [DC ch 2, DC] in each Ch 1 sp around, sl st to first st. (12)

Rnd 3: Sl st into Ch 2 sp, Ch 3 ( counts as st), [DC, Ch 2, 2 DC] in same ch sp, [2 DC, Ch 2, 2 DC] in each ch sp around, sl st to beginning ch 3 st. (24)

Rnd 4: Sl st BACKWARDS into the gap between the groupings, Ch 3 (counts as st), DC in same gap, *[2 DC, Ch 2, 2 DC] in next Ch 2 sp, 2 DC in gap between groupings, repeat from * around, sl st to beginning ch 3 st. (36)

Rnd 5: Sl st between the 2 first sts, Ch 5 (counts as DC + Ch 2 sp), DC in same spot between the DC sts from previous round, * [2 DC, Ch 2, 2 DC] in next ch 2 sp, [DC, Ch 2, DC] between the next 2 DC grouping from previous round, repeat from * around, ending with [2 DC, Ch 2, 2 DC] in last Ch 2 sp, Sl st to 3rd ch of beg. ch 5. (36)

Rnd 6: Sl st in ch 2 sp, Ch up 5 (counts as DC + Ch 2 sp), DC in same ch 2 sp, *[2 DC, Ch 2, 2 DC] in next Ch 2 sp, [DC, Ch 2, DC] in next ch 2 sp, repeat from * around, Sl st to 3rd Ch of beg. ch 5. (36)

Rnd 7: Repeat Rnd 6. (36)

Rnd 8: Sl st in ch 2 sp, Ch up 3 (counts as st), [DC, Ch 2, 2 DC] in same ch 2 sp, *[2 DC, Ch 2, 2 DC] in next Ch 2 sp, repeat from * around, Sl st to beg. ch 3 st. (48)

Rnd 9: Sl st in ch 2 sp, Ch up 3 (counts as st), [DC, Ch 2, 2 DC] in same ch 2 sp, * Ch 1 [2 DC, Ch 2, 2 DC] in next Ch 2 sp, repeat from * around, Sl st to beg. ch 3 st. (48)

Rnd 10: Sl st in ch 2 sp, Ch up 3 (counts as st), [DC, Ch 2, 2 DC] in same ch 2 sp, * Ch 2 [2 DC, Ch 2, 2 DC] in next Ch 2 sp, repeat from * around, Sl st to beg. ch 3 st. (48)

Rnds 11-20: Repeat Rnd 10. (48)

Rnd 21: Ch 1, SC in same st, SC in next st, * SC in ch 2 sp, SC in next 2 sts, 2 SC in ch 2 sp, SC in next 2 sts, repeat from * around, sl st to first st, ch 1, do not turn.

Rnds 22-25: SC in each st around, sl st to first st, Ch 1.

After Rnd 25, Fasten off, weave in all ends.

Strap:

Use 2 strands of yarn at the same time or use 1 strand of bulky yarn.
Start with long strand for sewing and then make your slip knot. You will use the long strand to sew to the bag after the strap is finished.

Ch 7

Row 1: HDC in 2nd Ch from hook and across, Ch 1, Turn. (6)

Rows 2-70: HDC in each st across, Ch 1, Turn. (6)

(you can make your strap handle as long or as short as you want)

Fasten off with long tail for sewing, Sew handle to bag.

Weave in any extra loose ends.

Enjoy!

This post contains affiliate links, which I may be compensated for when you make a purchase. That means if you click on any link and buy from the linked websites, I will receive a small percentage of the value of your order. The amount you pay is not changed. Thank you for all your support in clicking the links in my blog!! You all are so amazing!! ~Nadia

FREE Written Crochet Pattern: Hanging Planter Basket

FREE Written Crochet Pattern: Hanging Planter Basket

In the recent past, I have become quite the plant enthusiast.  In keeping with my new passion, I am always on the lookout for new plants and ways to showcase them. I saw these hanging baskets pop up on my plant pages, and I knew it would be something that I could make myself. This is the result of my “can I make this myself” discovery. So many of us crocheters catch ourselves saying that from time to time when we see projects like these. Below, find the written pattern to this hanging planter basket. I hope it is as easy to whip up as it was for me! Also, please note, you don’t have to be a plant enthusiast to enjoy these baskets. You can find so many uses for these around your home. Enjoy!


My dad will continue to be the videographer, editor, and photographer for our videos when I move away.

Support YARNutopia today so we can continue to bring you clear, quality crochet tutorials even after I move into my new home!
There will be an added expense of more travel and hopefully this won’t deter our ability to provide consistent videos on a weekly basis.

Donate Button with Credit Cards

**You can always contact me via Facebook if you have any problems with the pattern. I am happy to help if you have any questions along the way.
***These patterns are copyright YARNutopia © so PLEASE DO NOT COPY, SHARE, ADJUST OR RESELL MY PATTERN. I wrote and tested this pattern myself, from beginning to end. It took a lot of time and work, and I would really like to have it remain “my pattern.”
***You can sell anything you make from my patterns, please just link back to my website YARNutopia.com. Thank you!

Teacher: Nadia Fuad
Video and Editing: Fuad Azmat (My Daddy)
Share your work on Facebook!
Add me on Snapchat: YARNutopia
Follow me on Instagram
Visit My Ravelry Store and add this to your Favorites!
Follow me on Twitter: @YARNutopia
Enjoy this video and subscribe to my channel on YouTube for more tutorials on how to crochet!
Leave a comment, and share with your friends!

Designed by Nadia Fuad
You *may* sell items made from my pattern, but please reference my website YARNutopia.com.
Please do not copy, sell, and/or post this pattern and claim it as your own.

Materials you will need:

Get the supplies individually by clicking the links below
-Any cotton yarn (use 2 strands held together) or use 1 strand of bulky yarn
Size H-5.00mm Crochet Hook
Yarn Needle
Scissors

NOTES:
-Use a smaller hook to make these smaller
-Use a bigger hook to make these bigger
-You can use any size 4 medium, worsted weight yarn for this project (Use 2 strands held together to make it thicker, or use size 5 bulky yarn to make this basket)
-This basket is approximately 8 inches wide and deep.
-You can check out yarnsub.com to see yarn substitutions that are equal to the yarn I used in this project.

Special stitches:
Ch(s): chain(s)
YO: Yarn Over
St(s): Stitch(es)
Sl st: slip stitch
SC: Single Crochet
DC: Double Crochet

Pattern:

There is no video tutorial for this pattern.

Using 2 strands of yarn held together to make a bulky yarn, OR use bulky yarn

Start with ch 3, work in continuous rounds for the whole basket (no sl sts at the end of the rounds) and DO NOT turn your work.

Rnd 1: 10 DC in 3rd Ch from hook. (10)

Rnd 2: 2 DC in each st around. (20)

Rnd 3: [2 DC in next st, DC in next st] 10 times. (30)

Rnd 4: [2 DC in next st, DC in next 2 sts] 10 times. (40)

Rnd 5: [2 DC in next st, DC in next 3 sts] 10 times. (50)

Rnd 6: [2 DC in next st, DC in next 4 sts] 10 times. (60)

Rnd 7-9: [DC2TOG, DC in next 4 sts] 10 times. (50)

Rnd 8: [DC2TOG, DC in next 3 sts] 10 times. (40)

Rnd 9: [DC2TOG, DC in next 2 sts] 10 times. (30)

After Rnd 9, HDC in next st, SC in next st, Sl st in next st.

Loop for hanging: Ch 15 or 18, sl st back into the same st. Fasten off with LONG tail.
Wrap long tail around base of loop for extra support and good looks! Weave in the end.

Enjoy!

This post contains affiliate links, which I may be compensated for when you make a purchase. That means if you click on any link and buy from the linked websites, I will receive a small percentage of the value of your order. The amount you pay is not changed. Thank you for all your support in clicking the links in my blog!! You all are so amazing!! ~Nadia


FREE Crochet Video Tutorial: Seat Belt Shoulder Strap Cover

FREE Crochet Video Tutorial: Seat Belt Shoulder Strap Cover

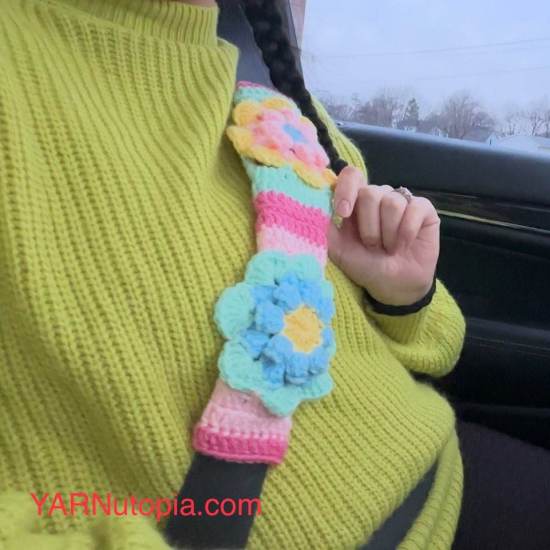
Drive down the road in style with this boho seat belt strap cover! It’s a perfect cheery looking accessory just in time for spring!! This was a great project to use up some scrap yarn from my stash. Don’t want to cover that seat belt strap!? Don’t worry! This video still offers you a 3D granny square design that would make a fantastic blanket!


Follow along with this video tutorial to learn how to make this seat belt strap cover:

My dad will continue to be the videographer, editor, and photographer for our videos even if we don’t live together.
Support YARNutopia today so we can continue to bring you clear, quality crochet tutorials even after I move into my new home!
There will be an added expense of more travel and hopefully this won’t deter our ability to provide consistent videos on a weekly basis.

Donate Button with Credit Cards

**You can always contact me via Facebook if you have any problems with the pattern. I am happy to help if you have any questions along the way.
***These patterns are copyright YARNutopia © so PLEASE DO NOT COPY, SHARE, ADJUST OR RESELL MY PATTERN. I wrote and tested this pattern myself, from beginning to end. It took a lot of time and work, and I would really like to have it remain “my pattern.”
***You can sell anything you make from my patterns, please just link back to my website YARNutopia.com. Thank you!

Teacher: Nadia Fuad
Video and Editing: Fuad Azmat (My Daddy)
Share your work on Facebook!
Add me on Snapchat: YARNutopia
Follow me on Instagram
Visit My Ravelry Store and add this to your Favorites!
Follow me on Twitter: @YARNutopia
Enjoy this video and subscribe to my channel on YouTube for more tutorials on how to crochet!
Leave a comment, and share with your friends!

Designed by Nadia Fuad
You *may* sell items made from my pattern, but please reference my website YARNutopia.com.
Please do not copy, sell, and/or post this pattern and claim it as your own.

Materials you will need:

Get the supplies individually by clicking the links below
-Any scrap yarn (I used worsted weight size 4 Medium yarn by various brands – Lion Brand, Red Heart Yarn, Brava-WeCrochet)
SizeG-4.25mm Crochet Hook
Yarn Needle
Scissors

NOTES:
-Use a smaller hook to make these smaller
-Use a bigger hook to make these bigger
-You can use any size 4 medium, worsted weight yarn for this project
-This square is 6 inches wide. A seatbelt is 2 inches across so this will fit perfectly around the strap when you tri-fold it.
-You can check out yarnsub.com to see yarn substitutions that are equal to the yarn I used in this project.


Special stitches:
Ch(s): chain(s)
YO: Yarn Over
BLO: Back Loop Only
St(s): Stitch(es)
Sl st: slip stitch
SK: Skip
SC: Single Crochet
DC: Double Crochet
Popcorn: 6 DC in same sp, remove hook from last dc, insert hook into 1st dc of grouping, put loop back onto hook, pull through, pull tight, popcorn made


This post contains affiliate links, which I may be compensated for when you make a purchase. That means if you click on any link and buy from the linked websites, I will receive a small percentage of the value of your order. The amount you pay is not changed. Thank you for all your support in clicking the links in my blog!! You all are so amazing!! ~Nadia

FREE Written Crochet Pattern: Seat Belt Shoulder Strap Cover

FREE Written Crochet Pattern: Seat Belt Shoulder Strap Cover

Drive down the road in style with this boho seat belt strap cover! It’s a perfect cheery looking accessory just in time for spring!! This was a great project to use up some scrap yarn from my stash. Don’t want to cover that seat belt strap!? Don’t worry! This video still offers you a 3D granny square design that would make a fantastic blanket!


My dad will continue to be the videographer, editor, and photographer for our videos when I move away.

Support YARNutopia today so we can continue to bring you clear, quality crochet tutorials even after I move into my new home!
There will be an added expense of more travel and hopefully this won’t deter our ability to provide consistent videos on a weekly basis.

Donate Button with Credit Cards

**You can always contact me via Facebook if you have any problems with the pattern. I am happy to help if you have any questions along the way.
***These patterns are copyright YARNutopia © so PLEASE DO NOT COPY, SHARE, ADJUST OR RESELL MY PATTERN. I wrote and tested this pattern myself, from beginning to end. It took a lot of time and work, and I would really like to have it remain “my pattern.”
***You can sell anything you make from my patterns, please just link back to my website YARNutopia.com. Thank you!

Teacher: Nadia Fuad
Video and Editing: Fuad Azmat (My Daddy)
Share your work on Facebook!
Add me on Snapchat: YARNutopia
Follow me on Instagram
Visit My Ravelry Store and add this to your Favorites!
Follow me on Twitter: @YARNutopia
Enjoy this video and subscribe to my channel on YouTube for more tutorials on how to crochet!
Leave a comment, and share with your friends!

Designed by Nadia Fuad
You *may* sell items made from my pattern, but please reference my website YARNutopia.com.
Please do not copy, sell, and/or post this pattern and claim it as your own.

Materials you will need:

Get the supplies individually by clicking the links below
-Any scrap yarn (I used worsted weight size 4 Medium yarn by various brands – Lion Brand, Red Heart Yarn, Brava-WeCrochet)
SizeG-4.25mm Crochet Hook
Yarn Needle
Scissors

NOTES:
-Use a smaller hook to make these smaller
-Use a bigger hook to make these bigger
-You can use any size 4 medium, worsted weight yarn for this project
-This square is 6 inches wide. A seatbelt is 2 inches across so this will fit perfectly around the strap when you tri-fold it.
-You can check out yarnsub.com to see yarn substitutions that are equal to the yarn I used in this project.


Special stitches:
Ch(s): chain(s)
YO: Yarn Over
BLO: Back Loop Only
St(s): Stitch(es)
Sl st: slip stitch
SK: Skip
SC: Single Crochet
DC: Double Crochet
Popcorn: 6 DC in same sp, remove hook from last dc, insert hook into 1st dc of grouping, put loop back onto hook, pull through, pull tight, popcorn made

Pattern:

If you have any confusion or difficulty with reading this pattern, please watch the video tutorial to have visual instructions.

Start with Magic Ring or ch 4 or 5 and sl st to beginning to form ring.

Rnd 1: ch 3, 15 DC in ring. sl st to beginning ch up 3. (16 sts)

Rnd 2: In any st, ch 3, Beg. Popcorn in same stitch, * Ch 2, sk next st, Popcorn in next st, repeat from * around, ch 2, sl st to beg. popcorn. (8 popcorns, 8 ch 2 sps)

Rnd 3: in any ch 2 sp, ch 3, work a 4 DC in same sp, * sc in popcorn, 5 DC in next sp, repeat from * around, sl st to beginning. (8 Shells)

Rnd 4: In any sc, ch 3, 6 DC in same st, *Sc in middle st of shell, 7 DC in next sc, repeat from * around, sl st to beginning ch up 3. (8 Shells)

Rnd 5: In any SC, ch 1, sc in same st, * Ch 5, sk shell, sc in next sc, repeat from * around, sl st to beginning sc. (8 ch 5 sps)

Rnd 6: Sl st into a ch 5 sp, Ch 3(counts as DC), put 4 more DC in same sp, Ch 2, 5DC in same sp (first corner made), *5 DC in next sp, [5 DC, Ch 2, 5 DC] in next ch 5 sp, repeat from * around ending with 5 DC in last ch 5 sp, sl st to ch 3 st. (60 sts around)

Rnd 7: Ch 3, DC in each st around putting [2 DC, ch 2, 2 DC] in each corner sp, Sl st to beginning ch 3 st. (76 sts around)

Rnd 8: repeat Rnd 7. (92 sts around)

Fasten off. Weave in all ends.

Make 2 squares, then sew them together on one side. Add buttons or velcro to close the piece and fit around your seatbelt. (see video tutorial for visual instructions)

Enjoy!

This post contains affiliate links, which I may be compensated for when you make a purchase. That means if you click on any link and buy from the linked websites, I will receive a small percentage of the value of your order. The amount you pay is not changed. Thank you for all your support in clicking the links in my blog!! You all are so amazing!! ~Nadia


FREE Written Crochet Pattern: Winter Fur Snood

FREE Written Crochet Pattern: Winter Fur Snood

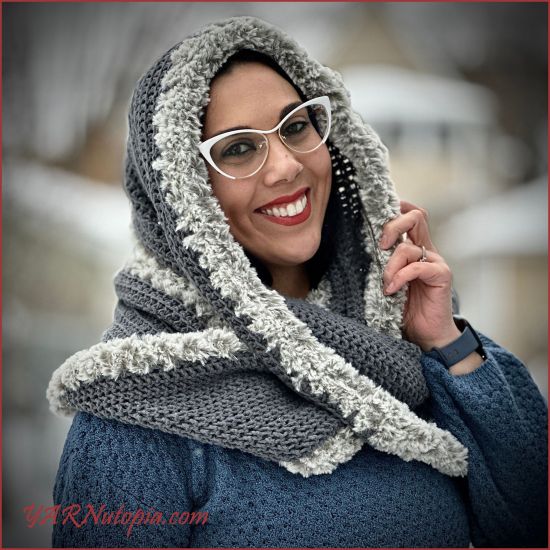
Grab your hook and your Lion Brand Yarns “Feels Like Butta” and “Go for Faux.” Now you have everything you need to make my winter fur snood!

‘Tis the season for cold temps, snow days, and crisp winds. What better way to stay warm and cozy than a fashionable snood? What is a snood you ask? It is a scarf + hood= snood!! It’s the perfect winter statement! It’s all the rave at this time and you can make your very own by following along to my easy pattern and video tutorial. Don’t like the idea of a snood? Don’t worry! This doubles as a VERY beautiful neck cowl!

No matter which way you choose to wear it, you will love it! Versatile, fashionable, and comfortable! It’s a perfect trifecta for you!


My dad will continue to be the videographer, editor, and photographer for our videos when I move away.
Support YARNutopia today so we can continue to bring you clear, quality crochet tutorials even after I move into my new home!
There will be an added expense of more travel and hopefully this won’t deter our ability to provide consistent videos on a weekly basis.

Donate Button with Credit Cards

**You can always contact me via Facebook if you have any problems with the pattern. I am happy to help if you have any questions along the way.
***These patterns are copyright YARNutopia © so PLEASE DO NOT COPY, SHARE, ADJUST OR RESELL MY PATTERN. I wrote and tested this pattern myself, from beginning to end. It took a lot of time and work, and I would really like to have it remain “my pattern.”
***You can sell anything you make from my patterns, please just link back to my website YARNutopia.com. Thank you!

Teacher: Nadia Fuad
Video and Editing: Fuad Azmat (My Daddy)
Share your work on Facebook!
Add me on Snapchat: YARNutopia
Follow me on Instagram
Visit My Ravelry Store and add this to your Favorites!
Follow me on Twitter: @YARNutopia
Enjoy this video and subscribe to my channel on YouTube for more tutorials on how to crochet!
Leave a comment, and share with your friends!

Designed by Nadia Fuad
You *may* sell items made from my pattern, but please reference my website YARNutopia.com.
Please do not copy, sell, and/or post this pattern and claim it as your own.

Materials you will need:

Get the supplies individually by clicking the links below
Lion Brand Feels Like Butta Yarn in Charcoal (654 yards)
Lion Brand Go For Faux Thick & Quick in Husky (72 yards)
SizeI-5.50mm Crochet Hook
Yarn Needle
Scissors

NOTES:
-Use a smaller hook to make these smaller
-Use a bigger hook to make these bigger
-You can use any size 4 medium, worsted weight yarn for this project
-This cowl is 80 inches around (you could make it longer or shorter based off your foundation chain)
-You can check out yarnsub.com to see yarn substitutions that are equal to the yarn I used in this project.


Special stitches:
Ch(s): chain(s)
YO: Yarn Over
BLO: Back Loop Only
St(s): Stitch(es)
Sl st: slip stitch
SK: Skip
SC: Single Crochet
DC: Double Crochet

Pattern:

If you have any confusion or difficulty with reading this pattern, please watch the video tutorial that is linked above in this blog post to have visual instructions.

Cowl:

Work in BLO for the whole cowl

Rnd 1: FDC 230 and sl st to first st without twisting foundation row. Or you can Ch 230 or 232 (as I say in the video tutorial) and Sl st to first ch, Ch 2, DC in each Ch around, sl st to first st, Do not turn. (230)

Rnd 2: Ch 2 (does not count as st), Work in BLO, DC in each st around, Sl st to first st, do not turn.

Rnds 3-18: repeat Rnd 2 (you can continue and make yours wider if you want!)

Fasten off, Weave in all ends.

Add a DC round of Faux Fur around each edge working between the posts of the stitches on the outer rows of your work. (See video tutorial for visual instructions)

Fasten off. Weave in all ends.

Enjoy!

This post contains affiliate links, which I may be compensated for when you make a purchase. That means if you click on any link and buy from the linked websites, I will receive a small percentage of the value of your order. The amount you pay is not changed. Thank you for all your support in clicking the links in my blog!! You all are so amazing!! ~Nadia

The yarn provided for this pattern is courtesy of Lion Brand Yarn


FREE Crochet Video Tutorial: Winter Fur Snood

FREE Crochet Video Tutorial: Winter Fur Snood

Grab your hook and your Lion Brand Yarns “Feels Like Butta” and “Go for Faux.” Now you have everything you need to make my winter fur snood!

‘Tis the season for cold temps, snow days, and crisp winds. What better way to stay warm and cozy than a fashionable snood? What is a snood you ask? It is a scarf + hood= snood!! It’s the perfect winter statement! It’s all the rave at this time and you can make your very own by following along to my easy pattern and video tutorial. Don’t like the idea of a snood? Don’t worry! This doubles as a VERY beautiful neck cowl!

No matter which way you choose to wear it, you will love it! Versatile, fashionable, and comfortable! It’s a perfect trifecta for you!


Follow along with this video tutorial to learn how to make this snood:

My dad will continue to be the videographer, editor, and photographer for our videos even if we don’t live together.
Support YARNutopia today so we can continue to bring you clear, quality crochet tutorials even after I move into my new home!
There will be an added expense of more travel and hopefully this won’t deter our ability to provide consistent videos on a weekly basis.

Donate Button with Credit Cards

**You can always contact me via Facebook if you have any problems with the pattern. I am happy to help if you have any questions along the way.
***These patterns are copyright YARNutopia © so PLEASE DO NOT COPY, SHARE, ADJUST OR RESELL MY PATTERN. I wrote and tested this pattern myself, from beginning to end. It took a lot of time and work, and I would really like to have it remain “my pattern.”
***You can sell anything you make from my patterns, please just link back to my website YARNutopia.com. Thank you!

Teacher: Nadia Fuad
Video and Editing: Fuad Azmat (My Daddy)
Share your work on Facebook!
Add me on Snapchat: YARNutopia
Follow me on Instagram
Visit My Ravelry Store and add this to your Favorites!
Follow me on Twitter: @YARNutopia
Enjoy this video and subscribe to my channel on YouTube for more tutorials on how to crochet!
Leave a comment, and share with your friends!

Designed by Nadia Fuad
You *may* sell items made from my pattern, but please reference my website YARNutopia.com.
Please do not copy, sell, and/or post this pattern and claim it as your own.

Materials you will need:

Get the supplies individually by clicking the links below
Lion Brand Feels Like Butta Yarn in Charcoal (654 yards)
Lion Brand Go For Faux Thick & Quick in Husky (72 yards)
SizeI-5.50mm Crochet Hook
Yarn Needle
Scissors

NOTES:
-Use a smaller hook to make these smaller
-Use a bigger hook to make these bigger
-You can use any size 4 medium, worsted weight yarn for this project
-This cowl is 80 inches around (you could make it longer or shorter based off your foundation chain)
-You can check out yarnsub.com to see yarn substitutions that are equal to the yarn I used in this project.

Special stitches:
Ch(s): chain(s)
YO: Yarn Over
BLO: Back Loop Only
St(s): Stitch(es)
Sl st: slip stitch
SK: Skip
SC: Single Crochet
DC: Double Crochet


This post contains affiliate links, which I may be compensated for when you make a purchase. That means if you click on any link and buy from the linked websites, I will receive a small percentage of the value of your order. The amount you pay is not changed. Thank you for all your support in clicking the links in my blog!! You all are so amazing!! ~Nadia

The yarn provided for this pattern is courtesy of Lion Brand Yarn

FREE Crochet Video Tutorial: Evergreen Ski Hat

FREE Crochet Video Tutorial: Evergreen Ski Hat

Nasir has been growing and changing SO MUCH! Therapy has been working wonders, and in the past several months, he has found so many new words and skills.

The holidays went pretty well, and he had a lot of fun participating in all the activities. Because of his high energy, we decided to outfit him with some snowboarding gear, and Nate took him out for a trial run. He loves it!

It was the inspiration for the Evergreen Ski Hat. I’m so excited for my guys to be matching up both in fashion and in fun!! I used Brava Yarn in Dublin green. The perfect color for my Irish husband! You can make this for anyone! The design is both feminine and masculine and adding a pom or different color can make this customizable for you or someone you love. It’s a great beanie design that I know you will want to make now! Here’s my free pattern!


Follow along with this video tutorial to learn how to make this Hat:


My dad will continue to be the videographer, editor, and photographer for our videos even if we don’t live together.
Support YARNutopia today so we can continue to bring you clear, quality crochet tutorials even after I move into my new home!
There will be an added expense of more travel and hopefully this won’t deter our ability to provide consistent videos on a weekly basis.

Donate Button with Credit Cards

**You can always contact me via Facebook if you have any problems with the pattern. I am happy to help if you have any questions along the way.
***These patterns are copyright YARNutopia © so PLEASE DO NOT COPY, SHARE, ADJUST OR RESELL MY PATTERN. I wrote and tested this pattern myself, from beginning to end. It took a lot of time and work, and I would really like to have it remain “my pattern.”
***You can sell anything you make from my patterns, please just link back to my website YARNutopia.com. Thank you!

Teacher: Nadia Fuad
Video and Editing: Fuad Azmat (My Daddy)
Share your work on Facebook!
Add me on Snapchat: YARNutopia
Follow me on Instagram
Visit My Ravelry Store and add this to your Favorites!
Follow me on Twitter: @YARNutopia
Enjoy this video and subscribe to my channel on YouTube for more tutorials on how to crochet!
Leave a comment, and share with your friends!

Designed by Nadia Fuad
You *may* sell items made from my pattern, but please reference my website YARNutopia.com.
Please do not copy, sell, and/or post this pattern and claim it as your own.

Materials you will need:
Get the supplies individually by clicking the links below
Brava Yarn in Dublin Green (or any color you want!) 200 Yards
SizeH-5.00mm Crochet Hook
Yarn Needle
Scissors

NOTES:
-Use a smaller hook to make these smaller
-Use a bigger hook to make these bigger
-You can use any size 4 medium, worsted weight yarn for this project
-You can check out yarnsub.com to see yarn substitutions that are equal to the yarn I used in this project.


Special stitches:
Ch(s): chain(s)
YO: Yarn Over
St(s): Stitch(es)
Sl st: slip stitch
SK: Skip
SC: Single Crochet
DC: Double Crochet
FPDC: Front Post Double Crochet
BPDC: Back Post Double Crochet


This post contains affiliate links, which I may be compensated for when you make a purchase. That means if you click on any link and buy from the linked websites, I will receive a small percentage of the value of your order. The amount you pay is not changed. Thank you for all your support in clicking the links in my blog!! You all are so amazing!! ~Nadia

The yarn provided for this pattern is courtesy of WeCrochet

FREE Written Crochet Pattern: Evergreen Ski Hat

FREE Written Crochet Pattern: Evergreen Ski Hat

Nasir has been growing and changing SO MUCH! Therapy has been working wonders, and in the past several months, he has found so many new words and skills.

The holidays went pretty well, and he had a lot of fun participating in all the activities. Because of his high energy, we decided to outfit him with some snowboarding gear, and Nate took him out for a trial run. He loves it!

It was the inspiration for the Evergreen Ski Hat. I’m so excited for my guys to be matching up both in fashion and in fun!! I used Brava Yarn in Dublin green. The perfect color for my Irish husband! You can make this for anyone! The design is both feminine and masculine and adding a pom or different color can make this customizable for you or someone you love. It’s a great beanie design that I know you will want to make now! Here’s my free pattern!


My dad will continue to be the videographer, editor, and photographer for our videos when I move away.
Support YARNutopia today so we can continue to bring you clear, quality crochet tutorials even after I move into my new home!
There will be an added expense of more travel and hopefully this won’t deter our ability to provide consistent videos on a weekly basis.

Donate Button with Credit Cards

**You can always contact me via Facebook if you have any problems with the pattern. I am happy to help if you have any questions along the way.
***These patterns are copyright YARNutopia © so PLEASE DO NOT COPY, SHARE, ADJUST OR RESELL MY PATTERN. I wrote and tested this pattern myself, from beginning to end. It took a lot of time and work, and I would really like to have it remain “my pattern.”
***You can sell anything you make from my patterns, please just link back to my website YARNutopia.com. Thank you!

Teacher: Nadia Fuad
Video and Editing: Fuad Azmat (My Daddy)
Share your work on Facebook!
Add me on Snapchat: YARNutopia
Follow me on Instagram
Visit My Ravelry Store and add this to your Favorites!
Follow me on Twitter: @YARNutopia
Enjoy this video and subscribe to my channel on YouTube for more tutorials on how to crochet!
Leave a comment, and share with your friends!

Designed by Nadia Fuad
You *may* sell items made from my pattern, but please reference my website YARNutopia.com.
Please do not copy, sell, and/or post this pattern and claim it as your own.

Materials you will need:

Get the supplies individually by clicking the links below
Brava Yarn in Dublin Green (or any color you want!) 200 Yards
SizeH-5.00mm Crochet Hook
Yarn Needle
Scissors

NOTES:
-Use a smaller hook to make these smaller
-Use a bigger hook to make these bigger
-You can use any size 4 medium, worsted weight yarn for this project
-You can check out yarnsub.com to see yarn substitutions that are equal to the yarn I used in this project.


Special stitches:
Ch(s): chain(s)
YO: Yarn Over
St(s): Stitch(es)
Sl st: slip stitch
SK: Skip
SC: Single Crochet
DC: Double Crochet
FPDC: Front Post Double Crochet
BPDC: Back Post Double Crochet


Pattern:

If you have any confusion or difficulty with reading this pattern, please watch the video tutorial that is linked above in this blog post to have visual instructions.

Hat:

Toddler/Child Size:

Ch 2

Rnd 1: 9 SC in 2nd Ch from hook, Sl st to 1st st, ch 1 (9)

Rnd 2: Work in the “V” of the stitch for all SC rows. 2 SC in each st around, Sl st to first st, Ch 1. (18)

Rnd 3: [2 SC in next st, SC in next st] 9 times, Sl st to first st, Ch 1. (27)

Rnd 4: [2 SC in next st, SC in next 2 sts] 9 times, Sl st to first st, Ch 1. (36)

Rnd 5: [2 SC in next st, SC in next 3 sts] 9 times, Sl st to first st, Ch 1. (45)

Rnd 6: [2 SC in next st, SC in next 4 sts] 9 times, Sl st to first st, Ch 1. (54)

Rnd 7-11: SC in each st around. Sl st to first st, Ch 1. (54)

Rnd 12: Ch 2 (instead of ch 1, does not count as stitch), DC in each st around. Sl st to first St, Ch 2. (54)

Rnd 13-16: FPDC on first st, *BPDC on next st, FPDC on next st, repeat from * around, Sl st to first st, Ch 2. (54)

Rnd 17: Ch 1 (instead of ch 2), SC in each st around, Sl st to first st, Ch 1. (54)

Rnds 18-26: SC into the V of each st around, Sl st to first st, Ch 1. (54)

Rnd 27: Repeat Round 12

Rnds 28-31: Repeat Rounds 13-16 alternating FPDC and BPDC.

Fasten off, weave in all ends. Add a pom if desired!


Child/Teen Size:

Ch 2

Rnd 1: 9 SC in 2nd Ch from hook, Sl st to 1st st, ch 1 (9)

Rnd 2: Work in the “V” of the stitch for all SC rows. 2 SC in each st around, Sl st to first st, Ch 1. (18)

Rnd 3: [2 SC in next st, SC in next st] 9 times, Sl st to first st, Ch 1. (27)

Rnd 4: [2 SC in next st, SC in next 2 sts] 9 times, Sl st to first st, Ch 1. (36)

Rnd 5: [2 SC in next st, SC in next 3 sts] 9 times, Sl st to first st, Ch 1. (45)

Rnd 6: [2 SC in next st, SC in next 4 sts] 9 times, Sl st to first st, Ch 1. (54)

Rnd 7: SC in each st around, Sl st to first st, Ch 1. (54)

Rnd 8: [2 SC in next st, SC in next 6 sts] 9 times, Sl st to first st, Ch 1. (60)

Rnds 9-11: SC in each st around, Sl st to first st, Ch 1. (60)

Rnd 12: Ch 2 (instead of ch 1, does not count as stitch), DC in each st around. Sl st to first St, Ch 2.

Rnd 13-16: FPDC on first st, *BPDC on next st, FPDC on next st, repeat from * around, Sl st to first st, Ch 2. (60)

Rnd 17: Ch 1 (instead of ch 2), SC in each st around, Sl st to first st, Ch 1. (60)

Rnds 18-26: SC into the V of each st around, Sl st to first st, Ch 1. (60)

Rnd 27: Repeat Round 12

Rnds 28-34: Repeat Rounds 13-16 alternating FPDC and BPDC

Fasten off, weave in all ends. Add a pom if desired!


Teen/Adult Size:

Ch 2

Rnd 1: 9 SC in 2nd Ch from hook, Sl st to 1st st, ch 1 (9)

Rnd 2: Work in the “V” of the stitch for all SC rows. 2 SC in each st around, Sl st to first st, Ch 1. (18)

Rnd 3: [2 SC in next st, SC in next st] 9 times, Sl st to first st, Ch 1. (27)

Rnd 4: [2 SC in next st, SC in next 2 sts] 9 times, Sl st to first st, Ch 1. (36)

Rnd 5: [2 SC in next st, SC in next 3 sts] 9 times, Sl st to first st, Ch 1. (45)

Rnd 6: [2 SC in next st, SC in next 4 sts] 9 times, Sl st to first st, Ch 1. (54)

Rnd 7: SC in each st around, Sl st to first st, Ch 1. (54)

Rnd 8: [2 SC in next st, SC in next 8 sts] 6 times, Sl st to first st, Ch 1. (60)

Rnd 9: [2 SC in next st, SC in next 9 sts] 6 times, Sl st to first st, Ch 1. (66)

Rnds 10-11: SC in each st around, Sl st to first st, Ch 1. (66)

Rnd 12: Ch 2 (instead of ch 1, does not count as stitch), DC in each st around. Sl st to first St, Ch 2.

Rnd 13-16: FPDC on first st, *BPDC on next st, FPDC on next st, repeat from * around, Sl st to first st, Ch 2. (66)

Rnd 17: Ch 1 (instead of ch 2), SC in each st around, Sl st to first st, Ch 1. (66)

Rnds 18-26: SC into the V of each st around, Sl st to first st, Ch 1. (66)

Rnd 27: Repeat Round 12

Rnds 28-36: Repeat Rounds 13-16 alternating FPDC and BPDC

Fasten off. Weave in all ends.

Enjoy!

This post contains affiliate links, which I may be compensated for when you make a purchase. That means if you click on any link and buy from the linked websites, I will receive a small percentage of the value of your order. The amount you pay is not changed. Thank you for all your support in clicking the links in my blog!! You all are so amazing!! ~Nadia

The yarn provided for this pattern is courtesy of WeCrochet


FREE Crochet Video Tutorial: Cuddle Up Baby Blanket

FREE Crochet Video Tutorial: Cuddle Up Baby Blanket

When a good friend is having a baby girl, one must use their skills and create a luxurious way to welcome her into the world. Join me as I share the free crochet pattern and video tutorial for The Cuddle Up Baby Blanket below. I used Vel-Luxe yarn by Lion Brand Yarn and I LOVE it. I want one for myself, it is so soft!


Follow along with this video tutorial to learn how to make this blanket:


My dad will continue to be the videographer, editor, and photographer for our videos even if we don’t live together.
Support YARNutopia today so we can continue to bring you clear, quality crochet tutorials even after I move into my new home!
There will be an added expense of more travel and hopefully this won’t deter our ability to provide consistent videos on a weekly basis.

Donate Button with Credit Cards

**You can always contact me via Facebook if you have any problems with the pattern. I am happy to help if you have any questions along the way.
***These patterns are copyright YARNutopia © so PLEASE DO NOT COPY, SHARE, ADJUST OR RESELL MY PATTERN. I wrote and tested this pattern myself, from beginning to end. It took a lot of time and work, and I would really like to have it remain “my pattern.”
***You can sell anything you make from my patterns, please just link back to my website YARNutopia.com. Thank you!

Teacher: Nadia Fuad
Video and Editing: Fuad Azmat (My Daddy)
Share your work on Facebook!
Add me on Snapchat: YARNutopia
Follow me on Instagram
Visit My Ravelry Store and add this to your Favorites!
Follow me on Twitter: @YARNutopia
Enjoy this video and subscribe to my channel on YouTube for more tutorials on how to crochet!
Leave a comment, and share with your friends!

Designed by Nadia Fuad
You *may* sell items made from my pattern, but please reference my website YARNutopia.com.
Please do not copy, sell, and/or post this pattern and claim it as your own.

Materials you will need:
Get the supplies individually by clicking the links below
Lion Brand Vel-Luxe Yarn in Dusty Pink (240 yards of this color) and Eggplant (492 yards of this color) (you can use 730-760 yards of any color of yarn)
SizeI-5.50mm Crochet Hook
Yarn Needle
Scissors

NOTES:
-Use a smaller hook to make these smaller
-Use a bigger hook to make these bigger
-You can use any size 4 medium, worsted weight yarn for this project. 2 contrasting colors look great together, but you can use 1 color or many colors if you’d like!
-You can check out yarnsub.com to see yarn substitutions that are equal to the yarn I used in this project.
-This blanket is a baby blanket size but you can use any multiple of 3 on your foundation chain to make this wider. Continue repeating the same row repeat to make it longer. My blanket measures 36 inches wide by 40 inches long.

Special stitches:
Ch(s): chain(s)
YO: Yarn Over
St(s): Stitch(es)
Sl st: slip stitch
SK: Skip
SC: Single Crochet
DC: Double Crochet


This post contains affiliate links, which I may be compensated for when you make a purchase. That means if you click on any link and buy from the linked websites, I will receive a small percentage of the value of your order. The amount you pay is not changed. Thank you for all your support in clicking the links in my blog!! You all are so amazing!! ~Nadia

The yarn provided for this pattern is courtesy of Lion Brand Yarn

FREE Written Crochet Pattern: Cuddle Up Baby Blanket

FREE Written Crochet Pattern: Cuddle Up Baby Blanket

When a good friend is having a baby girl, one must use their skills and create a luxurious way to welcome her into the world. Join me as I share the free crochet pattern and video tutorial for The Cuddle Up Baby Blanket below. I used Vel-Luxe yarn by Lion Brand Yarn and I LOVE it. I want one for myself, it is so soft!


My dad will continue to be the videographer, editor, and photographer for our videos when I move away.
Support YARNutopia today so we can continue to bring you clear, quality crochet tutorials even after I move into my new home!
There will be an added expense of more travel and hopefully this won’t deter our ability to provide consistent videos on a weekly basis.

Donate Button with Credit Cards

**You can always contact me via Facebook if you have any problems with the pattern. I am happy to help if you have any questions along the way.
***These patterns are copyright YARNutopia © so PLEASE DO NOT COPY, SHARE, ADJUST OR RESELL MY PATTERN. I wrote and tested this pattern myself, from beginning to end. It took a lot of time and work, and I would really like to have it remain “my pattern.”
***You can sell anything you make from my patterns, please just link back to my website YARNutopia.com. Thank you!

Teacher: Nadia Fuad
Video and Editing: Fuad Azmat (My Daddy)
Share your work on Facebook!
Add me on Snapchat: YARNutopia
Follow me on Instagram
Visit My Ravelry Store and add this to your Favorites!
Follow me on Twitter: @YARNutopia
Enjoy this video and subscribe to my channel on YouTube for more tutorials on how to crochet!
Leave a comment, and share with your friends!

Designed by Nadia Fuad
You *may* sell items made from my pattern, but please reference my website YARNutopia.com.
Please do not copy, sell, and/or post this pattern and claim it as your own.

Materials you will need:
Get the supplies individually by clicking the links below
Lion Brand Vel-Luxe Yarn in Dusty Pink (240 yards of this color) and Eggplant (492 yards of this color) (you can use 730-760 yards of any color of yarn)
SizeI-5.50mm Crochet Hook
Yarn Needle
Scissors

NOTES:
-Use a smaller hook to make these smaller
-Use a bigger hook to make these bigger
-You can use any size 4 medium, worsted weight yarn for this project. 2 contrasting colors look great together, but you can use 1 color or many colors if you’d like!
-You can check out yarnsub.com to see yarn substitutions that are equal to the yarn I used in this project.
-This blanket is a baby blanket size but you can use any multiple of 3 on your foundation chain to make this wider. Continue repeating the same row repeat to make it longer. My blanket measures 36 inches wide by 40 inches long.


Special stitches:
Ch(s): chain(s)
YO: Yarn Over
St(s): Stitch(es)
Sl st: slip stitch
SK: Skip
SC: Single Crochet
DC: Double Crochet


Pattern:

If you have any confusion or difficulty with reading this pattern, please watch the video tutorial that is linked above in this blog post to have visual instructions.

Blanket:

With Main Color (Eggplant)

Ch 78 or any multiple of 3

Row 1: 2 DC in 3rd Ch from hook, *Sk 2 Chs, [SC, 2 DC] in next ch, repeat from * across, ending with SC in last st, Ch 1, Turn.

Row 2: 2 DC in 1st st, *Sk next 2 DC sts, [SC, 2 DC] in next SC st, Repeat from * across ending with SC in last st, Ch 1, Turn.

Rows 3-7: Repeat Row 2

Rows 8-9: Change color to Dusty Pink, repeat Row 2

Rows 10-11: Change color to Eggplant, repeat Row 2

Rows 12-21: Change color to Dusty Pink, Repeat Row 2

Rows 22-23: Change Color to Eggplant, Repeat Row 2

Rows 24-25: Change color to Dusty Pink, Repeat Row 2

Rows 26-47: Change color to Eggplant, Repeat Row 2

Row 48-65: Repeat Rows 8-25

Rows 66-72: With Eggplant, repeat Row 2

Fasten off, weave in all ends.

Border:

Round 1: Attach to any corner of your work, Work between the groupings all around the blanket, Ch 1, SC in same corner, *Ch 3, SC in next gap between grouping of sts, repeat from * around. End with Ch 3, sl st to first SC. Do not turn.

Round 2: Sl st in next Ch 3 sp, Ch 1, SC in same sp, *7 DC in next Ch sp, SC in next ch sp, repeat from * around, sl st to first SC.

Fasten off

Weave in all ends. Enjoy!

This post contains affiliate links, which I may be compensated for when you make a purchase. That means if you click on any link and buy from the linked websites, I will receive a small percentage of the value of your order. The amount you pay is not changed. Thank you for all your support in clicking the links in my blog!! You all are so amazing!! ~Nadia

The yarn provided for this pattern is courtesy of Lion Brand Yarn


Asking a Favor!

Asking a Favor!

I wanted to hop on YARNutopia’s channel to ask a big favor! I NEED your help. In order to monetize my Ambient Sounds (second YouTube Channel) I need AT LEAST 4,000 watched hours. So this is where you can help me out. Go to my other channel here: @Fuad Azmat / Ambient Sounds and SUBSCRIBE and click to receive notifications of new video posts. Watch my videos. Do you like to have back ground noise on while you crochet? Do you like to have white noise play to help you sleep? Do you like to relax to the sounds of waves or wind chimes? If so, we got something for you! There’s a little something for everyone! So check us out here: @Fuad Azmat / Ambient Sounds
Thank you for your support and help and we will be back here on YARNutopia with a new crochet video soon! Thanks for watching!!

Channel Link: https://youtube.com/@fuadazmatambientsounds

View our Etsy Shop to get your fabulous crochet hooks here: http://tidd.ly/77c3804d


Happy Halloween 2022 from YARNutopia!

Happy Halloween 2022 from YARNutopia!

Our Annual Halloween Costume Reveal is here! This year, we have decided on some friendly monster costumes.

Nas loves his one-eyed green monster with horns! He was running around trying to catch pretend monsters and pretend he was one too! He’s such a little goofball!

Nasir’s costume consists of the crocheted green slip-on with a face. I paired that with the green leggings and turtleneck that I bought on Amazon. I used Lion Brand Yarn to create this ensemble.

Nate pulls off the big blue monster very well! For his costume, I created the fuzzy hat with horns. I purchased the furry costume from Amazon and voila it was the perfect match!

For my costume I just made a monster amigurumi doll and wore a pink and purple outfit to tie it all together.

In recent years, it has been difficult to find the time to make elaborate plans for costumes and not be able to get them done. I’ve scaled down quite a bit, but still like to make sure that I’ve included crochet in each costume. I hope you enjoy our monster costumes and keep coming back each year to see more!

If you’d like the crochet pattern for Nasir’s Monster Costume, you can find the written instructions here.

If you’d like the Hat Pattern that Nate is wearing, you can find the written instructions here.

If you’d like to make the little monster plushie I am holding in the photos, you can find the full written pattern here.


FREE Written Crochet Pattern: Monster/Alien Stuffed Toy Amigurumi

FREE Written Crochet Pattern: Monster/Alien Stuffed Toy Amigurumi

It’s that time of year again! Halloween is one of my favorite holidays. Every year, we try to create something unique and fun to share here on YARNutopia. This year is no exception, and we have decided on some friendly monster costumes.

For my costume I just made a monster amigurumi doll and wore a pink and purple outfit to tie it all together.

In recent years, it has been difficult to find the time to make elaborate plans for costumes and not be able to get them done. I’ve scaled down quite a bit, but still like to make sure that I’ve included crochet in each costume. I hope you enjoy our monster costumes and keep coming back each year to see more!


My dad will continue to be the videographer, editor, and photographer for our videos when I move away.
Support YARNutopia today so we can continue to bring you clear, quality crochet tutorials even after I move into my new home!
There will be an added expense of more travel and hopefully this won’t deter our ability to provide consistent videos on a weekly basis.

Donate Button with Credit Cards

**You can always contact me via Facebook if you have any problems with the pattern. I am happy to help if you have any questions along the way.
***These patterns are copyright YARNutopia © so PLEASE DO NOT COPY, SHARE, ADJUST OR RESELL MY PATTERN. I wrote and tested this pattern myself, from beginning to end. It took a lot of time and work, and I would really like to have it remain “my pattern.”
***You can sell anything you make from my patterns, please just link back to my website YARNutopia.com. Thank you!

Teacher: Nadia Fuad
Video and Editing: Fuad Azmat (My Daddy)
Share your work on Facebook!
Add me on Snapchat: YARNutopia
Follow me on Instagram
Visit My Ravelry Store and add this to your Favorites!
Follow me on Twitter: @YARNutopia
Enjoy this video and subscribe to my channel on YouTube for more tutorials on how to crochet!
Leave a comment, and share with your friends!

Pattern:

Designed by Nadia Fuad
You *may* sell items made from my pattern, but please reference my website YARNutopia.com.
Please do not copy, sell, and/or post this pattern and claim it as your own.

Materials you will need:
Get the supplies individually by clicking the links below
Lion Brand Yarn Basic Stitch Premium in the color Goldmine (1 ball)
Lion Brand Yarn Basic Stitch Anti Pilling in the color Ecru (less than 25 yards needed)
Lion Brand Yarn 24/7 Cotton in White and Black (less than 50 yards each needed)
Size G4.25mm Crochet Hook and F-3.75mm crochet hook
Yarn Needle
Scissors

NOTES:
-Use a smaller hook to make these smaller
-Use a bigger hook to make these bigger
-The measurements of this amigurumi are 16 inches tall and about 6 inches wide
-You can check out yarnsub.com to see yarn substitutions that are equal to the yarn I used in this project.
-The components to this pattern are: Body and head worked as one piece, 2 horns, Outer eye, Inner eye, 2 Arms, 4 Legs, and an embroidered mouth with teeth.

Special stitches:
Ch(s): chain(s)
YO: Yarn Over
St(s): Stitch(es)
Sl st: slip stitch
SK: Skip
SC: Single Crochet
SC2TOG: Single crochet decrease

Pattern:

If you have any confusion or difficulty with reading this pattern, please watch the video tutorial that is linked above in this blog post to have visual instructions.

Body

With Goldmine (tan colored yarn) and G-4.25mm crochet hook
Work in continuous rounds for all the pieces in this project.

Ch 24

Rnd 1: 2 SC in 2nd ch from hook, 1 SC in each of the next chs across, put 3 SC in last ch, continue to SC along the opposite side of the foundation ch, SC across, put 1 SC in the first st where you put 2 SC in. (48)

Rnds 2-30: SC in each st around. (48)

Rnd 31: [SC2TOG, SC in next 6 sts] 6 times. (42)

Rnd 32: [SC2TOG, SC in next 5 sts] 6 times. (36)

Rnd 33: [SC2TOG, SC in next 4 sts] 6 times. (30)

Rnd 34: [SC2TOG, SC in next 3 sts] 6 times. (24)

Start stuffing the body.

Rnd 35: [SC2TOG, SC in next 2 sts] 6 times. (18)

Start increasing for the head.

Rnd 36: [2 SC in next st, SC in next 2 sts] 6 times. (24)

Rnd 37: [2 SC in next st, SC in next 3 sts] 6 times. (30)

Rnd 38: [2 SC in next st, SC in next 4 sts] 6 times. (36)

Rnd 39: [2 SC in next st, SC in next 5 sts] 6 times. (42)

Rnd 40: [2 SC in next st, SC in next 6 sts] 6 times. (48)

Rnds 41-55: SC in each st around. (48)

Rnd 56: [SC2TOG, SC in next 6 sts] 6 times. (42)

Rnd 57: [SC2TOG, SC in next 5 sts] 6 times. (36)

Rnd 58: [SC2TOG, SC in next 4 sts] 6 times. (30)

At this point I paused production of this piece and moved on to work on the embellishments (arms, legs, eye etc) so that it would be easier to sew to the body and head without it being stuffed completely closed and sewn shut. (you can sew your pieces on your monster however you are comfortable with)

Rnd 59: [SC2TOG, SC in next 3 sts] 6 times. (24)

Start stuffing the neck part and head

Rnd 60: [SC2TOG, SC in next 2 sts] 6 times. (18)

Rnd 61: [SC2TOG, SC in next st] 6 times. (12)

finish stuffing the body and head piece.

Rnd 62: [SC2TOG]6 times. (6)

SC 1st and 4th sts together, fasten off, weave in ends.

Horns: Make 2

Using Ecru colored yarn and F-3.75mm crochet hook
Work in continuous Rounds

Ch 2

Rnd 1: 4 SC in 2nd ch from hook. (4)

Rnd 2: 2 SC in next st, SC in the rest of the sts around. (5)

Rnds 3-7: Repeat Rnd 2
You should have 10 sts around at the end of Rnd 7.
Fasten off with long tail for sewing.

Inner Eye

With Black yarn and F-3.75mm crochet hook
Work in continuous rounds

Ch 2

Rnd 1: 6 SC in 2nd Ch from hook. (6)

Rnd 2: 2 SC in each st around. (12)
Fasten off with long tail for sewing.

Outer Eye

With White yarn and F–3.75mm crochet hook
Work in continuous rounds

Ch 2

Rnd 1: 6 SC in 2nd Ch from hook. (6)

Rnd 2: 2 SC in each st around. (12)

Rnd 3: [2 SC in next st, SC in next st] 6 times. (18)

Rnd 4: [2 SC in next st, SC in next 2 sts] 6 times. (24)

Rnd 5: [2 SC in next st, SC in next 3 sts] 6 times. (30)

Rnd 6: [2 SC in next st, SC in next 4 sts] 6 times. (36)

Rnd 7: [2 SC in next st, SC in next 5 sts] 6 times. (42)

Arms: Make 2

With Goldmine (tan colored) yarn and F-3.75mm crochet hook
Work in continuous rounds

Ch 2

Rnd 1: 6 SC in 2nd Ch from hook. (6)

Rnd 2: 2 SC in each st around. (12)

Rnds 3-20: SC in each st around. (12)
Fasten off after round 20 with a long tail for sewing.

Legs: Make 4

Ch 2

Rnd 1: 6 SC in 2nd Ch from hook. (6)

Rnd 2: 2 SC in each st around. (12)

Rnd 3: [2 SC in next st, SC in next st] 6 times. (18)

Rnd 4: [2 SC in next st, SC in next 2 sts] 6 times. (24)

Rnds 5-8: SC in each st around. (24)

Rnd 9: [SC2TOG] 6 times, SC in last 12 sts. (18)

Rnd 10: [SC2TOG] 3 times, SC in next 6 sts, [SC2TOG] twice. (12)

Rnds 11-22: SC in each st around.
You can make these legs as long or as short as you want by continuing to create more rounds.
Fasten off with long tail for sewing.

Assembly Step:

Sew all 4 legs to bottom of body, Sew arms to each side, Sew black part of eye to the white part of the eye, add a fleck of white into the black part of the eye, then sew the white part of the eye to the head. Embroider a mouth with teeth with black yarn on the face. Sew horns to the top of the head (I did this part last when I was finished decreasing the stitches at the top of the head), Optional: Surface crochet a line up the center of the body with the same color yarn as the body (see photos for reference)

Weave in all ends. Enjoy!


This post contains affiliate links, which I may be compensated for when you make a purchase. That means if you click on any link and buy from the linked websites, I will receive a small percentage of the value of your order. The amount you pay is not changed. Thank you for all your support in clicking the links in my blog!! You all are so amazing!! ~Nadia

The yarn provided for this pattern is courtesy of Lion Brand Yarn

FREE Written Crochet Pattern: Toddler Monster Costume

FREE Written Crochet Pattern: Toddler Monster Costume

It’s that time of year again! Halloween is one of my favorite holidays. Every year, we try to create something unique and fun to share here on YARNutopia. This year is no exception, and we have decided on some friendly monster costumes.

Nas loves his one-eyed green monster with horns! He was running around trying to catch pretend monsters and pretend he was one too! He’s such a little goofball!

Nasir’s costume consists of the crocheted green slip-on with a face. I paired that with the green leggings and turtleneck that I bought on Amazon. I used Lion Brand Yarn to create this ensemble. The exact type of yarn and colors and amount is all listed below in the “Materials you will need” section.


My dad will continue to be the videographer, editor, and photographer for our videos when I move away.
Support YARNutopia today so we can continue to bring you clear, quality crochet tutorials even after I move into my new home!
There will be an added expense of more travel and hopefully this won’t deter our ability to provide consistent videos on a weekly basis.

Donate Button with Credit Cards

**You can always contact me via Facebook if you have any problems with the pattern. I am happy to help if you have any questions along the way.
***These patterns are copyright YARNutopia © so PLEASE DO NOT COPY, SHARE, ADJUST OR RESELL MY PATTERN. I wrote and tested this pattern myself, from beginning to end. It took a lot of time and work, and I would really like to have it remain “my pattern.”
***You can sell anything you make from my patterns, please just link back to my website YARNutopia.com. Thank you!

Teacher: Nadia Fuad
Video and Editing: Fuad Azmat (My Daddy)
Share your work on Facebook!
Add me on Snapchat: YARNutopia
Follow me on Instagram
Visit My Ravelry Store and add this to your Favorites!
Follow me on Twitter: @YARNutopia
Enjoy this video and subscribe to my channel on YouTube for more tutorials on how to crochet!
Leave a comment, and share with your friends!

Pattern:

Designed by Nadia Fuad
You *may* sell items made from my pattern, but please reference my website YARNutopia.com.
Please do not copy, sell, and/or post this pattern and claim it as your own.

Materials you will need:
Get the supplies individually by clicking the links below
Knit Picks Cotlin Yarn in Silver (less than 25 yards)
Lion Brand Yarn 24/7 Cotton in Lime, Black, and White. (4 balls of Lime (740 yards total needed), 1 ball of Black, and 1 ball of white)
SizeH-5.00mm Crochet Hook and F-3.75mm crochet hook for embellishments
Yarn Needle
Scissors

NOTES:
-Use a smaller hook to make these smaller
-Use a bigger hook to make these bigger
-The measurements of this costume are 16 inches long from shoulder to bottom and 18″ wide which is 36 inches around the waist.
-You can check out yarnsub.com to see yarn substitutions that are equal to the yarn I used in this project.
-Use 3 strands of yarn together for the BODY part of the costume only.
-The components to this pattern are: Body, Horns, Inner Eye, Outer Eye, Mouth, Teeth, and Eyelid
-This is worked from the top down and then each component is added after the body is made.

Special stitches:
Ch(s): chain(s)
YO: Yarn Over
St(s): Stitch(es)
Sl st: slip stitch
SK: Skip
SC: Single Crochet
DC: Double Crochet
DC2TOG: Double crochet decrease
DC3TOG: Double crochet 3 sts together

Pattern:

If you have any confusion or difficulty with reading this pattern, please watch the video tutorial that is linked above in this blog post to have visual instructions.

Body

With Lime Green
Use 3 strands of yarn at the same time
Use H-5.00mm crochet hook or I-5.5mm Crochet hook for this piece

Ch 54
Work in continuous rounds for this piece

Round 1: Without Twisting Foundation Chain, SC in 1st Ch to form a ring and continue to SC in each Ch around, work in continuous rounds. (54 SC)

Round 2: HDC in each st around. (54)

Rnd 3: [2 HDC in next st, HDC in next 8 sts] 6 times. (60)

Rnd 4: [2 HDC in next st, HDC in next 5 sts] 10 times. (70)

Rnd 5: [2 HDC in next st, HDC in next 6 sts] 10 times. (80)

Rnd 6: [2 HDC in next st, HDC in next 7 sts] 10 times. (90)

Rnd 7: [2 HDC in next st, HDC in next 8 sts] 10 times. (100)

Rnd 8: HDC in next 16 sts, Ch 10, Sk 10 sts, HDC in next 40 sts, Ch 10, Sk 10 sts, HDC in the last 24 sts. (80 sts and 2 ch 10 sps)

Rnd 9: HDC in each st putting 10 HDC in each of the Ch 10 sps. (100)

Rnds 10-34: HDC in each st around.
Fasten off after your piece is long enough.
Weave in ends.

Horns:

Make 2

With Gray yarn
Use 1 strand of yarn and 3.75mm crochet hook
Ch 2
Rnd 1: 4 SC in 2nd ch from hook (4)

Work in continuous rounds
Work in BLO

Rnd 2: 2 SC in next st, SC in the rest of the sts around. (5)

Rnds 3-10: repeat Round 2 (you should have 12 sts after Rnd 10 is complete

Rnd 11: SC in each st around. Fasten off with long tail for sewing.

Assembly Step:
Stuff Horns and sew them to each shoulder. Weave in ends.

Inner Eye:

With Black yarn and 3.75mm crochet hook

Ch 3

Rnd 1: 9 DC in 3rd ch from hook, sl st to first DC. Do not turn. (9)

Rnd 2: Ch 2 (does not count as st), 2 DC in each st around, sl st to first DC. (18)

Fasten off with long tail for sewing.

Outer Eye:

With White yarn and 3.75mm crochet hook

Ch 3

Rnd 1: 9 DC in 3rd Ch from hook, sl st to first DC, do not turn after each round. (9)

Rnd 2: Ch 2 (does not count as st), 2 DC in each st around, Sl st to first DC. (18)

Rnd 3: Ch 2, [2 DC in next st, DC in next st] 9 times, sl st to first DC. (27)

Rnd 4: Ch 2, [2 DC in next st, DC in next 2 sts] 9 times, sl st to first DC. (36)

Rnd 5: Ch 2, [2 DC in next st, DC in next 3 sts]9 times, sl st to first DC. (45)

Rnd 6: Ch 2. [2 DC in next st, DC in next 4 sts] 9 times, sl st to first DC. (54)

Rnd 7: Ch 2, [2 DC in next st, DC in next 5 sts] 9 times, sl st to first DC. (63)

Fasten off with long tail for sewing.

Assembly step:
Sew black circle inner eye to the center of the outer eye white piece. Add a fleck of white in the black piece for added effect. Sew White piece to the body of the costume. Weave in all ends.

Eyelid:

With Green and 3.75mm crochet hook
Use 1 strand of yarn

Ch 20

Row 1: DC in 3rd Ch and each ch across, Ch 1 turn.

Row 2: Sl st in first st, HDC in next 16 sts, sl st in last st. Fasten off with long tail for sewing.

Assembly step:

Sew the eyelid to the top of the outer eye white piece. I sewed mine with the HDC row on the top and the DC row on the bottom. I sewed only the top down, and the lid just sat over the eye (see photos for reference)

Mouth:

With Black and 3.75mm crochet hook
Use 1 strand of yarn

Ch 42

Row 1: DC in 3rd ch and in each ch across, Ch 2 turn. (40)

Row 2: [DC2TOG] 2 times, DC in each st across until 4 sts remain, [DC2TOG] 2 times, ch 2 turn. (36)

Row 3-5: repeat row 2
You should have 24 sts by the end of row 5
Continue to SC around entire piece to clean up edges.
Fasten off with long tail for sewing.

Teeth:

With White and 3.75mm crochet hook
use 1 strand of yarn

Ch 38

First tooth: Row 1: DC in 3rd ch from hook, DC in next 5 sts, Ch 2, turn. (6)

Row 2: [DC2TOG] 3 times, Ch 2, Turn. (3)

Row 3: DC3TOG, Continue to SL ST down the left side of the tooth back down to the foundation ch, sl st into the very next Ch on the foundation ch right next to the last tooth

*Next tooth: Row 1: Ch 2, DC in same st and in next 5 sts, Ch 2 turn. (6)

Row 2: [DC2TOG] 3 times, Ch 2, Turn. (3)

Row 3: DC3TOG, Continue to SL ST down the left side of the tooth back down to the foundation ch, sl st into the very next Ch on the foundation ch right next to the last tooth.

Repeat from * across, ending with sl sts down the left side of the last tooth. Fasten off with long tail for sewing.

Assembly Step:

Sew black part of mouth to the body under the eyeball, then sew the teeth to the top of the mouth piece.

Weave in all ends. Enjoy!


This post contains affiliate links, which I may be compensated for when you make a purchase. That means if you click on any link and buy from the linked websites, I will receive a small percentage of the value of your order. The amount you pay is not changed. Thank you for all your support in clicking the links in my blog!! You all are so amazing!! ~Nadia

The yarn provided for this pattern is courtesy of Lion Brand Yarn

FREE Written Crochet Pattern: Fuzzy Monster Hat with Horns

FREE Written Crochet Pattern: Fuzzy Monster Hat with Horns

It’s that time of year again! Halloween is one of my favorite holidays. Every year, we try to create something unique and fun to share here on YARNutopia. This year is no exception, and we have decided on some friendly monster costumes.

Nate pulls off the big blue monster very well! For his costume, I created the fuzzy hat with horns. I purchased the furry costume from Amazon and voila it was the perfect match!


My dad will continue to be the videographer, editor, and photographer for our videos when I move away.
Support YARNutopia today so we can continue to bring you clear, quality crochet tutorials even after I move into my new home!
There will be an added expense of more travel and hopefully this won’t deter our ability to provide consistent videos on a weekly basis.

Donate Button with Credit Cards

**You can always contact me via Facebook if you have any problems with the pattern. I am happy to help if you have any questions along the way.
***These patterns are copyright YARNutopia © so PLEASE DO NOT COPY, SHARE, ADJUST OR RESELL MY PATTERN. I wrote and tested this pattern myself, from beginning to end. It took a lot of time and work, and I would really like to have it remain “my pattern.”
***You can sell anything you make from my patterns, please just link back to my website YARNutopia.com. Thank you!

Teacher: Nadia Fuad
Video and Editing: Fuad Azmat (My Daddy)
Share your work on Facebook!
Add me on Snapchat: YARNutopia
Follow me on Instagram
Visit My Ravelry Store and add this to your Favorites!
Follow me on Twitter: @YARNutopia
Enjoy this video and subscribe to my channel on YouTube for more tutorials on how to crochet!
Leave a comment, and share with your friends!

Pattern:

Designed by Nadia Fuad
You *may* sell items made from my pattern, but please reference my website YARNutopia.com.
Please do not copy, sell, and/or post this pattern and claim it as your own.

Materials you will need:
Get the supplies individually by clicking the links below
Knit Picks Cotlin Yarn in Silver (less than 50 yards)
Lion Brand Yarn A Star is Born Oh Baby Yarn in Turquoise (2 balls)
-Lion Brand Homespun Yarn in Purple Haze (less than 25 yards)
Size G-4.25mm Crochet Hook
Yarn Needle
Scissors

NOTES:
-Use a smaller hook to make these smaller
-Use a bigger hook to make these bigger
-The measurements of this hat are for an adult male (23 inches circumference of head and 9 inches tall)
-You can check out yarnsub.com to see yarn substitutions that are equal to the yarn I used in this project.
-The components to this pattern are Hat Shell and Horns
-This is worked from the top down and then the horns and fur are added after the hat is made

Special stitches:
Ch(s): chain(s)
YO: Yarn Over
St(s): Stitch(es)
Sl st: slip stitch
SK: Skip
SC: Single Crochet
DC: Double Crochet

Pattern:

If you have any confusion or difficulty with reading this pattern, please watch the video tutorial that is linked above in this blog post to have visual instructions.

Hat:

WORK IN BLO (you will use the front loop later to attach the fur)

With turquoise yarn

Ch 2
Work in continuous rounds for this piece

Round 1: 9 SC in 2nd ch from hook. (9)

Round 2: 2 SC in each st around. (18)

Rnd 3: [2 SC in next st, SC in next st] 9 times. (27)

Rnd 4: [2 SC in next st, SC in next 2 sts] 9 times. (36)

Rnd 5: [2 SC in next st, SC in next 3 sts] 9 times. (45)

Rnd 6: [2 SC in next st, SC in next 4 sts] 9 times. (54)

Rnd 7: [2 SC in next st, SC in next 8 sts] 6 times. (60)

Rnd 8:  [2 SC in next st, SC in next 9 sts] 6 times. (66)

Rnds 9-45: SC in each st around.
Fasten off after round 45 or until your hat is long enough to fit your head.
Weave in all ends.

Horns:

Make 2 in the gray yarn
WORK IN BLO
Work in continuous rounds

Ch 2
Rnd 1: 4 SC in 2nd ch from hook. (4)

Rnd 2: 2 SC in next st, SC in the rest of the sts around. (5)

Rnd 3: SC in each st around. (5)

Rnd 4: Repeat Rnd 2. (6)

Rnd 5: Repeat Rnd 2. (7)

Rnd 6: Repeat Rnd 2. (8)

Rnd 7: SC in each st around. (8)

Rnds 8-17: Repeat Rnd 2.
At the end of rnd 17, you should have 18 sts around.
Fasten off with long tail for sewing.

Sew horns to the hat in the top front (see photos for reference on positioning)

Assembly step:
Cut a TON of 4 inch strands of the turquoise yarn and the homespun purple yarn
loop 1 or 2 strands around the front loops you left unworked on the hat and tie them in knots (this is a very tedious part of the hat, but it’s worth it!)
Make the purple spots first, then go in and add the turquoise yarn. I skipped 2 sts between attaching yarn so it wouldn’t be too fluffy but you can add or do less. The monster hat I made has 4 medium sized purple spots on the head. Don’t worry about uneven strands, after all the strands are attached, you will give the hat a haircut to your liking!

Enjoy!


This post contains affiliate links, which I may be compensated for when you make a purchase. That means if you click on any link and buy from the linked websites, I will receive a small percentage of the value of your order. The amount you pay is not changed. Thank you for all your support in clicking the links in my blog!! You all are so amazing!! ~Nadia

The yarn provided for this pattern is courtesy of Lion Brand Yarn

FREE Crochet Video Tutorial: Summer Mini Tote

FREE Crochet Video Tutorial: Summer Mini Tote

What a fantastic little tote in dual colors! It’s a great bag to end the summer on! It is a cute round handbag that can pack a lot inside. Add a cute button accessory and away you go! Large enough for all your favorite things!!


Follow along with this video tutorial to learn how to make this bag:


My dad will continue to be the videographer, editor, and photographer for our videos even if we don’t live together.
Support YARNutopia today so we can continue to bring you clear, quality crochet tutorials even after I move into my new home!
There will be an added expense of more travel and hopefully this won’t deter our ability to provide consistent videos on a weekly basis.

Donate Button with Credit Cards

**You can always contact me via Facebook if you have any problems with the pattern. I am happy to help if you have any questions along the way.
***These patterns are copyright YARNutopia © so PLEASE DO NOT COPY, SHARE, ADJUST OR RESELL MY PATTERN. I wrote and tested this pattern myself, from beginning to end. It took a lot of time and work, and I would really like to have it remain “my pattern.”
***You can sell anything you make from my patterns, please just link back to my website YARNutopia.com. Thank you!

Teacher: Nadia Fuad
Video and Editing: Fuad Azmat (My Daddy)
Share your work on Facebook!
Add me on Snapchat: YARNutopia
Follow me on Instagram
Visit My Ravelry Store and add this to your Favorites!
Follow me on Twitter: @YARNutopia
Enjoy this video and subscribe to my channel on YouTube for more tutorials on how to crochet!
Leave a comment, and share with your friends!

Designed by Nadia Fuad
You *may* sell items made from my pattern, but please reference my website YARNutopia.com.
Please do not copy, sell, and/or post this pattern and claim it as your own.

Materials you will need:
Get the supplies individually by clicking the links below
Lion Brand Yarn Basic Stitch Anti-Pilling yarn in Lemonade and Turquoise (Use 2 strands of yarn at the same time. I ordered 2 balls of each color)
SizeI-5.50mm Crochet Hook and a smaller crochet hook to fit through the base piece
Base Piece from Amazon
Button for closure
Yarn Needle
Scissors

NOTES:
-Use a smaller hook to make these smaller
-Use a bigger hook to make these bigger
-You can use any size 4 medium, worsted weight yarn for this project. 2 contrasting colors look great together, but you can use 1 color or many colors if you’d like!
-You can check out yarnsub.com to see yarn substitutions that are equal to the yarn I used in this project.


Special stitches:
Ch(s): chain(s)
YO: Yarn Over
St(s): Stitch(es)
Sl st: slip stitch
SK: Skip
SC: Single Crochet
DC: Double Crochet
Popcorn Stitch: 5 DC in same st, remove hook from loop, insert hook in 1st DC of grouping, put loop back on hook and pull through, folding all 5 sts in half creating a popcorn look.


This post contains affiliate links, which I may be compensated for when you make a purchase. That means if you click on any link and buy from the linked websites, I will receive a small percentage of the value of your order. The amount you pay is not changed. Thank you for all your support in clicking the links in my blog!! You all are so amazing!! ~Nadia

The yarn provided for this pattern is courtesy of Lion Brand Yarn

Life is Changing

Life is Changing

It’s been quite a while since I have last written an update both regarding my health and also Nasir’s diagnosis of autism. As far as my health goes, I feel I’m in the best place I have been in years. I have occasional setbacks, but over-all I have been feeling very good. I’ve been following up with doctors, continuing my biologic medication, and trying to practice a healthier lifestyle. I have been going to the fitness center several days a week. The gym is two-fold. One, for my physical and mental health, and secondly for Nasir. He is socializing with his peers more and more, and the gym’s childcare services provide an opportunity for him to do just that.

Where we started

Since I last blogged about this, we were in the middle of a whirlwind of overwhelming hits coming at us from every direction. Nas wasn’t meeting his appropriate age mile markers. I was battling my own health issues with my Crohn’s disease and mental health, the most difficult being post-partum depression and anxiety. You can read more here.

Soon after the doctors told us Nasir was on the Autism Spectrum, we were thrust into a new normal of therapies of all kinds. Speech, behavioral, occupational, and more. Nasir was nearly two years old and other than making some babble sounds, he didn’t say actual words, mimic our sounds, answer or respond to his name, he wouldn’t make eye contact often, he played independently from other children (other kids didn’t interest him much), he obsessively watched or paid attention to only certain things like specific TV shows that he watched over and over. We would discount or rationalize them, or chalk it up to other things – “maybe it’s his hearing” or “he was born a little early, he’s just a little delayed.”

What came next

Getting the diagnosis of ASD was bittersweet for our family. It’s one of the most overwhelming things to process, but we also have a solid reason for the why’s we were experiencing. We could finally move forward with all the wonderful resources our community has to offer.

Where we are now

Nasir is in therapy nearly every day. He is now talking non-stop. He has lots to talk about and share. He has big opinions and now that he has discovered his voice, he is eager to discover new words, things and experiences. He loves adventure, to play, and to build. He swims and loves the park. He has friends and learns a lot from parallel play. He recently started dancing and his love of music has always been strong. Magna-tiles have opened up his imagination, and he is a master at building castles. He sings, counts, says the alphabet, and identifies so many objects we see throughout the day. He loves his family. Mama and Daddy are his favorite people followed by his grandparents, all his aunties, uncles, cousins and his amazing therapists. He loves reading books, and presently, The Mickey Mouse Clubhouse is his favorite TV show. (We shout “OH TOODLES” a dozen times a day!)

We have come SO FAR in a just under a year. The therapies have provided Nate and I small windows in our day to have a break. Despite Nasir’s achievements, he is still demonstrating behavior that do not allow us many moments for breaks. He’s still a wild toddler, of course, but he also never sits still, his attention span is very short. We are having less meltdowns, but they still occur daily. My entire life is devoted to this sweet boy and facing all the challenges that come our way.

Moving ahead

When I do get a chance, I’m trying to get back into my crochet. I feel that spark coming back. I feel several sparks returning. I’m beginning to feel more like myself. Therapy has helped – my own therapy. It’s been life-changing. Little by little, I have been able to piece myself back together. I’m stronger than I have been in a long time. I can do hard things, and I’m doing them every day. If Nas is doing hard things, then I need to continue to set an example and do the same. We continue to take baby steps toward doing more crochet projects and hopefully soon, things will be back into full-swing.

I am currently working on one crochet project per month, and I have a goal of doing 3 to 4 projects per month like I used to do. At the time of creating this blog post, I am anticipating planning out our Halloween costumes for the family this year. You know we have to go all out like every year! Can’t wait to share what we have up our sleeve in 2022!


Here are some fun pictures we took this summer!


FREE Written Crochet Pattern: Boho Throw Blanket

FREE Written Crochet Pattern: Boho Throw Blanket

Hot off my hook is my Boho Throw! I started filming this week and kept messing up. My camera wasn’t focused or centered, my microphone was off. So many issues. So I scrapped the video and wrote this VERY EASY pattern.  I used Lion Brand Yarn Ferris Wheel for the throw and Lion Brand Skein Tones for the border.


My dad will continue to be the videographer, editor, and photographer for our videos when I move away.
Support YARNutopia today so we can continue to bring you clear, quality crochet tutorials even after I move into my new home!
There will be an added expense of more travel and hopefully this won’t deter our ability to provide consistent videos on a weekly basis.

Donate Button with Credit Cards

**You can always contact me via Facebook if you have any problems with the pattern. I am happy to help if you have any questions along the way.
***These patterns are copyright YARNutopia © so PLEASE DO NOT COPY, SHARE, ADJUST OR RESELL MY PATTERN. I wrote and tested this pattern myself, from beginning to end. It took a lot of time and work, and I would really like to have it remain “my pattern.”
***You can sell anything you make from my patterns, please just link back to my website YARNutopia.com. Thank you!

Teacher: Nadia Fuad
Video and Editing: Fuad Azmat (My Daddy)
Share your work on Facebook!
Add me on Snapchat: YARNutopia
Follow me on Instagram
Visit My Ravelry Store and add this to your Favorites!
Follow me on Twitter: @YARNutopia
Enjoy this video and subscribe to my channel on YouTube for more tutorials on how to crochet!
Leave a comment, and share with your friends!

Pattern:

Designed by Nadia Fuad
You *may* sell items made from my pattern, but please reference my website YARNutopia.com.
Please do not copy, sell, and/or post this pattern and claim it as your own.

Materials you will need:
Get the supplies individually by clicking the links below
Lion Brand Yarn Ferris Wheel in Summer Day
Lion Brand Yarn Skein Tones in Nutmeg
SizeH-5.00mm Crochet Hook
Yarn Needle
Scissors

NOTES:
-Use a smaller hook to make these smaller
-Use a bigger hook to make these bigger
-The measurements of this blanket are 40 inches x 50 inches
-You can check out yarnsub.com to see yarn substitutions that are equal to the yarn I used in this project.

Special stitches:
Ch(s): chain(s)
YO: Yarn Over
St(s): Stitch(es)
Sl st: slip stitch
SK: Skip
SC: Single Crochet
DC: Double Crochet
SHELL: 5 DC in same space


Pattern:

Ch 130 or any multiple of 3

Row 1:  2 DC in 3rd ch from hook, *Sk 2 Chs, 3 DC in next Ch, repeat from * across, ending with 3 DC in last Ch, Turn

Row 2: Ch 3 (counts as stitch), *3 DC in next GAP between the 3 DC groupings, repeat from * across, ending with 1 DC in last st, Turn.

Row 3: Ch 3, 2 DC in first gap where the Ch 3 is, *3 DC in next gap between 3 DC groupings, repeat from * across, ending with DC in last st, turn.

Repeat Rows 2 and 3 until your blanket is long enough.
I did 109 rows.

End on an ODD numbered row so it matches Row 1.

Fasten off, weave in ends.

Border:

Attach yarn to first gap after corner on the top right corner of your blanket

Round 1: Ch 3, 2 DC in same gap, 3 DC in next gap and in each gap around, in each corner stitch put [1 DC, Ch 2, 1 DC], continue putting 3DC between groupings. Sl st to beginning ch 3 st. DO NOT TURN.

Round 2: Ch 1, SC in the gap right AFTER the corner (where you sl st’d your work from round 1), Shell in next gap, SC in next gap, repeat from * around, in each corner put 7 DCs. SC before AND after the corners. Sl st to first SC st. Fasten off, Weave in all ends.

Enjoy!


This post contains affiliate links, which I may be compensated for when you make a purchase. That means if you click on any link and buy from the linked websites, I will receive a small percentage of the value of your order. The amount you pay is not changed. Thank you for all your support in clicking the links in my blog!! You all are so amazing!! ~Nadia

The yarn provided for this pattern is courtesy of Lion Brand Yarns

FREE Crochet Video Tutorial: Catchin’ Waves Crop Top

FREE Crochet Video Tutorial: Catchin’ Waves Crop Top

Warm weather, Beach Days, and the Catching Waves Crop Top are all you need for a fun in the sun summer!! This cute boho top gives all the vibes! Check out the video tutorial and written instructions below.


Follow along with this video tutorial to learn how to make this crop top:


My dad will continue to be the videographer, editor, and photographer for our videos even if we don’t live together.
Support YARNutopia today so we can continue to bring you clear, quality crochet tutorials even after I move into my new home!
There will be an added expense of more travel and hopefully this won’t deter our ability to provide consistent videos on a weekly basis.

Donate Button with Credit Cards

**You can always contact me via Facebook if you have any problems with the pattern. I am happy to help if you have any questions along the way.
***These patterns are copyright YARNutopia © so PLEASE DO NOT COPY, SHARE, ADJUST OR RESELL MY PATTERN. I wrote and tested this pattern myself, from beginning to end. It took a lot of time and work, and I would really like to have it remain “my pattern.”
***You can sell anything you make from my patterns, please just link back to my website YARNutopia.com. Thank you!

Teacher: Nadia Fuad
Video and Editing: Fuad Azmat (My Daddy)
Share your work on Facebook!
Add me on Snapchat: YARNutopia
Follow me on Instagram
Visit My Ravelry Store and add this to your Favorites!
Follow me on Twitter: @YARNutopia
Enjoy this video and subscribe to my channel on YouTube for more tutorials on how to crochet!
Leave a comment, and share with your friends!

Designed by Nadia Fuad
You *may* sell items made from my pattern, but please reference my website YARNutopia.com.
Please do not copy, sell, and/or post this pattern and claim it as your own.

Materials you will need:
Get the supplies individually by clicking the links below
Knitologie Wisp in Clay Pot (472 yards – 2 balls of yarn)
SizeH-5.00mm Crochet Hook
Yarn Needle
Scissors

NOTES:
-Use a smaller hook to make these smaller
-Use a bigger hook to make these bigger
-The measurements of this top are: Bust: 38 inches around, Waist: 38 inches around, Length: 18 inches from shoulder to bottom, but you can make this as big as you want by continuing the repeat.
-You can check out yarnsub.com to see yarn substitutions that are equal to the yarn I used in this project.

Special stitches:
Ch(s): chain(s)
YO: Yarn Over
St(s): Stitch(es)
Sl st: slip stitch
SK: Skip
SC: Single Crochet
DC: Double Crochet


This post contains affiliate links, which I may be compensated for when you make a purchase. That means if you click on any link and buy from the linked websites, I will receive a small percentage of the value of your order. The amount you pay is not changed. Thank you for all your support in clicking the links in my blog!! You all are so amazing!! ~Nadia

The yarn provided for this pattern is courtesy of KnitCrate Yarn

FREE Written Crochet Pattern: Catchin’ Waves Crop Top

FREE Written Crochet Pattern: Catchin’ Waves Crop Top

Warm weather, Beach Days, and the Catching Waves Crop Top are all you need for a fun in the sun summer!! This cute boho top gives all the vibes! Check out the video tutorial and written instructions below.


My dad will continue to be the videographer, editor, and photographer for our videos when I move away.
Support YARNutopia today so we can continue to bring you clear, quality crochet tutorials even after I move into my new home!
There will be an added expense of more travel and hopefully this won’t deter our ability to provide consistent videos on a weekly basis.

Donate Button with Credit Cards

**You can always contact me via Facebook if you have any problems with the pattern. I am happy to help if you have any questions along the way.
***These patterns are copyright YARNutopia © so PLEASE DO NOT COPY, SHARE, ADJUST OR RESELL MY PATTERN. I wrote and tested this pattern myself, from beginning to end. It took a lot of time and work, and I would really like to have it remain “my pattern.”
***You can sell anything you make from my patterns, please just link back to my website YARNutopia.com. Thank you!

Teacher: Nadia Fuad
Video and Editing: Fuad Azmat (My Daddy)
Share your work on Facebook!
Add me on Snapchat: YARNutopia
Follow me on Instagram
Visit My Ravelry Store and add this to your Favorites!
Follow me on Twitter: @YARNutopia
Enjoy this video and subscribe to my channel on YouTube for more tutorials on how to crochet!
Leave a comment, and share with your friends!

Pattern:

Designed by Nadia Fuad
You *may* sell items made from my pattern, but please reference my website YARNutopia.com.
Please do not copy, sell, and/or post this pattern and claim it as your own.

Materials you will need:
Get the supplies individually by clicking the links below
Knitologie Wisp in Clay Pot (472 yards – 2 balls of yarn)
SizeH-5.00mm Crochet Hook
Yarn Needle
Scissors

NOTES:
-Use a smaller hook to make these smaller
-Use a bigger hook to make these bigger
-The measurements of this top are: Bust: 38 inches around, Waist: 38 inches around, Length: 18 inches from shoulder to bottom, but you can make this as big as you want by continuing the repeat.
-You can check out yarnsub.com to see yarn substitutions that are equal to the yarn I used in this project.


Special stitches:
Ch(s): chain(s)
YO: Yarn Over
St(s): Stitch(es)
Sl st: slip stitch
SK: Skip
SC: Single Crochet
DC: Double Crochet


Pattern:

If you have any confusion or difficulty with reading this pattern, please watch the video tutorial that is linked above in this blog post to have visual instructions.

Crop Top:

Ch 111 or any multiple of 12+3

Row 1: 2 DC in 3rd Ch from hook, *DC in next 5 chs, Sk 1 ch, DC in next 5 chs, 3 DC in next ch, repeat from * across, ending with 2 DC in last st. Ch 2, Turn.

Row 2: 2 DC in first st, *DC in next 5 sts, Sk 2 sts, DC in next 5 sts, 3 DC in next st (this should be in the middle st of the 3 dc grouping), repeat from * across, ending with 2 DC in last st, Ch 2, Turn.

Row 3: 2 DC in first st, *DC in next 5 sts, Sk 2 sts, DC in next 5 sts, 3 DC in next st, repeat from * across, ending with 2 DC in last st, Ch 2, Turn.

Row 4 to 16: Repeat Row 3 (make it wider if half of your chest is not covered) See video tutorial for placement.

Make 2 panels like this.

Assembly step:
Sew the center seam together up the middle and in the middle of the back as well

Bottom band:

Attach your yarn at the corner of the panels that you sewed together. DC along the edge of the front side, then Continue DC stitches along the side of the Back edge to make it attached as a circle to wrap around the mid section. (See video tutorial for visual instructions). Sl st to first st and then ch 2 and continue onto next row.

I did 6 rounds total of 128 sts all around for each row.

You can continue to do more rows to make your shirt longer if you’d like.

Assembly step:

Sew up the sides to make the arm holes smaller if you’d like! Leave it open for a more free feel!

Weave in all ends. Enjoy!


This post contains affiliate links, which I may be compensated for when you make a purchase. That means if you click on any link and buy from the linked websites, I will receive a small percentage of the value of your order. The amount you pay is not changed. Thank you for all your support in clicking the links in my blog!! You all are so amazing!! ~Nadia

The yarn provided for this pattern is courtesy of KnitCrate Yarn


FREE Written Crochet Pattern: Snuggle Me Up Baby Blanket

FREE Written Crochet Pattern: Snuggle Me Up Baby Blanket

A very close friend of mine recently had her second baby and I wanted to make something special for her. The simplicity of the granny square is given a little remix in this pattern because I use cluster stitches in the corners to make this unique design. I hope you enjoy this pattern. Follow along


My dad will continue to be the videographer, editor, and photographer for our videos when I move away.
Support YARNutopia today so we can continue to bring you clear, quality crochet tutorials even after I move into my new home!
There will be an added expense of more travel and hopefully this won’t deter our ability to provide consistent videos on a weekly basis.

Donate Button with Credit Cards

**You can always contact me via Facebook if you have any problems with the pattern. I am happy to help if you have any questions along the way.
***These patterns are copyright YARNutopia © so PLEASE DO NOT COPY, SHARE, ADJUST OR RESELL MY PATTERN. I wrote and tested this pattern myself, from beginning to end. It took a lot of time and work, and I would really like to have it remain “my pattern.”
***You can sell anything you make from my patterns, please just link back to my website YARNutopia.com. Thank you!

Teacher: Nadia Fuad
Video and Editing: Fuad Azmat (My Daddy)
Share your work on Facebook!
Add me on Snapchat: YARNutopia
Follow me on Instagram
Visit My Ravelry Store and add this to your Favorites!
Follow me on Twitter: @YARNutopia
Enjoy this video and subscribe to my channel on YouTube for more tutorials on how to crochet!
Leave a comment, and share with your friends!

Pattern:

Designed by Nadia Fuad
You *may* sell items made from my pattern, but please reference my website YARNutopia.com.
Please do not copy, sell, and/or post this pattern and claim it as your own.

Materials you will need:
Get the supplies individually by clicking the links below
Circulo Yarns Charme (4 balls total)
SizeH-5.00mm Crochet Hook
Yarn Needle
Scissors

NOTES:
-Use a smaller hook to make these smaller
-Use a bigger hook to make these bigger
-The measurements of this blanket are 36 inches wide but you can make this as big as you want by continuing the repeat.


Special stitches:
Ch(s): chain(s)
YO: Yarn Over
St(s): Stitch(es)
Sl st: slip stitch
SK: Skip
SC: Single Crochet
DC: Double Crochet
4DCCluster: [YO, Insert Hook into st, YO, Pull through, YO, Pull through 2 loops] 4 times, YO pull through all 5 loops on your hook. Cluster made.

Pattern:

If you have any confusion or difficulty with reading this pattern, please watch the video tutorial that is linked above in this blog post to have visual instructions.

Blanket:

Use 2 strands of fingering weight yarn together at the same time, or use one strand of a thicker yarn to create this.

Ch 3

Round 1: 3 DC in 3rd ch from hook, Ch 4, *3 more DC in same Ch as first 3 DC, Ch 4, repeat from * 2 more times, Sl st to first st, Ch 2, Turn.

Rnd 2: In the corner Ch 4 sp: DC in corner, 4 DC Cluster in same corner, Ch 4, 4 DC Cluster in same corner, DC in same corner, *DC in each st until you get to the next corner, [DC, 4DCCluster, Ch 4, 4DCCluster, DC] in corner, Repeat from * around ending with DC in last st, Sl st to first st, Ch 2, Turn.

Rnd 3: *DC in each st until you get to the corner, [DC, 4DCCluster, Ch 4, 4DCCluster, DC] in corner, Repeat from * around ending with DC in last st, Sl st to first st, Ch 2, Turn.

Rnds 4-30: Repeat Round 3.

You can continue to make your blanket larger if you’d like! Just continue the repeat pattern!

Fasten off, Weave in all ends.

This post contains affiliate links, which I may be compensated for when you make a purchase. That means if you click on any link and buy from the linked websites, I will receive a small percentage of the value of your order. The amount you pay is not changed. Thank you for all your support in clicking the links in my blog!! You all are so amazing!! ~Nadia

The yarn provided for this pattern is courtesy of Circulo Yarns


FREE Crochet Video Tutorial: Snuggle Me Up Baby Blanket

FREE Crochet Video Tutorial: Snuggle Me Up Baby Blanket

A very close friend of mine recently had her second baby and I wanted to make something special for her. The simplicity of the granny square is given a little remix in this pattern because I use cluster stitches in the corners to make this unique design. I hope you enjoy this pattern. Follow along


Follow along with this video tutorial to learn how to make this blanket:


My dad will continue to be the videographer, editor, and photographer for our videos even if we don’t live together.
Support YARNutopia today so we can continue to bring you clear, quality crochet tutorials even after I move into my new home!
There will be an added expense of more travel and hopefully this won’t deter our ability to provide consistent videos on a weekly basis.

Donate Button with Credit Cards

**You can always contact me via Facebook if you have any problems with the pattern. I am happy to help if you have any questions along the way.
***These patterns are copyright YARNutopia © so PLEASE DO NOT COPY, SHARE, ADJUST OR RESELL MY PATTERN. I wrote and tested this pattern myself, from beginning to end. It took a lot of time and work, and I would really like to have it remain “my pattern.”
***You can sell anything you make from my patterns, please just link back to my website YARNutopia.com. Thank you!

Teacher: Nadia Fuad
Video and Editing: Fuad Azmat (My Daddy)
Share your work on Facebook!
Add me on Snapchat: YARNutopia
Follow me on Instagram
Visit My Ravelry Store and add this to your Favorites!
Follow me on Twitter: @YARNutopia
Enjoy this video and subscribe to my channel on YouTube for more tutorials on how to crochet!
Leave a comment, and share with your friends!

Designed by Nadia Fuad
You *may* sell items made from my pattern, but please reference my website YARNutopia.com.
Please do not copy, sell, and/or post this pattern and claim it as your own.


Materials you will need:
Get the supplies individually by clicking the links below
Circulo Yarns Charme (4 balls total)
SizeH-5.00mm Crochet Hook
Yarn Needle
Scissors

NOTES:
-Use a smaller hook to make these smaller
-Use a bigger hook to make these bigger
-The measurements of this blanket are 36 inches wide but you can make this as big as you want by continuing the repeat.
-You can check out yarnsub.com to see yarn substitutions that are equal to the Lion Brand yarn I used in this project.

Special stitches:
Ch(s): chain(s)
YO: Yarn Over
St(s): Stitch(es)
Sl st: slip stitch
SK: Skip
SC: Single Crochet
DC: Double Crochet
4DCCluster: [YO, Insert Hook into st, YO, Pull through, YO, Pull through 2 loops] 4 times, YO pull through all 5 loops on your hook. Cluster made.


This post contains affiliate links, which I may be compensated for when you make a purchase. That means if you click on any link and buy from the linked websites, I will receive a small percentage of the value of your order. The amount you pay is not changed. Thank you for all your support in clicking the links in my blog!! You all are so amazing!! ~Nadia

The yarn provided for this pattern is courtesy of Circulo Yarns

FREE Crochet Video Tutorial: Day & Night Mesh Sweater

FREE Crochet Video Tutorial: Day & Night Mesh Sweater

This beautiful Day & Night Mesh Sweater is the newest pattern Hot Off the Hook!! It is super easy and fun to make. I used Lion Brand Yarn Hometown to create this stylish design. I love it so much!!


Follow along with this video tutorial to learn how to make this sweater:


My dad will continue to be the videographer, editor, and photographer for our videos even if we don’t live together.
Support YARNutopia today so we can continue to bring you clear, quality crochet tutorials even after I move into my new home!
There will be an added expense of more travel and hopefully this won’t deter our ability to provide consistent videos on a weekly basis.

Donate Button with Credit Cards

**You can always contact me via Facebook if you have any problems with the pattern. I am happy to help if you have any questions along the way.
***These patterns are copyright YARNutopia © so PLEASE DO NOT COPY, SHARE, ADJUST OR RESELL MY PATTERN. I wrote and tested this pattern myself, from beginning to end. It took a lot of time and work, and I would really like to have it remain “my pattern.”
***You can sell anything you make from my patterns, please just link back to my website YARNutopia.com. Thank you!

Teacher: Nadia Fuad
Video and Editing: Fuad Azmat (My Daddy)
Share your work on Facebook!
Add me on Snapchat: YARNutopia
Follow me on Instagram
Visit My Ravelry Store and add this to your Favorites!
Follow me on Twitter: @YARNutopia
Enjoy this video and subscribe to my channel on YouTube for more tutorials on how to crochet!
Leave a comment, and share with your friends!

Designed by Nadia Fuad
You *may* sell items made from my pattern, but please reference my website YARNutopia.com.
Please do not copy, sell, and/or post this pattern and claim it as your own.

Materials you will need:
Get the supplies individually by clicking the links below
Lion Brand Hometown Yarn in colors New York White and Chicago Charcoal (4 balls white, 3 balls gray) total 600 yards of yarn
Size -Q-15.25mm Crochet Hook
Yarn Needle
Scissors

NOTES:

-Use a smaller hook to make this smaller
-Use a bigger hook to make this bigger
-This is written in US terms
-This took about 1 week to make but I did not work on it continuously.
-You can check out yarnsub.com to see yarn substitutions that are equal to the Lion Brand yarn I used in this project.

Special stitches:
Ch(s): chain(s)
YO: Yarn Over
St(s): Stitch(es)
Sl st: slip stitch
SK: Skip
FSC: Foundation Single Crochet
FDC: Foundation Double Crochet
SC: Single Crochet
Shell: 5 DC in same stitch
DC: Double Crochet
Stacked DC: This is a starting stitch, 2 SC’s stacked on top of each other or you can substitute a chain 3 as the first stitch if that’s more comfortable.


This post contains affiliate links, which I may be compensated for when you make a purchase. That means if you click on any link and buy from the linked websites, I will receive a small percentage of the value of your order. The amount you pay is not changed. Thank you for all your support in clicking the links in my blog!! You all are so amazing!! ~Nadia

The yarn provided for this pattern is courtesy of Lion Brand Yarn

FREE Written Crochet Pattern: Day & Night Mesh Sweater

FREE Written Crochet Pattern: Day & Night Mesh Sweater

This beautiful Day & Night Mesh Sweater is the newest pattern Hot Off the Hook!! It is super easy and fun to make. I used Lion Brand Yarn Hometown to create this stylish design. I love it so much!!


My dad will continue to be the videographer, editor, and photographer for our videos even if we don’t live together.
Support YARNutopia today so we can continue to bring you clear, quality crochet tutorials even after I move into my new home!
There will be an added expense of more travel and hopefully this won’t deter our ability to provide consistent videos on a weekly basis.

Donate Button with Credit Cards

**You can always contact me via Facebook if you have any problems with the pattern. I am happy to help if you have any questions along the way.
***These patterns are copyright YARNutopia © so PLEASE DO NOT COPY, SHARE, ADJUST OR RESELL MY PATTERN. I wrote and tested this pattern myself, from beginning to end. It took a lot of time and work, and I would really like to have it remain “my pattern.”
***You can sell anything you make from my patterns, please just link back to my website YARNutopia.com. Thank you!

Teacher: Nadia Fuad
Video and Editing: Fuad Azmat (My Daddy)
Share your work on Facebook!
Add me on Snapchat: YARNutopia
Follow me on Instagram
Visit My Ravelry Store and add this to your Favorites!
Follow me on Twitter: @YARNutopia
Enjoy this video and subscribe to my channel on YouTube for more tutorials on how to crochet!
Leave a comment, and share with your friends!

Designed by Nadia Fuad
You *may* sell items made from my pattern, but please reference my website YARNutopia.com.
Please do not copy, sell, and/or post this pattern and claim it as your own.

Materials you will need:
Get the supplies individually by clicking the links below
Lion Brand Hometown Yarn in colors New York White and Chicago Charcoal (4 balls white, 3 balls gray) total 600 yards of yarn
Size -Q-15.25mm Crochet Hook
Yarn Needle
Scissors

NOTES:

-Use a smaller hook to make this smaller
-Use a bigger hook to make this bigger
-This is written in US terms
-This took about 1 week to make but I did not work on it continuously.
-You can check out yarnsub.com to see yarn substitutions that are equal to the Lion Brand yarn I used in this project.

Special stitches:
Ch(s): chain(s)
YO: Yarn Over
St(s): Stitch(es)
Sl st: slip stitch
SK: Skip
FSC: Foundation Single Crochet
FDC: Foundation Double Crochet
SC: Single Crochet
Shell: 5 DC in same stitch
DC: Double Crochet
Stacked DC: This is a starting stitch, 2 SC’s stacked on top of each other or you can substitute a chain 3 as the first stitch if that’s more comfortable.


Pattern:

Front and Back Panel (The pattern is the same for both pieces but you need to make 2 panels so you can sew them together)

Row 1: Ch 26, DC in 3rd Ch and in each Ch across, OR FDC 24, Ch 2, Turn. (if you need to make it wider, make more chains or stitches. The video tutorial explains sizing and how to make it bigger or smaller)

Rows 2-20: DC BETWEEN each st, DC in last stitch (if necessary), Make sure you have 24 sts on each row.
Change color after every 5th row.

After row 20, Fasten off.
Once you have 2 panels for the front and back of the shirt, sew them together on each shoulder and down the sides (leaving holes for the arms available).

Weave in your ends.

You are sewing it together inside out.

Sleeves: Make 2

Row 1: Ch 18, sl st to first ch to form a ring, Ch 2, DC in each ch around. OR FDC 18, Sl st to first St to form a ring Ch 2, TURN (then sew the base of the stitches together to clean up the edge of the sleeve – you can see how to do this in the video tutorial.)

Rows 2-16: Ch 2, DC BETWEEN each st, make sure you have 18 sts around for each round. Sl st to first st, Ch 2, TURN.

Change color after every 4th row.

Fasten off after row 16. Sew to the sleeve holes on the shirt.

Weave in all ends.

Enjoy!!

This post contains affiliate links, which I may be compensated for when you make a purchase. That means if you click on any link and buy from the linked websites, I will receive a small percentage of the value of your order. The amount you pay is not changed. Thank you for all your support in clicking the links in my blog!! You all are so amazing!! ~Nadia

The yarn provided for this pattern is courtesy of Lion Brand Yarn


FREE Crochet Video Tutorial: Painted Gray Scarf

FREE Crochet Video Tutorial: Painted Gray Scarf

I know that it has been a while since I’ve posted a video tutorial and new pattern. So, I’m taking small steps back to filming to share my Painted Gray Scarf.

The Painted Gray Scarf is the newest pattern Hot Off the Hook!! It is super easy and fun to make. I used Lion Brand Yarn Scarfie to create this stylish design. Here’s the best part: this combination of stitches are a nice repeat and would make a lovely throw, baby blanket, afghan, or shawl. It’s THAT EASY! With a few adaptations of your own, the sky’s the limit.

For me, it’s subzero temps in Wisconsin, I needed a warm scarf. This one was perfect!


Follow along with this video tutorial to learn how to make this scarf:


My dad will continue to be the videographer, editor, and photographer for our videos even if we don’t live together.
Support YARNutopia today so we can continue to bring you clear, quality crochet tutorials even after I move into my new home!
There will be an added expense of more travel and hopefully this won’t deter our ability to provide consistent videos on a weekly basis.

Donate Button with Credit Cards

**You can always contact me via Facebook if you have any problems with the pattern. I am happy to help if you have any questions along the way.
***These patterns are copyright YARNutopia © so PLEASE DO NOT COPY, SHARE, ADJUST OR RESELL MY PATTERN. I wrote and tested this pattern myself, from beginning to end. It took a lot of time and work, and I would really like to have it remain “my pattern.”
***You can sell anything you make from my patterns, please just link back to my website YARNutopia.com. Thank you!

Teacher: Nadia Fuad
Video and Editing: Fuad Azmat (My Daddy)
Share your work on Facebook!
Add me on Snapchat: YARNutopia
Follow me on Instagram
Visit My Ravelry Store and add this to your Favorites!
Follow me on Twitter: @YARNutopia
Enjoy this video and subscribe to my channel on YouTube for more tutorials on how to crochet!
Leave a comment, and share with your friends!

Designed by Nadia Fuad
You *may* sell items made from my pattern, but please reference my website YARNutopia.com.
Please do not copy, sell, and/or post this pattern and claim it as your own.

Materials you will need:
Get the supplies individually by clicking the links below
Lion Brand Yarn Scarfie in Color: Cream/Black
Size -K-6.50mm Crochet Hook
Yarn Needle
Scissors

NOTES:

-Use a smaller hook to make this smaller
-Use a bigger hook to make this bigger
-This is written in US terms
-This took about 1 week to make but I did not work on it continuously.
-You can check out yarnsub.com to see yarn substitutions that are equal to the Lion Brand yarn I used in this project.

Special stitches:
Ch(s): chain(s)
YO: Yarn Over
St(s): Stitch(es)
Sl st: slip stitch
SK: Skip
FSC: Foundation Single Crochet
FDC: Foundation Double Crochet
SC: Single Crochet
Shell: 5 DC in same stitch
DC: Double Crochet
Stacked DC: This is a starting stitch, 2 SC’s stacked on top of each other or you can substitute a chain 3 as the first stitch if that’s more comfortable.


This post contains affiliate links, which I may be compensated for when you make a purchase. That means if you click on any link and buy from the linked websites, I will receive a small percentage of the value of your order. The amount you pay is not changed. Thank you for all your support in clicking the links in my blog!! You all are so amazing!! ~Nadia

The yarn provided for this pattern is courtesy of Lion Brand Yarn

FREE Written Crochet Pattern: Painted Gray Scarf

FREE Written Crochet Pattern: Painted Gray Scarf

I know that it has been a while since I’ve posted a video tutorial and new pattern. So, I’m taking small steps back to filming to share my Painted Gray Scarf.

The Painted Gray Scarf is the newest pattern Hot Off the Hook!! It is super easy and fun to make. I used Lion Brand Yarn Scarfie to create this stylish design. Here’s the best part: this combination of stitches are a nice repeat and would make a lovely throw, baby blanket, afghan, or shawl. It’s THAT EASY! With a few adaptations of your own, the sky’s the limit.

For me, it’s subzero temps in Wisconsin, I needed a warm scarf. This one was perfect!


My dad will continue to be the videographer, editor, and photographer for our videos even if we don’t live together.
Support YARNutopia today so we can continue to bring you clear, quality crochet tutorials even after I move into my new home!
There will be an added expense of more travel and hopefully this won’t deter our ability to provide consistent videos on a weekly basis.

Donate Button with Credit Cards

**You can always contact me via Facebook if you have any problems with the pattern. I am happy to help if you have any questions along the way.
***These patterns are copyright YARNutopia © so PLEASE DO NOT COPY, SHARE, ADJUST OR RESELL MY PATTERN. I wrote and tested this pattern myself, from beginning to end. It took a lot of time and work, and I would really like to have it remain “my pattern.”
***You can sell anything you make from my patterns, please just link back to my website YARNutopia.com. Thank you!

Teacher: Nadia Fuad
Video and Editing: Fuad Azmat (My Daddy)
Share your work on Facebook!
Add me on Snapchat: YARNutopia
Follow me on Instagram
Visit My Ravelry Store and add this to your Favorites!
Follow me on Twitter: @YARNutopia
Enjoy this video and subscribe to my channel on YouTube for more tutorials on how to crochet!
Leave a comment, and share with your friends!

Designed by Nadia Fuad
You *may* sell items made from my pattern, but please reference my website YARNutopia.com.
Please do not copy, sell, and/or post this pattern and claim it as your own.

Materials you will need:
Get the supplies individually by clicking the links below
Lion Brand Yarn Scarfie in Color: Cream/Black
Size -K-6.50mm Crochet Hook
Yarn Needle
Scissors

NOTES:

-Use a smaller hook to make this smaller
-Use a bigger hook to make this bigger
-This is written in US terms
-This took about 1 week to make but I did not work on it continuously.
-You can check out yarnsub.com to see yarn substitutions that are equal to the Lion Brand yarn I used in this project.

Special stitches:
Ch(s): chain(s)
YO: Yarn Over
St(s): Stitch(es)
Sl st: slip stitch
SK: Skip
FSC: Foundation Single Crochet
FDC: Foundation Double Crochet
SC: Single Crochet
Shell: 5 DC in same stitch
DC: Double Crochet
Stacked DC: This is a starting stitch, 2 SC’s stacked on top of each other or you can substitute a chain 3 as the first stitch if that’s more comfortable.


Pattern:

Row 1: FDC 206 or Ch 208 and then DC in 3rd Ch from hook and across. (206 DC), Ch 1, Turn

Row 2: SC in 1st st, *Sk 2 sts, Shell in next st, Sk 2 sts, SC in next st, repeat from * across, ending with SC in last st, ch 1, turn.

Row 3: Stacked DC in first st, *Ch 2, SC in middle st of next shell, Ch 2, DC in next SC between shells, Repeat from * across ending with DC in last st, Ch 1, turn.

Row 4: Stacked DC in 1st st, * 2 DC in ch 2 sp, DC in SC, 2 DC in next Ch 2 sp, DC in next DC, Repeat from * across ending with DC in last st, Ch 1, Turn.

Row 5: Stacked DC in 1st st, 2 more DC in first st (half shell made), *Sk 2 sts, SC in next st, Sk 2 sts, Shell in next st, Repeat from * across ending with a half shell in the last st, Ch 1, turn.

Row 6: SC in first st, *Ch 2, DC in next SC between shells, Ch 2, SC in middle st of next shell, repeat from * across ending with SC in last st, Ch 1, Turn.

Row 7: Repeat Row 4 concept

Row 8: Repeat Row 2

Row 9: Repeat Row 3

Row 10: Repeat Row 4

Row 11: Repeat Row 5

Row 12: Repeat Row 6

Row 13: Repeat Row 4

Row 14: Repeat Row 2

Row 15: Repeat Row 3

Row 16: Repeat Row 4

Fasten off

Weave in all ends. and Add fringe (optional)

Enjoy!!

This post contains affiliate links, which I may be compensated for when you make a purchase. That means if you click on any link and buy from the linked websites, I will receive a small percentage of the value of your order. The amount you pay is not changed. Thank you for all your support in clicking the links in my blog!! You all are so amazing!! ~Nadia

The yarn provided for this pattern is courtesy of Lion Brand Yarn


FREE Written Crochet Pattern: Winter Cat Hat

FREE Written Crochet Pattern: Winter Cat Hat

Christmas may be behind us, but the New Year is just ahead, or, if you live in a climate like mine, it really doesn’t matter what time of the year it is, my Winter Cat Hat is all you need to get through those cold and snowy days!!

This luxuriously cozy hat is not only functional, it is SO CUTE! You will be in style on the slopes or on the go with this fun and furry hat!!

There is no video tutorial to this pattern yet.

My dad will continue to be the videographer, editor, and photographer for our videos even if we don’t live together.
Support YARNutopia today so we can continue to bring you clear, quality crochet tutorials even after I move into my new home!
There will be an added expense of more travel and hopefully this won’t deter our ability to provide consistent videos on a weekly basis.

Donate Button with Credit Cards

**You can always contact me via Facebook if you have any problems with the pattern. I am happy to help if you have any questions along the way.
***These patterns are copyright YARNutopia © so PLEASE DO NOT COPY, SHARE, ADJUST OR RESELL MY PATTERN. I wrote and tested this pattern myself, from beginning to end. It took a lot of time and work, and I would really like to have it remain “my pattern.”
***You can sell anything you make from my patterns, please just link back to my website YARNutopia.com. Thank you!

Teacher: Nadia Fuad
Video and Editing: Fuad Azmat (My Daddy)
Share your work on Facebook!
Add me on Snapchat: YARNutopia
Follow me on Instagram
Visit My Ravelry Store and add this to your Favorites!
Follow me on Twitter: @YARNutopia
Enjoy this video and subscribe to my channel on YouTube for more tutorials on how to crochet!
Leave a comment, and share with your friends!

Designed by Nadia Fuad
You *may* sell items made from my pattern, but please reference my website YARNutopia.com.
Please do not copy, sell, and/or post this pattern and claim it as your own.

Materials you will need:
Get the supplies individually by clicking the links below
Hometown Yarn by Lion Brand in Catskills Corner (1 ball)
Go For Faux Yarn by Lion Brand Yarn in the color Blond Elk
Size -L-8.00mm Crochet Hook
Yarn Needle
Scissors

NOTES:

-Use a smaller hook to make this smaller
-Use a bigger hook to make this bigger
-This is written in US terms
-This took about 2 hours to make.
-You can check out yarnsub.com to see yarn substitutions that are equal to the Lion Brand yarn I used in this project.
-This pattern shows the measurement as an adult sized hat

Special stitches:
Ch(s): chain(s)
YO: Yarn Over
St(s): Stitch(es)
Sl st: slip stitch
SK: Skip
SC: Single Crochet
DC: Double Crochet

Pattern:

Ch 23
Work in continuous rounds

Rnd 1: SC in 2nd ch from hook and across putting 3 SC in last ch, continue working on opposite side of foundation chain, SC in each st across, putting 2 SC in last st, sl st to first st, Ch 1, turn. (44)

Rnd 2-15: 1 SC in each st around, sl st to first st, Ch 1, TURN. (44)

Fasten off Hometown Yarn.

Row 16: determine where the center back of your hat is and free up or mark 6 stitches to be free and unworked. Then attach your FUR yarn to the left stitch of that and start this row in that stitch. Ch 2, DC in each st until the marked stitch, Turn (use photo for reference)


Rows 17-19: Ch 2, DC BETWEEN each st across, Turn.

Fasten off.

Weave in all ends.

Assembly Step: Use extra yarn to shape 2 ears in the top corners of the hat.  I just sewed a piece of yarn to make pointed ears and tied it off and wove in the ends.
Add 2 braids to the corners where the fur and regular yarn meet. See photos for reference.

Enjoy!!

This post contains affiliate links, which I may be compensated for when you make a purchase. That means if you click on any link and buy from the linked websites, I will receive a small percentage of the value of your order. The amount you pay is not changed. Thank you for all your support in clicking the links in my blog!! You all are so amazing!! ~Nadia

The yarn provided for this pattern is courtesy of Lion Brand Yarn

FREE Written Crochet Pattern: Holiday Stocking Hat

FREE Written Crochet Pattern: Holiday Stocking Hat

The holiday season is upon us and I am so excited! I love cozy hats and scarves this time of year and I couldn’t resist making a new hat for the season! Introducing my super soft Holiday Stocking Hat! I used Vel-Luxe yarn for the main part of the hat, Go for Faux yarn for the fur brim and a furry pom I found at the craft store. All yarn is courtesy of Lion Brand Yarn.


My dad will continue to be the videographer, editor, and photographer for our videos even if we don’t live together.
Support YARNutopia today so we can continue to bring you clear, quality crochet tutorials even after I move into my new home!
There will be an added expense of more travel and hopefully this won’t deter our ability to provide consistent videos on a weekly basis.

Donate Button with Credit Cards

**You can always contact me via Facebook if you have any problems with the pattern. I am happy to help if you have any questions along the way.
***These patterns are copyright YARNutopia © so PLEASE DO NOT COPY, SHARE, ADJUST OR RESELL MY PATTERN. I wrote and tested this pattern myself, from beginning to end. It took a lot of time and work, and I would really like to have it remain “my pattern.”
***You can sell anything you make from my patterns, please just link back to my website YARNutopia.com. Thank you!

Teacher: Nadia Fuad
Video and Editing: Fuad Azmat (My Daddy)
Share your work on Facebook!
Add me on Snapchat: YARNutopia
Follow me on Instagram
Visit My Ravelry Store and add this to your Favorites!
Follow me on Twitter: @YARNutopia
Enjoy this video and subscribe to my channel on YouTube for more tutorials on how to crochet!
Leave a comment, and share with your friends!

Designed by Nadia Fuad
You *may* sell items made from my pattern, but please reference my website YARNutopia.com.
Please do not copy, sell, and/or post this pattern and claim it as your own.

Materials you will need:
Get the supplies individually by clicking the links below
Vel-Luxe Yarn by Lion Brand Yarn in the color Eggplant
Go For Faux Yarn by Lion Brand Yarn in the color Chinchilla
Size -H-5.00mm Crochet Hook
Yarn Needle
Scissors

NOTES:

-Use a smaller hook to make this smaller
-Use a bigger hook to make this bigger
-This is written in US terms
-This took about 5 hours to make.
-You can check out yarnsub.com to see yarn substitutions that are equal to the Lion Brand yarn I used in this project.
-This pattern with video tutorial shows the measurement as an adult sized hat

Special stitches:
Ch(s): chain(s)
YO: Yarn Over
St(s): Stitch(es)
Sl st: slip stitch
SK: Skip
SC: Single Crochet
DC: Double Crochet

Pattern:

Ch 2
Work in continuous rounds

Rnd 1: 9 SC in 2nd ch from hook (9)

Rnd 2: 2 SC in first st, SC in the rest of the sts around. (10)

Rnds 3-10: Repeat Rnd 2 (you’ll increase by 1 stitch each round, rnd 10 will have 18 sts)

Rnds 10-14: Sc in each st around. (18)

Rnds 15-20: 2 SC in first st, SC in the rest of the sts around (you’ll increase by 1 st each round, rnd 20 will have 24 sts)

Rnds 21-24: Sc in each st around. (24)

Rnd 25: [2 SC in next st, SC in next 3 sts] 6 times. (30)

Rnds 26-30: SC in each st around.

Rnd 31: [2 SC in next st, SC in next 4 sts] 6 times. (36)

Rnds 32-36: SC in each st around. (36)

Rnd 37: [2 SC in next st, SC in next 5 sts] 6 times. (42)

Rnds 38-40: SC in each st around. (42)

Rnd 41: [2SC in next st, SC in next 6 sts] 6 times. (48)

Rnds 42-45: SC in each st around. (48)

Rnd 46: [2 SC in next st, SC in next 7 sts] 6 times. (54)

Rnd 47: SC in each st around.

Rnd 48: [2 SC in next st, SC in next 8 sts] 6 times. (60)

Rnd 49: [2 SC in next st, SC in next 9 sts] 6 times. (66)

Rnds 50-75: SC in each st around. Fasten off velvety yarn.

Rnd 76: Attach Fur yarn to any stitch. Ch 2, DC in each st around, Sl st to first st. (if your tension is looser, DC evenly in 60 sts around (you can skip a few stitches here and there, no one will notice)

Rnds 77-78: Ch 2, DC in each st around, Sl st to first st.
(Since it’s fur, you can work BETWEEN the stitches and that will work just fine, use your fingers to find the spaces between your stitches and insert your next st in there)

Fasten off. Attach pom to top of hat.

Weave in all ends.

Enjoy!!

This post contains affiliate links, which I may be compensated for when you make a purchase. That means if you click on any link and buy from the linked websites, I will receive a small percentage of the value of your order. The amount you pay is not changed. Thank you for all your support in clicking the links in my blog!! You all are so amazing!! ~Nadia

The yarn provided for this pattern is courtesy of Lion Brand Yarn

Happy Halloween 2021

Happy Halloween 2021

Our Annual Halloween Costume Reveal is here! Nate is a Rainbow to my Pot of Gold and Nas is our lucky leprechaun!

We had a heck of a time trying to decide on a costume that could be worn by our trio. It was such a challenge to find something that didn’t require a huge commitment and large amount of hours. Lately, our days are spent with Nasir doing occupational therapy and speech therapies for his autism.

This change has left me with only pockets of time in a day to work, so it has been quite challenging to pull this years costume together.

We managed this crazy ensemble. Not as thrilling as years past, but still fun and colorful like our family. AND we managed to get Nas to sit still and give us a couple smiles. He melts my heart. He is our true gold.

I hope you enjoy our trio and until next year…Happy Halloween!


If you are interested in making the hats Nate and I are wearing, you can find the crochet pattern and video tutorial here.

If you are interested in making the scarf Nate is wearing, you can find the crochet pattern and video tutorial here.

FREE Written Crochet Pattern: Rainbow Pom Hat

FREE Written Crochet Pattern: Rainbow Pom Hat

I am obsessed with bright colors and anything rainbow!! I created this hat to match the Rainbow Pom Scarf! Check that pattern out and make the full set! This year for Halloween, we are doing a Rainbow Theme so I wanted to create a hat and scarf to go together. You can use any colors you like with this easy tutorial using Lion Brand Yarn in the Hometown Line. I hope you enjoy this tutorial and pattern!!


My dad will continue to be the videographer, editor, and photographer for our videos even if we don’t live together.
Support YARNutopia today so we can continue to bring you clear, quality crochet tutorials even after I move into my new home!
There will be an added expense of more travel and hopefully this won’t deter our ability to provide consistent videos on a weekly basis.

Donate Button with Credit Cards

**You can always contact me via Facebook if you have any problems with the pattern. I am happy to help if you have any questions along the way.
***These patterns are copyright YARNutopia © so PLEASE DO NOT COPY, SHARE, ADJUST OR RESELL MY PATTERN. I wrote and tested this pattern myself, from beginning to end. It took a lot of time and work, and I would really like to have it remain “my pattern.”
***You can sell anything you make from my patterns, please just link back to my website YARNutopia.com. Thank you!

Teacher: Nadia Fuad
Video and Editing: Fuad Azmat (My Daddy)
Share your work on Facebook!
Add me on Snapchat: YARNutopia
Follow me on Instagram
Visit My Ravelry Store and add this to your Favorites!
Follow me on Twitter: @YARNutopia
Enjoy this video and subscribe to my channel on YouTube for more tutorials on how to crochet!
Leave a comment, and share with your friends!

Designed by Nadia Fuad
You *may* sell items made from my pattern, but please reference my website YARNutopia.com.
Please do not copy, sell, and/or post this pattern and claim it as your own.

Materials you will need:
Get the supplies individually by clicking the links below
Lion Brand Yarn Hometown in all the colors of the rainbow
Size -N-10.00mm Crochet Hook
-Measuring Tape
-Pom Maker
Yarn Needle
Scissors

NOTES:

-Use a smaller hook to make this smaller
-Use a bigger hook to make this bigger
-This is written in US terms
-This took about 2 hours to make.
-You can check out yarnsub.com to see yarn substitutions that are equal to the Lion Brand yarn I used in this project.
-This pattern with video tutorial shows the measurement as an adult sized hat

Special stitches:
Ch(s): chain(s)
YO: Yarn Over
BLO: Back Loop Only
St(s): Stitch(es)
Sl st: slip stitch
SK: Skip
FSC: Foundation Single Crochet
FDC: Foundation Double Crochet
SC: Single Crochet
HDC: Half Double Crochet
DC: Double Crochet


Pattern:

Ch 21

Row 1: SC in 2nd ch from hook, DC in next 10 chs, HDC in last 5 chs, Change color on last st, Ch 1, Turn

Row 2: With new color, WORK IN BLO, HDC in 5 sts, DC in next 10 sts, SC in last 5 sts, Change color on last st, Ch 1, Turn.

Row 3: With new color, WORK IN BLO, SC in 5 sts, DC in next 10 sts, HDC in last 5 sts, Change color on last st, Ch 1, Turn.

Rows 4-21: Repeat Rows 2 and 3 until your hat is wide enough to fit around the head (I did 21 rows total, but you might need to do more or less rows)

Fasten off with long tail on your last stitch (use it for sewing)

Assembly Step:
Sew up the seam and sew up the top to cinch it closed. Make a pom and attach it to the top of the hat.

Weave in all ends.

Enjoy!!

This post contains affiliate links, which I may be compensated for when you make a purchase. That means if you click on any link and buy from the linked websites, I will receive a small percentage of the value of your order. The amount you pay is not changed. Thank you for all your support in clicking the links in my blog!! You all are so amazing!! ~Nadia

The yarn provided for this pattern is courtesy of Lion Brand Yarn


FREE Crochet Video Tutorial: Rainbow Pom Hat

FREE Crochet Video Tutorial: Rainbow Pom Hat

I am obsessed with bright colors and anything rainbow!! I created this hat to match the Rainbow Pom Scarf! Check that pattern out and make the full set! This year for Halloween, we are doing a Rainbow Theme so I wanted to create a hat and scarf to go together. You can use any colors you like with this easy tutorial using Lion Brand Yarn in the Hometown Line. I hope you enjoy this tutorial and pattern!!


Follow along with this video tutorial to learn how to make this hat:

My dad will continue to be the videographer, editor, and photographer for our videos even if we don’t live together.
Support YARNutopia today so we can continue to bring you clear, quality crochet tutorials even after I move into my new home!
There will be an added expense of more travel and hopefully this won’t deter our ability to provide consistent videos on a weekly basis.

Donate Button with Credit Cards

**You can always contact me via Facebook if you have any problems with the pattern. I am happy to help if you have any questions along the way.
***These patterns are copyright YARNutopia © so PLEASE DO NOT COPY, SHARE, ADJUST OR RESELL MY PATTERN. I wrote and tested this pattern myself, from beginning to end. It took a lot of time and work, and I would really like to have it remain “my pattern.”
***You can sell anything you make from my patterns, please just link back to my website YARNutopia.com. Thank you!

Teacher: Nadia Fuad
Video and Editing: Fuad Azmat (My Daddy)
Share your work on Facebook!
Add me on Snapchat: YARNutopia
Follow me on Instagram
Visit My Ravelry Store and add this to your Favorites!
Follow me on Twitter: @YARNutopia
Enjoy this video and subscribe to my channel on YouTube for more tutorials on how to crochet!
Leave a comment, and share with your friends!

Designed by Nadia Fuad
You *may* sell items made from my pattern, but please reference my website YARNutopia.com.
Please do not copy, sell, and/or post this pattern and claim it as your own.

Materials you will need:
Get the supplies individually by clicking the links below
Lion Brand Yarn Hometown in all the colors of the rainbow
Size -N-10.00mm Crochet Hook
-Measuring Tape
-Pom Maker
Yarn Needle
Scissors

NOTES:

-Use a smaller hook to make this smaller
-Use a bigger hook to make this bigger
-This is written in US terms
-This took about 2 hours to make.
-You can check out yarnsub.com to see yarn substitutions that are equal to the Lion Brand yarn I used in this project.
-This pattern with video tutorial shows the measurement as an adult sized hat

Special stitches:
Ch(s): chain(s)
YO: Yarn Over
St(s): Stitch(es)
Sl st: slip stitch
SK: Skip
SC: Single Crochet
HDC: Half Double Crochet
DC: Double Crochet


This post contains affiliate links, which I may be compensated for when you make a purchase. That means if you click on any link and buy from the linked websites, I will receive a small percentage of the value of your order. The amount you pay is not changed. Thank you for all your support in clicking the links in my blog!! You all are so amazing!! ~Nadia

The yarn provided for this pattern is courtesy of Lion Brand Yarn

FREE Written Crochet Pattern: Ruffled Trim Sweater Vest

FREE Written Crochet Pattern: Ruffled Trim Sweater Vest

I decided to get back into fashion pieces. I have been taking time to ease back into filming following Nasir’s diagnosis and felt it was time to dip my hook back into the fashion pool with my Ruffle Trim Sweater Vest. I used Lion Brand Comfy Cotton Blend Yarn on this piece and am SO PLEASED! This is so cute over a long sleeve t-shirt or blouse, but can also pair nicely with a tank top for a warmer weather look. If you are so inclined, you can also wear nothing under it and just use a little boob tape to hold it in place (or wear it over a sexy bra). You can adjust the length to make it a crop top or a little longer for a full vest look. This can be entirely flexible to your taste. Add bows to the front (check my vid here) or adorn with floral appliques! You can make the same pattern multiple ways for a new look every time! This would also make a great gift!!


My dad will continue to be the videographer, editor, and photographer for our videos even if we don’t live together.
Support YARNutopia today so we can continue to bring you clear, quality crochet tutorials even after I move into my new home!
There will be an added expense of more travel and hopefully this won’t deter our ability to provide consistent videos on a weekly basis.

Donate Button with Credit Cards

**You can always contact me via Facebook if you have any problems with the pattern. I am happy to help if you have any questions along the way.
***These patterns are copyright YARNutopia © so PLEASE DO NOT COPY, SHARE, ADJUST OR RESELL MY PATTERN. I wrote and tested this pattern myself, from beginning to end. It took a lot of time and work, and I would really like to have it remain “my pattern.”
***You can sell anything you make from my patterns, please just link back to my website YARNutopia.com. Thank you!

Teacher: Nadia Fuad
Video and Editing: Fuad Azmat (My Daddy)
Share your work on Facebook!
Add me on Snapchat: YARNutopia
Follow me on Instagram
Visit My Ravelry Store and add this to your Favorites!
Follow me on Twitter: @YARNutopia
Enjoy this video and subscribe to my channel on YouTube for more tutorials on how to crochet!
Leave a comment, and share with your friends!

Designed by Nadia Fuad
You *may* sell items made from my pattern, but please reference my website YARNutopia.com.
Please do not copy, sell, and/or post this pattern and claim it as your own.

Materials you will need:
Get the supplies individually by clicking the links below
Lion Brand Yarn Comfy Cotton Blend (1100 yards or 3 cakes of this specific yarn)
Size -H-5.00mm Crochet Hook
-Measuring Tape
Yarn Needle
Scissors

NOTES:

-Use a smaller hook to make this smaller
-Use a bigger hook to make this bigger
-This is written in US terms
-This took about 1 week to make but I did not work on it continuously.
-You can check out yarnsub.com to see yarn substitutions that are equal to the Lion Brand yarn I used in this project.
-This pattern with video tutorial shows the measurement as 40 inch bust, 40 inch waist, 20 inch length
-For Panel 1 and 2, measure from your armpit to the center of your chest and that is how many ROWS you will make. To measure the foundation chain of these panels, you need to measure from your navel, up around your shoulder to the back where your navel would hit on your back, that measurement needs to be the WIDTH of your panel or the length of the foundation chain. (See video tutorial for more visual instructions)
-For the bottom waist piece, you need to make the foundation chain the whole measurement of your waist and the length of it can be as long as you want to make the shirt.

Special stitches:
Ch(s): chain(s)
YO: Yarn Over
St(s): Stitch(es)
Sl st: slip stitch
SK: Skip
FSC: Foundation Single Crochet
FDC: Foundation Double Crochet
SC: Single Crochet
HDC: Half Double Crochet
DC: Double Crochet


Pattern:

Panel 1 and 2 (Left and Right)

Ch 101 (or FSC 100) (yours might be longer or shorter depending on your measurement–see NOTES section)

Row 1: SC in 2nd Ch from hook and across, Ch 1, Turn. (100)

Row 2: SC in each st across, Ch 1, Turn.

Rows 3-28: Repeat Row 2

Row 29: SC across and also continue to crochet around entire piece putting 3 SC in corners.
Sl st to first st and fasten off with long tail for sewing later.
If this is not wide enough or too wide, make more or less rows (See NOTES section for how to measure)
(Be sure to make 2 panels before going onto the bottom piece)

Ruffles:

On outside of each panel attach yarn to corner and only work along ONE SIDE of the panel.
Row 1: Ch 2, 2 DC in each st across, Ch 2, Turn

Row 2: *2 DC in next st, DC in next st, Repeat from * across. Fasten off, weave in ends.

Bottom Waistband Piece:

Ch 120 (or any amount that measures your waist measurement when the foundation chain is semi-stetched)

Row 1: Sl st to first Ch to form a large ring, Ch 1, SC in each Ch around, sl st to first st, Ch 1, TURN.

Row 2: SC in each st around, Sl st to first st, Ch 1, TURN.

Rows 3-24: Repeat Row 2
If you want this piece shorter or longer, feel free to make more or less rows.

Assembly Step:
overlap your panels across the front and back and line them up with the bottom of your shirt. Sew across the front, then across the back. Be sure that your “Seam” on the waistband part is on the back side of your piece when you’re sewing. (See video tutorial for visual instructions on how to line everything up together) I used the whip stitch to sew it all together. Weave in all your ends when finished.

Ties:

Chain 150 (or more) and fasten off (make 2)
Weave them in and out of the waist piece across the front for one and across the back for the other, then cinch it and tie into bows.

Weave in all ends.

Enjoy!!

This post contains affiliate links, which I may be compensated for when you make a purchase. That means if you click on any link and buy from the linked websites, I will receive a small percentage of the value of your order. The amount you pay is not changed. Thank you for all your support in clicking the links in my blog!! You all are so amazing!! ~Nadia

The yarn provided for this pattern is courtesy of Lion Brand Yarn


FREE Crochet Video Tutorial: Ruffled Trim Sweater Vest

FREE Crochet Video Tutorial: Ruffled Trim Sweater Vest

I decided to get back into fashion pieces. I have been taking time to ease back into filming following Nasir’s diagnosis and felt it was time to dip my hook back into the fashion pool with my Ruffle Trim Sweater Vest. I used Lion Brand Comfy Cotton Blend Yarn on this piece and am SO PLEASED! This is so cute over a long sleeve t-shirt or blouse, but can also pair nicely with a tank top for a warmer weather look. If you are so inclined, you can also wear nothing under it and just use a little boob tape to hold it in place (or wear it over a sexy bra). You can adjust the length to make it a crop top or a little longer for a full vest look. This can be entirely flexible to your taste. Add bows to the front (check my vid here) or adorn with floral appliques! You can make the same pattern multiple ways for a new look every time! This would also make a great gift!!


Follow along with this video tutorial to learn how to make this top:

My dad will continue to be the videographer, editor, and photographer for our videos even if we don’t live together.
Support YARNutopia today so we can continue to bring you clear, quality crochet tutorials even after I move into my new home!
There will be an added expense of more travel and hopefully this won’t deter our ability to provide consistent videos on a weekly basis.

Donate Button with Credit Cards

**You can always contact me via Facebook if you have any problems with the pattern. I am happy to help if you have any questions along the way.
***These patterns are copyright YARNutopia © so PLEASE DO NOT COPY, SHARE, ADJUST OR RESELL MY PATTERN. I wrote and tested this pattern myself, from beginning to end. It took a lot of time and work, and I would really like to have it remain “my pattern.”
***You can sell anything you make from my patterns, please just link back to my website YARNutopia.com. Thank you!

Teacher: Nadia Fuad
Video and Editing: Fuad Azmat (My Daddy)
Share your work on Facebook!
Add me on Snapchat: YARNutopia
Follow me on Instagram
Visit My Ravelry Store and add this to your Favorites!
Follow me on Twitter: @YARNutopia
Enjoy this video and subscribe to my channel on YouTube for more tutorials on how to crochet!
Leave a comment, and share with your friends!

Designed by Nadia Fuad
You *may* sell items made from my pattern, but please reference my website YARNutopia.com.
Please do not copy, sell, and/or post this pattern and claim it as your own.

Materials you will need:
Get the supplies individually by clicking the links below
Lion Brand Yarn Comfy Cotton Blend (1100 yards or 3 cakes of this specific yarn)
Size -H-5.00mm Crochet Hook
-Measuring Tape
Yarn Needle
Scissors

NOTES:

-Use a smaller hook to make this smaller
-Use a bigger hook to make this bigger
-This is written in US terms
-This took about 1 week to make but I did not work on it continuously.
-You can check out yarnsub.com to see yarn substitutions that are equal to the Lion Brand yarn I used in this project.
-This pattern with video tutorial shows the measurement as 40 inch bust, 40 inch waist, 20 inch length
-For Panel 1 and 2, measure from your armpit to the center of your chest and that is how many ROWS you will make. To measure the foundation chain of these panels, you need to measure from your navel, up around your shoulder to the back where your navel would hit on your back, that measurement needs to be the WIDTH of your panel or the length of the foundation chain. (See video tutorial for more visual instructions)
-For the bottom waist piece, you need to make the foundation chain the whole measurement of your waist and the length of it can be as long as you want to make the shirt.

Special stitches:
Ch(s): chain(s)
YO: Yarn Over
St(s): Stitch(es)
Sl st: slip stitch
SK: Skip
FSC: Foundation Single Crochet
FDC: Foundation Double Crochet
SC: Single Crochet
HDC: Half Double Crochet
DC: Double Crochet


This post contains affiliate links, which I may be compensated for when you make a purchase. That means if you click on any link and buy from the linked websites, I will receive a small percentage of the value of your order. The amount you pay is not changed. Thank you for all your support in clicking the links in my blog!! You all are so amazing!! ~Nadia

The yarn provided for this pattern is courtesy of Lion Brand Yarn

FREE Written Crochet Pattern: Chunky Rainbow Pom Scarf

FREE Written Crochet Pattern: Chunky Rainbow Pom Scarf

As I work my way back to filming regular crochet tutorials, I am also thinking ahead to our annual Halloween costumes. Here is the first of several pieces that will lead up to our big reveal. This is my Chunky Rainbow Pom Scarf. Perfect for the cool weather we are starting to experience here in Wisconsin.  The time for warm weather apparel is going to be here before we know it and we need to be prepared! My Rainbow 🌈 scarf can be made exactly how I made it but use your imagination and find your own color combination to match your look! There are many possibilities! These make great gifts for anyone. You can always make it with or without poms to change the look! Now that is versatility!! I used Hometown yarn by Lion Brand Yarn. You will want to grab yours too because the softness is divine!


My dad will continue to be the videographer, editor, and photographer for our videos even if we don’t live together.
Support YARNutopia today so we can continue to bring you clear, quality crochet tutorials even after I move into my new home!
There will be an added expense of more travel and hopefully this won’t deter our ability to provide consistent videos on a weekly basis.

Donate Button with Credit Cards

**You can always contact me via Facebook if you have any problems with the pattern. I am happy to help if you have any questions along the way.
***These patterns are copyright YARNutopia © so PLEASE DO NOT COPY, SHARE, ADJUST OR RESELL MY PATTERN. I wrote and tested this pattern myself, from beginning to end. It took a lot of time and work, and I would really like to have it remain “my pattern.”
***You can sell anything you make from my patterns, please just link back to my website YARNutopia.com. Thank you!

Teacher: Nadia Fuad
Video and Editing: Fuad Azmat (My Daddy)
Share your work on Facebook!
Add me on Snapchat: YARNutopia
Follow me on Instagram
Visit My Ravelry Store and add this to your Favorites!
Follow me on Twitter: @YARNutopia
Enjoy this video and subscribe to my channel on YouTube for more tutorials on how to crochet!
Leave a comment, and share with your friends!

Pattern:

Designed by Nadia Fuad
You *may* sell items made from my pattern, but please reference my website YARNutopia.com.
Please do not copy, sell, and/or post this pattern and claim it as your own.

Materials you will need:
Get the supplies individually by clicking the links below
Lion Brand Yarn Hometown Yarn in the colors of the rainbow (I used 1 ball each of the colors and then 2 balls of white)
-Pom Maker (I used a simple cardboard cutout)
Size -N-10.00mm Crochet Hook
Yarn Needle
Scissors

NOTES:

-Use a smaller hook to make this smaller
-Use a bigger hook to make this bigger
-This is written in US terms
-This took about 4 hours to make but I did not work on it continuously.
-You can check out yarnsub.com to see yarn substitutions that are equal to the Lion Brand yarn I used in this project.
-This pattern with video tutorial shows the measurement as 6 feet long and 12 inches wide, but you can make it wider by continuing the repeat pattern.

Special stitches:
Ch(s): chain(s)
YO: Yarn Over
St(s): Stitch(es)
Sl st: slip stitch
SK: Skip
SC: Single Crochet
HDC: Half Double Crochet
DC: Double Crochet
FDC: Foundation Double Crochet

Pattern:

Row 1: FDC 200 or chain 202 and DC in 3rd ch from hook and across.. (200)

Change color on last stitch (see video tutorial on how to change color)

Row 2: Ch 2 with new color and DC BETWEEN the posts across, Change color on last stitch, Turn.

Rows 3-7: Repeat Row 2 until you’ve used all 7 colors.

Fasten off, weave in all ends.

Assembly Step:
Make 4 poms in White and sew them to each corner of the scarf.

Weave in all ends.

Enjoy!!

This post contains affiliate links, which I may be compensated for when you make a purchase. That means if you click on any link and buy from the linked websites, I will receive a small percentage of the value of your order. The amount you pay is not changed. Thank you for all your support in clicking the links in my blog!! You all are so amazing!! ~Nadia

The yarn provided for this pattern is courtesy of Lion Brand Yarn


FREE Crochet Video Tutorial: Chunky Rainbow Pom Scarf

FREE Crochet Video Tutorial: Chunky Rainbow Pom Scarf

As I work my way back to filming regular crochet tutorials, I am also thinking ahead to our annual Halloween costumes. Here is the first of several pieces that will lead up to our big reveal. This is my Chunky Rainbow Pom Scarf. Perfect for the cool weather we are starting to experience here in Wisconsin.  The time for warm weather apparel is going to be here before we know it and we need to be prepared! My Rainbow 🌈 scarf can be made exactly how I made it but use your imagination and find your own color combination to match your look! There are many possibilities! These make great gifts for anyone. You can always make it with or without poms to change the look! Now that is versatility!! I used Hometown yarn by Lion Brand Yarn. You will want to grab yours too because the softness is divine!


Follow along with this video tutorial to learn how to make this scarf:


My dad will continue to be the videographer, editor, and photographer for our videos even if we don’t live together.
Support YARNutopia today so we can continue to bring you clear, quality crochet tutorials even after I move into my new home!
There will be an added expense of more travel and hopefully this won’t deter our ability to provide consistent videos on a weekly basis.

Donate Button with Credit Cards

**You can always contact me via Facebook if you have any problems with the pattern. I am happy to help if you have any questions along the way.
***These patterns are copyright YARNutopia © so PLEASE DO NOT COPY, SHARE, ADJUST OR RESELL MY PATTERN. I wrote and tested this pattern myself, from beginning to end. It took a lot of time and work, and I would really like to have it remain “my pattern.”
***You can sell anything you make from my patterns, please just link back to my website YARNutopia.com. Thank you!

Teacher: Nadia Fuad
Video and Editing: Fuad Azmat (My Daddy)
Share your work on Facebook!
Add me on Snapchat: YARNutopia
Follow me on Instagram
Visit My Ravelry Store and add this to your Favorites!
Follow me on Twitter: @YARNutopia
Enjoy this video and subscribe to my channel on YouTube for more tutorials on how to crochet!
Leave a comment, and share with your friends!

Designed by Nadia Fuad
You *may* sell items made from my pattern, but please reference my website YARNutopia.com.
Please do not copy, sell, and/or post this pattern and claim it as your own.

Materials you will need:
Get the supplies individually by clicking the links below
Lion Brand Yarn Hometown Yarn in the colors of the rainbow (I used 1 ball each of the colors and then 2 balls of white)
-Pom Maker (I used a simple cardboard cutout)
Size -N-10.00mm Crochet Hook
Yarn Needle
Scissors

NOTES:

-Use a smaller hook to make this smaller
-Use a bigger hook to make this bigger
-This is written in US terms
-This took about 4 hours to make but I did not work on it continuously.
-You can check out yarnsub.com to see yarn substitutions that are equal to the Lion Brand yarn I used in this project.
-This pattern with video tutorial shows the measurement as 6 feet long and 12 inches wide, but you can make it wider by continuing the repeat pattern.

Special stitches:
Ch(s): chain(s)
YO: Yarn Over
St(s): Stitch(es)
Sl st: slip stitch
SK: Skip
SC: Single Crochet
HDC: Half Double Crochet
DC: Double Crochet
FDC: Foundation Double Crochet


This post contains affiliate links, which I may be compensated for when you make a purchase. That means if you click on any link and buy from the linked websites, I will receive a small percentage of the value of your order. The amount you pay is not changed. Thank you for all your support in clicking the links in my blog!! You all are so amazing!! ~Nadia

The yarn provided for this pattern is courtesy of Lion Brand Yarn

FREE Written Crochet Pattern: Aspen Baby Blanket

FREE Written Crochet Pattern: Aspen Baby Blanket

There many different reasons to be inspired. The Aspen Baby Blanket was inspired by friends celebrating the birth of their baby. The Aspen tree was the foundation for this piece. Created using series of front and back post stitches, it creates a repeat texture leaf pattern.  The striking three dimensional profile of this project took my breath away. When you look at this overall piece you would never guess that it is easier than you think! I used Basic Stitch Anti-Pilling yarn by Lion Brand Yarn and it was THE most luxurious fiber giving this blanket the absolute softest feel. Follow my video tutorial or written pattern and get your started today! 


My dad will continue to be the videographer, editor, and photographer for our videos even if we don’t live together.
Support YARNutopia today so we can continue to bring you clear, quality crochet tutorials even after I move into my new home!
There will be an added expense of more travel and hopefully this won’t deter our ability to provide consistent videos on a weekly basis.

Donate Button with Credit Cards

**You can always contact me via Facebook if you have any problems with the pattern. I am happy to help if you have any questions along the way.
***These patterns are copyright YARNutopia © so PLEASE DO NOT COPY, SHARE, ADJUST OR RESELL MY PATTERN. I wrote and tested this pattern myself, from beginning to end. It took a lot of time and work, and I would really like to have it remain “my pattern.”
***You can sell anything you make from my patterns, please just link back to my website YARNutopia.com. Thank you!

Teacher: Nadia Fuad
Video and Editing: Fuad Azmat (My Daddy)
Share your work on Facebook!
Add me on Snapchat: YARNutopia
Follow me on Instagram
Visit My Ravelry Store and add this to your Favorites!
Follow me on Twitter: @YARNutopia
Enjoy this video and subscribe to my channel on YouTube for more tutorials on how to crochet!
Leave a comment, and share with your friends!

Pattern:

Designed by Nadia Fuad
You *may* sell items made from my pattern, but please reference my website YARNutopia.com.
Please do not copy, sell, and/or post this pattern and claim it as your own.

Materials you will need:
Get the supplies individually by clicking the links below
Lion Brand Yarn Basic Stitch in Frost and Ecru (6 balls of Frost, 2 balls of Ecru or 1100 yards of Frost, and 300 yards of Ecru)
Size H-5.00mm Crochet Hook
Yarn Needle
Scissors

NOTES:

-Use a smaller hook to make this smaller
-Use a bigger hook to make this bigger
-This is written in US terms
-This took about 2 weeks to make but I did not work on it continuously.
-You can check out yarnsub.com to see yarn substitutions that are equal to the Lion Brand yarn I used in this project.
-This pattern with video tutorial shows the measurement as 35 inches by 35 inches, but you can make it longer by continuing the repeat pattern.
-If you do not want to do a stacked Single Crochet in the first stitch of every row, you can do a half double crochet and that will suffice.

Special stitches:
Ch(s): chain(s)
YO: Yarn Over
St(s): Stitch(es)
Sl st: slip stitch
SK: Skip
SC: Single Crochet
HDC: Half Double Crochet
DC: Double Crochet
V-St aka V-Stitch: (DC, ch 1, DC) in same space
BPDC2TOG: Double Crochet 2 sts together
FPDC2TOG: Double Crochet 3 sts together
BPV-St: Back Post V-Stitch
FPV-St: Front Post V-Stitch

Pattern:

Row 1: FDC 203 or Ch 205, DC in 3rd Ch and each ch across (you need 203 sts for row 1)

Row 2: Stacked SC in 1st st, FPDC in next 2 sts, *BPDC on next 10 sts, FPDC on next 7 sts, repeat from * across until 3 sts remain, FPDC on next 2 sts, HDC in last st, Ch 1, Turn.

Row 3: Stacked SC in 1st st, BPDC on next 2 sts, *FPDC2TOG, FPDC on next 6 sts, FPDC2TOG, BPDC on next 7 sts, repeat from * across, ending with BPDC on next 2 sts, HDC in last st, ch 1, turn.

Row 4: Stacked SC in 1st st, FPDC on next 2 sts *BPDC2TOG, BPDC on next 4 sts, BPDC2TOG, FPDC on next 7 sts, repeat from * across until 3 sts remain, ending with FPDC on next 2 sts, HDC in last st, Ch 1, turn.

Row 5: Stacked SC in 1st st, BPDC on next 2 sts, *FPDC2TOG, FPDC on next 2 sts, FPDC2TOG, BPDC on next 7 sts, repeat from * across until 3 sts remain, ending with BPDC on next 2 sts, HDC in last st, Ch 1, turn.

Row 6: Stacked SC in 1st st, FPDC on next 2 sts, *[BPDC2TOG] twice, FPDC on next 3 sts, BPDC on next st, FPDC on next 3 sts, repeat from * across until 3 sts remain, ending with FPDC on next 2 sts, HDC in last st, Ch 1, turn.

Row 7: Stacked SC in 1st st, BPDC on next 2 sts, *FPDC2TOG, BPDC on next 3 sts, FPDC on next st, BPDC on next 3 sts, repeat from * across until 3 sts remain, ending with BPDC on next 2 sts, HDC in last st, Ch 1, Turn.

Row 8: Stacked SC in 1st st, FPDC on next 6 sts, *BPV-St on next st, FPDC on next 7 sts, repeat from * across until 7 sts remain, ending with FPDC on 6 sts, HDC in last st, Ch 1, Turn.

Row 9: Stacked SC in 1st st, BPDC on next 6 sts, *FPDC on next st, V-St in Ch sp, FDC on next st, BPDC on next 7 sts, repeat from * across until 7 sts remain, ending with BPDC on 6 sts, HDC in last st, Ch 1, turn.

Row 10: Stacked SC in 1st st, FPDC on next 6 sts, *BPDC on next 2 sts, V-st in Ch sp, BPDC on next 2 sts, FPDC on next 7 sts, repeat from * across until 7 sts remain, ending with FPDC on 6 sts, HDC in last st, Ch 1, Turn.

Row 11: Stacked SC in 1st st, BPDC on next 6 sts, *FPDC on next 3 sts, V-st in Ch sp, FPDC on next 3 sts, BPDC on next 7 sts, Repeat from * across until 7 sts remain, ending with BPDC on 6 sts, HDC in last st, Ch 1, Turn.

Row 12: Stacked SC in 1st st, FPDC on next 6 sts, *BPDC on next 4 sts, 2 DC in ch sp, BPDC on next 4 sts, FPDC on next 7 sts, repeat from * across until 7 sts remain, ending with FPDC on next 6 sts, HDC in last st, Ch 1, Turn.

Row 13: Stacked SC in 1st st, BPDC on next 6 sts, *FPDC2TOG, FPDC on next 6 sts, FPDC2TOG, BPDC on next 7 sts, repeat from * across until 7 sts remain, ending with BPDC on next 6 sts, HDC in last st, Ch 1, Turn.

Row 14: Stacked SC in 1st st, FPDC on next 6 sts, *BPDC2TOG, BPDC on next 4 sts, BPDC2TOG, FPDC on next 7 sts, repeat from * across until 7 sts remain, ending with FPDC on next 6 sts, HDC in last st, Ch 1, Turn.

Row 15: Stacked SC in 1st st, BPDC on next 6 sts, *FPDC2TOG, FPDC on next 2 sts, FPDC2TOG, BPDC on next 7 sts, repeat from * across until 7 sts remain, ending with BPDC on next 6 sts, HDC in last st, Ch 1, Turn.

Row 16: Stacked SC in 1st st, FPDC on next 2 sts, *BPDC on next st, FPDC on next 3 sts, [BPDC2TOG] twice, FPDC on next 3 sts, repeat from * across until 7 sts remain, ending with FPDC on next 3 sts, BPDC on next st, FPDC on next 2 sts, HDC in last st, Ch 1, Turn.

Row 17: Stacked SC in 1st st, BPDC on next 2 sts, *FPDC on next st, BPDC on next 3 sts, FPDC2TOG, BPDC on next 3 sts, repeat from * across until 7 sts remain, ending with BPDC on next 3 sts, FPDC on next st, BPDC on next 2 sts, HDC in last st, Ch 1, Turn.

Row 18: Stacked SC in 1st st, FPDC on next 2 sts, *BPV-St on next st, FPDC on next 7 sts, repeat from * across, ending with FPDC on 2 sts before last, HDC in last st, Ch 1, Turn.

Row 19: Stacked SC in 1st st, BPDC on next 2 sts, *FPDC on next st, V-St in Ch sp, FPDC on next st, BPDC on next 7 sts, repeat from * across until 3 sts remain, ending with BPDC on next 2 sts, HDC in last st, Ch 1, turn.

Row 20: Stacked SC in 1st st, FPDC on next 2 sts, *BPDC on next 2 sts, V-St in Ch sp, BPDC on next 2 sts, FPDC on next 7 sts, repeat from * across until 3 sts remain, ending with FPDC on next 2 sts, HDC in last st, Ch 1, Turn.

Row 21: Stacked SC in 1st st, BPDC on next 2 sts, *FPDC on next 3 sts, V-St in Ch sp, FPDC on next 3 sts, BPDC on next 7 sts, repeat from * across until 3 sts remain, ending with BPDC on next 2 sts, HDC in last st, Ch 1, Turn.

Row 22: Stacked SC in 1st st, FPDC on next 2 sts, *BPDC on next 4 sts, 2 DC in Ch sp, BPDC on next 4 sts, FPDC on next 7 sts, Repeat from * across until 3 sts remain, ending with FPDC on next 2 sts, HDC in last st, Ch 1, Turn.

Rows 23-42: Repeat Rows 3-22

Rows 43-62: Repeat Rows 3 to 22

Rows 63-82: Repeat Rows 3-22

Rows 83-92: Repeat Rows 3-12
End on a repeat of Row 12 before fastening off. (SEE video tutorial for visual instructions on ending/fastening off)

Border:

Attach Yarn in a corner

Round 1: Ch 2, DC in each st around and in each row on the side, put 3 DC in corners (See video tutorial for visual instructions), sl st to first st, Ch 2, DO NOT TURN.

Round 2: DC in each st around putting 3 DC in the middle DC of each corner, sl st to first st, Fasten off.

Fasten off, weave in all ends.

Enjoy!!

This post contains affiliate links, which I may be compensated for when you make a purchase. That means if you click on any link and buy from the linked websites, I will receive a small percentage of the value of your order. The amount you pay is not changed. Thank you for all your support in clicking the links in my blog!! You all are so amazing!! ~Nadia

The yarn provided for this pattern is courtesy of Lion Brand Yarn


Time to Change Direction

Time to Change Direction

Very often, I’ll make a list or itinerary of what projects I want to work on or which ones pique my interest. I have no idea how many works in progress I have going on because sometimes the inspiration is so strong to work on something and then a few days later…meh…and there it sits. Yet, there is always something that gets my creative energy charged, and that, my YARNutopians, is the key to picking my next project.

What’s on my hook today?

I started off with the best intentions to work on a few summer projects and started them in hopes to film before the snow flies. Well, all the best intentions are just that, intentions. I have them started, they are not going anywhere, I will finish them, SOMEDAY. Just not today. Instead, my direction has changed because of the most exciting news that a close friend had a baby! So, I guess in the world of crochet, we go with the creative flow. Because I went from hooking up a swimsuit cover-up to a baby blanket all in the matter of minutes! Talk about a 180!

Babies and Blankets, oh my!

This particular blanket is using a new design which is so fun to make! I am using Lion Brand Yarn Basic Stitch in the color Frost to begin this fabulous piece. Look at that texture and softness!


There is just something so alluring about this minty color in a baby layette! I can’t wait to see the impact this is going to make when I am done!

What about you?

What inspires you? Is it personal wants or needs? Is it something you are creating to gift to someone? Is it based on when the inspiration hits, or is it the news of someone having a baby, getting married, a holiday or some event that gets your hook moving???

Share your inspiration here!


Thank You

Thank You

I want to say a huge thank you to everyone who took the time to read my latest blog post regarding my absence from YARNutopia lately and the next chapter we are heading into with our son Nasir. I have been overwhelmed with so many emotions from the outpouring of love and supportive kind words you left on my posts, in my messages, and the texts I received all day.

There is no way for me to individually reply to all of you, but just know I read every word and took it all to heart. I appreciate all the openness you shared from your personal experiences with friends, family members, or even first-hand experiences with Autism Spectrum Disorder. I am currently educating myself on all the different types of therapies and discussing with the specialists what they advise in helping Nasir progress. We hope to see some changes in the first month of this new therapy. We are extremely hopeful.

Reading all the comments and messages that flooded in gave me so much encouragement and hope for my little guy. I know he will accomplish great things in his life, and luckily, we can be his advocates for his success.

In the meantime, please continue to support YARNutopia by sharing my patterns, watching my videos on YouTube, visiting my blog, and purchasing the Wood Be Fancy Crochet Hooks. That helps tremendously during this transition!

From the bottom of my heart, thank you all,

Nadia


Where’s Nadia?

Where’s Nadia?

Lately, I have been receiving quite a few inquiries asking for new crochet video tutorials. So many of you have been kind and thoughtful to reach out to ask if everything is ok simply because I haven’t posted videos or new content for a while. A lot has been happening and many of the recent events have made it difficult to find time to post or film.

We are halfway through a rough year.

Covid quarantine had already hindered my video production because it was difficult to film, travel, get together with my parents to help with my posts. During this time, Nate and I noticed Nas was not meeting his baby/toddler milestones. We chalked it up to being so isolated from other kids and lack of activities because who has any data about raising babies during a pandemic? Naturally, we didn’t want to think there was anything amiss, but over time we noticed Nasir was falling further and further behind on meeting these markers. He wasn’t responding to his name when called, he was transfixed on specific shows, his attention span was non-existent, he had no fear of danger, he wouldn’t parallel play, didn’t listen, didn’t make eye contact, began hitting aggressively because he was unable to communicate only a few words, he had very little verbal skills and much of what he gained would be lost after one or two days. Yet, here he is so silly, adventurous, funny, smart and just being our cute little Nasir in so many other remarkable ways, we didn’t know if these things we were observing were ok or should we be concerned? He is our first child, so we had no way to fully know.

One or two of these things would be no cause for alarm, but we started adding up more and more then questioning more and more until we couldn’t deny the fact that we might be dealing with something more than just the lack of socialization because of the stay at home order.

Tests, Tests, and more Tests

We took Nas to doctor after doctor, therapist after therapist and to make a long story short, the doctors and specialists have told us he is on the Autism Spectrum. In some of his abilities, he is excelling and is testing in a much higher percentile. In other ways, he is testing quite low. He is struggling with language the most which he is currently testing at an 8-9 month level. He is almost 26 months old at the time I’m posting this. Nate and I felt heartbroken at first, but not for long. We put ourselves into 5th gear and did all the things within our power to make things easier for Nas.


Our lives are turned upside down

We have speech therapy and occupational therapy in home (Finally! It was virtual for the first few months because of Covid) The therapists we have in-home were instrumental in pointing us in the right direction to get Nasir the help and support he needs. We were recently approved for even more early intervention programs which we have learned are extraordinary in what they are able to do to help Nas. We are hopeful and optimistic. Although we have to wait a short bit to enroll him for those programs, there is a beginning in sight!

Oh my heart…

Nasir is our whole world. His struggles and his energy have kept our hands and hearts full. There has been little to no time to do more than take care of him, keep up with his never-ending energy, and get him the best resources we can to help him navigate this challenging path. Our entire life has been devoted to his care and to the success he can achieve by this early intervention. I know that this is a process and I have to trust the process, but I am not going to lie, I have cried a million tears, I have filled out thousands of pages of paperwork, I have made a hundred phone calls and some days it still doesn’t feel like enough. I have some serious mom guilt. I can’t even describe it. We are tired, worn out, frustrated at times, hard on ourselves, you name it, we have felt it. I don’t leave the house for days because it’s just too much. We go to my parents’ house for a break from time to time because they are such a big help for us when we are exhausted.

This has tested us as parents, it has tested us as a husband and wife. But at the end of the day, we have this incredibly sweet boy who needs us SO much. Our hearts explode with the love and need to keep him safe and happy and do whatever we can to get him to reach all of his potential. One day, we are hopeful that we may hear him say Mama and Dada..

One day at a time

I haven’t forgotten about my YARNutopian family. Quite the contrary – in fact, I actually feel so anxious to get back to my crochet, but I simply have to sacrifice something in order to manage life right now. I am still working, but very minimally. I still check in every day and post older links to some fun patterns I’ve shared in the past. I have great expectations in the mornings, but by mid-day I am wiped out by the challenges we have in our home at the moment. This is hard.

I am currently working on a new crochet project. It’s going at a snail’s pace, but it is going. I am trying to navigate this new chapter of our lives while giving myself some grace to be ok with the status quo. When the time comes, Nasir will have some one-on-one time with specialists who will provide what he needs to help him talk and reach his goals, then I will have a few hours each day of respite to get back to crochet. In the meantime, I appreciate your patience, support, and understanding as we keep moving forward. Please continue to watch my videos, visit my blog, and support my pages. I promise, I will be back.

With love and hugs,
Nadia


FREE Crochet Video Tutorial: Summer Breeze Triangle Shawl

FREE Crochet Video Tutorial: Summer Breeze Triangle Shawl

I’m springing into summer with a new pattern and lots of new changes. My Summer Breeze Shawl is just what you need on your empty hook! Perfect for weddings, cool summer evenings or wrap around sarong! Made with Lion Brand Mandala Baby yarn in Pixie Hollow is extraordinary as it creates this beautiful colorway in this triangular shawl. It’s a ten row repeat pattern and uses many different stitches making it more of an intermediate pattern but with the video tutorial anyone can do it! Give it a try today!!


Follow along with this video tutorial to learn how to make this shawl:


My dad will continue to be the videographer, editor, and photographer for our videos even if we don’t live together.
Support YARNutopia today so we can continue to bring you clear, quality crochet tutorials even after I move into my new home!
There will be an added expense of more travel and hopefully this won’t deter our ability to provide consistent videos on a weekly basis.

Donate Button with Credit Cards

**You can always contact me via Facebook if you have any problems with the pattern. I am happy to help if you have any questions along the way.
***These patterns are copyright YARNutopia © so PLEASE DO NOT COPY, SHARE, ADJUST OR RESELL MY PATTERN. I wrote and tested this pattern myself, from beginning to end. It took a lot of time and work, and I would really like to have it remain “my pattern.”
***You can sell anything you make from my patterns, please just link back to my website YARNutopia.com. Thank you!

Teacher: Nadia Fuad
Video and Editing: Fuad Azmat (My Daddy)
Share your work on Facebook!
Add me on Snapchat: YARNutopia
Follow me on Instagram
Visit My Ravelry Store and add this to your Favorites!
Follow me on Twitter: @YARNutopia
Enjoy this video and subscribe to my channel on YouTube for more tutorials on how to crochet!
Leave a comment, and share with your friends!


Designed by Nadia Fuad
You *may* sell items made from my pattern, but please reference my website YARNutopia.com.
Please do not copy, sell, and/or post this pattern and claim it as your own.

Materials you will need:
Get the supplies individually by clicking the links below
Lion Brand Yarn Mandala Baby in the color Pixie Hollow (see video tutorial for other suggestions on yarn to use)
Size H-5.00mm Crochet Hook
Yarn Needle
Scissors

NOTES:

-Use a smaller hook to make this smaller
-Use a bigger hook to make this bigger
-This is written in US terms
-This took about a week to make but I did not work on it continuously.
-You can check out yarnsub.com to see yarn substitutions that are equal to the Lion Brand yarn I used in this project.
-This pattern with video tutorial shows the long side being 70 inches (177cm) and the short sides being 36 inches (92cm) but you can make it longer by continuing the repeat pattern.

Special stitches:
Ch(s): chain(s)
YO: Yarn Over
St(s): Stitch(es)
Sl st: slip stitch
SK: Skip
SC: Single Crochet
HDC: Half Double Crochet
DC: Double Crochet
V-Stitch: (DC, ch 1, DC) in same space
TR: Treble Crochet
DC2TOG: Double Crochet 2 sts together
DC3TOG: Double Crochet 3 sts together
3DCcluster: 3 Double Crochet Cluster Stitch
2DCcluster: 2 Double Crochet Cluster Stitch


This post contains affiliate links, which I may be compensated for when you make a purchase. That means if you click on any link and buy from the linked websites, I will receive a small percentage of the value of your order. The amount you pay is not changed. Thank you for all your support in clicking the links in my blog!! You all are so amazing!! ~Nadia

The yarn provided for this pattern is courtesy of Lion Brand Yarn

FREE Written Crochet Pattern: Summer Breeze Triangle Shawl

FREE Written Crochet Pattern: Summer Breeze Triangle Shawl

I’m springing into summer with a new pattern and lots of new changes. My Summer Breeze Shawl is just what you need on your empty hook! Perfect for weddings, cool summer evenings or wrap around sarong! Made with Lion Brand Mandala Baby yarn in Pixie Hollow is extraordinary as it creates this beautiful colorway in this triangular shawl. It’s a ten row repeat pattern and uses many different stitches making it more of an intermediate pattern but with the video tutorial anyone can do it! Give it a try today!!


My dad will continue to be the videographer, editor, and photographer for our videos even if we don’t live together.
Support YARNutopia today so we can continue to bring you clear, quality crochet tutorials even after I move into my new home!
There will be an added expense of more travel and hopefully this won’t deter our ability to provide consistent videos on a weekly basis.

Donate Button with Credit Cards

**You can always contact me via Facebook if you have any problems with the pattern. I am happy to help if you have any questions along the way.
***These patterns are copyright YARNutopia © so PLEASE DO NOT COPY, SHARE, ADJUST OR RESELL MY PATTERN. I wrote and tested this pattern myself, from beginning to end. It took a lot of time and work, and I would really like to have it remain “my pattern.”
***You can sell anything you make from my patterns, please just link back to my website YARNutopia.com. Thank you!

Teacher: Nadia Fuad
Video and Editing: Fuad Azmat (My Daddy)
Share your work on Facebook!
Add me on Snapchat: YARNutopia
Follow me on Instagram
Visit My Ravelry Store and add this to your Favorites!
Follow me on Twitter: @YARNutopia
Enjoy this video and subscribe to my channel on YouTube for more tutorials on how to crochet!
Leave a comment, and share with your friends!

Pattern:

Designed by Nadia Fuad
You *may* sell items made from my pattern, but please reference my website YARNutopia.com.
Please do not copy, sell, and/or post this pattern and claim it as your own.

Materials you will need:
Get the supplies individually by clicking the links below
Lion Brand Yarn Mandala Baby in the color Pixie Hollow (see video tutorial for other suggestions on yarn to use)
Size H-5.00mm Crochet Hook
Yarn Needle
Scissors

NOTES:

-Use a smaller hook to make this smaller
-Use a bigger hook to make this bigger
-This is written in US terms
-This took about a week to make but I did not work on it continuously.
-You can check out yarnsub.com to see yarn substitutions that are equal to the Lion Brand yarn I used in this project.
-This pattern with video tutorial shows the long side being 70 inches (177cm) and the short sides being 36 inches (92cm) but you can make it longer by continuing the repeat pattern.

Special stitches:
Ch(s): chain(s)
YO: Yarn Over
St(s): Stitch(es)
Sl st: slip stitch
SK: Skip
SC: Single Crochet
HDC: Half Double Crochet
DC: Double Crochet
V-Stitch: (DC, ch 1, DC) in same space
TR: Treble Crochet
DC2TOG: Double Crochet 2 sts together
DC3TOG: Double Crochet 3 sts together
3DCcluster: 3 Double Crochet Cluster Stitch
2DCcluster: 2 Double Crochet Cluster Stitch

Pattern:

Start with a magic ring or Ch 4, sl st to first ch to form a ring

Row 1: Ch 4 (counts as DC+Ch 1 sp here and throughout), 3 DC in ring, Ch 2, 3 DC in ring, Ch 1, DC in ring. Turn. (8 sts)

Row 2: Ch 4, DC in same first st, Ch 1, Sk Ch 1 sp, DC in next DC, Ch 1, Sk next st, DC in next st, Ch 1, [DC, Ch 1, DC] in corner Ch 2 sp, Ch 1, DC in next st, Ch 1, Sk 1, DC in next st, Ch 1, Sk next Ch 1 sp, [DC, Ch 1, DC] in last st, Turn.

Row 3: Ch 4, DC in same 1st st, DC in each ch sp and in each st until corner, [2 DC, Ch 2, 2 DC in corner, DC in each ch sp and each st until 1 st remains, [DC, Ch 1, DC] in last st, Turn.

Row 4: Ch 4, DC in same 1st st, Ch 1, sk ch 1 sp & next st, V-Stitch in next st, Ch 1, Sk 3 sts, V-Stitch in next st, Ch 1, Sk 3 sts, V-Stitch in next st, [DC, Ch 1, 2 DC, Ch 1, DC] in corner ch sp, Sk next st, V-Stitch in next st, Ch 1, Sk 3 sts, V-Stitch in next st, Ch 1, Sk 3 sts, V-Stitch in next st, Ch 1 Sk next st & ch 1 sp, [DC, Ch 1, DC] in last st, Turn.

Row 5: Ch 4, DC in same first st, Ch 2, Sk Ch 1 sp & next st, 2 DC cluster in next Ch 1 sp (between V-Stitches), Ch 3, Sk V-Stitch, 2 DC cluster in next Ch 1 sp, Ch 3, 2DCcluster in next Ch 1 sp between V-Stitches, Ch 3, Sk V-stitch, DC2TOG in next st and ch 1 sp together, Ch 3, TR2TOG on middle 2 sts of corner, Ch 3, DC2tog in Ch 1 sp and next st together, Ch 3 Sk V-Stitch, 2 DC cluster in next Ch 1 sp, Ch 3, 2DCcluster between V-Stitches, Ch 3, 2DCcluster between V-sts, Ch 2, [DC, Ch 1, DC] in last st. Turn.

Row 6: Ch 4, 3 DC in same first st, Ch 3, Sk next Ch sp+DC st+Ch 2 sp+DC2TOG st, *[3DC Ch 3, 3DC] in next Ch 3 sp, Ch 3, Sk next Ch 3 sp, Repeat from * until corner, [3 DC, Ch 4, 3 DC] in corner, **Ch 3, Sk next Ch 3 sp, [3DC Ch 3, 3DC] in next Ch 3 sp, repeat from ** until end, [3DC, Ch 1, DC] in last st. Turn.

Row 7: Ch 6 (counts as DC+Ch 3sp), [3DCcluster, Ch 2, 3DCcluster] in next Ch 1 sp, *2TR in ch sp from 2 prev. rows working around the ch sp from last row, [3DCcluster, Ch 2, 3DCcluster, Ch 2, 3DCcluster] in next Ch 3 sp, ** Repeat from * to ** until corner, [3DCcluster, Ch 2, 3DCcluster, Ch 2, 3DCcluster, Ch2, 3DCcluster] in corner, repeat from * to ** until end, Ch 3 and DC in last st.

Row 8: Ch 6, DC in same first st, DC3TOG over Ch sp and next 2 clusters, * Between the two TR sts put [3 DC, Ch 3, 3 DC], DC3ToG working in each of the next 3 cluster sts, ** Repeat from * to ** until corner, DC2TOG on 1st two clusters of corner, [3 DC, Ch 3, 3 DC] in corner, DC2TOG on next 2 clusters after corner, repeat from * to ** until end. [DC, Ch 3, DC] in last st, Turn.

Row 9: Ch 4, DC in same 1st st, * 3 SC in Ch 3 sp, [TR, Ch 1, TR, Ch 1, TR] in DC3TOG st, Repeat from * until corner, [2 SC, Ch 3, 2 SC] in corner, [TR, Ch 1, TR, Ch 1, TR] in next DC2TOG st, **3 SC in next Ch sp, [TR, Ch 1, TR, Ch 1, TR] in next DC3TOG st, Repeat from ** to end, [DC Ch 1, DC] in last st. Turn.

Row 10: Ch 4, 2 DC in 1st st, DC in Ch 1 sp, * Sk next 3 sts, DC in TR, 2 DC in Ch 1 sp, DC in next TR, 2 DC in next ch 1 sp, DC in next TR, repeat from * until corner. Sk 2 SC before corner, [3 DC, Ch 2, 3 DC] in corner, ** DC in next TR, 2 DC in next Ch 1 sp, DC in next TR, 2 DC in next Ch 1 sp, DC in next TR, Sk next 3 SC sts, repeat from ** until end, [2DC, Ch 1, DC] in last st. Turn.

Rows 11-46: Repeat Rows 2 thru 10 as many times as you’d like! (See video tutorial on how to do the repeat)

Fasten off, weave in all ends.

Enjoy!!

This post contains affiliate links, which I may be compensated for when you make a purchase. That means if you click on any link and buy from the linked websites, I will receive a small percentage of the value of your order. The amount you pay is not changed. Thank you for all your support in clicking the links in my blog!! You all are so amazing!! ~Nadia

The yarn provided for this pattern is courtesy of Lion Brand Yarn


[

Free Pattern Round-Up: Father’s Day Crochet Projects

Free Pattern Round-Up: Father’s Day Crochet Projects

With Father’s Day right around the corner, here a a few great projects to show that special person in your life how much they mean to you! There are many who fill the role of “dad” and these crochet gifts will mean so much to them. Homemade gifts made with love are truly cherished.

This collection of free patterns cover a variety of items with varying skill levels. Pick yours today and get started now!

Check out patterns from many great designers!


Dad’s Soap on a Rope

Designed by Through the Loop Yarn Craft

Earl Grey Cup Cozy

By Rich Textures Crochet


Viking Gnome Towel Topper

By Nana’s Crafty Home


Crochet Scarf for Men

By Golden Lucy Crafts


Simple Crochet Treat Basket

By Jen Hayes Creations


Da Boss Hat

By ACCROchet
This is a Paid Pattern, but totally worth it!! I love it!


DC Dice Bag and Tray

By Green Fox Farms Designs


I Heart Dad Can Cozy

By Jo to the World


Remote Holder

By Jo to the World


Geometric Arrow Coasters

By YARNutopia


Blaze Orange Woodsman Hat

By YARNutopia


Adult Men’s Chunky Slippers

By YARNutopia


The Uptown Blanket Scarf

By YARNutopia


Sharp Dressed Man Vest

By YARNutopia

FREE Written Crochet Pattern: Hair Scrunchies

FREE Written Crochet Pattern: Hair Scrunchies

It’s time for a messy bun and getting stuff done! Tie your hair up with one of my easy-to-make hair scrunchies!

Scrunchies are back, and they’re all the rave! You can make an assortment of them in every color and size using my pattern. Here, I show you how to take the same pattern using a few adjustments and changes gives you different sizes and looks! You can never have too many scrunchies!! So step aside hair ties, scrunchies are taking over! Never underestimate the power of a good scrunchie and start making some today! #scrunchielife


My dad will continue to be the videographer, editor, and photographer for our videos even if we don’t live together.
Support YARNutopia today so we can continue to bring you clear, quality crochet tutorials even after I move into my new home!
There will be an added expense of more travel and hopefully this won’t deter our ability to provide consistent videos on a weekly basis.

Donate Button with Credit Cards

**You can always contact me via Facebook if you have any problems with the pattern. I am happy to help if you have any questions along the way.
***These patterns are copyright YARNutopia © so PLEASE DO NOT COPY, SHARE, ADJUST OR RESELL MY PATTERN. I wrote and tested this pattern myself, from beginning to end. It took a lot of time and work, and I would really like to have it remain “my pattern.”
***You can sell anything you make from my patterns, please just link back to my website YARNutopia.com. Thank you!

Teacher: Nadia Fuad
Video and Editing: Fuad Azmat (My Daddy)
Share your work on Facebook!
Add me on Snapchat: YARNutopia
Follow me on Instagram
Visit My Ravelry Store and add this to your Favorites!
Follow me on Twitter: @YARNutopia
Enjoy this video and subscribe to my channel on YouTube for more tutorials on how to crochet!
Leave a comment, and share with your friends!

Pattern:

Designed by Nadia Fuad
You *may* sell items made from my pattern, but please reference my website YARNutopia.com.
Please do not copy, sell, and/or post this pattern and claim it as your own.

Materials you will need:
Get the supplies individually by clicking the links below
-Any Size 4 Medium, Worsted Weight Yarn (I Used Lion Brand Yarns Vel-Luxe yarn, or you could use Lily’s Sugar and Creme, or Lion Brand Vanna’s Choice. You could also use Brava yarn by WeCrochet)
Hair Ties or Rubber Bands
Size H-5.00mm Crochet Hook
Yarn Needle
Scissors

NOTES:

-Use a smaller hook to make this smaller
-Use a bigger hook to make this bigger
-This is written in US terms
-This took about 4 hours to make but I did not work on it continuously.
-You can check out yarnsub.com to see yarn substitutions that are equal to the Lion Brand yarn I used in this project.
-This pattern is for leg warmers that measures: 10 inch ankle, up to 18 inch calf, and they are 13 inches long They will fit most adults.

Special stitches:
Ch(s): chain(s)
YO: Yarn Over
St(s): Stitch(es)
Sl st: slip stitch
SK: Skip
SC: Single Crochet
HDC: Half Double Crochet
DC: Double Crochet

Pattern:

Make a slip knot and add the loop to your hook

Insert hook into the center opening of the hair tie and wrap your working yarn around the band. Slip stitch to attach your yarn.

Round 1: HDC 48 sts working AROUND the hair tie, Sl st to first st to close round, scoot the stitches around to cover the whole band.

Round 2: Ch 2 (does not count as anything), [2DC in next st, DC in next 2 sts] 16 times, sl st to first DC. Fasten off, weave in all ends.
This creates a ruffle and a fabulous scrunchie look!

Assembly:

There’s no assembly, just fun! Make as many of these as you’d like, in alllll the colors!!

Enjoy!!

This post contains affiliate links, which I may be compensated for when you make a purchase. That means if you click on any link and buy from the linked websites, I will receive a small percentage of the value of your order. The amount you pay is not changed. Thank you for all your support in clicking the links in my blog!! You all are so amazing!! ~Nadia

The yarn provided for this pattern is courtesy of Lion Brand Yarn