You can’t go wrong with this ensemble!! Perfect for any baby on your gift giving list or any special baby event! Change up the colors for a boy or a girl! There’s definitely something to love in this set! These pieces can be made any time of year! Make one or make all four pieces below. Click the links or the photos to be redirected to their written patterns and video tutorials. All crochet patterns in this post are FREE!
This is a great ensemble for any newborn to 6 month baby layette. It is an absolute dream to make! This set is such a lovely gift for a baby shower! These pieces can be made any time of year! Make one or make all four pieces below. Click the links or the photos to be redirected to their written patterns and video tutorials. All crochet patterns in this post are FREE!
The weather can be unpredictable. It can go from a warm day to a cool evening in a matter of a couple hours! A shawl is always a nice accessory to have on hand when the temperature shifts. Here are some great FREE patterns for crochet wraps! There’s at least one in here that will be sure to catch your eye! Be sure to click the photo or the link to the pattern of any of these wonderful designs. It will take you to its free pattern so you can get started on your next project today!
Elena from Beatrice Ryan Designs made this beautiful shawl. This elegant design is perfect for any special occasion and will add a touch of style to your summer wardrobe! Check this out and be prepared to hear all the ooh’s and ahh’s when you wear this out!
Oooh la, la! Celina from Simply Collectible Crochet designed this Coraline in Rio Mini Wrap! It is the perfect wrap for your summer adventure! This beautiful shawl is lightweight and uses Red Heart Yarns Unforgettable. It can be used as a shoulder wrap, but cleverly doubles as a pretty cowl scarf too!
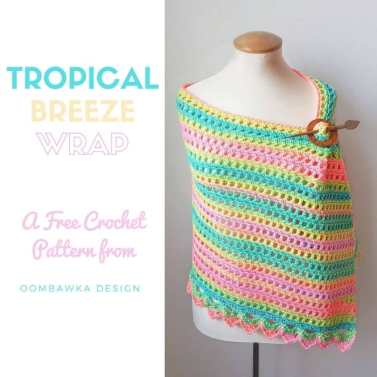
Why not create this Summer Shawl that would be beautiful and the perfect accessory to any outfit. It would be the perfect Mother’s Day gift, a gift you could make for your bridesmaids, or a hit for anyone on your gift list, any time of the year!
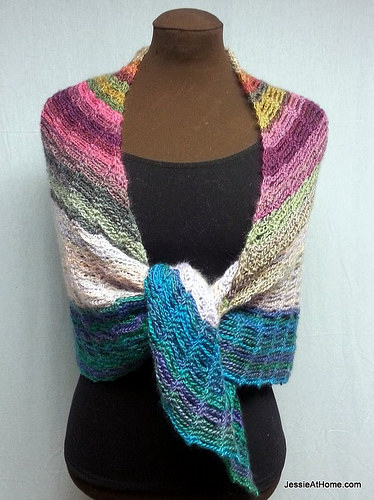
Jessie at Home has this amazing Unchained Shawl Free Crochet Pattern. If you can make a chain stitch and a single crochet, you can make this wrap! It’s super simple and utilizes the beauty of variegated yarn to create a stunning piece that will make everyone take notice! I sure did! What a lovely piece to be worn in a multitude of ways! One piece, several looks! Can’t go wrong with that!
Penelope’s Lacy Wrap by Celina from Simply Collectible Crochet is a versatile piece that has several ways for you to wear this one great shawl! Check out her blog to get suggestions on all the ways to wear this lightweight piece and make this in less than a few hours!
This Mobius Shawl and Hooded Cowl by Donna from Naztazia has a complex look but definitely not! It’s one of the simplest crochet shawls you will ever make! What a beautiful and unique design for those cool summer nights! Donna has an accompanying video tutorial to go along with this great pattern!
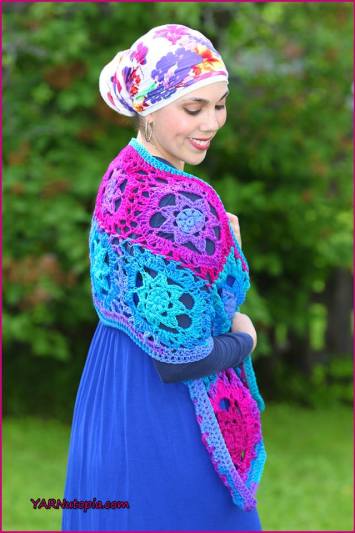
Celina from Simply Collectible Crochet designed another great piece! This is absolutely beautiful! Penelope’s Flirty Shawl is another piece that can be worn in many ways! Hop on over to her blog to check out this free crochet pattern and get yours started! What a great gift this would be!
Marly Bird designed this beautiful crocheted shawl. This fashionable and fun accessories will become a favorite of yours. If you start it now, you can have it done in one weekend! It works up so fast!
My Patchwork Medley Baby Blanket is a variety of crochet stitches and pieces stitched together to make this luxuriously soft quilt. Perfect for snuggling! Using Red Heart Yarns Soft Essentials in Purple Reign Stripes and Sugar Plum, this piece is the perfect accent for any nursery!
My dad will continue to be the videographer, editor, and photographer for our videos when I move away.
Support YARNutopia today so we can continue to bring you clear, quality crochet tutorials even after I move into my new home!
There will be an added expense of more travel and hopefully this won’t deter our ability to provide consistent videos on a weekly basis.
Follow along with this video tutorial to learn how to make this blanket:
**You can always contact me via Facebook if you have any problems with the pattern. I am happy to help if you have any questions along the way.
***You can definitely sell anything you make from my patterns, please just link back to my website YARNutopia.com. Thank you!
Teacher: Nadia Fuad
Video and Editing: Fuad Azmat (My Daddy)
Share your work on Facebook!
Add me on Snapchat: YARNutopia
Follow me on Instagram
Visit My Ravelry Store and add this to your Favorites!
Follow me on Twitter: @YARNutopia
Enjoy this video and subscribe to my channel on YouTube for more tutorials on how to crochet!
Leave a comment, and share with your friends!
Pattern:
Designed by Nadia Fuad You *may* sell items made from my pattern, but please reference my website YARNutopia.com.
Please do not copy, sell, and/or post this pattern and claim it as your own.
NOTES:
-Use a smaller hook to make these smaller
-Use a bigger hook to make these bigger
-Watch the FULL introduction of the video tutorial for frequently asked questions and watch the full video for tips on how to make these smaller or bigger.
-You will need 964 Yards of yarn for this whole project. (4 skeins of each color)
-My blanket is 30 inches (76 cm) by 36 inches (92 cm)
-You can use any type of Worsted Weight, Aran, or Bulky yarn to crochet this blanket
-Different Afghan Sizes can be found in the middle of this page here.
Special stitches:
Ch(s): chain(s)
YO: Yarn Over
St(s): Stitch(es)
Sl st: slip stitch
SK: Skip
SC: Single Crochet
HDC: Half Double Crochet
DC: Double Crochet
Cluster: [YO, Insert Hook, YO, pull through, YO, pull through 2 loops on hook] 3 times, YO, pull through all 4 loops on hook. Cluster made.
Pattern:
If you have any confusion or difficulty with reading this pattern, please watch the video tutorial to have visual instructions.
Pattern:
Bigger Rectangles:
MAKE 2
Ch 43 or any odd number that is 16 inches (40 cm) Row 1: Cluster in 4th Ch from hook, *DC in next ch, Cluster in the next ch, repeat from * across, ending with DC in last ch, ch 1, turn. (41 sts) Row 2: SC in each st across, turn. (41 sts) Row 3: Ch 3 (counts as DC), *Cluster in next st, DC in next st, repeat from * across, ch 1, turn. (41 sts) Rows 4-25: Repeat rows 2 and 3 until your piece is 12 inches long, ending on a repeat of Row 3. (see video tutorial for visual instructions)
Fasten off, Weave in ends.
MAKE 2
Ch 48 or any even number that measures the same width as your first piece Row 1: HDC in 2nd ch from hook, *Sl st i next ch, HDC in next ch, repeat from * across ending with HDC in last ch, ch 1, turn. Row 2: Sl st in 1st st, HDC in next, Sl st in next, repeat from * across, ending with Sl st in last st, ch 1, turn. Row 3: HDC in 1st st, Sl st in next st, HDC in next st, repeat from * across, ending with HDC in last st, ch 1, turn. Rows 4-44: Repeat rows 2 and 3 until your piece is 12 inches long, ending on a repeat of Row 3. (see video tutorial for visual instructions)
Fasten off, weave in ends.
Short Strips:
MAKE 2:
Start one with Solid for the first 8 rows, and change color for the last 8 rows to Stripes color.
Start the second one with Stripes for the first 8 rows, and change color for the last 8 rows to Solid color.
With long tail, make slip knot,
Ch 39 or any amount that measures the length of your bigger rectangle pieces. Row 1: SC in 2nd ch from hook and across. Ch 1, turn. (38) Row 2: SC in BLO of each st across. Ch 1, turn. Rows 3-8: Repeat Row 2
Change color Row 9-16: Repeat Row 2 until your piece is 4 inches wide
Fasten off with long tail for sewing.
Longer Strips:
MAKE 2:
Start one with Solid for the first 8 rows, and change color for the last 8 rows to Stripes color.
Start the second one with Stripes for the first 8 rows, and change color for the last 8 rows to Solid color.
With long tail, make slip knot,
Ch 45 or any amount that measures the Width of your bigger rectangle pieces. Row 1: SC in 2nd ch from hook and across. Ch 1, turn. (44) Row 2: SC in BLO of each st across. Ch 1, turn. Rows 3-8: Repeat Row 2
Change color Row 9-16: Repeat Row 2 until your piece is 4 inches wide
Fasten off with long tail for sewing.
Small Center Squares:
Make 2 in Solid and Make 2 in Stripes
Ch 4 Rnd 1: 2 DC in 4th ch from hook, Ch 2 [3 DC in same ch, ch 2] 3 times, sl st to beginning. Rnd 2: Ch 1, sc in same st and next 2 sts, *[sc, ch 2, sc] in corner, sc in next 3 sts, repeat from * around, ending with corner. Sl st to 1st sc. Fasten off with long tail for sewing.
Assembly step:
Sew all your pieces together using the Whip Stitch Method. (See video tutorial for visual instructions)
Border:
DC around entire blanket putting 3 DC in corners.
Fasten off, weave in all ends.
Enjoy!!
This post contains affiliate links, which means if you click on the link and buy from the linked websites, I will receive a small percentage of the value of your order. The amount you pay is not changed.
The yarn provided for this pattern is courtesy of Red Heart Yarns
The All-Year-Round Poncho is one of the only fun fashion pieces you will need for any season! Simple, yet versatile, this great tunic style poncho can be worn in a number of ways. Paired with a variety of accessories, you can change the entire look! Can’t get much better than that! Made with the right type of yarn, it would also be a great swimsuit cover-up or can be worn over a sundress!!
You could add pockets for a different look! For a more formal look, pair this with wide leg pants or a skirt and a dark top. For a Boho look, you could wear a long necklace, rider boots, a crossbody bag and a nice scarf. This is such a fun style to play around with for any time of the year!!
Follow along with this video tutorial to learn how to make this Poncho:
***You can sell anything you make from my patterns, please just link back to my website YARNutopia.com. Thank you!
Teacher: Nadia Fuad
Video and Editing: Fuad Azmat (My Daddy)
Share your work on Facebook!
Add me on Snapchat: YARNutopia
Follow me on Instagram
Visit My Ravelry Store and add this to your Favorites!
Follow me on Twitter: @YARNutopia
Enjoy this video and subscribe to my channel on YouTube for more tutorials on how to crochet!
Leave a comment, and share with your friends!
Designed by Nadia Fuad
You may sell items made from my pattern, but please reference my website YARNutopia.com.
Please do not copy, sell, and/or post this pattern and claim it as your own.
NOTES:
-This took me approximately 12 Hours total to make this piece.
-To make this smaller or bigger, use a smaller or bigger hook size.
-You can chain more or less on your foundation chain, there is no multiple in this project.
-MEASURE: From your navel to your side for the measurement of your panel. (See video tutorial intro for more details on how to make this bigger)
-The one I show in the video tutorial will fit a size Medium person and measures 48 Inches around and 25 inches long. You can watch the video tutorial to learn how to make this longer and wider. It is supposed to fit loosely around the body.
-The Ch 1 at the beginning of the row DOES NOT count as a stitch.
-One panel measures 12 inches wide and 48 inches long, but you can make yours as wide and long as you want it to be by just chaining more in your foundation row and continuing rows to make this longer.
Special stitches:
Ch(s): chain(s)
St(s): Stitch(es)
Sl st: slip stitch
Sk: Skip
SC: Single Crochet
DC: Double Crochet
Pattern: MAKE 2 Ch 21 or any number that measures from your navel to your side. Row 1: SC in 2nd ch from hook and across, ch 1, turn. (20 sts) Row 2-106: SC in each st across. Ch 1, turn. (20)
You can continue rows to make this longer. SC around entire panel.
Fasten off. Weave in all ends.
Assembly Step:
After both panels are made, line them up and (whip-stitch) sew front seam and back seam. Sew sides up as well. Use video tutorial for visual instructions. Once it is all sewn up, add fringe to the bottom and tie on beads.
Weave in all ends.
Enjoy!
This post contains affiliate links, which I may be compensated for when you make a purchase. That means if you click on any link and buy from the linked websites, I will receive a small percentage of the value of your order. The amount you pay is not changed. Thank you for all your support in clicking the links in my blog!! You all are so amazing!! ~Nadia
The yarn provided for this pattern is courtesy of Red Heart Yarns
I have always had a “zest” for life, and “lime” so grateful to be able to do what I love. For the past 2 weeks, my creative “juices” have been going in high gear to bring you this series of puns leading up to Valentine’s Day. I hope you enjoyed it as much as I have!! At times, I may have blurred the “limes” between humorous and pushing too far. I’m sure some were a bit “sour” and others made you “peel” with laughter. Today’s pun is no exception. This pillow is “juice” the cutest way to end our series and allows me to “ex-press” how much all this means to me. I do this for YOU! I plan to “wedge” this under me to provide something to “curdle” up with once my procedure and biopsies are over. I’m so lucky to have my “main squeeze” with me during these tests! My life is made up of many “making lemonade” moments. Any way you “slice” it, was a perfect way to bring this series to a close. So, time to “pucker up” and get this procedure done! Happy Valentine’s Day Everyone! Sending you all my love!! I also want to say a special Happy Valentine’s Day to my Nate for taking the day off work to be with me today.
Watch this video tutorial to learn how to make the lemon slice:
Teacher: Nadia Fuad
Video and Editing: Fuad Azmat (My Daddy)
Share your work on Facebook!
Add me on Snapchat: YARNutopia
Follow me on Instagram
Visit My Ravelry Store and add this to your Favorites!
Follow me on Twitter: @YARNutopia
Enjoy this video and subscribe to my channel on YouTube for more tutorials on how to crochet!
Leave a comment, and share with your friends!
Pattern:
Designed by Nadia Fuad You *may* sell items made from my pattern, but please reference my website YARNutopia.com.
Please do not copy, sell, and/or post this pattern and claim it as your own.
NOTES:
-Use a smaller hook to make these smaller
-Use a bigger hook to make these bigger
Special stitches:
Ch(s): chain(s)
YO: Yarn Over
St(s): Stitch(es)
Sl st: slip stitch
SK: Skip
SC: Single Crochet
SC2TOG: Single Crochet 2 Together
TR: Treble Crochet
Pattern:
If you have any confusion or difficulty with reading this pattern, please watch the video tutorial to have visual instructions.
Lemon Slice (Make 2)
With White:
Ch 2 Rnd 1: 6 SC in 2nd ch from hook, sl st to 1st sc, ch 1 (6)
Rnd 2: 2 SC in each st around, sl st to 1st sc. (12)
Rnd 3: Ch 7 (counts as TR + Ch 3 sp), *Sk 1 st, TR in next, Ch 3, repeat from * around, sl st to 4th ch of beginning ch 7. (8 TR, 8 Ch 3 sps) Fasten off, change to Lemon
Rnd 4: Working behind ch 3 sps, in sk’d sts from round 2, Ch up 4 (counts as TR), 3 TR in same st, *ch 1, 4 TR in next sk’d st from round 2. repeat from * around, sl st to beg. ch up 4. (32 TR, 8 ch 1 sps)
Fasten off Yellow, change back to white
Rnd 5: Attach yarn to TR from Rnd 3 and ch 1 sp from Rnd 4. SC 2 Rnds together. *[SC in ch 3 sp and in next TR] 4 times, SC in next TR and ch 1 sp. Repeat from * around, sl st to 1st sc, fasten off white. (40 sc around) (See video tutorial for specific locations of stitches)
Rnd 6: In any st around, with Brighter yellow color, ch 1, 2 SC in same st, 1 SC in next 4 sts, *2 SC in next st, 1 SC in next 4 sts, repeat from * around, sl st to 1st sc. Fasten off with long tail for sewing.
Assembly step:
Iron on letters to pillow first
Then sew lemon slices to pillow using video tutorial as a guide.
Sew on a felt heart (optional)
Enjoy!!
This post contains affiliate links, which means if you click on the link and buy from the linked websites, I will receive a small percentage of the value of your order. The amount you pay is not changed.
I “gnome” that this series is almost done. I hope these have brought some “magic” to your life. I’ve been “toad” that I make up some pretty good ones! I have been “trolling” through some keywords to pun this caption to make sure it’s “elfin'” hilarious. Some have been so funny, I hope no one wet their “plants” reading these! I’m being “fairy” careful to make sure they’re full of fun and “fantasy.” I have “pixie-d” some great projects to make some special Valentine’s ideas to help your love “grow.” This cute Gnome would be perfect for a “garden party” accent!
Watch this video tutorial to learn how to make this gnome:
My dad will continue to be the videographer, editor, and photographer for our videos when I move away.
Support YARNutopia today so we can continue to bring you clear, quality crochet tutorials even after I move into my new home!
There will be an added expense of more travel and hopefully this won’t deter our ability to provide consistent videos on a weekly basis.
Teacher: Nadia Fuad
Video and Editing: Fuad Azmat (My Daddy)
Share your work on Facebook!
Add me on Snapchat: YARNutopia
Follow me on Instagram
Visit My Ravelry Store and add this to your Favorites!
Follow me on Twitter: @YARNutopia
Enjoy this video and subscribe to my channel on YouTube for more tutorials on how to crochet!
Leave a comment, and share with your friends!
Pattern:
Designed by Nadia Fuad You *may* sell items made from my pattern, but please reference my website YARNutopia.com.
Please do not copy, sell, and/or post this pattern and claim it as your own.
NOTES:
-Use a smaller hook to make these smaller
-Use a bigger hook to make these bigger
Special stitches:
Ch(s): chain(s)
YO: Yarn Over
St(s): Stitch(es)
Sl st: slip stitch
SK: Skip
SC: Single Crochet
SC2TOG: Single Crochet 2 Together
Pattern:
If you have any confusion or difficulty with reading this pattern, please watch the video tutorial to have visual instructions.
Body
Ch 2 Rnd 1: 6 SC in 2nd ch from hook. (6) Rnd 2: 2SC in each st around. (12) Rnd 3: [2 SC in next st, SC in next st] 6 times. (18) Rnd 4: [2 SC in next st, SC in next 2 sts] 6 times. (24) Rnd 5-12: SC in each st around. (24) Rnd 13: [SC2TOG, SC in next 2 sts] 6 times. (18) Rnd 14: SC in each st around. (18) Rnd 15: [SC2TOG, SC in next st] 6 times. (12)
stuff body Rnd 16: SC in each st around. (12) Rnd 17: [SC2TOG] 6 times. (6)
Fasten off. Weave in ends.
Hat:
Ch 2 Rnd 1: 6 SC in 2nd ch from hook Rnd 2: SC in each st around. (6) Rnd 3: 2 SC in next st, SC in the rest of the sts around. (7) Rnds 4-14: Repeat Round 3 until you have a total of 18 sts. Rnds 15-18: SC in each st around. (18)
Fasten off with long tail for sewing.
Nose:
Ch 2 Rnd 1: 6 SC in 2nd ch from hook. (6) Rnd 2: 2SC in each st around. (12) Rnds 3-4: SC in each st around. (12)
Fasten off with long tail for sewing.
Stuff nose and sew closed
Arms:
Ch 6 Row 1: SC in 2nd ch from hook and across, ch 1, turn. Row 2-20: SC in each st across. Ch 1, turn.
Fasten off with long tail for sewing.
Assembly step:
Sew all the pieces together using video tutorial/photos as a guide.
Attach strands of yarn for beard hair and fray yarn out to have frizzy hair.
Enjoy!!
This post contains affiliate links, which I may be compensated for when you make a purchase. That means if you click on any link and buy from the linked websites, I will receive a small percentage of the value of your order. The amount you pay is not changed. Thank you for all your support in clicking the links in my blog!! You all are so amazing!! ~Nadia
The yarn provided for this pattern is courtesy of Red Heart Yarns
I “periodically” get inspiration from everyday things for these crochet love notes. I get a “sine” that an idea might work, and then I start to “planet.” Some of these are “sodium” funny, I have slapped my “neon” a couple of occasions! The “gravity” to make these puns epic is “multiplied” by the fact that I’m running out of “time.” I’m trying to finish them at the “speed of light.” I have plenty of “energy” to keep these going for a couple more days! No “matter” what, through everything, you know my love for this is “constant,” but right now, I’m going to take a break and have a piece of “Pi.”
Follow along with this video tutorial to learn how to make these finger puppets:
Teacher: Nadia Fuad
Video and Editing: Fuad Azmat (My Daddy)
Share your work on Facebook!
Add me on Snapchat: YARNutopia
Follow me on Instagram
Visit My Ravelry Store and add this to your Favorites!
Follow me on Twitter: @YARNutopia
Enjoy this video and subscribe to my channel on YouTube for more tutorials on how to crochet!
Leave a comment, and share with your friends!
Pattern:
Designed by Nadia Fuad You *may* sell items made from my pattern, but please reference my website YARNutopia.com.
Please do not copy, sell, and/or post this pattern and claim it as your own.
NOTES:
-Use a smaller hook to make these smaller
-Use a bigger hook to make these bigger
Special stitches:
Ch(s): chain(s)
YO: Yarn Over
St(s): Stitch(es)
Sl st: slip stitch
SK: Skip
SC: Single Crochet
SC2TOG: Single Crochet 2 Together
Pattern:
If you have any confusion or difficulty with reading this pattern, please watch the video tutorial to have visual instructions.
Scientist head: Make 2
Ch 5 Row 1: SC in 2nd ch from hook and across, ch 1, turn. (4) Row 2: 2 SC in 1st st, 1 SC in next 2 sts, 2 SC in last st, ch 1, turn. (6) Row 3: 2 SC in 1st st, SC in next 4 sts, 2 SC in last st, ch 1, turn. (8) Row 4: 2 SC in 1st st, 1 SC in next 6 sts, 2 SC in last st, ch 1, turn. (10) Row 5-6: SC in each st across, ch 1, turn. (10) Row 7: SC2TOG, SC in next 6 sts, SC2TOG, Ch 1, turn. (8) Row 8: SC2TOG, SC in next 4 sts, SC2TOG, Ch 1, turn. (6) Row 9: SC2TOG, SC in next 2 sts, SC2TOG, Ch 1, turn. (4)
Fasten off with long tail for sewing.
Robe:
Ch 6, Sl st to 1st ch to form ring. Ch 1 Rnd 1: 12 SC in ring Rnd 2: SC in each st around. (12) Rnd 3: [2 SC in next st, SC in next st] 6 times. (18) Rnd 4: SC in each st around. (18) Rnd 5: [2 SC in next st, SC in next 2 sts] 6 times. (24) Rnd 6-9: SC in each st around. (24)
Fasten off. Weave in ends.
Einstein Mustache:
Make 2
Ch 3 Row 1: 2 DC in 3rd ch from hook.
Fasten off with long tail for sewing.
Assembly step:
Sew all the pieces together and stuff head using video tutorial/photos as a guide.
Embroider Eyes.
Attach strands of yarn for hair and fray yarn out to have frizz/voluminous hair.
Enjoy!!
This post contains affiliate links, which I may be compensated for when you make a purchase. That means if you click on any link and buy from the linked websites, I will receive a small percentage of the value of your order. The amount you pay is not changed. Thank you for all your support in clicking the links in my blog!! You all are so amazing!! ~Nadia
The yarn provided for this pattern is courtesy of Red Heart Yarns
We are “bass-ically” coming to the end of our Valentine’s puns. I “fish” we had more time because I’m having so much “fin!” I have a “boat-load” of material. I’m not being “koi” about it. With only a few days left, I’m not about to “swimmer” down. Instead, I’m over here, “kraken” myself up! I “sardine-ly” try to keep everyone laughing. You know I’m not doing this just for the “halibut.” These puns are an annual event. You may wonder, “”Water” you doing these for, Nadia?” My answer is, “These puns are a big “tank” you for being in my life!” I have always said, “You are my “ray” of sunshine.” You make me want to “Carp-e” Diem, and not “flounder” around anymore. There’s nothing “fishy” about this. My “sole” is truly in making up these puns!
Follow along with this video tutorial to learn how to make these fish:
Teacher: Nadia Fuad
Video and Editing: Fuad Azmat (My Daddy)
Share your work on Facebook!
Add me on Snapchat: YARNutopia
Follow me on Instagram
Visit My Ravelry Store and add this to your Favorites!
Follow me on Twitter: @YARNutopia
Enjoy this video and subscribe to my channel on YouTube for more tutorials on how to crochet!
Leave a comment, and share with your friends!
Pattern:
Designed by Nadia Fuad You *may* sell items made from my pattern, but please reference my website YARNutopia.com.
Please do not copy, sell, and/or post this pattern and claim it as your own.
NOTES:
-Use a smaller hook to make these smaller
-Use a bigger hook to make these bigger
Special stitches:
Ch(s): chain(s)
YO: Yarn Over
St(s): Stitch(es)
Sl st: slip stitch
SK: Skip
SC: Single Crochet
Pattern:
If you have any confusion or difficulty with reading this pattern, please watch the video tutorial to have visual instructions.
Fish body: Make 2
Ch 3
Row 1: SC in 2nd ch from hook and next ch, ch 1, turn. (2)
Row 2: 2 SC in each st across. ch 1. turn. (4)
Row 3: 2 SC in 1st st, SC in next 2 sts, 2 SC in last st, ch 1, turn. (6)
Row 4: 2 SC in 1st st, 1 SC in next 4 sts, 2 SC in last st, ch 1, turn. (8)
Row 5: SC in each st across, Ch 1, turn. (8)
Row 6: 2 SC in 1st st, SC in next 6 sts, 2 SC in last st, ch 1, turn. (10)
Row 7: 2 SC in 1st st, SC in next 8 sts, 2 SC in last st, ch 1, turn. (12)
Rows 8-14: SC in each st across. Ch 1, turn. (12)
Row 15: SC2TOG, SC in 8 sts, SC2TOG, Ch 1, Turn. (10)
Row 16: SC2TOG, SC in 6 sts, SC2TOG, ch 1, turn. (8)
Row 17: SC in each st across ch 1, turn. (8)
Row 18: SC2TOG, SC in 4 sts, SC2TOG, ch 1, turn. (6)
Row 19: SC2TOG, SC in 2 sts, SC2TOG, ch 1, turn. (4)
Row 20: [SC2TOG] 2 times, ch 1
Fasten off with long tail for sewing.
Tail: Make 2
Ch 19
Row 1: Sl st in 2nd ch from hook, SC in next, HDC in next, DC in next, TR in next, DC in next, HDC in next, SC in next, Sl st in next, Sl st in next, SC in next, HDC in next, DC in next, TR in next, DC in next HDC in next, SC in next, Sl st in last ch. Fasten off with long tail for sewing.
Zig Zag: Make 2
Ch 20
Row 1: SC in 2nd ch from hook and next 2 chs, SC3TOG, SC in next 3 chs, 3 SC in next ch, SC in next 3 chs, SC3TOG, SC in last 3 chs, fasten off with long tail.
Top fin: Make 2
Ch 10
Row 1: SC in 2nd ch from hook, *Sk 1 ch, 5 DC in next ch, Sk 1 ch, SC in next ch, repeat from * ch 1, turn.
Row 2: SC in 1st st, *DC in next 2 sts, 3 DC in next, DC in next 2 sts, SC in next, repeat from * across.
Fasten off with long tail for sewing.
Bottom fin:
Ch 6
Row 1: SC in 2nd ch from hook, Sk 1 ch, 5 DC in next ch, Sk 1 ch, SC in next ch. Ch 1, turn
Row 2: SC in 1st st, *DC in next 2 sts, 3 DC in next st, DC in next 2 sts, SC in last st. Fasten off with long tail.
Assembly step:
Sew all the pieces together using video tutorial/photos as a guide.
Stuff fish. Sew felt eyes and mouth to fish.
Enjoy!!
This post contains affiliate links, which means if you click on the link and buy from the linked websites, I will receive a small percentage of the value of your order. The amount you pay is not changed.
Rise and shine, it’s a “brew-tiful” day! Words can’t “espresso” how much you “bean” to me. You always stay “grounded” and work at “mocha” me happy. Even when I have a “latte” on my mind, you are there to give me your sweet “sugar.” Every day, you’re ready to face the daily “grind.” Even if each day feels like a “deja brew,” you never get “heated” and say “I don’t give a “frapp,”” or “What’s “Sumatra” with my life?” Instead, you’re always “perky” and “tea-riffic!” So, better “latte” than never, I want you to know that you’re more than an Average “Joe.” You’re just my “cup of tea.”
Follow along with this video tutorial to learn how to make this mug cozy:
Teacher: Nadia Fuad
Video and Editing: Fuad Azmat (My Daddy)
Share your work on Facebook!
Add me on Snapchat: YARNutopia
Follow me on Instagram
Visit My Ravelry Store and add this to your Favorites!
Follow me on Twitter: @YARNutopia
Enjoy this video and subscribe to my channel on YouTube for more tutorials on how to crochet!
Leave a comment, and share with your friends!
Pattern:
Designed by Nadia Fuad You *may* sell items made from my pattern, but please reference my website YARNutopia.com.
Please do not copy, sell, and/or post this pattern and claim it as your own.
NOTES:
-Use a smaller hook to make these smaller
-Use a bigger hook to make these bigger
My dad will continue to be the videographer, editor, and photographer for our videos when I move away.
Support YARNutopia today so we can continue to bring you clear, quality crochet tutorials even after I move into my new home!
There will be an added expense of more travel and hopefully this won’t deter our ability to provide consistent videos on a weekly basis.
Special stitches:
Ch(s): chain(s)
YO: Yarn Over
St(s): Stitch(es)
Sl st: slip stitch
SK: Skip
SC: Single Crochet
Pattern:
If you have any confusion or difficulty with reading this pattern, please watch the video tutorial to have visual instructions.
Heart: Make 4
Ch 3
Rnd 1: [3 TR, 3 DC, ch 1, TR, ch 1, 3 DC, 3 TR, ch 3, sl st] in 3rd ch from hook.
Rnd 2: Ch 3, [SC, DC] in 1st TR, 3 DC in next st, 2 DC in next st, DC in next 3 sts, DC in ch 1 sp, Ch 1, DC in TR, ch 1, DC in ch 1 sp, DC in next 3 sts, 2 DC in next st, 3 DC in next st, [DC, SC] in last st, ch 3, sl st in center.
Fasten off with long tail for sewing.
Button hole:
When finishing one heart, Ch 4 and sl st back into center.
See video tutorial for visual instructions.
Assembly step:
Sew all the pieces together using video tutorial/photos as a guide.
Sew button on end. Wrap around mug.
Enjoy!!
This post contains affiliate links, which I may be compensated for when you make a purchase. That means if you click on any link and buy from the linked websites, I will receive a small percentage of the value of your order. The amount you pay is not changed. Thank you for all your support in clicking the links in my blog!! You all are so amazing!! ~Nadia
The yarn provided for this pattern is courtesy of Red Heart Yarns
There has “bee-n” a lot of “buzz” going around about these puns. “Honey,” I’m trying to always “beehive” to “bee” sure my jokes don’t “sting.” I try to “bee” positive and “comb” through many ideas before they “stick.” Not all of my puns are “flower-y” or silly. I have “pollen” for a few lame ones. I agree that a couple were a bit “un-bee-lievable.” I always appreciate your feedback and “raw honey-sty.” Your encouragement makes me feel like a “Queen.” I’m trying to stay “hummm-ble, ” so I will stop “drone-ing” on and on, but before I go, I should say, I think you all are the “bees knees!” *insert cringy eyerolls here* HAHA!
Follow along with this video tutorial to learn how to make a bee amigurumi:
Teacher: Nadia Fuad
Video and Editing: Fuad Azmat (My Daddy)
Share your work on Facebook!
Add me on Snapchat: YARNutopia
Follow me on Instagram
Visit My Ravelry Store and add this to your Favorites!
Follow me on Twitter: @YARNutopia
Enjoy this video and subscribe to my channel on YouTube for more tutorials on how to crochet!
Leave a comment, and share with your friends!
Pattern:
Designed by Nadia Fuad You *may* sell items made from my pattern, but please reference my website YARNutopia.com.
Please do not copy, sell, and/or post this pattern and claim it as your own.
NOTES:
-Use a smaller hook to make these smaller
-Use a bigger hook to make these bigger
Special stitches:
Ch(s): chain(s)
YO: Yarn Over
St(s): Stitch(es)
Sl st: slip stitch
SK: Skip
SC: Single Crochet
Pattern:
If you have any confusion or difficulty with reading this pattern, please watch the video tutorial to have visual instructions.
Bee: Circles: With Yellow
Make 4
Ch 2 Rnd 1: 6 SC in 2nd ch from hook. (6) Rnd 2: 2 SC in each st around. (12) Rnd 3: [2 SC in next st, SC in next st] 6 times. (18) Rnd 4: [2 SC in next st, SC in next st] 6 times. (24)
Fasten off with long tail for 2 circles, and short tail for 2 circles.
Stripes: With Black
Make 2
Ch 21 Row 1: SC in 2nd ch from hook and across. Fasten off with long tail.
Stinger:
Ch 5
Sl st in 2nd ch from hook, SC in next, HDC in next, DC in next. Fasten off with long tail.
Wings: With White
Make 2
Ch 3 Row 1: 5 DC in 3rd ch from hook, Ch 2, turn Row 2: [DC, TR] in first st, [TR, DC, HDC] in next st, SC in next st, [HDC, DC, TR] in next st, [TR, DC] in next st, Ch 2, Sl st in last st. Fasten off with long tail for sewing.
Assembly step:
Sew all the pieces together using video tutorial/photos as a guide.
Cut out felt eyes and mouth and glue with tacky glue for face.
Insert Pipe Cleaner for antenna.
Enjoy!!
This post contains affiliate links, which means if you click on the link and buy from the linked websites, I will receive a small percentage of the value of your order. The amount you pay is not changed.
Trying to think of new and clever puns each day is making me feel a bit “plum” crazy. I tend to think “what’s “to-mato” with you, Nadia? You need to “ketchup” and figure these all out!” I’m trying to keep these upbeat and “juice” the cutest play on words, but sometimes it can become a bit “dicey.” I want to say thank you “cherry” much for “picking” up on my sense of humor and playing along with my “fruit-iness!”
Watch this video tutorial to learn how to make this tomato:
Teacher: Nadia Fuad
Video and Editing: Fuad Azmat (My Daddy)
Share your work on Facebook!
Add me on Snapchat: YARNutopia
Follow me on Instagram
Visit My Ravelry Store and add this to your Favorites!
Follow me on Twitter: @YARNutopia
Enjoy this video and subscribe to my channel on YouTube for more tutorials on how to crochet!
Leave a comment, and share with your friends!
Pattern:
Designed by Nadia Fuad You *may* sell items made from my pattern, but please reference my website YARNutopia.com.
Please do not copy, sell, and/or post this pattern and claim it as your own.
NOTES:
-Use a smaller hook to make these smaller
-Use a bigger hook to make these bigger
Special stitches:
Ch(s): chain(s)
YO: Yarn Over
St(s): Stitch(es)
Sl st: slip stitch
SK: Skip
SC: Single Crochet
Pattern:
If you have any confusion or difficulty with reading this pattern, please watch the video tutorial to have visual instructions.
Top of Tomato
With Green
Ch 2 Rnd 1: SC 8 in 2nd ch from hook, sl st to beginning. Rnd 2: *Ch 6, sl st in 2nd ch from hook, SC in next ch, HDC in next 3 chs, sl st in next st, repeat from * around. Rnd 3: Sl st around round 1 making surface sts (See video tutorial for visual instructions), sl st to 1st sl st, turn. (8 sl sts) Rnd 4-6: SC in each st around.
Fasten off with long tail for sewing.
Sew top hole closed.
Body of Tomato With Red
Ch 2 Rnd 1: 6 SC in 2nd Ch from hook. (6 sts)
Rnd 2: [3 SC in next st, 2 SC in next st, 1 SC in next st] Twice. (12 sts)
Rnd 3: SC in next st, 2 SC in next 3 sts, 1 SC in next 3 sts, 2 SC in next 3 sts, 1 SC in last 2 sts. (18 sts)
Rnd 4: 1 SC in next 2 sts, [2 SC in next st, 1 SC in next st] 3 times, 1 sc in next 3 sts, [2 sc in next st, 1 SC in next st] 3 times, SC in last st. (24 sts)
Rnd 5: SC in next 3 sts, [2 SC in next st, SC in next st] 3 times, SC in next 6 sts, [2SC in next st, SC in next st] 3 times, SC in last 3 sts. (30 sts)
Rnds 6-9: SC in each st around. (30 sts)
Rnd 10: SC in next 3 sts, [SC2TOG, SC in next st] 3 Times, SC in next 6 sts, [SC2TOG, SC in next st] 3 Times, SC in last 3 sts (24 sts)
Rnd 11: SC in 2 sts, [SC2TOG, SC in next st] 3 Times, SC in next 3 sts, [SC2TOG, SC in next st] 3 Times, SC in last st. (18 sts)
Rnd 12: SC in next st, [SC2TOG] 3 times, SC in 3 sts, [SC2TOG] 3 times, SC in last 2 sts. (12 sts)
Stuff tomato and continue with last round.
Rnd 13: [SC2TOG] 6 times.
SC 1st and 4th sts together
Fasten off with long tail.
See video tutorial to see how to weave long strand around tomato to make curve shape and fasten off.
Assembly step:
Sew green top to tomato
Add felted face with tacky glue.
See video tutorial for visual instructions.
Enjoy!!
This post contains affiliate links, which means if you click on the link and buy from the linked websites, I will receive a small percentage of the value of your order. The amount you pay is not changed.
I hope you are enjoying these “corny” puns! I’m “stalking” the Internet with “corn-viction” to help “plant” my mind with ideas this Valentine’s Day. Each pun is “butter” than the last. I come “ear” to find creativity. I search online for a “kernel” of truth and a pun that’s “a-peel-ing.” When I find it, I say “shucks” this is “sweet!” I’ve had to “weed” through a lot of “crop” to come up with all these “a-maize-ing” puns, but you’re worth it! After you finish “plowing” through the amount of “ridicul-husk”puns in this caption, I hope the rest of your day is filled with” uni-corns” and rainbows!
Watch this video tutorial to learn how to make this Corn Amigurumi:
Teacher: Nadia Fuad
Video and Editing: Fuad Azmat (My Daddy)
Share your work on Facebook!
Add me on Snapchat: YARNutopia
Follow me on Instagram
Visit My Ravelry Store and add this to your Favorites!
Follow me on Twitter: @YARNutopia
Enjoy this video and subscribe to my channel on YouTube for more tutorials on how to crochet!
Leave a comment, and share with your friends!
Pattern:
Designed by Nadia Fuad You *may* sell items made from my pattern, but please reference my website YARNutopia.com.
Please do not copy, sell, and/or post this pattern and claim it as your own.
NOTES:
-Use a smaller hook to make these smaller
-Use a bigger hook to make these bigger
Special stitches:
Ch(s): chain(s)
YO: Yarn Over
St(s): Stitch(es)
Sl st: slip stitch
SK: Skip
SC: Single Crochet
Puff St: [YO, Insert Hook, YO, Pull through] 3 times, YO, pull through all 7 loops on hook. Puff St made.
Pattern:
If you have any confusion or difficulty with reading this pattern, please watch the video tutorial to have visual instructions.
Outside Leaf:
Make 3 in Green
Ch 2
Row 1: SC in 2nd ch from hook, ch 1, turn. (1)
Row 2: 2 SC in stitch, ch 1, turn. (2)
Row 3: 2SC in each st across, ch 1, turn. (4)
Row 4: SC in each st across. Ch 1, turn. (4)
Row 5: 2 SC in 1st st, SC in next 2 sts, 2 SC in last st, ch 1, turn. (6)
Row 6: SC in each st across. Ch 1, turn. (6)
Row 7: 2 SC in 1st st, SC in next 4 sts, 2 SC in last st, ch 1, turn. (8)
Row 8-15: SC in each st across. Ch 1, turn. (8)
Row 16: SC2TOG, SC in the next 4 sts, SC2TOG, ch 1, turn. (6)
Row 17: SC in each st across. Ch 1, turn. (6)
Row 18: SC2TOG, SC in next 2 sts, SC2TOG, ch 1, turn. (4)
Row 19: SC in each st across. Ch 1, turn. (4)
Row 20: [SC2TOG] Twice, ch 1, turn. (2)
Row 21: SC2TOG. (1)
Fasten off with long tail for sewing.
Corn:
Make 2
With Yellow
Ch 2
Row 1: SC in 2nd ch from hook, ch 1, turn. (1)
Row 2: 2 SC in stitch, ch 1, turn. (2)
Row 3: 2SC in each st across, ch 1, turn. (4)
Row 4: [Puff St, ch 1] in each st across. (4)
Row 5: 2 SC in 1st puff st, 1 SC in next 2 puff sts, 2 SC in last puff st, ch 1, turn. (6)
See video tutorial for visual instructions for the next part
Row 6: [Puff st, Ch 1] in each st across. (6)
Row 7-10: [Puff st, ch 1] in each puff st across. (6)
Row 11: SC2TOG, SC in next 2 sts, SC2TOG, ch 1, turn. (4)
Row 12: [Puff st, ch 1] in each st across. (4)
Row 13: [SC2TOG] twice, ch 1 turn. (2)
Row 14: SC2TOG (1)
Fasten off with long tail.
Eyes:
With White Make 2
Ch 2, 6 SC in 2nd ch from hook Fasten off with tail for sewing
Assembly step:
Sew Corn halves together, stuff piece and continue sewing.
Sew leaves together. See video tutorial for sewing visual instructions.
Sew on White eyes, glue on black dots for pupils and glue on mouth out of felt
Enjoy!!
This post contains affiliate links, which means if you click on the link and buy from the linked websites, I will receive a small percentage of the value of your order. The amount you pay is not changed.
“Bravo-cado” on sharing these puns everyone! I have laughed a lot and said, “You’ve “guac” to be kidding me,” several times! Some responses are “hard-core” and “avo-control!” There were a few “guac-ward” moments. I know, I tend be go too far that I can end up in the “pits” with these puns. It seems so wrong but feels so “ripe,” so keep it up, and “guac” my world with your creativity!
Watch this video tutorial to learn how to make this amigurumi:
Teacher: Nadia Fuad
Video and Editing: Fuad Azmat (My Daddy)
Share your work on Facebook!
Add me on Snapchat: YARNutopia
Follow me on Instagram
Visit My Ravelry Store and add this to your Favorites!
Follow me on Twitter: @YARNutopia
Enjoy this video and subscribe to my channel on YouTube for more tutorials on how to crochet!
Leave a comment, and share with your friends!
Pattern:
Designed by Nadia Fuad You *may* sell items made from my pattern, but please reference my website YARNutopia.com.
Please do not copy, sell, and/or post this pattern and claim it as your own.
NOTES:
-Use a smaller hook to make these smaller
-Use a bigger hook to make these bigger
Special stitches:
Ch(s): chain(s)
YO: Yarn Over
St(s): Stitch(es)
Sl st: slip stitch
SK: Skip
SC: Single Crochet
Pattern:
If you have any confusion or difficulty with reading this pattern, please watch the video tutorial to have visual instructions.
Outer Shell of Avocado Make 2
With Dark Green
Ch 2 Rnd 1: 6 SC in 2nd Ch from hook. (6 sts)
Rnd 2: [3 SC in next st, 2 SC in next st, 1 SC in next st] Twice. (12 sts)
Rnd 3: SC in next st, 2 SC in next 3 sts, 1 SC in next 3 sts, 2 SC in next 3 sts, 1 SC in last 2 sts. (18 sts)
Rnd 4: 1 SC in next 2 sts, [2 SC in next st, 1 SC in next st] 3 times, 1 sc in next 3 sts, [2 sc in next st, 1 SC in next st] 3 times, SC in last st. (24 sts)
Rnd 5: SC in next 3 sts, [2 SC in next st, SC in next st] 3 times, SC in next 6 sts, [2SC in next st, SC in next st] 3 times, SC in last 3 sts. (30 sts)
Rnds 6-9: SC in each st around. (30 sts)
Fasten off with long tail for sewing.
Inside of Avocado:
With Brown:
Ch 2 Rnd 1: 6 SC in 2nd from hook. (6 sts) Rnd 2: 2 SC in each st around. (12 sts) Rnd 3: [2 SC in next st, SC in next st] 6 times. (18 sts) Rnds 4-5: SC in each st around
Change color to light green Rnd 6: 2 SC in each st around. (36 sts) Rnd 7: 2 SC in each of the next 10 sts, 1 SC in the rest of the sts around. (46 sts) Rnd 8: 1 SC in next 20 sts, Leave the rest of the sts unworked. Fasten off.
Other side of Avocado:
With light green:
Ch 2 Rnd 1: 6 SC in 2nd from hook. (6 sts) Rnd 2: 2 SC in each st around. (12 sts) Rnd 3: [2 SC in next st, SC in next st] 6 times. (18 sts) Rnds 4-5: SC in each st around Rnd 6: 2 SC in each st around. (36 sts) Rnd 7: 2 SC in each of the next 10 sts, 1 SC in the rest of the sts around. (46 sts) Rnd 8: 1 SC in next 20 sts, Leave the rest of the sts unworked. Fasten off.
Assembly step:
Stuff piece, sew pieces together, add felt face (optional)
See video tutorial for visual instructions.
Enjoy!!
This post contains affiliate links, which means if you click on the link and buy from the linked websites, I will receive a small percentage of the value of your order. The amount you pay is not changed.
You may think that making up puns is no “truffle” at all. But, Holy “Shiitake,” it’s not easy!! I “moss” say that I have really taken a “lichen” to this. At least I have “morel” support from everyone. You give me “mush-room” to be creative, so I can “button” down and get these done! Once I get a good pun figured out, I feel like the “porto-bell-o” of the ball! I appreciate your encouragement because that’s what friends are “spore.”
Watch this video tutorial to learn how to make this amigurumi:
Teacher: Nadia Fuad
Video and Editing: Fuad Azmat (My Daddy)
Share your work on Facebook!
Add me on Snapchat: YARNutopia
Follow me on Instagram
Visit My Ravelry Store and add this to your Favorites!
Follow me on Twitter: @YARNutopia
Enjoy this video and subscribe to my channel on YouTube for more tutorials on how to crochet!
Leave a comment, and share with your friends!
Pattern:
Designed by Nadia Fuad You *may* sell items made from my pattern, but please reference my website YARNutopia.com.
Please do not copy, sell, and/or post this pattern and claim it as your own.
NOTES:
-Use a smaller hook to make these smaller
-Use a bigger hook to make these bigger
Special stitches:
Ch(s): chain(s)
YO: Yarn Over
St(s): Stitch(es)
Sl st: slip stitch
SK: Skip
SC: Single Crochet
Pattern:
If you have any confusion or difficulty with reading this pattern, please watch the video tutorial to have visual instructions.
Stem of Mushroom:
With Off-White:
Ch 2 Rnd 1: 6 SC in 2nd ch from hook. (6) Rnd 2: 2 SC in each st around. (12) Rnds 3-12: SC in each st around. Fasten off.
Stuff Stem
Top of Mushroom:
With colored yarn:
Ch 2 Rnd 1: 6 SC in 2nd ch from hook. (6) Rnd 2: 2 SC in each st around. (12) Rnd 3: [2 SC in next st, SC in next st] 6 times. (18) Rnd 4: SC in each st around. (18) Rnd 5: [2 SC in next st, 1 SC in next 2 sts] 6 times. (24) Rnd 6-7: SC in each st around. (24)
Fasten off with long tail for sewing
Assembly step:
Sew top to stuffed stem. See video tutorial for visual instructions.
Enjoy!!
This post contains affiliate links, which means if you click on the link and buy from the linked websites, I will receive a small percentage of the value of your order. The amount you pay is not changed.
This may be my “cheesiest” pun yet. It’s “nacho” fault if these puns get so “stinky” you roll your eyes when I say life is “cheddar” when we’re together. When I am with you, I don’t feel “aged” or “bleu.” I do have to stay “sharp” to keep up these punny lines. Otherwise, it could look “swiss-picious” if I am laughing at these “prov-ALONE.” So, like I said, we are really “gouda” together so please, will you “brie” mine? It would be “mice” if your answer was “YES, cheese!”
Watch this video tutorial to learn how to make this amigurumi:
Teacher: Nadia Fuad
Video and Editing: Fuad Azmat (My Daddy)
Share your work on Facebook!
Add me on Snapchat: YARNutopia
Follow me on Instagram
Visit My Ravelry Store and add this to your Favorites!
Follow me on Twitter: @YARNutopia
Enjoy this video and subscribe to my channel on YouTube for more tutorials on how to crochet!
Leave a comment, and share with your friends!
Pattern:
Designed by Nadia Fuad You *may* sell items made from my pattern, but please reference my website YARNutopia.com.
Please do not copy, sell, and/or post this pattern and claim it as your own.
NOTES:
-Use a smaller hook to make these smaller
-Use a bigger hook to make these bigger
Special stitches:
Ch(s): chain(s)
YO: Yarn Over
St(s): Stitch(es)
Sl st: slip stitch
SK: Skip
SC: Single Crochet
SC2TOG: Single Crochet 2 Together
DC: Double Crochet
Pattern:
If you have any confusion or difficulty with reading this pattern, please watch the video tutorial to have visual instructions.
Triangle Part: Make 2
With Yellow:
Ch 14 Row 1: SC in 2nd ch from hook and across, ch 1, turn. (13) Row 2: SC in each st across. Ch 1, turn. (13) Row 3: SC2TOG, SC in next 9 sts, SC2TOG, Ch 1, turn. (11) Row 4: SC in each st across. Ch 1, turn. (11) Row 5: SC2TOG, SC in next 7 sts, SC2TOG, Ch 1, turn. (9) Row 6: SC in each st across. Ch 1, turn. (9) Row 7: SC2TOG, SC in next 5 sts, SC2TOG, Ch 1, turn. (7) Row 8: SC in each st across. Ch 1, Turn. (7) Row 9: SC2TOG, SC in next 3 sts, SC2TOG, Ch 1, turn. (5) Row 10: SC in each st across. Ch 1, Turn. (5) Row 11: SC2TOG, SC in next st, SC2TOG, Ch 1, turn. (3) Row 12: SC in each st across. Ch 1, turn. (3) Row 13: SC3TOG. (1)
Fasten off with long tail for sewing.
Rectangle Side Make 3
With Yellow
Ch 11 Row 1: SC in 2nd ch from hook and across, ch 1, turn. (10) Row 2-15: SC in each st across, ch 1, turn.
Fasten off with long tail for sewing.
Circles:
Small: Make 6
Ch 2 Rnd 1: 6 SC in 2nd ch from hook. (6)
Sl st to beginning. Fasten off with long tail for sewing.
Medium: Make 4
Ch 2 Rnd 1: 6 SC in 2nd ch from hook. (6) Rnd 2: 2 SC in each st around. (12)
Sl st to next st. Fasten off with long tail for sewing.
Large: Make 1
Ch 2 Rnd 1: 6 SC in 2nd ch from hook. (6) Rnd 2: 2 SC in each st around. (12) Rnd 3: [2sc in next st, sc in next st] 6 times. (18)
Sl st to next st. Fasten off with long tail for sewing.
Mouse head:
Ch 2 Rnd 1: 4 SC in 2nd ch from hook. (4) Rnd 2: SC in each st around. (4) Rnd 3: [2sc in next st, sc in next st] 2 times. (6) Rnd 4: 2 SC in each st around. (12) Rnd 5: [2sc in next st, sc in next st] 6 times. (18) Rnd 6: SC in each st around. (18) Rnd 7: [SC2TOG, SC in next st] 6 times. (12)
Assembly step:
Embroider eyes and nose, stuff head, and go onto rnd 8 Rnd 8: [SC2TOG] 6 Times. (6) Rnd 9: SC next and 4th st together. Fasten off with long tail for sewing
Ears:
Make 2:
With pink,
Ch 2 Rnd 1: 6 SC in 2nd ch from hook. (6)
Fasten off
With Gray, Attach yarn to any stitch Rnd 2: 2SC in each st around. Sl st to beginning. Fasten off with long tail for sewing.
Weave in all ends and sew to mouse head.
Assembly:
Sew all pieces together. Watch video tutorial for visual instructions. (Stuff cheese, sew on “holes,” sew mouse to cheese”
Enjoy!!
This post contains affiliate links, which means if you click on the link and buy from the linked websites, I will receive a small percentage of the value of your order. The amount you pay is not changed.
I know you are “falling” for some of these “unbe-leaf-ably” silly puns. It helps to create good “chemis-tree” between us when we can “photo-sympathize” with how lame they can become. I know it’s “over-ELM-ing,” but we can still laugh together. I hope it’s “OAK-kay” that I continue to post until I get “stumped.” Even then I won’t “leaf” you “hanging” as I “branch” out and try to be more punny!
Watch this video tutorial to learn how to make this leaf:
Teacher: Nadia Fuad
Video and Editing: Fuad Azmat (My Daddy)
Share your work on Facebook!
Add me on Snapchat: YARNutopia
Follow me on Instagram
Visit My Ravelry Store and add this to your Favorites!
Follow me on Twitter: @YARNutopia
Enjoy this video and subscribe to my channel on YouTube for more tutorials on how to crochet!
Leave a comment, and share with your friends!
Pattern:
Designed by Nadia Fuad You *may* sell items made from my pattern, but please reference my website YARNutopia.com.
Please do not copy, sell, and/or post this pattern and claim it as your own.
NOTES:
-Use a smaller hook to make these smaller
-Use a bigger hook to make these bigger
-Watch the FULL introduction of the video tutorial for frequently asked questions and watch the full video for tips on how to make these smaller or bigger.
-Make more chains on your foundation chain to make your leaf bigger
Special stitches:
Ch(s): chain(s)
YO: Yarn Over
St(s): Stitch(es)
Sl st: slip stitch
SK: Skip
SC: Single Crochet
HDC: Half Double Crochet
DC: Double Crochet
TR: Treble Crochet
Pattern:
If you have any confusion or difficulty with reading this pattern, please watch the video tutorial to have visual instructions.
With 2 strands of yarn,
Ch 10
Sl st in 2nd ch from hook, SC in next, HDC in next, DC in next 2 chs, TR in next 3 chs, Ch 3, Sl st in last ch, Ch 3,
Work on opposite side of foundation ch, TR in next 3 sts, DC in next 2 chs, HDC in next, SC in next, Sl st in last. Fasten off.
With one strand of yarn and a different color,
Sl st around edge of leave and create the stem and sl st up the center. (See video tutorial for visual instructions.)
Weave in all ends.
Enjoy!!
This post contains affiliate links, which means if you click on the link and buy from the linked websites, I will receive a small percentage of the value of your order. The amount you pay is not changed.
Day 2 of our Valentine’s Day puns and things are really “heating” up. I don’t mean to “int-erupt” your day, but you should know how much I “lava” this silliness, so much so, that I could just “burst!”
Watch this video tutorial to learn how to make this bag:
My dad will continue to be the videographer, editor, and photographer for our videos when I move away.
Support YARNutopia today so we can continue to bring you clear, quality crochet tutorials even after I move into my new home!
There will be an added expense of more travel and hopefully this won’t deter our ability to provide consistent videos on a weekly basis.
Teacher: Nadia Fuad
Video and Editing: Fuad Azmat (My Daddy)
Share your work on Facebook!
Add me on Snapchat: YARNutopia
Follow me on Instagram
Visit My Ravelry Store and add this to your Favorites!
Follow me on Twitter: @YARNutopia
Enjoy this video and subscribe to my channel on YouTube for more tutorials on how to crochet!
Leave a comment, and share with your friends!
Pattern:
Designed by Nadia Fuad You *may* sell items made from my pattern, but please reference my website YARNutopia.com.
Please do not copy, sell, and/or post this pattern and claim it as your own.
NOTES:
-Use a smaller hook to make these smaller
-Use a bigger hook to make these bigger
-Watch the FULL introduction of the video tutorial for frequently asked questions and watch the full video for tips on how to make these smaller or bigger.
-Make more rounds to make this taller
-Make more chains on your foundation chain to make your bag wider
-I cut out a felt heart and sewed it on with black yarn for an extra embellishment.
Special stitches:
Ch(s): chain(s)
YO: Yarn Over
St(s): Stitch(es)
Sl st: slip stitch
SK: Skip
SC: Single Crochet
HDC: Half Double Crochet
DC: Double Crochet
Pattern:
If you have any confusion or difficulty with reading this pattern, please watch the video tutorial to have visual instructions.
Bag:
Ch 35
Work in **FRONT LOOPS ONLY FOR THE WHOLE BAG**
Rnd 1: SC in 2nd ch from hook and across, 3 SC in last ch, Work on opposite side of foundation ch, SC across, put 2 SC in last st.
Work in continuous rounds
Rnds 2-30: SC in each st around.
Change Color
Rnds 31-34: SC in each st around.
Fasten off, weave in ends.
Drips of lava:
Sl st to front loop of any st on Round 31
Sl st in 3 sts, Ch 22
Sl st in 2nd ch from hook, sc in next, HDC in next 2 chs, DC in next, HDC in next, SC in next 2 chs, HDC in next 2 chs, DC in next 5 chs, HDC in next 2 chs, SC in next 2 chs, HDC in last 2 chs,
Sl st in next 10 sts on round 31 of bag
Ch 10
SC in 2nd ch from hook, HDC in next, DC in next 4 chs, HDC in next 3 chs,
Sl st in next 5 sts on round 31 of bag
Ch 18
SC in 2nd ch from hook, HDC in next 4 chs, DC in next 2 chs, SC in next 2 chs, HDC in next 2 chs, DC in next 3 chs, HDC in next 3 chs,
Sl st in next 10 sts on round 31 of bag
Ch 11
HDC in 2nd ch from hook, HDC in next ch, SC in next 2 chs, HDC in next 2 chs, DC in next 4 chs,
Sl st in next 5 sts on round 31 of bag
Ch 14
SC in 2nd ch from hook, SC in next, HDC in next, DC in next 5 chs, HDC in next 4 chs, SC in next ch,
Sl st in next 8 sts on round 31 of bag
Ch 11
SC in 2nd ch from hook, HDC in next, DC in next 2 chs, HDC in next 2 chs, SC in next, HDC in next 3 chs,
Sl st in next 6 sts on round 31 of bag
Ch 15
SC in 2nd ch from hook, HDC in next 2 chs, DC in next 3 chs, HDC in next, SC in next 2 chs, HDC in next, DC in next 3 chs, HDC in next ch
Sl st in next 6 sts on round 31 of bag
Ch 8
SC in 2nd ch from hook, HDC in next DC in next HDC in next, SC in last 3 chs
Sl st in next 3 sts on round 31 of bag
Ch 13
Sl st in 2nd ch from hook, SC in next, HDC in next, SC in next, HDC in next, DC in next 2 chs, HDC in next, SC in next, HDC in next 3 chs,
Sl st in next 6 sts on round 31 of bag
Ch 11
SC in 2nd ch from hook, HDC in next, DC in next 2 chs, HDC in next 2 chs, SC in next, HDC in next 3 chs,
Sl st in last sts to beginning.
Fasten off with a long tail for sewing,
Sew all lava drips down to bag. (See video tutorial for visual instructions)
Strap:
Ch 100, weave through round 32 of bag.
Sl st to 1st ch, fasten off, weave in all ends.
Cinch top closed.
Add Felted Heart applique (optional)
Enjoy!!
This post contains affiliate links, which I may be compensated for when you make a purchase. That means if you click on any link and buy from the linked websites, I will receive a small percentage of the value of your order. The amount you pay is not changed. Thank you for all your support in clicking the links in my blog!! You all are so amazing!! ~Nadia
The yarn provided for this pattern is courtesy of Red Heart Yarns
My first of 14 Valentine’s Day puns begins with these Two Peas In A Pod. Every day I’m “brussel-in” to make these puns! It makes me very “hap-pea!” So, if you “carrot” all, “peas” give these puns a chance. I’m pretty sure that it will “lettuce” have a few good laughs together! This is going to be so much “pun!”
Watch this video tutorial to learn how to make this project:
My dad will continue to be the videographer, editor, and photographer for our videos when I move away.
Support YARNutopia today so we can continue to bring you clear, quality crochet tutorials even after I move into my new home!
There will be an added expense of more travel and hopefully this won’t deter our ability to provide consistent videos on a weekly basis.
Designed by Nadia Fuad You *may* sell items made from my pattern, but please reference my website YARNutopia.com.
Please do not copy, sell, and/or post this pattern and claim it as your own.
NOTES:
-Use a smaller hook to make these smaller
-Use a bigger hook to make these bigger
-Watch the FULL introduction of the video tutorial for frequently asked questions and watch the full video for tips on how to make these smaller or bigger.
Special stitches:
Ch(s): chain(s)
YO: Yarn Over
St(s): Stitch(es)
Sl st: slip stitch
SK: Skip
SC: Single Crochet
HDC: Half Double Crochet
DC: Double Crochet
SC2TOG: Single Crochet 2 Together
Pattern:
If you have any confusion or difficulty with reading this pattern, please watch the video tutorial to have visual instructions.
Peas:
Make 2
With Spring Green
Ch 2 Rnd 1: 6 sc in 2nd ch from hook. (6)
Work in continuous rounds
Rnd 2: 2 SC in each st around. (12)
Rnd 3: [2 SC in next, 1 SC in next] 6 times. (18)
Rnds 4-7: SC in each st around. (18)
Rnd 8: [SC2TOG, SC in next st] 6 times. (12)
Assembly step:
Stuff Pea, Add eyes and nose in black yarn, (eye lashes for girl) Continue onto last round.
Rnd 9: [SC2TOG] 6 Times. (6)
SC next and 4th sts together.
Fasten off, weave in ends.
Bow for Female:
With Pink
Ch 6 Row 1: SC in 2nd ch from hook and across, ch 1, turn. (5)
Rows 2-4: SC in each st across, ch 1, turn. (5)
Fasten off with long tail.
Wrap long tail around piece to make bow shape.
Sew to Pea.
See video tutorial for visual instructions.
Pod:
Ch 19 Rnd 1: SC in 2nd ch from hook and across ch putting 3 sc in last ch, work on opposite side of foundation ch, sc across, put 2 sc in last st of round. (38 sc)
Work in continuous rounds
Rnd 2: SC in each st around. (38)
Rnd 3: SC2TOG, SC to opposite side of pod, SC2TOG, SC in the rest of the sts on the round. (36 sts)
Rnd 4: Repeat Round 3
Rnds 5-6: SC in each st around
Fasten off, weave in all ends.
Leaf:
Ch 8 Row 1: Sl st in 2nd ch from hook, SC in next, HDC in next, DC in next, HDC in next, SC in next, Sl st in last.
Fasten off with long tail. Sew to pod.
Vine:
Ch 13 Row 1: SC in 2nd ch from hook and across. Fasten off with long tail.
Twist and Sew vine to pod.
Enjoy!!
This post contains affiliate links, which I may be compensated for when you make a purchase. That means if you click on any link and buy from the linked websites, I will receive a small percentage of the value of your order. The amount you pay is not changed. Thank you for all your support in clicking the links in my blog!! You all are so amazing!! ~Nadia
The yarn provided for this pattern is courtesy of Red Heart Yarns