12 Days of Christmas: Lace Shell Bookmark – FREE Written Crochet Pattern

12 Days of Christmas: Lace Shell Bookmark – FREE Written Crochet Pattern
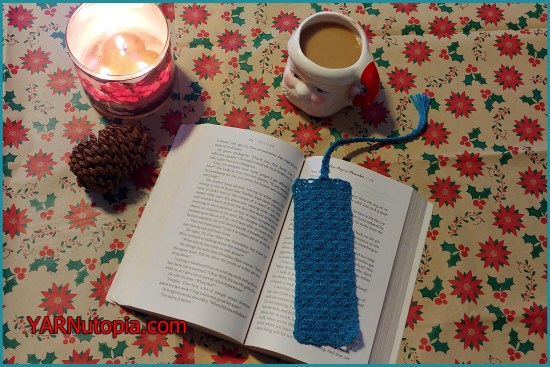
We are launching our 12 Days of Christmas crafts with a beautiful handmade bookmark. Do you know someone who loves to read? For all the book lovers in your life, you can make this beautiful Shell Stitch Lace Bookmarker. Pair this with a best seller book and you will be sure to awe the most distinguished book enthusiast on your list!


My dad will continue to be the videographer, editor, and photographer for our videos when I move away.
Support YARNutopia today so we can continue to bring you clear, quality crochet tutorials even after I move into my new home!
There will be an added expense of more travel and hopefully this won’t deter our ability to provide consistent videos on a weekly basis.

Donate Button with Credit Cards

**You can always contact me via Facebook if you have any problems with the pattern. I am happy to help if you have any questions along the way.
***These patterns are copyright YARNutopia © so PLEASE DO NOT COPY, SHARE, ADJUST OR RESELL MY PATTERN. I wrote and tested this pattern myself, from beginning to end. It took a lot of time and work, and I would really like to have it remain “my pattern.”
***You can sell anything you make from my patterns, please just link back to my website YARNutopia.com. Thank you!

Teacher: Nadia Fuad
Video and Editing: Fuad Azmat (My Daddy)
Share your work on Facebook!
Add me on Snapchat: YARNutopia
Follow me on Marly Bird’s Chic Sheep yarn
Visit My Ravelry Store and add this to your Favorites!
Follow me on Twitter: @YARNutopia
Enjoy this video and subscribe to my channel on YouTube for more tutorials on how to crochet!
Leave a comment, and share with your friends!

Pattern:

Designed by Nadia Fuad
You *may* sell items made from my pattern, but please reference my website YARNutopia.com.
Please do not copy, sell, and/or post this pattern and claim it as your own.

Materials you will need:
Get the supplies individually by clicking the links below
Aunt Lydia’s Crochet Thread
-1.00mm crochet hook

Yarn Needle
Scissors

NOTES:
-Use a smaller hook to make these smaller
-Use a bigger hook to make these bigger
-You can do as many rows of this pattern as you want to make it as long as you want.


Special stitches:
Ch(s): chain(s)
YO: Yarn Over
BLO: Back Loop Only
FLO: Front Loop Only
St(s): Stitch(es)
Sl st: slip stitch
SK: Skip
SC: Single Crochet
HDC: Half Double Crochet
DC: Double Crochet
TR: Treble Crochet
Shell: [DC, Ch 1, DC, Ch 1, DC, Ch 1, DC] in same stitch

Pattern:

If you have any confusion or difficulty with reading this pattern, please watch the video tutorial that is linked above in this blog post to have visual instructions.

With Thread and 1mm crochet hook

Ch 35

Row 1: HDC in 3rd Ch from hook, * Sk 3 chs, [DC, Ch 1, DC, Ch 1, DC, Ch 1, DC] in next Ch (Shell made), Sk 3 Chs, HDC in next Ch, Repeat From * across, ending with HDC in last Ch. Turn.

Row 2: Ch 3, [DC, Ch 1, DC] in first st, *HDC in Center Ch of next Shell, Shell in next HDC, Repeat from * across, ending with [DC, Ch 1, 2 DC] in last St. Turn.

Row 3: Ch 2, HDC in first st, *Shell in next HDC , HDC in center of next Shell, Repeat from * ending with HDC in last st. Turn.

Rows 4-29: Repeat Rows 2 and 3

Row 30: Ch 3, *SC in center of next shell, Ch 3, HDC in next HDC, Repeat from * across, ending with HDC in last st.
Fasten off, weave in ends.

Attach many strands of yarn in the top center of your bookmark and make a braid. Tie off and cut the tassel to make it neat.

Enjoy!!

This post contains affiliate links, which I may be compensated for when you make a purchase. That means if you click on any link and buy from the linked websites, I will receive a small percentage of the value of your order. The amount you pay is not changed. Thank you for all your support in clicking the links in my blog!! You all are so amazing!! ~Nadia

The yarn provided for this pattern is courtesy of Red Heart Yarns


Wedding Plans: 8 Weeks Left

Wedding Plans: 8 Weeks Left

There are eight weeks left before our wedding, and this week the invitations were sent! I will be waiting for the RSVPs to come in and will be busy crocheting the color coded “meal flowers” immediately.
My colors are all jewel tones – an amethyst purple, dark sapphire blue, and an emerald/teal green and of course gold. Each flower indicates a coordinating meal and will be attached to each escort card.


Our reception will be a plated dinner and our selections are the following:

Chicken Option:
(Nadia’s Favorite Food)
Chicken (Murgh) Makhani
A Pakistani dish consisting of a spiced curry mixture of cream, tomato, and butter,
blended together with full flavored roasted boneless chicken pieces served with Basmati rice.

Beef/Seafood Option:
(Nate’s Favorite Food)
Steak/Salmon
6 oz. center cut sirloin steak with king salmon, paired with house whipped Yukon gold potatoes and fresh garlic hericot vert

Vegetarian Option:
(Combined Favorite)
Classic Pesto Linguini
Linguini in light pesto cream with artichoke hearts, sun-dried tomatoes, spinach, onions, and shaved parmesan served with garlic toast

For all kids, we will be serving signature Mac & Cheese.

Before planning a wedding, one never realizes the details that go into coordinating such an event!

Since we are having a Pakistani/Irish fusion wedding held on St. Patrick’s Day weekend, there are fun details from both of our cultures being incorporated into our special day.

My Mehndi is being held a day before our wedding and this event is a fun day for the ladies.  The Henna Ceremony, or the Rasm-e-henna ceremony, typically takes place one or two days prior to the main wedding day. Mehndi is a form of body art from Ancient India, in which decorative designs are created on a person’s body, using a paste, created from the powdered dry leaves of the henna plant. The henna is symbolically placed on the bride’s hands and feet by a professional mehndi artist. The designs are very intricate. Often hidden within the mehndi pattern the name or initials of the groom are applied. In Pakistan, the Mehndi is often one of the most important pre-wedding ceremonies. This ritual is supposed to bring good luck and longevity to the bride’s married life.


The wedding day will all be held at the same place with our ceremony being held in one part of the venue and reception and dinner in the banquet room.

The Walima (Groom’s Reception) is a meal that is held the day after the wedding. It is a feast of traditional Pakistani foods. It is at this ceremony that the bride and groom are formally and publicly showcased as a married couple.

Thankfully we are able to do much of the wedding DIY ourselves. My mom and I have been on the go for the past week, (well since I got engaged, but more so in the past week!) and we have been able to check a lot off the to-do list. We are definitely do-ers and planners! Nate has been sooo incredibly helpful as well, and of course, my dad weighs in to share ideas about the Pakistani parts of our wedding.

We met with our amazing DJ and planned out the music for the best dance party!

I may have mentioned in an earlier blog post that I plan to make all my flowers myself. I have been working on all the flowers for the bouquets, boutonnières, corsages, and centerpieces.


We started to put together an arrangement this past weekend to come up with how to incorporate the crochet flowers into our centerpieces. This was just a rough start, but we are loving how they look against the Lemon Leaf greenery. I have gotten a good start on the flowers and have about 150-175 left to crochet aside from those tiny meal flowers which I will know more when those RSVPs come in.


I crocheted my girls the Wrapped In Jewels Shawl which I will be gifting to them at our Rehearsal dinner. I shared those with you at the end of last year, and I was able to cross that off my list. I also have the Henna Inspired Mandalas that I crocheted and hope to somehow incorporate those into the weekend but not sure where.

Details, details, details!! I love the creative parts of the planning, but the logistics are giving me a touch of worry trying to keep everything straight and organized. So far, it is all coming together very well. My excitement is growing by the day! More updates to come!! Thank you for joining me on this journey!!

~Nadia

My dad will continue to be the videographer, editor, and photographer for our videos when I move away.
Support YARNutopia today so we can continue to bring you clear, quality crochet tutorials even after I get married and move into my new home! There will be an added expense of more travel and hopefully this won’t deter our ability to provide consistent videos on a weekly basis.

Donate Button with Credit Cards


Aunt Lydia’s Crochet Thread Patterns Redheart Now Has Crochet Thread Red Heart Blog – laikas.info

Crochet Tutorial: Destiny Headband

Crochet Tutorial: Destiny Headband

If you are following me on my blog or any social media, you will recall that I released my Link to the Past Phrygian Cap last week as Part One of the Halloween cosplay costume designs that I am creating for Nate and myself.

Today, Part Two of the costume set, is this Destiny Headband. This is a bit of a tedious process using thin thread and crocheting around wire, but the results are worth the efforts! Continue to stay tuned to more great patterns along the way to complete one or both of my costume series!

Not into the costume idea? Make a headband with just leaves! You could also use the leaf applique separately for flowers or anywhere you would need to add a decorative embellishment.


Shop Red Heart, America's Favorite Yarn

Watch this video tutorial to learn how to make this whole headband:

Support YARNutopia today so we can continue to bring you clear, quality crochet tutorials

Donate Button with Credit Cards

**You can always contact me via Facebook if you have any problems with the pattern. I am happy to help if you have any questions along the way.
***These patterns are copyright YARNutopia © so PLEASE DO NOT COPY, SHARE, ADJUST OR RESELL MY PATTERN. I wrote and tested this pattern myself, from beginning to end. It took a lot of time and work, and I would really like to have it remain “my pattern.”
***You can sell anything you make from my patterns, please just link back to my website YARNutopia.com. Thank you!Teacher: Nadia Fuad
Video and Editing: Fuad Azmat (My Daddy)
Share your work on Facebook!
Add me on Snapchat: YARNutopia
Follow me on Instagram
Visit My Ravelry Store and add this to your Favorites!
Follow me on Twitter: @YARNutopia
Enjoy this video and subscribe to my channel on YouTube for more tutorials on how to crochet!
Leave a comment, and share with your friends!

Please check out the new beginning graphic designed and developed by my brother Nabeel. He and his wife own and operate NFD Graphics. Please hop over to their Facebook page and show them some love! For all your graphic and video/logo design needs be sure to contact them today!
www.nfdgraphics.com


Shop Red Heart, America's Favorite Yarn

Pattern:

“Designed by Nadia Fuad
You *may* sell items made from my pattern, but please reference my website YARNutopia.com.
Please do not copy, sell, and/or post this pattern and claim it as your own.

Materials:
***Click here to get the whole KIT!!***

Aunt Lydia’s Classic Crochet Size 10 in Peacock
Aunt Lydia’s Metallic Crochet Size 10 in Gold/Gold
1.00mm Crochet Hook
Yarn Needle
Scissors
Floral Wire
Stitch Markers
Wire Cutters
Needlenose Pliers
Measure Tape


Shop Red Heart, America's Favorite Yarn

You can buy any of the items in this kit. Buy all or buy one item. Check it out to see the supplies you can get online to make this project!

NOTES:

-This project uses less than 150 yards of yarn.
-Use a smaller hook to make these smaller
-Use a bigger hook to make these bigger
-Watch the FULL video tutorial for visual instructions for each row and tips on how to make this smaller and bigger.
-Weave in all the ends as you go so you don’t have to weave them all in at the very end.
-If the instructions above are confusing, please message me on Facebook, and I will answer any questions you may have. Please be specific in your questions. Thank you!!
-The measurements for this headband is 25 inches long, but you can make your braid as long as you’d like!
-It is recommended to use Cotton thread for this project.

Special stitches:
Ch(s): chain(s)
YO: Yarn Over
St(s): Stitch(es)
BLO: Back Loops Only
prev.: Previous
Sl st: slip stitch
SC: Single Crochet
HDC2TOG: Half Double crochet decrease
HDC: Half Double Crochet
DC: Double Crochet
TR: Treble Crochet
DTR: Double Treble Crochet

Pattern:

If you have any confusion or difficulty with reading this pattern, please watch the video tutorial to have visual instructions.

Make 8 Leaves:
With Metallic Gold:
Ch 18
Rnd 1: Sl st in 2nd ch from hook, SC in next, HDC in next, DC in next 2 chs, TR in next 2 chs, DTR in next 3 chs, TR in next 2 chs, DC in next 2 chs, HDC in next ch, SC in next, Sl st in last ch, Ch 2, Sl st back in the same ch as last Sl st, continue working on opposite side of foundation chain, SC in next st, HDC in next st, DC in next 2 sts, TR in next 2 sts, DTR in next 3 sts, TR in next 2 sts, DC in next 2 sts, HDC in next, SC in next, Sl st in next.
Rnd 2: Add wire and continue working around wire and into the sts. Ch up 1, put 2 SC in each st around.
Fasten off, weave in ends. Cut wire and shape leaf.
(See video tutorial for visual instructions)

Center “Hooks”:
Make 2 in Metallic Gold
Ch 25
Sl st in 2nd ch from hook, SC in next, HDC in next, DC in next 2 chs, TR in next 2 chs, 2 DTR in each of the next 3 chs, TR in next 2 chs, DC in next 2 chs, HDC in next 10 chs.
For one of the hooks, turn your work around and add the wire, SC around entire piece.
Fasten off, weave in ends, cut wire, shape your piece.
For the other hook, do not turn your work around, just add the wire and SC around entire piece.
Fasten off, weave in ends, cut wire, shape your piece.

V-Shape:
Ch 31
Row 1: Add wire and work along chain and around the wire. HDC in 2nd ch from hook and in next 13 chs, HDC2TOG, HDC in 14 chs.
Fasten off, cut wire, shape piece in a V-Shape.

Jewel in the center:
Use Peacock Blue
Work in continuous rounds
Ch 2
Rnd 1: 6 SC in 2nd Ch from hook. (6)
Rnd 2: 2 SC in each st around. (12)
Rnd 3: [2SC in next st, SC in next] 6 times. (18)
Rnd 4: [2SC in next st, SC in next 2 sts] 6 times. (24)
Rnd 5: [2SC in next st, SC in next 3 sts] 6 times. (30)
Rnd 6: [2SC in next st, SC in next 4 sts] 6 times. (36)
Add wire for your last round
Rnd 7: [2SC in next st, SC in next 5 sts] 6 times. (42)
Fasten off, weave in ends. Cut wire and shape your piece.

Headband piece:
Make 6
Ch 300, fasten off.

Assembly step:
Braid the headband chains and tie knots on each end.
Sew all the pieces to the headband.
See video tutorial for visual guide.
Use photos as a visual guide.
Weave in the rest of your ends and make it look pretty!

Enjoy!!

This post contains affiliate links, which means if you click on the link and buy from the linked websites, I will receive a small percentage of the value of your order. The amount you pay is not changed.

The yarn provided for this pattern is courtesy of Red Heart Yarns


Shop Red Heart, America's Favorite Yarn

Like this headband? Try the Link to the Past Stocking Cap!


Shop Red Heart, America's Favorite Yarn