
When planning a wedding, one of the very first things you consider is the type of wedding you want and the budget to go along with your dream. It isn’t always easy to have those two things come together seamlessly unless you have all the resources available without the concern of finances. That’s why DIY (or do-it-yourself) is a great way to cut costs and bring some of those wedding expenses down – and dreams to life – using your own creativity. Be aware – there’s a cost to that too, just not always in dollars.
It Starts With YES!
When Nate proposed, we were in Amsterdam, Netherlands on a high – figuratively not literally. (read about it here) Excited from the thrill of getting engaged on this European trip, planning a wedding in that moment was not on the forefront of our minds. We hadn’t even chosen a date for our wedding until weeks following our engagement. I am such a planner, so I needed time to organize our wedding with guests from overseas, so we decided on March 17, 2018, St. Patrick’s Day. This was the perfect day to have our Pakistani/Irish fusion wedding. I wanted the Pakistani features and Nate is Irish, so he wanted to incorporate some Irish elements into our special day.
Looking a year ahead gave us much needed time to sort out details for this fusion wedding and put finances on paper. Thankfully, our parents were able to help, but how much would this all cost?
We visited vendors which was exciting and full of promise. Yet, when we started to talk dollars and cents, we began to realize that we needed to scale down considerably on some of our “wants.” Our budget was limited. One of the more shocking realizations was finding out that for flowers; personal flowers such as bouquets, boutonnieres, and corsages along with centerpiece arrangements and other floral décor, would cost over $2000 USD. As much as I LOVE fresh flowers, spending $2000 on that one detail was out of the question.
Famous Last Words
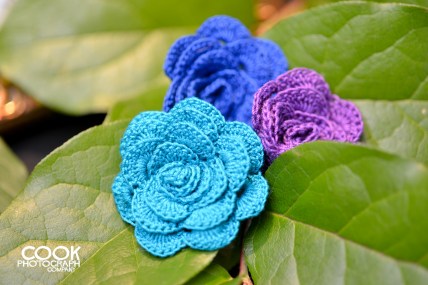
Ideas began to formulate. I knew I wanted to incorporate elements of crochet into my wedding, and the more I considered it, the more it made sense for me to make all of the flowers. I knew it would be a lofty goal. Hand crocheting 200+ flowers for all my floral elements, as well as 200 place card meal flowers, was no easy task. But spending $2000 on bouquets and arrangement fresh flowers, which will wilt and be discarded was hard to contemplate. I could save a huge chunk of money if I did these myself. So, it was decided almost a year ahead of time, I would crochet the flowers. I had plenty of time, right?
I think I remember vaguely in the fog of my over-zealous wedding-muddled mind, Nate saying to me,
“Are you sure you want to do that? I don’t want you to get too stressed out…..” Brides and stress? Phfft…
Oh, how prophetic that conversation would be.
My flip response was something on the lines of,
“No worries, I won’t get stressed. It’s a year away. I have plenty of time.” Eye-roll please…
The Best Laid Plans…
Eleven months in advance may seem like plenty of time to take on a project like this. That is if you have NOTHING to do BUT this. I started out pretty well. I decided on using Red Heart Yarns Aunt Lydia’s Thread in the colors of my bridesmaids’ dresses for their bouquets and a throw bouquet. I would pair the groomsmen’s boutonnieres in coordinating colors. My bouquet would be shades of red and Nate would have a matching flower to mine. I could get a jump start on place card flowers once I decided on the coinciding meal. I would crochet similar coordinating flowers to use for my table centerpieces. Easy peasy lemon squeezy. Puhll-eeaaazzze…I got this!
I mapped out the year. I could crochet three flowers a day which would put me on a course to finish in plenty of time for the wedding. It would give me an ample time-frame to make bouquets, plan those centerpieces, decide on any other arrangements, and color code all the seating place cards. The only thing is, I had to stay on task. One missed day meant the next day I had to make six flowers. One missed week meant making 21 flowers to catch up. Do you get my drift? Don’t even ask what it required to catch up on a lost month. There are no words…
(If you are looking for a tutorial on how to make these flowers, click here)

Fast forward to six weeks before the wedding and my fingers felt like they were falling off due to the insane flower making schedule I had going on. Every plan and deadline shot to hell. I even sliced my hand with that tiny 1mm crochet hook I was using! Haha! I remember at 2 a.m one morning, my eyes going crossed and mind delirious, thinking up curse words while miscounting my stitches, and repeating over and over that I will NEVER crochet with thread or make another flower in MY LIFE ever again. I must have asked myself a hundred times…WHY!? Why did I decide to do this?!
Honestly….This is why….
This Is What Dreams Are Made Of
I am such a detail person. It comes from my mama. And just like my mama, I believe those tiny details matter. Every single one of these details mattered to me. I would not have done it otherwise. Looking back, I know I complained, I may have even cried, but the results of all the hard work and late nights paid off. Each detail, each flower, each element came together in perfect harmony on our wedding day and it was so worth it! So, so worth it! Details, details, details….


The bouquets I designed consisted of 12-14 crochet flowers in the final assembly. I accented the burst of color using gold beads, gold tulle, gold ribbon, and gold jewels to wrap the handle of the bouquet holders I chose. I crocheted roses for my bridal bouquet and crocheted an assortment of handmade flowers for the bridesmaids and the throw bouquet. My sister-in-law/maid-of-honor and I still have the scars from the blisters burned on our hands from the hot glue! Bouquet assembly was not easy!


Each boutonniere consisted of a coordinating crocheted single flower attached to a stem and leaf. For Nate’s two younger brother’s, I created a trio of crocheted small flowers as an alternate look since they were our ushers and groomsmen! Even our little ring bearer had his own!


The wrist corsages for my mom and Nate’s Grandma were a single flower crocheted in gold thread and fastened to gold glitter elastic wrist bands.

Each centerpiece was a combination of Moroccan Lanterns alternating with floating candles on opposite tables. Small votive candles accented each table, along with the gold framed table number we added Salal Lemon Leaf and Evergreen Huckleberry for a splash of deep green on our black table cloth linens. I accented the leaves with a combination of three crochet flowers on one side and an accent flower on the opposite side of the arrangement for a splash of crochet color and balance.


For the last table detail, we added small place card holders that were tiny replicas of brass oil lamps. Each name card was paired with a tiny crochet flower detail indicating the meal choice of each guest and inserted into the place card holder. I had four meal options, and each option had a color coordinated flower that matched the meal choice of each guest. Each place card was printed with our guests’ names, and I attached a tiny flower on the end with a gold brad using a paper hole-punch. This tiny, but impressive, element was a huge hit with our guests!


It Doesn’t Stop There
Aside from the details that adorned our tables, we had a couple other crochet specifics that I incorporated into our wedding day. Since it was a Pakistani/Irish Fusion wedding a few live flower arrangements had elements of plants indigenous to Ireland. Bells of Ireland mixed with Fringe Cups, Burdock, Thistle, Ladies Mantle, Clover and an assortment of other greens decorated our reception room. I decided to add crochet Calla Lilies to this greenery mix! I found an amazing pattern by Happy Patty and purchased it from her Etsy Shop! I fell in love with these Irish fused greenery arrangements even more with this added detail. Bittersweet Florist was fun to work with and loved the idea of adding crochet Callas. They had never seen crochet lilies before!


It may seem like an overwhelming amount of crochet flowers and crochet elements added to the wedding day. I did not want it to look like too many crocheted components pulled together, hoping it appeared as attractive as imagined when I started on this project. When we put it all together, it wasn’t at all over the top or too much. It was just the right amount. I even added the Henna Inspired Mandala as a table top cover in our reception area. I used it under some Huckleberry leaves to accent our seating chart table. Subtle yet lovely…a tiny splash of crochet color made it just the perfect element to add in this one spot.

It’s All in the Details
It took a lot of planning, but that’s my thing. I love planning, and details can make all the difference. Like I mentioned, I am a detail oriented person and being a bride didn’t change any of this. In fact, it amped it up! Just be careful not to get caught up in too many little things. It can suck you in! Doing all these crochet elements made this uniquely my own. It was such a wonderful feeling that I made each of these details come to life with crochet.
In the end, each guest had a small crochet take-away aside from their wedding favor. My bridesmaids, men of honor, groomsmen, ring bearer, and family, each had their flowers to have as a keepsake from our special day. One lucky guest caught the Throw Bouquet! Even the centerpiece flowers became souvenirs for some guests. We could not ask for more! This is what every bride should feel. I accomplished this incredible feat and brought a lot of joy not only to myself but to each guest who attended our wedding. It truly mattered in showing each person who attended how special they are and how much it meant to us that they were to celebrate our love.


In the end, I crocheted 140 centerpiece flowers, 70 bouquet flowers, 19 boutonniere flowers, 3 wrist corsages, 200 place card flowers, as well as the Calla Lilies to accent the greenery arrangement, the Henna Inspired Mandala and lastly, I did make each of my girls a special wedding shawl which I will share in a separate blog. I did this work all in the months leading up to our wedding. It wasn’t easy, but it was so very special. I saved more than $1,500.00 USD by doing this myself.
Do-It-Yourself: Lovely But Not Easy
My advice for anyone planning to take on the task of DIY projects for your wedding would be to plan it out, give yourself plenty of time to tackle a project of this magnitude, know the commitment you are making because it can overwhelm you, and it is ok to get frustrated. Just don’t take on a project that consumes you to the point that you lose the joy in the reason you started this in the first place. With the right frame of mind, in the end, you will have a wedding that has the special added touches that make it your unique day with elements that are talked about for years! Always remember: This is YOUR special day do what feels right for YOU. Have fun and enjoy it all!
Watch this video tutorial to learn how to make wedding flowers:


A special thank you to the following:
Our amazing parents for supporting us and making all our dreams come true.
Our entire wedding party for helping us through this whole journey and being the best wedding party ever!!
All of our guests, you are so special to us, and we were so happy to celebrate our special day with each and every one of you!
Cook Photograph Company for the wonderful photos (See more of our wedding photos on their Facebook Page here)
Bittersweet Floral for the lovely Irish greens added to our reception hall
Nite Lights Entertainment for the AH-MAZING Music, Lighting, and Photo Booth! That was the best party I have ever been to!!
The Waterfront Restaurant and Tavern for such a great venue to celebrate our wedding at! Everything was so elegant and regal.
This post contains affiliate links, which I may be compensated for when you make a purchase. That means if you click on any link and buy from the linked websites, I will receive a small percentage of the value of your order. The amount you pay is not changed. Thank you for all your support in clicking the links in my blog!! You all are so amazing!! ~Nadia


