On March 4th, 2017, while traveling through Europe, Nate surprised me with a spontaneous proposal in the Amsterdam Schipol Airport. As we were heading to the bathrooms (haha!) he got down on one knee and asked me to marry him!
He was shaking, I was shaking, I was crying, and of course, I said YES! We’ve been talking about it for some time now and all the plans we were making were leading to this exciting event.
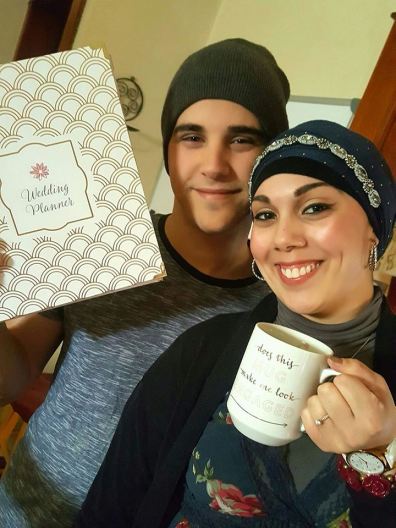
It was very fitting that we had this private moment that included the two of us, my brother and my mom who was able to capture these lovely photos.
No matter how tired we were from all the traveling, our joy carried us through our 13 hour layover where we ventured into Amsterdam city for a celebration dinner.
Upon arrival back to the United States, and of course after letting my close friends and family know this exciting news, we started making immediate plans for our wedding.
We are looking ahead and planning an early 2018 wedding celebration. We recently had some engagement photos taken and made our formal announcement on our personal social media accounts. We now wish to share it with all the YARNutopians!
Photo credit: Fuad Azmat (My daddy!)
As we journey ahead in the next year planning our event, we are excited to tie in elements of our cultures and OF COURSE, elements of crochet! I am going a different route on my dress, as many have already asked me if I was going to crochet my wedding gown, but I am absolutely 100% going to incorporate other small details of crochet for this special day.
I’m excited to share this year-long journey with my amazing YARNutopia family and I will be creating tutorials of fun elements that I plan to use on the big day!
I am excited to hear suggestions on crochet projects that you have used for your special events! I’m always open to hearing, so please feel free to share your ideas!! This will be a fun way to share this together!
Please join us in sharing our joy and happiness as we move onto this new and exciting chapter of our lives!
It’s my birthday! I created this Birthday Wish Granny Square to add to our 365 Days of Granny Squares project. It uses variety of crochet stitches to create an interesting design! I hope you enjoy making your square!
A couple disclaimers before you start: Be sure to check your tension and use the correct size hook for your square. I demonstrate with an H-5.00mm crochet hook in the video tutorial, but you can make yours bigger or smaller by using a bigger or smaller hook. Also, if yours turns out wonky when you are finished, you may need to block this square to make it nice and flat.
Watch this video to learn how to make this square:
**You can always contact me via Facebook if you have any problems with the pattern. I am happy to help if you have any questions along the way.
***You can sell anything you make from my patterns, please just link back to my website YARNutopia.com. Thank you!
Teacher: Nadia Fuad
Video and Editing: Fuad Azmat (My Daddy)
Share your work on Facebook!
Add me on Snapchat: YARNutopia
Follow me on Instagram
Visit My Ravelry Store and add this to your Favorites!
Follow me on Twitter: @YARNutopia
Enjoy this video and subscribe to my channel on YouTube for more tutorials on how to crochet!
Leave a comment, and share with your friends!
Pattern:
Designed by Nadia Fuad You *may* sell items made from my pattern, but please reference my website YARNutopia.com.
Please do not copy, sell, and/or post this pattern and claim it as your own.
NOTES:
-You can use a smaller or larger hook to make this square depending on your tension. I wouldn’t use anything larger than an I-5.5mm Crochet Hook though.
-The finished square measures 7 inches (18 cm)
-This square is worked from the center outward
Special stitches:
Ch(s): chain(s)
YO: Yarn Over
St(s): Stitch(es)
Sl st: slip stitch
SK: Skip
SC: Single Crochet
HDC: Half-Double Crochet
DC: Double Crochet
Beg. Popcorn: Ch up 3, 4DC in same sp, remove hook, put hook in ch up 3, put loop back on hook, pull through and pull tight.
Popcorn: 5DC in same sp, remove hook, put hook in 1st dc of grouping, put loop back on hook, pull through and pull tight.
Picot: Ch 3, sl st in 3rd ch from hook. Picot made.
Long DC: Double crochet in Picot of Petal
Pattern:
If you have any confusion or difficulty with reading this pattern, please watch the video tutorial to have visual instructions.
Ch 13
Rnd 1: Sc in 2nd ch from hook and across. (12)
Rnd 2: Work in BLO, Ch up 1, turn, Sc across
Rnd 3: Work in FLO Ch 1, turn, SC across
Rnd 4: Repeat row 2, fasten off, weave in ends.
Rnd 5: Sk 3 sts, Attach yarn in BLO of next st, ch 1, sc in same st and in next 5 sts, leaving last 3 sts unworked. (6 sts)
Rnd 6: Ch 1, turn, SC in FLO across. (6 sts)
Rnd 7: Ch 1, turn, Work in BLO, SC across. (6 sts)
Assembly: SC around cake (40 sts evenly) See video tutorial for specific stitches.
Rnd 8: (See video tutorial to learn how to do this round) In top right st of the top layer of cake: Ch 1, sc in same st, Ch 4, sk 4 sts, sc in next st, Ch 4, sk 2 sts, sc in next st, ch 4, sk 3 sts, sc in next st, ch 4, sk 3 sts, sc in next st, [ch 4, sk 2 sts, sc in next st] 5 times, ch 4, sk 3 sts, sc in next st, ch 4, sk 2 sts, sc in next st, ch 4, sk last sts, sl st to 1st sc.
Rnd 9: Sl st in ch 4 sp, ch 1, SC in same sp, *Ch 4, SC in next ch sp, repeat from * around. Sl st to beg sc
Rnd 10: Sl st in ch 4 sp, Ch up 3 (counts as DC), 3 DC in same sp, *[4 DC, ch 2, 4 DC] in next sp, 4 DC in next 2 ch sps, repeat from * around. Sl st to beg. ch up 3.
Rnd 11: DC in each st around, [2dc, ch 2, 2dc] in corners. Fasten off
Weave in all ends.
Frilly siding:
Turn square upside down,
Working in front loops of bottom layer of cake:
Sc in 1st st, *ch 3, sc in next st, repeat from * across. Fasten off, weave in ends.
Candle:
Row 1: Attach yarn to edge round on top center of cake, ch up 1, sc in same st and next st
Row 2, Ch 1, turn, SC in 2 sts
Fasten off, weave in ends.
With Yellow, attach yarn to st, ch 3, sl st in next st, fasten off, weave in ends.
Enjoy!!
This post contains affiliate links, which I may be compensated for when you make a purchase. That means if you click on any link and buy from the linked websites, I will receive a small percentage of the value of your order. The amount you pay is not changed. Thank you for all your support in clicking the links in my blog!! You all are so amazing!! ~Nadia