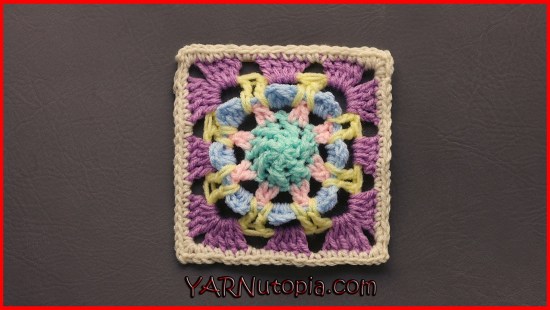
I created this Frosty Flakes Granny Square design to add to our 365 Days of Granny Squares project. It uses variety of crochet stitches to create an interesting design! I hope you enjoy making your square!
A couple disclaimers before you start: Be sure to check your tension and use the correct size hook for your square. I demonstrate with an H-5.00mm crochet hook in the video tutorial, but you can make yours bigger or smaller by using a bigger or smaller hook. Also, if yours turns out wonky when you are finished, you may need to block this square to make it nice and flat.
Follow along with this video tutorial to learn how to make this Granny Square:
**You can always contact me via Facebook if you have any problems with the pattern. I am happy to help if you have any questions along the way.
***You can sell anything you make from my patterns, please just link back to my website YARNutopia.com. Thank you!
Teacher: Nadia Fuad
Video and Editing: Fuad Azmat (My Daddy)
Share your work on Facebook!
Add me on Snapchat: YARNutopia
Follow me on Instagram
Visit My Ravelry Store and add this to your Favorites!
Follow me on Twitter: @YARNutopia
Enjoy this video and subscribe to my channel on YouTube for more tutorials on how to crochet!
Leave a comment, and share with your friends!
Pattern:
Designed by Nadia Fuad You *may* sell items made from my pattern, but please reference my website YARNutopia.com.
Please do not copy, sell, and/or post this pattern and claim it as your own.
My dad will continue to be the videographer, editor, and photographer for our videos when I move away.
Support YARNutopia today so we can continue to bring you clear, quality crochet tutorials even after I move into my new home!
There will be an added expense of more travel and hopefully this won’t deter our ability to provide consistent videos on a weekly basis.
NOTES:
-You can use a smaller or larger hook to make this square depending on your tension. I wouldn’t use anything larger than an I-5.5mm Crochet Hook though.
-The finished square measures 7 inches
-This square is worked from the center outward
Special stitches:
Ch(s): chain(s)
YO: Yarn Over
St(s): Stitch(es)
Sl st: slip stitch
SK: Skip
SC: Single Crochet
HDC: Half-Double Crochet
DC: Double Crochet
FPDC: Front Post Double Crochet
TR: Treble Crochet
Pattern:
If you have any confusion or difficulty with reading this pattern, please watch the video tutorial to have visual instructions.
With White
Ch 4, sl st to 1st ch to form a ring.
Rnd 1: Ch 1, 12 SC in ring. Sl st to 1st sc (12 sts)
Rnd 2: Ch up 1, SC in same st, *Ch 6, Sk next st, SC in next st, repeat from * around, sl st to 1st sc. (6 ch 6 sps)
Rnd 3: In any ch 6 sp: Ch up 1 [SC, HDC, 2DC, Ch 3, 2DC, HDC, SC] in same sp, Sl St in next SC and in next CH sp, repeat from * around. Sl st to 1st SC of this round. Fasten off
Rnd 4: Starting in a DC before a chain 3 sp: Ch 1, SC in same st, ch 3, SC in same st, * [SC, Ch 5, SC] in middle ch of ch 3 sp, [SC, ch 3, SC] in next DC after Ch 3 sp, Ch 3, [SC, ch 3, SC] in next DC before a Ch 3 sp, repeat from * around, sl st to beginning sc. Fasten off. (See video tutorial for specific locations)
Rnd 5: With blue, In any 3rd ch of ch 5 sp: * Ch 10, Sl st in 3rd ch of next ch 5 sp, repeat from * around, sl st to 1st ch of beg. ch 10.
Rnd 6: Sl st in ch 10 sp, ch up 1, [9SC, ch 3, 4 SC] in same sp, 10 SC in next ch 10 sp, [4SC, ch 3, 9 SC] in next sp, [9SC, ch 3, 4 SC] in next sp, 10 SC in next ch 10 sp, [4 SC, ch 3, 9SC] in next sp, sl st to 1st sc. (18 sc on each side)
Rnd 7: Ch up 1, SC in 1st 5 sts, (working behind your work) TR in the Ch 3 sp of round 4, SC in next 4 sts, [sc, ch 2, sc] in corner, sc in next 9 sts, (working behind your work) TR in the Ch 3 sp of round 4, SC in next 9 sts, [sc, ch 2, sc] in corner, SC in next 4 sts, (working behind your work) TR in the Ch 3 sp of round 4, SC in next 10 sts, TR in ch 3 sp of round 4, SC in next 4 sts, [sc, ch 2, sc] in corner, SC in next 9 sts, TR in Ch 3 sp of round 4, SC in next 9 sts, [SC, ch 2, SC] in corner, SC in next 4 sts, TR in ch 3 Sp of round 4, SC in last 5 sts. Sl st to 1st sc.
Rnd 8: Ch up 2, (counts as HDC) (See video tutorial for visual instructions), HDC in each st, FPDC around each TR working in Ch 10 sp from round 5, and work [SC, ch 2, SC] in corners. Sl st to ch 2 at the beginning.
This post contains affiliate links, which I may be compensated for when you make a purchase. That means if you click on any link and buy from the linked websites, I will receive a small percentage of the value of your order. The amount you pay is not changed. Thank you for all your support in clicking the links in my blog!! You all are so amazing!! ~Nadia
The yarn provided for this pattern is courtesy of Red Heart Yarns
“Perhaps the most wondrous of all mystical creatures, the unicorn is a symbol of miracles and enchantment.”
The unicorn gives us the power to believe that anything is possible. These fun and mythical creatures are what fantasies and dreams are made of. This pattern will transform a basic pair of slippers into unicorns that is fun for all ages!
Not looking to make unicorn slippers? Transform yours into other creatures with a few modifications! My video tutorial and FREE written pattern gives instructions on how to make 3 different sizes. I think we all could use some cozy unicorn slippers. Am I right?
Follow along with this video tutorial to learn how to make these magical slippers:
My dad will continue to be the videographer, editor, and photographer for our videos when I move away.
Support YARNutopia today so we can continue to bring you clear, quality crochet tutorials even after I move into my new home!
There will be an added expense of more travel and hopefully this won’t deter our ability to provide consistent videos on a weekly basis.
Enjoy this video and subscribe to my channel on YouTube for more tutorials on how to crochet!
Leave a comment, and share with your friends!
Designed by Nadia Fuad
Questions? Leave a comment! You may sell items made from my pattern, but please reference my name and Etsy Shop (YARNutopia). Please do not copy and post this pattern and claim it as your own.
-The written pattern has sole sizes for Small 5/6 US Women’s Shoe Size, Medium 7/8 US Women’s Shoe Size, and Large 9/10 US Women’s Shoe Size
-The video tutorial ONLY shows the MEDIUM size.
-The sole is made and then the back of the slipper is made and then the front of the slipper and embellishments are made. If you are making smaller or bigger sizes, follow the written pattern for the sole and then watch the video tutorial for help on making the back of the slipper and the front of the slipper.
-The front of the slipper is the same on ALL sizes. The back may be a little different because of the stitch counts.
-This pattern is written for one foot. Be sure to make enough pieces for two feet.
-Depending on how stuffed you want this slipper, you can stuff it as much as you need. The more you stuff, the more your foot will be pushed down into the sole.
Special Stitches:
Ch: chain
St(s): Stitch(es)
Sl st: slip stitch
SC: Single Crochet
DC: Double Crochet
BLO: Work in the Back Loop Only
DC2TOG: Double Crochet 2 Together
DC3TOG: Double Crochet 3 Together
Small (Will fit Size 5/6 US Women’s Shoe Size)
Sole: With Minty, Use 2 Strands of yarn at the same time. (Make 2)
Ch 23 Round 1: SC in 2nd ch from hook and across until last ch, 3 sc in last ch, sc along the opposite side, 2 sc in same st as 1st st. Sl st to 1st sc. (46 sts)
Round 2: Ch 1, 2 SC in 1st st, sc in next 8 sts, HDC in next 12 sts, 2 HDC in each of the next 3 sts, HDC in next 12 sts, SC in next 8 sts, 2 SC in last sts, Sl st to 1st sc. (52 sts)
Round 3: Ch 1, 1 SC in 1st st, 2 SC in next st, 1 SC in next 13 sts, 1 HDC in next 6 sts, DC in next 3 sts, 2 DC in each of the next 3 sts, DC in next 3 sts, HDC in next 6 sts, SC in next 13 sts, 2 SC in next, SC in last sts. Sl st to first st. (58 sts)
Round 4: Ch 1, SC in 1st st, 2 SC in next, HDC in next 20 Sts, DC in next 3 sts, 2 DC in each of the next 6 sts, DC in next 3 sts, HDC in next 20 sts, 2 SC in next st, 1 SC in last sts. Sl st to first st.
Round 5: Ch 2, HDC in 1st st, 2 HDC in next 2 sts, DC in next 25 sts, 2 HDC in next st, HDC in next st, 2 HDC in nexxt st, 1 HDC in next st, SC in 4 sts, HDC in next st, 2 HDC in next st, 1 DC in next 22 sts, 2 HDC in next 2 sts, SC in last sts. Sl st to first st. (73 sts)
Round 6: Ch 1, turn, (Looking at wrong side of work), Sl st in each st around (73 sts), turn.
Round 7: Ch 1, (Looking at right side of work) SC around, Sl st to beginning.
Round 8: Ch 1, SC around, sl st to beginning. Fasten off.
Count 39 sts on the front of sole. Place stitch marker in first and last sts making 39 sts on the front of the sole (See video tutorial for visual instructions)
Go on to making the Back of slipper.
Medium (Will fit Size 7/8 US Women’s Shoe Size)
Video Tutorial Features this Size
Sole: With Minty, Use 2 Strands of yarn at the same time. (Make 2)
Ch 23 Round 1: SC in 2nd ch from hook and across until last ch, 3 sc in last ch, sc along the opposite side, 2 sc in same st as 1st st. Sl st to 1st sc. (46 sts)
Round 2: Ch 1, 2 SC in 1st st, sc in next 8 sts, HDC in next 12 sts, 2 HDC in each of the next 3 sts, HDC in next 12 sts, SC in next 8 sts, 2 SC in last sts, Sl st to 1st sc. (52 sts)
Round 3: Ch 1, 1 SC in 1st st, 2 SC in next st, 1 SC in next 13 sts, 1 HDC in next 6 sts, DC in next 3 sts, 2 DC in each of the next 3 sts, DC in next 3 sts, HDC in next 6 sts, SC in next 13 sts, 2 SC in next, SC in last sts. Sl st to 1st st. (58 sts)
Round 4: Ch 1, SC in 1st st, 2 SC in next, HDC in next 20 Sts, DC in next 3 sts, 2 DC in each of the next 6 sts, DC in next 3 sts, HDC in next 20 sts, 2 SC in next st, 1 SC in last sts. Sl st to 1st st.
Round 5: Ch 1, 2 SC in 1st 3 sts, HDC in next 5 sts, DC in next 23 sts, 2 DC in next 4 sts, DC in next 24 sts, HDC in next st, 2 SC in last sts, Sl st to 1st sc. (75 sts)
Round 6: Ch 1, turn, (Looking at wrong side of work), Sl st in each st around (75 sts), turn.
Round 7: Ch 1, (Looking at right side of work) SC around, Sl st to beginning.
Round 8: Ch 1, SC around, sl st to beginning. Fasten off.
Count 39 sts on the front of sole. Place stitch marker in first and last sts making 39 sts on the front of the sole (See video tutorial for visual instructions)
Go on to making the Back of slipper.
Large (Will Fit Size 9/10 US Women’s Shoe Size)
Sole: With Minty, Use 2 Strands of yarn at the same time. (Make 2)
Ch 23 Round 1: SC in 2nd ch from hook and across until last ch, 3 sc in last ch, sc along the opposite side, 2 sc in same st as 1st st. Sl st to 1st sc. (46 sts)
Round 2: Ch 1, 2 SC in 1st st, sc in next 8 sts, HDC in next 12 sts, 2 HDC in each of the next 3 sts, HDC in next 12 sts, SC in next 8 sts, 2 SC in last sts, Sl st to 1st sc. (52 sts)
Round 3: Ch 1, 1 SC in 1st st, 2 SC in next st, 1 SC in next 13 sts, 1 HDC in next 6 sts, DC in next 3 sts, 2 DC in each of the next 3 sts, DC in next 3 sts, HDC in next 6 sts, SC in next 13 sts, 2 SC in next, SC in last sts. Sl st to 1st st. (58 sts)
Round 4: Ch 1, SC in 1st st, 2 SC in next, HDC in next 20 Sts, DC in next 3 sts, 2 DC in each of the next 6 sts, DC in next 3 sts, HDC in next 20 sts, 2 SC in next st, 1 SC in last sts. Sl st to 1st st.
Round 5: Ch 1, 2 SC in 1st 3 sts, HDC in next 5 sts, DC in next 23 sts, 2 DC in next 4 sts, DC in next 24 sts, HDC in next st, 2 SC in last sts, Sl st to 1st sc. (75 sts)
Round 6: Ch 2, 2 HDC in 1st st, HDC in next 2 sts, 2 DC in next 2 sts, DC in next 30 sts, [2 DC in next st, DC in next st] 4 times, DC in next 29 sts, 2 DC in next st, 2 HDC in next st, (If there are sts left, HDC in them), Sl st to first HDC. Sl st to beginning. (83 sts)
Round 7: Ch 1, turn, (Looking at wrong side of work), Sl st in each st around (83 sts), turn.
Round 8: Ch 1, (Looking at right side of work) SC around, Sl st to beginning.
Round 9: Ch 1, SC around, sl st to beginning. Fasten off.
Count 39 sts on the front of sole. Place stitch marker in first and last sts making 39 sts on the front of the sole (See video tutorial for visual instructions)
Go on to making the Back of slipper.
For all sizes:
Back of slipper:
(With White and 2 strands of yarn)
Make sure you have 39 sts free in the front of sole Row 1: Ch up 1, SC across to marked st Rows 2-20: Ch 1, turn, SC in each st across.
Fasten off with long tail for sewing.
See video tutorial for sewing and visual instructions.
Assembly:
Fold inward toward sole, sew along Row 1 of back of slipper making a tunnel. Stuff the tunnel with polyfil and sew open ends closed.
Front of slipper:
Make sure you have 39 sts free on all sizes. With White and 2 strands of yarn
Row 1: Ch 1, SC across to last st, ch 1, turn. (39 sts) Row 2: SC across. Ch 1, turn. (39 sts) Row 3: SC in 1st 14 sts, [DC2TOG] 5 Times, SC in last 15 sts, ch 1, turn. (34 sts) Row 4: SC in 1st 10 sts, [DC2TOG, DC in next st] 4 times, DC2TOG, SC in last 10 sts, ch 1, turn. Row 5: SC in 1st 8 sts, [DC2TOG] 6 times, SC in last 9 sts. Ch 1, turn. Row 6: SC in 1st 6 sts, [DC2TOG] 6 times, SC in last 5 sts. Ch 1, turn. (17 sts) Row 7: SC in first 4 sts, [DC2TOG] 4 times, SC in last 5 sts, ch 1, turn. Row 8: [DC2TOG] 3 times. DC in next st, [DC2TOG] 3 times. Ch 1, turn. Row 9: DC3TOG, DC in next, DC3TOG. Fasten off.
Top Front of slipper:
This piece is worked separately and then sewn onto the slipper.
With 2 strands of white yarn,
Ch 40
Row 1: SC in 2nd ch from hook and across. Ch 1, turn. Row 2: SC across. Ch 1, turn. (39 sts) Row 3: SC in 1st 14 sts, [DC2TOG] 5 Times, SC in last 15 sts, ch 1, turn. (34 sts) Row 4: SC in 1st 10 sts, [DC2TOG, DC in next st] 4 times, DC2TOG, SC in last 10 sts, ch 1, turn. Row 5: SC in 1st 8 sts, [DC2TOG] 6 times, SC in last 9 sts. Ch 1, turn. Row 6: SC in 1st 6 sts, [DC2TOG] 6 times, SC in last 5 sts. Ch 1, turn. (17 sts) Row 7: SC in first 4 sts, [DC2TOG] 4 times, SC in last 5 sts, ch 1, turn. Row 8: [DC2TOG] 3 times. DC in next st, [DC2TOG] 3 times. Ch 1, turn. Row 9: DC3TOG, DC in next, DC3TOG. Fasten off with very long tail for sewing.
Eyes and Circle under Horn:
Use Red Heart Yarn in Black for the eyes, use Variegated yarn for the circle under the horn.
Ch 2 Rnd 1: Sc 6 in 2nd ch from hook. Sl st to 1st st. (6) Rnd 2: Ch 1, Sc 2 in each st. sl st to 1st st (12) Rnd 3: ch 1, (Sc 2 in next st, sc in next st) 6 times. Sl st to 1st st (18)
Fasten of with long tail for sewing.
White pupils for the Eyes:
Ch 2 Rnd 1: Sc 6 in 2nd ch from hook. (6)
Fasten off with long tail.
Sew to black portion of eye.
Horn:
In Gleam yarn in Creamy, work in continuous rounds
Ch 2 Rnd 1: 4 SC in 2nd ch from hook (4) Rnd 2: SC in each st around Rnd 3: 2 SC in each st around. (8) Rnd 4: SC in each st around Rnd 5: 2 SC in next st, SC in next 7 sts (9) Rnd 6: SC in each st around (9) Rnd 7: 2 SC in next st, SC in next 8 sts (10) Rnd 8: SC in each st around (10) Rnd 9: 2 SC in next st, SC in next 9 sts (11) Rnd 10: SC in each st around. (11)
Ears: Make 2 in White
Ch 6 Row 1: Sc in 2nd ch from hook and across, ch 1, turn. (5) Row 2: SC in each st across. Ch 1, turn. (5) Row 3: SC2TOG, SC in next, SC2TOG, ch 1, turn. (3) Row 4: SC across, ch 1, turn. (3) Row 5: SC3TOG
SC around entire ear. Fasten off with long tail for sewing.
Cheeks: Make 2 with pink yarn
Ch 6 Row 1: SC in 2nd ch from hook, HDC in next, DC in next, HDC in next, SC in last.
Fasten off with long tail for sewing.
Mane:
With Variegated yarn and work in continuous rounds.
Ch 8 Rnd 1: SC in 1st ch and around Rnd 2-6: SC in each st around. Rnd 7-9: SL ST in 4 sts, SC in 4 sts Rnds 10-19: SC in each st around Rnds 20-22: SL St in 4 sts, SC in 4 sts Rnds 22-28: SC in each st around
Fasten off with long tail. Stuff it.
Sew to slipper behind eyes/horn.
Assembly step:
Sew all pieces to slipper. Embellish by embroidering the mouth and nose.
Add fringe to the piece behind the horn to make the mane.
See video tutorial for visual instructions on all the pieces and where they go.
Sew everything closed after stuffing.
This post contains affiliate links, which I may be compensated for when you make a purchase. That means if you click on any link and buy from the linked websites, I will receive a small percentage of the value of your order. The amount you pay is not changed. Thank you for all your support in clicking the links in my blog!! You all are so amazing!! ~Nadia
The yarn provided for this pattern is courtesy of Red Heart Yarns
I created this Dynamic Window Granny Square design to add to our 365 Days of Granny Squares project. It uses variety of crochet stitches to create an interesting design! I hope you enjoy making your square!
A couple disclaimers before you start: Be sure to check your tension and use the correct size hook for your square. I demonstrate with an H-5.00mm crochet hook in the video tutorial, but you can make yours bigger or smaller by using a bigger or smaller hook. Also, if yours turns out wonky when you are finished, you may need to block this square to make it nice and flat.
Follow along with this video tutorial to learn how to make this granny square:
My dad will continue to be the videographer, editor, and photographer for our videos when I move away.
Support YARNutopia today so we can continue to bring you clear, quality crochet tutorials even after I move into my new home!
There will be an added expense of more travel and hopefully this won’t deter our ability to provide consistent videos on a weekly basis.
**You can always contact me via Facebook if you have any problems with the pattern. I am happy to help if you have any questions along the way.
***You can sell anything you make from my patterns, please just link back to my website YARNutopia.com. Thank you!
Teacher: Nadia Fuad
Video and Editing: Fuad Azmat (My Daddy)
Share your work on Facebook!
Add me on Snapchat: YARNutopia
Follow me on Instagram
Visit My Ravelry Store and add this to your Favorites!
Follow me on Twitter: @YARNutopia
Enjoy this video and subscribe to my channel on YouTube for more tutorials on how to crochet!
Leave a comment, and share with your friends!
Pattern:
Designed by Nadia Fuad You *may* sell items made from my pattern, but please reference my website YARNutopia.com.
Please do not copy, sell, and/or post this pattern and claim it as your own.
Materials:
-Red Heart Super Saver Yarn in as many colors as you want.
-H-5.00mm Crochet Hook
-Yarn Needle
-Scissors
NOTES:
-You can use a smaller or larger hook to make this square depending on your tension. I wouldn’t use anything larger than an I-5.5mm Crochet Hook though.
-The finished square measures 6.5 inches
-This square is worked from the center outward
Special stitches:
Ch(s): chain(s)
YO: Yarn Over
St(s): Stitch(es)
Sl st: slip stitch
SK: Skip
SC: Single Crochet
HDC: Half-Double Crochet
DC: Double Crochet
BPSC: Back Post Single Crochet
BPHDC: Back Post Half Double Crochet
BPDC: Back Post Double Crochet
BPTR: Back Post Treble Crochet
Beg. Cluster: Ch up 2, [Y/O, Insert Hook, Y/O, Pull through, Y/O Pull through 2 loops] 2 times. Y/O pull through all 3 loops on hook.
3DC Cluster: [Y/O, Insert Hook, Y/O, Pull through, Y/O Pull through 2 loops] 3 times. Y/O pull through all 4 loops on hook.
Pattern:
If you have any confusion or difficulty with reading this pattern, please watch the video tutorial to have visual instructions.
Ch 4, sl st to 1st ch to form a ring.
Rnd 1: Ch 1, 8 SC in ring. Sl st to 1st sc (8 sts)
Rnd 2: Ch up 1, SC in same st, *Ch 2, Sk next st, SC in next st, repeat from * around, sl st to 1st sc. (4 ch 2 sps)
Rnd 3: In any ch 2 sp: Ch up 4 (counts as TR), [DC, HDC, SC, HDC, DC, TR] in same sp, * [TR, ch 3, TR] in sc, [TR, DC, HDC, SC, HDC, DC, TR] in next ch sp, repeat from * around, sl st to ch up 4.
Rnd 4: In any ch 3 corner sp: Ch up 4 (counts as TR), [TR, Ch 3, 2 TR] in same sp, * TR in next st, DC in next 2 sts, HDC in next st, SC in next st, HDC in next st, DC in next 2 sts, TR in next st, [2 TR, ch 3, 2 TR] in corner, repeat from * around, sl st to ch up 4.
Rnd 5: In any corner: Ch 1, *[2SC, ch 2, 2 SC] in corner, BPSC in next 3 sts, BPHDC in next st, BPDC in next st, BPTR in next 3 sts, BPDC in next st, BPHDC in next st, BPSC in next 3 sts, repeat from * around, sl st to beg. sc.
Rnd 6: In any corner: [Beg. Cluster, ch 2, cluster] in corner, * Ch 1, [sk 1 st, Cluster in next st] 8 times, ch 1, [cluster, ch 2, cluster] in corner. repeat from * around, sl st to beg. cluster. Fasten off.
Weave in all ends.
Enjoy!!
This post contains affiliate links, which I may be compensated for when you make a purchase. That means if you click on any link and buy from the linked websites, I will receive a small percentage of the value of your order. The amount you pay is not changed. Thank you for all your support in clicking the links in my blog!! You all are so amazing!! ~Nadia
The yarn provided for this pattern is courtesy of Red Heart Yarns
It’s my birthday! I created this Birthday Wish Granny Square to add to our 365 Days of Granny Squares project. It uses variety of crochet stitches to create an interesting design! I hope you enjoy making your square!
A couple disclaimers before you start: Be sure to check your tension and use the correct size hook for your square. I demonstrate with an H-5.00mm crochet hook in the video tutorial, but you can make yours bigger or smaller by using a bigger or smaller hook. Also, if yours turns out wonky when you are finished, you may need to block this square to make it nice and flat.
Watch this video to learn how to make this square:
**You can always contact me via Facebook if you have any problems with the pattern. I am happy to help if you have any questions along the way.
***You can sell anything you make from my patterns, please just link back to my website YARNutopia.com. Thank you!
Teacher: Nadia Fuad
Video and Editing: Fuad Azmat (My Daddy)
Share your work on Facebook!
Add me on Snapchat: YARNutopia
Follow me on Instagram
Visit My Ravelry Store and add this to your Favorites!
Follow me on Twitter: @YARNutopia
Enjoy this video and subscribe to my channel on YouTube for more tutorials on how to crochet!
Leave a comment, and share with your friends!
Pattern:
Designed by Nadia Fuad You *may* sell items made from my pattern, but please reference my website YARNutopia.com.
Please do not copy, sell, and/or post this pattern and claim it as your own.
NOTES:
-You can use a smaller or larger hook to make this square depending on your tension. I wouldn’t use anything larger than an I-5.5mm Crochet Hook though.
-The finished square measures 7 inches (18 cm)
-This square is worked from the center outward
Special stitches:
Ch(s): chain(s)
YO: Yarn Over
St(s): Stitch(es)
Sl st: slip stitch
SK: Skip
SC: Single Crochet
HDC: Half-Double Crochet
DC: Double Crochet
Beg. Popcorn: Ch up 3, 4DC in same sp, remove hook, put hook in ch up 3, put loop back on hook, pull through and pull tight.
Popcorn: 5DC in same sp, remove hook, put hook in 1st dc of grouping, put loop back on hook, pull through and pull tight.
Picot: Ch 3, sl st in 3rd ch from hook. Picot made.
Long DC: Double crochet in Picot of Petal
Pattern:
If you have any confusion or difficulty with reading this pattern, please watch the video tutorial to have visual instructions.
Ch 13
Rnd 1: Sc in 2nd ch from hook and across. (12)
Rnd 2: Work in BLO, Ch up 1, turn, Sc across
Rnd 3: Work in FLO Ch 1, turn, SC across
Rnd 4: Repeat row 2, fasten off, weave in ends.
Rnd 5: Sk 3 sts, Attach yarn in BLO of next st, ch 1, sc in same st and in next 5 sts, leaving last 3 sts unworked. (6 sts)
Rnd 6: Ch 1, turn, SC in FLO across. (6 sts)
Rnd 7: Ch 1, turn, Work in BLO, SC across. (6 sts)
Assembly: SC around cake (40 sts evenly) See video tutorial for specific stitches.
Rnd 8: (See video tutorial to learn how to do this round) In top right st of the top layer of cake: Ch 1, sc in same st, Ch 4, sk 4 sts, sc in next st, Ch 4, sk 2 sts, sc in next st, ch 4, sk 3 sts, sc in next st, ch 4, sk 3 sts, sc in next st, [ch 4, sk 2 sts, sc in next st] 5 times, ch 4, sk 3 sts, sc in next st, ch 4, sk 2 sts, sc in next st, ch 4, sk last sts, sl st to 1st sc.
Rnd 9: Sl st in ch 4 sp, ch 1, SC in same sp, *Ch 4, SC in next ch sp, repeat from * around. Sl st to beg sc
Rnd 10: Sl st in ch 4 sp, Ch up 3 (counts as DC), 3 DC in same sp, *[4 DC, ch 2, 4 DC] in next sp, 4 DC in next 2 ch sps, repeat from * around. Sl st to beg. ch up 3.
Rnd 11: DC in each st around, [2dc, ch 2, 2dc] in corners. Fasten off
Weave in all ends.
Frilly siding:
Turn square upside down,
Working in front loops of bottom layer of cake:
Sc in 1st st, *ch 3, sc in next st, repeat from * across. Fasten off, weave in ends.
Candle:
Row 1: Attach yarn to edge round on top center of cake, ch up 1, sc in same st and next st
Row 2, Ch 1, turn, SC in 2 sts
Fasten off, weave in ends.
With Yellow, attach yarn to st, ch 3, sl st in next st, fasten off, weave in ends.
Enjoy!!
This post contains affiliate links, which I may be compensated for when you make a purchase. That means if you click on any link and buy from the linked websites, I will receive a small percentage of the value of your order. The amount you pay is not changed. Thank you for all your support in clicking the links in my blog!! You all are so amazing!! ~Nadia
I created this Hello, Sunshine Granny Square design to add to our 365 Days of Granny Squares project. It uses variety of crochet stitches to create an interesting design! I hope you enjoy making your square!
A couple disclaimers before you start: Be sure to check your tension and use the correct size hook for your square. I demonstrate with an H-5.00mm crochet hook in the video tutorial, but you can make yours bigger or smaller by using a bigger or smaller hook. Also, if yours turns out wonky when you are finished, you may need to block this square to make it nice and flat.
Follow along with this video tutorial to learn how to make this granny square:
My dad will continue to be the videographer, editor, and photographer for our videos when I move away.
Support YARNutopia today so we can continue to bring you clear, quality crochet tutorials even after I move into my new home!
There will be an added expense of more travel and hopefully this won’t deter our ability to provide consistent videos on a weekly basis.
**You can always contact me via Facebook if you have any problems with the pattern. I am happy to help if you have any questions along the way.
***You can sell anything you make from my patterns, please just link back to my website YARNutopia.com. Thank you!
Teacher: Nadia Fuad
Video and Editing: Fuad Azmat (My Daddy)
Share your work on Facebook!
Add me on Snapchat: YARNutopia
Follow me on Instagram
Visit My Ravelry Store and add this to your Favorites!
Follow me on Twitter: @YARNutopia
Enjoy this video and subscribe to my channel on YouTube for more tutorials on how to crochet!
Leave a comment, and share with your friends!
Pattern:
Designed by Nadia Fuad You *may* sell items made from my pattern, but please reference my website YARNutopia.com.
Please do not copy, sell, and/or post this pattern and claim it as your own.
NOTES:
-You can use a smaller or larger hook to make this square depending on your tension. I wouldn’t use anything larger than an I-5.5mm Crochet Hook though.
-The finished square measures 7 inches (18 cm)
-This square is worked from the center outward
Special stitches:
Ch(s): chain(s)
YO: Yarn Over
St(s): Stitch(es)
Sl st: slip stitch
SK: Skip
SC: Single Crochet
HDC: Half-Double Crochet
DC: Double Crochet
Beg. Popcorn: Ch up 3, 4DC in same sp, remove hook, put hook in ch up 3, put loop back on hook, pull through and pull tight.
Popcorn: 5DC in same sp, remove hook, put hook in 1st dc of grouping, put loop back on hook, pull through and pull tight.
Picot: Ch 3, sl st in 3rd ch from hook. Picot made.
Long DC: Double crochet in Picot of Petal
Pattern:
If you have any confusion or difficulty with reading this pattern, please watch the video tutorial to have visual instructions.
Ch 4, sl st to 1st ch to form a ring.
Rnd 1: Ch 1, 8 SC in ring. Sl st to 1st sc (8 sts)
Rnd 2: Ch up 3, Beg. Popcorn in same st, *ch 3, Popcorn in next st, repeat from * around, sl st to beg. popcorn. (8 Popcorn sts, 8 ch 3 sps)
Rnd 3: In any ch 3 sp, Ch up 3, [Beg. Popcorn, ch 3, Popcorn]in same sp, *ch 3, [Popcorn, ch 3, Popcorn] in next ch sp, repeat from * around, sl st to beg. popcorn. (16 popcorn sts)
Rnd 4: In ch 3 sp between popcorns (see video tutorial for specific placement), ch 1, [sc, hdc, dc, tr, picot, tr, dc, hdc, sc] in same sp, *ch 2, sk next ch 3 sp, [sc, hdc, dc, tr, picot, tr, dc, hdc, sc] in next ch 3 sp, repeat from * around, sl st to (8 petals made)
Rnd 5: Working in ch sps between petals from round 3, ch up 1, sc in same sp working around ch from round 4, *ch 4, sc in next free ch sp, put ch behind petal, repeat from * around, sl st to 1st sc. (see video tutorial for visual instructions on this round) (8 ch 4 sps)
Rnd 6: In any ch sp: Ch up 3 (counts as DC), [3DC, ch 2, 4 DC] in same sp, *4DC in next ch sp, [4DC, ch 2, 4 DC] in next ch sp, Repeat from * around, sl st to ch up 3.
Rnd 7: In any st, Ch up 3, DC in each st around putting [3DC, ch 2, 3 DC] in corners, sl st to beg. ch up 3.
Rnd 8: In corner: Ch up 3, *[sk 1st st, DC in next st, DC in sk’d st (X-Stitch Made)] 4 times, tack down petal putting X-Stitch through Picot, X-Stitch in the rest of the stitches on the side until the corner. (there should be 9 X-Stitches) on the side. In corners put: 2 DC, Long DC in Picot of petal, tacking it down, 2 more DC in same corner ch sp, repeat from * around. Ending with 2 DC, Long DC in Picot of petal, 1 more DC in same corner, sl st to ch up 3. Fasten off.
Weave in all ends.
Enjoy!!
This post contains affiliate links, which I may be compensated for when you make a purchase. That means if you click on any link and buy from the linked websites, I will receive a small percentage of the value of your order. The amount you pay is not changed. Thank you for all your support in clicking the links in my blog!! You all are so amazing!! ~Nadia
The yarn provided for this pattern is courtesy of Red Heart Yarns
I created this Autumn Meadow Granny Square design to add to our 365 Days of Granny Squares project. It uses variety of crochet stitches to create an interesting design! I hope you enjoy making your square!
A couple disclaimers before you start: Be sure to check your tension and use the correct size hook for your square. I demonstrate with an H-5.00mm crochet hook in the video tutorial, but you can make yours bigger or smaller by using a bigger or smaller hook. Also, if yours turns out wonky when you are finished, you may need to block this square to make it nice and flat.
Follow along with this video tutorial to learn how to make this square:
**You can always contact me via Facebook if you have any problems with the pattern. I am happy to help if you have any questions along the way.
***You can sell anything you make from my patterns, please just link back to my website YARNutopia.com. Thank you!
Teacher: Nadia Fuad
Video and Editing: Fuad Azmat (My Daddy)
Share your work on Facebook!
Add me on Snapchat: YARNutopia
Follow me on Instagram
Visit My Ravelry Store and add this to your Favorites!
Follow me on Twitter: @YARNutopia
Enjoy this video and subscribe to my channel on YouTube for more tutorials on how to crochet!
Leave a comment, and share with your friends!
Pattern:
Designed by Nadia Fuad You *may* sell items made from my pattern, but please reference my website YARNutopia.com.
Please do not copy, sell, and/or post this pattern and claim it as your own.
Materials:
-Red Heart Super Saver Yarn in as many colors as you want.
-H-5.00mm Crochet Hook
-Yarn Needle
-Scissors
NOTES:
-You can use a smaller or larger hook to make this square depending on your tension. I wouldn’t use anything larger than an I-5.5mm Crochet Hook though.
-The finished square measures 6 inches.
-This square is worked from the center outward
Special stitches:
Ch(s): chain(s)
YO: Yarn Over
St(s): Stitch(es)
Sl st: slip stitch
SK: Skip
SC: Single Crochet
HDC: Half-Double Crochet
DC: Double Crochet
BPSC: Back Post Single Crochet
Pattern:
If you have any confusion or difficulty with reading this pattern, please watch the video tutorial to have visual instructions.
Ch 4, sl st to 1st ch to form a ring.
Rnd 1: Ch up 2 (counts as HDC), 11 HDC in ring, sl st to beg ch up 2. (12 Sts)
Rnd 2: Ch up 4 (Counts as HDC+ ch 2 sp), HDC in same st, [HDC, ch 2, HDC] in each st around. Sl st to 2nd ch of beg ch 4. Fasten off.
Rnd 3: Around 2 HDC’s (see video tutorial), BPSC around 2 sts, ch 3, * BPSC around the next 2 sts, ch 3, repeat from * around. Sl st to first BPSC.
Rnd 4: In any ch 3 sp: * [ch 1, sc, HDC, 3DC, HDC, SC, sl st in same ch 3 sp] sl st in in next ch 3 sp, [ch 1, sc, HDC, 2 DC, Picot, DC, HDC, SC, Sl st in same ch 3 sp] sl st in next ch 3 sp, repeat from * around. sl st to beginning sl st or sc. (6 pointy petals, 6 round petals) Fasten off.
Rnd 5: Working around the BPSC’s from round 3: BPSC around BPSC, * ch 4, BPSC around next BPSC, Repeat from * around. Sl st to first BPSC.
Rnd 6: In any ch 4 sp: Ch up 3, [2DC, ch 2, 2 DC] in same sp, * 3 DC in each of the next 2 ch 4 sps, [3DC, ch 2, 3DC] in next ch 4 sp, Repeat from * around. Sl st to beg. ch up 3.
Rnd 7: In any corner: Ch up 3, [DC, ch 2, 2 DC] in same corner sp, 3 DC in gap between each dc groupings until next corner. [2DC, ch 2, 2 DC] in corners. Sl st to beg. ch up 3.
Rnd 8: In any corner: Ch 1, [2sc, ch 2, 2 sc] in same corner, sc in each st around putting [2dc, ch 2, 2 dc] in corners. Fasten off.
I created this Wild Flower Days Granny Square design to add to our 365 Days of Granny Squares project. It uses variety of crochet stitches to create an interesting design! I hope you enjoy making your square!
A couple disclaimers before you start: Be sure to check your tension and use the correct size hook for your square. I demonstrate with an H-5.00mm crochet hook in the video tutorial, but you can make yours bigger or smaller by using a bigger or smaller hook. Also, if yours turns out wonky when you are finished, you may need to block this square to make it nice and flat.
Follow along with this video tutorial to learn how to make this granny square:
My dad will continue to be the videographer, editor, and photographer for our videos when I move away.
Support YARNutopia today so we can continue to bring you clear, quality crochet tutorials even after I move into my new home!
There will be an added expense of more travel and hopefully this won’t deter our ability to provide consistent videos on a weekly basis.
**You can always contact me via Facebook if you have any problems with the pattern. I am happy to help if you have any questions along the way.
***You can sell anything you make from my patterns, please just link back to my website YARNutopia.com. Thank you!
Teacher: Nadia Fuad
Video and Editing: Fuad Azmat (My Daddy)
Share your work on Facebook!
Add me on Snapchat: YARNutopia
Follow me on Instagram
Visit My Ravelry Store and add this to your Favorites!
Follow me on Twitter: @YARNutopia
Enjoy this video and subscribe to my channel on YouTube for more tutorials on how to crochet!
Leave a comment, and share with your friends!
Pattern:
Designed by Nadia Fuad You *may* sell items made from my pattern, but please reference my website YARNutopia.com.
Please do not copy, sell, and/or post this pattern and claim it as your own.
Materials:
-Red Heart Super Saver Yarn in as many colors as you want.
-H-5.00mm Crochet Hook
-Yarn Needle
-Scissors
NOTES:
-You can use a smaller or larger hook to make this square depending on your tension. I wouldn’t use anything larger than an I-5.5mm Crochet Hook though.
-The finished square measures 6 inches.
-This square is worked from the center outward
Special stitches:Ch(s): chain(s)
YO: Yarn Over
St(s): Stitch(es)
Sl st: slip stitch
SK: Skip
SC: Single Crochet
HDC: Half-Double Crochet
DC: Double Crochet
Beg. Popcorn: Ch up 3, 3 DC in same sp, remove hook, Insert hook into 1st ch up 3 of grouping, put loop back on hook and pull through. Beg. Popcorn made. (See video tutorial for visual instructions)
Popcorn: 4 DC in same sp, remove hook, Insert hook into 1st dc of grouping, put loop back on hook and pull through. Popcorn made. (See video tutorial for visual instructions)
Pattern:
If you have any confusion or difficulty with reading this pattern, please watch the video tutorial to have visual instructions.
Ch 4, sl st to 1st ch to form a ring.
Rnd 1: Ch up 3 (counts as DC), 11 DC in ring, sl st to beg DC. (12 Sts)
Rnd 2: Ch up 3 (Counts as DC), *Sk 1 st, Sl st in next st, Ch 3, repeat from * around, sl st to 1st ch of beg ch 3. (6 ch sps)
Rnd 3: Sl st into ch 3 sp, *Ch up 3, 4 DC in same sp, Ch 3, Sl st in same sp, Sl st into next sp, Repeat from * around sl st to bottom of 1st ch up 3. (6 petals made) Fasten off.
Rnd 4: Working in Sk’d Sts from Round 1, behind petals: Ch up 3, 2 DC in same st, 3 DC in each skipped st around, sl st to beg. ch up 3. (18 sts)
Rnd 5: Ch up 3 (counts as DC), DC in same st, 2 DC in each st around. Sl st to beg. ch up 3. (36 DC)
Rnd 6: Ch up 3, Beg. Popcorn in same st, DC in next 3 sts, *Popcorn in next st, DC in next 3 sts, repeat from * around, sl st to beg. popcorn st.
Rnd 7: In any DC after a popcorn st: Ch up 3, DC in next 2 sts, *Ch 4, Sk Popcorn, DC in next 3 sts, repeat from * around, sl st to beg. ch up 3.
Rnd 8: Ch up 1, sc in same st, sc in next 2 sts, 5 sc in ch 4 sp, *sc in next 3 sts, 5 sc in ch sp, repeat from * around. Sl st to 1st sc.
Rnd 9: In any 1st sc of a 5 sc grouping in a ch sp: Ch up 5 (Counts as DC + Ch 2 corner sp), *DC in next 2 sts, HDC in next 3 sts, SC in next 8 sts, HDC in next 3 sts, DC in next 2 sts, CH 2 repeat from * around, sl st to 3rd ch of beg. ch 5.
Fasten off.
I created this Soul Shine Granny Square design to add to our 365 Days of Granny Squares project. It uses variety of crochet stitches to create an interesting design! I hope you enjoy making your square!
A couple disclaimers before you start: Be sure to check your tension and use the correct size hook for your square. I demonstrate with an H-5.00mm crochet hook in the video tutorial, but you can make yours bigger or smaller by using a bigger or smaller hook. Also, if yours turns out wonky when you are finished, you may need to block this square to make it nice and flat.
Follow along with this video tutorial to make your granny square:
My dad will continue to be the videographer, editor, and photographer for our videos when I move away.
Support YARNutopia today so we can continue to bring you clear, quality crochet tutorials even after I move into my new home!
There will be an added expense of more travel and hopefully this won’t deter our ability to provide consistent videos on a weekly basis.
**You can always contact me via Facebook if you have any problems with the pattern. I am happy to help if you have any questions along the way.
***You can sell anything you make from my patterns, please just link back to my website YARNutopia.com. Thank you!
Teacher: Nadia Fuad
Video and Editing: Fuad Azmat (My Daddy)
Share your work on Facebook!
Add me on Snapchat: YARNutopia
Follow me on Instagram
Visit My Ravelry Store and add this to your Favorites!
Follow me on Twitter: @YARNutopia
Enjoy this video and subscribe to my channel on YouTube for more tutorials on how to crochet!
Leave a comment, and share with your friends!
Pattern:
Designed by Nadia Fuad You *may* sell items made from my pattern, but please reference my website YARNutopia.com.
Please do not copy, sell, and/or post this pattern and claim it as your own.
Materials:
-Red Heart Super Saver Yarn in as many colors as you want.
-H-5.00mm Crochet Hook
-Yarn Needle
-Scissors
NOTES:
-You can use a smaller or larger hook to make this square depending on your tension. I wouldn’t use anything larger than an I-5.5mm Crochet Hook though.
-The finished square measures 8.5 inches (22cm).
-This square is worked from the center outward
Special stitches:
Ch(s): chain(s)
YO: Yarn Over
St(s): Stitch(es)
Sl st: slip stitch
SK: Skip
SC: Single Crochet
HDC: Half-Double Crochet
DC: Double Crochet
BPDC: Back Post Double Crochet
V-Stitch: [DC, ch 1, DC] in same space
Puff Stitch: [YO, Insert Hook, YO pull through] 4 times. YO pull through all 9 loops. Ch 1 to secure. Puff made.
Pattern:
If you have any confusion or difficulty with reading this pattern, please watch the video tutorial to have visual instructions.
Ch 4, sl st to 1st ch to form a ring.
Rnd 1: Ch up 1, 8 SC in ring, sl st to 1st sc. (8 sc)
Rnd 2: Ch up 3 (Counts as HDC + Ch 1 sp), HDC in same st, *Ch 1, [HDC, ch 2, HDC] in next st, repeat from * around, sl st to 2nd ch of beg. ch up 3.
Rnd 3: In any ch 1 sp: Ch up 4 (Counts as DC + Ch 1 sp), DC in same sp, V-Stitch in every ch 1 sp around. Sl st to 3rd ch of beg. ch 4. (32 DC, 16 Ch 1 sps)
Rnd 4: In any ch 1 sp: Ch 1, SC in same sp, *Ch 3, SC in next ch 1 sp, Repeat from * around, sl st to 1st sc. (16 sc)
Rnd 5: BPDC around any sc, * 2 DC in ch 3 sp, BPDC around next SC, repeat from * around. Sl st to beg. BPDC.
Rnd 6: Ch up 3, [DC, ch 3, 2 DC] in same st, * Ch 2, 3 HDC in next BPDC, Ch 2, 3 SC in next BPDC, Ch 2, 3 HDC in next BPDC, ch 2, [2DC, ch 3, 2DC] in next BPDC, repeat from * around. Sl st to beg. Ch 3.
Rnd 7: In any corner ch 3 sp: Ch 3, Puff in same sp, ch 1, DC in same sp, [DC, Puff, Ch 1, DC] in each ch sp around. Sl st to beg. ch up 3.
Rnd 8: On the right side of a puff stitch in a corner: Ch up 1, Sc in same sp, ch 3, *SC on other side of puff st, ch 3, sk 2 DC, SC on right side of next puff st, ch 3, repeat from * around, sl st to beg. SC. (See video tutorial for this round and the next round)
Rnd 9: In any corner: Ch up 2 (counts as HDC), [HDC, ch 2, 2 HDC] in same sp, *2 HDC in each of the next 9 ch sps, [2 HDC, ch 2, 2HDC] in corner. repeat from * around. Sl st to beg. ch up 2. Fasten off.
As I make progress on the costumes that I am designing for Nate and myself for Halloween, I was puzzled over how to make a pair of Beast Mitts. I pooled over ideas of what would work, what would be comfortable for an evening of partying with our friends, what would look like a pair of paws with claws? All these questions are answered in this pair of open finger gloves.
These mitts are not meant for freezing temperature days. Just by appearance, it’s obvious why. These are strictly for costume purpose. However, but omitting the finger/claws you would have a basic pair of fingerless gloves or hand warmers.
I used Red Heart Boutique Fur to cover these paws. You are free to use creative choices for the type of fur you would like to use. You can create a different look by using different types of furs.
The pattern can be adjusted for any size hand. In my video, I created this pair to fit a larger sized man-hand. With easy math, you can make this pattern from child size to an XL hand size. Have fun with this costume/prop accessory. It is perfect for so many designs – wildcats, bears, lions, werewolves, beasts, monsters, etc.
Designed by Nadia Fuad You *may* sell items made from my pattern, but please reference my website YARNutopia.com.
Please do not copy, sell, and/or post this pattern and claim it as your own.
NOTES:
-The pattern video tutorial starts at 7 minutes and 22 seconds. The first 7 minutes are frequently asked questions and other information.
-You can use any yarn that is a worsted weight or a Double Knitting (DK) yarn to make these gloves
-This pattern is written for an adult size, but if you watch the whole video tutorial, I explain how to make these bigger or smaller.
-You can use a smaller or larger hook to make this square depending on your tension.
-This took me about 3 hours to complete
-This video tutorial shows only the Right Hand, but with simple modifications, you can make the left hand.
Special stitches:
Ch(s): chain(s)
YO: Yarn Over
St(s): Stitch(es)
Sl st: slip stitch
SK: Skip
SC: Single Crochet
HDC: Half Double Crochet
DC: Double Crochet
Pattern:
If you have any confusion or difficulty with reading this pattern, please watch the video tutorial to have visual instructions.
Fingerless Glove:
Ch 26 Row 1: Sc in 2nd ch from hook and across, ch 1, turn Rows 2-32: SC in each st across, ch 1 turn.
Fasten off with long tail.
Sew the seam up the side, leaving a space for a thumb hole (See video tutorial for visual instructions)
Fingers: Index Finger: Ch 1, SC in next 4, [ch 2, turn, DC across] 5 times. Fasten off.
Middle Finger: Ch 1, SC in next 4, [Ch 2, Turn, DC across] 5 times. Fasten off.
Ring Finger: Ch 1, SC in next 4, [Ch 2, Turn, DC across] 4 times, ch 2, HDC across. Fasten off.
Pinky: Ch 1, sc in next 4, [Ch 2, Turn, DC across] 3 times. Fasten off.
Thumb: Ch 1, sc around thumb (5 sts), [Ch 2, Turn, DC across] 3 times. Fasten off.
Make Chain Straps to hold fingers in place (See video tutorial to make these)
Claws: Make 10 (Work in continuous rounds)
With Black
Ch 2
Rnd 1: SC 4 in 2nd ch from hook. (4)
Rnd 2: SC in each st. (4)
Rnd 3: 2 SC in next st, 1 sc in next 3 sts. (5)
Rnd 4: 2 SC in next st, 1 sc in next 4 sts. (6)
Rnd 5: 2 SC in next st, 1 sc in next 5 sts. (7)
Rnd 6: 2 SC in next st, 1 sc in next 6 sts. (8)
Fasten off with long tail for sewing.
Sew claws to the tips of the fingers. See video tutorial for visual instructions.
Add fur to the back of the hand by weaving it throughout the hand with a yarn needle. See video tutorial for more visual instructions.
This post contains affiliate links, which means if you click on the link and buy from the linked websites, I will receive a small percentage of the value of your order. The amount you pay is not changed.
I created this Sublime Light Granny Square design to add to our 365 Days of Granny Squares project. It uses variety of crochet stitches to create an interesting design! I hope you enjoy making your square!
A couple disclaimers before you start: Be sure to check your tension and use the correct size hook for your square. I demonstrate with an H-5.00mm crochet hook in the video tutorial, but you can make yours bigger or smaller by using a bigger or smaller hook. Also, if yours turns out wonky when you are finished, you may need to block this square to make it nice and flat.
Follow along with this video tutorial to make your granny square:
My dad will continue to be the videographer, editor, and photographer for our videos when I move away.
Support YARNutopia today so we can continue to bring you clear, quality crochet tutorials even after I move into my new home!
There will be an added expense of more travel and hopefully this won’t deter our ability to provide consistent videos on a weekly basis.
**You can always contact me via Facebook if you have any problems with the pattern. I am happy to help if you have any questions along the way.
***You can sell anything you make from my patterns, please just link back to my website YARNutopia.com. Thank you!
Teacher: Nadia Fuad
Video and Editing: Fuad Azmat (My Daddy)
Share your work on Facebook!
Add me on Snapchat: YARNutopia
Follow me on Instagram
Visit My Ravelry Store and add this to your Favorites!
Follow me on Twitter: @YARNutopia
Enjoy this video and subscribe to my channel on YouTube for more tutorials on how to crochet!
Leave a comment, and share with your friends!
Pattern:
Designed by Nadia Fuad You *may* sell items made from my pattern, but please reference my website YARNutopia.com.
Please do not copy, sell, and/or post this pattern and claim it as your own.
NOTES:
-You can use a smaller or larger hook to make this square depending on your tension. I wouldn’t use anything larger than an I-5.5mm Crochet Hook though.
-The finished square measures 6 inches.
-This square is worked from the center outward
Special stitches:
Ch(s): chain(s)
YO: Yarn Over
St(s): Stitch(es)
Sl st: slip stitch
SK: Skip
SC: Single Crochet
HDC: Half-Double Crochet
DC: Double Crochet
Beg. Cluster: Ch 3, [Y/O, Insert Hook in sp, YO pull through, YO pull through 2 loops] 3 times, Y/O pull through all 4 loops on hook
Cluster: [Y/O, Insert Hook in sp, YO pull through, YO pull through 2 loops] 4 times, Y/O pull through all 5 loops on hook
Pattern:
If you have any confusion or difficulty with reading this pattern, please watch the video tutorial to have visual instructions.
Ch 4, sl st to 1st ch to form a ring.
Rnd 1: Ch up 1, 12 SC in ring, sl st to 1st sc. (12 sc)
Rnd 2: Sl st in each st around. (see video tutorial to see how to fasten off this round) (12 sl sts)
Rnd 3: Working in the stitches of round 1: In any stitch, ch up 1, 2 SC in each st around. Sl st to first sc of this round. Fasten off. (24 sc)
Rnd 4: In any stitch: Ch 1, SC in same st, * Ch 2, Sk 1 st, SC in next st, repeat from * around. Sl st to 1st sc of this round. Fasten off. (12 Ch sps)
Rnd 5: In any ch 2 sp: Beg. Cluster st, * Ch 3, Cluster in next ch sp, repeat from * around, sl st to beg. cluster. Fasten off.
Rnd 6: In any ch 3 sp, * Ch 5, sl st in same ch sp, ch 5, sl st in next ch sp, repeat from * around. sl st to 1st ch of beg. ch 5.
Rnd 7: In any ch 5 sp above a cluster st: Ch 3, [3DC, ch 2, 4 DC] in same sp, * Ch 1, sc in next ch sp, ch 2, SC in next ch sp, ch 2, sc in next sp, ch 2, sc in next sp, ch 2, sc in next sp, ch 1, [4DC, ch 2, 4DC] in next sp. repeat from * around. Sl st to beg. ch up 3.
Rnd 8: In any corner: Ch 3 [DC, ch2, 2DC] in same sp, DC in next st, ch 1, sk 1 st, *DC in next st, [ch 1, sk 1, DC in next ch 1 sp] 6 times, ch 1, sk 1 st, DC in next st, ch 1, sk 1 st, DC in next st, [2DC, CH2, 2DC] in corner, repeat from * around. Sl st to beg ch up 3. Fasten off.
This post contains affiliate links, which I may be compensated for when you make a purchase. That means if you click on any link and buy from the linked websites, I will receive a small percentage of the value of your order. The amount you pay is not changed. Thank you for all your support in clicking the links in my blog!! You all are so amazing!! ~Nadia
The yarn provided for this pattern is courtesy of Red Heart Yarns
Many times I have made suggestions of ideas on what you can make using the squares from our 365 Days of Granny Squares. Recently, I designed the Spinning Spider Granny Square (Number 266) and The Web We Weave Granny Square (Number 246). I began thinking about a project that I could make to tie these two in together that would work for a table runner or other Halloween related item.
I decided to create a look that has the spider spinning from the web. Doing that required a bit of adjustment on the placement of the spider on the square. In my original Spinning Spider Granny Square Video Tutorial, I demonstrated how to make the square with the spider running vertically on the square. In the Table Runner, I made a few stitch adjustments, I turned the spider to go on a diagonal to achieve the desired results for my finished work, allowing me to run Slip Stitches creating a web strand from the bottom (spinneret) of my spider to the Web square. Please see the video tutorial for instructions below to make this adjustment.
Then, I created duplicate sets of square Numbers 246 and 266 of our 365 Days of Granny Squares to create the ends of our runner. I combined these blocks with the solid granny square (Number 2)that I used with various color combinations of black and orange or black and white to match the other squares in this project. Note: You do not have to make these adjustments nor use my colors. This is creator’s choice.
This video is a tutorial on how to assemble the squares and add the border detail to finish off this great Halloween table runner. You will find the links and videos to the squares that I have already filmed prior to this project. Not interested in the runner? Why not make additional squares to make a lapghan or blanket? Let your imagination be your guide.
**You can always contact me via Facebook if you have any problems with the pattern. I am happy to help if you have any questions along the way.
***You can sell anything you make from my patterns, please just link back to my website YARNutopia.com. Thank you!
Teacher: Nadia Fuad
Video and Editing: Fuad Azmat (My Daddy)
Share your work on Facebook!
Add me on Snapchat: YARNutopia
Follow me on Instagram
Visit My Ravelry Store and add this to your Favorites!
Follow me on Twitter: @YARNutopia
Enjoy this video and subscribe to my channel on YouTube for more tutorials on how to crochet!
Leave a comment, and share with your friends!
Pattern:
Designed by Nadia Fuad You *may* sell items made from my pattern, but please reference my website YARNutopia.com.
Please do not copy, sell, and/or post this pattern and claim it as your own.
Special stitches:
Ch(s): chain(s)
YO: Yarn Over
St(s): Stitch(es)
Sl st: slip stitch
SK: Skip
SC: Single Crochet
HDC: Half-Double Crochet
DC: Double Crochet
TR: Treble Crochet (YO twice)
BLO: Back Loop Only
FLO: Front Loop Only
Notes:
-This Table runner is 41 inches long (105 cm) and 20 inches wide (53 cm)
-You can attach your squares any way you’d like, I do the whip stitch, but you can do any stitch you prefer. Check out this blog post at the top, there is a video tutorial on different attaching methods
Follow along with this video tutorial to learn how to make this table runner:
Follow along with this video tutorial to learn how to make the Web We Weave Granny Square:
Solid Granny Square
Make 4:
Make rounds 1-2 in Orange
Make rounds 3-6 in Black
Make 2:
Make rounds 1-2 in White
Make rounds 3-6 in Black
For round 6 on the solid granny square, use Half Double Crochet instead of Double Crochet to have the same size as your other squares.
Follow along with this video tutorial to learn how to make a solid granny square:
Border
See video tutorial for starting point.
Sc in same sp, *sk 1 st, 5 DC in next, sk 1 st, sc in next, repeat from * until next corner, sc in next 2 sps, repeat from * again until end of table runner, put 5 DC in that space.
Again, watch the video tutorial for clear specific visual instructions.
This post contains affiliate links, which means if you click on the link and buy from the linked websites, I will receive a small percentage of the value of your order. The amount you pay is not changed.
I created this Autumn Flower Granny Square design to add to our 365 Days of Granny Squares project. It uses variety of crochet stitches to create an interesting design! I hope you enjoy making your square!
A couple disclaimers before you start: Be sure to check your tension and use the correct size hook for your square. I demonstrate with an H-5.00mm crochet hook in the video tutorial, but you can make yours bigger or smaller by using a bigger or smaller hook. Also, if yours turns out wonky when you are finished, you may need to block this square to make it nice and flat.
Follow along with this video tutorial to learn how to make this square:
**You can always contact me via Facebook if you have any problems with the pattern. I am happy to help if you have any questions along the way.
***You can sell anything you make from my patterns, please just link back to my website YARNutopia.com. Thank you!
Teacher: Nadia Fuad
Video and Editing: Fuad Azmat (My Daddy)
Share your work on Facebook!
Add me on Snapchat: YARNutopia
Follow me on Instagram
Visit My Ravelry Store and add this to your Favorites!
Follow me on Twitter: @YARNutopia
Enjoy this video and subscribe to my channel on YouTube for more tutorials on how to crochet!
Leave a comment, and share with your friends!
Pattern:
Designed by Nadia Fuad You *may* sell items made from my pattern, but please reference my website YARNutopia.com.
Please do not copy, sell, and/or post this pattern and claim it as your own.
Materials:
-Red Heart Super Saver Yarn in as many colors as you want.
-H-5.00mm Crochet Hook
-Yarn Needle
-Scissors
NOTES:
-You can use a smaller or larger hook to make this square depending on your tension. I wouldn’t use anything larger than an I-5.5mm Crochet Hook though.
-The finished square measures 6 inches.
-This square is worked from the center outward
Special stitches:
Ch(s): chain(s)
YO: Yarn Over
St(s): Stitch(es)
Sl st: slip stitch
SK: Skip
SC: Single Crochet
HDC: Half-Double Crochet
DC: Double Crochet
TR: Treble Crochet (YO twice)
BLO: Back Loop Only
FLO: Front Loop Only
BPSC: Back Post Single Crochet
FPHDC: Front Post Half Double Crochet
Pattern:
If you have any confusion or difficulty with reading this pattern, please watch the video tutorial to have visual instructions.
Ch 4, sl st to 1st ch to form a ring.
Rnd 1: Ch up 3 (counts as DC), 11 DC in ring, sl st to beg. ch up 3. (12 sts)
Fasten off.
Rnd 2: Attach yarn with BPSC around any st, ch 2, *BPSC around next st, ch 2, repeat from * around, sl st to first BPSC
Rnd 3: Ch 1, *FPHDC around BPSC, 3 DC in ch 2 sp, repeat from * around, sl st to 1st FPHDC. Fasten off.
Rnd 4: Work on sts from round 2: Attach yarn with BPSC around BPSC from round 2, *Ch 4, Sk next BPSC, BPSC around next BPSC from round 2, repeat from * around, sl st to first BPSC. (6 ch 4 sps)
Rnd 5: Ch 1, SC in same st, *[SC, HDC, 3 DC, HDC, SC] in ch 4 sp, SC in BPSC, repeat from * around, sl st to 1st SC.
Rnd 6: Ch 1, SC in same st, *2DC in next 7 sts, SC in next, repeat from * around, sl st to 1st sc. Fasten off.
Rnd 7: [BPSC, ch 4, BPSC] around BPSC from round 4, Ch 4, *[BPSC, ch 4, BPSC] around next BPSC from round 4, ch 4, repeat from * around, sl st to first BPSC. (12 ch 4 sps)
Rnds 8: In ch 4 sp: Ch 4 (counts as TR), [3TR ch 2, 4 TR] in same sp, *4 TR in next 2 ch sps, [4TR, ch 2, 4TR] in next ch sp, repeat from * around, sl st to ch up 4.
Rnd 9: In any corner: Ch up 3 (counts as DC), [2DC, ch 2, 3 DC] in same sp, DC in each st around, in corners, put [3DC, ch 2, 3DC] Sl st to beginning ch up 3.
Fasten off.
I created this Spinning Spider Granny Square design to add to our 365 Days of Granny Squares project. It uses variety of crochet stitches to create an interesting design! I hope you enjoy making your square!
This Spinning Spider Granny Square is a great match for The Web We Weave Granny Square! Make them both into a big blanket for a spooky afghan!
A couple disclaimers before you start: Be sure to check your tension and use the correct size hook for your square. I demonstrate with an H-5.00mm crochet hook in the video tutorial, but you can make yours bigger or smaller by using a bigger or smaller hook. Also, if yours turns out wonky when you are finished, you may need to block this square to make it nice and flat.
Follow along with this video tutorial to learn how to make this square:
**You can always contact me via Facebook if you have any problems with the pattern. I am happy to help if you have any questions along the way.
***You can sell anything you make from my patterns, please just link back to my website YARNutopia.com. Thank you!
Teacher: Nadia Fuad
Video and Editing: Fuad Azmat (My Daddy)
Share your work on Facebook!
Add me on Snapchat: YARNutopia
Follow me on Instagram
Visit My Ravelry Store and add this to your Favorites!
Follow me on Twitter: @YARNutopia
Enjoy this video and subscribe to my channel on YouTube for more tutorials on how to crochet!
Leave a comment, and share with your friends!
Pattern:
Designed by Nadia Fuad You *may* sell items made from my pattern, but please reference my website YARNutopia.com.
Please do not copy, sell, and/or post this pattern and claim it as your own.
NOTES:
-You can use a smaller or larger hook to make this square depending on your tension. I wouldn’t use anything larger than an I-5.5mm Crochet Hook though.
-The finished square measures 6 inches.
-This square is worked from the center outward
Special stitches:
Ch(s): chain(s)
YO: Yarn Over
St(s): Stitch(es)
Sl st: slip stitch
SK: Skip
SC: Single Crochet
HDC: Half-Double Crochet
DC: Double Crochet
TR: Treble Crochet (YO twice)
BLO: Back Loop Only
FLO: Front Loop Only
Pattern:
If you have any confusion or difficulty with reading this pattern, please watch the video tutorial to have visual instructions.
Ch 4, sl st to 1st ch to form a ring.
Rnd 1: Ch up 3 (counts as DC), 7 DC in ring, sl st to beg. ch up 3. (8)
Rnd 2: Ch up 3 (counts as DC), WORK IN FLO DC in same st, 2 DC in each st around. Sl st to beg. ch up 3. (16)
Rnd 3: [Ch 6, Sl st in 2nd ch from hook and next 4 ch’s, sl st in same st on round 2, sl st into next st] 4 times, SC in next st, 4 DC in next 2 sts, SC in next st, sl st in next st, [Ch 6, Sl st in 2nd ch from hook and next 4 ch’s, sl st in same st on round 2, sl st into next st] 4 times. Leave last 4 sts unworked. Fasten off.
Rnd 4: Attach yarn to unworked BLO of round 1. Ch up 3, (Counts as DC), DC in next, Ch 3, *DC in next 2 sts, ch 3, Repeat from * around, sl st to beg ch up 3.
Rnd 5: In any ch 3 sp: *[3DC, ch 2, 3 DC, ch 2], repeat from * in each ch 3 sp, sl st to beg ch up 3. (see video tutorial for visual instructions)
Rnd 6: In any corner: Ch 3 (counts as DC), [DC, ch 2, 2 DC] in same sp, * Ch 1, Sk 1, DC in next, ch 1, sk 1, [DC, ch 1, DC] in ch 2 sp, ch 1, sk 1, dc in next, ch 1, sk 1, [2DC, ch 2, 2 DC] in corner, repeat from * around. Sl st to beg. ch up 3.
Rnd 7: Start in a 2nd DC on the side: See video tutorial at minute 24 for specific location. Ch 1. SC in same st tacking down leg, sc in ch 1 sp, *sc in next dc tacking down leg, sc in ch 1 sp, sc in next dc tacking down leg, sc in ch 1 sp, sc in next 2 sts, [2sc, ch2, 2sc] in corner. sc in each st across to next corner. [2sc, ch 2, 2 sc] in next corner. sc in next 2 sts, sc in ch 1 sp, sc in next st tacking down leg, sc in ch 1 sp, sc in next dc tacking down leg, sc in ch 1 sp, repeat from * around. Ending with a sc in last ch 1 sp. sl st to 1st sc of this round.
Rnds 8 & 9: Ch up 3, DC in each st around, [2DC, ch 2, 2 DC] in each corner. sl st to beginning ch up 3.
A little over a month ago, I began to put this piece together. As I started to place the order of the granny squares, it suddenly made sense to artistically place them in a spiral pattern as if it is a path leading to a destination. After moving each piece around it made sense to have the ‘trail’ end with a big heart. Hence the name, Heart Will Lead You Home Blanket. Little did I know that it was taking me on the path of finding its way to meaning more than just a granny square blanket.
More than a blanket, it tells a story
Although it starts as a series of squares, sometimes a project becomes more than just that and takes on a life of it’s own. It becomes a piece of art or a purpose. This blanket was that and more for me! Using basic granny square stitches I connected my trail of squares that made up my spiral design. Then, using the same stitch, I completed the body of the blanket in 4 parts. Working inward from each side and up and down in the center, I was able to achieve the look I was hoping for. After that, I needed to frame it and the border had to tie this all together. I stumbled upon this border by Rainbow Knits and I knew that it would be the perfect addition. The border design was the right touch to finishing this off beautifully. Props to the designer for clear and precise instructions for helping me top off this blanket with such lovely detail. And, who doesn’t love hearts!?
There’s a reason
Earlier this year, I was visiting with Nate’s aunt and uncle, and during the conversation it came up about a community fundraising auction where the money raised would provide fresh water for villages in Uganda. Upon doing some research on this local (their small community of 9,100 people) organization, I found that it was created and run in memory of a young man who lost his life in a car accident at 17 years old. Runjesse.com provides aid to numerous causes throughout their community and the world.
I knew that I had to get involved so I reached out to the organizer who happens to be the mother of the young man who lost his life. I offered to donate my blanket to be auctioned off as part of their upcoming fundraiser in hopes that the money donated can provide fresh water to those in need. She was so gracious and kind. Through research, I saw her own efforts to make this happen in photos of her in the villages in Africa doing great works of providing water to remote areas. Do you realize that 8 Million people in Uganda don’t have access to safe water, and over 4,000 children die every year from diarrhea caused by unsafe water and poor sanitation?! It occurred to me that in this small community, one heart, one individual, surrounded by the support of a community and the world, can make a difference and make change locally and abroad. The heart border surrounding the trail leading to one heart at the end seemed so appropriate for this! It all made sense. It was perfectly symbolic. A family, a tiny community, can begin to heal by making such a positive impact out of a heartbreaking and tragic loss.
For anyone who has been through something life changing, tragic, or negative, taking that experience and turning it into good can be incredibly healing. It may NEVER take away the pain fully, but having purpose can make an enormous amount of difference in dealing with pain. Big or small, we all have the ability to help and support one another and even change the world in a small way.
This project has a larger purpose
As we come to the last few months of our granny squares, each blanket made has or will be donated or shared with someone in need or someone who will benefit from this work that I am doing. In my final blog, at the end of this year, I will provide more information on where each piece will hopefully find it’s way to and will continue until each square is included in a blanket and each blanket finds a home.
As always, thank you for being part of this 365 Day journey. Each stitch we share, each square we create, each project we complete is one step closer to making our world a little warmer place to be…
Much love, Nadia ♥
Below is the final blanket piece and the list of squares used.
I created this Diamond Block Granny Square design to add to our 365 Days of Granny Squares project. It uses variety of crochet stitches to create an interesting design! I hope you enjoy making your square!
A couple disclaimers before you start: Be sure to check your tension and use the correct size hook for your square. I demonstrate with an H-5.00mm crochet hook in the video tutorial, but you can make yours bigger or smaller by using a bigger or smaller hook. Also, if yours turns out wonky when you are finished, you may need to block this square to make it nice and flat.
Follow along with this video tutorial to learn how to make this granny square:
**You can always contact me via Facebook if you have any problems with the pattern. I am happy to help if you have any questions along the way.
***You can sell anything you make from my patterns, please just link back to my website YARNutopia.com. Thank you!
Teacher: Nadia Fuad
Video and Editing: Fuad Azmat (My Daddy)
Share your work on Facebook!
Add me on Snapchat: YARNutopia
Follow me on Instagram
Visit My Ravelry Store and add this to your Favorites!
Follow me on Twitter: @YARNutopia
Enjoy this video and subscribe to my channel on YouTube for more tutorials on how to crochet!
Leave a comment, and share with your friends!
Pattern:
Designed by Nadia Fuad You *may* sell items made from my pattern, but please reference my website YARNutopia.com.
Please do not copy, sell, and/or post this pattern and claim it as your own.
Materials:
-Red Heart Super Saver Yarn in as many colors as you want.
-H-5.00mm Crochet Hook
-Yarn Needle
-Scissors
NOTES:
-You can use a smaller or larger hook to make this square depending on your tension. I wouldn’t use anything larger than an I-5.5mm Crochet Hook though.
-The finished square measures 6 inches.
-This square is worked from the center outward
Special stitches:
Ch(s): chain(s)
YO: Yarn Over
St(s): Stitch(es)
Sl st: slip stitch
SK: Skip
SC: Single Crochet
HDC: Half-Double Crochet
DC: Double Crochet
TR: Treble Crochet (YO twice)
FPDC: Front Post Double Crochet
Pattern:
If you have any confusion or difficulty with reading this pattern, please watch the video tutorial to have visual instructions.
Ch 4, sl st to 1st ch to form a ring.
Rnd 1: Ch up 3 (counts as DC), 2 DC in ring. ch 2, 3DC in ring, ch 2, 3 DC in ring, ch 2, 3 DC in ring, ch 2, sl st to ch up 3.
Rnd 2: In any corner ch 2 sp: Ch 1, FPDC in st to the right of corner (See video tutorial for specific stitch), *HDC in next 3 sts, FPDC around DC after corner, CH 3, FPDC around DC before corner, Repeat from * ending with FPDC and ch 3. sl st to beg. FPDC.
Rnd 3: In any ch 3 corner sp: ch up 1, 2 SC in same sp, *SC in next st, HDC in next st, [2 DC, ch 2, 2 DC] in next, HDC in next, SC in next, 2 sc in ch 3 sp, repeat from * around. sl st to 1st sc. Fasten off.
Rnd 4: In any ch 2 corner sp: ch 1, 2 SC in same sp, * SC in next, HDC in next, DC in next 2, 2 TR in next, ch 2, 2 TR in next, DC in next 2 sts, HDC in next, SC in next, 2 SC in next ch sp, repeat from * around, sl st to beg. sc.
Rnd 5: Ch up 3, DC in each st around, in ch sps put [2dc, ch 2, 2 dc], sl st to beg ch up 3.
I created this Pastel Overload Granny Square design to add to our 365 Days of Granny Squares project. It uses variety of crochet stitches to create an interesting design! I hope you enjoy making your square!
A couple disclaimers before you start: Be sure to check your tension and use the correct size hook for your square. I demonstrate with an H-5.00mm crochet hook in the video tutorial, but you can make yours bigger or smaller by using a bigger or smaller hook. Also, if yours turns out wonky when you are finished, you may need to block this square to make it nice and flat.
Follow along with this video tutorial to learn how to make this granny square:
**You can always contact me via Facebook if you have any problems with the pattern. I am happy to help if you have any questions along the way.
***You can sell anything you make from my patterns, please just link back to my website YARNutopia.com. Thank you!
Teacher: Nadia Fuad
Video and Editing: Fuad Azmat (My Daddy)
Share your work on Facebook!
Add me on Snapchat: YARNutopia
Follow me on Instagram
Visit My Ravelry Store and add this to your Favorites!
Follow me on Twitter: @YARNutopia
Enjoy this video and subscribe to my channel on YouTube for more tutorials on how to crochet!
Leave a comment, and share with your friends!
Pattern:
Designed by Nadia Fuad You *may* sell items made from my pattern, but please reference my website YARNutopia.com.
Please do not copy, sell, and/or post this pattern and claim it as your own.
Materials:
-Red Heart Super Saver Yarn in as many colors as you want.
-H-5.00mm Crochet Hook
-Yarn Needle
-Scissors
NOTES:
-You can use a smaller or larger hook to make this square depending on your tension. I wouldn’t use anything larger than an I-5.5mm Crochet Hook though.
-The finished square measures 6.5 inches.
-This square is worked from the center outward
Special stitches:
Ch(s): chain(s)
YO: Yarn Over
St(s): Stitch(es)
Sl st: slip stitch
SK: Skip
SC: Single Crochet
HDC: Half-Double Crochet
DC: Double Crochet
TR: Treble Crochet (YO twice)
DTR: Double Treble Crochet (YO Three Times)
FPDTR: Front Post Double Treble
Pattern:
If you have any confusion or difficulty with reading this pattern, please watch the video tutorial to have visual instructions.
Ch 4, sl st to 1st ch to form a ring.
Rnd 1: Ch up 3 (counts as DC), 6DC in ring. sl st to beg. ch 3.
Rnd 2: In any st: Ch 3, DC in st to the right of ch up 3, DC in st to left of ch up 3, DC in same st as ch up 3, *DC in next free st, DC in prev. st. repeat from * around. Sl st to Ch up 3. (16 DC) If this round is confusing, see video tutorial for visual instructions.
Rnd 3: In any st, ch up 3, DC in next st, ch 3, *dc2tog, ch 3, repeat from * around, sl st to 1st DC.
Rnd 4: In any ch 3 sp: Beg. Cluster, *Ch 5, cluster in next ch 3 sp, repeat from * around, sl st to beg. cluster.
Rnd 5: Work in ch 3 sps from round 3: Ch up 6 (counts as TR + Ch 2), TR in same sp on other side of cluster, *TR in next ch 3 sp, Ch 2, TR in same sp on other side of cluster, repeat from * around, sl st to 4th ch of beg. ch 6.
Rnd 6: In any ch 2 sp: Ch 3 (counts as DC), [3 DC, ch 2, 4 DC] in same sp, * ch 2, 4 DC in next sp, ch 2, [4 DC, ch 2, 4 DC] in next sp, repeat from * around. sl st to beg ch up 3.
Rnd 7: ch up 1. sc in each st, 2 sc in each ch 2 sp, and [2sc, ch 2, 2sc] in each corner.
I created The Web We Weave Granny Square design to add to our 365 Days of Granny Squares project. It uses quite a few chain stitches to create a look of a spider web! You can make this with the traditional black and white colors or you can get crazy with it and use bright colors or make your square bigger and just increase your chains each round to make your web larger! I hope you enjoy making your square!
A couple disclaimers before you start: Be sure to check your tension and use the correct size hook for your square. I demonstrate with an H-5.00mm crochet hook in the video tutorial, but you can make yours bigger or smaller by using a bigger or smaller hook. Also, if yours turns out wonky when you are finished, you may need to block this square to make it nice and flat.
Watch this video tutorial to learn how to make this granny square:
My dad will continue to be the videographer, editor, and photographer for our videos when I move away.
Support YARNutopia today so we can continue to bring you clear, quality crochet tutorials even after I move into my new home!
There will be an added expense of more travel and hopefully this won’t deter our ability to provide consistent videos on a weekly basis.
**You can always contact me via Facebook if you have any problems with the pattern. I am happy to help if you have any questions along the way.
***You can sell anything you make from my patterns, please just link back to my website YARNutopia.com. Thank you!
Teacher: Nadia Fuad
Video and Editing: Fuad Azmat (My Daddy)
Share your work on Facebook!
Add me on Snapchat: YARNutopia
Follow me on Instagram
Visit My Ravelry Store and add this to your Favorites!
Follow me on Twitter: @YARNutopia
Enjoy this video and subscribe to my channel on YouTube for more tutorials on how to crochet!
Leave a comment, and share with your friends!
Pattern:
Designed by Nadia Fuad You *may* sell items made from my pattern, but please reference my website YARNutopia.com.
Please do not copy, sell, and/or post this pattern and claim it as your own.
NOTES:
-You can use a smaller or larger hook to make this square depending on your tension. I wouldn’t use anything larger than an I-5.5mm Crochet Hook though.
-The finished square measures 6.5 inches
-This square is worked from the center outward
Special stitches:
Ch(s): chain(s)
YO: Yarn Over
St(s): Stitch(es)
Sl st: slip stitch
SK: Skip
SC: Single Crochet
HDC: Half-Double Crochet
DC: Double Crochet
FPDC: Front Post Double Crochet
Pattern:
If you have any confusion or difficulty with reading this pattern, please watch the video tutorial to have visual instructions.
With Black:
SOLID GRANNY SQUARE:
Ch 4, sl st to beginning to form a ring
Rnd 1: Ch 4 (counts as DC + Ch 1 Sp), [DC, Ch 1] 7 times into ring. Sl st to 3rd ch of beg. ch 4. (8ch sps, 8 DC)
Rnd 2: Sl st into Ch sp, ch up 3, [2dc, ch 2, 3 dc] in same sp, *3dc in next ch sp, [3dc, ch 2, 3dc] in next ch sp, repeat from * around. Sl st to beg. ch up 3.
Rnd 3-5: Ch up 3, DC in each st around putting [2DC, ch 2, 2 DC] in corners
WEB:
With white, Attach yarn in center ring (see video tutorial)
Rnd 1: Ch up 5 (counts as DC + Ch 2 sp), [DC, ch 2] 7 times in center ring, sl st to 3rd ch of beg. ch 5. If this gets confusing, see the video tutorial, it explains it a lot better.
Rnd 2: Ch 1, FPDC around ch up 3, [ch 3, FPDC around next st] 7 times, ch 3, sl st around FPDC
Rnd 3: Ch 1, FPDC around FPDC, [ch 4, FPDC around next st] 7 times, ch 4, sl st around FPDC
Rnd 4: Ch 1, FPDC around FPDC, [ch 5, FPDC around next st] 7 times, ch 5, sl st around FPDC
Rnd 5: Ch 1, FPDC around FPDC, [ch 6, FPDC around next st] 7 times, ch 6, sl st around FPDC
Rnd 6: Ch 1, FPDC around FPDC, [ch 7, FPDC around next st] 7 times, ch 7, sl st around FPDC
Rnd 7: Ch 1, FPDC around FPDC, [ch 8, FPDC around next st] 7 times, ch 8, sl st around FPDC
Rnd 8: Sl st into ch 8 sp, Sc in center st on background square and in next sts until the corner working in the ch sp and in each st (see video tutorial for visual instructions), *In corner, work in the FPDC st and in the corner ch 2 sp and put [sc, ch 2, sc], then work in the next ch 8 sp and in the next 10 sts and put a sc in each st, then sc in the fpdc and in the st behind it on the background square, then work in the next ch 8 sp and in the rest of the sts on the side until you get to the corner and then repeat from * around.
This post contains affiliate links, which means if you click on the link and buy from the linked websites, I will receive a small percentage of the value of your order. The amount you pay is not changed.
The yarn provided for this pattern is courtesy of Red Heart Yarns
I created this Butterfly Effect Granny Square design to add to our 365 Days of Granny Squares project. It uses variety of crochet stitches to create a look of a 3D Butterfly! You can make this with two-toned wings or have the wings be one color! This square turned out to be a little larger (8 1/2 inches) but if you use a smaller hook this square may turn out to be 6 or 7 inches. I hope you enjoy making your square!
A couple disclaimers before you start: Be sure to check your tension and use the correct size hook for your square. I demonstrate with an H-5.00mm crochet hook in the video tutorial, but you can make yours bigger or smaller by using a bigger or smaller hook. Also, if yours turns out wonky when you are finished, you may need to block this square to make it nice and flat.
Watch this video tutorial to learn how to make this square:
**You can always contact me via Facebook if you have any problems with the pattern. I am happy to help if you have any questions along the way.
***You can sell anything you make from my patterns, please just link back to my website YARNutopia.com. Thank you!
Teacher: Nadia Fuad
Video and Editing: Fuad Azmat (My Daddy)
Share your work on Facebook!
Add me on Snapchat: YARNutopia
Follow me on Instagram
Visit My Ravelry Store and add this to your Favorites!
Follow me on Twitter: @YARNutopia
Enjoy this video and subscribe to my channel on YouTube for more tutorials on how to crochet!
Leave a comment, and share with your friends!
My dad will continue to be the videographer, editor, and photographer for our videos when I move away.
Support YARNutopia today so we can continue to bring you clear, quality crochet tutorials even after I move into my new home!
There will be an added expense of more travel and hopefully this won’t deter our ability to provide consistent videos on a weekly basis.
Pattern:
Designed by Nadia Fuad You *may* sell items made from my pattern, but please reference my website YARNutopia.com.
Please do not copy, sell, and/or post this pattern and claim it as your own.
NOTES:
-You can use a smaller or larger hook to make this square depending on your tension. I wouldn’t use anything larger than an I-5.5mm Crochet Hook though.
-The finished square measures 8.5 inches.
-This square is worked from the center outward
Special stitches:
Ch(s): chain(s)
YO: Yarn Over
St(s): Stitch(es)
Sl st: slip stitch
SK: Skip
SC: Single Crochet
HDC: Half-Double Crochet
DC: Double Crochet
TR: Treble Crochet (YO twice)
Beg. Popcorn: ch up 3, 4 DC in same st, remove hook from loop, insert hook in 1st st, put loop back on hook and pull through.
Popcorn: 5 DC in same st, remove hook from loop, insert hook in 1st st, put loop back on hook and pull through.
Beg. TR Popcorn: ch up 4, 6 TR in same st, remove hook from loop, insert hook in 1st st, put loop back on hook and pull through.
Picot: ch 3, sl st in 3rd ch from hook
Pattern:
If you have any confusion or difficulty with reading this pattern, please watch the video tutorial to have visual instructions.
Ch 4, sl st to beginning to form a ring
Rnd 1: Beg. Popcorn in ring, ch 2, 3DC in ring, ch 2, 3 DC in ring, ch 2, Popcorn in ring, Ch 2, [3DC, ch 2, 3DC] in ring, ch 2, sl st to beg. popcorn.
Rnd 2: Beg. Popcorn in popcorn, ch 2, Dc in ch 2 sp, DC in the next 3 sts, [2dc, ch 2, 2dc] in corner, dc in next 3 sts, DC in ch 2 sp, ch 2, Popcorn in Popcorn, ch 2, DC in ch 2 sp, DC in next 3 sts, [2dc, ch 2, 2dc] in corner, DC in next 3 sts, DC in ch 2 sp, Ch 2, sl st to beg. popcorn.
Rnd 3: Beg. Popcorn in popcorn, ch 2, DC in ch 2 sp, DC in next 6 sts [2DC, ch 2, 2DC] in corner, DC in next 6 sts, DC in ch 2 sp, ch 2, popcorn in popcorn, ch 2, DC in ch 2 sp, DC in next 6 sts, [2DC, ch 2, 2 DC] in corner, DC in 6 sts, DC in ch 2 sp, ch 2, sl st to Beg. Popcorn st.
Rnd 4: Beg. TR Popcorn in popcorn st, ch 2, dc in ch 2 sp, dc in next 9 sts [2 DC, ch 2, 2 DC] in corner, dc in next 9 sts, dc in ch 2 sp, ch 2, Popcorn in Popcorn, Ch 2, DC in ch 2 sp, DC in 9 sts, [2DC, ch 2, 2 DC] in corner, DC in next 9 sts, DC in ch 2 sp, Ch 2, sl st to Beg. TR Popcorn.
Rnd 5: Sl st into ch 2 sp after TR Popcorn, Ch 3, DC in same sp, DC in next 12 sts, [2 DC, ch 2, 2 DC] in corner, DC in next 12 sts, 2 DC in ch 2 sp, Ch 2, Popcorn in popcorn, Ch 2, 2 DC in ch 2 sp, DC in next 12 sts, [2DC, ch 2, 2 DC] in corner, DC in next 12 sts, 2 DC in ch 2 sp, ch 2, sl st to beg. ch up 3.
Rnd 6: Ch 3, DC in next 15 sts, [2DC, ch 2, 2 DC] in corner, *DC in 16 sts, [2 DC, ch 2, 2 DC] in corner, repeat from * 2 more times, sl st to ch up 3. (If this round is confusing, see video tutorial)
Rnd 7: Ch up 3, DC in next 17 sts, [2 DC, ch 2, 2 DC] in corner. * DC in next 20 sts, [2 DC, ch 2, 2 DC] in corner, repeat from * 2 more times, DC in last 2 sts, Sl st to ch up 3.
Rnd 8: Sc in each st around putting [2sc, ch 2, 2 sc] in corners.
Fasten off. Weave in ends.
Wings: (See video tutorial for visual instructions)
Right wing:
Attach yarn with long tail for sewing later
Sl st around a DC in a popcorn st from round 3 toward the bottom of the butterfly body.
Row 1: Ch 4, sl st in both popcorn sts from round 1, ch 6, sl st in popcorn below the head. ch 1 turn.
Row 2: [5DC, TR, Picot, TR, 9 DC] in ch 6 sp, sl st in next 2 sl sts, [6 HDC, 2 DC, 3 HDC] In ch 4 sp, sl st in ch 4 sp, ch 1 turn.
Row 3: HDC in 11 sts, Sl st in next 2 sl sts, DC in 9 sts, [DC, Picot, DC] in picot, DC in next 6 sts and sl st in last st also. Fasten off with long tail.
Sew wing down flat. Weave in all ends.
Left wing:
Attach yarn with long tail for sewing later
Row 1: Sl st in popcorn st below the head. Ch 6, sl st in both popcorn sts from round 1, ch 4, sl t in popcorn st from round 3, ch 1 turn.
Row 2: [3HDC, 2 DC, 6HDC] in ch 4 sp, sl st in next 2 sl sts, [9DC, TR, Picot, TR, 5 DC] in ch 6 sp, sl st in ch 6 sp, ch 1 turn.
Row 3: DC in 6 sts, [DC, Picot, DC] in Picot, DC in 9 sts, sl st in next 2 sl sts, HDC in 11 sts, sl st in last st also. Fasten off with long tail.
Sew wing down flat. Weave in all ends.
Feelers/Antennae
With long tail, make slip knot
Ch 3, sl st in 3rd ch from hook, ch 3, sl st around Beg. TR Popcorn Stitch, ch 6, sl st in 3rd ch from hook, fasten off with long tail. Sew feelers down flat.
Fasten off, Weave in ends.
Enjoy!!
This post contains affiliate links, which I may be compensated for when you make a purchase. That means if you click on any link and buy from the linked websites, I will receive a small percentage of the value of your order. The amount you pay is not changed. Thank you for all your support in clicking the links in my blog!! You all are so amazing!! ~Nadia
The yarn provided for this pattern is courtesy of Red Heart Yarns
I created this Snail’s Pace Granny Square design to add to our 365 Days of Granny Squares project. It uses variety of crochet stitches to create a snail in a square! It’s for times in your life when you feel like you’re moving at a snail’s pace, but hey, at least you’re moving forward! I hope you enjoy making your square!
A couple disclaimers before you start: Be sure to check your tension and use the correct size hook for your square. I demonstrate with an H-5.00mm crochet hook in the video tutorial, but you can make yours bigger or smaller by using a bigger or smaller hook. Also, if yours turns out wonky when you are finished, you may need to block this square to make it nice and flat.
Follow along with this video tutorial to learn how to make this granny square:
My dad will continue to be the videographer, editor, and photographer for our videos when I move away.
Support YARNutopia today so we can continue to bring you clear, quality crochet tutorials even after I move into my new home!
There will be an added expense of more travel and hopefully this won’t deter our ability to provide consistent videos on a weekly basis.
**You can always contact me via Facebook if you have any problems with the pattern. I am happy to help if you have any questions along the way.
***You can sell anything you make from my patterns, please just link back to my website YARNutopia.com. Thank you!
Teacher: Nadia Fuad
Video and Editing: Fuad Azmat (My Daddy)
Share your work on Facebook!
Add me on Snapchat: YARNutopia
Follow me on Instagram
Visit My Ravelry Store and add this to your Favorites!
Follow me on Twitter: @YARNutopia
Enjoy this video and subscribe to my channel on YouTube for more tutorials on how to crochet!
Leave a comment, and share with your friends!
Pattern:
Designed by Nadia Fuad You *may* sell items made from my pattern, but please reference my website YARNutopia.com.
Please do not copy, sell, and/or post this pattern and claim it as your own.
NOTES:
-You can use a smaller or larger hook to make this square depending on your tension. I wouldn’t use anything larger than an I-5.5mm Crochet Hook though.
-The finished square measures 6.5 inches.
-This square is worked from the center outward
If you have any confusion or difficulty with reading this pattern, please watch the video tutorial to have visual instructions.
With color A, Ch 4, sl st to 1st ch to form a ring.
Rnd 1: Ch up 1, 3 sc in ring, pull up loop and drop, with color B, 3 sc in ring (work in a continuous round)
Rnd 2: 2 HDC in next st, 2 B3 in next, 2 B3 in next, 1 B3 in next st, pull up loop and drop, Go back to color A, ch 1, [sc in next st, 2sc in next st] 5 times, 2sc in next 2 sts
Rnd 3: Put color B loop on hook, 2 B4 in next 14 sts, fasten off color B, pick up loop from color A, 1 HDC in next 21 sts, ch 4, sl st into 2nd ch from hook, sc in next ch, hdc in next ch, hdc around hdc post of previous stitch, HDC in the next 7 sts, LDC in next 4 sts from previous round, Ch 3, sl st into next st, ch 6, DC4TOG over Chain, sl st to the ch 3 that you sl st’d to the spiral. Fasten off.
Rnd 4: Start in 2nd st to the right of the tail: CH 3, DC in same st, DC in next st, DC in the HDC that’s worked around the post (See video tutorial), [DC, ch 2, DC] in next st, DC in next 7 sts, [DC, ch 2, DC] in next st, DC in next st, HDC in next st, SC in next st, CH 1, DC in next st after the head, DC in next 3 sts, [DC, ch 2, DC] in next st, DC in next 7 sts, [DC, ch 2, DC] in next st, DC in last 3 sts.
Rnd 5: Ch up 3, DC in each st around, [2 DC, ch 2, 2DC] in corners
Rnd 6: Repeat round 5
Fasten off.
Antennae:
Ch 3, sl st into 3rd ch from hook, ch 8, sl st in 3rd ch from hook, fasten off with long tail. sew to square, (See video tutorial for visual instructions)
Enjoy!!
This post contains affiliate links, which I may be compensated for when you make a purchase. That means if you click on any link and buy from the linked websites, I will receive a small percentage of the value of your order. The amount you pay is not changed. Thank you for all your support in clicking the links in my blog!! You all are so amazing!! ~Nadia
The yarn provided for this pattern is courtesy of Red Heart Yarns
I created this In the Garden Granny Square design to add to our 365 Days of Granny Squares project. It uses variety of crochet stitches to create an interesting floral design! I hope you enjoy making your square!
A couple disclaimers before you start: Be sure to check your tension and use the correct size hook for your square. I demonstrate with an H-5.00mm crochet hook in the video tutorial, but you can make yours bigger or smaller by using a bigger or smaller hook. Also, if yours turns out wonky when you are finished, you may need to block this square to make it nice and flat.
Follow along with this video tutorial to learn how to make this granny square:
My dad will continue to be the videographer, editor, and photographer for our videos when I move away.
Support YARNutopia today so we can continue to bring you clear, quality crochet tutorials even after I move into my new home!
There will be an added expense of more travel and hopefully this won’t deter our ability to provide consistent videos on a weekly basis.
**You can always contact me via Facebook if you have any problems with the pattern. I am happy to help if you have any questions along the way.
***You can sell anything you make from my patterns, please just link back to my website YARNutopia.com. Thank you!
Teacher: Nadia Fuad
Video and Editing: Fuad Azmat (My Daddy)
Share your work on Facebook!
Add me on Snapchat: YARNutopia
Follow me on Instagram
Visit My Ravelry Store and add this to your Favorites!
Follow me on Twitter: @YARNutopia
Enjoy this video and subscribe to my channel on YouTube for more tutorials on how to crochet!
Leave a comment, and share with your friends!
Pattern:
Designed by Nadia Fuad You *may* sell items made from my pattern, but please reference my website YARNutopia.com.
Please do not copy, sell, and/or post this pattern and claim it as your own.
NOTES:
-You can use a smaller or larger hook to make this square depending on your tension. I wouldn’t use anything larger than an I-5.5mm Crochet Hook though.
-The finished square measures 6.5 inches.
-This square is worked from the center outward
Special stitches:
Ch(s): chain(s)
YO: Yarn Over
St(s): Stitch(es)
Sl st: slip stitch
SK: Skip
SC: Single Crochet
HDC: Half-Double Crochet
DC: Double Crochet
TR: Treble Crochet (YO twice)
DTR: Double Treble Crochet (YO Three Times)
FPDTR: Front Post Double Treble
Pattern:
If you have any confusion or difficulty with reading this pattern, please watch the video tutorial to have visual instructions.
Ch 4, sl st to 1st ch to form a ring.
Rnd 1: Ch up 1, 12 sc in ring. sl st to 1st sc.
Rnd 2: In any st: Ch 1, sc in same st, *ch 2, sc in next st, ch 2, sk 1 st, sc in next st, repeat from * around. sl st to 1st sc.
Rnd 3: In a corner ch 2 sp (see video tutorial for specific location): *Ch 3, 3DC in same sp, ch 3, sl st in same sp, 2sc in next ch 2 sp, sl into next ch sp, repeat from * around, sl st to beg. ch of beg. ch up 3.
Rnd 4: Sl st around the beg. ch up 3 from prev. round: Ch 1, 3 sc around beg. ch 3. *HDC in next 3 sts, 3sc around next ch 3, ch 2, 3 sc around next ch up 3, repeat from * around, sl st to 1st sc. Fasten off.
Rnd 5: In any 1st sc of 2sc grouping from round 3: *Ch 4, sl st in next sc, ch 5, sl st in next sc, repeat from * around, sl st to 1st ch of beg. ch 4.
Rnd 6: In ch 4 sp on side: Ch 1, *[SC, HDC, DC, Picot, DC, HDC, SC] in ch 4 sp, [3sc, ch 2, sc] in ch 5 sp, repeat from * around. sl st to 1st sc of this round. Fasten off.
Rnd 7: In corner ch 2 sp: Ch 4, [TR, ch 2, 2 TR] in same corner sp, *Sk 1 st, TR in next, Ch 1, SC in picot, Ch 1, SK next 4 sts, TR in next, SK 1 st, [2TR, ch 2, 2 TR] in corner, repeat from * around, sl st to beg. ch up 4.
Rnd 8: In any corner: Ch 1, *sc in corner, FPDTR around middle DC of petal from round 3, ch 2, FPDTR around middle DC of petal again, SC in same corner on round 7, sc in next 3 sts, sc in ch 1 sp, DTR in skipped st from round 1, sc in ch 1 sp and in next 3 sts, repeat from * around. Sl st to beg. sc.
Rnd 9: In any corner: Ch 3 (counts as DC) [DC, ch 2, 2 DC] in same corner sp, *DC in each st on side, [2DC, ch 2, 2DC] in corner, repeat from * around, sl st to beg. ch up 3. Fasten off. Weave in all ends.
This post contains affiliate links, which I may be compensated for when you make a purchase. That means if you click on any link and buy from the linked websites, I will receive a small percentage of the value of your order. The amount you pay is not changed. Thank you for all your support in clicking the links in my blog!! You all are so amazing!! ~Nadia
The yarn provided for this pattern is courtesy of Red Heart Yarns
I created this In Full Bloom Granny Square design to add to our 365 Days of Granny Squares project. It uses variety of crochet stitches including crocodile stitches to create an interesting floral design! I hope you enjoy making your square!
A couple disclaimers before you start: Be sure to check your tension and use the correct size hook for your square. I demonstrate with an H-5.00mm crochet hook in the video tutorial, but you can make yours bigger or smaller by using a bigger or smaller hook. Also, if yours turns out wonky when you are finished, you may need to block this square to make it nice and flat.
Follow along with this video tutorial to learn how to make this square:
My dad will continue to be the videographer, editor, and photographer for our videos when I move away.
Support YARNutopia today so we can continue to bring you clear, quality crochet tutorials even after I move into my new home!
There will be an added expense of more travel and hopefully this won’t deter our ability to provide consistent videos on a weekly basis.
**You can always contact me via Facebook if you have any problems with the pattern. I am happy to help if you have any questions along the way.
***You can sell anything you make from my patterns, please just link back to my website YARNutopia.com. Thank you!
Teacher: Nadia Fuad
Video and Editing: Fuad Azmat (My Daddy)
Share your work on Facebook!
Add me on Snapchat: YARNutopia
Follow me on Instagram
Visit My Ravelry Store and add this to your Favorites!
Follow me on Twitter: @YARNutopia
Enjoy this video and subscribe to my channel on YouTube for more tutorials on how to crochet!
Leave a comment, and share with your friends!
Pattern:
Designed by Nadia Fuad You *may* sell items made from my pattern, but please reference my website YARNutopia.com.
Please do not copy, sell, and/or post this pattern and claim it as your own.
NOTES:
-You can use a smaller or larger hook to make this square depending on your tension. I wouldn’t use anything larger than an I-5.5mm Crochet Hook though.
-The finished square measures 6.5 inches.
-This square is worked from the center outward
Special stitches:
Ch(s): chain(s)
YO: Yarn Over
St(s): Stitch(es)
Sl st: slip stitch
SK: Skip
SC: Single Crochet
HDC: Half-Double Crochet
DC: Double Crochet
TR: Treble Crochet (YO twice)
FPDC: Front Post Double Crochet
Crocodile Stitch: 5 FPDC up the post, ch 2, 5 FPDC down the next post
Pattern:
If you have any confusion or difficulty with reading this pattern, please watch the video tutorial to have visual instructions.
Rnd 1: Ch 5, sl st to 5th ch from hook, [ch 4, sl st in same ch] 3 times. (4 ch sps)
Rnd 2: In any ch sp: Ch 1, sc 6 times in each ch sp. sl st to 1st sc. (24 sc)
Rnd 3: in any 2nd sc from 6sc grouping: ch 1, sc in same st, *ch 2, sk 2 sts, sc in next, repeat from * around, sl st to 1st sc. (8 ch 2 sps)
Rnd 4: In ch sp on the side (see video tutorial for specific location): *[Ch 1, 3DC, sl st, 3DC, sl st, 3DC, sl st] in ch sp, sl st in next ch sp, SC in same ch sp, sl st into next ch sp, repeat from * around sl st to beg ch sp and sl st to 1st sc.
Rnd 5: In any sc: Ch 7 (counts as DC + Ch 4 sp), *SC in middle petal, ch 4, DC in next sc, ch 4, repeat from * around, sl st to 3rd ch of beg. ch 7. (8ch 4 sps)
Rnd 6: In any ch 4 sp: Ch up 3, 5 DC in same sp, *6 DC in next sp, ch 3, 6 DC in next sp, Repeat from * around, ending with ch 3, sl st to beg ch 3. Fasten off.
**Rnd 7 starts making the crocodile stitches. See video tutorial for visual instructions for this next part.**
Rnd 7: Starting at the bottom of a DC before a ch 3 sp: *Crocodile Stitch, ch 1, sk 3 sts, Crocodile Stitch, ch 1, sk 3 sts, Crocodile Stitch, SC in DC from Round 5, repeat from * around, sl st to beg. ch up 3.
Rnd 8: Working on sts from Round 6: DC in each st putting [2DC, ch 2, 2DC] in corners
Rnd 9: In any corner: Ch 1, *[3sc, ch 2, 3sc] in corner, sc in next st, sc in next st pinning down crocodile st from round 7, sc in next 5 sts, sc in next pinning down crocodile st, sc in next 6 sts, sc in next pinning down crocodile st, sc in next st, repeat from * around, sl st to beg. sc.
Fasten off. Weave in all ends.
Enjoy!!
This post contains affiliate links, which I may be compensated for when you make a purchase. That means if you click on any link and buy from the linked websites, I will receive a small percentage of the value of your order. The amount you pay is not changed. Thank you for all your support in clicking the links in my blog!! You all are so amazing!! ~Nadia
The yarn provided for this pattern is courtesy of Red Heart Yarns
I created this Charming Chain Granny Square design to add to our 365 Days of Granny Squares project. It uses variety of crochet stitches to create an interesting design using a lot of chains! I hope you enjoy making your square!
A couple disclaimers before you start: Be sure to check your tension and use the correct size hook for your square. I demonstrate with an H-5.00mm crochet hook in the video tutorial, but you can make yours bigger or smaller by using a bigger or smaller hook. Also, if yours turns out wonky when you are finished, you may need to block this square to make it nice and flat.
Watch this video tutorial to learn how to make this granny square:
My dad will continue to be the videographer, editor, and photographer for our videos when I move away.
Support YARNutopia today so we can continue to bring you clear, quality crochet tutorials even after I move into my new home!
There will be an added expense of more travel and hopefully this won’t deter our ability to provide consistent videos on a weekly basis.
**You can always contact me via Facebook if you have any problems with the pattern. I am happy to help if you have any questions along the way.
***You can sell anything you make from my patterns, please just link back to my website YARNutopia.com. Thank you!
Teacher: Nadia Fuad
Video and Editing: Fuad Azmat (My Daddy)
Share your work on Facebook!
Add me on Snapchat: YARNutopia
Follow me on Instagram
Visit My Ravelry Store and add this to your Favorites!
Follow me on Twitter: @YARNutopia
Enjoy this video and subscribe to my channel on YouTube for more tutorials on how to crochet!
Leave a comment, and share with your friends!
Pattern:
Designed by Nadia Fuad You *may* sell items made from my pattern, but please reference my website YARNutopia.com.
Please do not copy, sell, and/or post this pattern and claim it as your own.
NOTES:
-You can use a smaller or larger hook to make this square depending on your tension. I wouldn’t use anything larger than an I-5.5mm Crochet Hook though.
-The finished square measures 6 inches.
-This square is worked from the center outward
Special stitches:
Ch(s): chain(s)
YO: Yarn Over
St(s): Stitch(es)
Sl st: slip stitch
SK: Skip
SC: Single Crochet
HDC: Half-Double Crochet
DC: Double Crochet
TR: Treble Crochet (YO twice)
Shell: 5 DC in same sp
Pattern:
If you have any confusion or difficulty with reading this pattern, please watch the video tutorial to have visual instructions.
Rnd 1:Ch 4, sl st to 1st ch to form a ring, ch 1, (sc, ch 2) 4 times in ring, sl st to beginning sc and sl st into ch 2 sp.
Rnd 2: Ch up 1, [sc, ch 2, sc] in same sp, * ch 2, [sc, ch 2, sc] in next ch sp, repeat from * around, sl st to 1st sc. Sl st into ch sp.
Rnd 3: Ch 1, turn, sc in same sp, * ch 3, [sc, ch 2, sc] in corner, repeat from * around, sl st to beg. sc. Turn.
Color Change.
Rnd 4: In corner, Ch 1, *[SC, ch 2, SC] in corner, Ch 2, DC in SC from Rnd 1, Ch 2, Repeat from * around, sl st to beg. sc.
Color Change
Rnd 5: In Corner, Ch 1, *[SC, ch 2, SC] in corner, Ch 7, Repeat from * around, sl st to beg sc.
Rnd 6: Sl st into corner, Turn, SC in same corner, * Ch 9 ,[SC, ch 2, SC] in corner, repeat from * ending with SC, ch 2 in corner, sl st to beg sc. turn.
Rnd 7: Sl st into corner, Ch 1, * [SC, Ch 2, SC] in corner, ch 11, repeat from * around, sl st to 1st sc.
Change Color
Rnd 8: In corner, Ch 1, *[SC, ch 2, SC] in corner, ch 6, DC in DC from rnd 4, Ch 6, repeat from * around, sl st to beg. sc.
Rnd 9: In corner, Ch 5 (counts as DC + Ch 2 sp), DC in same sp, *Sk sc, sc in 1st ch, sk 1 ch, shell in next ch, sk 1 ch, sc in next ch, sk 1 ch, shell in DC, sk 1 ch, sc in next ch, sk 1 ch, shell in next ch, sk 1 ch, sc in last ch, sk sc, [DC, ch 2, DC] in corner, repeat from * around, sl st to 3rd ch of beg. ch 5.
Rnd 10: In corner, ch 5, DC in same sp, *[ ch 2, HDC in sc, ch 2, sc in middle dc of shell] 3 times, ch 2, HDC in sc, ch 2, [DC, ch 2, DC] in corner, repeat from * around, sl st to 3rd ch of beg. ch 5.
Rnd 11: In corner, ch 3, [DC, ch 2, 2 DC] in same sp, 2 DC in each ch sp, [2DC, ch 2, 2DC] in corners, sl st to beg.
Enjoy!!
This post contains affiliate links, which I may be compensated for when you make a purchase. That means if you click on any link and buy from the linked websites, I will receive a small percentage of the value of your order. The amount you pay is not changed. Thank you for all your support in clicking the links in my blog!! You all are so amazing!! ~Nadia
The yarn provided for this pattern is courtesy of Red Heart Yarns
I created this Flower Bunch Granny Square design to add to our 365 Days of Granny Squares project. It uses variety of crochet stitches to create a garden-like look with the flowers in the round! I hope you enjoy making your square!
A couple disclaimers before you start: Be sure to check your tension and use the correct size hook for your square. I demonstrate with an H-5.00mm crochet hook in the video tutorial, but you can make yours bigger or smaller by using a bigger or smaller hook. Also, if yours turns out wonky when you are finished, you may need to block this square to make it nice and flat.
Follow along with this video tutorial to learn how to make this granny square:
**You can always contact me via Facebook if you have any problems with the pattern. I am happy to help if you have any questions along the way.
***You can sell anything you make from my patterns, please just link back to my website YARNutopia.com. Thank you!
Teacher: Nadia Fuad
Video and Editing: Fuad Azmat (My Daddy)
Share your work on Facebook!
Add me on Snapchat: YARNutopia
Follow me on Instagram
Visit My Ravelry Store and add this to your Favorites!
Follow me on Twitter: @YARNutopia
Enjoy this video and subscribe to my channel on YouTube for more tutorials on how to crochet!
Leave a comment, and share with your friends!
Pattern:
Designed by Nadia Fuad You *may* sell items made from my pattern, but please reference my website YARNutopia.com.
Please do not copy, sell, and/or post this pattern and claim it as your own.
Materials:
-Red Heart Super Saver Yarn in as many colors as you want.
-H-5.00mm Crochet Hook
-Yarn Needle
-Scissors
NOTES:
-You can use a smaller or larger hook to make this square depending on your tension. I wouldn’t use anything larger than an I-5.5mm Crochet Hook though.
-The finished square measures 6 inches.
-This square is worked from the center outward
Special stitches:
Ch(s): chain(s)
YO: Yarn Over
St(s): Stitch(es)
Sl st: slip stitch
SK: Skip
SC: Single Crochet
HDC: Half-Double Crochet
DC: Double Crochet
TR: Treble Crochet (YO twice)
Beg. Popcorn: ch up 3, 4 DC in same st, remove hook from loop, insert hook in 1st st, put loop back on hook and pull through.
Popcorn: 5 DC in same st, remove hook from loop, insert hook in 1st st, put loop back on hook and pull through.
Cluster: YO, insert hook, YO pull through, YO pull through 2, YO, insert hook, YO pull through, YO pull through 2, YO, insert hook, YO pull through, YO pull through 2, YO pull through all 4 loops on hook. Cluster made.
Pattern:
If you have any confusion or difficulty with reading this pattern, please watch the video tutorial to have visual instructions.
Rnd 1: Grab 12 strands of yarn that are about 8 inches, then make a ring with them (see video tutorial), and crochet 36 sc in the ring, sl st to beg. sc. (36 sc)
Rnd 2: In any ch st, SC in 4 sts, *ch 5, 10 sc in 2nd ch from hook, sl st to 1st sc, ch 1, 3sc in same st, (sl st to next st, 3 sc in next st) 4 times. sl st to beg petal, sc down the 3 chs of the stem, sc in next 4 sts from rnd 1, repeat from * around ending with sc in last 4 sts, sl st to beginning sc. Fasten off. (You can sew the centers of your flowers closed, see video tutorial for specifications)
Rnd 3: Start in a st before a stem, (See video tutorial for placement), Ch 6 (counts as dc + ch 3), sk over flower stem, DC in next 8 sts, *ch 3, DC in next 8 sts, working behind flowers, repeat from * around, ending with DC in last 7 sts, sl st to 3rd ch of beg. ch 6.
Rnd 4: In corner, Ch 1, *[3 sc, ch 2, 3 sc] in corner, sc in next 4 sts, ch 5, 10 sc in 2nd ch from hook, sl st to 1st sc, ch 1, 3sc in same st, (sl st to next st, 3 sc in next st) 4 times. sl st to beg petal, sc down the 3 chs of the stem, sc in next 4 sts, repeat from * around. sl st to beg. sc.
Rnd 5: In any corner, ch 3, [DC, ch 2, 2 DC] in same corner, *[sk st, DC in next, DC in sk’d st (working in front of the dc you made)] 3 times, dc in next st before stem/flower, DC in st after stem/flower, [sk st, dc in next, dc in sk’d st (working behind the dc you made)] 3 times, [2 DC, ch 2, 2 DC] in corner, repeat from * around
Rnd 6: In any corner, ch 3, [DC, ch 2, 2 DC] in same corner, *[sk st, dc in next, dc in sk’d st] repeat until you get to next corner, [2 dc, ch 2, 2 dc] in next corner, repeat from * around. sl st to beg. ch up 3.
Fasten off, Weave in ends.
Make French knots in the center of your flowers and tack them down. See video tutorial for visual instructions.
I created this Cornershop Granny Square design to add to our 365 Days of Granny Squares project. It uses variety of crochet stitches to create a look with popping corners! I hope you enjoy making your square!
A couple disclaimers before you start: Be sure to check your tension and use the correct size hook for your square. I demonstrate with an H-5.00mm crochet hook in the video tutorial, but you can make yours bigger or smaller by using a bigger or smaller hook. Also, if yours turns out wonky when you are finished, you may need to block this square to make it nice and flat
Follow along with this video tutorial to learn how to make this square:
**You can always contact me via Facebook if you have any problems with the pattern. I am happy to help if you have any questions along the way.
***You can sell anything you make from my patterns, please just link back to my website YARNutopia.com. Thank you!
Teacher: Nadia Fuad
Video and Editing: Fuad Azmat (My Daddy)
Share your work on Facebook!
Add me on Snapchat: YARNutopia
Follow me on Instagram
Visit My Ravelry Store and add this to your Favorites!
Follow me on Twitter: @YARNutopia
Enjoy this video and subscribe to my channel on YouTube for more tutorials on how to crochet!
Leave a comment, and share with your friends!
Pattern:
Designed by Nadia Fuad You *may* sell items made from my pattern, but please reference my website YARNutopia.com.
Please do not copy, sell, and/or post this pattern and claim it as your own.
Materials:
-Red Heart Super Saver Yarn in as many colors as you want.
-H-5.00mm Crochet Hook
-Yarn Needle
-Scissors
NOTES:
-You can use a smaller or larger hook to make this square depending on your tension. I wouldn’t use anything larger than an I-5.5mm Crochet Hook though.
-The finished square measures 6 inches.
-This square is worked from the center outward
Special stitches:
Ch(s): chain(s)
YO: Yarn Over
St(s): Stitch(es)
Sl st: slip stitch
SK: Skip
SC: Single Crochet
HDC: Half-Double Crochet
DC: Double Crochet
TR: Treble Crochet (YO twice)
Beg. Popcorn: ch up 3, 4 DC in same st, remove hook from loop, insert hook in 1st st, put loop back on hook and pull through.
Popcorn: 5 DC in same st, remove hook from loop, insert hook in 1st st, put loop back on hook and pull through.
Cluster: YO, insert hook, YO pull through, YO pull through 2, YO, insert hook, YO pull through, YO pull through 2, YO, insert hook, YO pull through, YO pull through 2, YO pull through all 4 loops on hook. Cluster made.
Pattern:
If you have any confusion or difficulty with reading this pattern, please watch the video tutorial to have visual instructions.
Ch 8, sl st to beginning to form a ring
Rnd 1: Ch 4 (counts as DC + Ch 1 sp), [Popcorn, ch 1, popcorn, ch 1, dc, ch 1] 4 times in ring. ending with a popcorn. sl st to 3rd ch of ch up 3. (See video tutorial for visual instructions)
Rnd 2: In any ch 1 sp between popcorn sts, ch 5 (counts as DC + ch 2 sps), DC in same sp, *ch 2, FPDC around DC from rnd 1, ch 2, [DC, ch 2, DC] in ch 1 sp between popcorns, repeat from * around, sl st to 3rd ch of beg. ch 5.
Rnd 3: In corner, Ch up 4, *[Cluster, ch 1] 2 times in next sp, [Cluster, ch 1] 2 times in next sp, [DC, ch 2, DC] in corner, repeat from * around, sl st to 3rd ch of beg ch 4.
Rnd 4: In corner, ch up 4, *Popcorn in ch 1 sp, ch 1, DC in next st, DC in ch 1 sp, DC in cluster, DC in ch 1 sp, DC in cluster, DC in ch 1 sp, DC in cluster, Ch 1, Popcorn in next ch 1 sp, Ch 1, [DC, ch 2, DC] in next corner, Ch 1, repeat from * around, sl st to 3rd ch of beg. ch 4.
Rnd 5: In any corner, ch up 3, [1DC, ch 2, 2 DC] in same corner, *2DC in next ch sp before popcorn, sk popcorn st, DC in next 7 sts, Sk popcorn st, 2 DC in ch 1 sp, [2DC, ch 2, 2 DC] in corner, repeat from * around. Sl st to beg. ch up 3.
I created this Dazzling Dragonfly Granny Square design to add to our 365 Days of Granny Squares project. It uses variety of crochet stitches to create a look of a 3D Dragonfly! I hope you enjoy making your square!
A couple disclaimers before you start: Be sure to check your tension and use the correct size hook for your square. I demonstrate with an H-5.00mm crochet hook in the video tutorial, but you can make yours bigger or smaller by using a bigger or smaller hook. Also, if yours turns out wonky when you are finished, you may need to block this square to make it nice and flat.
Follow along with this video tutorial to learn how to make this square:
Support YARNutopia today so we can continue to bring you clear, quality crochet tutorials
**You can always contact me via Facebook if you have any problems with the pattern. I am happy to help if you have any questions along the way.
***You can sell anything you make from my patterns, please just link back to my website YARNutopia.com. Thank you!
Teacher: Nadia Fuad
Video and Editing: Fuad Azmat (My Daddy)
Share your work on Facebook!
Add me on Snapchat: YARNutopia
Follow me on Instagram
Visit My Ravelry Store and add this to your Favorites!
Follow me on Twitter: @YARNutopia
Enjoy this video and subscribe to my channel on YouTube for more tutorials on how to crochet!
Leave a comment, and share with your friends!
Pattern:
Designed by Nadia Fuad You *may* sell items made from my pattern, but please reference my website YARNutopia.com.
Please do not copy, sell, and/or post this pattern and claim it as your own.
NOTES:
-You can use a smaller or larger hook to make this square depending on your tension. I wouldn’t use anything larger than an I-5.5mm Crochet Hook though.
-The finished square measures 6 inches.
-This square is worked from the center outward
Special stitches:
Ch(s): chain(s)
YO: Yarn Over
St(s): Stitch(es)
Sl st: slip stitch
SK: Skip
SC: Single Crochet
HDC: Half-Double Crochet
DC: Double Crochet
TR: Treble Crochet (YO twice)
Beg. Popcorn: ch up 3, 4 DC in same st, remove hook from loop, insert hook in 1st st, put loop back on hook and pull through.
Popcorn: 5 DC in same st, remove hook from loop, insert hook in 1st st, put loop back on hook and pull through.
Beg. TR Popcorn: ch up 3, 4 DC in same st, remove hook from loop, insert hook in 1st st, put loop back on hook and pull through. ch up 4, 5 DC in same st, remove hook from loop, insert hook in 1st st, put loop back on hook and pull through.
Pattern:
If you have any confusion or difficulty with reading this pattern, please watch the video tutorial to have visual instructions.
Ch 4, sl st to beginning to form a ring
Rnd 1: Beg. Popcorn in ring, ch 2, 3DC in ring, ch 2, DC in ring, CH 11, sc in 2nd ch from hook and in next 4 sts, HDC in rest of the chs, 3 HDC in last ch and make a popcorn st (see video tutorial to see how to do that), DC back into ring, ch 2, 3 DC in ring, ch 2, Sl st to beg. popcorn.
Rnd 2: Beg. Popcorn in popcorn, ch 2, Dc in ch 2 sp, DC in the next st, [2dc, ch 2, 2dc] in next st, dc in next st, DC in ch 2 sp, sk dc, [2DTR, ch 2, 2DTR] in center ring (working behind the dragonfly tail), dc in ch 2 sp, DC in next st, [2dc, ch 2, 2dc] in next st, dc in next st, 2 dc in ch sp, ch 2, sl st to beg. popcorn.
Rnd 3: Beg. Popcorn in popcorn, ch 2, DC in ch sp, dc in next 4 sts, [DC, ch 3, DC] in corner, DC in next 6 sts, [dc, ch 3, dc] in corner, dc in next 6 sts, [dc, ch 3, dc] in corner, dc in next 6 sts, dc in ch sp, ch 2, sl st to popcorn.
Rnd 4: Beg. TR Popcorn in popcorn st, ch 2, dc in ch sp, dc in next 6 sts [DC, ch 3, DC] in corner, dc in next 8 sts, [dc, ch 3, dc] in corner, dc in next 8 sts, [dc, ch 3, dc] in corner, dc in next 8 sts, ch 2, sl st to beg. tr popcorn.
Rnd 5: Ch 3, [DC, ch 2, 2 dc] in same popcorn st, DC in next 8 sts, [2 DC, ch 3, 1 DC] in corner, DC in next 10 sts, [2 DC, ch 3, 1 DC] in next corner, DC in next 10 sts, [1 DC, ch 3, 1 DC] in next corner, DC in next 10 sts, Sl st to beg ch up 3.
Rnd 6: DC in each st around putting [2 DC, ch 2, 2 DC] in each corner.
Rnd 7:Sc in each st around, [2 sc, ch 2, 2 sc] in each corner. Sl st to beginning.
Assembly: Sew tail down.
Wings: (See video tutorial for visual instructions)
Attach yarn with long tail for sewing later
Right side: Ch 8, DC in 3rd ch from hook, DC in next, HDC in next, SC in the rest of the chs, sl st back into body of dragonfly, ch 10, TR in 4th ch from hook, DC in next 2 sts, HDC in next, SC in the rest of the sts, sl st back onto body of dragonfly, fasten off, Sew wings down flat.
To make the opposite side:
ch 10, TR in 4th ch from hook, DC in next 2 sts, HDC in next, SC in the rest of the sts, sl st back onto body of dragonfly, Ch 8, DC in 3rd ch from hook, DC in next, HDC in next, SC in the rest of the chs, sl st back into body of dragonfly, fasten off, Sew wings down flat.
Fasten off, Weave in ends.
Enjoy!!
This post contains affiliate links, which I may be compensated for when you make a purchase. That means if you click on any link and buy from the linked websites, I will receive a small percentage of the value of your order. The amount you pay is not changed. Thank you for all your support in clicking the links in my blog!! You all are so amazing!! ~Nadia
I created this Floral Palisade Granny Square design to add to our 365 Days of Granny Squares project. It uses variety of crochet stitches to create a look that reminds me of a gate into a beautiful garden! I hope you enjoy making your square!
A couple disclaimers before you start: Be sure to check your tension and use the correct size hook for your square. I demonstrate with an H-5.00mm crochet hook in the video tutorial, but you can make yours bigger or smaller by using a bigger or smaller hook. Also, if yours turns out wonky when you are finished, you may need to block this square to make it nice and flat.
Follow along with this video tutorial to learn how to make this square:
My dad will continue to be the videographer, editor, and photographer for our videos when I move away.
Support YARNutopia today so we can continue to bring you clear, quality crochet tutorials even after I move into my new home!
There will be an added expense of more travel and hopefully this won’t deter our ability to provide consistent videos on a weekly basis.
**You can always contact me via Facebook if you have any problems with the pattern. I am happy to help if you have any questions along the way.
***You can sell anything you make from my patterns, please just link back to my website YARNutopia.com. Thank you!
Teacher: Nadia Fuad
Video and Editing: Fuad Azmat (My Daddy)
Share your work on Facebook!
Add me on Snapchat: YARNutopia
Follow me on Instagram
Visit My Ravelry Store and add this to your Favorites!
Follow me on Twitter: @YARNutopia
Enjoy this video and subscribe to my channel on YouTube for more tutorials on how to crochet!
Leave a comment, and share with your friends!
Pattern:
Designed by Nadia Fuad You *may* sell items made from my pattern, but please reference my website YARNutopia.com.
Please do not copy, sell, and/or post this pattern and claim it as your own.
NOTES:
-You can use a smaller or larger hook to make this square depending on your tension. I wouldn’t use anything larger than an I-5.5mm Crochet Hook though.
-The finished square measures 6 inches.
-This square is worked from the center outward
Special stitches:
Ch(s): chain(s)
YO: Yarn Over
St(s): Stitch(es)
Sl st: slip stitch
SK: Skip
SC: Single Crochet
HDC: Half-Double Crochet
DC: Double Crochet
TR: Treble Crochet (YO twice)
Picot: Ch 3, sl st to 3rd ch from hook
Beg cluster: YO, Insert Hook, YO pull through, YO, pull through 2 loops, YO, insert hook, YO Pull through, YO pull through 2 loops, YO pull through 3 loops on hook.
Cluster: [YO, Insert Hook, YO pull through, YO, pull through 2 loops] 3 times, YO pull through all 4 loops on hook.
SC3TOG: Single Crochet 3 Together Decrease
Pattern:
If you have any confusion or difficulty with reading this pattern, please watch the video tutorial to have visual instructions.
Ch 4, sl st to beginning to form a ring
Rnd 1: Ch 3 (counts as DC), DC in ring, ch 2, (2DC, ch 2) 7 times in ring. Sl st to beginning.
Rnd 2: In any ch sp, ch 2, Beg. Cluster in same sp, ch 3, * cluster in next sp, ch 3, repeat from * around, sl st to beg. cluster.
Rnd 3: In any ch 3 sp, ch 1, [sc, hdc, dc, tc, picot, tc, dc, hdc, sc] in each ch sp, sl st to beg. sc. (8 petals made) Fasten off.
Rnd 4: In any picot, ch 1, sc in same sp, *ch 6, sc in next picot, repeat from * around. Sl st to beg. sc.
Rnd 5: In ch 6 sp, Ch 3 (counts as dc) 5 DC in same sp, *(6DC, Ch 2, 6DC) in next sp (Corner made), 6 DC in next sp, repeat from * around, sl st to beg ch up 3.
Rnd 6: In any corner, Ch 1, *[sc, ch 2, sc] in corner, sc in next 3 sts on round 5, DTR in DC from Previous Petal from Round 3, SC in next 5 sts on round 5, DTR in DC from next petal from round 3, SC in next 2 sts on rnd 5, DTR in Previous Petal from round 3, SC in next 5 sts from rnd 5, DTR in DC from next petal from Rnd 3, SC in next 3 sts from rnd 5, repeat from * around, sl st to first sc of this round.
Rnd 7:Sc in each st around, [sc, ch 2, sc] in each corner. Sl st to beginning.
Fasten off, Weave in ends.
Enjoy!!
This post contains affiliate links, which I may be compensated for when you make a purchase. That means if you click on any link and buy from the linked websites, I will receive a small percentage of the value of your order. The amount you pay is not changed. Thank you for all your support in clicking the links in my blog!! You all are so amazing!! ~Nadia
The yarn provided for this pattern is courtesy of Red Heart Yarns
I created this Blooming Daydreams Granny Square design to add to our 365 Days of Granny Squares project. It uses variety of crochet stitches to create a look that reminds me of summer! I hope you enjoy making your square!
A couple disclaimers before you start: Be sure to check your tension and use the correct size hook for your square. I demonstrate with an H-5.00mm crochet hook in the video tutorial, but you can make yours bigger or smaller by using a bigger or smaller hook. Also, if yours turns out wonky when you are finished, you may need to block this square to make it nice and flat.
***You can sell anything you make from my patterns, please just link back to my website YARNutopia.com. Thank you!
Teacher: Nadia Fuad
Video and Editing: Fuad Azmat (My Daddy)
Share your work on Facebook!
Add me on Snapchat: YARNutopia
Follow me on Instagram
Visit My Ravelry Store and add this to your Favorites!
Follow me on Twitter: @YARNutopia
Enjoy this video and subscribe to my channel on YouTube for more tutorials on how to crochet!
Leave a comment, and share with your friends!
Pattern:
Designed by Nadia Fuad You *may* sell items made from my pattern, but please reference my website YARNutopia.com.
Please do not copy, sell, and/or post this pattern and claim it as your own.
NOTES:
-You can use a smaller or larger hook to make this square depending on your tension. I wouldn’t use anything larger than an I-5.5mm Crochet Hook though.
-The finished square measures 7 inches, but you can stop at any round to make this smaller, or you can continue on to make it larger just repeating the last few rounds.
-This square is worked from the center outward
-You could make a bunch of these squares and make a throw blanket and then make the pillow as a matching set!
Special stitches:
Ch(s): chain(s)
YO: Yarn Over
St(s): Stitch(es)
Sl st: slip stitch
SK: Skip
SC: Single Crochet
HDC: Half-Double Crochet
DC: Double Crochet
TR: Treble Crochet
Popcorn: 6 DC in same sp, remove hook from last dc, insert hook into 1st dc of grouping, put loop back onto hook, pull through, pull tight, popcorn made
Picot: Ch 3, sl st to 3rd ch from hook (Picot made)
BPSC: Back Post Single Crochet
Pattern:
If you have any confusion or difficulty with reading this pattern, please watch the video tutorial to have visual instructions.
Start with Magic Ring or ch 4 or 5 and sl st to beginning to form ring.
Rnd 1: ch 3, 15 DC in ring. sl st to beginning ch up 3. (16 sts)
Rnd 2: In any st, ch 3, Beg. Popcorn in same stitch, * Ch 2, sk next st, Popcorn in next st, repeat from * around, ch 2, sl st to beg. popcorn. (8 popcorns, 8 ch 2 sps)
Rnd 3: in any ch 2 sp, ch 3, work a 4 DC in same sp, * sc in popcorn, 5 DC in next sp, repeat from * around, sl st to beginning. (8 Shells)
Rnd 4: In any sc, ch 3, 6 DC in same st, *Sc in middle st of shell, 7 DC in next sc, repeat from * around, sl st to beginning ch up 3. (8 Shells)
Rnd 5: In any SC, ch 1, sc in same st, * Ch 5, sk shell, sc in next sc, repeat from * around, sl st to beginning sc. (8 ch 5 sps)
Rnd 6: In any ch 5 sp, ch 1, [sc, hdc, 2dc, tc, picot, tc, 2dc, hdc, sc] in each ch 5 sp around. Sl st to beginning sc. Fasten off, weave in ends. (8 Pointed Petals)
Rnd 7: Working BEHIND your work, Attach Yarn to sc from Round 4. Ch 6, *BPSC around next sc from Round 4, ch 5, Repeat from * around, Sl st to 1st ch of beginning ch 6. (8 Ch 5 sps) (Optional: Instead of BPSC’s you could just slip stitch)
Rnd 8: In any ch 5 sp: Ch 3, 5 DC in same sp, * [5DC, ch 2, 5 DC] in next sp, 5 DC in next sp, repeat from * around, ending with [5DC, ch 2, 5DC] in last sp, sl st to ch up 3. (60 DC)
Rnd 9: Ch up 3, DC in each st around putting [2DC, ch 2, 2 DC] in the corners, sl st to beginning. (19 DC on each side)
Rnd 10: In any corner: Ch 3, [DC, ch 2, 2DC] in same corner sp, * Ch 1, sk 1 st, DC in next, repeat from * until next corner, [2 DC, ch 2, 2 DC] in corner. Repeat around. Sl st to ch up 3.
This post contains affiliate links, which I may be compensated for when you make a purchase. That means if you click on any link and buy from the linked websites, I will receive a small percentage of the value of your order. The amount you pay is not changed. Thank you for all your support in clicking the links in my blog!! You all are so amazing!! ~Nadia
The yarn provided for this pattern is courtesy of Red Heart Yarns
As we continue our journey through the 365 Days of Granny Squares, we have accumulated 210 squares as of today! If you are like me, your storage containers are busting full and are in need of projects to be made! I began this Island in the Sea Blanket as my second project in my series of blankets that I plan to make using these granny squares.
I named this piece because of the unique square from day 75. I went on to finishing the square as per the written pattern by Aurora. It turned out larger than any of the squares in our collection. I had to find a use and decided this was the perfect way to showcase this beautiful granny! I surrounded it with double crochet rows of various shades of cool tones to create an island oasis in a sea of blue.
This blanket utilizes 5 other large squares that we have made this year as well as 14 of our smaller squares. I have listed each square I used in this project below with links to their video tutorials.
This is just my idea to use these squares in a bigger project, but you can get as creative as you want to make a blanket or other projects where these can come in handy!
As we embarked on this project, I have witnessed an incredible amount of creativity that has come from others participating in these daily squares. I’m so happy to see everyone Hashtagging #365DaysofGrannySquares and #YARNutopia. I am watching everyone’s posts and progress! *Double Tap*
The purpose of this project was to teach a variety of stitches and expand our crochet knowledge in granny squares that exist. I have seen an array of beautiful blankets, pillow covers, jackets, and many other pieces of art springing forth from this creativity from everyone participating. Each square is a small piece of art that was meant for a bigger purpose.
This is the original layout of my blanket:
Here is a closeup to show that I made a double crochet border around each square and then sewed them together:
Here I am working on the blanket, finishing up the sewing!
Here is my finished blanket draped over the sofa:
Step By Step:
-I crocheted a double crochet border around each granny square (I would recommend 1 round of a border for each square, but if it doesn’t line up, you can add 2 rounds on the smaller squares to make them the right size)
-Then, I sewed the large squares together in a row
-I started crocheting my rows of blue using double crochet. I worked in the Back Loops Only to make a ribbed look (that’s optional) Then I made 5 rows of each color. (You can change color as often as you want)
-Once I had 5 sections done, I sewed my giant square to the center of my work.
-I started crocheting on the right side of the large square, making rows and stopping once I hit that square, then turned my work and continued on my way to make the rows until that side lined up with the large square. Then I fastened that side off.
-I attached my yarn to the left side and did the same thing, working rows of double crochet until that was the same height as the center square. Once both sides were surrounding the square, I sewed up the left and right side of the square to the double crochet rows.
-Once that was all done, I continued to crochet along just like I was on the opposite end of the blanket above the large island square. (5 rows of each color, changing colors 5 times)
-Then, I sewed the small squares together and then sewed them to the last row of the blanket.
-Once my blanket was all put together, I crocheted a simple double crochet border around the entire piece.
-I had a lot of ends to weave in, but it was all worth it!
I used an H-5.00mm crochet hook to make this blanket
I used all Red Heart Super Saver Yarn
I created this design to add to our 365 Days of Granny Squares project. It uses variety of crochet stitches to create a look that reminds me of a flower found in a bouquet. It inspired me to name it “Hey Daisy Bouquet.” I hope you enjoy making your square!
A couple disclaimers before you start: Be sure to check your tension and use the correct size hook for your square. I demonstrate with an H-5.00mm crochet hook in the video tutorial, but you can make yours bigger or smaller by using a bigger or smaller hook. Also, if yours turns out wonky when you are finished, you may need to block this square to make it nice and flat.
Watch this video tutorial to learn how to make this square:
**You can always contact me via Facebook if you have any problems with the pattern. I am happy to help if you have any questions along the way.
***You can sell anything you make from my patterns, please just link back to my website YARNutopia.com. Thank you!
Teacher: Nadia Fuad
Video and Editing: Fuad Azmat (My Daddy)
Share your work on Facebook!
Add me on Snapchat: YARNutopia
Follow me on Instagram
Visit My Ravelry Store and add this to your Favorites!
Follow me on Twitter: @YARNutopia
Enjoy this video and subscribe to my channel on YouTube for more tutorials on how to crochet!
Leave a comment, and share with your friends!
Pattern:
Designed by Nadia Fuad
You may sell items made from my pattern, but please reference my website YARNutopia.com.
Please do not copy, sell, and/or post this pattern and claim it as your own.
Materials:
-Red Heart Super Saver Yarn in as many colors as you want. I just used scrap yarn.
-H-5.00mm Crochet Hook
-Yarn Needle
-Scissors
NOTES:
-You can use a smaller or larger hook to make this square depending on your tension.
-The finished square measures 7 inches (approx. 18 cm)
Special stitches:
Ch(s): chain(s)
YO: Yarn Over
St(s): Stitch(es)
Sl st: slip stitch
SK: Skip
SC: Single Crochet
HDC: Half-Double Crochet
DC: Double Crochet
TR: Treble Crochet
SC4TOG: pull up a loop in each of the next 4 chs and then y/o and pull through all 5 of the loops on your hook
Bullion Stitch: wrap 6 times around hook, insert hook into stitch, y/o, pull through, y/o pull through all 8 loops on hook.
Pattern:
If you have any confusion or difficulty with reading this pattern, please watch the video tutorial to have visual instructions.
Start with Magic Ring or ch 5 and sl st to beginning to form ring.
Rnd 1: ch 1, [Bullion, ch 1] 8 times in ring. sl st to 1st Bullion Stitch (8 sts, 8 ch 1 sps)
Rnd 2: In any Ch 1 sp, ch 1, 2 sc in each ch sp around. sl st to beginning. (16 sc)
Rnd 3: in any stitch, * ch 5, work a sc4tog down the ch (see video tutorial for visual instructions), ch 1, sl st to next st, repeat from * around. (16 petals)
Rnd 4: In any ch 1 sp, ch 5 (counts as dc and ch 2 sp), * DC in next ch 1 sp, ch 2, repeat from * around (16 dc and ch 2 sps)
Rnd 5: In any ch 2 sp, ch up 3, [2dc, ch 2, 3 dc] in same ch sp, *ch 1, [2 hdc in next ch sp, ch 1] 3 times, [3dc, ch 2, 3dc] in next sp, repeat from * all around. (see video tutorial for visual instructions)
Rnd 6: In any ch 2 corner sp, ch up 3, [2dc, ch 2, 3 dc] in same ch sp, *ch 1, [2 dc in next ch sp, ch 1] 4 times, [3dc, ch 2, 3dc] in next sp, repeat from * all around. (see video tutorial for visual instructions)
Rnd 7: (Optional) In any ch 2 corner sp, ch up 3, [2dc, ch 2, 3 dc] in same ch sp, *ch 1, [2 dc in next ch sp, ch 1] 5 times, [3dc, ch 2, 3dc] in next sp, repeat from * all around. (see video tutorial for visual instructions)
I created this design to add to our 365 Days of Granny Squares project. It combines popcorn stitches (my favorite!), and a few other crochet stitches to create a look that reminds me of a lantern. It inspired me to name it “Be the Light.” I hope you enjoy making your square!
A couple disclaimers before you start: Be sure to check your tension and use the correct size hook for your square. I demonstrate with an H-5.00mm crochet hook in the video tutorial, but you can make yours bigger or smaller by using a bigger or smaller hook. Also, if yours turns out wonky when you are finished, you may need to block this square to make it nice and flat.
Follow along with this video tutorial to learn how to make this granny square:
**You can always contact me via Facebook if you have any problems with the pattern. I am happy to help if you have any questions along the way.
***You can sell anything you make from my patterns, please just link back to my website YARNutopia.com. Thank you!
Teacher: Nadia Fuad
Video and Editing: Fuad Azmat (My Daddy)
Share your work on Facebook!
Add me on Snapchat: YARNutopia
Follow me on Instagram
Visit My Ravelry Store and add this to your Favorites!
Follow me on Twitter: @YARNutopia
Enjoy this video and subscribe to my channel on YouTube for more tutorials on how to crochet!
Leave a comment, and share with your friends!
Pattern:
Designed by Nadia Fuad
You may sell items made from my pattern, but please reference my website YARNutopia.com.
Please do not copy, sell, and/or post this pattern and claim it as your own.
NOTES:
-You can use a smaller or larger hook to make this square depending on your tension.
-The finished square measures 8 inches (approx. 20 cm)
Special stitches:
Ch(s): chain(s)
YO: Yarn Over
St(s): Stitch(es)
Sl st: slip stitch
SK: Skip
SC: Single Crochet
HDC: Half-Double Crochet
EDC: Extended Double Crochet
DC: Double Crochet
TR: Treble Crochet
Popcorn: 5dc in same st, remove hook from loop, put hook in 1st dc of grouping, put loop back on hook, pull through, tight. Popcorn made.
Beg. Popcorn: 4dc in same st as ch up 3, remove hook from loop, put hook in ch up 3, put loop back on hook, pull through, tight, Beg. Popcorn made.
Pattern:
If you have any confusion or difficulty with reading this pattern, please watch the video tutorial to have visual instructions.
Start with Magic Ring or ch 6 and sl st to beginning to form ring.
Rnd 1: Beg. Popcorn, *ch 1, Popcorn, repeat from * until there are 8 popcorn sts, ch 1, sl st to beg. popcorn st. (8 popcorn sts, 8 ch 1 sps)
Rnd 2: In Ch 1 sp, ch 1, 2 sc in each ch sp around. sl st to beginning. (16 sc)
Rnd 3: ch 1, 2 sc in each st around. sl st to beginning. (32 sc)
Rnd 4: ch 3, beg. popcorn in same st, ch 2, *sk next st, popcorn in next st, ch 2, repeat from * around, sl st to beg. popcorn. (16 popcorn sts, 16 ch 2 sps)
Rnd 5: In any ch 2 sp, ch 1, *SC in same sp, EDC in sk’d st from rnd 3, SC in same sp, repeat from * in each ch sp around, sl st to beginning. (48 sts)
Rnd 6: In any 1st sc of grouping, ch 3, dc in same st, * ch 2, 2dc in next st, hdc in next 2 sts, sc in 6 sts, hdc in next 2 sts, 2dc in next st, repeat from * around ending with hdc in last 2 sts, sl st to beginning. (56 sts)
Rnd 7: In ch 2 corner sp, ch 1, [sc, ch 2, sc] in same sp, * sc in next 6 sts, [sc, hdc, dc, sc, dc] in next st, ch 3, [dc, sc, dc, hdc, sc] in next st, sc in next 6 sts, [sc, ch 2, sc] in corner, repeat from * around, sl st to beginning.
Rnd 8: In ch 2 corner sp, ch 4 (counts as TR), [TR, ch 2, 2TR] in same sp, * ch1, sk 1 st, tr in next, ch 1, sk 1, tr in next, ch 1, sk 1, tr in next, ch 1, sc in ch 3 sp, ch 1, sk over 6 sts, tr in next, ch 1, sk 1, tr in next, ch 1, sk 1, tr in next, ch 1, sk 1, [2tr, ch 2, 2tr] in corner. Repeat from * around, sl st to ch 4. (watch video tutorial to learn this round, it’s easier than it seems!
Rnd 9: In corner sp, ch 1, *[2sc, ch 2, 2sc] in corner, sc in each st and ch sp across (19 sts), repeat from * around. sl st to beginning.
I created this Real Wheel Granny Square design to add to our 365 Days of Granny Squares project. It uses variety of crochet stitches to create a look that reminds me of a wheel or something round!! I hope you enjoy making your square!
A couple disclaimers before you start: Be sure to check your tension and use the correct size hook for your square. I demonstrate with an H-5.00mm crochet hook in the video tutorial, but you can make yours bigger or smaller by using a bigger or smaller hook. Also, if yours turns out wonky when you are finished, you may need to block this square to make it nice and flat.
Follow along with this video tutorial to make your own granny square:
My dad will continue to be the videographer, editor, and photographer for our videos when I move away.
Support YARNutopia today so we can continue to bring you clear, quality crochet tutorials even after I move into my new home!
There will be an added expense of more travel and hopefully this won’t deter our ability to provide consistent videos on a weekly basis.
***You can sell anything you make from my patterns, please just link back to my website YARNutopia.com. Thank you!
Teacher: Nadia Fuad
Video and Editing: Fuad Azmat (My Daddy)
Share your work on Facebook!
Add me on Snapchat: YARNutopia
Follow me on Instagram
Visit My Ravelry Store and add this to your Favorites!
Follow me on Twitter: @YARNutopia
Enjoy this video and subscribe to my channel on YouTube for more tutorials on how to crochet!
Leave a comment, and share with your friends!
Pattern:
Designed by Nadia Fuad You *may* sell items made from my pattern, but please reference my website YARNutopia.com.
Please do not copy, sell, and/or post this pattern and claim it as your own.
NOTES:
-You can use a smaller or larger hook to make this square depending on your tension. I wouldn’t use anything larger than an I-5.5mm Crochet Hook though.
-The finished square measures approximately 6 inches.
-This square is worked from the center outward
Special stitches:
Ch(s): chain(s)
YO: Yarn Over
St(s): Stitch(es)
Sl st: slip stitch
SK: Skip
SC: Single Crochet
HDC: Half-Double Crochet
DC: Double Crochet
FPDC: Front Post Double Crochet
TR: Treble Crochet
V-Stitch: [dc, ch 2, dc] in same sp
Pattern:
If you have any confusion or difficulty with reading this pattern, please watch the video tutorial to have visual instructions.
Start with Magic Ring or ch 4 and sl st to beginning to form ring.
Rnd 1: ch 3, 7dc in ring, sl st to ch up 3. (8)
Rnd 2: In any st, ch 5, DC in same st, [DC, ch 2, DC] in each st around. Sl st to 3rd ch of beginning ch 5.
Rnd 3: In any 1st st of a V-Stitch, Beginning FPDC, * ch 1, FPDC around next st, ch 2, FPDC around next st, repeat from * around. Sl st to beginning FPDC.
Rnd 4: In any FPDC, Beginning BPDC, [BPDC, ch 1] around next 3 sts, *ch 3, [BPDC, ch 1] around next 4 sts, repeat from * around. Sl st to beginning BPDC.
Rnd 5: in any ch 3 sp, ch 3, [2 dc, ch 2, 3 dc] in same sp, *[ch 1, 3 dc in next ch sp] until corner, Put [3dc, ch 2, 3dc] in corner, repeat from * around. (see video tutorial if any of these rounds gets confusing)
Rnd 6: In corner, ch up 3, 2dc in same sp, *[V-Stitch in next ch 1 sp] 4 times, [3dc, ch 2, 3dc] in corner, repeat from * around. sl st to beginning.
Rnd 7: ch 1, sc in each st, put 2 sc in ch 2 sps, put [sc, ch 2, sc] in corners. sl st to beginning.
Fasten off, weave in ends.
Enjoy!
This post contains affiliate links, which I may be compensated for when you make a purchase. That means if you click on any link and buy from the linked websites, I will receive a small percentage of the value of your order. The amount you pay is not changed. Thank you for all your support in clicking the links in my blog!! You all are so amazing!! ~Nadia
The yarn provided for this pattern is courtesy of Red Heart Yarns
I created this Desert Shell Granny Square design to add to our 365 Days of Granny Squares project. It uses variety of crochet stitches to create a look that reminds me of the heat!! I hope you enjoy making your square!
A couple disclaimers before you start: Be sure to check your tension and use the correct size hook for your square. I demonstrate with an H-5.00mm crochet hook in the video tutorial, but you can make yours bigger or smaller by using a bigger or smaller hook. Also, if yours turns out wonky when you are finished, you may need to block this square to make it nice and flat.
Follow along with this video tutorial to make your own granny square:
***You can sell anything you make from my patterns, please just link back to my website YARNutopia.com. Thank you!
Teacher: Nadia Fuad
Video and Editing: Fuad Azmat (My Daddy)
Share your work on Facebook!
Add me on Snapchat: YARNutopia
Follow me on Instagram
Visit My Ravelry Store and add this to your Favorites!
Follow me on Twitter: @YARNutopia
Enjoy this video and subscribe to my channel on YouTube for more tutorials on how to crochet!
Leave a comment, and share with your friends!
Pattern:
Designed by Nadia Fuad You *may* sell items made from my pattern, but please reference my website YARNutopia.com.
Please do not copy, sell, and/or post this pattern and claim it as your own.
Materials:
-Red Heart Super Saver Yarn in as many colors as you want.
-H-5.00mm Crochet Hook
-Yarn Needle
-Scissors
NOTES:
-You can use a smaller or larger hook to make this square depending on your tension. I wouldn’t use anything larger than an I-5.5mm Crochet Hook though.
-The finished square measures approximately 6 inches.
-This square is worked from the center outward
Special stitches:
Ch(s): chain(s)
YO: Yarn Over
St(s): Stitch(es)
Sl st: slip stitch
SK: Skip
SC: Single Crochet
HDC: Half-Double Crochet
DC: Double Crochet
FPDC: Front Post Double Crochet
TR: Treble Crochet
Pattern:
If you have any confusion or difficulty with reading this pattern, please watch the video tutorial to have visual instructions.
Start with Magic Ring or ch 4 and sl st to beginning to form ring.
Rnd 1: ch 3, 2 dc in ring [ch 2, 3dc] 3 times in ring, ch 2, sl st to beginning.
Rnd 2: In any corner, ch 3, [2dc, ch 2, 3 dc] in same sp, [ch 1, 3dc, ch 2, 3dc] in each sp, sl st to beginning.
Rnd 3: In any corner, Ch 1 *[SC, EDC, SC] in corner, sc in next 3 sts, EDC in next 3 sts working in sk’d sts from rnd 1, sc in next 3 sts working in round 2, , repeat from * around, sl st to beginning sc.
Rnd 4: In any EDC corner, ch 3 (counts as DC), 4 DC in same st, *sk 1 st, sc in next, sk 2 sts, 5 dc in middle EDC of 3EDC grouping, sk 2 sts, sc in next, sk 1 st, 5 DC in corner EDC, repeat from * around. Sl st to beginning ch 3. (See video tutorial if this round gets confusing)
Rnd 5: in any side shell, sc in middle st and sc in next st, * ch 10, sk next shell, sc in middle 3 sts of next shell, repeat from * around ending with sc in last st, sl st to beginning sc.
Rnd 6: In ch 10 sp: Ch 3, 5 dc in same sp, *[6dc, ch 2, 6 dc] in next sp, 6 dc in next sp, repeat from * around. Sl st to beginning ch up 3.
Rnd 7: SC in each st around, putting [sc, ch 2, sc] in corners.
I created this Neela Pani design to add to our 365 Days of Granny Squares project. It uses variety of crochet stitches to create a look that reminds me of water! I hope you enjoy making your square!
A couple disclaimers before you start: Be sure to check your tension and use the correct size hook for your square. I demonstrate with an H-5.00mm crochet hook in the video tutorial, but you can make yours bigger or smaller by using a bigger or smaller hook. Also, if yours turns out wonky when you are finished, you may need to block this square to make it nice and flat.
Follow along with this video tutorial to make your own granny square:
***You can sell anything you make from my patterns, please just link back to my website YARNutopia.com. Thank you!
Teacher: Nadia Fuad
Video and Editing: Fuad Azmat (My Daddy)
Share your work on Facebook!
Add me on Snapchat: YARNutopia
Follow me on Instagram
Visit My Ravelry Store and add this to your Favorites!
Follow me on Twitter: @YARNutopia
Enjoy this video and subscribe to my channel on YouTube for more tutorials on how to crochet!
Leave a comment, and share with your friends!
Pattern:
Designed by Nadia Fuad You *may* sell items made from my pattern, but please reference my website YARNutopia.com.
Please do not copy, sell, and/or post this pattern and claim it as your own.
Materials:
-Red Heart Super Saver Yarn in as many colors as you want.
-H-5.00mm Crochet Hook
-Yarn Needle
-Scissors
NOTES:
-You can use a smaller or larger hook to make this square depending on your tension. I wouldn’t use anything larger than an I-5.5mm Crochet Hook though.
-The finished square measures approximately 6 inches.
-This square is worked from the center outward
Special stitches:
Ch(s): chain(s)
YO: Yarn Over
St(s): Stitch(es)
Sl st: slip stitch
SK: Skip
SC: Single Crochet
HDC: Half-Double Crochet
DC: Double Crochet
FPDC: Front Post Double Crochet
TR: Treble Crochet
Puff Stitch: [YO, Insert Hook, YO, Pull through] 3 times, YO pull through all 7 loops.
Pattern:
If you have any confusion or difficulty with reading this pattern, please watch the video tutorial to have visual instructions.
Start with Magic Ring or ch 6 and sl st to beginning to form ring.
Rnd 1: ch 3, 15 DC in ring. sl st to beginning ch up 3. (16 sts)
Rnd 2: In any st, ch 3, FPDC around same st, [DC and FPDC] in each st, sl st to beg. ch up 3. (32 sts)
Rnd 3: In any st, Ch 2, Puff st in same st, *ch 1, puff st in next st, repeat from * around, sl st to first puff st. (32 puff sts)
Rnd 4: In any ch 1 sp, ch 1, 2 sc in same sp, *2 hdc in next sp, 2 hdc in next sp, 2 dc in next sp, ch 3, 2 dc in next sp, 2 hdc in next sp, 2 hdc in next sp, 2 sc in next sp (change color after second sc), with new color, 2 sc in next sp, repeat from * around. (see video tutorial for this round if it is confusing)
Rnd 5: DC in each st around putting [3 dc, ch 2, 3 dc] in each corner.