On the 7th Day of Christmas, my true love models for me, this Shred the Slopes Hat that is perfect for when you go ski. Or in his case, snowboarding, but that doesn’t rhyme. haha! Let’s just say it’s perfect for any cold weather conditions! This fabulous hat is the next project in our holiday series. This hat uses Herringbone Half Double Crochets to make a simple and fabulous design!
Watch this video tutorial to learn how to make this hat:
My dad will continue to be the videographer, editor, and photographer for our videos when I move away.
Support YARNutopia today so we can continue to bring you clear, quality crochet tutorials even after I move into my new home!
There will be an added expense of more travel and hopefully this won’t deter our ability to provide consistent videos on a weekly basis.
**You can always contact me via Facebook if you have any problems with the pattern. I am happy to help if you have any questions along the way.
***You can sell anything you make from my patterns, please just link back to my website YARNutopia.com. Thank you!
Teacher: Nadia Fuad
Video and Editing: Fuad Azmat (My Daddy)
Share your work on Facebook!
Add me on Snapchat: YARNutopia
Follow me on Instagram
Visit My Ravelry Store and add this to your Favorites!
Follow me on Twitter: @YARNutopia
Enjoy this video and subscribe to my channel on YouTube for more tutorials on how to crochet!
Leave a comment, and share with your friends!
Pattern:
Designed by Nadia Fuad You *may* sell items made from my pattern, but please reference my website YARNutopia.com.
Please do not copy, sell, and/or post this pattern and claim it as your own.
NOTES:
-This hat is worked flat and then seamed up the back.
-This hat uses Herringbone Half Double Crochet stitches
-This hat is a unisex design
-This hat can be made in any size. Simply start with any amount of chains that you want the height of your hat to be. Click here to get the size chart
-The finished hat measures 26 inches around when stretched and is 10 inches long.
Special stitches:
Ch(s): chain(s)
YO: Yarn Over
St(s): Stitch(es)
Sl st: slip stitch
SK: Skip
SC: Single Crochet
HDC: Half Double Crochet
HHDC: Herringbone Half Double Crochet
BLO: Back Loop Only
FLO: Front Loop Only
Pattern:
If you have any confusion or difficulty with reading this pattern, please watch the video tutorial to have visual instructions.
Ch 35 or any amount for the measurement you need to make a hat. Click here to get the size chart Row 1: HHDC in 3rd ch from hook and across. Ch 1, turn. (34 sts)
Rows 2-6: Working in BLO, HHDC in each st across, ch 1, turn.
Rows 7-10: Working in Both Loops, SC in each st across, ch 1, turn.
Rows 11-16: Working in BLO, HHDC in each st across, ch 1, turn.
Rows 17-20: Working in Both Loops, SC in each st across, ch 1, turn.
Rows 21-26: Working in BLO, HHDC in each st across, ch 1, turn.
Rows 27-30: Working in Both Loops, SC in each st across, ch 1, turn.
Rows 31-36: Working in BLO, HHDC in each st across, ch 1, turn.
Rows 37-40: Working in Both Loops, SC in each st across, ch 1, turn.
You could fasten off here or make it wider.
Rows 41-46: Working in BLO, HHDC in each st across, ch 1, turn.
Rows 47-50: Working in Both Loops, SC in each st across, ch 1, turn.
Fasten off with long tail for sewing.
Assembly:
Sew the back seam closed, Make pom and sew to top of hat, SC around bottom edge of hat to clean up the edges.
This post contains affiliate links, which I may be compensated for when you make a purchase. That means if you click on any link and buy from the linked websites, I will receive a small percentage of the value of your order. The amount you pay is not changed. Thank you for all your support in clicking the links in my blog!! You all are so amazing!! ~Nadia
Learn how to make this Sparkling Wine Beverage Bag using cable crochet! Making the party rounds during the holiday season? Why not wrap up a special bottle of your favorite beverage in this Sparkling Wine Beverage Bag?! The host/hostess of every event you visit this Christmas will be charmed by this lovely touch and elegant presentation.
Follow along with this video tutorial to learn how to make this beverage bag:
My dad will continue to be the videographer, editor, and photographer for our videos when I move away.
Support YARNutopia today so we can continue to bring you clear, quality crochet tutorials even after I move into my new home!
There will be an added expense of more travel and hopefully this won’t deter our ability to provide consistent videos on a weekly basis.
**You can always contact me via Facebook if you have any problems with the pattern. I am happy to help if you have any questions along the way.
***You can sell anything you make from my patterns, please just link back to my website YARNutopia.com. Thank you!
Teacher: Nadia Fuad
Video and Editing: Fuad Azmat (My Daddy)
Share your work on Facebook!
Add me on Snapchat: YARNutopia
Follow me on Instagram
Visit My Ravelry Store and add this to your Favorites!
Follow me on Twitter: @YARNutopia
Enjoy this video and subscribe to my channel on YouTube for more tutorials on how to crochet!
Leave a comment, and share with your friends!
Pattern:
Designed by Nadia Fuad You *may* sell items made from my pattern, but please reference my website YARNutopia.com.
Please do not copy, sell, and/or post this pattern and claim it as your own.
NOTES:
-Make the piece flat that will wrap around the bottle
-The bottom of the bottle circle is made separately and sewn to the piece.
-This piece is seamed down the back
-This bag is 11 inches (28cm) long -WATCH THE VIDEO TUTORIAL FOR CABLE DESIGN FOR EVERY ROW
Special stitches:
Ch(s): chain(s)
YO: Yarn Over
St(s): Stitch(es)
Sl st: slip stitch
SK: Skip
SC: Single Crochet
HDC: Half Double Crochet
FPDC: Front Post Double Crochet
BPDC: Back Post Double Crochet
Pattern:
If you have any confusion or difficulty with reading this pattern, please watch the video tutorial to have visual instructions.
Ch 34 Row 1: HDC in 3rd ch from hook and across. Ch 1, turn. (33 sts)
Row 2: HDC in 13 sts, [FPDC in next, HDC in next] 4 times, HDC in last 12 sts, ch 1, turn.
Row 3: HDC in 13 sts, [BPDC in next, HDC in next] 4 times, HDC in last 12 sts, ch 1, turn.
Row 4: HDC in 13 sts, FPDC in next, HDC in next, Sk 2 sts, FPDC around FPDC, HDC in sk’d HDC, FPDC around sk’d FPDC, HDC in next, FPDC in next, HDC in next 13 sts, ch 1, turn.
Row 5: HDC in 13 sts, [BPDC in next, HDC in next] 4 times, HDC in last 12 sts, ch 1, turn.
Row 6: HDC in 13 sts, Sk 2 sts, FPDC around FPDC, HDC in sk’d HD, FPDC around sk’d FPDC, HDC in next, Sk 2 sts, FPDC around FPDC, HDC in sk’d HDC, FPDC around sk’d FPDC, HDC in last 13 sts, ch 1, turn.
Row 7: HDC in 13 sts, [BPDC in next, HDC in next] 4 times, HDC in last 12 sts, ch 1, turn.
Row 8-11: Repeat rows 4-7
Rows 12-15: Repeat Rows 4-7
Rows 16-19: Repeat Rows 4-7
Row 20: HDC in 13 sts, [FPDC in next, HDC in next] 4 times, HDC in last 12 sts, ch 1, turn.
Rows 21-30: HDC across, ch 1, turn.
Fasten off with long tail.
Bottom part of bag:
Ch 4, sl st to 1st ch to form ring. Rnd 1: Ch up 3, (Counts as DC), 11 DC into ring, sl st to ch up 3 (12 sts) Rnd 2: Ch up 3, DC in same st as sl st, 2 DC in each st around, sl st to ch up 3 (24 sts) Rnd 3: Ch up 3, DC in same st as sl st, *DC in next st, 2 DC in next st, repeat from * around, sl st to ch up 3, fasten off with long tail. (36 sts)
Assembly:
Sew the back seam closed, then sew the bottom of the bag to the bag bottom. Weave in all loose ends.
Use ribbon to close the top of the bag.
Enjoy!!
This post contains affiliate links, which I may be compensated for when you make a purchase. That means if you click on any link and buy from the linked websites, I will receive a small percentage of the value of your order. The amount you pay is not changed. Thank you for all your support in clicking the links in my blog!! You all are so amazing!! ~Nadia
The yarn provided for this pattern is courtesy of Red Heart Yarns
These Winter Snowman Coasters will be perfect on any table this holiday! Make this fun holiday accent for your guests. It’s perfect for serving your beverages! Try a new technique of working with cork board to crochet with!
Some fun suggestions by changing up the color are that you can change the look of the coasters. Going around the coaster with black yarn and putting a beak instead of a carrot nose, you can transform these snowmen into penguins or other varieties of characters. Want to change the shape? Use square coasters or cut squares out of your cork board and work around the squares using the same technique. Also, you can use the same technique on a larger cork and create a single hot pad for your Christmas Tabletop. Have fun with these ideas! They don’t have to be holiday related. You can make a few changes and have them all year round.
Follow this video tutorial to learn how to make these coasters:
My dad will continue to be the videographer, editor, and photographer for our videos when I move away.
Support YARNutopia today so we can continue to bring you clear, quality crochet tutorials even after I move into my new home!
There will be an added expense of more travel and hopefully this won’t deter our ability to provide consistent videos on a weekly basis.
**You can always contact me via Facebook if you have any problems with the pattern. I am happy to help if you have any questions along the way.
***You can sell anything you make from my patterns, please just link back to my website YARNutopia.com. Thank you!
Teacher: Nadia Fuad
Video and Editing: Fuad Azmat (My Daddy)
Share your work on Facebook!
Add me on Snapchat: YARNutopia
Follow me on Instagram
Visit My Ravelry Store and add this to your Favorites!
Follow me on Twitter: @YARNutopia
Enjoy this video and subscribe to my channel on YouTube for more tutorials on how to crochet!
Leave a comment, and share with your friends!
Pattern:
Designed by Nadia Fuad You *may* sell items made from my pattern, but please reference my website YARNutopia.com.
Please do not copy, sell, and/or post this pattern and claim it as your own.
NOTES:
-If you want to use a different yarn, go to YarnSub.com and type in Red Heart Super Saver and equivalent yarns will show up
-Finished size is about 5 inches (15 cm)
Special stitches:
Ch(s): chain(s)
YO: Yarn Over
St(s): Stitch(es)
Sl st: slip stitch
SK: Skip
SC: Single Crochet
HDC: Half Double Crochet
TR: Treble Crochet
Pattern:
If you have any confusion or difficulty with reading this pattern, please watch the video tutorial to have visual instructions.
Coaster
Cut Cork into 4 inch circles
Punch holes around cork coaster measuring 1 inch in between them and a half inch into the coaster (see video tutorial for visual instructions.)
With White:
Row 1: Sl st into one hole, ch 3, sl st into next hole, ch 3, repeat around, sl st to 1st sl st. Ch 1.
Row 2: Sl st into ch 3 sp, Ch 1, 3 SC in ch 3 sp, ch 1, 3 SC in next ch 3 sp, repeat from * around. Sl st to 1st SC.
Row 3: Ch 1, sc in 1st 3 sts, sl st into ch sp, ch 4, TR in same sp, 2 TR in next 3 sts, TR in ch sp, ch 4, sl st in same ch 4 sp, *sc in next 3 sts, 2 SC in ch sp, repeat from * for the rest of the round. Sl st to 1st st.
Row 4: Sl st in each st to ch up 4. Sc in each ch of the ch up 4, HDC in next 2 sts, 2 DC in each of the next 4 sts, HDC in next 2 sts, sc in each of the next 4 ch, sl st in next 3 sts. Fasten off. Weave in ends.
Carrot nose: with Orange
Ch 5
Sl st in 2nd ch from hook, sc in next, HDC in last 2 chs, Fasten off, Sew onto head
Eyes: with Black
French Knots for eyes (See video tutorial for visual instructions)
Mittens: with Holly Berry Make 2
Ch 5
Row 1: SC in 2nd ch from hook and across, 2 SC in last st, CH 1, turn (5)
Row 2: 2 SC in 1st st, sc in next 4 sts, ch 1, turn. (6)
Row 3: SC in 1st 3 sts, ch 3, sl st in 3rd ch from hook and in same st where last sc was worked. Fasten off.
Sew to coaster.
Assembly:
Sew all the pieces to coaster and tie ribbon around neck.
Enjoy!!
This post contains affiliate links, which I may be compensated for when you make a purchase. That means if you click on any link and buy from the linked websites, I will receive a small percentage of the value of your order. The amount you pay is not changed. Thank you for all your support in clicking the links in my blog!! You all are so amazing!! ~Nadia
The yarn provided for this pattern is courtesy of Red Heart Yarns
It doesn’t take a lot of money to dress a baby up like a little fashionista! Just a hook, some yarn, and of course, some ribbon to make these trendy Holly-Day Booties! There is plenty of time for these to be made before Christmas and find their way under someone’s tree this holly-day season!
Make your princess a pair of these adorable booties today!! It’s perfect in time for the cold season. These booties will dress up any holiday outfit and will stun so many when they find out they were handmade!! The pattern shown in the video is a very simplistic pattern that you can make in an afternoon. This is not difficult at all! It would be great for any crocheter!!
Follow along with this video tutorial to learn how to make these booties:
**You can always contact me via Facebook if you have any problems with the pattern. I am happy to help if you have any questions along the way.
***You can sell anything you make from my patterns, please just link back to my website YARNutopia.com. Thank you!
Teacher: Nadia Fuad
Video and Editing: Fuad Azmat (My Daddy)
Share your work on Facebook!
Add me on Snapchat: YARNutopia
Follow me on Instagram
Visit My Ravelry Store and add this to your Favorites!
Follow me on Twitter: @YARNutopia
Enjoy this video and subscribe to my channel on YouTube for more tutorials on how to crochet!
Leave a comment, and share with your friends!
Pattern:
Designed by Nadia Fuad You *may* sell items made from my pattern, but please reference my website YARNutopia.com.
Please do not copy, sell, and/or post this pattern and claim it as your own.
NOTES:
-I do not have different sizes for these booties. You can make them bigger or smaller by using a bigger or smaller crochet hook.
-Finished size will fit a 6 month old baby (4 inch sole)
-Instructions on tips on how to make this bigger is stated in the intro of the video tutorial
Special stitches:
Ch(s): chain(s)
YO: Yarn Over
St(s): Stitch(es)
Sl st: slip stitch
SK: Skip
SC: Single Crochet
HDC: Half-Double Crochet
DC: Double Crochet
FLO: Front Loops Only
BLO: Back Loops Only
DC2TOG: Double Crochet Decrease
SC2TOG: Single Crochet Decrease
Pattern:
If you have any confusion or difficulty with reading this pattern, please watch the video tutorial to have visual instructions.
Sole of bootie: Make 2
With White Metallic
Chain 10 Rnd 1: 2 SC into 2nd ch from hook. SC in next 5 chs, HDC in next 2 sts, 8 DC in last ch, Working on other side of foundation, HDC in next 2 sts, SC in next 5 sts, 2 SC in last stitch where beginning 2 SC are. Don’t join. (26 sts)
Rnd 2: 2 SC in 1st st, 2 SC in next. SC 7, HDC in next, 2 HDC in each of the next 6 stitches, HDC in next, SC 7, 2 SC in last 2 sts. Do not join – (36 sts)
Rnd 3: SC in next 2 stitches, 2 SC in next, SC in next 10 sts, 2 SC in next 2 stitches, SC in next 6 sts, 2 SC in next 2 sts. SC in next 10 sts, 2SC in next st. SC in last 2 sts. Sl st in next st. (42 sts)
Rnd 4: Ch 1, turn, Sl St in each st around. Fasten off. (42 sts)
Back of bootie:
With White Metallic
Count 10 sts evenly in the back (see video tutorial for visual instructions) Row 1: SC across 10 sts in the back of bootie, ch 1, turn (10) Row 2: 2 SC in 1st st, SC to last st, 2 SC in last st, ch 1, turn. (12) Row 3: 2 SC in 1st st, SC in 4 sts, SC2TOG, SC in next 4 sts, 2sc in last st, ch 1, turn. (13) Row 4: 2 SC in 1st st, SC in 5 sts, SC2TOG, SC in next 4 sts, 2sc in last st, ch 1, turn. (14) Row 5: 2 SC in 1st st, SC in 6 sts, SC2TOG, SC in next 4 sts, 2sc in last st, ch 1, turn. (15) Row 6-9: 2 SC in 1st st, SC to last st, 2 SC in last st, ch 1, turn. (17 sts at the end of row 6, 19 sts at the end of row 7, 21 sts at the end of row 8, 23 sts at the end of row 9)
Fasten off. Weave in ends.
With Burgundy:
SC around entire back (See video tutorial for visual instructions) Fasten off, weave in ends.
Attach yarn in top right corner of back of bootie, ch 3, *sk 2 sts, sl st in next st, ch 3, repeat from * across, fasten off (see video tutorial for visual instructions)
Front of bootie:
With White Metallic
Start where last st was made from the back of bootie (See video tutorial for visual instructions) Row 1: SC in 10 sts, DC in 15 sts, SC in last 7 sts and in last st on back of bootie, ch 1, turn. (31 sts) Row 2: in FLO, SC in each st across, ch 1, turn. (31 sts) Row 3: in BLO, SC in 10 sts, [DC2TOG] 7 times, SC in last 9 sts, ch 1, turn. (26 sts) Row 4: in FLO, SC in 10 sts, [DC2TOG] 4 times, SC in last 8 sts, ch 1, turn. (22 sts) Row 5: in BLO, SC in 8 sts [DC2TOG] 3 Times, SC in last 8 sts. (19 sts)
Fasten off, weave in ends.
With Burgundy: Row 1: SC in each st across row 5. Row 2: Ch 3, turn, *sk 2 sts, sl st in next, ch 3, repeat from * across.
Fasten off, weave in all ends.
Assembly:
Sew back to front (See video tutorial for visual instructions)
Weave ribbon in ch 3 sps on back of bootie
Cut Felt into leaf designs and attach them using French Knots with Burgundy yarn to your booties for embellishments.
Enjoy!!
This post contains affiliate links, which I may be compensated for when you make a purchase. That means if you click on any link and buy from the linked websites, I will receive a small percentage of the value of your order. The amount you pay is not changed. Thank you for all your support in clicking the links in my blog!! You all are so amazing!! ~Nadia
The yarn provided for this pattern is courtesy of Red Heart Yarns
This Rustic Evergreen Ornament is a simple yet festive touch to your country Christmas decor. This darling accent also makes a great gift topper embellishment! Using your scrap yarn, this easy to make project is a lovely touch that will make your home feel warm and welcoming.
Crochet strips tied and shaped around an everyday stick accented with rich shades of green and brown, topped with a small star make this item one of the easiest and most cozy DIY projects you will make this holiday season!
Follow along with this video tutorial to learn how to make this ornament:
**You can always contact me via Facebook if you have any problems with the pattern. I am happy to help if you have any questions along the way.
***You can sell anything you make from my patterns, please just link back to my website YARNutopia.com. Thank you!
Teacher: Nadia Fuad
Video and Editing: Fuad Azmat (My Daddy)
Share your work on Facebook!
Add me on Snapchat: YARNutopia
Follow me on Instagram
Visit My Ravelry Store and add this to your Favorites!
Follow me on Twitter: @YARNutopia
Enjoy this video and subscribe to my channel on YouTube for more tutorials on how to crochet!
Leave a comment, and share with your friends!
Pattern:
Designed by Nadia Fuad You *may* sell items made from my pattern, but please reference my website YARNutopia.com.
Please do not copy, sell, and/or post this pattern and claim it as your own.
NOTES:
-The smaller the hook, the better
-The stick I used was about 7 inches long
-Be careful tying your knots to not snap the twig in half
Special stitches:
Ch(s): chain(s)
YO: Yarn Over
St(s): Stitch(es)
Sl st: slip stitch
SK: Skip
SC: Single Crochet
HDC: Half-Double Crochet
FHDC: Foundation Half Double Crochet
Pattern:
If you have any confusion or difficulty with reading this pattern, please watch the video tutorial to have visual instructions.
Tree:
Top Strands: Make 2
FHDC 15, Fasten off. Weave in all ends
Next Strands: Make 2
FHDC 19, Fasten off. Weave in all ends
Next Strands: Make 2
FHDC 23, Fasten off. Weave in all ends
Last Strands: Make 2
FHDC 27, Fasten off. Weave in all ends
You should have 8 strands in total.
Assembly step:
Tie all strands to twig (See video tutorial for visual instructions
Star:
Ch 2
Rnd 1: 10 sc in 2nd ch from hook. Sl st to 1st st
Rnd 2: *Ch up 5, SC in 2nd ch from hook, HDC in next ch, DC in last 2 chs, Sk 1 st, sl st in next st, Repeat from * around. Sl st to beginning. (5 star points)
Fasten off, weave in ends
Assembly:
Attach Star to top of tree on twig and tie a strand of thread for an ornament. See video tutorial for visual instructions.
Enjoy!!
This post contains affiliate links, which means if you click on the link and buy from the linked websites, I will receive a small percentage of the value of your order. The amount you pay is not changed.
Show a little holiday cheer by dressing up your pet! This pattern has options for each gender as well as tips on making this darling sweater for any sized fur-baby! Get your pet ready for the holidays by spending a few cozy days snuggled up in their holiday attire in front of the Christmas tree!
These are my pets, Reuben and Bebe. They “love” their sweaters. LOL I’m kidding, they didn’t last very long in them.
I hope your pet has more fun in their holiday sweaters! Share photos of your fur babies on Facebook!
Follow along with this video tutorial to learn how to make this pet sweater:
**You can always contact me via Facebook if you have any problems with the pattern. I am happy to help if you have any questions along the way.
***You can sell anything you make from my patterns, please just link back to my website YARNutopia.com. Thank you!
Teacher: Nadia Fuad
Video and Editing: Fuad Azmat (My Daddy)
Share your work on Facebook!
Add me on Snapchat: YARNutopia
Follow me on Instagram
Visit My Ravelry Store and add this to your Favorites!
Follow me on Twitter: @YARNutopia
Enjoy this video and subscribe to my channel on YouTube for more tutorials on how to crochet!
Leave a comment, and share with your friends!
Pattern:
Designed by Nadia Fuad You *may* sell items made from my pattern, but please reference my website YARNutopia.com.
Please do not copy, sell, and/or post this pattern and claim it as your own.
My dad will continue to be the videographer, editor, and photographer for our videos when I move away.
Support YARNutopia today so we can continue to bring you clear, quality crochet tutorials even after I move into my new home!
There will be an added expense of more travel and hopefully this won’t deter our ability to provide consistent videos on a weekly basis.
NOTES:
-You can use a bigger sized hook to make this sweater bigger.
-You can also chain more to make yours bigger. There is no specific stitch counts for this sweater
-The sweater I made for Bebe measures 25 cm (10 Inches) in Length from neck to bottom fringe
-Measure the neck of your pet and chain an amount that will measure around them
– Measure the length of your pet and chain an amount that will fit the length of their back
Special stitches:
Ch(s): chain(s)
YO: Yarn Over
St(s): Stitch(es)
Sl st: slip stitch
SK: Skip
SC: Single Crochet
HDC: Half-Double Crochet
DC: Double Crochet
BLO: Back Loops Only
3DC Cluster: [YO, Insert Hook, YO, Pull Through, YO Pull through 2 Loops] 3 Times and then YO and pull through all 4 loops on your hook
Pattern:
If you have any confusion or difficulty with reading this pattern, please watch the video tutorial to have visual instructions.
Neck:
Measure your pet’s neck
Chain an amount that is that long
Ch 30
Sl st in 1st ch to form a ring. Rnd 1: Ch 1, SC in each ch around, sl st to 1st sc, ch 1
(Optional: Change color every row) Rnds 2-5: in BLO, SC in each st around, sl st to 1st sc, ch 1
Make your neck part as long as you want.
Fasten off.
Back of Sweater:
Change color every row (See video tutorial to see how to trail strand along work)
Ch 26 (Or any Multiple of 5+1) Row 1: Sc in 2nd ch from hook and next 4 chs, HDC in next 15 chs, DC in last 5 chs, Turn
Row 2: Ch up 3 (Counts as DC here and throughout) Work in BLO, DC in next 4 sts, HDC in next 15 sts, SC in last 5 sts. Turn
Row 3: Ch 1, SC in first 5 sts, HDC in next 15 sts, DC in last 5 sts, Turn
Rows 4-23: Repeat rows 2 and 3 or as long as you need it to be. End on an ODD numbered Row.
Fasten off, Weave in ends.
Edging: Row 1: SC along the bottom edge of the sweater (See video tutorial for visual instructions) Row 2: Ch 6, 3DC cluster in 3rd ch from hook, Ch 3, 3 dc cluster in 3rd ch from hook. Sl st in ch where 1st cluster was made, ch 3, sk 5 sts, sl st in next st. (see video tutorial for visual instructions)
Fasten off. Weave in ends.
Assembly step:
Mark 9 free stitches on your neck piece, then sew Back of Sweater to the neck piece of the sweater leaving the 9 sts free for the front of the sweater (See video tutorial for visual instructions)
Front of Sweater:
Attach yarn to st on the neck piece (Shown in Video tutorial)
Row 1: Ch 1, HDC in each Free stitch across. (10 sts in total)
Row 2: ch 1, turn, HDC across (10)
Row 3: Ch 1, Turn, 2 HDC in first st, HDC in each st until the last st, 2 HDC in last st (12)
Row 4: Ch 1, turn, HDC across (12)
Row 5: Ch 1, Turn, 2 HDC in first st, HDC in each st until the last st, 2 HDC in last st. (14)
Row 6: Ch 1, Turn, HDC across (14)
Row 7: Ch 1, Turn, 2 HDC in first st, HDC in each st until the last st, 2 HDC in last st. (16)
Row 8-14: Ch 1, Turn, HDC across (16)
Fasten off. Weave in ends.
Attach buttons to each side and then button the sides down. If you do not want to use buttons, sew the sides down.
Bow:
Ch 15
Round 1: SC in 1st ch and each ch around
Place stitch marker and work the rest of the rounds in continuous rounds
Rounds 2-5: Working in BLO, SC in each st around
Fasten off with really long tail
Assembly:
Wrap yarn around bow making a cute bow. Sew to neck part of sweater.
Our first crochet project in the 12 Days of Christmas, starts with this Bows and Bells Napkin Rings! This project takes a common household item and transforms it to make these lovely tabletop decorations.
These napkin rings use an every day household item that usually gets tossed in the trash or recycled. This project is a great way to reduce waste and reuse your tissue paper rolls!
While I was experimenting and playing around with the napkin ring, I noticed a flame-less tea-light candle fit inside the ring perfectly! ((Disclaimer: DO NOT USE OR LIGHT A REAL CANDLE WITH THIS PIECE)) Sitting on the side of a shelf, this looks very festive!
Follow along with this video tutorial to learn how to make these napkin rings:
**You can always contact me via Facebook if you have any problems with the pattern. I am happy to help if you have any questions along the way.
***You can sell anything you make from my patterns, please just link back to my website YARNutopia.com. Thank you!
Teacher: Nadia Fuad
Video and Editing: Fuad Azmat (My Daddy)
Share your work on Facebook!
Add me on Snapchat: YARNutopia
Follow me on Instagram
Visit My Ravelry Store and add this to your Favorites!
Follow me on Twitter: @YARNutopia
Enjoy this video and subscribe to my channel on YouTube for more tutorials on how to crochet!
Leave a comment, and share with your friends!
Pattern:
Designed by Nadia Fuad You *may* sell items made from my pattern, but please reference my website YARNutopia.com.
Please do not copy, sell, and/or post this pattern and claim it as your own.
NOTES:
-You do not have to use a cardboard piece on the inside of your napkin ring. You can just sew it closed without anything inside.
Special stitches:
Ch(s): chain(s)
YO: Yarn Over
St(s): Stitch(es)
Sl st: slip stitch
SK: Skip
SC: Single Crochet
Pattern:
If you have any confusion or difficulty with reading this pattern, please watch the video tutorial to have visual instructions.
Ring: Cut pieces of cardboard from the Tissue Rings
With Green:
Ch 9
Row 1: Sc in 2nd ch from hook and across, ch 1, turn
Rows 2-25: SC in each st across, ch 1, turn (8 sts)
You can continue working more or less rows depending on how big your cardboard ring is.
Fasten off with long tail for sewing.
Sew crochet piece around cardboard piece.
See video tutorial for visual instructions.
Bow:
With Red
Ch 20
Round 1: SC in 1st ch and each ch around
Place stitch marker and work the rest of the rounds in continuous rounds
Rounds 2-5: Working in BLO, SC in each st around
Fasten off with really long tail
Bow strand:
Ch 15
HDC in 2nd ch from hook and next 5 chs, HDC3TOG, HDC in last 6 chs
Fasten off.
Weave in ends
Assembly:
Wrap yarn around bow and bow strand making a cute bow. Sew to napkin ring, sew on bow.
It’s that time of the year as we prepare our home for the holidays. Those personal touches of handmade items mean so much and bring back nostalgic memories of past Christmas holidays. Start your own tradition of passing down this special tree skirt by making your very own today!
This lovely Fabulous Flurries Tree Skirt is the perfect project to accent your home and tree for generations to come! The snowflake appliqués are a nice touch of winter. You can create your own by adding other appliqués or just leave the skirt free and clear of any embellishments for a more simple touch. Change colors and make it festive as you wish for your home. Enjoy this lovely piece that is sure to be a hit for years!
Watch this video tutorial to learn how to make this tree skirt:
My dad will continue to be the videographer, editor, and photographer for our videos when I move away.
Support YARNutopia today so we can continue to bring you clear, quality crochet tutorials even after I move into my new home!
There will be an added expense of more travel and hopefully this won’t deter our ability to provide consistent videos on a weekly basis.
**You can always contact me via Facebook if you have any problems with the pattern. I am happy to help if you have any questions along the way.
***You can sell anything you make from my patterns, please just link back to my website YARNutopia.com. Thank you!
Teacher: Nadia Fuad
Video and Editing: Fuad Azmat (My Daddy)
Share your work on Facebook!
Add me on Snapchat: YARNutopia
Follow me on Instagram
Visit My Ravelry Store and add this to your Favorites!
Follow me on Twitter: @YARNutopia
Enjoy this video and subscribe to my channel on YouTube for more tutorials on how to crochet!
Leave a comment, and share with your friends!
Pattern:
Designed by Nadia Fuad You *may* sell items made from my pattern, but please reference my website YARNutopia.com.
Please do not copy, sell, and/or post this pattern and claim it as your own.
NOTES:
-You can use a smaller or larger hook to make this square depending on your tension. I wouldn’t use anything larger than a K-6.50mm Crochet Hook though.
-The finished square measures 28 inches across (72 cm)
-This project is worked from the center outward and then has motifs to sew on to the large piece
Special stitches:
Ch(s): chain(s)
YO: Yarn Over
St(s): Stitch(es)
Sl st: slip stitch
SK: Skip
SC: Single Crochet
HDC: Half-Double Crochet
DC: Double Crochet
RSC: Reverse Single Crochet (work single crochets backwards)
Pattern:
If you have any confusion or difficulty with reading this pattern, please watch the video tutorial to have visual instructions.
Tree Skirt:
With Royal:
Ch 29 Row 1: DC in 5th Ch from hook, * Ch 1, DC in next Ch, repeat from * across, turn. (26 sts)
Row 2: Ch 4 (counts as DC + Ch 1), skip ch-1 sp, * DC in next st, 2 DC in next Ch sp, DC in next st, Ch 1, skip next sp, repeat from * to last st, dc in 3rd ch of ch4, turn. (50 sts)
Row 3: Ch 4, skip ch sp, * [DC in next 2 sts, ch 1] twice, skip next sp, repeat from * to last st; DC in 3rd ch of ch4, turn. (50 sts)
Row 4: Ch 4, skip ch sp, * DC in next 2 sts, 2 DC in next sp, DC in next 2 sts, Ch 1, skip next sp, repeat from * to last st, DC in 3rd ch of ch4, turn. (74 sts)
Row 5: Ch 4, skip ch sp, * [DC in next 3 sts, Ch 1] twice, skip next sp, repeat from * to last st, DC in 3rd ch of ch4, turn. (74 sts)
Row 6: Ch 4, sk ch sp, *DC in each st until ch 1 sp, put [dc, ch 1, dc] in ch 1 sp, repeat from * across. do not work any sts in last ch sp, DC in 3rd ch of ch 4, turn. (120 sts)
Row 7: Ch 4, Sk ch sp, * DC in each st until ch 1 sp, ch 1, sk ch 1 sp, repeat from * across.
Row 8-10: Repeat Row 7
Rows 11-15: Repeat rows 6-10
Rows 16-20: Repeat Rows 6-10
Row 21: ch 1, RSC across in each st and each ch 1 sp across. Fasten off.
Weave in all ends.
Smaller Snowflake: Make 4
With E-3.50mm crochet hook and white yarn
Ch 4, Sl st in 1st ch to form a ring. Rnd 1: *Ch 6, Sl st in the ring, repeat from * 5 times, Sl st to beg. ch of ch 6. (6 ch 6 sps)
Rnd 2: Sl st in ch 6 sp, *Ch 6, sl st in 4th ch from hook, ch 5, sl st in same ch, ch 3, sl st in same ch, ch 2, sl st in next ch 6 sp, repeat from * around.
Fasten off with long tail for sewing, weave in ends.
Bigger Snowflake: Make 3
With E-3.50mm crochet hook and white yarn
Ch 4, sl st to 1st ch to form a ring.
Rnd 1: Ch 1, 6 SC in ring. Sl st to 1st sc (6 sts)
Rnd 2: Ch up 1, SC in same st, *Ch 6, SC in next st, repeat from * around, sl st to 1st sc. (6 ch 6 sps)
Rnd 3: In any ch 6 sp: Ch up 1 [SC, HDC, 2DC, Ch 3, 2DC, HDC, SC] in same sp, Sl St in next SC and in next CH sp, repeat from * around. Sl st to 1st SC of this round.
Rnd 4: Sl st in each st until you get to a DC before a chain 3 sp: Ch 1, SC in same st, ch 3, SC in same st, * [SC, Ch 5, SC] in ch 3 sp, [SC, ch 3, SC] in next DC after Ch 3 sp, Ch 3, [SC, ch 3, SC] in next DC before a Ch 3 sp, repeat from * around, sl st to beginning sc. Fasten off. (See video tutorial for specific locations)
Fasten off with long tail for sewing.
Weave in all ends.
Assembly:
Sew snowflakes to tree skirt
Make swirls with chains and sew them to the tree skirt. (See video tutorial for chains and visual instructions)
Enjoy!!
This post contains affiliate links, which I may be compensated for when you make a purchase. That means if you click on any link and buy from the linked websites, I will receive a small percentage of the value of your order. The amount you pay is not changed. Thank you for all your support in clicking the links in my blog!! You all are so amazing!! ~Nadia
The yarn provided for this pattern is courtesy of Red Heart Yarns
I created this Berry Giving Granny Square design to add to our 365 Days of Granny Squares project. It uses variety of crochet stitches to create an interesting design! I hope you enjoy making your square!
A couple disclaimers before you start: Be sure to check your tension and use the correct size hook for your square. I demonstrate with an H-5.00mm crochet hook in the video tutorial, but you can make yours bigger or smaller by using a bigger or smaller hook. Also, if yours turns out wonky when you are finished, you may need to block this square to make it nice and flat.
Follow along with this video tutorial to learn how to make this square:
**You can always contact me via Facebook if you have any problems with the pattern. I am happy to help if you have any questions along the way.
***You can sell anything you make from my patterns, please just link back to my website YARNutopia.com. Thank you!
Teacher: Nadia Fuad
Video and Editing: Fuad Azmat (My Daddy)
Share your work on Facebook!
Add me on Snapchat: YARNutopia
Follow me on Instagram
Visit My Ravelry Store and add this to your Favorites!
Follow me on Twitter: @YARNutopia
Enjoy this video and subscribe to my channel on YouTube for more tutorials on how to crochet!
Leave a comment, and share with your friends!
Pattern:
Designed by Nadia Fuad You *may* sell items made from my pattern, but please reference my website YARNutopia.com.
Please do not copy, sell, and/or post this pattern and claim it as your own.
NOTES:
-You can use a smaller or larger hook to make this square depending on your tension. I wouldn’t use anything larger than an I-5.5mm Crochet Hook though.
-The finished square measures 6.5 inches (16cm)
-This square is worked from the center outward
Special stitches:
Ch(s): chain(s)
YO: Yarn Over
St(s): Stitch(es)
Sl st: slip stitch
SK: Skip
SC: Single Crochet
HDC: Half-Double Crochet
DC: Double Crochet
BPDC: Back Post Double Crochet
TR: Treble Crochet
Beg. Cluster: [YO, Insert hook, YO, pull through] 3 times, YO, pull through all 4 loops.
Cluster: [YO, insert hook, YO, pull through] 4 times, YO, pull through all 5 loops.
2DCcluster: [YO, Insert Hook, YO, Pull through] 2 times, YO, pull through 3 loops.
Pattern:
If you have any confusion or difficulty with reading this pattern, please watch the video tutorial to have visual instructions.
Ch 4, sl st to 1st ch to form a ring.
Rnd 1: Ch 2, Beg. Cluster, Ch 4, [Cluster into ring, Ch 4] 5 more times, Sl st to beg. cluster. (6 clusters, 6 ch 4 sps)
Rnd 2: In ch 4 sp: Ch 2 [Counts as HDC], 3 HDC in same sp, 4 HDC in each ch 4 sp, sl st to beg ch 2. (24 HDC)
Rnd 3: In a gap between the groupings (See video tutorial for specific location), Ch up 2, DC in same sp (counts as beg. 2DCcluster, Ch 3, 2DCcluster in Previous DC just made, 2DCcluster in same gap between HDC’s, * Ch 4, 2DCcluster in next gap, Ch 3, 2DCcluster in previous cluster just made, 2DCcluster in same gap, repeat from * around, sl st to beg.
Rnd 4: In a ch 4 sp, ch 1, SC in same sp, *DC into each HDC from round 2 working around the ch 4 sp hiding it in the sts, SC in same ch 4 sp, Ch 2, sc in next ch 4 sp, repeat from * around putting clusters in front of ch 2 sps. Sl st to 1st sc.
Rnd 5: In any ch 2 sp behind a cluster: Ch 3 (counts as DC), 3 DC in same sp, *BPDC in each of the next 6 sts, 4 DC in next ch 2 sp, repeat from * around. Sl st to beg. ch 3.
Rnd 6: Ch 4 (counts as TR), TR in next, *DC in next 2 sts, HDC in next 2 sts, SC in next 3 sts, HDC in next 2 sts, DC in next 2 sts, TR in next 2 sts, Ch 3, TR in next 2 sts, repeat from * around, sl st to beg ch 4.
Rnd 7: ch up 1, SC in all sts around, [2sc, ch 2, 2 sc] in each corner.
Fasten off.
Weave in all ends.
Enjoy!!
This post contains affiliate links, which means if you click on the link and buy from the linked websites, I will receive a small percentage of the value of your order. The amount you pay is not changed.
I created this Frosty Flakes Granny Square design to add to our 365 Days of Granny Squares project. It uses variety of crochet stitches to create an interesting design! I hope you enjoy making your square!
A couple disclaimers before you start: Be sure to check your tension and use the correct size hook for your square. I demonstrate with an H-5.00mm crochet hook in the video tutorial, but you can make yours bigger or smaller by using a bigger or smaller hook. Also, if yours turns out wonky when you are finished, you may need to block this square to make it nice and flat.
Follow along with this video tutorial to learn how to make this Granny Square:
**You can always contact me via Facebook if you have any problems with the pattern. I am happy to help if you have any questions along the way.
***You can sell anything you make from my patterns, please just link back to my website YARNutopia.com. Thank you!
Teacher: Nadia Fuad
Video and Editing: Fuad Azmat (My Daddy)
Share your work on Facebook!
Add me on Snapchat: YARNutopia
Follow me on Instagram
Visit My Ravelry Store and add this to your Favorites!
Follow me on Twitter: @YARNutopia
Enjoy this video and subscribe to my channel on YouTube for more tutorials on how to crochet!
Leave a comment, and share with your friends!
Pattern:
Designed by Nadia Fuad You *may* sell items made from my pattern, but please reference my website YARNutopia.com.
Please do not copy, sell, and/or post this pattern and claim it as your own.
My dad will continue to be the videographer, editor, and photographer for our videos when I move away.
Support YARNutopia today so we can continue to bring you clear, quality crochet tutorials even after I move into my new home!
There will be an added expense of more travel and hopefully this won’t deter our ability to provide consistent videos on a weekly basis.
NOTES:
-You can use a smaller or larger hook to make this square depending on your tension. I wouldn’t use anything larger than an I-5.5mm Crochet Hook though.
-The finished square measures 7 inches
-This square is worked from the center outward
Special stitches:
Ch(s): chain(s)
YO: Yarn Over
St(s): Stitch(es)
Sl st: slip stitch
SK: Skip
SC: Single Crochet
HDC: Half-Double Crochet
DC: Double Crochet
FPDC: Front Post Double Crochet
TR: Treble Crochet
Pattern:
If you have any confusion or difficulty with reading this pattern, please watch the video tutorial to have visual instructions.
With White
Ch 4, sl st to 1st ch to form a ring.
Rnd 1: Ch 1, 12 SC in ring. Sl st to 1st sc (12 sts)
Rnd 2: Ch up 1, SC in same st, *Ch 6, Sk next st, SC in next st, repeat from * around, sl st to 1st sc. (6 ch 6 sps)
Rnd 3: In any ch 6 sp: Ch up 1 [SC, HDC, 2DC, Ch 3, 2DC, HDC, SC] in same sp, Sl St in next SC and in next CH sp, repeat from * around. Sl st to 1st SC of this round. Fasten off
Rnd 4: Starting in a DC before a chain 3 sp: Ch 1, SC in same st, ch 3, SC in same st, * [SC, Ch 5, SC] in middle ch of ch 3 sp, [SC, ch 3, SC] in next DC after Ch 3 sp, Ch 3, [SC, ch 3, SC] in next DC before a Ch 3 sp, repeat from * around, sl st to beginning sc. Fasten off. (See video tutorial for specific locations)
Rnd 5: With blue, In any 3rd ch of ch 5 sp: * Ch 10, Sl st in 3rd ch of next ch 5 sp, repeat from * around, sl st to 1st ch of beg. ch 10.
Rnd 6: Sl st in ch 10 sp, ch up 1, [9SC, ch 3, 4 SC] in same sp, 10 SC in next ch 10 sp, [4SC, ch 3, 9 SC] in next sp, [9SC, ch 3, 4 SC] in next sp, 10 SC in next ch 10 sp, [4 SC, ch 3, 9SC] in next sp, sl st to 1st sc. (18 sc on each side)
Rnd 7: Ch up 1, SC in 1st 5 sts, (working behind your work) TR in the Ch 3 sp of round 4, SC in next 4 sts, [sc, ch 2, sc] in corner, sc in next 9 sts, (working behind your work) TR in the Ch 3 sp of round 4, SC in next 9 sts, [sc, ch 2, sc] in corner, SC in next 4 sts, (working behind your work) TR in the Ch 3 sp of round 4, SC in next 10 sts, TR in ch 3 sp of round 4, SC in next 4 sts, [sc, ch 2, sc] in corner, SC in next 9 sts, TR in Ch 3 sp of round 4, SC in next 9 sts, [SC, ch 2, SC] in corner, SC in next 4 sts, TR in ch 3 Sp of round 4, SC in last 5 sts. Sl st to 1st sc.
Rnd 8: Ch up 2, (counts as HDC) (See video tutorial for visual instructions), HDC in each st, FPDC around each TR working in Ch 10 sp from round 5, and work [SC, ch 2, SC] in corners. Sl st to ch 2 at the beginning.
This post contains affiliate links, which I may be compensated for when you make a purchase. That means if you click on any link and buy from the linked websites, I will receive a small percentage of the value of your order. The amount you pay is not changed. Thank you for all your support in clicking the links in my blog!! You all are so amazing!! ~Nadia
The yarn provided for this pattern is courtesy of Red Heart Yarns
Holiday entertaining is right around the corner. I personally enjoy tea with friends. Add a special touch to your table setting with The Joyful Teapot Cozy!
I added the word “Joy” to my teapot, but you can add any word. It’s very simple to chain and sew it onto the cozy. You don’t have to use holly leaves and berries as your embellishments either. Have fun with it and get creative by adding flowers, leaves, or other appliqués to make your teapot cozy personal.
The Joyful Teapot Cozy makes a lovely gift idea. Wrapped around a vintage teapot and filled with specialty teas, this would go far in making someone’s holiday tea-rrific!
Now it’s time to pour yourself a cup of hot tea, pull out your hook and get started today!
Follow along with this video tutorial to learn how to make this Teapot Cozy:
Information at the beginning of the video, Tutorial actually starts at 9 minutes.
My dad will continue to be the videographer, editor, and photographer for our videos when I move away.
Support YARNutopia today so we can continue to bring you clear, quality crochet tutorials even after I move into my new home!
There will be an added expense of more travel and hopefully this won’t deter our ability to provide consistent videos on a weekly basis.
Enjoy this video and subscribe to my channel on YouTube for more tutorials on how to crochet!
Leave a comment, and share with your friends!
Pattern:
Designed by Nadia Fuad
Questions? Leave a comment! You may sell items made from my pattern, but please reference my name and Etsy Shop (YARNutopia). Please do not copy and post this pattern and claim it as your own.
-This pattern is for a standard 4-cup round, side handle teapot with a lid and a curved spout. You could make it smaller or bigger just making more rows on the sides.
-You can make this cozy with any yarn: Cotton, Acrylic, Polyester
-You can make this using a bigger crochet hook if your tension is tighter
-You do not have to add the appliques, you could just have a plain teapot cozy sans the leaf/word design.
-This teapot Cozy is worked from the top down.
Special Stitches:
Ch: chain
St(s): Stitch(es)
Sl st: slip stitch
SC: Single Crochet
DC: Double Crochet
Puff: [YO, Insert Hook, YO, Pull Through] 2 times. YO, pull through all 5 loops on hook. Puff made.
Picot: Ch 2, Sl st in 2nd ch from hook
Backing of Teapot Cozy
With Gleam Yarn in Creamy,
Ch 12, sl st to 1st ch to form a large ring.
Round 1: Ch 1, SC in each ch around, sl st to 1st SC. (12 sts)
Round 2: Ch 1, SC in each st around, sl st to 1st SC. (12 sts)
Round 3: Ch 1, [Puff, Ch 1, Puff, Ch 1] in each st around, Sl St to 1st Puff St. (16 puff sts)
Round 4: Working in ch 1 sps: Ch 1, 2 HDC in same Ch 1 Sp, 1 HDC in next Ch 1 sp, *2 HDC in next ch 1 sp, HDC in next ch 1 sp, repeat from * around. Sl st to 1st HDC. (36 sts)
Round 5: Ch 1, HDC in each st around, sl st to 1st st. (36 sts)
Round 6: Ch 1, [Puff, Ch 2] in each st around, sl st to 1st Puff st. (36 Puff sts)
Round 7: In any ch 2 sp: Ch 2, HDC in each ch 2 sp around, sl st to beg. ch 2. (36 sts)
**You will now be working in rows:
Row 8: Ch 1, [Puff, ch 1] in same st and next 17 sts. Leave the rest unworked. Ch 1, turn. (18 sts)
Row 9: 2 HDC in each Ch 1 sp across. Ch 1, turn. (34 sts)
Rows 10-13: 1 HDC in each st across. Ch 1, turn. (34 sts)
(Optional: Continue working these rows until your piece is as tall as you need it to be, then go on to row 14)
Row 14: HDC2TOG, HDC in each st until the last 2 sts, HDC2TOG on the last 2 sts, ch 1, turn. (32 sts)
Row 15: HDC2TOG, HDC in each st until the last 2 sts, HDC2TOG on the last 2 sts, ch 1, turn. (30 sts)
Row 16: *HDC2TOG, HDC in next 3 sts, repeat from * across. Ch 1, turn. (24 sts)
Row 17: *HDC2TOG, HDC in next 2 sts, repeat from * across. Ch 1, turn. (18 sts)
Row 18: HDC in each st across.
Fasten off with Long tail for this side.
When you make the other side, you can cut your yarn short. (See video tutorial for visual instructions.
Attach your yarn to the unworked st from Round 7. Repeat Rows 8-18
Crochet a button hole loop after your last row by chaining 6, and sl st back into st. Fasten off.
Assembly step:
Sew front closed around spout of teapot. (see video tutorial for visual instructions)
Sew button to bottom back of cozy on the opposite side of button hole loop.
Leaf: Make 7
With Patina Gleam Yarn
Ch 9 Round 1: Sl st in 2nd ch from hook, SC in next Ch, HDC in next 4 Chs, SC in next, Sl st in next, Ch 2, Sl back in the same ch,
Working on opposite side of foundation chain: SC in next, HDC in next 4, SC in next, Sl st in last. Do not attach.
Round 2: [Sl st in next 2 sts, Picot] 3 times, sl st in ch 2 sp, ch 2, Sl st in same ch 2 sp, [Sl st in next 2 sts, Picot] 3 times. Sl st to beginning. Fasten off with long tail for sewing.
Berry: Make 9
With Red Shimmer
Ch 2 Round 1: 6 SC in 2nd ch from hook
Fasten off with long tail for sewing. Assembly step:
I recommend watching the video tutorial to learn how to sew all the pieces to your teapot cozy.
Sew leaves and berries to teapot cozy.
For the word “JOY” just chain an amount and pin it to the cozy and sew it on. You can also embroider the word to the cozy if you wish. Have fun with it!
See video tutorial for visual instructions on all the pieces and where they go.
Weave in all ends.
Enjoy!!
This post contains affiliate links, which I may be compensated for when you make a purchase. That means if you click on any link and buy from the linked websites, I will receive a small percentage of the value of your order. The amount you pay is not changed. Thank you for all your support in clicking the links in my blog!! You all are so amazing!! ~Nadia
The yarn provided for this pattern is courtesy of Red Heart Yarns
Here is the Fallen Leaves Cup Cozy! One leaf applique doubles as a secret pocket which is perfect for a tea bag, some cash, or a gift card to a coffee shop. Mug cozies make great gifts for family, friends, neighbors, teachers, colleagues and many others on your gift giving list.
Some suggested gift ideas: Mug or Travel mug + Cup Cozy + Hot Cocoa/Cash/Tea Bags/Specialty Coffee makes the perfect gift for that “hard to buy for” person on your list!
The handmade cup cozy adds a personal touch to an already awesome idea!
I have added a button to my cup cozy. You can get wooden buttons at the Etsy Shop Wood Be Fancy. You do not have to use a button, you could sew the seam up and have it slide on a travel mug.
Follow along with this video tutorial to learn how to make this cup cozy: The instructions start at 6 Minutes, 50 Seconds.
My dad will continue to be the videographer, editor, and photographer for our videos when I move away.
Support YARNutopia today so we can continue to bring you clear, quality crochet tutorials even after I move into my new home!
There will be an added expense of more travel and hopefully this won’t deter our ability to provide consistent videos on a weekly basis.
Enjoy this video and subscribe to my channel on YouTube for more tutorials on how to crochet!
Leave a comment, and share with your friends!
Pattern:
Designed by Nadia Fuad
Questions? Leave a comment! You may sell items made from my pattern, but please reference my name and Etsy Shop (YARNutopia). Please do not copy and post this pattern and claim it as your own.
-This pattern is for a standard sized cup. You could make it smaller or bigger just making more rows on your backing portion.
-You can make this cup cozy with any yarn: Cotton, Acrylic, Polyester
-You can make this using a bigger crochet hook if your tension is tighter
-You do not have to add the appliques, you could just have a plain cup cozy sans the leaf design.
-You can make the backing of your cup cozy bigger by chaining any even number.
Special Stitches:
Ch: chain
St(s): Stitch(es)
Sl st: slip stitch
SC: Single Crochet
DC: Double Crochet
TR: Treble Crochet
Picot: Ch 2, sl st in same st
Backing of Cup Cozy
Ch 12 or any even number.
Row 1: HDC in 2nd ch from hook, *Sl st in next ch, HDC in next ch, repeat from * across. (11 sts)
Row 2: Ch 1, turn, Sl st in 1st st, *HDC in next st, Sl st in next st, repeat from * across. (11 sts)
Row 3: Ch 1, turn, HDC in 1st st, *Sl st in next st, HDC in next st, repeat from * across. (11 sts)
Rows 4-28: Repeat rows 2 and 3 ending on a repeat of Row 2.
Fasten off with long tail if you are sewing it closed.
Fasten off with short tail if you are not sewing it closed.
Weave in all ends if you are adding a button.
Leaf: Make 2
Ch 9 Round 1: Sl st in 2nd ch from hook, SC in next 2 Chs, HDC in next 2 Chs, DC in next, TR in next, 10 TR in last ch
Working on opposite side of foundation chain: TR in next, DC in next, HDC in next 2, SC in next 2, Sl st in last.
Round 2: [Sl st in next 2 sts, Picot] 5 times, sl st in next 3 sts, ch 5, sl st in 2nd ch from hook and next 3 chs, sl st back in the same st on round 1 of the leaf, sl st in next 3 sts, Picot, [sl st in next 2 sts, Picot] 5 times, sl st to beginning, Picot, Fasten off. Assembly step:
Sew leaves and button to cup cozy. When sewing one leaf, be sure to keep it open as a pocket.
Chain a loop on the edge of the cup cozy for looping around the button.
See video tutorial for visual instructions on all the pieces and where they go.
Weave in all ends.
Enjoy!!
This post contains affiliate links, which I may be compensated for when you make a purchase. That means if you click on any link and buy from the linked websites, I will receive a small percentage of the value of your order. The amount you pay is not changed. Thank you for all your support in clicking the links in my blog!! You all are so amazing!! ~Nadia
“Perhaps the most wondrous of all mystical creatures, the unicorn is a symbol of miracles and enchantment.”
The unicorn gives us the power to believe that anything is possible. These fun and mythical creatures are what fantasies and dreams are made of. This pattern will transform a basic pair of slippers into unicorns that is fun for all ages!
Not looking to make unicorn slippers? Transform yours into other creatures with a few modifications! My video tutorial and FREE written pattern gives instructions on how to make 3 different sizes. I think we all could use some cozy unicorn slippers. Am I right?
Follow along with this video tutorial to learn how to make these magical slippers:
My dad will continue to be the videographer, editor, and photographer for our videos when I move away.
Support YARNutopia today so we can continue to bring you clear, quality crochet tutorials even after I move into my new home!
There will be an added expense of more travel and hopefully this won’t deter our ability to provide consistent videos on a weekly basis.
Enjoy this video and subscribe to my channel on YouTube for more tutorials on how to crochet!
Leave a comment, and share with your friends!
Designed by Nadia Fuad
Questions? Leave a comment! You may sell items made from my pattern, but please reference my name and Etsy Shop (YARNutopia). Please do not copy and post this pattern and claim it as your own.
-The written pattern has sole sizes for Small 5/6 US Women’s Shoe Size, Medium 7/8 US Women’s Shoe Size, and Large 9/10 US Women’s Shoe Size
-The video tutorial ONLY shows the MEDIUM size.
-The sole is made and then the back of the slipper is made and then the front of the slipper and embellishments are made. If you are making smaller or bigger sizes, follow the written pattern for the sole and then watch the video tutorial for help on making the back of the slipper and the front of the slipper.
-The front of the slipper is the same on ALL sizes. The back may be a little different because of the stitch counts.
-This pattern is written for one foot. Be sure to make enough pieces for two feet.
-Depending on how stuffed you want this slipper, you can stuff it as much as you need. The more you stuff, the more your foot will be pushed down into the sole.
Special Stitches:
Ch: chain
St(s): Stitch(es)
Sl st: slip stitch
SC: Single Crochet
DC: Double Crochet
BLO: Work in the Back Loop Only
DC2TOG: Double Crochet 2 Together
DC3TOG: Double Crochet 3 Together
Small (Will fit Size 5/6 US Women’s Shoe Size)
Sole: With Minty, Use 2 Strands of yarn at the same time. (Make 2)
Ch 23 Round 1: SC in 2nd ch from hook and across until last ch, 3 sc in last ch, sc along the opposite side, 2 sc in same st as 1st st. Sl st to 1st sc. (46 sts)
Round 2: Ch 1, 2 SC in 1st st, sc in next 8 sts, HDC in next 12 sts, 2 HDC in each of the next 3 sts, HDC in next 12 sts, SC in next 8 sts, 2 SC in last sts, Sl st to 1st sc. (52 sts)
Round 3: Ch 1, 1 SC in 1st st, 2 SC in next st, 1 SC in next 13 sts, 1 HDC in next 6 sts, DC in next 3 sts, 2 DC in each of the next 3 sts, DC in next 3 sts, HDC in next 6 sts, SC in next 13 sts, 2 SC in next, SC in last sts. Sl st to first st. (58 sts)
Round 4: Ch 1, SC in 1st st, 2 SC in next, HDC in next 20 Sts, DC in next 3 sts, 2 DC in each of the next 6 sts, DC in next 3 sts, HDC in next 20 sts, 2 SC in next st, 1 SC in last sts. Sl st to first st.
Round 5: Ch 2, HDC in 1st st, 2 HDC in next 2 sts, DC in next 25 sts, 2 HDC in next st, HDC in next st, 2 HDC in nexxt st, 1 HDC in next st, SC in 4 sts, HDC in next st, 2 HDC in next st, 1 DC in next 22 sts, 2 HDC in next 2 sts, SC in last sts. Sl st to first st. (73 sts)
Round 6: Ch 1, turn, (Looking at wrong side of work), Sl st in each st around (73 sts), turn.
Round 7: Ch 1, (Looking at right side of work) SC around, Sl st to beginning.
Round 8: Ch 1, SC around, sl st to beginning. Fasten off.
Count 39 sts on the front of sole. Place stitch marker in first and last sts making 39 sts on the front of the sole (See video tutorial for visual instructions)
Go on to making the Back of slipper.
Medium (Will fit Size 7/8 US Women’s Shoe Size)
Video Tutorial Features this Size
Sole: With Minty, Use 2 Strands of yarn at the same time. (Make 2)
Ch 23 Round 1: SC in 2nd ch from hook and across until last ch, 3 sc in last ch, sc along the opposite side, 2 sc in same st as 1st st. Sl st to 1st sc. (46 sts)
Round 2: Ch 1, 2 SC in 1st st, sc in next 8 sts, HDC in next 12 sts, 2 HDC in each of the next 3 sts, HDC in next 12 sts, SC in next 8 sts, 2 SC in last sts, Sl st to 1st sc. (52 sts)
Round 3: Ch 1, 1 SC in 1st st, 2 SC in next st, 1 SC in next 13 sts, 1 HDC in next 6 sts, DC in next 3 sts, 2 DC in each of the next 3 sts, DC in next 3 sts, HDC in next 6 sts, SC in next 13 sts, 2 SC in next, SC in last sts. Sl st to 1st st. (58 sts)
Round 4: Ch 1, SC in 1st st, 2 SC in next, HDC in next 20 Sts, DC in next 3 sts, 2 DC in each of the next 6 sts, DC in next 3 sts, HDC in next 20 sts, 2 SC in next st, 1 SC in last sts. Sl st to 1st st.
Round 5: Ch 1, 2 SC in 1st 3 sts, HDC in next 5 sts, DC in next 23 sts, 2 DC in next 4 sts, DC in next 24 sts, HDC in next st, 2 SC in last sts, Sl st to 1st sc. (75 sts)
Round 6: Ch 1, turn, (Looking at wrong side of work), Sl st in each st around (75 sts), turn.
Round 7: Ch 1, (Looking at right side of work) SC around, Sl st to beginning.
Round 8: Ch 1, SC around, sl st to beginning. Fasten off.
Count 39 sts on the front of sole. Place stitch marker in first and last sts making 39 sts on the front of the sole (See video tutorial for visual instructions)
Go on to making the Back of slipper.
Large (Will Fit Size 9/10 US Women’s Shoe Size)
Sole: With Minty, Use 2 Strands of yarn at the same time. (Make 2)
Ch 23 Round 1: SC in 2nd ch from hook and across until last ch, 3 sc in last ch, sc along the opposite side, 2 sc in same st as 1st st. Sl st to 1st sc. (46 sts)
Round 2: Ch 1, 2 SC in 1st st, sc in next 8 sts, HDC in next 12 sts, 2 HDC in each of the next 3 sts, HDC in next 12 sts, SC in next 8 sts, 2 SC in last sts, Sl st to 1st sc. (52 sts)
Round 3: Ch 1, 1 SC in 1st st, 2 SC in next st, 1 SC in next 13 sts, 1 HDC in next 6 sts, DC in next 3 sts, 2 DC in each of the next 3 sts, DC in next 3 sts, HDC in next 6 sts, SC in next 13 sts, 2 SC in next, SC in last sts. Sl st to 1st st. (58 sts)
Round 4: Ch 1, SC in 1st st, 2 SC in next, HDC in next 20 Sts, DC in next 3 sts, 2 DC in each of the next 6 sts, DC in next 3 sts, HDC in next 20 sts, 2 SC in next st, 1 SC in last sts. Sl st to 1st st.
Round 5: Ch 1, 2 SC in 1st 3 sts, HDC in next 5 sts, DC in next 23 sts, 2 DC in next 4 sts, DC in next 24 sts, HDC in next st, 2 SC in last sts, Sl st to 1st sc. (75 sts)
Round 6: Ch 2, 2 HDC in 1st st, HDC in next 2 sts, 2 DC in next 2 sts, DC in next 30 sts, [2 DC in next st, DC in next st] 4 times, DC in next 29 sts, 2 DC in next st, 2 HDC in next st, (If there are sts left, HDC in them), Sl st to first HDC. Sl st to beginning. (83 sts)
Round 7: Ch 1, turn, (Looking at wrong side of work), Sl st in each st around (83 sts), turn.
Round 8: Ch 1, (Looking at right side of work) SC around, Sl st to beginning.
Round 9: Ch 1, SC around, sl st to beginning. Fasten off.
Count 39 sts on the front of sole. Place stitch marker in first and last sts making 39 sts on the front of the sole (See video tutorial for visual instructions)
Go on to making the Back of slipper.
For all sizes:
Back of slipper:
(With White and 2 strands of yarn)
Make sure you have 39 sts free in the front of sole Row 1: Ch up 1, SC across to marked st Rows 2-20: Ch 1, turn, SC in each st across.
Fasten off with long tail for sewing.
See video tutorial for sewing and visual instructions.
Assembly:
Fold inward toward sole, sew along Row 1 of back of slipper making a tunnel. Stuff the tunnel with polyfil and sew open ends closed.
Front of slipper:
Make sure you have 39 sts free on all sizes. With White and 2 strands of yarn
Row 1: Ch 1, SC across to last st, ch 1, turn. (39 sts) Row 2: SC across. Ch 1, turn. (39 sts) Row 3: SC in 1st 14 sts, [DC2TOG] 5 Times, SC in last 15 sts, ch 1, turn. (34 sts) Row 4: SC in 1st 10 sts, [DC2TOG, DC in next st] 4 times, DC2TOG, SC in last 10 sts, ch 1, turn. Row 5: SC in 1st 8 sts, [DC2TOG] 6 times, SC in last 9 sts. Ch 1, turn. Row 6: SC in 1st 6 sts, [DC2TOG] 6 times, SC in last 5 sts. Ch 1, turn. (17 sts) Row 7: SC in first 4 sts, [DC2TOG] 4 times, SC in last 5 sts, ch 1, turn. Row 8: [DC2TOG] 3 times. DC in next st, [DC2TOG] 3 times. Ch 1, turn. Row 9: DC3TOG, DC in next, DC3TOG. Fasten off.
Top Front of slipper:
This piece is worked separately and then sewn onto the slipper.
With 2 strands of white yarn,
Ch 40
Row 1: SC in 2nd ch from hook and across. Ch 1, turn. Row 2: SC across. Ch 1, turn. (39 sts) Row 3: SC in 1st 14 sts, [DC2TOG] 5 Times, SC in last 15 sts, ch 1, turn. (34 sts) Row 4: SC in 1st 10 sts, [DC2TOG, DC in next st] 4 times, DC2TOG, SC in last 10 sts, ch 1, turn. Row 5: SC in 1st 8 sts, [DC2TOG] 6 times, SC in last 9 sts. Ch 1, turn. Row 6: SC in 1st 6 sts, [DC2TOG] 6 times, SC in last 5 sts. Ch 1, turn. (17 sts) Row 7: SC in first 4 sts, [DC2TOG] 4 times, SC in last 5 sts, ch 1, turn. Row 8: [DC2TOG] 3 times. DC in next st, [DC2TOG] 3 times. Ch 1, turn. Row 9: DC3TOG, DC in next, DC3TOG. Fasten off with very long tail for sewing.
Eyes and Circle under Horn:
Use Red Heart Yarn in Black for the eyes, use Variegated yarn for the circle under the horn.
Ch 2 Rnd 1: Sc 6 in 2nd ch from hook. Sl st to 1st st. (6) Rnd 2: Ch 1, Sc 2 in each st. sl st to 1st st (12) Rnd 3: ch 1, (Sc 2 in next st, sc in next st) 6 times. Sl st to 1st st (18)
Fasten of with long tail for sewing.
White pupils for the Eyes:
Ch 2 Rnd 1: Sc 6 in 2nd ch from hook. (6)
Fasten off with long tail.
Sew to black portion of eye.
Horn:
In Gleam yarn in Creamy, work in continuous rounds
Ch 2 Rnd 1: 4 SC in 2nd ch from hook (4) Rnd 2: SC in each st around Rnd 3: 2 SC in each st around. (8) Rnd 4: SC in each st around Rnd 5: 2 SC in next st, SC in next 7 sts (9) Rnd 6: SC in each st around (9) Rnd 7: 2 SC in next st, SC in next 8 sts (10) Rnd 8: SC in each st around (10) Rnd 9: 2 SC in next st, SC in next 9 sts (11) Rnd 10: SC in each st around. (11)
Ears: Make 2 in White
Ch 6 Row 1: Sc in 2nd ch from hook and across, ch 1, turn. (5) Row 2: SC in each st across. Ch 1, turn. (5) Row 3: SC2TOG, SC in next, SC2TOG, ch 1, turn. (3) Row 4: SC across, ch 1, turn. (3) Row 5: SC3TOG
SC around entire ear. Fasten off with long tail for sewing.
Cheeks: Make 2 with pink yarn
Ch 6 Row 1: SC in 2nd ch from hook, HDC in next, DC in next, HDC in next, SC in last.
Fasten off with long tail for sewing.
Mane:
With Variegated yarn and work in continuous rounds.
Ch 8 Rnd 1: SC in 1st ch and around Rnd 2-6: SC in each st around. Rnd 7-9: SL ST in 4 sts, SC in 4 sts Rnds 10-19: SC in each st around Rnds 20-22: SL St in 4 sts, SC in 4 sts Rnds 22-28: SC in each st around
Fasten off with long tail. Stuff it.
Sew to slipper behind eyes/horn.
Assembly step:
Sew all pieces to slipper. Embellish by embroidering the mouth and nose.
Add fringe to the piece behind the horn to make the mane.
See video tutorial for visual instructions on all the pieces and where they go.
Sew everything closed after stuffing.
This post contains affiliate links, which I may be compensated for when you make a purchase. That means if you click on any link and buy from the linked websites, I will receive a small percentage of the value of your order. The amount you pay is not changed. Thank you for all your support in clicking the links in my blog!! You all are so amazing!! ~Nadia
The yarn provided for this pattern is courtesy of Red Heart Yarns
I created this Dynamic Window Granny Square design to add to our 365 Days of Granny Squares project. It uses variety of crochet stitches to create an interesting design! I hope you enjoy making your square!
A couple disclaimers before you start: Be sure to check your tension and use the correct size hook for your square. I demonstrate with an H-5.00mm crochet hook in the video tutorial, but you can make yours bigger or smaller by using a bigger or smaller hook. Also, if yours turns out wonky when you are finished, you may need to block this square to make it nice and flat.
Follow along with this video tutorial to learn how to make this granny square:
My dad will continue to be the videographer, editor, and photographer for our videos when I move away.
Support YARNutopia today so we can continue to bring you clear, quality crochet tutorials even after I move into my new home!
There will be an added expense of more travel and hopefully this won’t deter our ability to provide consistent videos on a weekly basis.
**You can always contact me via Facebook if you have any problems with the pattern. I am happy to help if you have any questions along the way.
***You can sell anything you make from my patterns, please just link back to my website YARNutopia.com. Thank you!
Teacher: Nadia Fuad
Video and Editing: Fuad Azmat (My Daddy)
Share your work on Facebook!
Add me on Snapchat: YARNutopia
Follow me on Instagram
Visit My Ravelry Store and add this to your Favorites!
Follow me on Twitter: @YARNutopia
Enjoy this video and subscribe to my channel on YouTube for more tutorials on how to crochet!
Leave a comment, and share with your friends!
Pattern:
Designed by Nadia Fuad You *may* sell items made from my pattern, but please reference my website YARNutopia.com.
Please do not copy, sell, and/or post this pattern and claim it as your own.
Materials:
-Red Heart Super Saver Yarn in as many colors as you want.
-H-5.00mm Crochet Hook
-Yarn Needle
-Scissors
NOTES:
-You can use a smaller or larger hook to make this square depending on your tension. I wouldn’t use anything larger than an I-5.5mm Crochet Hook though.
-The finished square measures 6.5 inches
-This square is worked from the center outward
Special stitches:
Ch(s): chain(s)
YO: Yarn Over
St(s): Stitch(es)
Sl st: slip stitch
SK: Skip
SC: Single Crochet
HDC: Half-Double Crochet
DC: Double Crochet
BPSC: Back Post Single Crochet
BPHDC: Back Post Half Double Crochet
BPDC: Back Post Double Crochet
BPTR: Back Post Treble Crochet
Beg. Cluster: Ch up 2, [Y/O, Insert Hook, Y/O, Pull through, Y/O Pull through 2 loops] 2 times. Y/O pull through all 3 loops on hook.
3DC Cluster: [Y/O, Insert Hook, Y/O, Pull through, Y/O Pull through 2 loops] 3 times. Y/O pull through all 4 loops on hook.
Pattern:
If you have any confusion or difficulty with reading this pattern, please watch the video tutorial to have visual instructions.
Ch 4, sl st to 1st ch to form a ring.
Rnd 1: Ch 1, 8 SC in ring. Sl st to 1st sc (8 sts)
Rnd 2: Ch up 1, SC in same st, *Ch 2, Sk next st, SC in next st, repeat from * around, sl st to 1st sc. (4 ch 2 sps)
Rnd 3: In any ch 2 sp: Ch up 4 (counts as TR), [DC, HDC, SC, HDC, DC, TR] in same sp, * [TR, ch 3, TR] in sc, [TR, DC, HDC, SC, HDC, DC, TR] in next ch sp, repeat from * around, sl st to ch up 4.
Rnd 4: In any ch 3 corner sp: Ch up 4 (counts as TR), [TR, Ch 3, 2 TR] in same sp, * TR in next st, DC in next 2 sts, HDC in next st, SC in next st, HDC in next st, DC in next 2 sts, TR in next st, [2 TR, ch 3, 2 TR] in corner, repeat from * around, sl st to ch up 4.
Rnd 5: In any corner: Ch 1, *[2SC, ch 2, 2 SC] in corner, BPSC in next 3 sts, BPHDC in next st, BPDC in next st, BPTR in next 3 sts, BPDC in next st, BPHDC in next st, BPSC in next 3 sts, repeat from * around, sl st to beg. sc.
Rnd 6: In any corner: [Beg. Cluster, ch 2, cluster] in corner, * Ch 1, [sk 1 st, Cluster in next st] 8 times, ch 1, [cluster, ch 2, cluster] in corner. repeat from * around, sl st to beg. cluster. Fasten off.
Weave in all ends.
Enjoy!!
This post contains affiliate links, which I may be compensated for when you make a purchase. That means if you click on any link and buy from the linked websites, I will receive a small percentage of the value of your order. The amount you pay is not changed. Thank you for all your support in clicking the links in my blog!! You all are so amazing!! ~Nadia
The yarn provided for this pattern is courtesy of Red Heart Yarns
It’s my birthday! I created this Birthday Wish Granny Square to add to our 365 Days of Granny Squares project. It uses variety of crochet stitches to create an interesting design! I hope you enjoy making your square!
A couple disclaimers before you start: Be sure to check your tension and use the correct size hook for your square. I demonstrate with an H-5.00mm crochet hook in the video tutorial, but you can make yours bigger or smaller by using a bigger or smaller hook. Also, if yours turns out wonky when you are finished, you may need to block this square to make it nice and flat.
Watch this video to learn how to make this square:
**You can always contact me via Facebook if you have any problems with the pattern. I am happy to help if you have any questions along the way.
***You can sell anything you make from my patterns, please just link back to my website YARNutopia.com. Thank you!
Teacher: Nadia Fuad
Video and Editing: Fuad Azmat (My Daddy)
Share your work on Facebook!
Add me on Snapchat: YARNutopia
Follow me on Instagram
Visit My Ravelry Store and add this to your Favorites!
Follow me on Twitter: @YARNutopia
Enjoy this video and subscribe to my channel on YouTube for more tutorials on how to crochet!
Leave a comment, and share with your friends!
Pattern:
Designed by Nadia Fuad You *may* sell items made from my pattern, but please reference my website YARNutopia.com.
Please do not copy, sell, and/or post this pattern and claim it as your own.
NOTES:
-You can use a smaller or larger hook to make this square depending on your tension. I wouldn’t use anything larger than an I-5.5mm Crochet Hook though.
-The finished square measures 7 inches (18 cm)
-This square is worked from the center outward
Special stitches:
Ch(s): chain(s)
YO: Yarn Over
St(s): Stitch(es)
Sl st: slip stitch
SK: Skip
SC: Single Crochet
HDC: Half-Double Crochet
DC: Double Crochet
Beg. Popcorn: Ch up 3, 4DC in same sp, remove hook, put hook in ch up 3, put loop back on hook, pull through and pull tight.
Popcorn: 5DC in same sp, remove hook, put hook in 1st dc of grouping, put loop back on hook, pull through and pull tight.
Picot: Ch 3, sl st in 3rd ch from hook. Picot made.
Long DC: Double crochet in Picot of Petal
Pattern:
If you have any confusion or difficulty with reading this pattern, please watch the video tutorial to have visual instructions.
Ch 13
Rnd 1: Sc in 2nd ch from hook and across. (12)
Rnd 2: Work in BLO, Ch up 1, turn, Sc across
Rnd 3: Work in FLO Ch 1, turn, SC across
Rnd 4: Repeat row 2, fasten off, weave in ends.
Rnd 5: Sk 3 sts, Attach yarn in BLO of next st, ch 1, sc in same st and in next 5 sts, leaving last 3 sts unworked. (6 sts)
Rnd 6: Ch 1, turn, SC in FLO across. (6 sts)
Rnd 7: Ch 1, turn, Work in BLO, SC across. (6 sts)
Assembly: SC around cake (40 sts evenly) See video tutorial for specific stitches.
Rnd 8: (See video tutorial to learn how to do this round) In top right st of the top layer of cake: Ch 1, sc in same st, Ch 4, sk 4 sts, sc in next st, Ch 4, sk 2 sts, sc in next st, ch 4, sk 3 sts, sc in next st, ch 4, sk 3 sts, sc in next st, [ch 4, sk 2 sts, sc in next st] 5 times, ch 4, sk 3 sts, sc in next st, ch 4, sk 2 sts, sc in next st, ch 4, sk last sts, sl st to 1st sc.
Rnd 9: Sl st in ch 4 sp, ch 1, SC in same sp, *Ch 4, SC in next ch sp, repeat from * around. Sl st to beg sc
Rnd 10: Sl st in ch 4 sp, Ch up 3 (counts as DC), 3 DC in same sp, *[4 DC, ch 2, 4 DC] in next sp, 4 DC in next 2 ch sps, repeat from * around. Sl st to beg. ch up 3.
Rnd 11: DC in each st around, [2dc, ch 2, 2dc] in corners. Fasten off
Weave in all ends.
Frilly siding:
Turn square upside down,
Working in front loops of bottom layer of cake:
Sc in 1st st, *ch 3, sc in next st, repeat from * across. Fasten off, weave in ends.
Candle:
Row 1: Attach yarn to edge round on top center of cake, ch up 1, sc in same st and next st
Row 2, Ch 1, turn, SC in 2 sts
Fasten off, weave in ends.
With Yellow, attach yarn to st, ch 3, sl st in next st, fasten off, weave in ends.
Enjoy!!
This post contains affiliate links, which I may be compensated for when you make a purchase. That means if you click on any link and buy from the linked websites, I will receive a small percentage of the value of your order. The amount you pay is not changed. Thank you for all your support in clicking the links in my blog!! You all are so amazing!! ~Nadia
I created this Hello, Sunshine Granny Square design to add to our 365 Days of Granny Squares project. It uses variety of crochet stitches to create an interesting design! I hope you enjoy making your square!
A couple disclaimers before you start: Be sure to check your tension and use the correct size hook for your square. I demonstrate with an H-5.00mm crochet hook in the video tutorial, but you can make yours bigger or smaller by using a bigger or smaller hook. Also, if yours turns out wonky when you are finished, you may need to block this square to make it nice and flat.
Follow along with this video tutorial to learn how to make this granny square:
My dad will continue to be the videographer, editor, and photographer for our videos when I move away.
Support YARNutopia today so we can continue to bring you clear, quality crochet tutorials even after I move into my new home!
There will be an added expense of more travel and hopefully this won’t deter our ability to provide consistent videos on a weekly basis.
**You can always contact me via Facebook if you have any problems with the pattern. I am happy to help if you have any questions along the way.
***You can sell anything you make from my patterns, please just link back to my website YARNutopia.com. Thank you!
Teacher: Nadia Fuad
Video and Editing: Fuad Azmat (My Daddy)
Share your work on Facebook!
Add me on Snapchat: YARNutopia
Follow me on Instagram
Visit My Ravelry Store and add this to your Favorites!
Follow me on Twitter: @YARNutopia
Enjoy this video and subscribe to my channel on YouTube for more tutorials on how to crochet!
Leave a comment, and share with your friends!
Pattern:
Designed by Nadia Fuad You *may* sell items made from my pattern, but please reference my website YARNutopia.com.
Please do not copy, sell, and/or post this pattern and claim it as your own.
NOTES:
-You can use a smaller or larger hook to make this square depending on your tension. I wouldn’t use anything larger than an I-5.5mm Crochet Hook though.
-The finished square measures 7 inches (18 cm)
-This square is worked from the center outward
Special stitches:
Ch(s): chain(s)
YO: Yarn Over
St(s): Stitch(es)
Sl st: slip stitch
SK: Skip
SC: Single Crochet
HDC: Half-Double Crochet
DC: Double Crochet
Beg. Popcorn: Ch up 3, 4DC in same sp, remove hook, put hook in ch up 3, put loop back on hook, pull through and pull tight.
Popcorn: 5DC in same sp, remove hook, put hook in 1st dc of grouping, put loop back on hook, pull through and pull tight.
Picot: Ch 3, sl st in 3rd ch from hook. Picot made.
Long DC: Double crochet in Picot of Petal
Pattern:
If you have any confusion or difficulty with reading this pattern, please watch the video tutorial to have visual instructions.
Ch 4, sl st to 1st ch to form a ring.
Rnd 1: Ch 1, 8 SC in ring. Sl st to 1st sc (8 sts)
Rnd 2: Ch up 3, Beg. Popcorn in same st, *ch 3, Popcorn in next st, repeat from * around, sl st to beg. popcorn. (8 Popcorn sts, 8 ch 3 sps)
Rnd 3: In any ch 3 sp, Ch up 3, [Beg. Popcorn, ch 3, Popcorn]in same sp, *ch 3, [Popcorn, ch 3, Popcorn] in next ch sp, repeat from * around, sl st to beg. popcorn. (16 popcorn sts)
Rnd 4: In ch 3 sp between popcorns (see video tutorial for specific placement), ch 1, [sc, hdc, dc, tr, picot, tr, dc, hdc, sc] in same sp, *ch 2, sk next ch 3 sp, [sc, hdc, dc, tr, picot, tr, dc, hdc, sc] in next ch 3 sp, repeat from * around, sl st to (8 petals made)
Rnd 5: Working in ch sps between petals from round 3, ch up 1, sc in same sp working around ch from round 4, *ch 4, sc in next free ch sp, put ch behind petal, repeat from * around, sl st to 1st sc. (see video tutorial for visual instructions on this round) (8 ch 4 sps)
Rnd 6: In any ch sp: Ch up 3 (counts as DC), [3DC, ch 2, 4 DC] in same sp, *4DC in next ch sp, [4DC, ch 2, 4 DC] in next ch sp, Repeat from * around, sl st to ch up 3.
Rnd 7: In any st, Ch up 3, DC in each st around putting [3DC, ch 2, 3 DC] in corners, sl st to beg. ch up 3.
Rnd 8: In corner: Ch up 3, *[sk 1st st, DC in next st, DC in sk’d st (X-Stitch Made)] 4 times, tack down petal putting X-Stitch through Picot, X-Stitch in the rest of the stitches on the side until the corner. (there should be 9 X-Stitches) on the side. In corners put: 2 DC, Long DC in Picot of petal, tacking it down, 2 more DC in same corner ch sp, repeat from * around. Ending with 2 DC, Long DC in Picot of petal, 1 more DC in same corner, sl st to ch up 3. Fasten off.
Weave in all ends.
Enjoy!!
This post contains affiliate links, which I may be compensated for when you make a purchase. That means if you click on any link and buy from the linked websites, I will receive a small percentage of the value of your order. The amount you pay is not changed. Thank you for all your support in clicking the links in my blog!! You all are so amazing!! ~Nadia
The yarn provided for this pattern is courtesy of Red Heart Yarns
I created this Autumn Meadow Granny Square design to add to our 365 Days of Granny Squares project. It uses variety of crochet stitches to create an interesting design! I hope you enjoy making your square!
A couple disclaimers before you start: Be sure to check your tension and use the correct size hook for your square. I demonstrate with an H-5.00mm crochet hook in the video tutorial, but you can make yours bigger or smaller by using a bigger or smaller hook. Also, if yours turns out wonky when you are finished, you may need to block this square to make it nice and flat.
Follow along with this video tutorial to learn how to make this square:
**You can always contact me via Facebook if you have any problems with the pattern. I am happy to help if you have any questions along the way.
***You can sell anything you make from my patterns, please just link back to my website YARNutopia.com. Thank you!
Teacher: Nadia Fuad
Video and Editing: Fuad Azmat (My Daddy)
Share your work on Facebook!
Add me on Snapchat: YARNutopia
Follow me on Instagram
Visit My Ravelry Store and add this to your Favorites!
Follow me on Twitter: @YARNutopia
Enjoy this video and subscribe to my channel on YouTube for more tutorials on how to crochet!
Leave a comment, and share with your friends!
Pattern:
Designed by Nadia Fuad You *may* sell items made from my pattern, but please reference my website YARNutopia.com.
Please do not copy, sell, and/or post this pattern and claim it as your own.
Materials:
-Red Heart Super Saver Yarn in as many colors as you want.
-H-5.00mm Crochet Hook
-Yarn Needle
-Scissors
NOTES:
-You can use a smaller or larger hook to make this square depending on your tension. I wouldn’t use anything larger than an I-5.5mm Crochet Hook though.
-The finished square measures 6 inches.
-This square is worked from the center outward
Special stitches:
Ch(s): chain(s)
YO: Yarn Over
St(s): Stitch(es)
Sl st: slip stitch
SK: Skip
SC: Single Crochet
HDC: Half-Double Crochet
DC: Double Crochet
BPSC: Back Post Single Crochet
Pattern:
If you have any confusion or difficulty with reading this pattern, please watch the video tutorial to have visual instructions.
Ch 4, sl st to 1st ch to form a ring.
Rnd 1: Ch up 2 (counts as HDC), 11 HDC in ring, sl st to beg ch up 2. (12 Sts)
Rnd 2: Ch up 4 (Counts as HDC+ ch 2 sp), HDC in same st, [HDC, ch 2, HDC] in each st around. Sl st to 2nd ch of beg ch 4. Fasten off.
Rnd 3: Around 2 HDC’s (see video tutorial), BPSC around 2 sts, ch 3, * BPSC around the next 2 sts, ch 3, repeat from * around. Sl st to first BPSC.
Rnd 4: In any ch 3 sp: * [ch 1, sc, HDC, 3DC, HDC, SC, sl st in same ch 3 sp] sl st in in next ch 3 sp, [ch 1, sc, HDC, 2 DC, Picot, DC, HDC, SC, Sl st in same ch 3 sp] sl st in next ch 3 sp, repeat from * around. sl st to beginning sl st or sc. (6 pointy petals, 6 round petals) Fasten off.
Rnd 5: Working around the BPSC’s from round 3: BPSC around BPSC, * ch 4, BPSC around next BPSC, Repeat from * around. Sl st to first BPSC.
Rnd 6: In any ch 4 sp: Ch up 3, [2DC, ch 2, 2 DC] in same sp, * 3 DC in each of the next 2 ch 4 sps, [3DC, ch 2, 3DC] in next ch 4 sp, Repeat from * around. Sl st to beg. ch up 3.
Rnd 7: In any corner: Ch up 3, [DC, ch 2, 2 DC] in same corner sp, 3 DC in gap between each dc groupings until next corner. [2DC, ch 2, 2 DC] in corners. Sl st to beg. ch up 3.
Rnd 8: In any corner: Ch 1, [2sc, ch 2, 2 sc] in same corner, sc in each st around putting [2dc, ch 2, 2 dc] in corners. Fasten off.
This blog is compiled to show the costumes I made for Nate and myself. You can find them all in one place rather than navigating through my blog to find each individual pattern. Here, I have them all in one spot for your convenience. You can click the links in the paragraphs before the photos or you can simply click the photos to view the video tutorials and written patterns for each individual piece for these costumes.
We start with the Beast Hat. It’s perfect not only for a costume (although, I will warn you, it is very warm, and won’t last long in a crowd of people), but also for cold days! It’s an easily adaptable and versatile pattern by changing colors and embellishments to make any animal-istic creature that you fancy!
Second, you will find the Beast Gloves here. With some simple modifications, you can take these very scary beast gloves and turn them into an easy pair of hand-warmers, just by omitting the finger portion of the pattern. These were made to enhance the crochet costume. Have fun with it!
Next up, by making a very simple chain, I was able to create this embroidery embellishment detail that I sewed onto the costume jacket. I first traced out the design in a chalk pencil, chained the length needed for each scroll design and sewed it on using a yarn needle. I added some lace and just pinned it inside the sleeves and on the collar.
Lastly, I made these simple foot coverings. These are a very basic flat panel using double crochet with an ankle cuff that wraps around the bottom of the leg. Once complete, I sewed fur through the stitches to give it a paw-like look that can be worn over shoes. (These do not have a written pattern or a video tutorial)
For the Princess costume, I created the shirt here. This is one of two pieces for the dress ensemble. I added tulle and embellished the outfit with medium sized flower roses that I used in my Floral Dream Crown tutorial.
The Princess Costume Skirt was the second piece I crocheted for this ensemble. As you will see in the pattern, you can make this as big or as small as you want it to be. This can modified to be made in a variety of princess dresses by changing colors or adding different embellishments.
Lastly, I added the Enchanted Rose Cape that can be found here as a finishing touch to this princess costume. This cape can also be modified into a poncho or a bridal cape.
Here are the photos of us together in our costumes! Photos do not lead to any patterns.
An enormous amount of improvising was done in the creation of this princess dress that I made for my Halloween costume. Nate and I are attending a costume party this year and I was all set to make sure that this was created in time. But boy, did I underestimate how hard it would be to make this ensemble! In the process, I ran out of yarn, I had to frog my work a few times, and actually shed a few tears. The skirt wasn’t as voluminous as I hoped, but you know what, it doesn’t matter anymore! I finished it, and I am getting passed the flaws to appreciate the work that went into making this. Overall, it may not be exactly what I imagined, but once in awhile a project takes on a life of its own and still turns out alright!
This pattern is for the basic dress design. However, you can change color. Add or subtract embellishments or details to customize your own costume. Pick a princess you love and go for it! Whether it be yellow like the one in this tutorial or pink, blue, a blue top with yellow skirt, green. Modifying this for any character can bring your costume to life!
Once the shell of the costume was made and the side panels added, I used similar colored tulle to enhance the sides giving the skirt full scallop look. I sewed the tulle in the sides and tucked it in the center then secured the entire piece with a center rose. I used the medium size rose flower from my Floral Dream Crown pattern.
Using a corset style lace-up, I used ribbon to create a closure for the shirt. Simply tying it down the back creates this look.
I wrapped tulle around the shoulders of the top and using a couple stitches, I secured it into place. I added another rose in the center bust area to tie in this design with similar details as the skirt.
I finished the shell of my princess skirt in the photo below. It was still a work in progress as I planned to add details and volume. I had a revelation after trying it on for sizing, that by itself, the shell works nicely for a basic maxi skirt. After trying it on I was like, “I would totally wear the skirt like this!”
Follow this video tutorial to learn how to make the Princess Skirt:
Follow this video tutorial to learn how to make the Princess Lace-Up Costume Top:
**You can always contact me via Facebook if you have any problems with the pattern. I am happy to help if you have any questions along the way.
***You can sell anything you make from my patterns, please just link back to my website
YARNutopia.com. Thank you!
Teacher: Nadia Fuad
Video and Editing: Fuad Azmat (My Daddy)
Share your work on Facebook!
Add me on Snapchat: YARNutopia
Follow me on Instagram
Visit My Ravelry Store and add this to your Favorites!
Follow me on Twitter: @YARNutopia
Enjoy this video and subscribe to my channel on YouTube for more tutorials on how to crochet!
Leave a comment, and share with your friends!
Pattern:
Designed by Nadia Fuad You *may* sell items made from my pattern, but please reference my website YARNutopia.com.
Please do not copy, sell, and/or post this pattern and claim it as your own.
-The pattern video tutorial starts at 8 minutes 14 seconds. The first 8 minutes are frequently asked questions and other information.
-You can use any cotton/acrylic/polyester yarn you want to use. As long as it’s a thinner and lighter weight yarn. Having so much yarn can result in a heavy skirt.
-This pattern is written for an adult size, but you can make it any size by chaining more or less. The top doesn’t have any multiple so you can chain as many as you need to in the beginning. The skirt is in a multiple of 14, so you can make your chain as big as you want as long as your count is in the multiple of 14. (I explain all this in the video if that is confusing)
-You can use a smaller or larger hook to make this smaller or bigger depending on your tension.
-For measurements and to learn how big mine turned out to be, watch the beginning of the video tutorial. For the top, I measure it as I go.
-This took me approximately 12 hours to complete fully.
Special stitches:
Ch(s): chain(s)
YO: Yarn Over
St(s): Stitch(es)
Sl st: slip stitch
SK: Skip
SC: Single Crochet
DC: Double Crochet
DC3TOG: Double Crochet Decrease 3 stitches together
Shell: 5 DC in indicated stitch
Pattern:
If you have any confusion or difficulty with reading this pattern, please watch the video tutorial to have visual instructions.
Skirt:
Row 1: FDC 140 or any multiple of 14 that measures your hip measurement PLUS 6-10 extra inches.
Round 2: Form FDC round into a ring and slip stitch to the beginning FDC. (See video tutorial for visual instructions), ch up 2, DC in first 5 sts, *3 DC in next st, DC in next 5 sts, DC3TOG, DC in next 5 sts, repeat from * ending with DC3TOG.
Round 3: (See video tutorial for visual instructions at 20 minutes), Do not slip stitch to beginning, DC in first 5 sts, * 3DC in middle DC of 3DC grouping, DC in next 5 sts, DC3TOG, DC in next 5 sts, repeat from * around, do not slip stitch to beginning.
Continue working in continuous rounds.
Rounds 4-65: * DC in next 5 sts, 3DC in middle DC of 3DC grouping, DC in next 5 sts, DC3TOG, DC in next 5 sts, repeat from * around, do not slip stitch to beginning.
You can make this as long or short as you want just repeating the continuous pattern. Go onto the next step when when you are satisfied with the length.
Round 66: Skip the next st, sl st into the next st, ch 1, sc in same st, sk 2 sts, 5 DC in next st (shell made), *sk 2 sts, sc in next st, shell in next st, repeat from * around, sl st to beginning sc. Fasten off.
Waistband:
Attach yarn on any st around waist. Ch up 4. (Counts as TR), TR in each st around, sl st to ch up 4. Fasten off.
Weave ribbon through the TR’s to tighten waist.
Half Circle Side Panels: Make 6
Ch 4, sl st to 4th ch from hook to form a ring. Row 1: Ch 3 (counts as DC here and throughout), 9 DC into ring, turn. (10) Row 2: Ch 3, DC in same st, 2 DC in each st across, turn. (20) Row 3: Ch 3, 1 DC in each st across, turn. (20) Row 4: Ch 3, DC in same st, [1 DC in next st, 2 DC in next st] Repeat across, turn. (30) Row 5: Ch 3, 1 DC in each st across, turn. (30) Row 6: Ch 3, DC in same st, [1 DC in next 2 sts, 2 DC in next st] Repeat across, turn. (40) Row 7: Ch 3, 1 DC in each st across, turn. (40) Row 8: Ch 3, DC in same st, [1 DC in next 3 sts, 2 DC in next st] Repeat across, turn. (50) Row 9: Ch 3, 1 DC in each st across, turn. (50) Row 10: Ch 3, DC in same st, [1 DC in next 4 sts, 2 DC in next st] Repeat across, turn. (60) Row 11: Ch 3, 1 DC in each st across, turn. (60) Row 12: Ch 3, DC in same st, [1 DC in next 5 sts, 2 DC in next st] Repeat across, turn. (70) Row 13: Ch 3, 1 DC in each st across, turn. (70) Row 14: Ch 3, DC in same st, [1 DC in next 6 sts, 2 DC in next st] Repeat across, turn. (80) Row 15: Ch 3, 1 DC in each st across, turn. Row 16: Ch 3, DC in same st, [1 DC in next 7 sts, 2 DC in next st] Repeat across. (90) Fasten off with long tail for sewing.
Sew panels to sides of skirt using video tutorial as a visual guide.
Top:
Chain 77 (or any amount that measures your chest measurement) Row 1: DC in 3rd ch from hook and across, ch 2, turn. (75) Row 2-30: DC in each st across.
You can continue to make it longer if yours isn’t long enough.
Fasten off when finished.
Weave ribbon down the back (Optional: You could seam up the back by sewing it closed or crocheting it closed)
Straps: Make 2 Row 1: FDC 42 or an amount that measures from the back of your shoulder to the front of the shoulder (See video tutorial for visual instructions) Row 2: Ch 2, DC across. Fasten off with long tail.
Sew to Top
(See video tutorial for location)
Row 1: sc in 4th ch from hook (first ch 1 sp made). * Ch 1, skip 1 ch, sc in next ch. Repeat from * to end.
Row 2: Ch 1, turn, [2 sc and 1 sl st] in first ch 1 sp, [3sc, 1 sl st] in each of the next 3 ch 1 sps, [3 hdc, 1 sl st] in each of the next 4 ch 1 sps, [4 hdc, 1 sl st] in each of the next 4 ch 1 sps, [4 dc, 1 sl st] in each of the next 4 ch 1 sps. Fasten off with long tail for sewing. Roll strip into a flower, stitch flower together at base.
Enjoy!!
Why not make the matching Beast set? Below, click the image to take you to its video tutorial and written pattern.
I created this Wild Flower Days Granny Square design to add to our 365 Days of Granny Squares project. It uses variety of crochet stitches to create an interesting design! I hope you enjoy making your square!
A couple disclaimers before you start: Be sure to check your tension and use the correct size hook for your square. I demonstrate with an H-5.00mm crochet hook in the video tutorial, but you can make yours bigger or smaller by using a bigger or smaller hook. Also, if yours turns out wonky when you are finished, you may need to block this square to make it nice and flat.
Follow along with this video tutorial to learn how to make this granny square:
My dad will continue to be the videographer, editor, and photographer for our videos when I move away.
Support YARNutopia today so we can continue to bring you clear, quality crochet tutorials even after I move into my new home!
There will be an added expense of more travel and hopefully this won’t deter our ability to provide consistent videos on a weekly basis.
**You can always contact me via Facebook if you have any problems with the pattern. I am happy to help if you have any questions along the way.
***You can sell anything you make from my patterns, please just link back to my website YARNutopia.com. Thank you!
Teacher: Nadia Fuad
Video and Editing: Fuad Azmat (My Daddy)
Share your work on Facebook!
Add me on Snapchat: YARNutopia
Follow me on Instagram
Visit My Ravelry Store and add this to your Favorites!
Follow me on Twitter: @YARNutopia
Enjoy this video and subscribe to my channel on YouTube for more tutorials on how to crochet!
Leave a comment, and share with your friends!
Pattern:
Designed by Nadia Fuad You *may* sell items made from my pattern, but please reference my website YARNutopia.com.
Please do not copy, sell, and/or post this pattern and claim it as your own.
Materials:
-Red Heart Super Saver Yarn in as many colors as you want.
-H-5.00mm Crochet Hook
-Yarn Needle
-Scissors
NOTES:
-You can use a smaller or larger hook to make this square depending on your tension. I wouldn’t use anything larger than an I-5.5mm Crochet Hook though.
-The finished square measures 6 inches.
-This square is worked from the center outward
Special stitches:Ch(s): chain(s)
YO: Yarn Over
St(s): Stitch(es)
Sl st: slip stitch
SK: Skip
SC: Single Crochet
HDC: Half-Double Crochet
DC: Double Crochet
Beg. Popcorn: Ch up 3, 3 DC in same sp, remove hook, Insert hook into 1st ch up 3 of grouping, put loop back on hook and pull through. Beg. Popcorn made. (See video tutorial for visual instructions)
Popcorn: 4 DC in same sp, remove hook, Insert hook into 1st dc of grouping, put loop back on hook and pull through. Popcorn made. (See video tutorial for visual instructions)
Pattern:
If you have any confusion or difficulty with reading this pattern, please watch the video tutorial to have visual instructions.
Ch 4, sl st to 1st ch to form a ring.
Rnd 1: Ch up 3 (counts as DC), 11 DC in ring, sl st to beg DC. (12 Sts)
Rnd 2: Ch up 3 (Counts as DC), *Sk 1 st, Sl st in next st, Ch 3, repeat from * around, sl st to 1st ch of beg ch 3. (6 ch sps)
Rnd 3: Sl st into ch 3 sp, *Ch up 3, 4 DC in same sp, Ch 3, Sl st in same sp, Sl st into next sp, Repeat from * around sl st to bottom of 1st ch up 3. (6 petals made) Fasten off.
Rnd 4: Working in Sk’d Sts from Round 1, behind petals: Ch up 3, 2 DC in same st, 3 DC in each skipped st around, sl st to beg. ch up 3. (18 sts)
Rnd 5: Ch up 3 (counts as DC), DC in same st, 2 DC in each st around. Sl st to beg. ch up 3. (36 DC)
Rnd 6: Ch up 3, Beg. Popcorn in same st, DC in next 3 sts, *Popcorn in next st, DC in next 3 sts, repeat from * around, sl st to beg. popcorn st.
Rnd 7: In any DC after a popcorn st: Ch up 3, DC in next 2 sts, *Ch 4, Sk Popcorn, DC in next 3 sts, repeat from * around, sl st to beg. ch up 3.
Rnd 8: Ch up 1, sc in same st, sc in next 2 sts, 5 sc in ch 4 sp, *sc in next 3 sts, 5 sc in ch sp, repeat from * around. Sl st to 1st sc.
Rnd 9: In any 1st sc of a 5 sc grouping in a ch sp: Ch up 5 (Counts as DC + Ch 2 corner sp), *DC in next 2 sts, HDC in next 3 sts, SC in next 8 sts, HDC in next 3 sts, DC in next 2 sts, CH 2 repeat from * around, sl st to 3rd ch of beg. ch 5.
Fasten off.
I created this Soul Shine Granny Square design to add to our 365 Days of Granny Squares project. It uses variety of crochet stitches to create an interesting design! I hope you enjoy making your square!
A couple disclaimers before you start: Be sure to check your tension and use the correct size hook for your square. I demonstrate with an H-5.00mm crochet hook in the video tutorial, but you can make yours bigger or smaller by using a bigger or smaller hook. Also, if yours turns out wonky when you are finished, you may need to block this square to make it nice and flat.
Follow along with this video tutorial to make your granny square:
My dad will continue to be the videographer, editor, and photographer for our videos when I move away.
Support YARNutopia today so we can continue to bring you clear, quality crochet tutorials even after I move into my new home!
There will be an added expense of more travel and hopefully this won’t deter our ability to provide consistent videos on a weekly basis.
**You can always contact me via Facebook if you have any problems with the pattern. I am happy to help if you have any questions along the way.
***You can sell anything you make from my patterns, please just link back to my website YARNutopia.com. Thank you!
Teacher: Nadia Fuad
Video and Editing: Fuad Azmat (My Daddy)
Share your work on Facebook!
Add me on Snapchat: YARNutopia
Follow me on Instagram
Visit My Ravelry Store and add this to your Favorites!
Follow me on Twitter: @YARNutopia
Enjoy this video and subscribe to my channel on YouTube for more tutorials on how to crochet!
Leave a comment, and share with your friends!
Pattern:
Designed by Nadia Fuad You *may* sell items made from my pattern, but please reference my website YARNutopia.com.
Please do not copy, sell, and/or post this pattern and claim it as your own.
Materials:
-Red Heart Super Saver Yarn in as many colors as you want.
-H-5.00mm Crochet Hook
-Yarn Needle
-Scissors
NOTES:
-You can use a smaller or larger hook to make this square depending on your tension. I wouldn’t use anything larger than an I-5.5mm Crochet Hook though.
-The finished square measures 8.5 inches (22cm).
-This square is worked from the center outward
Special stitches:
Ch(s): chain(s)
YO: Yarn Over
St(s): Stitch(es)
Sl st: slip stitch
SK: Skip
SC: Single Crochet
HDC: Half-Double Crochet
DC: Double Crochet
BPDC: Back Post Double Crochet
V-Stitch: [DC, ch 1, DC] in same space
Puff Stitch: [YO, Insert Hook, YO pull through] 4 times. YO pull through all 9 loops. Ch 1 to secure. Puff made.
Pattern:
If you have any confusion or difficulty with reading this pattern, please watch the video tutorial to have visual instructions.
Ch 4, sl st to 1st ch to form a ring.
Rnd 1: Ch up 1, 8 SC in ring, sl st to 1st sc. (8 sc)
Rnd 2: Ch up 3 (Counts as HDC + Ch 1 sp), HDC in same st, *Ch 1, [HDC, ch 2, HDC] in next st, repeat from * around, sl st to 2nd ch of beg. ch up 3.
Rnd 3: In any ch 1 sp: Ch up 4 (Counts as DC + Ch 1 sp), DC in same sp, V-Stitch in every ch 1 sp around. Sl st to 3rd ch of beg. ch 4. (32 DC, 16 Ch 1 sps)
Rnd 4: In any ch 1 sp: Ch 1, SC in same sp, *Ch 3, SC in next ch 1 sp, Repeat from * around, sl st to 1st sc. (16 sc)
Rnd 5: BPDC around any sc, * 2 DC in ch 3 sp, BPDC around next SC, repeat from * around. Sl st to beg. BPDC.
Rnd 6: Ch up 3, [DC, ch 3, 2 DC] in same st, * Ch 2, 3 HDC in next BPDC, Ch 2, 3 SC in next BPDC, Ch 2, 3 HDC in next BPDC, ch 2, [2DC, ch 3, 2DC] in next BPDC, repeat from * around. Sl st to beg. Ch 3.
Rnd 7: In any corner ch 3 sp: Ch 3, Puff in same sp, ch 1, DC in same sp, [DC, Puff, Ch 1, DC] in each ch sp around. Sl st to beg. ch up 3.
Rnd 8: On the right side of a puff stitch in a corner: Ch up 1, Sc in same sp, ch 3, *SC on other side of puff st, ch 3, sk 2 DC, SC on right side of next puff st, ch 3, repeat from * around, sl st to beg. SC. (See video tutorial for this round and the next round)
Rnd 9: In any corner: Ch up 2 (counts as HDC), [HDC, ch 2, 2 HDC] in same sp, *2 HDC in each of the next 9 ch sps, [2 HDC, ch 2, 2HDC] in corner. repeat from * around. Sl st to beg. ch up 2. Fasten off.
As I make progress on the costumes that I am designing for Nate and myself for Halloween, I was puzzled over how to make a pair of Beast Mitts. I pooled over ideas of what would work, what would be comfortable for an evening of partying with our friends, what would look like a pair of paws with claws? All these questions are answered in this pair of open finger gloves.
These mitts are not meant for freezing temperature days. Just by appearance, it’s obvious why. These are strictly for costume purpose. However, but omitting the finger/claws you would have a basic pair of fingerless gloves or hand warmers.
I used Red Heart Boutique Fur to cover these paws. You are free to use creative choices for the type of fur you would like to use. You can create a different look by using different types of furs.
The pattern can be adjusted for any size hand. In my video, I created this pair to fit a larger sized man-hand. With easy math, you can make this pattern from child size to an XL hand size. Have fun with this costume/prop accessory. It is perfect for so many designs – wildcats, bears, lions, werewolves, beasts, monsters, etc.
Designed by Nadia Fuad You *may* sell items made from my pattern, but please reference my website YARNutopia.com.
Please do not copy, sell, and/or post this pattern and claim it as your own.
NOTES:
-The pattern video tutorial starts at 7 minutes and 22 seconds. The first 7 minutes are frequently asked questions and other information.
-You can use any yarn that is a worsted weight or a Double Knitting (DK) yarn to make these gloves
-This pattern is written for an adult size, but if you watch the whole video tutorial, I explain how to make these bigger or smaller.
-You can use a smaller or larger hook to make this square depending on your tension.
-This took me about 3 hours to complete
-This video tutorial shows only the Right Hand, but with simple modifications, you can make the left hand.
Special stitches:
Ch(s): chain(s)
YO: Yarn Over
St(s): Stitch(es)
Sl st: slip stitch
SK: Skip
SC: Single Crochet
HDC: Half Double Crochet
DC: Double Crochet
Pattern:
If you have any confusion or difficulty with reading this pattern, please watch the video tutorial to have visual instructions.
Fingerless Glove:
Ch 26 Row 1: Sc in 2nd ch from hook and across, ch 1, turn Rows 2-32: SC in each st across, ch 1 turn.
Fasten off with long tail.
Sew the seam up the side, leaving a space for a thumb hole (See video tutorial for visual instructions)
Fingers: Index Finger: Ch 1, SC in next 4, [ch 2, turn, DC across] 5 times. Fasten off.
Middle Finger: Ch 1, SC in next 4, [Ch 2, Turn, DC across] 5 times. Fasten off.
Ring Finger: Ch 1, SC in next 4, [Ch 2, Turn, DC across] 4 times, ch 2, HDC across. Fasten off.
Pinky: Ch 1, sc in next 4, [Ch 2, Turn, DC across] 3 times. Fasten off.
Thumb: Ch 1, sc around thumb (5 sts), [Ch 2, Turn, DC across] 3 times. Fasten off.
Make Chain Straps to hold fingers in place (See video tutorial to make these)
Claws: Make 10 (Work in continuous rounds)
With Black
Ch 2
Rnd 1: SC 4 in 2nd ch from hook. (4)
Rnd 2: SC in each st. (4)
Rnd 3: 2 SC in next st, 1 sc in next 3 sts. (5)
Rnd 4: 2 SC in next st, 1 sc in next 4 sts. (6)
Rnd 5: 2 SC in next st, 1 sc in next 5 sts. (7)
Rnd 6: 2 SC in next st, 1 sc in next 6 sts. (8)
Fasten off with long tail for sewing.
Sew claws to the tips of the fingers. See video tutorial for visual instructions.
Add fur to the back of the hand by weaving it throughout the hand with a yarn needle. See video tutorial for more visual instructions.
This post contains affiliate links, which means if you click on the link and buy from the linked websites, I will receive a small percentage of the value of your order. The amount you pay is not changed.
I created this Sublime Light Granny Square design to add to our 365 Days of Granny Squares project. It uses variety of crochet stitches to create an interesting design! I hope you enjoy making your square!
A couple disclaimers before you start: Be sure to check your tension and use the correct size hook for your square. I demonstrate with an H-5.00mm crochet hook in the video tutorial, but you can make yours bigger or smaller by using a bigger or smaller hook. Also, if yours turns out wonky when you are finished, you may need to block this square to make it nice and flat.
Follow along with this video tutorial to make your granny square:
My dad will continue to be the videographer, editor, and photographer for our videos when I move away.
Support YARNutopia today so we can continue to bring you clear, quality crochet tutorials even after I move into my new home!
There will be an added expense of more travel and hopefully this won’t deter our ability to provide consistent videos on a weekly basis.
**You can always contact me via Facebook if you have any problems with the pattern. I am happy to help if you have any questions along the way.
***You can sell anything you make from my patterns, please just link back to my website YARNutopia.com. Thank you!
Teacher: Nadia Fuad
Video and Editing: Fuad Azmat (My Daddy)
Share your work on Facebook!
Add me on Snapchat: YARNutopia
Follow me on Instagram
Visit My Ravelry Store and add this to your Favorites!
Follow me on Twitter: @YARNutopia
Enjoy this video and subscribe to my channel on YouTube for more tutorials on how to crochet!
Leave a comment, and share with your friends!
Pattern:
Designed by Nadia Fuad You *may* sell items made from my pattern, but please reference my website YARNutopia.com.
Please do not copy, sell, and/or post this pattern and claim it as your own.
NOTES:
-You can use a smaller or larger hook to make this square depending on your tension. I wouldn’t use anything larger than an I-5.5mm Crochet Hook though.
-The finished square measures 6 inches.
-This square is worked from the center outward
Special stitches:
Ch(s): chain(s)
YO: Yarn Over
St(s): Stitch(es)
Sl st: slip stitch
SK: Skip
SC: Single Crochet
HDC: Half-Double Crochet
DC: Double Crochet
Beg. Cluster: Ch 3, [Y/O, Insert Hook in sp, YO pull through, YO pull through 2 loops] 3 times, Y/O pull through all 4 loops on hook
Cluster: [Y/O, Insert Hook in sp, YO pull through, YO pull through 2 loops] 4 times, Y/O pull through all 5 loops on hook
Pattern:
If you have any confusion or difficulty with reading this pattern, please watch the video tutorial to have visual instructions.
Ch 4, sl st to 1st ch to form a ring.
Rnd 1: Ch up 1, 12 SC in ring, sl st to 1st sc. (12 sc)
Rnd 2: Sl st in each st around. (see video tutorial to see how to fasten off this round) (12 sl sts)
Rnd 3: Working in the stitches of round 1: In any stitch, ch up 1, 2 SC in each st around. Sl st to first sc of this round. Fasten off. (24 sc)
Rnd 4: In any stitch: Ch 1, SC in same st, * Ch 2, Sk 1 st, SC in next st, repeat from * around. Sl st to 1st sc of this round. Fasten off. (12 Ch sps)
Rnd 5: In any ch 2 sp: Beg. Cluster st, * Ch 3, Cluster in next ch sp, repeat from * around, sl st to beg. cluster. Fasten off.
Rnd 6: In any ch 3 sp, * Ch 5, sl st in same ch sp, ch 5, sl st in next ch sp, repeat from * around. sl st to 1st ch of beg. ch 5.
Rnd 7: In any ch 5 sp above a cluster st: Ch 3, [3DC, ch 2, 4 DC] in same sp, * Ch 1, sc in next ch sp, ch 2, SC in next ch sp, ch 2, sc in next sp, ch 2, sc in next sp, ch 2, sc in next sp, ch 1, [4DC, ch 2, 4DC] in next sp. repeat from * around. Sl st to beg. ch up 3.
Rnd 8: In any corner: Ch 3 [DC, ch2, 2DC] in same sp, DC in next st, ch 1, sk 1 st, *DC in next st, [ch 1, sk 1, DC in next ch 1 sp] 6 times, ch 1, sk 1 st, DC in next st, ch 1, sk 1 st, DC in next st, [2DC, CH2, 2DC] in corner, repeat from * around. Sl st to beg ch up 3. Fasten off.
This post contains affiliate links, which I may be compensated for when you make a purchase. That means if you click on any link and buy from the linked websites, I will receive a small percentage of the value of your order. The amount you pay is not changed. Thank you for all your support in clicking the links in my blog!! You all are so amazing!! ~Nadia
The yarn provided for this pattern is courtesy of Red Heart Yarns
Many times I have made suggestions of ideas on what you can make using the squares from our 365 Days of Granny Squares. Recently, I designed the Spinning Spider Granny Square (Number 266) and The Web We Weave Granny Square (Number 246). I began thinking about a project that I could make to tie these two in together that would work for a table runner or other Halloween related item.
I decided to create a look that has the spider spinning from the web. Doing that required a bit of adjustment on the placement of the spider on the square. In my original Spinning Spider Granny Square Video Tutorial, I demonstrated how to make the square with the spider running vertically on the square. In the Table Runner, I made a few stitch adjustments, I turned the spider to go on a diagonal to achieve the desired results for my finished work, allowing me to run Slip Stitches creating a web strand from the bottom (spinneret) of my spider to the Web square. Please see the video tutorial for instructions below to make this adjustment.
Then, I created duplicate sets of square Numbers 246 and 266 of our 365 Days of Granny Squares to create the ends of our runner. I combined these blocks with the solid granny square (Number 2)that I used with various color combinations of black and orange or black and white to match the other squares in this project. Note: You do not have to make these adjustments nor use my colors. This is creator’s choice.
This video is a tutorial on how to assemble the squares and add the border detail to finish off this great Halloween table runner. You will find the links and videos to the squares that I have already filmed prior to this project. Not interested in the runner? Why not make additional squares to make a lapghan or blanket? Let your imagination be your guide.
**You can always contact me via Facebook if you have any problems with the pattern. I am happy to help if you have any questions along the way.
***You can sell anything you make from my patterns, please just link back to my website YARNutopia.com. Thank you!
Teacher: Nadia Fuad
Video and Editing: Fuad Azmat (My Daddy)
Share your work on Facebook!
Add me on Snapchat: YARNutopia
Follow me on Instagram
Visit My Ravelry Store and add this to your Favorites!
Follow me on Twitter: @YARNutopia
Enjoy this video and subscribe to my channel on YouTube for more tutorials on how to crochet!
Leave a comment, and share with your friends!
Pattern:
Designed by Nadia Fuad You *may* sell items made from my pattern, but please reference my website YARNutopia.com.
Please do not copy, sell, and/or post this pattern and claim it as your own.
Special stitches:
Ch(s): chain(s)
YO: Yarn Over
St(s): Stitch(es)
Sl st: slip stitch
SK: Skip
SC: Single Crochet
HDC: Half-Double Crochet
DC: Double Crochet
TR: Treble Crochet (YO twice)
BLO: Back Loop Only
FLO: Front Loop Only
Notes:
-This Table runner is 41 inches long (105 cm) and 20 inches wide (53 cm)
-You can attach your squares any way you’d like, I do the whip stitch, but you can do any stitch you prefer. Check out this blog post at the top, there is a video tutorial on different attaching methods
Follow along with this video tutorial to learn how to make this table runner:
Follow along with this video tutorial to learn how to make the Web We Weave Granny Square:
Solid Granny Square
Make 4:
Make rounds 1-2 in Orange
Make rounds 3-6 in Black
Make 2:
Make rounds 1-2 in White
Make rounds 3-6 in Black
For round 6 on the solid granny square, use Half Double Crochet instead of Double Crochet to have the same size as your other squares.
Follow along with this video tutorial to learn how to make a solid granny square:
Border
See video tutorial for starting point.
Sc in same sp, *sk 1 st, 5 DC in next, sk 1 st, sc in next, repeat from * until next corner, sc in next 2 sps, repeat from * again until end of table runner, put 5 DC in that space.
Again, watch the video tutorial for clear specific visual instructions.
This post contains affiliate links, which means if you click on the link and buy from the linked websites, I will receive a small percentage of the value of your order. The amount you pay is not changed.
I created this Autumn Flower Granny Square design to add to our 365 Days of Granny Squares project. It uses variety of crochet stitches to create an interesting design! I hope you enjoy making your square!
A couple disclaimers before you start: Be sure to check your tension and use the correct size hook for your square. I demonstrate with an H-5.00mm crochet hook in the video tutorial, but you can make yours bigger or smaller by using a bigger or smaller hook. Also, if yours turns out wonky when you are finished, you may need to block this square to make it nice and flat.
Follow along with this video tutorial to learn how to make this square:
**You can always contact me via Facebook if you have any problems with the pattern. I am happy to help if you have any questions along the way.
***You can sell anything you make from my patterns, please just link back to my website YARNutopia.com. Thank you!
Teacher: Nadia Fuad
Video and Editing: Fuad Azmat (My Daddy)
Share your work on Facebook!
Add me on Snapchat: YARNutopia
Follow me on Instagram
Visit My Ravelry Store and add this to your Favorites!
Follow me on Twitter: @YARNutopia
Enjoy this video and subscribe to my channel on YouTube for more tutorials on how to crochet!
Leave a comment, and share with your friends!
Pattern:
Designed by Nadia Fuad You *may* sell items made from my pattern, but please reference my website YARNutopia.com.
Please do not copy, sell, and/or post this pattern and claim it as your own.
Materials:
-Red Heart Super Saver Yarn in as many colors as you want.
-H-5.00mm Crochet Hook
-Yarn Needle
-Scissors
NOTES:
-You can use a smaller or larger hook to make this square depending on your tension. I wouldn’t use anything larger than an I-5.5mm Crochet Hook though.
-The finished square measures 6 inches.
-This square is worked from the center outward
Special stitches:
Ch(s): chain(s)
YO: Yarn Over
St(s): Stitch(es)
Sl st: slip stitch
SK: Skip
SC: Single Crochet
HDC: Half-Double Crochet
DC: Double Crochet
TR: Treble Crochet (YO twice)
BLO: Back Loop Only
FLO: Front Loop Only
BPSC: Back Post Single Crochet
FPHDC: Front Post Half Double Crochet
Pattern:
If you have any confusion or difficulty with reading this pattern, please watch the video tutorial to have visual instructions.
Ch 4, sl st to 1st ch to form a ring.
Rnd 1: Ch up 3 (counts as DC), 11 DC in ring, sl st to beg. ch up 3. (12 sts)
Fasten off.
Rnd 2: Attach yarn with BPSC around any st, ch 2, *BPSC around next st, ch 2, repeat from * around, sl st to first BPSC
Rnd 3: Ch 1, *FPHDC around BPSC, 3 DC in ch 2 sp, repeat from * around, sl st to 1st FPHDC. Fasten off.
Rnd 4: Work on sts from round 2: Attach yarn with BPSC around BPSC from round 2, *Ch 4, Sk next BPSC, BPSC around next BPSC from round 2, repeat from * around, sl st to first BPSC. (6 ch 4 sps)
Rnd 5: Ch 1, SC in same st, *[SC, HDC, 3 DC, HDC, SC] in ch 4 sp, SC in BPSC, repeat from * around, sl st to 1st SC.
Rnd 6: Ch 1, SC in same st, *2DC in next 7 sts, SC in next, repeat from * around, sl st to 1st sc. Fasten off.
Rnd 7: [BPSC, ch 4, BPSC] around BPSC from round 4, Ch 4, *[BPSC, ch 4, BPSC] around next BPSC from round 4, ch 4, repeat from * around, sl st to first BPSC. (12 ch 4 sps)
Rnds 8: In ch 4 sp: Ch 4 (counts as TR), [3TR ch 2, 4 TR] in same sp, *4 TR in next 2 ch sps, [4TR, ch 2, 4TR] in next ch sp, repeat from * around, sl st to ch up 4.
Rnd 9: In any corner: Ch up 3 (counts as DC), [2DC, ch 2, 3 DC] in same sp, DC in each st around, in corners, put [3DC, ch 2, 3DC] Sl st to beginning ch up 3.
Fasten off.
I created this Spinning Spider Granny Square design to add to our 365 Days of Granny Squares project. It uses variety of crochet stitches to create an interesting design! I hope you enjoy making your square!
This Spinning Spider Granny Square is a great match for The Web We Weave Granny Square! Make them both into a big blanket for a spooky afghan!
A couple disclaimers before you start: Be sure to check your tension and use the correct size hook for your square. I demonstrate with an H-5.00mm crochet hook in the video tutorial, but you can make yours bigger or smaller by using a bigger or smaller hook. Also, if yours turns out wonky when you are finished, you may need to block this square to make it nice and flat.
Follow along with this video tutorial to learn how to make this square:
**You can always contact me via Facebook if you have any problems with the pattern. I am happy to help if you have any questions along the way.
***You can sell anything you make from my patterns, please just link back to my website YARNutopia.com. Thank you!
Teacher: Nadia Fuad
Video and Editing: Fuad Azmat (My Daddy)
Share your work on Facebook!
Add me on Snapchat: YARNutopia
Follow me on Instagram
Visit My Ravelry Store and add this to your Favorites!
Follow me on Twitter: @YARNutopia
Enjoy this video and subscribe to my channel on YouTube for more tutorials on how to crochet!
Leave a comment, and share with your friends!
Pattern:
Designed by Nadia Fuad You *may* sell items made from my pattern, but please reference my website YARNutopia.com.
Please do not copy, sell, and/or post this pattern and claim it as your own.
NOTES:
-You can use a smaller or larger hook to make this square depending on your tension. I wouldn’t use anything larger than an I-5.5mm Crochet Hook though.
-The finished square measures 6 inches.
-This square is worked from the center outward
Special stitches:
Ch(s): chain(s)
YO: Yarn Over
St(s): Stitch(es)
Sl st: slip stitch
SK: Skip
SC: Single Crochet
HDC: Half-Double Crochet
DC: Double Crochet
TR: Treble Crochet (YO twice)
BLO: Back Loop Only
FLO: Front Loop Only
Pattern:
If you have any confusion or difficulty with reading this pattern, please watch the video tutorial to have visual instructions.
Ch 4, sl st to 1st ch to form a ring.
Rnd 1: Ch up 3 (counts as DC), 7 DC in ring, sl st to beg. ch up 3. (8)
Rnd 2: Ch up 3 (counts as DC), WORK IN FLO DC in same st, 2 DC in each st around. Sl st to beg. ch up 3. (16)
Rnd 3: [Ch 6, Sl st in 2nd ch from hook and next 4 ch’s, sl st in same st on round 2, sl st into next st] 4 times, SC in next st, 4 DC in next 2 sts, SC in next st, sl st in next st, [Ch 6, Sl st in 2nd ch from hook and next 4 ch’s, sl st in same st on round 2, sl st into next st] 4 times. Leave last 4 sts unworked. Fasten off.
Rnd 4: Attach yarn to unworked BLO of round 1. Ch up 3, (Counts as DC), DC in next, Ch 3, *DC in next 2 sts, ch 3, Repeat from * around, sl st to beg ch up 3.
Rnd 5: In any ch 3 sp: *[3DC, ch 2, 3 DC, ch 2], repeat from * in each ch 3 sp, sl st to beg ch up 3. (see video tutorial for visual instructions)
Rnd 6: In any corner: Ch 3 (counts as DC), [DC, ch 2, 2 DC] in same sp, * Ch 1, Sk 1, DC in next, ch 1, sk 1, [DC, ch 1, DC] in ch 2 sp, ch 1, sk 1, dc in next, ch 1, sk 1, [2DC, ch 2, 2 DC] in corner, repeat from * around. Sl st to beg. ch up 3.
Rnd 7: Start in a 2nd DC on the side: See video tutorial at minute 24 for specific location. Ch 1. SC in same st tacking down leg, sc in ch 1 sp, *sc in next dc tacking down leg, sc in ch 1 sp, sc in next dc tacking down leg, sc in ch 1 sp, sc in next 2 sts, [2sc, ch2, 2sc] in corner. sc in each st across to next corner. [2sc, ch 2, 2 sc] in next corner. sc in next 2 sts, sc in ch 1 sp, sc in next st tacking down leg, sc in ch 1 sp, sc in next dc tacking down leg, sc in ch 1 sp, repeat from * around. Ending with a sc in last ch 1 sp. sl st to 1st sc of this round.
Rnds 8 & 9: Ch up 3, DC in each st around, [2DC, ch 2, 2 DC] in each corner. sl st to beginning ch up 3.
Whether it’s for a costume, a winter hat, or giving this for a gift, you will go bananas over this fun character hat and find it very a-peel-ing!! There’s a new musical animation film coming out in December. One of the characters from the movie inspired this cute earflap hat. I made this cutie patootie Gorilla Hat just in time for Halloween and the holidays! My nephew is a lil’ gorilla and makes the best model!!
Follow along with this video tutorial to learn how to make this hat:
Enjoy this video and subscribe to my channel on YouTube for more tutorials on how to crochet!
Leave a comment, and share with your friends!
Pattern:
Designed by Nadia Fuad
Questions? Leave a comment! You may sell items made from my pattern, but please reference my name and Etsy Shop (YARNutopia). Please do not copy and post this pattern and claim it as your own.
You can buy any of the items in this kit. Buy all or buy one item. Check it out to see the supplies you can get online to make this project!
NOTES:
-I do not have smaller sizes for this hat, it is made for a Child size.
-You can easily adjust this size to make it bigger by adding increase rounds and more rows to make it longer. Check out this page for tips on hat sizes.
Special Stitches:
Ch: chain
St(s): Stitch(es)
Sl st: slip stitch
SC: Single Crochet
DC: Double Crochet
BLO: Work in the Back Loop Only
Hat
With Homespun and Bulky yarn together
Ch 4, sl st to 1st ch to form a ring (or start with Magic Ring) Rnd 1: Ch up 3 (counts as DC), 8 DC into ring, sl st to ch up 3. (9) Rnd 2: Ch 3, 2 DC in each sp between sts around. sl st to ch up 3. (18) Rnd 3: Ch 3, DC in same sp as ch up 3, DC in next sp, * 2 DC in next, DC in next, repeat from * around, sl st to beginning ch up 3. (27) Rnd 4: Ch up 3, DC in same sp as ch up 3, DC in next sp, * 2 DC in next, DC in next 2 sps, repeat from * around, Sl st to ch up 3. (36) Rnd 5-9: Ch up 3, DC in each st around, Sl st to ch up 3. (36)
Earflaps:
First earflap: Row 1: Ch up 3, (Counts as DC), DC in next 4. (5)
Row 2: Ch up 3, Turn, DC in between each st. (5)
Row 3: Ch up 3, Turn, DC2TOG, DC in last 2 sps. (4)
Row 4: Ch up 3, Turn, DC3TOG.
Fasten off, weave in end.
Second Earflap
See video tutorial for specific location
Repeat as 1st earflap.
Snout: Use Red Heart Yarn in Gray and H-5.00mm Crochet Hook
Ch 2 Rnd 1: Sc 6 in 2nd ch from hook. (6) Rnd 2: Sc 2 in each st. (12) Rnd 3: (Sc 2 in next st, sc in next st) 6 times. (18) Rnd 4: (Sc 2 in next st, sc in next 2 sts) 6 times. (24) Rnd 5: (Sc 2 in next st, sc in next 3 sts) 6 times. (30) Rnd 6: (Sc 2 in next st, sc in next 4 st) 6 times. (36) Rnd 7: (Sc 2 in next st, sc in next 5 sts) 6 times. (42) Rnds 8 & 9: Sc in each st around. (42)
Fasten of with long tail for sewing.
Embroider Mouth to snout.
See video tutorial for visual instructions
Stuff snout and sew to hat.
Behind the Eyes:
Ch 2 Rnd 1: Sc 6 in 2nd ch from hook. (6) Rnd 2: Sc 2 in each st. (12) Rnd 3: (Sc 2 in next st, sc in next st) 6 times. (18) Rnd 4: (Sc 2 in next st, sc in next 2 sts) 6 times. (24) Rnd 5: (Sc 2 in next st, sc in next 3 sts) 6 times. (30)
Fasten off with long tail.
Sew to hat
Eyes: Make 2
With White
Ch 2 Rnd 1: Sc 6 in 2nd ch from hook. (6) Rnd 2: Sc 2 in each st. (12) Rnd 3: (Sc 2 in next st, sc in next st) 6 times. (18) Rnds 4-6: Sc in each st around. (18)
Pupil: Make 2
With Black
Ch 2 Rnd 1: Sc 6 in 2nd ch from hook. (6)
Assembly step:
Sew pupils to eyeball, stuff eye, and sew to hat.
Nose:
Ch 4 Row 1: SC in 2nd ch from hook and across (3) Row 2-16: Ch 1, Turn, SC in each st across.
Fasten off with long tail.
See video tutorial for visual instructions to form nose and sew to snout.
Eyebrow:
In black
Ch 2
Rnd 1: 4 SC in 2nd ch from hook (4)
Rnd 2: 2 SC in each st around. (8)
Stuff a little as you go,
Rnds 3-18: SC in each st around. (8)
Rnd 19: SC2Tog 4 times, Fasten off with long tail for sewing.
See video tutorial on how to stuff and sew to hat.
Ears: Make 2 in Gray
Ch 2
Rnd 1: 6 Sc in 2nd ch from hook, sl st to 1st sc.
Rnd 2: Ch up 3 (counts as DC), DC in same st, 2 HDC in next 2 sts, 2 DC in next, 2 HDC in next 2 sts, sl st to ch up 3. (12)
Rnd 3: Ch 1, 2 SC in first 2 sts, 1 Sc in next 4 sts, 2 SC in next 2 sts, 1 SC in last 4 sts, (16)
Fasten off with long tail for sewing.
Assembly step:
Cut a bunch of scrap yarn, tie to top of hat for hair, comb it out for fuzzy hair
Make braids on each earflap.
Weave in all ends.
Enjoy!!
This post contains affiliate links, which means if you click on the link and buy from the linked websites, I will receive a small percentage of the value of your order. The amount you pay is not changed.
A little over a month ago, I began to put this piece together. As I started to place the order of the granny squares, it suddenly made sense to artistically place them in a spiral pattern as if it is a path leading to a destination. After moving each piece around it made sense to have the ‘trail’ end with a big heart. Hence the name, Heart Will Lead You Home Blanket. Little did I know that it was taking me on the path of finding its way to meaning more than just a granny square blanket.
More than a blanket, it tells a story
Although it starts as a series of squares, sometimes a project becomes more than just that and takes on a life of it’s own. It becomes a piece of art or a purpose. This blanket was that and more for me! Using basic granny square stitches I connected my trail of squares that made up my spiral design. Then, using the same stitch, I completed the body of the blanket in 4 parts. Working inward from each side and up and down in the center, I was able to achieve the look I was hoping for. After that, I needed to frame it and the border had to tie this all together. I stumbled upon this border by Rainbow Knits and I knew that it would be the perfect addition. The border design was the right touch to finishing this off beautifully. Props to the designer for clear and precise instructions for helping me top off this blanket with such lovely detail. And, who doesn’t love hearts!?
There’s a reason
Earlier this year, I was visiting with Nate’s aunt and uncle, and during the conversation it came up about a community fundraising auction where the money raised would provide fresh water for villages in Uganda. Upon doing some research on this local (their small community of 9,100 people) organization, I found that it was created and run in memory of a young man who lost his life in a car accident at 17 years old. Runjesse.com provides aid to numerous causes throughout their community and the world.
I knew that I had to get involved so I reached out to the organizer who happens to be the mother of the young man who lost his life. I offered to donate my blanket to be auctioned off as part of their upcoming fundraiser in hopes that the money donated can provide fresh water to those in need. She was so gracious and kind. Through research, I saw her own efforts to make this happen in photos of her in the villages in Africa doing great works of providing water to remote areas. Do you realize that 8 Million people in Uganda don’t have access to safe water, and over 4,000 children die every year from diarrhea caused by unsafe water and poor sanitation?! It occurred to me that in this small community, one heart, one individual, surrounded by the support of a community and the world, can make a difference and make change locally and abroad. The heart border surrounding the trail leading to one heart at the end seemed so appropriate for this! It all made sense. It was perfectly symbolic. A family, a tiny community, can begin to heal by making such a positive impact out of a heartbreaking and tragic loss.
For anyone who has been through something life changing, tragic, or negative, taking that experience and turning it into good can be incredibly healing. It may NEVER take away the pain fully, but having purpose can make an enormous amount of difference in dealing with pain. Big or small, we all have the ability to help and support one another and even change the world in a small way.
This project has a larger purpose
As we come to the last few months of our granny squares, each blanket made has or will be donated or shared with someone in need or someone who will benefit from this work that I am doing. In my final blog, at the end of this year, I will provide more information on where each piece will hopefully find it’s way to and will continue until each square is included in a blanket and each blanket finds a home.
As always, thank you for being part of this 365 Day journey. Each stitch we share, each square we create, each project we complete is one step closer to making our world a little warmer place to be…
Much love, Nadia ♥
Below is the final blanket piece and the list of squares used.
I created this Diamond Block Granny Square design to add to our 365 Days of Granny Squares project. It uses variety of crochet stitches to create an interesting design! I hope you enjoy making your square!
A couple disclaimers before you start: Be sure to check your tension and use the correct size hook for your square. I demonstrate with an H-5.00mm crochet hook in the video tutorial, but you can make yours bigger or smaller by using a bigger or smaller hook. Also, if yours turns out wonky when you are finished, you may need to block this square to make it nice and flat.
Follow along with this video tutorial to learn how to make this granny square:
**You can always contact me via Facebook if you have any problems with the pattern. I am happy to help if you have any questions along the way.
***You can sell anything you make from my patterns, please just link back to my website YARNutopia.com. Thank you!
Teacher: Nadia Fuad
Video and Editing: Fuad Azmat (My Daddy)
Share your work on Facebook!
Add me on Snapchat: YARNutopia
Follow me on Instagram
Visit My Ravelry Store and add this to your Favorites!
Follow me on Twitter: @YARNutopia
Enjoy this video and subscribe to my channel on YouTube for more tutorials on how to crochet!
Leave a comment, and share with your friends!
Pattern:
Designed by Nadia Fuad You *may* sell items made from my pattern, but please reference my website YARNutopia.com.
Please do not copy, sell, and/or post this pattern and claim it as your own.
Materials:
-Red Heart Super Saver Yarn in as many colors as you want.
-H-5.00mm Crochet Hook
-Yarn Needle
-Scissors
NOTES:
-You can use a smaller or larger hook to make this square depending on your tension. I wouldn’t use anything larger than an I-5.5mm Crochet Hook though.
-The finished square measures 6 inches.
-This square is worked from the center outward
Special stitches:
Ch(s): chain(s)
YO: Yarn Over
St(s): Stitch(es)
Sl st: slip stitch
SK: Skip
SC: Single Crochet
HDC: Half-Double Crochet
DC: Double Crochet
TR: Treble Crochet (YO twice)
FPDC: Front Post Double Crochet
Pattern:
If you have any confusion or difficulty with reading this pattern, please watch the video tutorial to have visual instructions.
Ch 4, sl st to 1st ch to form a ring.
Rnd 1: Ch up 3 (counts as DC), 2 DC in ring. ch 2, 3DC in ring, ch 2, 3 DC in ring, ch 2, 3 DC in ring, ch 2, sl st to ch up 3.
Rnd 2: In any corner ch 2 sp: Ch 1, FPDC in st to the right of corner (See video tutorial for specific stitch), *HDC in next 3 sts, FPDC around DC after corner, CH 3, FPDC around DC before corner, Repeat from * ending with FPDC and ch 3. sl st to beg. FPDC.
Rnd 3: In any ch 3 corner sp: ch up 1, 2 SC in same sp, *SC in next st, HDC in next st, [2 DC, ch 2, 2 DC] in next, HDC in next, SC in next, 2 sc in ch 3 sp, repeat from * around. sl st to 1st sc. Fasten off.
Rnd 4: In any ch 2 corner sp: ch 1, 2 SC in same sp, * SC in next, HDC in next, DC in next 2, 2 TR in next, ch 2, 2 TR in next, DC in next 2 sts, HDC in next, SC in next, 2 SC in next ch sp, repeat from * around, sl st to beg. sc.
Rnd 5: Ch up 3, DC in each st around, in ch sps put [2dc, ch 2, 2 dc], sl st to beg ch up 3.
Oh, baby, it’s cold outside! Winter is right around the corner! Get a head start on beating the cold with my chunky yarn Faux Fur Trapper Hat that is sure to cut the cold with all the furry detail! This contemporary spin on a classic design is sure to be a big hit with even the most picky fashionistas on your gift list!
Whether it’s for the slopes or heading outside on a chilly morn, this is the first thing you will want to grab on your way out the door! This versatile hat can be made with or without the faux fur. Get creative with your faux fur choice or add some fleece fabric and sew that on! Choose from a variety of colors and make one for everyone on your holiday list! This is a simple yet stylish pattern that is sure to see a lot of use in winter!
Watch this video tutorial to learn how to make this hat:
Enjoy this video and subscribe to my channel on YouTube for more tutorials on how to crochet!
Leave a comment, and share with your friends!
Pattern:
Designed by Nadia Fuad
Questions? Leave a comment! You may sell items made from my pattern, but please reference my name and Etsy Shop (YARNutopia). Please do not copy and post this pattern and claim it as your own.
Materials: -Lion Brand Hometown USA yarn in Los Angeles Tan (160 Yards)
-Red Heart Boutique Fur (13 yards)
-Size K-6.50mm Crochet Hook
-Yarn Needle
-Scissors
NOTES:
-I do not have smaller sizes for this hat, it is made for a teen/adult size.
-You can use any bulky yarn you want to use and any fur, I would recommend a K-6.50mm crochet hook, but you can use any hook to make it bigger or smaller (smaller hook, smaller hat)
Special Stitches:
Ch: chain
St(s): Stitch(es)
Sl st: slip stitch
SC: Single Crochet
DC: Double Crochet
TR: Treble Crochet
BLO: Work in the Back Loop Only
FPDC: Front Post Double Crochet
FPTR: Front Post Treble Crochet
Hat
With Tan Bulky Yarn
Ch 6, sl st to 1st ch to form a ring (or start with Magic Ring) Rnd 1: Ch up 3 (counts as DC), 9 DC into ring, sl st to ch up 3. (10) Rnd 2: Ch 3, FPDC around same st, [DC, FPDC] in each st around. Sl st to beg. ch up 3. (20) Rnd 3: Ch up 3, DC in same st, FPDC around next, [2 DC in next st, FPDC around FPDC], repeat around. sl st to beg. ch up 3. (30) Rnd 4: Ch up 3, DC in each st around. Sl st to beg ch up 3. (30) Rnd 5: (See video tutorial for visual instructions) Ch up 3, DC in next 3 sts, FPTR around FPDC from round 3, FPTR around next FPDC from round 3, DC in next 5 sts on round 4, *[FPTR around next FPDC from round 3] twice, DC in next 6 sts from round 4, Repeat from * around ending with DC in last 5 sts. Sl st to beg. ch up 3. Rnd 6: Ch up 3, DC in 3 sts, FPDC around BOTH FPTR’s decreasing them together. DC in 5, *FPDC around BOTH FPTR’s DC in 6 sts, Repeat from * around ending with DC in last 5. Sl st to beg. ch up 3. Rnd 7: Ch up 3, DC in each st and [DC, FPDC] in every FPDC. (40) Rnd 8: Ch up 3, DC in same st, 1 DC in next 3 sts, *2 DC in next, 1 DC in next 3 sts, repeat from * around. Sl st to beg. ch up 3. (50) Rnd 9: Ch up 3, *DC in each st until a st that is worked into a FPDC, FPTR in the FPDC from round 7, Repeat from * around. sl st to beg. ch up 3. (50) Rnd 10: Ch up 3, DC in each st and FPDC in every FPTR. (50) Rnd 11: Ch up 3, DC in each st and FPDC in every FPDC. (50)
Earflaps: Make 2 Row 1: Ch 4, sl st to beg ch to form a ring. Ch up 3, 9 DC in ring. Sl st to ch up 3. (10)
Row 2: Ch up 3, DC in same st, 2 DC in same st, leave last 2 sts unworked. Ch 3 Turn.
Row 3: DC in same st, DC in next, *2 DC in next, DC in next, repeat from * across
Fasten off with long tail for sewing.
Inner Earflap: Make 2.
Ch 6 (or as many chains that will cover the inside of the earflap) Row 1: SC in 2nd ch from hook and across Row 2-4: Ch 1, turn, SC in each st across
If you need to do more rows, continue to do more rows until you are satisfied. Then Fasten off and sew to earflap.
See video tutorial for visual instructions on sewing
Front of hat:
With Fur
Ch 10 (or as many chains that will cover the front of the hat) Row 1: SC in 2nd ch from hook and across Row 2-4: Ch 1, turn, SC in each st across
If you need to do more rows, continue to do more rows until you are satisfied. Then Fasten off and sew to hat.
See video tutorial for visual instructions on sewing
Make braids and poms for the top of the hat and the earflaps.
See video tutorial for visual instructions.
Weave in all ends!
I created this Pastel Overload Granny Square design to add to our 365 Days of Granny Squares project. It uses variety of crochet stitches to create an interesting design! I hope you enjoy making your square!
A couple disclaimers before you start: Be sure to check your tension and use the correct size hook for your square. I demonstrate with an H-5.00mm crochet hook in the video tutorial, but you can make yours bigger or smaller by using a bigger or smaller hook. Also, if yours turns out wonky when you are finished, you may need to block this square to make it nice and flat.
Follow along with this video tutorial to learn how to make this granny square:
**You can always contact me via Facebook if you have any problems with the pattern. I am happy to help if you have any questions along the way.
***You can sell anything you make from my patterns, please just link back to my website YARNutopia.com. Thank you!
Teacher: Nadia Fuad
Video and Editing: Fuad Azmat (My Daddy)
Share your work on Facebook!
Add me on Snapchat: YARNutopia
Follow me on Instagram
Visit My Ravelry Store and add this to your Favorites!
Follow me on Twitter: @YARNutopia
Enjoy this video and subscribe to my channel on YouTube for more tutorials on how to crochet!
Leave a comment, and share with your friends!
Pattern:
Designed by Nadia Fuad You *may* sell items made from my pattern, but please reference my website YARNutopia.com.
Please do not copy, sell, and/or post this pattern and claim it as your own.
Materials:
-Red Heart Super Saver Yarn in as many colors as you want.
-H-5.00mm Crochet Hook
-Yarn Needle
-Scissors
NOTES:
-You can use a smaller or larger hook to make this square depending on your tension. I wouldn’t use anything larger than an I-5.5mm Crochet Hook though.
-The finished square measures 6.5 inches.
-This square is worked from the center outward
Special stitches:
Ch(s): chain(s)
YO: Yarn Over
St(s): Stitch(es)
Sl st: slip stitch
SK: Skip
SC: Single Crochet
HDC: Half-Double Crochet
DC: Double Crochet
TR: Treble Crochet (YO twice)
DTR: Double Treble Crochet (YO Three Times)
FPDTR: Front Post Double Treble
Pattern:
If you have any confusion or difficulty with reading this pattern, please watch the video tutorial to have visual instructions.
Ch 4, sl st to 1st ch to form a ring.
Rnd 1: Ch up 3 (counts as DC), 6DC in ring. sl st to beg. ch 3.
Rnd 2: In any st: Ch 3, DC in st to the right of ch up 3, DC in st to left of ch up 3, DC in same st as ch up 3, *DC in next free st, DC in prev. st. repeat from * around. Sl st to Ch up 3. (16 DC) If this round is confusing, see video tutorial for visual instructions.
Rnd 3: In any st, ch up 3, DC in next st, ch 3, *dc2tog, ch 3, repeat from * around, sl st to 1st DC.
Rnd 4: In any ch 3 sp: Beg. Cluster, *Ch 5, cluster in next ch 3 sp, repeat from * around, sl st to beg. cluster.
Rnd 5: Work in ch 3 sps from round 3: Ch up 6 (counts as TR + Ch 2), TR in same sp on other side of cluster, *TR in next ch 3 sp, Ch 2, TR in same sp on other side of cluster, repeat from * around, sl st to 4th ch of beg. ch 6.
Rnd 6: In any ch 2 sp: Ch 3 (counts as DC), [3 DC, ch 2, 4 DC] in same sp, * ch 2, 4 DC in next sp, ch 2, [4 DC, ch 2, 4 DC] in next sp, repeat from * around. sl st to beg ch up 3.
Rnd 7: ch up 1. sc in each st, 2 sc in each ch 2 sp, and [2sc, ch 2, 2sc] in each corner.
It starts with a chill in the air and dew on the grass, the time of the year when we begin to add an extra layer for warmth. Why not do that in style for someone you love? With a touch of old-fashioned elegance and sophisticated elements of Jay Gatsby, The Classic Man Scarf is the perfect accessory for the man in your life. I have a personal bias with this particular model, being that he happens to be the man in MY life! This scarf is very versatile and can be worn in a multitude of ways as shown in these photos. The length provides possibility for many different looks.
I combined a variety of stitches and textures to create this lovely piece that is sure to please even the most fashion conscious individual. Using the waffle stitch, half double crochet ribbed stitches, and waves, this multi-textured scarf is a perfect design for anyone. My design was made with three colors of soft yarn giving it all the comfort and warmth needed when we can’t get away from the cold weather.
Whether it’s a cool autumn day and Jack Frost is nipping at your nose or there is a Polar Vortex chilling you to the bone, The Classic Man Scarf is the perfect accessory for all those times you need to keep yourself nice and toasty, but still look fantastic doing it!
No photo shoot is complete without a few fun bloopers! We work hard, but play hard too! Enjoy!
My dad will continue to be the videographer, editor, and photographer for our videos when I move away.
Support YARNutopia today so we can continue to bring you clear, quality crochet tutorials even after I move into my new home!
There will be an added expense of more travel and hopefully this won’t deter our ability to provide consistent videos on a weekly basis.
Follow along with this video tutorial to learn how to make this scarf:
Enjoy this video and subscribe to my channel on YouTube for more tutorials on how to crochet!
Leave a comment, and share with your friends!
Pattern:
Designed by Nadia Fuad
Questions? Leave a comment! You may sell items made from my pattern, but please reference my name and Etsy Shop (YARNutopia). Please do not copy and post this pattern and claim it as your own.
NOTES:
-You can use any type of yarn you want for this project as long as you have about 510 yards of yarn.
-You can use as many colors as you want and you don’t have to make this a masculine scarf if you want to make it in feminine colors, this would be pretty for anybody!
-This scarf measures 66 inches (167 cm) long, but you can continue the repeat and make it bigger if you want.
-The main part (wavy stitch) of this scarf is in multiples of 14+2 so you can make this as big as you want.
Special Stitches:
Ch: chain
St(s): Stitch(es)
Sl st: slip stitch
SC: Single Crochet
DC: Double Crochet
TR: Treble Crochet
BLO: Work in the Back Loop Only
FPDC: Front Post Double Crochet
BPDC: Back Post Double Crochet
Scarf Main portion (Wavy)
With Charcoal
Ch 184 (Or any multiple of 14 + 2) Row 1: SC in 2nd ch from hook, [SC in next, HDC in next 2, DC in next 2, TR in next 3, DC in next 2, HDC in next 2, SC in next 2], repeat across. SC in last st. Row 2: Ch 1, turn, sc in 1st st, *SC in next, HDC in next 2, DC in next 2, TR in next 3, DC in next 2, HDC in next 2, SC in next 2, repeat from * across. SC in last st. turn. Row 3: With Black, Work in the 3rd Loop of each st, ch up 3, DC in each st across. (See video tutorial to see where 3rd loop is) Row 4: With Charcoal: Sl St in each St across. Row 5: Ch 4 (counts as TR), *TR in next, DC in next 2, HDC in next 2, SC in next 3, HDC in next 2, DC in next 2, TR in next 3, repeat from * across. End with TR in last st. Row 6: Repeat Row 5 Row 7: Repeat Row 3 with Black yarn Row 8: Repeat Row 4 Row 9-16: Repeat Rows 1-8 Once more Row 17: Repeat Row 1 with Charcoal Row 18: Repeat Row 2 Round 19: Ch up 3, DC in same st, work down the short side of the scarf, DC 32 sts evenly down the side (see video tutorial for specifics on where to place sts), when you get to the foundation row,
Sides: Row 1: With Blue: Start in the middle DC in corner. Ch 1, HDC in each st to next corner middle DC (32 sts)
Row 2: CH 1, HDC in each st across.
Rows 3-7: Repeat Row 2
Change Color
Row 8: Ch 3 (counts as DC), DC across, turn. (32)
Row 9: Ch 3, [DC in next st, FPDC in next, DC in next 2] 10 times, ch 3 turn.
Row 10: DC in next 2 sts, [FPDC in next 2 sts, DC in next st] 9 times, DC in last 2 sts.
Rows 11-20: Repeat Rows 9 and 10
Row 21: DC across. Fasten off. Weave in all ends.
Enjoy!!
“Being a true gentleman never goes out of fashion.” ~Unknown
This post contains affiliate links, which I may be compensated for when you make a purchase. That means if you click on any link and buy from the linked websites, I will receive a small percentage of the value of your order. The amount you pay is not changed. Thank you for all your support in clicking the links in my blog!! You all are so amazing!! ~Nadia
The yarn provided for this pattern is courtesy of Red Heart Yarns
I created The Web We Weave Granny Square design to add to our 365 Days of Granny Squares project. It uses quite a few chain stitches to create a look of a spider web! You can make this with the traditional black and white colors or you can get crazy with it and use bright colors or make your square bigger and just increase your chains each round to make your web larger! I hope you enjoy making your square!
A couple disclaimers before you start: Be sure to check your tension and use the correct size hook for your square. I demonstrate with an H-5.00mm crochet hook in the video tutorial, but you can make yours bigger or smaller by using a bigger or smaller hook. Also, if yours turns out wonky when you are finished, you may need to block this square to make it nice and flat.
Watch this video tutorial to learn how to make this granny square:
My dad will continue to be the videographer, editor, and photographer for our videos when I move away.
Support YARNutopia today so we can continue to bring you clear, quality crochet tutorials even after I move into my new home!
There will be an added expense of more travel and hopefully this won’t deter our ability to provide consistent videos on a weekly basis.
**You can always contact me via Facebook if you have any problems with the pattern. I am happy to help if you have any questions along the way.
***You can sell anything you make from my patterns, please just link back to my website YARNutopia.com. Thank you!
Teacher: Nadia Fuad
Video and Editing: Fuad Azmat (My Daddy)
Share your work on Facebook!
Add me on Snapchat: YARNutopia
Follow me on Instagram
Visit My Ravelry Store and add this to your Favorites!
Follow me on Twitter: @YARNutopia
Enjoy this video and subscribe to my channel on YouTube for more tutorials on how to crochet!
Leave a comment, and share with your friends!
Pattern:
Designed by Nadia Fuad You *may* sell items made from my pattern, but please reference my website YARNutopia.com.
Please do not copy, sell, and/or post this pattern and claim it as your own.
NOTES:
-You can use a smaller or larger hook to make this square depending on your tension. I wouldn’t use anything larger than an I-5.5mm Crochet Hook though.
-The finished square measures 6.5 inches
-This square is worked from the center outward
Special stitches:
Ch(s): chain(s)
YO: Yarn Over
St(s): Stitch(es)
Sl st: slip stitch
SK: Skip
SC: Single Crochet
HDC: Half-Double Crochet
DC: Double Crochet
FPDC: Front Post Double Crochet
Pattern:
If you have any confusion or difficulty with reading this pattern, please watch the video tutorial to have visual instructions.
With Black:
SOLID GRANNY SQUARE:
Ch 4, sl st to beginning to form a ring
Rnd 1: Ch 4 (counts as DC + Ch 1 Sp), [DC, Ch 1] 7 times into ring. Sl st to 3rd ch of beg. ch 4. (8ch sps, 8 DC)
Rnd 2: Sl st into Ch sp, ch up 3, [2dc, ch 2, 3 dc] in same sp, *3dc in next ch sp, [3dc, ch 2, 3dc] in next ch sp, repeat from * around. Sl st to beg. ch up 3.
Rnd 3-5: Ch up 3, DC in each st around putting [2DC, ch 2, 2 DC] in corners
WEB:
With white, Attach yarn in center ring (see video tutorial)
Rnd 1: Ch up 5 (counts as DC + Ch 2 sp), [DC, ch 2] 7 times in center ring, sl st to 3rd ch of beg. ch 5. If this gets confusing, see the video tutorial, it explains it a lot better.
Rnd 2: Ch 1, FPDC around ch up 3, [ch 3, FPDC around next st] 7 times, ch 3, sl st around FPDC
Rnd 3: Ch 1, FPDC around FPDC, [ch 4, FPDC around next st] 7 times, ch 4, sl st around FPDC
Rnd 4: Ch 1, FPDC around FPDC, [ch 5, FPDC around next st] 7 times, ch 5, sl st around FPDC
Rnd 5: Ch 1, FPDC around FPDC, [ch 6, FPDC around next st] 7 times, ch 6, sl st around FPDC
Rnd 6: Ch 1, FPDC around FPDC, [ch 7, FPDC around next st] 7 times, ch 7, sl st around FPDC
Rnd 7: Ch 1, FPDC around FPDC, [ch 8, FPDC around next st] 7 times, ch 8, sl st around FPDC
Rnd 8: Sl st into ch 8 sp, Sc in center st on background square and in next sts until the corner working in the ch sp and in each st (see video tutorial for visual instructions), *In corner, work in the FPDC st and in the corner ch 2 sp and put [sc, ch 2, sc], then work in the next ch 8 sp and in the next 10 sts and put a sc in each st, then sc in the fpdc and in the st behind it on the background square, then work in the next ch 8 sp and in the rest of the sts on the side until you get to the corner and then repeat from * around.
This post contains affiliate links, which means if you click on the link and buy from the linked websites, I will receive a small percentage of the value of your order. The amount you pay is not changed.
The yarn provided for this pattern is courtesy of Red Heart Yarns
I created this Butterfly Effect Granny Square design to add to our 365 Days of Granny Squares project. It uses variety of crochet stitches to create a look of a 3D Butterfly! You can make this with two-toned wings or have the wings be one color! This square turned out to be a little larger (8 1/2 inches) but if you use a smaller hook this square may turn out to be 6 or 7 inches. I hope you enjoy making your square!
A couple disclaimers before you start: Be sure to check your tension and use the correct size hook for your square. I demonstrate with an H-5.00mm crochet hook in the video tutorial, but you can make yours bigger or smaller by using a bigger or smaller hook. Also, if yours turns out wonky when you are finished, you may need to block this square to make it nice and flat.
Watch this video tutorial to learn how to make this square:
**You can always contact me via Facebook if you have any problems with the pattern. I am happy to help if you have any questions along the way.
***You can sell anything you make from my patterns, please just link back to my website YARNutopia.com. Thank you!
Teacher: Nadia Fuad
Video and Editing: Fuad Azmat (My Daddy)
Share your work on Facebook!
Add me on Snapchat: YARNutopia
Follow me on Instagram
Visit My Ravelry Store and add this to your Favorites!
Follow me on Twitter: @YARNutopia
Enjoy this video and subscribe to my channel on YouTube for more tutorials on how to crochet!
Leave a comment, and share with your friends!
My dad will continue to be the videographer, editor, and photographer for our videos when I move away.
Support YARNutopia today so we can continue to bring you clear, quality crochet tutorials even after I move into my new home!
There will be an added expense of more travel and hopefully this won’t deter our ability to provide consistent videos on a weekly basis.
Pattern:
Designed by Nadia Fuad You *may* sell items made from my pattern, but please reference my website YARNutopia.com.
Please do not copy, sell, and/or post this pattern and claim it as your own.
NOTES:
-You can use a smaller or larger hook to make this square depending on your tension. I wouldn’t use anything larger than an I-5.5mm Crochet Hook though.
-The finished square measures 8.5 inches.
-This square is worked from the center outward
Special stitches:
Ch(s): chain(s)
YO: Yarn Over
St(s): Stitch(es)
Sl st: slip stitch
SK: Skip
SC: Single Crochet
HDC: Half-Double Crochet
DC: Double Crochet
TR: Treble Crochet (YO twice)
Beg. Popcorn: ch up 3, 4 DC in same st, remove hook from loop, insert hook in 1st st, put loop back on hook and pull through.
Popcorn: 5 DC in same st, remove hook from loop, insert hook in 1st st, put loop back on hook and pull through.
Beg. TR Popcorn: ch up 4, 6 TR in same st, remove hook from loop, insert hook in 1st st, put loop back on hook and pull through.
Picot: ch 3, sl st in 3rd ch from hook
Pattern:
If you have any confusion or difficulty with reading this pattern, please watch the video tutorial to have visual instructions.
Ch 4, sl st to beginning to form a ring
Rnd 1: Beg. Popcorn in ring, ch 2, 3DC in ring, ch 2, 3 DC in ring, ch 2, Popcorn in ring, Ch 2, [3DC, ch 2, 3DC] in ring, ch 2, sl st to beg. popcorn.
Rnd 2: Beg. Popcorn in popcorn, ch 2, Dc in ch 2 sp, DC in the next 3 sts, [2dc, ch 2, 2dc] in corner, dc in next 3 sts, DC in ch 2 sp, ch 2, Popcorn in Popcorn, ch 2, DC in ch 2 sp, DC in next 3 sts, [2dc, ch 2, 2dc] in corner, DC in next 3 sts, DC in ch 2 sp, Ch 2, sl st to beg. popcorn.
Rnd 3: Beg. Popcorn in popcorn, ch 2, DC in ch 2 sp, DC in next 6 sts [2DC, ch 2, 2DC] in corner, DC in next 6 sts, DC in ch 2 sp, ch 2, popcorn in popcorn, ch 2, DC in ch 2 sp, DC in next 6 sts, [2DC, ch 2, 2 DC] in corner, DC in 6 sts, DC in ch 2 sp, ch 2, sl st to Beg. Popcorn st.
Rnd 4: Beg. TR Popcorn in popcorn st, ch 2, dc in ch 2 sp, dc in next 9 sts [2 DC, ch 2, 2 DC] in corner, dc in next 9 sts, dc in ch 2 sp, ch 2, Popcorn in Popcorn, Ch 2, DC in ch 2 sp, DC in 9 sts, [2DC, ch 2, 2 DC] in corner, DC in next 9 sts, DC in ch 2 sp, Ch 2, sl st to Beg. TR Popcorn.
Rnd 5: Sl st into ch 2 sp after TR Popcorn, Ch 3, DC in same sp, DC in next 12 sts, [2 DC, ch 2, 2 DC] in corner, DC in next 12 sts, 2 DC in ch 2 sp, Ch 2, Popcorn in popcorn, Ch 2, 2 DC in ch 2 sp, DC in next 12 sts, [2DC, ch 2, 2 DC] in corner, DC in next 12 sts, 2 DC in ch 2 sp, ch 2, sl st to beg. ch up 3.
Rnd 6: Ch 3, DC in next 15 sts, [2DC, ch 2, 2 DC] in corner, *DC in 16 sts, [2 DC, ch 2, 2 DC] in corner, repeat from * 2 more times, sl st to ch up 3. (If this round is confusing, see video tutorial)
Rnd 7: Ch up 3, DC in next 17 sts, [2 DC, ch 2, 2 DC] in corner. * DC in next 20 sts, [2 DC, ch 2, 2 DC] in corner, repeat from * 2 more times, DC in last 2 sts, Sl st to ch up 3.
Rnd 8: Sc in each st around putting [2sc, ch 2, 2 sc] in corners.
Fasten off. Weave in ends.
Wings: (See video tutorial for visual instructions)
Right wing:
Attach yarn with long tail for sewing later
Sl st around a DC in a popcorn st from round 3 toward the bottom of the butterfly body.
Row 1: Ch 4, sl st in both popcorn sts from round 1, ch 6, sl st in popcorn below the head. ch 1 turn.
Row 2: [5DC, TR, Picot, TR, 9 DC] in ch 6 sp, sl st in next 2 sl sts, [6 HDC, 2 DC, 3 HDC] In ch 4 sp, sl st in ch 4 sp, ch 1 turn.
Row 3: HDC in 11 sts, Sl st in next 2 sl sts, DC in 9 sts, [DC, Picot, DC] in picot, DC in next 6 sts and sl st in last st also. Fasten off with long tail.
Sew wing down flat. Weave in all ends.
Left wing:
Attach yarn with long tail for sewing later
Row 1: Sl st in popcorn st below the head. Ch 6, sl st in both popcorn sts from round 1, ch 4, sl t in popcorn st from round 3, ch 1 turn.
Row 2: [3HDC, 2 DC, 6HDC] in ch 4 sp, sl st in next 2 sl sts, [9DC, TR, Picot, TR, 5 DC] in ch 6 sp, sl st in ch 6 sp, ch 1 turn.
Row 3: DC in 6 sts, [DC, Picot, DC] in Picot, DC in 9 sts, sl st in next 2 sl sts, HDC in 11 sts, sl st in last st also. Fasten off with long tail.
Sew wing down flat. Weave in all ends.
Feelers/Antennae
With long tail, make slip knot
Ch 3, sl st in 3rd ch from hook, ch 3, sl st around Beg. TR Popcorn Stitch, ch 6, sl st in 3rd ch from hook, fasten off with long tail. Sew feelers down flat.
Fasten off, Weave in ends.
Enjoy!!
This post contains affiliate links, which I may be compensated for when you make a purchase. That means if you click on any link and buy from the linked websites, I will receive a small percentage of the value of your order. The amount you pay is not changed. Thank you for all your support in clicking the links in my blog!! You all are so amazing!! ~Nadia
The yarn provided for this pattern is courtesy of Red Heart Yarns
In keeping with my costume theme that began with my Enchanted Rose Cape, I have finished designing Part 2: The Beast Hat. From the outside, he may appear menacing, but underneath is a heart of gold. He’s my perfect beast!
This beast hat encapsulates the fierce persona that one would like to portray in this costume. If you are looking to do the Beast from Beauty and the Beast, this particular hat is just the right way to achieve that!
Beyond the Beast, this hat has a lot of versatility! You can remove the horns, change the colors, change the ears to create your own adult hat in various animals such as a bear, a skunk, a panda, or the like. This is a very warm and heavy hat perfect for those winter days. Enjoy this tutorial and written pattern!
Watch this video tutorial to learn how to make this hat:
Designed by Nadia Fuad You *may* sell items made from my pattern, but please reference my website YARNutopia.com.
Please do not copy, sell, and/or post this pattern and claim it as your own.
NOTES:
-The pattern video tutorial starts at 9 minutes. The first 9 minutes are frequently asked questions and other information.
-You can use any bulky yarn or any furry yarn if you cannot find the Patons Theo yarn.
-This pattern is written for an adult size, but if you stop increasing on rounds 2 or 3 of the hat, you could make this for a baby.
-You can use a smaller or larger hook to make this square depending on your tension.
-For measurements and to learn how big mine turned out to be, watch the beginning of the video tutorial.
-This took me about 3 hours to complete
Special stitches:
Ch(s): chain(s)
YO: Yarn Over
St(s): Stitch(es)
Sl st: slip stitch
SK: Skip
SC: Single Crochet
DC: Double Crochet
DC2TOG: Double Crochet Decrease
Pattern:
If you have any confusion or difficulty with reading this pattern, please watch the video tutorial to have visual instructions.
Hat:
With L hook
Ch 3
Rnd 1: 9 DC in 3rd ch from hook, sl st in sp between ch up 2 and 1st dc. ch up 2 (9 DC)
Rnd 2: 2 DC in each sp between sts, sl st in sp between ch up 2 and 1st dc, ch up 2 (18 DC)
Rnd 3: *2 DC in 1st sp, 1 DC in next sp, repeat from * around. sl st in sp between ch up 2 and 1st dc, ch up 2. (27)
Rnd 4: *2 DC in 1st sp, 1 DC in next 2 sps, repeat from * around. sl st in sp between ch up 2 and 1st dc, ch up 2. (36)
Rnds 5-8: DC in each sp around, sl st in sp between ch up 2 and 1st dc, ch up 2. (36)
You can make more rounds if you need it longer, when you are satisfied, go on to making the earflaps
Work in the sps between the sts for this part (see video tutorial for visual instructions)
Row 1: Ch 2, DC in the same st and in the next 5 sts, Ch 2 turn (6 sts)
Row 2: DC2TOG, DC in next 4 sts, ch 2, turn (5 sts)
Row 3: DC2TOG, DC in next 4 sts, Ch 2, turn (5 sts)
Row 4: DC2TOG, DC in next 3 sts, CH 2, turn (4 sts)
Row 4: DC2TOG, DC2TOG, fasten off. (2 sts)
Fold hat in half and make other earflap on opposite side repeating the same thing you did for first earflap.
Ears: Make 2 with G hook
Work in continuous rounds, put st marker after each round to mark beginning of round
Work in BACK LOOPS ONLY
Ch 2
Rnd 1: 6sc in 2nd ch from hook (6)
Rnd 2: 2 sc in each st around. (12)
Rnd 3: [2 sc in next st, sc in next st] 6 times. (18)
Rnd 4: [2 sc in next st, sc in next 2 sts] 6 times. (24)
Rnd 5: [2 sc in next st, sc in next 3 sts] 6 times. (30)
Rnds 6-12: Sc in each st around. (30)
Fasten off with long tail.
Add fur by single crocheting around the ear edge. Fasten off. Weave in ends.
Sew ears to hat
Horns: Make 2 with G hook
WORK IN BACK LOOPS ONLY
ch 2
Rnd 1: 5 sc in 2nd ch from hook (5)
Rnds 2-3: sc in each st around. (5)
Rnd 4: 2 sc in next 2 sts, 1 sc in next 3 sts (7)
Rnd 5: 2 sc in next 2 sts, sc in next 2 sts, sc2tog, sc in next st. (8)
Rnd 6: 2 sc in next 2 sts, sc in next 2 sts, sc2tog, sc in last 2 sts (9)
Rnd 7: 2 sc in next 2 sts, sc in next 2 sts, sc2tog, sc in last 3 sts. (10)
Rnds 8-9: sc in each st around. (10)
Rnd 10: sc in next 5 sts, 2sc in next 2 sts, sc in next 3 sts. (12)
Rnd 11: sc2tog, sc in next 3 sts, 2sc in next 2 sts, sc in next 5 sts. (13)
Rnd 12: sc2tog, sc in next 3 sts, 2sc in next 2 sts, sc in next 6 sts. (14)
Rnd 13: sc2tog, sc in next 3 sts, 2sc in next 2 sts, sc in next 7 sts. (15)
Rnds 14-16: Sc in each st around. (15)
Mohawk: with L hook
Ch 6
Row 1: DC in 3rd ch from hook and across, Ch up 2, turn
Row 2-12: DC between each st across, ch up 2, turn
Or however long you need to make it.
Add tassles to your ear flaps (see video tutorial for visual instructions)
Enjoy!!
Make the Beast Gloves here:
This post contains affiliate links, which means if you click on the link and buy from the linked websites, I will receive a small percentage of the value of your order. The amount you pay is not changed.
I created this Snail’s Pace Granny Square design to add to our 365 Days of Granny Squares project. It uses variety of crochet stitches to create a snail in a square! It’s for times in your life when you feel like you’re moving at a snail’s pace, but hey, at least you’re moving forward! I hope you enjoy making your square!
A couple disclaimers before you start: Be sure to check your tension and use the correct size hook for your square. I demonstrate with an H-5.00mm crochet hook in the video tutorial, but you can make yours bigger or smaller by using a bigger or smaller hook. Also, if yours turns out wonky when you are finished, you may need to block this square to make it nice and flat.
Follow along with this video tutorial to learn how to make this granny square:
My dad will continue to be the videographer, editor, and photographer for our videos when I move away.
Support YARNutopia today so we can continue to bring you clear, quality crochet tutorials even after I move into my new home!
There will be an added expense of more travel and hopefully this won’t deter our ability to provide consistent videos on a weekly basis.
**You can always contact me via Facebook if you have any problems with the pattern. I am happy to help if you have any questions along the way.
***You can sell anything you make from my patterns, please just link back to my website YARNutopia.com. Thank you!
Teacher: Nadia Fuad
Video and Editing: Fuad Azmat (My Daddy)
Share your work on Facebook!
Add me on Snapchat: YARNutopia
Follow me on Instagram
Visit My Ravelry Store and add this to your Favorites!
Follow me on Twitter: @YARNutopia
Enjoy this video and subscribe to my channel on YouTube for more tutorials on how to crochet!
Leave a comment, and share with your friends!
Pattern:
Designed by Nadia Fuad You *may* sell items made from my pattern, but please reference my website YARNutopia.com.
Please do not copy, sell, and/or post this pattern and claim it as your own.
NOTES:
-You can use a smaller or larger hook to make this square depending on your tension. I wouldn’t use anything larger than an I-5.5mm Crochet Hook though.
-The finished square measures 6.5 inches.
-This square is worked from the center outward
If you have any confusion or difficulty with reading this pattern, please watch the video tutorial to have visual instructions.
With color A, Ch 4, sl st to 1st ch to form a ring.
Rnd 1: Ch up 1, 3 sc in ring, pull up loop and drop, with color B, 3 sc in ring (work in a continuous round)
Rnd 2: 2 HDC in next st, 2 B3 in next, 2 B3 in next, 1 B3 in next st, pull up loop and drop, Go back to color A, ch 1, [sc in next st, 2sc in next st] 5 times, 2sc in next 2 sts
Rnd 3: Put color B loop on hook, 2 B4 in next 14 sts, fasten off color B, pick up loop from color A, 1 HDC in next 21 sts, ch 4, sl st into 2nd ch from hook, sc in next ch, hdc in next ch, hdc around hdc post of previous stitch, HDC in the next 7 sts, LDC in next 4 sts from previous round, Ch 3, sl st into next st, ch 6, DC4TOG over Chain, sl st to the ch 3 that you sl st’d to the spiral. Fasten off.
Rnd 4: Start in 2nd st to the right of the tail: CH 3, DC in same st, DC in next st, DC in the HDC that’s worked around the post (See video tutorial), [DC, ch 2, DC] in next st, DC in next 7 sts, [DC, ch 2, DC] in next st, DC in next st, HDC in next st, SC in next st, CH 1, DC in next st after the head, DC in next 3 sts, [DC, ch 2, DC] in next st, DC in next 7 sts, [DC, ch 2, DC] in next st, DC in last 3 sts.
Rnd 5: Ch up 3, DC in each st around, [2 DC, ch 2, 2DC] in corners
Rnd 6: Repeat round 5
Fasten off.
Antennae:
Ch 3, sl st into 3rd ch from hook, ch 8, sl st in 3rd ch from hook, fasten off with long tail. sew to square, (See video tutorial for visual instructions)
Enjoy!!
This post contains affiliate links, which I may be compensated for when you make a purchase. That means if you click on any link and buy from the linked websites, I will receive a small percentage of the value of your order. The amount you pay is not changed. Thank you for all your support in clicking the links in my blog!! You all are so amazing!! ~Nadia
The yarn provided for this pattern is courtesy of Red Heart Yarns
I created this In the Garden Granny Square design to add to our 365 Days of Granny Squares project. It uses variety of crochet stitches to create an interesting floral design! I hope you enjoy making your square!
A couple disclaimers before you start: Be sure to check your tension and use the correct size hook for your square. I demonstrate with an H-5.00mm crochet hook in the video tutorial, but you can make yours bigger or smaller by using a bigger or smaller hook. Also, if yours turns out wonky when you are finished, you may need to block this square to make it nice and flat.
Follow along with this video tutorial to learn how to make this granny square:
My dad will continue to be the videographer, editor, and photographer for our videos when I move away.
Support YARNutopia today so we can continue to bring you clear, quality crochet tutorials even after I move into my new home!
There will be an added expense of more travel and hopefully this won’t deter our ability to provide consistent videos on a weekly basis.
**You can always contact me via Facebook if you have any problems with the pattern. I am happy to help if you have any questions along the way.
***You can sell anything you make from my patterns, please just link back to my website YARNutopia.com. Thank you!
Teacher: Nadia Fuad
Video and Editing: Fuad Azmat (My Daddy)
Share your work on Facebook!
Add me on Snapchat: YARNutopia
Follow me on Instagram
Visit My Ravelry Store and add this to your Favorites!
Follow me on Twitter: @YARNutopia
Enjoy this video and subscribe to my channel on YouTube for more tutorials on how to crochet!
Leave a comment, and share with your friends!
Pattern:
Designed by Nadia Fuad You *may* sell items made from my pattern, but please reference my website YARNutopia.com.
Please do not copy, sell, and/or post this pattern and claim it as your own.
NOTES:
-You can use a smaller or larger hook to make this square depending on your tension. I wouldn’t use anything larger than an I-5.5mm Crochet Hook though.
-The finished square measures 6.5 inches.
-This square is worked from the center outward
Special stitches:
Ch(s): chain(s)
YO: Yarn Over
St(s): Stitch(es)
Sl st: slip stitch
SK: Skip
SC: Single Crochet
HDC: Half-Double Crochet
DC: Double Crochet
TR: Treble Crochet (YO twice)
DTR: Double Treble Crochet (YO Three Times)
FPDTR: Front Post Double Treble
Pattern:
If you have any confusion or difficulty with reading this pattern, please watch the video tutorial to have visual instructions.
Ch 4, sl st to 1st ch to form a ring.
Rnd 1: Ch up 1, 12 sc in ring. sl st to 1st sc.
Rnd 2: In any st: Ch 1, sc in same st, *ch 2, sc in next st, ch 2, sk 1 st, sc in next st, repeat from * around. sl st to 1st sc.
Rnd 3: In a corner ch 2 sp (see video tutorial for specific location): *Ch 3, 3DC in same sp, ch 3, sl st in same sp, 2sc in next ch 2 sp, sl into next ch sp, repeat from * around, sl st to beg. ch of beg. ch up 3.
Rnd 4: Sl st around the beg. ch up 3 from prev. round: Ch 1, 3 sc around beg. ch 3. *HDC in next 3 sts, 3sc around next ch 3, ch 2, 3 sc around next ch up 3, repeat from * around, sl st to 1st sc. Fasten off.
Rnd 5: In any 1st sc of 2sc grouping from round 3: *Ch 4, sl st in next sc, ch 5, sl st in next sc, repeat from * around, sl st to 1st ch of beg. ch 4.
Rnd 6: In ch 4 sp on side: Ch 1, *[SC, HDC, DC, Picot, DC, HDC, SC] in ch 4 sp, [3sc, ch 2, sc] in ch 5 sp, repeat from * around. sl st to 1st sc of this round. Fasten off.
Rnd 7: In corner ch 2 sp: Ch 4, [TR, ch 2, 2 TR] in same corner sp, *Sk 1 st, TR in next, Ch 1, SC in picot, Ch 1, SK next 4 sts, TR in next, SK 1 st, [2TR, ch 2, 2 TR] in corner, repeat from * around, sl st to beg. ch up 4.
Rnd 8: In any corner: Ch 1, *sc in corner, FPDTR around middle DC of petal from round 3, ch 2, FPDTR around middle DC of petal again, SC in same corner on round 7, sc in next 3 sts, sc in ch 1 sp, DTR in skipped st from round 1, sc in ch 1 sp and in next 3 sts, repeat from * around. Sl st to beg. sc.
Rnd 9: In any corner: Ch 3 (counts as DC) [DC, ch 2, 2 DC] in same corner sp, *DC in each st on side, [2DC, ch 2, 2DC] in corner, repeat from * around, sl st to beg. ch up 3. Fasten off. Weave in all ends.
This post contains affiliate links, which I may be compensated for when you make a purchase. That means if you click on any link and buy from the linked websites, I will receive a small percentage of the value of your order. The amount you pay is not changed. Thank you for all your support in clicking the links in my blog!! You all are so amazing!! ~Nadia
The yarn provided for this pattern is courtesy of Red Heart Yarns
So many little girls love to play dress up or pretend to be their favorite Disney Princess. I was no exception, and that spirit was something I never grew out of. I love Disney movies and the characters they embody. My Enchanted Rose Cape was inspired by one of my favorites. Fashioned after a scene from Beauty and the Beast, I created this caplet/cape combination piece to add to a costume that I am in the process of creating.
As I was creating this piece, I saw the potential for so many possibilities that could come out of this one fashion item. Changing the color to ivory, or even a sparkly white yarn, this would make a lovely winter bridal cape. In fact, just changing the color to match something in your wardrobe would make this a perfect piece for a formal cover-up. It could be an everyday poncho/cape in tones of grays or warm browns. This could also be transformed into other costume capes for characters such as Red Riding Hood, Rose Red, or any other fairy-tale or medieval character. The possibilities in color choices are endless, and the ideas know no bounds. Have fun with it!!
It doesn’t stop there. If you prefer to not include the longer cape, this would make a cute little caplet, or remove the hood and it makes a nice poncho. Adjust the size and you can change the whole look! With this easy repeat pattern and stitch, anything is possible!
Enjoy this pattern and share your photos on the Facebook page when you finish!!
Make the full costume by clicking here or clicking this photo below.
Follow along with this video tutorial to learn how to make this cape:
My dad will continue to be the videographer, editor, and photographer for our videos when I move away.
Support YARNutopia today so we can continue to bring you clear, quality crochet tutorials even after I move into my new home!
There will be an added expense of more travel and hopefully this won’t deter our ability to provide consistent videos on a weekly basis.
Pattern:
Designed by Nadia Fuad You *may* sell items made from my pattern, but please reference my website YARNutopia.com.
Please do not copy, sell, and/or post this pattern and claim it as your own.
NOTES:
-You can use a smaller or larger hook to make this square depending on your tension.
-This pattern is in multiples of 3, so you can make this as big or small as you want.
-Just continue the repeat pattern until your piece is as big or as wide as you want it to be to go onto the next step if you feel like I stopped too soon in the video tutorial. This pattern is very versatile and you can make this as big as you want.
-This piece works the poncho first, then the cape, then the hood last.
-The hood is made separately and then sewn onto the cape.
-For measurements and to learn how big mine turned out to be, watch the beginning of the video tutorial.
-This took me about 15 hours to complete from beginning to end.
Special stitches:
Ch(s): chain(s)
YO: Yarn Over
St(s): Stitch(es)
Sl st: slip stitch
SK: Skip
SC: Single Crochet
DC: Double Crochet
aka: Also Known As
Pattern:
If you have any confusion or difficulty with reading this pattern, please watch the video tutorial to have visual instructions.
Poncho
Ch 90 (or any multiple of 3). Sl st to 1st ch to form a large ring.
Rnd 1: ch 1, [sc, ch 2, sc] in same ch, *sk 2 ch’s, [sc, ch 2, sc] in next ch, repeat from * around, ending with sk last 2 chs, sl st to 1st sc of the round, and sl st into ch 2 sp. (30 ch 2 sps)
Rnd 2: Ch 3, 2 DC in same sp, put 3 DC in each ch 2 sp around, sl st to beg. ch up 3 and into next st. (90 DC)
Rnd 3: Ch 1, [sc, ch 2, sc] in same st, *sk 2 sts, [sc, ch 2, sc] in next st, repeat from * around, ending with sk last st and beg. ch up 3, sl st to 1st sc and sl st into ch sp.
At this point, put a stitch marker at the beginning and halfway point of your work (see video tutorial for visual instructions).
Rnd 4: ch 3, 5 DC in same sp, put 3 DC in each ch sp until you get to the halfway point, put 6 DC in the halfway point ch 2 sp, then put 3DC in each of the ch sps until the end of the round.
Rnds 5-27: Repeat rows 3 and 4 until your piece is as long as you want it to be. I ended on round 27. You want to end on an ODD round (aka a repeat of round 3)
Rnd 28: Ch 3, 2 DC in same sp, put 3 DC in each ch 2 sp around, sl st to beg. ch up 3 and into next st.
Rnd 29: Ch 1, [sc, ch 2, sc] in same st, *sk 2 sts, [sc, ch 2, sc] in next st, repeat from * around, ending with sk last st and beg. ch up 3, sl st to 1st sc and sl st into ch sp.
Rnd 30: Ch 3, 2 DC in same sp, put 3 DC in each ch 2 sp around, sl st to beg. ch up 3.
Rnd 31: Ch 1. Sc in each st around. Sl st to beg. sc, fasten off. Weave in ends.
**Put stitch markers where you want to keep the front open for your cape part. See video tutorial to see where to mark your work
**Row 1 of the cape is worked on the inside of the poncho in round 29.
Cape: Row 1: In a ch sp that is marked, ch 1, sc in same sp, ch 2, sc in same sp, sk to next ch sp, [sc, ch 2, sc] in each ch 2 sp around (see video tutorial to do this round correctly), ch 1 turn
Row 2: Sl st into ch 2 sp, Ch up 3, 2DC in same sp, 3 DC in each ch 2 sp across, ch 1, turn.
Row 3: Sl st into middle st of 3dc grouping, ch 1, [sc, ch 2, sc] in same st, * sk 2 sts, [sc, ch 2, sc] in next st, repeat from * across skip last st, ch 1, turn.
Row 4: Sl st into ch 2 sp, ch 3, 5DC in same sp, 3DC in each ch sp until the last sp, 6 DC in last ch sp, ch 1, turn.
Row 5: Sl st into 2nd st of 6 dc grouping, ch 1, [sc, ch 2, sc] in same st, sk 2 sts, [sc, ch 2, sc in next st, repeat from * across, sk last st, ch 1 turn.
Row 6: sl st into ch 2 sp, ch 3, 2 DC in same sp, 3 dc in each ch 2 sp across, ch 1, turn.
Rows 7-38: Repeat Rows 3-6 as many times as you want to make your cape as long and wide as you want it to be. (I ended on row 38) Be sure to end on a repeat of row 5.
Rows 39-40: Ch 1, turn, sc in each st across.
Fasten off. Weave in all ends.
Hood:
The hood is made separately and then sewn onto neck part of poncho. See video tutorial for specifics on how to sew this to the cape.
Ch 92 (or however many chains you began with + 2)
Row 1: (1 SC, CH 2, 1 SC) in 3rd ch from hook, *Sk next 2 ch, (1 sc, ch 2, 1 sc) in next ch, repeat from * across, end with 1 HDC in the last ch, turn.
Row 2: Ch 3 (Counts as DC), *3 DC in next ch-2 space. Repeat from * across, end with 1 DC in top of turning ch, turn.
Row 3: Ch 2 (Counts as HDC), * (1 sc, ch 2, 1 sc) in 2nd dc of next 3DC grouping, repeat from * across, end with 1 HDC in top of turning ch, turn.
Rows 4-22: Repeat Rows 2 and 3 until your hood is as wide as you want it to be. (End on an even row (aka a repeat of row 2).
Fasten off, weave in ends.
Sew hood to cape and sew up the top of the hood (see video tutorial for visual instructions)
Time for Fur!!
Sl st fur around hood, around bottom of poncho, and around the bottom of the cape.
Weave in all your ends, and enjoy your cape!
Enjoy!!
This post contains affiliate links, which I may be compensated for when you make a purchase. That means if you click on any link and buy from the linked websites, I will receive a small percentage of the value of your order. The amount you pay is not changed. Thank you for all your support in clicking the links in my blog!! You all are so amazing!! ~Nadia
The yarn provided for this pattern is courtesy of Red Heart Yarns
I created this In Full Bloom Granny Square design to add to our 365 Days of Granny Squares project. It uses variety of crochet stitches including crocodile stitches to create an interesting floral design! I hope you enjoy making your square!
A couple disclaimers before you start: Be sure to check your tension and use the correct size hook for your square. I demonstrate with an H-5.00mm crochet hook in the video tutorial, but you can make yours bigger or smaller by using a bigger or smaller hook. Also, if yours turns out wonky when you are finished, you may need to block this square to make it nice and flat.
Follow along with this video tutorial to learn how to make this square:
My dad will continue to be the videographer, editor, and photographer for our videos when I move away.
Support YARNutopia today so we can continue to bring you clear, quality crochet tutorials even after I move into my new home!
There will be an added expense of more travel and hopefully this won’t deter our ability to provide consistent videos on a weekly basis.
**You can always contact me via Facebook if you have any problems with the pattern. I am happy to help if you have any questions along the way.
***You can sell anything you make from my patterns, please just link back to my website YARNutopia.com. Thank you!
Teacher: Nadia Fuad
Video and Editing: Fuad Azmat (My Daddy)
Share your work on Facebook!
Add me on Snapchat: YARNutopia
Follow me on Instagram
Visit My Ravelry Store and add this to your Favorites!
Follow me on Twitter: @YARNutopia
Enjoy this video and subscribe to my channel on YouTube for more tutorials on how to crochet!
Leave a comment, and share with your friends!
Pattern:
Designed by Nadia Fuad You *may* sell items made from my pattern, but please reference my website YARNutopia.com.
Please do not copy, sell, and/or post this pattern and claim it as your own.
NOTES:
-You can use a smaller or larger hook to make this square depending on your tension. I wouldn’t use anything larger than an I-5.5mm Crochet Hook though.
-The finished square measures 6.5 inches.
-This square is worked from the center outward
Special stitches:
Ch(s): chain(s)
YO: Yarn Over
St(s): Stitch(es)
Sl st: slip stitch
SK: Skip
SC: Single Crochet
HDC: Half-Double Crochet
DC: Double Crochet
TR: Treble Crochet (YO twice)
FPDC: Front Post Double Crochet
Crocodile Stitch: 5 FPDC up the post, ch 2, 5 FPDC down the next post
Pattern:
If you have any confusion or difficulty with reading this pattern, please watch the video tutorial to have visual instructions.
Rnd 1: Ch 5, sl st to 5th ch from hook, [ch 4, sl st in same ch] 3 times. (4 ch sps)
Rnd 2: In any ch sp: Ch 1, sc 6 times in each ch sp. sl st to 1st sc. (24 sc)
Rnd 3: in any 2nd sc from 6sc grouping: ch 1, sc in same st, *ch 2, sk 2 sts, sc in next, repeat from * around, sl st to 1st sc. (8 ch 2 sps)
Rnd 4: In ch sp on the side (see video tutorial for specific location): *[Ch 1, 3DC, sl st, 3DC, sl st, 3DC, sl st] in ch sp, sl st in next ch sp, SC in same ch sp, sl st into next ch sp, repeat from * around sl st to beg ch sp and sl st to 1st sc.
Rnd 5: In any sc: Ch 7 (counts as DC + Ch 4 sp), *SC in middle petal, ch 4, DC in next sc, ch 4, repeat from * around, sl st to 3rd ch of beg. ch 7. (8ch 4 sps)
Rnd 6: In any ch 4 sp: Ch up 3, 5 DC in same sp, *6 DC in next sp, ch 3, 6 DC in next sp, Repeat from * around, ending with ch 3, sl st to beg ch 3. Fasten off.
**Rnd 7 starts making the crocodile stitches. See video tutorial for visual instructions for this next part.**
Rnd 7: Starting at the bottom of a DC before a ch 3 sp: *Crocodile Stitch, ch 1, sk 3 sts, Crocodile Stitch, ch 1, sk 3 sts, Crocodile Stitch, SC in DC from Round 5, repeat from * around, sl st to beg. ch up 3.
Rnd 8: Working on sts from Round 6: DC in each st putting [2DC, ch 2, 2DC] in corners
Rnd 9: In any corner: Ch 1, *[3sc, ch 2, 3sc] in corner, sc in next st, sc in next st pinning down crocodile st from round 7, sc in next 5 sts, sc in next pinning down crocodile st, sc in next 6 sts, sc in next pinning down crocodile st, sc in next st, repeat from * around, sl st to beg. sc.
Fasten off. Weave in all ends.
Enjoy!!
This post contains affiliate links, which I may be compensated for when you make a purchase. That means if you click on any link and buy from the linked websites, I will receive a small percentage of the value of your order. The amount you pay is not changed. Thank you for all your support in clicking the links in my blog!! You all are so amazing!! ~Nadia
The yarn provided for this pattern is courtesy of Red Heart Yarns
I created this Wrinkled Rose Granny Square design to add to our 365 Days of Granny Squares project. It uses variety of crochet stitches to create an interesting 3-D design! I hope you enjoy making your square!
A couple disclaimers before you start: Be sure to check your tension and use the correct size hook for your square. I demonstrate with an H-5.00mm crochet hook in the video tutorial, but you can make yours bigger or smaller by using a bigger or smaller hook. Also, if yours turns out wonky when you are finished, you may need to block this square to make it nice and flat.
Follow along with this video tutorial to learn how to make this square:
My dad will continue to be the videographer, editor, and photographer for our videos when I move away.
Support YARNutopia today so we can continue to bring you clear, quality crochet tutorials even after I move into my new home!
There will be an added expense of more travel and hopefully this won’t deter our ability to provide consistent videos on a weekly basis.
**You can always contact me via Facebook if you have any problems with the pattern. I am happy to help if you have any questions along the way.
***You can sell anything you make from my patterns, please just link back to my website YARNutopia.com. Thank you!
Teacher: Nadia Fuad
Video and Editing: Fuad Azmat (My Daddy)
Share your work on Facebook!
Add me on Snapchat: YARNutopia
Follow me on Instagram
Visit My Ravelry Store and add this to your Favorites!
Follow me on Twitter: @YARNutopia
Enjoy this video and subscribe to my channel on YouTube for more tutorials on how to crochet!
Leave a comment, and share with your friends!
Pattern:
Designed by Nadia Fuad You *may* sell items made from my pattern, but please reference my website YARNutopia.com.
Please do not copy, sell, and/or post this pattern and claim it as your own.
NOTES:
-You can use a smaller or larger hook to make this square depending on your tension. I wouldn’t use anything larger than an I-5.5mm Crochet Hook though.
-The finished square measures 6.5 inches.
-This square is worked from the center outward
Special stitches:
Ch(s): chain(s)
YO: Yarn Over
St(s): Stitch(es)
Sl st: slip stitch
SK: Skip
SC: Single Crochet
HDC: Half-Double Crochet
DC: Double Crochet
TR: Treble Crochet (YO twice)
FPSC: Front Post Single Crochet
X-Stitch: Sk 1 st, DC in next st, Ch 2, DC in sk’d st
Pattern:
If you have any confusion or difficulty with reading this pattern, please watch the video tutorial to have visual instructions.
Ch 4, sl st to 1st ch to form a ring.
Rnd 1: Ch up 3 (counts as DC), TR in ring, DC in ring, Ch 2, [DC, TR, DC, Ch 2] 3 times, sl st to beg.
Rnd 2: In any ch 2 sp: Ch 1, sc in same sp, *3DC in next st, FPSC around TR, 3DC in next st, [SC, CH 2, SC] in corner, repeat from * around ending with sc, ch 2 in beg. corner, sl st to 1st sc.
Rnd 3: In any FPSC: Ch 3 (counts as DC), DC in same st, *2TC in each of the next 3 sts, TC in next st, SK ch sp, TC in net st, TC in previous st again (X-made), TC in same st after ch sp, (see video tutorial for visual instructions), 2 TC in each of the next 3 sts, [2DC, CH 2, 2DC] in FPSC, repeat from * around ending with 2 DC, ch 2, sl st to beg. Fasten off.
Work behind work for Round 4.
Rnd 4: In any Skipped ch 2 sp from Round 2: Ch 3 (counts as DC), [DC ch 2, 2 DC] in same sp, *Ch 5, [2DC, ch 2, 2 DC] in next corner sp, repeat from * around, sl st to beg.
Rnd 5: In Corner, Ch 3 (counts as DC), Make an X-Stitch tacking down the Treble-X from the Petal on the Flower (see video tutorial for visual instructions), DC in same ch sp from round 4’s corner, DC in next 2 sts, *6 DC in ch sp, DC in corner, X-Stitch tacking down the Treble-X from the petal on the flower, DC in same corner, DC in next 2 sts, repeat from * around, sl st to beg.
Rnd 6: Ch 3, FPDC on next st, [DC, ch 2, DC] in corner, FPDC around next st, DC in 6 st, TR in ch 2 sp of flower petals (round 3), working between the DC’s from prev. round, DC in next 6 sts, FPDC on next st, Repeat from * around, sl st to ch up 3. (see video tutorial for visual instructions)
Rnd 7: DC in each st around putting [DC, ch 2, DC] in corners. Sl st to beginning, Fasten off.
Enjoy!!
This post contains affiliate links, which I may be compensated for when you make a purchase. That means if you click on any link and buy from the linked websites, I will receive a small percentage of the value of your order. The amount you pay is not changed. Thank you for all your support in clicking the links in my blog!! You all are so amazing!! ~Nadia
The yarn provided for this pattern is courtesy of Red Heart Yarns
I created this Charming Chain Granny Square design to add to our 365 Days of Granny Squares project. It uses variety of crochet stitches to create an interesting design using a lot of chains! I hope you enjoy making your square!
A couple disclaimers before you start: Be sure to check your tension and use the correct size hook for your square. I demonstrate with an H-5.00mm crochet hook in the video tutorial, but you can make yours bigger or smaller by using a bigger or smaller hook. Also, if yours turns out wonky when you are finished, you may need to block this square to make it nice and flat.
Watch this video tutorial to learn how to make this granny square:
My dad will continue to be the videographer, editor, and photographer for our videos when I move away.
Support YARNutopia today so we can continue to bring you clear, quality crochet tutorials even after I move into my new home!
There will be an added expense of more travel and hopefully this won’t deter our ability to provide consistent videos on a weekly basis.
**You can always contact me via Facebook if you have any problems with the pattern. I am happy to help if you have any questions along the way.
***You can sell anything you make from my patterns, please just link back to my website YARNutopia.com. Thank you!
Teacher: Nadia Fuad
Video and Editing: Fuad Azmat (My Daddy)
Share your work on Facebook!
Add me on Snapchat: YARNutopia
Follow me on Instagram
Visit My Ravelry Store and add this to your Favorites!
Follow me on Twitter: @YARNutopia
Enjoy this video and subscribe to my channel on YouTube for more tutorials on how to crochet!
Leave a comment, and share with your friends!
Pattern:
Designed by Nadia Fuad You *may* sell items made from my pattern, but please reference my website YARNutopia.com.
Please do not copy, sell, and/or post this pattern and claim it as your own.
NOTES:
-You can use a smaller or larger hook to make this square depending on your tension. I wouldn’t use anything larger than an I-5.5mm Crochet Hook though.
-The finished square measures 6 inches.
-This square is worked from the center outward
Special stitches:
Ch(s): chain(s)
YO: Yarn Over
St(s): Stitch(es)
Sl st: slip stitch
SK: Skip
SC: Single Crochet
HDC: Half-Double Crochet
DC: Double Crochet
TR: Treble Crochet (YO twice)
Shell: 5 DC in same sp
Pattern:
If you have any confusion or difficulty with reading this pattern, please watch the video tutorial to have visual instructions.
Rnd 1:Ch 4, sl st to 1st ch to form a ring, ch 1, (sc, ch 2) 4 times in ring, sl st to beginning sc and sl st into ch 2 sp.
Rnd 2: Ch up 1, [sc, ch 2, sc] in same sp, * ch 2, [sc, ch 2, sc] in next ch sp, repeat from * around, sl st to 1st sc. Sl st into ch sp.
Rnd 3: Ch 1, turn, sc in same sp, * ch 3, [sc, ch 2, sc] in corner, repeat from * around, sl st to beg. sc. Turn.
Color Change.
Rnd 4: In corner, Ch 1, *[SC, ch 2, SC] in corner, Ch 2, DC in SC from Rnd 1, Ch 2, Repeat from * around, sl st to beg. sc.
Color Change
Rnd 5: In Corner, Ch 1, *[SC, ch 2, SC] in corner, Ch 7, Repeat from * around, sl st to beg sc.
Rnd 6: Sl st into corner, Turn, SC in same corner, * Ch 9 ,[SC, ch 2, SC] in corner, repeat from * ending with SC, ch 2 in corner, sl st to beg sc. turn.
Rnd 7: Sl st into corner, Ch 1, * [SC, Ch 2, SC] in corner, ch 11, repeat from * around, sl st to 1st sc.
Change Color
Rnd 8: In corner, Ch 1, *[SC, ch 2, SC] in corner, ch 6, DC in DC from rnd 4, Ch 6, repeat from * around, sl st to beg. sc.
Rnd 9: In corner, Ch 5 (counts as DC + Ch 2 sp), DC in same sp, *Sk sc, sc in 1st ch, sk 1 ch, shell in next ch, sk 1 ch, sc in next ch, sk 1 ch, shell in DC, sk 1 ch, sc in next ch, sk 1 ch, shell in next ch, sk 1 ch, sc in last ch, sk sc, [DC, ch 2, DC] in corner, repeat from * around, sl st to 3rd ch of beg. ch 5.
Rnd 10: In corner, ch 5, DC in same sp, *[ ch 2, HDC in sc, ch 2, sc in middle dc of shell] 3 times, ch 2, HDC in sc, ch 2, [DC, ch 2, DC] in corner, repeat from * around, sl st to 3rd ch of beg. ch 5.
Rnd 11: In corner, ch 3, [DC, ch 2, 2 DC] in same sp, 2 DC in each ch sp, [2DC, ch 2, 2DC] in corners, sl st to beg.
Enjoy!!
This post contains affiliate links, which I may be compensated for when you make a purchase. That means if you click on any link and buy from the linked websites, I will receive a small percentage of the value of your order. The amount you pay is not changed. Thank you for all your support in clicking the links in my blog!! You all are so amazing!! ~Nadia
The yarn provided for this pattern is courtesy of Red Heart Yarns
I created this Flower Bunch Granny Square design to add to our 365 Days of Granny Squares project. It uses variety of crochet stitches to create a garden-like look with the flowers in the round! I hope you enjoy making your square!
A couple disclaimers before you start: Be sure to check your tension and use the correct size hook for your square. I demonstrate with an H-5.00mm crochet hook in the video tutorial, but you can make yours bigger or smaller by using a bigger or smaller hook. Also, if yours turns out wonky when you are finished, you may need to block this square to make it nice and flat.
Follow along with this video tutorial to learn how to make this granny square:
**You can always contact me via Facebook if you have any problems with the pattern. I am happy to help if you have any questions along the way.
***You can sell anything you make from my patterns, please just link back to my website YARNutopia.com. Thank you!
Teacher: Nadia Fuad
Video and Editing: Fuad Azmat (My Daddy)
Share your work on Facebook!
Add me on Snapchat: YARNutopia
Follow me on Instagram
Visit My Ravelry Store and add this to your Favorites!
Follow me on Twitter: @YARNutopia
Enjoy this video and subscribe to my channel on YouTube for more tutorials on how to crochet!
Leave a comment, and share with your friends!
Pattern:
Designed by Nadia Fuad You *may* sell items made from my pattern, but please reference my website YARNutopia.com.
Please do not copy, sell, and/or post this pattern and claim it as your own.
Materials:
-Red Heart Super Saver Yarn in as many colors as you want.
-H-5.00mm Crochet Hook
-Yarn Needle
-Scissors
NOTES:
-You can use a smaller or larger hook to make this square depending on your tension. I wouldn’t use anything larger than an I-5.5mm Crochet Hook though.
-The finished square measures 6 inches.
-This square is worked from the center outward
Special stitches:
Ch(s): chain(s)
YO: Yarn Over
St(s): Stitch(es)
Sl st: slip stitch
SK: Skip
SC: Single Crochet
HDC: Half-Double Crochet
DC: Double Crochet
TR: Treble Crochet (YO twice)
Beg. Popcorn: ch up 3, 4 DC in same st, remove hook from loop, insert hook in 1st st, put loop back on hook and pull through.
Popcorn: 5 DC in same st, remove hook from loop, insert hook in 1st st, put loop back on hook and pull through.
Cluster: YO, insert hook, YO pull through, YO pull through 2, YO, insert hook, YO pull through, YO pull through 2, YO, insert hook, YO pull through, YO pull through 2, YO pull through all 4 loops on hook. Cluster made.
Pattern:
If you have any confusion or difficulty with reading this pattern, please watch the video tutorial to have visual instructions.
Rnd 1: Grab 12 strands of yarn that are about 8 inches, then make a ring with them (see video tutorial), and crochet 36 sc in the ring, sl st to beg. sc. (36 sc)
Rnd 2: In any ch st, SC in 4 sts, *ch 5, 10 sc in 2nd ch from hook, sl st to 1st sc, ch 1, 3sc in same st, (sl st to next st, 3 sc in next st) 4 times. sl st to beg petal, sc down the 3 chs of the stem, sc in next 4 sts from rnd 1, repeat from * around ending with sc in last 4 sts, sl st to beginning sc. Fasten off. (You can sew the centers of your flowers closed, see video tutorial for specifications)
Rnd 3: Start in a st before a stem, (See video tutorial for placement), Ch 6 (counts as dc + ch 3), sk over flower stem, DC in next 8 sts, *ch 3, DC in next 8 sts, working behind flowers, repeat from * around, ending with DC in last 7 sts, sl st to 3rd ch of beg. ch 6.
Rnd 4: In corner, Ch 1, *[3 sc, ch 2, 3 sc] in corner, sc in next 4 sts, ch 5, 10 sc in 2nd ch from hook, sl st to 1st sc, ch 1, 3sc in same st, (sl st to next st, 3 sc in next st) 4 times. sl st to beg petal, sc down the 3 chs of the stem, sc in next 4 sts, repeat from * around. sl st to beg. sc.
Rnd 5: In any corner, ch 3, [DC, ch 2, 2 DC] in same corner, *[sk st, DC in next, DC in sk’d st (working in front of the dc you made)] 3 times, dc in next st before stem/flower, DC in st after stem/flower, [sk st, dc in next, dc in sk’d st (working behind the dc you made)] 3 times, [2 DC, ch 2, 2 DC] in corner, repeat from * around
Rnd 6: In any corner, ch 3, [DC, ch 2, 2 DC] in same corner, *[sk st, dc in next, dc in sk’d st] repeat until you get to next corner, [2 dc, ch 2, 2 dc] in next corner, repeat from * around. sl st to beg. ch up 3.
Fasten off, Weave in ends.
Make French knots in the center of your flowers and tack them down. See video tutorial for visual instructions.
I created this Cornershop Granny Square design to add to our 365 Days of Granny Squares project. It uses variety of crochet stitches to create a look with popping corners! I hope you enjoy making your square!
A couple disclaimers before you start: Be sure to check your tension and use the correct size hook for your square. I demonstrate with an H-5.00mm crochet hook in the video tutorial, but you can make yours bigger or smaller by using a bigger or smaller hook. Also, if yours turns out wonky when you are finished, you may need to block this square to make it nice and flat
Follow along with this video tutorial to learn how to make this square:
**You can always contact me via Facebook if you have any problems with the pattern. I am happy to help if you have any questions along the way.
***You can sell anything you make from my patterns, please just link back to my website YARNutopia.com. Thank you!
Teacher: Nadia Fuad
Video and Editing: Fuad Azmat (My Daddy)
Share your work on Facebook!
Add me on Snapchat: YARNutopia
Follow me on Instagram
Visit My Ravelry Store and add this to your Favorites!
Follow me on Twitter: @YARNutopia
Enjoy this video and subscribe to my channel on YouTube for more tutorials on how to crochet!
Leave a comment, and share with your friends!
Pattern:
Designed by Nadia Fuad You *may* sell items made from my pattern, but please reference my website YARNutopia.com.
Please do not copy, sell, and/or post this pattern and claim it as your own.
Materials:
-Red Heart Super Saver Yarn in as many colors as you want.
-H-5.00mm Crochet Hook
-Yarn Needle
-Scissors
NOTES:
-You can use a smaller or larger hook to make this square depending on your tension. I wouldn’t use anything larger than an I-5.5mm Crochet Hook though.
-The finished square measures 6 inches.
-This square is worked from the center outward
Special stitches:
Ch(s): chain(s)
YO: Yarn Over
St(s): Stitch(es)
Sl st: slip stitch
SK: Skip
SC: Single Crochet
HDC: Half-Double Crochet
DC: Double Crochet
TR: Treble Crochet (YO twice)
Beg. Popcorn: ch up 3, 4 DC in same st, remove hook from loop, insert hook in 1st st, put loop back on hook and pull through.
Popcorn: 5 DC in same st, remove hook from loop, insert hook in 1st st, put loop back on hook and pull through.
Cluster: YO, insert hook, YO pull through, YO pull through 2, YO, insert hook, YO pull through, YO pull through 2, YO, insert hook, YO pull through, YO pull through 2, YO pull through all 4 loops on hook. Cluster made.
Pattern:
If you have any confusion or difficulty with reading this pattern, please watch the video tutorial to have visual instructions.
Ch 8, sl st to beginning to form a ring
Rnd 1: Ch 4 (counts as DC + Ch 1 sp), [Popcorn, ch 1, popcorn, ch 1, dc, ch 1] 4 times in ring. ending with a popcorn. sl st to 3rd ch of ch up 3. (See video tutorial for visual instructions)
Rnd 2: In any ch 1 sp between popcorn sts, ch 5 (counts as DC + ch 2 sps), DC in same sp, *ch 2, FPDC around DC from rnd 1, ch 2, [DC, ch 2, DC] in ch 1 sp between popcorns, repeat from * around, sl st to 3rd ch of beg. ch 5.
Rnd 3: In corner, Ch up 4, *[Cluster, ch 1] 2 times in next sp, [Cluster, ch 1] 2 times in next sp, [DC, ch 2, DC] in corner, repeat from * around, sl st to 3rd ch of beg ch 4.
Rnd 4: In corner, ch up 4, *Popcorn in ch 1 sp, ch 1, DC in next st, DC in ch 1 sp, DC in cluster, DC in ch 1 sp, DC in cluster, DC in ch 1 sp, DC in cluster, Ch 1, Popcorn in next ch 1 sp, Ch 1, [DC, ch 2, DC] in next corner, Ch 1, repeat from * around, sl st to 3rd ch of beg. ch 4.
Rnd 5: In any corner, ch up 3, [1DC, ch 2, 2 DC] in same corner, *2DC in next ch sp before popcorn, sk popcorn st, DC in next 7 sts, Sk popcorn st, 2 DC in ch 1 sp, [2DC, ch 2, 2 DC] in corner, repeat from * around. Sl st to beg. ch up 3.
I created this Dazzling Dragonfly Granny Square design to add to our 365 Days of Granny Squares project. It uses variety of crochet stitches to create a look of a 3D Dragonfly! I hope you enjoy making your square!
A couple disclaimers before you start: Be sure to check your tension and use the correct size hook for your square. I demonstrate with an H-5.00mm crochet hook in the video tutorial, but you can make yours bigger or smaller by using a bigger or smaller hook. Also, if yours turns out wonky when you are finished, you may need to block this square to make it nice and flat.
Follow along with this video tutorial to learn how to make this square:
Support YARNutopia today so we can continue to bring you clear, quality crochet tutorials
**You can always contact me via Facebook if you have any problems with the pattern. I am happy to help if you have any questions along the way.
***You can sell anything you make from my patterns, please just link back to my website YARNutopia.com. Thank you!
Teacher: Nadia Fuad
Video and Editing: Fuad Azmat (My Daddy)
Share your work on Facebook!
Add me on Snapchat: YARNutopia
Follow me on Instagram
Visit My Ravelry Store and add this to your Favorites!
Follow me on Twitter: @YARNutopia
Enjoy this video and subscribe to my channel on YouTube for more tutorials on how to crochet!
Leave a comment, and share with your friends!
Pattern:
Designed by Nadia Fuad You *may* sell items made from my pattern, but please reference my website YARNutopia.com.
Please do not copy, sell, and/or post this pattern and claim it as your own.
NOTES:
-You can use a smaller or larger hook to make this square depending on your tension. I wouldn’t use anything larger than an I-5.5mm Crochet Hook though.
-The finished square measures 6 inches.
-This square is worked from the center outward
Special stitches:
Ch(s): chain(s)
YO: Yarn Over
St(s): Stitch(es)
Sl st: slip stitch
SK: Skip
SC: Single Crochet
HDC: Half-Double Crochet
DC: Double Crochet
TR: Treble Crochet (YO twice)
Beg. Popcorn: ch up 3, 4 DC in same st, remove hook from loop, insert hook in 1st st, put loop back on hook and pull through.
Popcorn: 5 DC in same st, remove hook from loop, insert hook in 1st st, put loop back on hook and pull through.
Beg. TR Popcorn: ch up 3, 4 DC in same st, remove hook from loop, insert hook in 1st st, put loop back on hook and pull through. ch up 4, 5 DC in same st, remove hook from loop, insert hook in 1st st, put loop back on hook and pull through.
Pattern:
If you have any confusion or difficulty with reading this pattern, please watch the video tutorial to have visual instructions.
Ch 4, sl st to beginning to form a ring
Rnd 1: Beg. Popcorn in ring, ch 2, 3DC in ring, ch 2, DC in ring, CH 11, sc in 2nd ch from hook and in next 4 sts, HDC in rest of the chs, 3 HDC in last ch and make a popcorn st (see video tutorial to see how to do that), DC back into ring, ch 2, 3 DC in ring, ch 2, Sl st to beg. popcorn.
Rnd 2: Beg. Popcorn in popcorn, ch 2, Dc in ch 2 sp, DC in the next st, [2dc, ch 2, 2dc] in next st, dc in next st, DC in ch 2 sp, sk dc, [2DTR, ch 2, 2DTR] in center ring (working behind the dragonfly tail), dc in ch 2 sp, DC in next st, [2dc, ch 2, 2dc] in next st, dc in next st, 2 dc in ch sp, ch 2, sl st to beg. popcorn.
Rnd 3: Beg. Popcorn in popcorn, ch 2, DC in ch sp, dc in next 4 sts, [DC, ch 3, DC] in corner, DC in next 6 sts, [dc, ch 3, dc] in corner, dc in next 6 sts, [dc, ch 3, dc] in corner, dc in next 6 sts, dc in ch sp, ch 2, sl st to popcorn.
Rnd 4: Beg. TR Popcorn in popcorn st, ch 2, dc in ch sp, dc in next 6 sts [DC, ch 3, DC] in corner, dc in next 8 sts, [dc, ch 3, dc] in corner, dc in next 8 sts, [dc, ch 3, dc] in corner, dc in next 8 sts, ch 2, sl st to beg. tr popcorn.
Rnd 5: Ch 3, [DC, ch 2, 2 dc] in same popcorn st, DC in next 8 sts, [2 DC, ch 3, 1 DC] in corner, DC in next 10 sts, [2 DC, ch 3, 1 DC] in next corner, DC in next 10 sts, [1 DC, ch 3, 1 DC] in next corner, DC in next 10 sts, Sl st to beg ch up 3.
Rnd 6: DC in each st around putting [2 DC, ch 2, 2 DC] in each corner.
Rnd 7:Sc in each st around, [2 sc, ch 2, 2 sc] in each corner. Sl st to beginning.
Assembly: Sew tail down.
Wings: (See video tutorial for visual instructions)
Attach yarn with long tail for sewing later
Right side: Ch 8, DC in 3rd ch from hook, DC in next, HDC in next, SC in the rest of the chs, sl st back into body of dragonfly, ch 10, TR in 4th ch from hook, DC in next 2 sts, HDC in next, SC in the rest of the sts, sl st back onto body of dragonfly, fasten off, Sew wings down flat.
To make the opposite side:
ch 10, TR in 4th ch from hook, DC in next 2 sts, HDC in next, SC in the rest of the sts, sl st back onto body of dragonfly, Ch 8, DC in 3rd ch from hook, DC in next, HDC in next, SC in the rest of the chs, sl st back into body of dragonfly, fasten off, Sew wings down flat.
Fasten off, Weave in ends.
Enjoy!!
This post contains affiliate links, which I may be compensated for when you make a purchase. That means if you click on any link and buy from the linked websites, I will receive a small percentage of the value of your order. The amount you pay is not changed. Thank you for all your support in clicking the links in my blog!! You all are so amazing!! ~Nadia
I created this Floral Palisade Granny Square design to add to our 365 Days of Granny Squares project. It uses variety of crochet stitches to create a look that reminds me of a gate into a beautiful garden! I hope you enjoy making your square!
A couple disclaimers before you start: Be sure to check your tension and use the correct size hook for your square. I demonstrate with an H-5.00mm crochet hook in the video tutorial, but you can make yours bigger or smaller by using a bigger or smaller hook. Also, if yours turns out wonky when you are finished, you may need to block this square to make it nice and flat.
Follow along with this video tutorial to learn how to make this square:
My dad will continue to be the videographer, editor, and photographer for our videos when I move away.
Support YARNutopia today so we can continue to bring you clear, quality crochet tutorials even after I move into my new home!
There will be an added expense of more travel and hopefully this won’t deter our ability to provide consistent videos on a weekly basis.
**You can always contact me via Facebook if you have any problems with the pattern. I am happy to help if you have any questions along the way.
***You can sell anything you make from my patterns, please just link back to my website YARNutopia.com. Thank you!
Teacher: Nadia Fuad
Video and Editing: Fuad Azmat (My Daddy)
Share your work on Facebook!
Add me on Snapchat: YARNutopia
Follow me on Instagram
Visit My Ravelry Store and add this to your Favorites!
Follow me on Twitter: @YARNutopia
Enjoy this video and subscribe to my channel on YouTube for more tutorials on how to crochet!
Leave a comment, and share with your friends!
Pattern:
Designed by Nadia Fuad You *may* sell items made from my pattern, but please reference my website YARNutopia.com.
Please do not copy, sell, and/or post this pattern and claim it as your own.
NOTES:
-You can use a smaller or larger hook to make this square depending on your tension. I wouldn’t use anything larger than an I-5.5mm Crochet Hook though.
-The finished square measures 6 inches.
-This square is worked from the center outward
Special stitches:
Ch(s): chain(s)
YO: Yarn Over
St(s): Stitch(es)
Sl st: slip stitch
SK: Skip
SC: Single Crochet
HDC: Half-Double Crochet
DC: Double Crochet
TR: Treble Crochet (YO twice)
Picot: Ch 3, sl st to 3rd ch from hook
Beg cluster: YO, Insert Hook, YO pull through, YO, pull through 2 loops, YO, insert hook, YO Pull through, YO pull through 2 loops, YO pull through 3 loops on hook.
Cluster: [YO, Insert Hook, YO pull through, YO, pull through 2 loops] 3 times, YO pull through all 4 loops on hook.
SC3TOG: Single Crochet 3 Together Decrease
Pattern:
If you have any confusion or difficulty with reading this pattern, please watch the video tutorial to have visual instructions.
Ch 4, sl st to beginning to form a ring
Rnd 1: Ch 3 (counts as DC), DC in ring, ch 2, (2DC, ch 2) 7 times in ring. Sl st to beginning.
Rnd 2: In any ch sp, ch 2, Beg. Cluster in same sp, ch 3, * cluster in next sp, ch 3, repeat from * around, sl st to beg. cluster.
Rnd 3: In any ch 3 sp, ch 1, [sc, hdc, dc, tc, picot, tc, dc, hdc, sc] in each ch sp, sl st to beg. sc. (8 petals made) Fasten off.
Rnd 4: In any picot, ch 1, sc in same sp, *ch 6, sc in next picot, repeat from * around. Sl st to beg. sc.
Rnd 5: In ch 6 sp, Ch 3 (counts as dc) 5 DC in same sp, *(6DC, Ch 2, 6DC) in next sp (Corner made), 6 DC in next sp, repeat from * around, sl st to beg ch up 3.
Rnd 6: In any corner, Ch 1, *[sc, ch 2, sc] in corner, sc in next 3 sts on round 5, DTR in DC from Previous Petal from Round 3, SC in next 5 sts on round 5, DTR in DC from next petal from round 3, SC in next 2 sts on rnd 5, DTR in Previous Petal from round 3, SC in next 5 sts from rnd 5, DTR in DC from next petal from Rnd 3, SC in next 3 sts from rnd 5, repeat from * around, sl st to first sc of this round.
Rnd 7:Sc in each st around, [sc, ch 2, sc] in each corner. Sl st to beginning.
Fasten off, Weave in ends.
Enjoy!!
This post contains affiliate links, which I may be compensated for when you make a purchase. That means if you click on any link and buy from the linked websites, I will receive a small percentage of the value of your order. The amount you pay is not changed. Thank you for all your support in clicking the links in my blog!! You all are so amazing!! ~Nadia
The yarn provided for this pattern is courtesy of Red Heart Yarns
I created this Celestial Delight Granny Square design to add to our 365 Days of Granny Squares project. It uses variety of crochet stitches to create a look that reminds me of wild stars in the universe! I hope you enjoy making your square!
A couple disclaimers before you start: Be sure to check your tension and use the correct size hook for your square. I demonstrate with an H-5.00mm crochet hook in the video tutorial, but you can make yours bigger or smaller by using a bigger or smaller hook. Also, if yours turns out wonky when you are finished, you may need to block this square to make it nice and flat.
Follow along with this video tutorial to make your own granny square:
***You can sell anything you make from my patterns, please just link back to my website YARNutopia.com. Thank you!
Teacher: Nadia Fuad
Video and Editing: Fuad Azmat (My Daddy)
Share your work on Facebook!
Add me on Snapchat: YARNutopia
Follow me on Instagram
Visit My Ravelry Store and add this to your Favorites!
Follow me on Twitter: @YARNutopia
Enjoy this video and subscribe to my channel on YouTube for more tutorials on how to crochet!
Leave a comment, and share with your friends!
Pattern:
Designed by Nadia Fuad You *may* sell items made from my pattern, but please reference my website YARNutopia.com.
Please do not copy, sell, and/or post this pattern and claim it as your own.
NOTES:
-You can use a smaller or larger hook to make this square depending on your tension. I wouldn’t use anything larger than an I-5.5mm Crochet Hook though.
-The finished square measures 8 inches.
-This square is worked from the center outward
Special stitches:
Ch(s): chain(s)
YO: Yarn Over
St(s): Stitch(es)
Sl st: slip stitch
SK: Skip
SC: Single Crochet
HDC: Half-Double Crochet
DC: Double Crochet
TR: Treble Crochet (YO twice)
DTR: Double Treble Crochet (YO 3 times)
TTR: Triple Treble Crochet (YO 4 times! Woah!)
Beg cluster: YO, Insert Hook, YO pull through, YO, pull through 2 loops, YO, insert hook, YO Pull through, YO pull through 2 loops, YO pull through 3 loops on hook.
Cluster: [YO, Insert Hook, YO pull through, YO, pull through 2 loops] 3 times, YO pull through all 4 loops on hook.
SC3TOG: Single Crochet 3 Together Decrease
Pattern:
If you have any confusion or difficulty with reading this pattern, please watch the video tutorial to have visual instructions.
Ch 2
Rnd 1: 8 SC in 2nd ch from hook, sl st to beginning. (8)
Rnd 2: In any st, ch 2, HDC in same st, 2HDC in each st around, sl st to ch 2. (16)
Rnd 3: Between HDC groupings, Ch up 3, beg. cluster in same sp, *ch 3, cluster between next HDC grouping, repeat from * around, sl st to beg. cluster. (8 clusters)
Rnd 4: In any ch 3 sp, *ch 8, sc in 3rd ch from hook, sc in next, HDC in next 2 chs, DC in next 2 chs, Sl st into ch 3 sp, sc in cluster st, sl st into next sp, repeat from * around, sl st to 1st ch of beginning ch 8. (8 Points made)
Rnd 5: At the base of any point, ch 1, sc in same st, sc in next 5 sts, *[sc, ch 3, sc] in top of point, sc in next 6 sts, sc3tog over [sl st, sc, and sl st], sc in the next 6 sts, repeat from * around, ending with sc3tog. sl st to beginning sc. fasten off.
Rnd 6: In any ch 3 sp at the top of a point: Ch 3, [DC, ch 2, 2 DC] in same sp, sk 1, * DC in next, Sk 1, TR in next, Sk 1, DTR in next, Sk 1, TTR in next, Sk 1, DTR in next, Sk 1, TR in next, Sk 1, DC in next, sk 1, sc in ch 3 sp, sk 1, repeat from * around.
Rnd 7: In any corner, Ch 3, [dc, ch 2, 2 dc] in same sp, *HDC in next st, SC in next, HDC in next, DC in next 2 sts, TC in next, DC in next, HDC in next, SC in next 3 sts, HDC in next, DC in next, TC in next, DC in next 2 sts, HDC in next, SC in next, HDC in next, [2dc, ch 2, 2dc] in corner, repeat from * around. Sl st to ch up 3.
Rnd 8: SC in each st around putting [sc, ch 2, sc] in corners.
Fasten off, Weave in ends.
Enjoy!!
This post contains affiliate links, which I may be compensated for when you make a purchase. That means if you click on any link and buy from the linked websites, I will receive a small percentage of the value of your order. The amount you pay is not changed. Thank you for all your support in clicking the links in my blog!! You all are so amazing!! ~Nadia
The yarn provided for this pattern is courtesy of Red Heart Yarns
I created this Blooming Daydreams Granny Square design to add to our 365 Days of Granny Squares project. It uses variety of crochet stitches to create a look that reminds me of summer! I hope you enjoy making your square!
A couple disclaimers before you start: Be sure to check your tension and use the correct size hook for your square. I demonstrate with an H-5.00mm crochet hook in the video tutorial, but you can make yours bigger or smaller by using a bigger or smaller hook. Also, if yours turns out wonky when you are finished, you may need to block this square to make it nice and flat.
***You can sell anything you make from my patterns, please just link back to my website YARNutopia.com. Thank you!
Teacher: Nadia Fuad
Video and Editing: Fuad Azmat (My Daddy)
Share your work on Facebook!
Add me on Snapchat: YARNutopia
Follow me on Instagram
Visit My Ravelry Store and add this to your Favorites!
Follow me on Twitter: @YARNutopia
Enjoy this video and subscribe to my channel on YouTube for more tutorials on how to crochet!
Leave a comment, and share with your friends!
Pattern:
Designed by Nadia Fuad You *may* sell items made from my pattern, but please reference my website YARNutopia.com.
Please do not copy, sell, and/or post this pattern and claim it as your own.
NOTES:
-You can use a smaller or larger hook to make this square depending on your tension. I wouldn’t use anything larger than an I-5.5mm Crochet Hook though.
-The finished square measures 7 inches, but you can stop at any round to make this smaller, or you can continue on to make it larger just repeating the last few rounds.
-This square is worked from the center outward
-You could make a bunch of these squares and make a throw blanket and then make the pillow as a matching set!
Special stitches:
Ch(s): chain(s)
YO: Yarn Over
St(s): Stitch(es)
Sl st: slip stitch
SK: Skip
SC: Single Crochet
HDC: Half-Double Crochet
DC: Double Crochet
TR: Treble Crochet
Popcorn: 6 DC in same sp, remove hook from last dc, insert hook into 1st dc of grouping, put loop back onto hook, pull through, pull tight, popcorn made
Picot: Ch 3, sl st to 3rd ch from hook (Picot made)
BPSC: Back Post Single Crochet
Pattern:
If you have any confusion or difficulty with reading this pattern, please watch the video tutorial to have visual instructions.
Start with Magic Ring or ch 4 or 5 and sl st to beginning to form ring.
Rnd 1: ch 3, 15 DC in ring. sl st to beginning ch up 3. (16 sts)
Rnd 2: In any st, ch 3, Beg. Popcorn in same stitch, * Ch 2, sk next st, Popcorn in next st, repeat from * around, ch 2, sl st to beg. popcorn. (8 popcorns, 8 ch 2 sps)
Rnd 3: in any ch 2 sp, ch 3, work a 4 DC in same sp, * sc in popcorn, 5 DC in next sp, repeat from * around, sl st to beginning. (8 Shells)
Rnd 4: In any sc, ch 3, 6 DC in same st, *Sc in middle st of shell, 7 DC in next sc, repeat from * around, sl st to beginning ch up 3. (8 Shells)
Rnd 5: In any SC, ch 1, sc in same st, * Ch 5, sk shell, sc in next sc, repeat from * around, sl st to beginning sc. (8 ch 5 sps)
Rnd 6: In any ch 5 sp, ch 1, [sc, hdc, 2dc, tc, picot, tc, 2dc, hdc, sc] in each ch 5 sp around. Sl st to beginning sc. Fasten off, weave in ends. (8 Pointed Petals)
Rnd 7: Working BEHIND your work, Attach Yarn to sc from Round 4. Ch 6, *BPSC around next sc from Round 4, ch 5, Repeat from * around, Sl st to 1st ch of beginning ch 6. (8 Ch 5 sps) (Optional: Instead of BPSC’s you could just slip stitch)
Rnd 8: In any ch 5 sp: Ch 3, 5 DC in same sp, * [5DC, ch 2, 5 DC] in next sp, 5 DC in next sp, repeat from * around, ending with [5DC, ch 2, 5DC] in last sp, sl st to ch up 3. (60 DC)
Rnd 9: Ch up 3, DC in each st around putting [2DC, ch 2, 2 DC] in the corners, sl st to beginning. (19 DC on each side)
Rnd 10: In any corner: Ch 3, [DC, ch 2, 2DC] in same corner sp, * Ch 1, sk 1 st, DC in next, repeat from * until next corner, [2 DC, ch 2, 2 DC] in corner. Repeat around. Sl st to ch up 3.
This post contains affiliate links, which I may be compensated for when you make a purchase. That means if you click on any link and buy from the linked websites, I will receive a small percentage of the value of your order. The amount you pay is not changed. Thank you for all your support in clicking the links in my blog!! You all are so amazing!! ~Nadia
The yarn provided for this pattern is courtesy of Red Heart Yarns
In summer, we are surrounded by bright color and full blooms that inspire creativity. My Blooming Daydreams Throw Pillow is a menagerie of hues and texture used to create this whimsical cushion. Perfect for a blast of life and color to any room of your home. Change the palette for your decor when you make your very own, or make this as a gift for someone you love!
With interior design leaning toward bohemian inspired decor, this floral accent pillow brings a nice vibe of color to a neutral room. It can offset plain walls of an apartment, and accented with some earthy plants, it can give a fun yet laid back ambiance.
You can toss this pillow on a bed and pair it with some fun throws. It can spruce up a drab bedroom! Don’t want to make a throw pillow? Make more than one of these squares to make a matching blanket!!
The backside of this pillow is a plain solid granny square, you can use that side and make a simple pillow without any floral design, just make 2 of the same square and sew them together and stuff a pillow form inside!
Watch this video tutorial to learn how to make your own pillow cover:
**You can always contact me via Facebook if you have any problems with the pattern. I am happy to help if you have any questions along the way.
***You can sell anything you make from my patterns, please just link back to my website YARNutopia.com. Thank you!
Teacher: Nadia Fuad
Video and Editing: Fuad Azmat (My Daddy)
Share your work on Facebook!
Add me on Snapchat: YARNutopia
Follow me on Instagram
Visit My Ravelry Store and add this to your Favorites!
Follow me on Twitter: @YARNutopia
Enjoy this video and subscribe to my channel on YouTube for more tutorials on how to crochet!
Leave a comment, and share with your friends!
Pattern:
Designed by Nadia Fuad You *may* sell items made from my pattern, but please reference my website YARNutopia.com.
Please do not copy, sell, and/or post this pattern and claim it as your own.
NOTES:
-You can use a smaller or larger hook to make this square depending on your tension. I wouldn’t use anything larger than an I-5.5mm Crochet Hook though.
-The finished square measures 16 inches, but you can stop at any round to make this smaller, or you can continue on to make it larger just repeating the last few rounds.
-This square is worked from the center outward and then small appliques are made to sew on (the appliques are optional)
-This project used about 600 yards of yarn
-The backside of the pillow was a solid granny square type of square, but you can make rows or any other backing to make yours the way you want.
-You could make a bunch of these squares and make a throw blanket and then make the pillow as a matching set!
-Colors used:
Rnd 1: Coral
Rnd 2: Orchid
Rnd 3: Bright Orchid
Rnd 4: Boysenberry
Rnd 5: Dark Orchid
Rnd 6: Jade
Rnd 7: Jade
Rnd 8: Flamingo
Rnd 9: Pool
Rnd 10: Yellow
Rnd 11: Flamingo
Rnd 12: Egg Blue
Rnds 13-22: Flamingo
Back of Pillow: Egg Blue
Flowers: Center: Yellow Outside: Egg Blue
Special stitches:
Ch(s): chain(s)
YO: Yarn Over
St(s): Stitch(es)
Sl st: slip stitch
SK: Skip
SC: Single Crochet
HDC: Half-Double Crochet
DC: Double Crochet
TR: Treble Crochet
Popcorn: 6 DC in same sp, remove hook from last dc, insert hook into 1st dc of grouping, put loop back onto hook, pull through, pull tight, popcorn made
Picot: Ch 3, sl st to 3rd ch from hook (Picot made)
BPSC: Back Post Single Crochet
3TC Cluster: [YO twice, Insert Hook into sp, YO pull through, YO pull through 2 loops] 3 times, YO pull through all 4 loops on the hook
Pattern:
If you have any confusion or difficulty with reading this pattern, please watch the video tutorial to have visual instructions.
Start with Magic Ring or ch 4 or 5 and sl st to beginning to form ring.
Rnd 1: ch 3, 15 DC in ring. sl st to beginning ch up 3. (16 sts)
Rnd 2: In any st, ch 3, Beg. Popcorn in same stitch, * Ch 2, sk next st, Popcorn in next st, repeat from * around, ch 2, sl st to beg. popcorn. (8 popcorns, 8 ch 2 sps)
Rnd 3: in any ch 2 sp, ch 3, work a 4 DC in same sp, * sc in popcorn, 5 DC in next sp, repeat from * around, sl st to beginning. (8 Shells)
Rnd 4: In any sc, ch 3, 6 DC in same st, *Sc in middle st of shell, 7 DC in next sc, repeat from * around, sl st to beginning ch up 3. (8 Shells)
Rnd 5: In any SC, ch 1, sc in same st, * Ch 5, sk shell, sc in next sc, repeat from * around, sl st to beginning sc. (8 ch 5 sps)
Rnd 6: In any ch 5 sp, ch 1, [sc, hdc, 2dc, tc, picot, tc, 2dc, hdc, sc] in each ch 5 sp around. Sl st to beginning sc. Fasten off, weave in ends. (8 Pointed Petals)
Rnd 7: Working BEHIND your work, Attach Yarn to sc from Round 4. Ch 6, *BPSC around next sc from Round 4, ch 5, Repeat from * around, Sl st to 1st ch of beginning ch 6. (8 Ch 5 sps) (Optional: Instead of BPSC’s you could just slip stitch)
Rnd 8: In any ch 5 sp: Ch 3, 5 DC in same sp, * [5DC, ch 2, 5 DC] in next sp, 5 DC in next sp, repeat from * around, ending with [5DC, ch 2, 5DC] in last sp, sl st to ch up 3. (60 DC)
Rnd 9: Ch up 3, DC in each st around putting [2DC, ch 2, 2 DC] in the corners, sl st to beginning. (19 DC on each side)
Rnd 10: In any corner: Ch 3, [DC, ch 2, 2DC] in same corner sp, * Ch 1, sk 1 st, DC in next, repeat from * until next corner, [2 DC, ch 2, 2 DC] in corner. Repeat around. Sl st to ch up 3.
Rnd 11: In any corner, ch 3, [DC, ch 2, 2 DC] in same corner sp, * DC in next 2 sts, [3TC cluster in skipped st from rnd 9, DC in next st] 10 times. DC in next st, [2DC, ch 2, 2 DC] in corner, repeat from * around, sl st to ch up 3.
Rnd 12: In any corner: Ch 2, [HDC, ch 2, 2HDC] In same corner sp, HDC in each st around putting [2HDC, ch 2, 2 HDC] in each corner.
Rnd 13: Repeat round 12
Rnd 14: In any corner: Ch 2, HDC in each st around putting [HDC, ch 2, HDC] in corners
Rnds 15-22: Repeat Round 14, Turn your work each round or every other round so your square doesn’t get wonky! Watch the video tutorial to learn how to turn your work and still work the beginning corner.
You can continue to make the square bigger, or you can fasten off sooner depending on the size you need to make your square.
Fasten off,
Weave in all ends.
Backside of Pillow:
Ch 4 or 5, sl st to beginning to form a ring (you can start with magic ring if you want)
Rnd 1: Ch up 3 (counts as DC), 2 DC in ring, ch 2, [3 DC in ring, Ch 2] 3 times, sl st to beg. ch.
Rnd 2: DC in each st putting [2DC, ch 2, 2 DC] in corners.
Repeat Round 2 as many times as you need until your square is big enough. I did a total of 15 Rounds for the back of my pillow.
Fasten off with REALLY LONG TAIL for sewing. Optional: Crochet your front and back together using single crochet or slip stitches.
Flower: Make 4.
Ch 4, Sl st to beg. to form a ring.
Rnd 1: Ch 4 (counts as DC+Ch 1 sp), [DC, Ch 1] 9 times in ring. Sl st to 3rd ch of beg. ch up 4. (10 DC/10 ch sps) Fasten off
Rnd 2: In any ch 1 sp, Ch 3 (counts as DC), [2DC, 3 TC, 3 DC] in same sp, *Sl st in next sp, [3 DC, 3TC, 3DC] in next sp, repeat from * around. (5 petals made)
Fasten off with long tail for sewing.
Leaves: Make 8.
Ch 9
sc in 2nd ch from hook, HDC in next, DC in next 3, HDC in next, SC in next, Sl St in last ch, ch 2, Sl st in same ch
Work on opposite side of foundation ch: SC in next, HDC in next, DC in next 3, HDC in next, SC in last, Sl st to beginning sc, Fasten off with long tail for sewing.
Assembly:
See video tutorial for visual instructions.
Sew appliques onto front of pillow cover. Sew front and back together but before closing completely, insert pillow form, then sew up the rest.
This post contains affiliate links, which I may be compensated for when you make a purchase. That means if you click on any link and buy from the linked websites, I will receive a small percentage of the value of your order. The amount you pay is not changed. Thank you for all your support in clicking the links in my blog!! You all are so amazing!! ~Nadia
The yarn provided for this pattern is courtesy of Red Heart Yarns
As we continue our journey through the 365 Days of Granny Squares, we have accumulated 210 squares as of today! If you are like me, your storage containers are busting full and are in need of projects to be made! I began this Island in the Sea Blanket as my second project in my series of blankets that I plan to make using these granny squares.
I named this piece because of the unique square from day 75. I went on to finishing the square as per the written pattern by Aurora. It turned out larger than any of the squares in our collection. I had to find a use and decided this was the perfect way to showcase this beautiful granny! I surrounded it with double crochet rows of various shades of cool tones to create an island oasis in a sea of blue.
This blanket utilizes 5 other large squares that we have made this year as well as 14 of our smaller squares. I have listed each square I used in this project below with links to their video tutorials.
This is just my idea to use these squares in a bigger project, but you can get as creative as you want to make a blanket or other projects where these can come in handy!
As we embarked on this project, I have witnessed an incredible amount of creativity that has come from others participating in these daily squares. I’m so happy to see everyone Hashtagging #365DaysofGrannySquares and #YARNutopia. I am watching everyone’s posts and progress! *Double Tap*
The purpose of this project was to teach a variety of stitches and expand our crochet knowledge in granny squares that exist. I have seen an array of beautiful blankets, pillow covers, jackets, and many other pieces of art springing forth from this creativity from everyone participating. Each square is a small piece of art that was meant for a bigger purpose.
This is the original layout of my blanket:
Here is a closeup to show that I made a double crochet border around each square and then sewed them together:
Here I am working on the blanket, finishing up the sewing!
Here is my finished blanket draped over the sofa:
Step By Step:
-I crocheted a double crochet border around each granny square (I would recommend 1 round of a border for each square, but if it doesn’t line up, you can add 2 rounds on the smaller squares to make them the right size)
-Then, I sewed the large squares together in a row
-I started crocheting my rows of blue using double crochet. I worked in the Back Loops Only to make a ribbed look (that’s optional) Then I made 5 rows of each color. (You can change color as often as you want)
-Once I had 5 sections done, I sewed my giant square to the center of my work.
-I started crocheting on the right side of the large square, making rows and stopping once I hit that square, then turned my work and continued on my way to make the rows until that side lined up with the large square. Then I fastened that side off.
-I attached my yarn to the left side and did the same thing, working rows of double crochet until that was the same height as the center square. Once both sides were surrounding the square, I sewed up the left and right side of the square to the double crochet rows.
-Once that was all done, I continued to crochet along just like I was on the opposite end of the blanket above the large island square. (5 rows of each color, changing colors 5 times)
-Then, I sewed the small squares together and then sewed them to the last row of the blanket.
-Once my blanket was all put together, I crocheted a simple double crochet border around the entire piece.
-I had a lot of ends to weave in, but it was all worth it!
I used an H-5.00mm crochet hook to make this blanket
I used all Red Heart Super Saver Yarn
Ready, set, Pokémon GO! Get your hooks ready to make some great Pokémon accessories and get a head start on your holiday projects! As this Pokémon Go! game has swept the world, I am no exception to the craze, I am hooked on crochet AND this app! (pun intended!)
Now we can hunt Pokémon in style with these great accessories. I made a cute Pikachu hat for my nephew, using my Basic Beanie Hat pattern and added some embellishments. Below, you will find the written instructions for those pieces.
Here are some other great crochet projects from other crocheters for additional Pokémon gear! Check ’em out and catch ’em all!
This BASIC BEANIE HAT will help you make the shell of this Pikachu hat:
I used all Red Heart Super Saver yarn in Yellow, Black, Red, and White
I used an H-5.00mm crochet hook
Ears: work in continuous rounds. Make 2
With Yellow:
Rnd 1: ch 11, sc in 2nd ch from hook and across, put 3 sc in last ch, sc on opposite side of ch, put 2 sc in last st, place st marker
Rnd 2: 2 sc in next st, 1 sc in next 9 sts, 2 sc in next 3 sts, 1 sc to last st, 2 sc in last st, fasten off with long tail for sewing
With black:
Row 1: Ch 5, sc in 2nd ch and across (4), ch 1, turn
Row 2: Sc in 1st st, sc2tog, sc in next st (3), ch 1, turn
Row 3: sc3tog, sc around entire piece, fasten off with long tail for sewing.
Triangle made.
Sew black triangle to yellow piece at top.
Embroider nose and mouth on hat
Eyes: (Make 2)
With black: ch 2, 10 HDC in 2nd ch from hook. Sl st to 1st st, fasten off with long tail for sewing.
Embroider white dots in eyes for effect.
Cheeks: (Make 2)
With Red: Ch 2, 10 HDC in 2nd ch from hook. Sl st to 1st st, fasten off with long tail for sewing.
Sew all embellishments to basic beanie hat made in yellow.


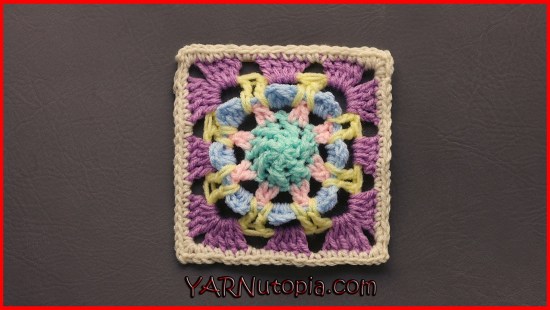


