Each year, we try to find a fun and exciting costumes for Halloween, and I love to take you on this journey with me. As each piece of the costume is released, I will update my blog to bring more and more pieces to life. Be sure to follow along to see all these updates!
The first installment of this year’s Halloween costume, is this Sweet Dream Romper. Although my intent is to use this outfit for Nasir’s cosplay costume as Max from the book “Where The Wild Things Are,” you will be able to follow through my video tutorial to create one of your own as part of a baby layette. You can change the colors, add knee patches, use smaller buttons or eliminate the buttons altogether. The creative ideas with this fall & winter pattern are endless! One thing I think we can all agree on is that Nas will be the perfect Max. 😍 He’s already happy about it!
My dad will continue to be the videographer, editor, and photographer for our videos when I move away.
Support YARNutopia today so we can continue to bring you clear, quality crochet tutorials even after I move into my new home!
There will be an added expense of more travel and hopefully this won’t deter our ability to provide consistent videos on a weekly basis.
***You can sell anything you make from my patterns, please just link back to my website YARNutopia.com. Thank you!
Teacher: Nadia Fuad
Video and Editing: Fuad Azmat (My Daddy) Share your work on Facebook!
Add me on Snapchat: YARNutopia Follow me on Instagram
Visit My Ravelry Storeand add this to your Favorites!
Follow me on Twitter: @YARNutopia
Enjoy this video and subscribe to my channel on YouTube for more tutorials on how to crochet!
Leave a comment, and share with your friends!
Designed by Nadia Fuad
You may sell items made from my pattern, but please reference my website YARNutopia.com.
Please do not copy, sell, and/or post this pattern and claim it as your own.
NOTES:
-To make this smaller or bigger, use a smaller or bigger hook size
-This is made from the bottom up
-This romper will fit a 3-6 month old baby
-See the video tutorial for sizing information.
Special stitches:
Ch(s): chain(s)
St(s): Stitch(es)
Sk: Skip
Sl st: slip stitch
SC: Single Crochet
DC: Double Crochet
HDC: Half Double Crochet
HDC2TOG: Half Double Crochet Decrease
BLO: Back Loop Only
FLO: Front Loop Only
Pattern:
Legs:
Make 2
Ch 27, Sl st to first ch to form a ring
Rnd 1: Ch 1, HDC in each ch around, sl st to 1st st, turn. (27)
Rnds 2-15: Ch 1, HDC in each st around, Sl st to first st, turn. (27)
Fasten off Leg 1 with a long tail for sewing later, Do NOT fasten off Leg 2
Attaching the legs:
Making body
Rnd 16: Working on Leg 2, Ch 1, HDC in each st around, Ch 3, HDC in each st on Leg 1, Ch 3, Sl st to first st on Leg 2, Turn. (54 sts, 2 ch 3 sps)
Rnd 17: Ch 1, HDC in each st and each ch around, sl st to first st, turn. (60)
Rnds 18-46: Ch 1, HDC in each st around, sl st to first st, Turn. (60)
Do not fasten off, continue with the first strap
Left Back Strap:
Row 1: Sl st in next 4 sts, Ch 1, HDC in 10 sts, ch 1, turn. (10)
Row 2: HDC in each st across, ch 1, turn. (10)
Row 3: HDC2TOG, HDC in next 6 sts, HDC2TOG, ch 1, turn. (8)
Row 4: HDC in each st across, Ch 1, turn. (8)
Row 5: HDC2TOG, HDC in next 4 sts, HDC2TOG, ch 1, turn. (6)
Rows 6-9: HDC in each st across, Ch 1, Turn. (6)
Row 10: HDC in first 2 sts, Ch 2, Sk 2 sts HDC in last 2 sts, ch 1, turn. (button hole made)
Row 11: HDC in each st and each ch across. (6)
Fasten off, weave in ends.
Left Front Strap:
Skip 6 sts on row 46 of body
Attach yarn to next st
Row 1: Ch 1, HDC in 10 sts, ch 1, turn. (10)
Row 2: HDC in each st across, ch 1, turn. (10)
Row 3: HDC2TOG, HDC in next 6 sts, HDC2TOG, ch 1, turn. (8)
Row 4: HDC in each st across, Ch 1, turn. (8)
Row 5: HDC2TOG, HDC in next 4 sts, HDC2TOG, ch 1, turn. (6)
Rows 6-9: HDC in each st across, Ch 1, Turn. (6)
Fasten off, weave in ends.
Right Front Strap:
Skip 4 sts on row 46 of body
Attach yarn to next st
Row 1: Ch 1, HDC in 10 sts, ch 1, turn. (10)
Row 2: HDC in each st across, ch 1, turn. (10)
Row 3: HDC2TOG, HDC in next 6 sts, HDC2TOG, ch 1, turn. (8)
Row 4: HDC in each st across, Ch 1, turn. (8)
Row 5: HDC2TOG, HDC in next 4 sts, HDC2TOG, ch 1, turn. (6)
Rows 6-9: HDC in each st across, Ch 1, Turn. (6)
Fasten off, weave in ends.
Right Back Strap:
Skip 6 sts on row 46 of body
Attach yarn to next st
Row 1: Sl st in next 4 sts, Ch 1, HDC in 10 sts, ch 1, turn. (10)
Row 2: HDC in each st across, ch 1, turn. (10)
Row 3: HDC2TOG, HDC in next 6 sts, HDC2TOG, ch 1, turn. (8)
Row 4: HDC in each st across, Ch 1, turn. (8)
Row 5: HDC2TOG, HDC in next 4 sts, HDC2TOG, ch 1, turn. (6)
Rows 6-9: HDC in each st across, Ch 1, Turn. (6)
Row 10: HDC in first 2 sts, Ch 2, Sk 2 sts HDC in last 2 sts, ch 1, turn. (button hole made)
Row 11: HDC in each st and each ch across. (6)
Fasten off, weave in ends.
Ankle Cuffs
Do the same thing for both legs
Mark 3 sts evenly around the ankle,
Attach yarn to any stitch on ankle Rnd 1: Ch 1, HDC in each st around, put a HDC2TOG stitch on the stitches you marked to decrease, sl st to first st when you get back around, ch 1 (Do not turn) (24)
Rnd 2: FPHDC on next st, BPHDC on next st, repeat from * around, sl st to first st, ch 1. (24)
Rnds 3-5: FPHDC on FPHDC sts, BPHDC n BPHDC sts, all the way around, sl st to first st, ch 1. (24)
Fasten off, weave in all ends
**Add buttons to the top straps, add buttons to the front of romper.**
Enjoy!
~Nadia
This post contains affiliate links, which I may be compensated for when you make a purchase. That means if you click on any link and buy from the linked websites, I will receive a small percentage of the value of your order. The amount you pay is not changed. Thank you for all your support in clicking the links in my blog!! You all are so amazing!! ~Nadia
The yarn provided for this pattern is courtesy of Red Heart Yarns
Have you ever wanted to try a bit of weaving? How about incorporating a little weaving with your crochet? My Chain Weaver Slouchy hat brings these two crafts together to make one great project! Perfect for cooler nights that are soon to be upon us here in the North, this slouchy hat is very easy to work up and finish in a short few hours. Change the colors to match any cold weather ensemble and this hat will make a great gift!
See the video tutorial and written instructions below!
Follow along with this video tutorial to learn how to make this hat:
My dad will continue to be the videographer, editor, and photographer for our videos when I move away.
Support YARNutopia today so we can continue to bring you clear, quality crochet tutorials even after I move into my new home!
There will be an added expense of more travel and hopefully this won’t deter our ability to provide consistent videos on a weekly basis.
***You can sell anything you make from my patterns, please just link back to my website YARNutopia.com. Thank you!
Teacher: Nadia Fuad
Video and Editing: Fuad Azmat (My Daddy) Share your work on Facebook!
Add me on Snapchat: YARNutopia Follow me on Instagram
Visit My Ravelry Storeand add this to your Favorites!
Follow me on Twitter: @YARNutopia
Enjoy this video and subscribe to my channel on YouTube for more tutorials on how to crochet!
Leave a comment, and share with your friends!
Designed by Nadia Fuad
You may sell items made from my pattern, but please reference my website YARNutopia.com.
Please do not copy, sell, and/or post this pattern and claim it as your own.
NOTES:
-To make this smaller or bigger, use a smaller or bigger hook size
-This is made from the top down
-This hat will fit any adult person
-See the video tutorial for sizing information.
Special stitches:
Ch(s): chain(s)
St(s): Stitch(es)
Sk: Skip
Sl st: slip stitch
SC: Single Crochet
DC: Double Crochet
HDC: Half Double Crochet
BLO: Back Loop Only
FLO: Front Loop Only
Pattern:
With Dusty Grey
Ch 3
Rnd 1: 9 DC in 3rd ch from hook, sl st to first DC. (9)
Rnd 2: Ch 2 (does not count as a st), 2 DC in each st around, sl st to first DC. (18)
Rnd 3: Ch 2, [2 DC in next st, DC in next st] 9 times, sl st to first DC. (27)
Rnd 4: Ch 5 (counts as DC + Ch 2 Sp), * DC in next st, Ch 2, repeat from * around, sl st to 3rd ch of beg. ch 5. (27)
Rnd 5: Sl st into Ch 2 sp, Ch 5, *DC in next Ch 2 Sp, Ch 2, Repeat from * around, Sl st to 3rd Ch of beg. ch 5. (27)
Rnd 6: Sl st into Ch 2 sp, Ch 4 (counts as DC + Ch 1 sp), * DC in next DC st, Ch 1, DC in next Ch 2 sp, Ch 1, repeat from * around, sl st to 3rd Ch of beg. ch 4. (54)
Rnd 7: Sl st into ch sp, Ch 5 (counts as DC + Ch 2 sp), * DC in next Ch sp, Ch 2, repeat from * around, sl st to 3rd ch of beg. ch 5. (54)
Rnds 8-16: Repeat Rnd 7
Rnd 17: Sl st into ch sp, Ch 1, SC in same ch sp, SC in each ch 2 sp around (this will cinch the brim in tighter), do not sl st to first st, work in continuous rounds and in BLO for the rest of this hat.
Rnds 18-24: SC in each st around working in BLO and continuous rounds.
Fasten off, weave in all ends.
(See video tutorial for visual instructions if you get stuck on this part)
Adding the colorful chains:
To add the chains, just create long chains and weave them in and out of the DC sts on each row. Below I share how many chains I made for each row, but yours might be different depending on the tension of your chains. (See video tutorial for visual instructions on how to weave the chains in and out of the sts)
Rnd 4: 54 Chains
Rnd 5: 75 Chains
Rnd 6: 98 Chains
Rnd 7: 108 Chains
Rnd 8: 120 Chains
Rnd 9: 140 Chains
Rnd 10: 148 Chains
Rnd 11: 150 Chains
Rnd 12: 148 Chains
Rnd 13: 148 Chains
Rnd 14: 150 Chains
Rnd 15: 100 Chains
Rnd 16: 78 Chains
Be sure to weave in all your ends!
Enjoy!
~Nadia
This post contains affiliate links, which I may be compensated for when you make a purchase. That means if you click on any link and buy from the linked websites, I will receive a small percentage of the value of your order. The amount you pay is not changed. Thank you for all your support in clicking the links in my blog!! You all are so amazing!! ~Nadia
The yarn provided for this pattern is courtesy of Red Heart Yarns
Oooh I’m all about the baby toys right now and that has brought me to compiling a round-up blog for some of my favorite patterns!! You are guaranteed to find something in this blog post that will brighten up any nursery, please any mama or mama-to-be, be perfect for gift giving, and bring so much joy to the little ones they are made for! Let’s check out all the toys!
In this collection, you will find fabulous teether toys, loveys, and different amigurumi toys that can be turned into rattles as well! Some of these are just too cute for words!
Click on the links or on the photos to go to the pattern for each toy! Enjoy!
For those of us who are all about wearing fabulous accessories, let me present The Bow-tastic Hat!! This hat allows for you to interchange the bow in order to match your #OOTD (outfit of the day)!! This winter wear provides lots of chances to take one item and change it up to match several things in your child’s (or your own) wardrobe without investing in numerous looks! Perfect for keeping things to a minimum while getting the maximum looks from one great piece!
Please check the “NOTES” section of my pattern to find ways to adjust the sizing on this hat.
Follow along with this video tutorial to learn how to make this hat:
My dad will continue to be the videographer, editor, and photographer for our videos when I move away.
Support YARNutopia today so we can continue to bring you clear, quality crochet tutorials even after I move into my new home!
There will be an added expense of more travel and hopefully this won’t deter our ability to provide consistent videos on a weekly basis.
***You can sell anything you make from my patterns, please just link back to my website YARNutopia.com. Thank you!
Teacher: Nadia Fuad
Video and Editing: Fuad Azmat (My Daddy) Share your work on Facebook!
Add me on Snapchat: YARNutopia Follow me on Instagram
Visit My Ravelry Storeand add this to your Favorites!
Follow me on Twitter: @YARNutopia
Enjoy this video and subscribe to my channel on YouTube for more tutorials on how to crochet!
Leave a comment, and share with your friends!
Designed by Nadia Fuad
You may sell items made from my pattern, but please reference my website YARNutopia.com.
Please do not copy, sell, and/or post this pattern and claim it as your own.
NOTES:
-To make this smaller or bigger, use a smaller or bigger hook size
-This is made from the bottom up
-If you work in multiples of 6, then you can make this bigger or smaller.
-This hat will fit any baby that is 6-12 months old
-See the video tutorial for larger sizing information.
–For larger sizes, make your brim any of the following number of rows: 54 rows, 60 rows, 66 rows, 72 rows and then when you are working the top of the hat, SC around the brim that same number of stitches as the amount of rows in your brim that you have. Then, when you are ready to decrease the top to close it up, decrease in the amount of 6 stitches each row until you get to 54 stitches around, then follow the instructions for the rest of the decreasing in the pattern/video tutorial.
Special stitches:
Ch(s): chain(s)
St(s): Stitch(es)
Sk: Skip
Sl st: slip stitch
SC: Single Crochet
DC: Double Crochet
HDC: Half Double Crochet
BLO: Back Loop Only
FLO: Front Loop Only
Pattern:
Brim of Hat:
Work in BLO for the whole brim
With Hygge Charm in Shooting Star
Ch 21
Row 1: SC in 2nd Ch from hook and across, ch 1, turn. (20)
Rows 2-25: SC in each st across, ch 1, turn. (20)
Row 26: SC in first 4 sts, Ch 3, Sk 3 sts, SC in the rest of the sts on the row, Ch 1, turn.
Row 27: SC in each st and each ch across, ch 1, turn. (20)
Rows 28-31: SC in each st across, Ch 1, turn. (20)
Row 32: Repeat Row 26
Row 33: Repeat Row 27
Rows 34-54: SC in each st across, ch 1, turn. (20)
Fasten off with long tail for sewing
Assembly Step:
Sew the brim closed (see video tutorial for visual instructions)
Weave in your ends.
Top part of hat: (with same yarn as the brim)
Make sure the Ch 3 holes are toward the bottom half of your brim, attach yarn to the opposite end of the side of the brim (see video tutorial for visual instructions)
work in BOTH LOOPS of this section of the hat, Work in continuous rounds (insert a stitch marker if you need to mark the beginning of your rounds)
Rnd 1: SC 60 sts evenly around the brim of the hat. (if you made more rows of your brim, be sure to SC any multiple of 6 on this round)
Rnds 2-15: SC in each st around. (60)
(for larger sizes, do a few more rounds before decreasing)
If you have more than 60 sts, decrease 6 sts evenly every round until you get to 54 sts, then go onto round 17 instructions.
Rnd 16: [SC2TOG, SC in next 8 sts] 6 times. (54)
Rnd 17: [SC2TOG, SC in next 4 sts] 9 times. (45)
Rnd 18: [SC2TOG, SC in next 3 sts] 9 times. (36)
Rnd 19: [SC2TOG, SC in next 2 sts] 9 times. (27)
Rnd 20: [SC2TOG, SC in next st] 9 times. (18)
Rnd 21: [SC2TOG] 9 times. (9)
Fasten off with long tail, sew top of hat closed.
Sew a fur pom to the top of the hat.
Ear Flaps:
Make 2 in your main color
Ch 5
Row 1: SC in 2nd ch and across, ch 1, turn. (4)
Row 2: 2 SC in first st, SC in each st until 1 st is remaining, 2 SC in last st, ch 1, turn. (6)
Row 3: SC across, ch 1, turn. (6)
Row 4: Repeat Row 2. (8)
Row 5: Repeat Row 3. (8)
Row 6: Repeat Row 2. (10)
Row 7: Repeat Row 3. (10)
Row 8: Repeat Row 2. (12)
Rows 9-16: SC in each st across, Ch 1, Turn.
Continue to SC around the piece. Fasten off with long tail for sewing.
Sew to each side of the hat on the inside of the brim (See video tutorial for visual instructions.
Add braided tassels to the ear flaps (optional)
Bow:
Using Red Heart Yarns With Love Metallic
Work in BLO and in continuous rounds.
Ch 48
Rnd 1: Bring chain around to the first ch, SC in 1st ch and next 19 chs, Sl st in next 4 chs, SC in next 20 chs, Sl st in last 4 chs. Rnds 2-8: SC in 20 sts, Sl st in 4 sts, SC in 20 sts, Sl st in last 4 sts.
Fasten off and weave in all ends.
Slide the bow through the chain 3 holes on the brim of the hat.
Enjoy!
~Nadia
This post contains affiliate links, which I may be compensated for when you make a purchase. That means if you click on any link and buy from the linked websites, I will receive a small percentage of the value of your order. The amount you pay is not changed. Thank you for all your support in clicking the links in my blog!! You all are so amazing!! ~Nadia
The yarn provided for this pattern is courtesy of Red Heart Yarns
My Boho Scarf Headband is an EASY project that is perfect for summer! Whether it is to keep your hair off of your face or out of your eyes for any reason, this cute boho scarf is a little accessory to add to your summer (or all year-round) wardrobe. This design was made with Scrubby Smoothie cotton yarn by Red Heart Yarns, but these can be made with any fiber! It is a versatile design and will be fun to play around with!
Follow along with this video tutorial to learn how to make this headband:
My dad will continue to be the videographer, editor, and photographer for our videos when I move away.
Support YARNutopia today so we can continue to bring you clear, quality crochet tutorials even after I move into my new home!
There will be an added expense of more travel and hopefully this won’t deter our ability to provide consistent videos on a weekly basis.
**You can always contact me via Facebook if you have any problems with the pattern. I am happy to help if you have any questions along the way.
Designed by Nadia Fuad
You may sell items made from my pattern, but please reference my website YARNutopia.com.
Please do not copy, sell, and/or post this pattern and claim it as your own.
NOTES:
-This is worked from the top down
-You can make this bigger or smaller if you want since it is a repeat pattern.
-You can use any type of yarn for this project. Gauge is not important.
Special stitches:
Ch(s): chain(s)
YO: Yarn Over
St(s): Stitch(es)
Sl st: slip stitch
SC: Single Crochet
HDC: Half-Double Crochet
DC: Double Crochet
TC: Treble Crochet
FSC: Foundation Single Crochet
Cluster: YO, Insert hook in st, YO pull through, YO, pull through 2 loops, YO, insert hook back into st, YO pull through, YO, pull through 2 loops, YO, insert hook back into st, YO pull through, YO pull through 2 loops, YO pull through 4 loops. Cluster made.
Pattern:
Ch 5, sl st to first ch to form a ring
Row 1: Ch 4, (Counts as TC), [4TR, Ch 3, 5 TR] in ring, turn. (10 TR)
Row 2: Ch 3, (counts as DC), 2 DC in same st as ch up 3, DC in each st until you get to the ch 3 sp, 5 DC in ch 3 sp, DC in each of the next sts until you get to the last st, 3 DC in last st, turn. (19 DC)
Row 3: Ch 4, 2 TC in same st as ch up 4, *ch 1, sk next st, TC in next st, repeat from * until you get to the middle st of the 5 dc group in center. (TR, ch 3, TR) in middle st, [TR, ch 1, sk next st] repeat until last st. 3 TR in last st. (16 TR)
Row 4: Repeat Row 2. (33 DC)
Row 5: Ch 3, 2 DC in same st as ch up 3, [ch 1, sk next st, cluster st in next st] repeat until you get to the middle st of the 5 dc group in center, ch 1, [TR, ch 3, TR] in center st, [ch 1, sk next st, cluster in next st] repeat until last st, 3 DC in last st. Turn. (You should have 6DC, 16 ch 1 sps, 14 (or 16) clusters, 2TR, and 1 ch 3 sp) If you end up with a few extra stitches it’s okay. Just make sure you have 3 sts in the first and last st on this row.
Row 6: Repeat Row 2. (47 DC)
Row 7: Ch 4, 2 TR in same st as ch up 4, [sk next st, TR in next st, TR in skipped st] repeat until you get to the center dc of 5 dc group in center, [TR, ch 3, TR] in middle st, [sk next st, TR in next st, TR in skipped st] repeat until the end, 3 TR in last st. Turn. (52 TR)
Row 12: Repeat Row 6. (91 DC)
Fasten off, weave in all ends.
Straps:
FSC 30
SC across LONG edge of Bandana Triangle (See video tutorial for specific location)
FSC 30
Fasten off, weave in ends.
Enjoy!
This post contains affiliate links, which I may be compensated for when you make a purchase. That means if you click on any link and buy from the linked websites, I will receive a small percentage of the value of your order. The amount you pay is not changed. Thank you for all your support in clicking the links in my blog!! You all are so amazing!! ~Nadia
The yarn provided for this pattern is courtesy of Red Heart Yarns
This afghan block is part of the Wedding Blanket CAL that Marly Bird is hosting on her website!! See more details about it here!
My contribution to this crochet-along is the “Where Love Grows Afghan Block.” It has a floral design to it and it is very fitting to a wedding theme of love and growing together in your relationship.
On the Red Heart team we have a wonderful leader of the Joy Creators, named Ally. Ally got married in May and we wanted to do something very special for her. I got the Joy Creators together and we each made a square to put together to make a wedding blanket for Ally and her husband.
Below is a photo of the whole blanket put together! All the crochet designers that were part of this crochet along had our afghan blocks sewn together to make this patchwork quilt into a beautiful wedding gift!
Follow along with this video tutorial to learn how to make this afghan block:
**You can always contact me via Facebook if you have any problems with the pattern. I am happy to help if you have any questions along the way.
***You can sell anything you make from my patterns, please just link back to my website YARNutopia.com. Thank you!
My dad will continue to be the videographer, editor, and photographer for our videos when I move away.
Support YARNutopia today so we can continue to bring you clear, quality crochet tutorials even after I move into my new home!
There will be an added expense of more travel and hopefully this won’t deter our ability to provide consistent videos on a weekly basis.
Teacher: Nadia Fuad
Video and Editing: Fuad Azmat (My Daddy)
Share your work on Facebook!
Add me on Snapchat: YARNutopia
Follow me on Instagram
Visit My Ravelry Store and add this to your Favorites!
Follow me on Twitter: @YARNutopia
Enjoy this video and subscribe to my channel on YouTube for more tutorials on how to crochet!
Leave a comment, and share with your friends!
Pattern:
Designed by Nadia Fuad
You may sell items made from my pattern, but please reference my website YARNutopia.com.
Please do not copy, sell, and/or post this pattern and claim it as your own.
NOTES:
-You can make many of these into a blanket of any size. Use the Afghan Size Guide in this Blog Post
-The measurement for my square came out to be 12 inches
-You can use any colors you want. I used a Worsted Weight, Size 4 Medium Yarn but you can use any Double Knitting Yarn or any Aran Yarn as well.
-You do not have to change color so often, but sewing in those pesky ends is a nightmare. Be sure to sew them in as you go.
Special stitches:
Ch(s): chain(s)
YO: Yarn Over
St(s): Stitch(es)
Sl st: slip stitch
SK/Sk’d: Skip/Skipped
BLO: Back Loop Only
FLO: Front Loop Only
SC: Single Crochet
HDC: Half-Double Crochet
DC: Double Crochet
TR: Treble Crochet
Cluster: [YO, insert hook, YO, pull through, YO pull through 2 loops on your hook] 3 times, YO pull through all 4 loops on your hook
Beg. Cluster: [YO, insert hook, YO, pull through, YO pull through 2 loops on your hook] 2 times, YO pull through all 3 loops on your hook
LHDC: Long Half Double Crochet
LDC: Long Double Crochet
Pattern:
With Suede,
Start with a Magic Ring or Ch 4 and Sl st to first Ch to form a ring Rnd 1: Ch 3 (Counts as DC here and throughout), 7 DC into ring, Sl st to first Ch 3 st. (8 sts)
Rnd 2: Ch 2, Beginning Cluster in same st, *Ch 2, Cluster in next st, repeat from * around, ending with Ch 2, Sl st to first cluster. Fasten off, change color to VIP. (8 cluster sts)
Rnd 3: With VIP, Attach yarn to any Ch 2 sp, Ch 1, * 3 SC in Ch 2 sp, SC in cluster st, repeat from * around, sl st to first SC, Fasten off and change color to Linen. (32 sc sts)
Rnd 4: With Linen, Work in BLO, Attach yarn to any SC, Ch 4 (Counts as DC + Ch 1 sp), *DC in next st, Ch 1, repeat from * around, ending with ch 1, sl st to 3rd ch of beginning ch 4. Fasten off. (32 sts)
Rnd 5: With Linen, Attach yarn to any FRONT LOOP of any st on Round 3 that was not worked into, (See video tutorial for visual instructions), RSC in each st around. Fasten off.
Rnd 6: In any ch sp of Round 4, Attach Suede. Ch 5 (Counts as DC + Ch 2 sp), *DC in next Ch sp, Ch 2, repeat from * around, ending with Ch 2, sl st to 3rd ch of beg. ch 5. Fasten off, change color to Linen. (32 sts)
Rnd 7: With Linen, Attach to any Ch 2 sp, Ch 1, 2 HDC in each Ch 2 sp around, Sl st to first HDC. Fasten off, change color to VIP. (64 sts)
Rnd 8: With VIP, Attach to any st, Ch 1, SC in first 4 sts, * Ch 5, Sk 4 sts, SC in next 4 sts, repeat from * around, ending with Ch 5, Sl st to 1st SC, do NOT fasten off. (8 Ch 5 sps created)
Rnd 9: Continue using VIP color, Sl st into next st and IN BETWEEN the 2 sts of the 4 SC grouping (See video tutorial for specific location), Ch 1, SC in same spot, *[3DC, 3TR, 3DC] in next ch 5 sp, SC between 2 middle SC of next 4 SC grouping, repeat from * around, sl st to first SC. Fasten off, change color to Linen. (If your work is curling at this point do not worry, it will flatten out in the next few rounds) (8 petals made)
Rnd 10: With Linen, Attach to any FIRST DC of a petal, work in BLO for this round, Ch 1, HDC in first 4 sts, *[HDC, Ch 2, HDC] in next st, HDC in next 4 sts, Long HDC in same spot as SC from previous round, HDC in next 4 sts, repeat from * around, ending with LHDC in last st, sl st to first HDC. Fasten off, change color to Suede. (96 sts)
Rnd 11: With Suede, Attach to any LHDC, Work in THIRD LOOP of each st in this round, (See video tutorial for visual instructions), Ch 4 (Counts as TR), [2TR, Ch 2, 3 TR] in same st, * Sk 3 sts, SC in next 2 sts, SC in ch 2 sp, SC in next 2 sts, HDC in next 2 sts, DC in next st, TR in LHDC st, DC in next st, HDC in next 2 sts, SC in next 2 sts, SC in ch 2 sp, SC in next 2 sts, Sk 3 sts, [3TR, Ch 2, 3 TR] in LHDC st, repeat from * around, sl st to first Ch 4 st. do NOT fasten off. (92 sts around)
Rnd 12: Continue using Suede color, work in BOTH LOOPS of sts, In same st as join, Ch 3, DC in next 2 sts, * [2DC, Ch 2, 2 DC] in corner ch 2 sp, DC in next 3 sts, HDC in next 17 sts, DC in next 3 sts, repeat from * around, sl st to beginning ch 3 st. Fasten off, change color to VIP. (108 sts)
Rnd 13: With VIP, Attach yarn to any corner ch 2 sp, Ch 3, [DC, ch 2, 2 DC] in same corner sp, * Ch 1, Sk 1 st, DC in next st, repeat from * until next corner, [2 DC, ch 2, 2 DC] in corner, repeat from * around, sl st to beg. ch 3 st. Fasten off, change color to Suede.
Rnd 14: With Suede, Attach yarn to any corner ch 2 sp, Ch 1, *[SC, Ch 2, SC] in corner, SC in next 2 sts, [LDC in Sk st from previous round, SC in next st on Rnd 13] 14 times, LDC in Sk’d st from Previous Round, SC in next 2 sts, repeat from * around, sl st to first SC. Fasten off, change color to Linen.
Rnd 15: With Linen, attach yarn in any corner ch 2 sp, Ch 1, 3 SC in same corner sp, SC in each st around putting 3 SC in corner ch 2 sps, sl st to first SC, do NOT fasten off. (144 sts)
Rnd 16: Continue using Linen, Ch 1, SC in each st round putting 3 SC in middle SC of corners, sl st to first SC, do NOT fasten off. (152 sts)
Rnd 17: Repeat Round 16 (You can opt out of doing this round if your square is 12 inches after Round 16)
Fasten off, weave in all ends.
Block your square if needed.
Enjoy!!
This post contains affiliate links, which I may be compensated for when you make a purchase. That means if you click on any link and buy from the linked websites, I will receive a small percentage of the value of your order. The amount you pay is not changed. Thank you for all your support in clicking the links in my blog!! You all are so amazing!! ~Nadia
The yarn provided for this pattern is courtesy of Red Heart Yarns
Many of you have seen my videos on YouTube and commented on the type of crochet hook I am using in a majority of my tutorials. My dad started mass producing these crochet hooks after so many inquiries flooded in. Each hook handle, as demonstrated in this video tutorial, is individually crafted and designed. A great deal of time is spent on every single hook handle.
These special crochet hooks are ergonomically created to fit perfectly into the palm of your hand. I use these in each and every video we film.
I spent much of my early crochet years in the hospital. My mom taught me the basics, and I used crochet as a time pass for those long stays trapped in a hospital bed. I loved watching YouTube just like many of you. I watched the Crochet Crowd, Moogly, and Naztazia and learned more advanced techniques through their tutorials.
I started noticing when using a traditional aluminum crochet hook, my finger and wrist joints would start to pain while holding the thin hook. Most of the pain was in part from being so ill. The disease, and side effects of my medications caused bone deterioration and joint problems. It wasn’t unusual to have swollen hands and rusty joints almost every day. My dad saw my struggle, and when I would tell him it hurt to crochet, we started to brainstorm ways to make things easier.
My dad is not a master craftsman. He didn’t even own many power tools. He didn’t carve or do woodworking, yet, he decided to experiment a little and began to design handles for my crochet hooks. In fact, his early introduction to the world of wood craft had him on a first name basis with the local Emergency Room doctors from all the mishaps he encountered trying to perfect his design. Eventually, he was able to craft this final design, have less trips to the ER, and rarely ends up with stitches anymore!
Not only are these the most comfortable in my hand, but due to those arthritic effects from long term illness, the joints in my hand and wrist feel better with this handle when I work. These handles make it so much easier to crochet for a duration of time and reduce the stress on my joints.
This blog is in part a plug for the hooks my dad makes because, why not? Besides filming and editing my video tutorials, he works so hard to make each and every one of these crochet hooks as demonstrated in his documentary video. Each individual hook is made exactly like shown. The time and care put in to each one is unsurpassed! Just check out the testimonials on his Etsy Shop to hear what others have to say.
More than a shameless plug for this product, this blog is about a dad who cares so much about his daughter that he found a way to make her passion easier on her. He designed this amazing hook handle so that I don’t hurt any more. He took to learning wood crafting and carving, taught himself how to use all these power tools and even sacrificed his own hands to make mine feel better. Those numerous ER trips to get stitches in his hands are testament to how far he would go to make me happy and pain-free.
With Father’s Day approaching, let’s remember the selfless sacrifices our dads have made. The hard work and dedication they show us and their unending acts of love they provide. I am pretty lucky to have one of the best! Thanks, Daddy for everything!
We all love a comfortable pair of house slippers. The guys in our lives are no exception. With Father’s Day right around the corner, why not make Dad a pair of these fantastic Chunky Boot Slippers. Perfect for putting your feet up and relaxing around the house. Add a leather or vinyl non-skid bottom to make them more versatile and avoid slipping. These chunky boots are squishy soft and would be perfect for anyone!
Follow along with this video tutorial to learn how to make these slippers:
My dad will continue to be the videographer, editor, and photographer for our videos when I move away.
Support YARNutopia today so we can continue to bring you clear, quality crochet tutorials even after I move into my new home!
There will be an added expense of more travel and hopefully this won’t deter our ability to provide consistent videos on a weekly basis.
Teacher: Nadia Fuad
Video and Editing: Fuad Azmat (My Daddy)
Share your work on Facebook!
Add me on Snapchat: YARNutopia
Follow me on Instagram
Visit My Ravelry Store and add this to your Favorites!
Follow me on Twitter: @YARNutopia
Enjoy this video and subscribe to my channel on YouTube for more tutorials on how to crochet!
Leave a comment, and share with your friends!
Pattern:
Designed by Nadia Fuad You *may* sell items made from my pattern, but please reference my website YARNutopia.com.
Please do not copy, sell, and/or post this pattern and claim it as your own.
NOTES:
-Use a smaller hook to make these smaller
-Use a bigger hook to make these bigger
-Watch the FULL introduction of the video tutorial for frequently asked questions and watch the full video for tips on how to make these smaller or bigger.
-The written pattern is for a size 10/10.5 US Men’s Size Shoe. You can adjust the size for measurements.
-This project uses 150 yards of BULKY yarn.
-Sew on patches of leather to the bottom of your slippers to make them non-skid.
-You can also put strips of hot-glue on the bottom of your slippers to make them non-skid
-For larger sizing tips and tricks, see written instructions below or video tutorial.
Special stitches:
Ch(s): chain(s)
YO: Yarn Over
RS: Right Side
WS: Wrong Side
St(s): Stitch(es)
Sl st: slip stitch
SK: Skip
SC: Single Crochet
SC2TOG: Single Crochet Decrease
Pattern:
If you have any confusion or difficulty with reading this pattern, please watch the video tutorial to have visual instructions.
Make 2
Sole:
With your main color (Steel):
Ch 4
Row 1: 2 SC in 2nd Ch from hook, 2 SC in each of the next 2 Chs, Ch 1, Turn. (6)
Row 2: 2 SC in 1st st, SC in each st to last st, 2 SC in last st, Ch 1, turn. (8)
Row 3: Repeat Row 2. (10)
Rows 4-12: SC in each st across, Ch 1, turn. (10)
(FOR LARGER SIZES: Do more rows of single crochets for a longer length before going onto the next row)
Row 13: Repeat Row 2. (12)
Rows 14-20: SC in each st across, Ch 1, turn. (12)
(FOR LARGER SIZES: Do more rows of single crochets for a longer length before going onto the next row)
Row 21: SC2TOG, SC in each st until 2 sts remain, SC2TOG, Ch 1, turn. (10)
Row 22: Repeat Row 21. (8)
Row 23: Repeat Row 21. (6)
Row 24: Repeat Row 21. (4)
Do not fasten off, continue to SC around entire Sole.
Fasten off. Weave in ends.
Assembly step:
With Sapphire blue, Slip Stitch around the last round of of the Sole (See video tutorial for visual instructions)
Sides of Slipper:
Attach Steel again, to the BLO of the last round of the sole (See video tutorial for specific location)
Rnd 1: Ch 1, SC in each St around, sl st to first st, ch 1. (I had 50 sts around, but you might have more or less) Rnd 2: SC in each st around. Sl st to first st. Fasten off, weave in ends.
Scroll down to see the rest of the pattern.
Top of Foot:
With your main color (Steel)
Ch 7 Row 1: SC in 2nd Ch from hook and across, ch 1, turn. (6)
Row 2: SC in each st across, ch 1, turn. (6)
Row 3: 2 SC in 1st st, SC in next 4 sts, 2 SC in last st, Ch 1, turn. (8)
Row 4: 2 SC in 1st st, SC in next 6 sts, 2 SC in last st, Ch 1, turn. (10)
Row 5: 2 SC in 1st st, SC in next 8 sts, 2 SC in last st, Ch 1, turn. (12)
Row 6-14: SC in each st across, ch 1, turn. (12)
If you need to make less rows if your feet are smaller or more rows to make it longer, you can continue until you are satisfied with the length, then go onto the instructions for dividing the leg opening.
Divide for Leg Opening: Right Side: Row 1: SC in 1st 5 sts, Ch 1, turn. (5) Row 2-10: SC across, ch 1, turn. (5)
Fasten off. Weave in ends.
Left Side: Row 1: Sk 2 sts on Row 14 of foot, SC in remaining 5 sts, Ch 1, turn. (5) Row 2-10: SC across, Ch 1, turn. (5)
Fasten off with long tail for sewing.
Assembly Step:
Sew both backs of legs together, INSIDE OUT. (See video tutorial for visual instructions on how to sew these pieces together)
Weave in all ends.
SINGLE CROCHET around the bottom edge of the “Top part of the foot” (See video tutorial for visual instructions)
Using the Single Crochet Method and the Sapphire Blue yarn, Single Crochet the top part of the foot to the bottom part of the foot. Weave in all ends.
Ankle:
With your main color (Steel):
Ch 6 Row 1: SC in 2nd Ch and across, Ch 1, Turn. (5) Rows 2-23: SC in each st across, Ch 1, turn. (5)
Fasten off with long tail for sewing.
Sew to top hole of shoe, and sew up the back seam (See video tutorial for visual instructions)
With Sapphire Blue, SC evenly around ankle, Fasten off. Weave in all ends.
Make another one to complete the pair!
Enjoy!!
This post contains affiliate links, which I may be compensated for when you make a purchase. That means if you click on any link and buy from the linked websites, I will receive a small percentage of the value of your order. The amount you pay is not changed. Thank you for all your support in clicking the links in my blog!! You all are so amazing!! ~Nadia
The yarn provided for this pattern is courtesy of Red Heart Yarns
Last week, we took a tour of my new nursery that my mom and I set up. (see it here!!) It was so much fun to see the colors come to life, the artwork get hung, and the crib readied for baby’s arrival.
Today, I am introducing the Happy Hues Sampler Baby Blanket. This luxurious blanket was made in the hues of my nursery. Yours can be made in any combo of color or why not use this project for a great stash buster!? You will love this project so much!
I have provided you instructions on how to expand the size of this blanket to fit any size bed. Whether it be all colorful or just a combination of tones that fit the decor of a specific room, this blanket will make the perfect addition to any home or nursery. Join me and get started today!
Watch this video tutorial to learn how to make this blanket:
**You can always contact me via Facebook if you have any problems with the pattern. I am happy to help if you have any questions along the way.
***You can sell anything you make from my patterns, please just link back to my website YARNutopia.com. Thank you!
My dad will continue to be the videographer, editor, and photographer for our videos when I move away.
Support YARNutopia today so we can continue to bring you clear, quality crochet tutorials even after I move into my new home!
There will be an added expense of more travel and hopefully this won’t deter our ability to provide consistent videos on a weekly basis.
Teacher: Nadia Fuad
Video and Editing: Fuad Azmat (My Daddy)
Share your work on Facebook!
Add me on Snapchat: YARNutopia
Follow me on Instagram
Visit My Ravelry Store and add this to your Favorites!
Follow me on Twitter: @YARNutopia
Enjoy this video and subscribe to my channel on YouTube for more tutorials on how to crochet!
Leave a comment, and share with your friends!
Pattern:
Designed by Nadia Fuad
You may sell items made from my pattern, but please reference my website YARNutopia.com.
Please do not copy, sell, and/or post this pattern and claim it as your own.
NOTES:
-You can make this blanket any size. Use the Afghan Size Guide in this Blog Post
-The measurements for my blanket came out to be approximately 45 inches X 50 Inches
-You can make this blanket any size by making your beginning chain an even number.
-You can use any colors you want. I used a Worsted Weight, Size 4 Medium Yarn but you can use any Double Knitting Yarn or any Aran Yarn as well.
-This blanket took me approximately 3 days to complete.
-You do not have to change color so often, but sewing in those pesky ends is a nightmare. Be sure to sew them in as you go, but if you are not changing color as often as I do in the video tutorial, you can carry your yarn up the rows on the sides because when we make our border, we cover the sides anyway.
-Ch 3 at the beginning of a row counts as a stitch unless otherwise specified (See video tutorial for explanation, especially when working treble crochet rows)
-If you do not have the same exact stitch count as me (if you are off by a few stitches, do not worry about it, it is OK, the border will hide any imperfections on the edges)
Special stitches:
Ch(s): chain(s)
YO: Yarn Over
St(s): Stitch(es)
Sl st: slip stitch
SK: Skip
SC: Single Crochet
HDC: Half-Double Crochet
DC: Double Crochet
TR: Treble Crochet
PS: Puff Stitch: *YO, insert hook into st, YO, pull through, repeat from * until you have 7 loops on your hook. YO pull through all 7 loops.
Pattern:
Change color every row.
With Charcoal Ch 132 Row 1: Dc in 3rd ch from hook and across, turn. (130)
Row 2: With White, Ch 3 (counts as stitch here and throughout), Sk 1 st, *DC in next st, DC in sk’d st working behind the DC you just made, Sk next st, repeat from * across ending with DC in last st, turn. (130)
Row 3: With Denim, Ch 1, SC in same st, *Ch 2, Sk 2 sts, SC in next st, repeat from * across ending with SC in last st, turn. (44 SC, 43 Ch 2 sps)
Row 4: With Dusty Gray, In first SC st, Ch up 3 (counts as st), put 3 DC in each Ch 2 sp across, (if you have 129 sts, add one more stitch at the end) turn. (130 sts)
Row 5: With Country Blue, Attach yarn to first st, Ch 1, SC in same st, *TR in next st, SC in next st, repeat from * across ending with SC in last st, turn. (130 sts)
Row 6: With White, Ch 1, HDC in each st across, Turn. (130 sts)
Row 7: With Charcoal, Ch 1, HDC in 1st st, Puff st in next st, *Ch 1, Puff st in next st, repeat from * across ending with HDC in last st, turn. (66 sts)
Row 8: With Country Blue, Attach yarn to first st, Ch 3 (counts as st), DC in same st, DC in each Ch 1 sp across ending with 2 DC in last st, turn. (130 sts)
Row 9: Repeat Row 2 with color Dusty Grey
Row 10: repeat Row 3 with color Denim
Row 11: repeat Row 4 with Charcoal
Row 12: repeat Row 5 with White (Be sure this round you are looking at the BACK side of your work)
Row 13: repeat Row 6 with Denim
Row 14: repeat Row 7 with Dusty Grey
Row 15: repeat Row 8 with Country Blue
Repeat Rows 2-15 with the same color sequence
End on row 78
or make this blanket as long as you want!
BORDER:
Rnd 1: SC around entire blanket putting 3 sc in each corner. Sl st to first sc.
Rnd 2: Ch 3, 2 DC in same st, *sk 2 sts, 3 DC in next st, repeat from * around putting [3DC, ch 2, 3DC] in corners, sl st to first st when finished with this round.
Rnd 3: sl st in next 2 sts and into gap between groupings, Ch 3, [2DC, ch 2, 3 DC] in same gap, *SC in next gap between groupings, [3DC, ch 2, 3DC] in next gap between groupings, repeat from * around putting [3DC, ch 2, 3DC] in corners, sl st to first st when finished with this round.
That border is amazing and can be put on any blanket!!
Weave in all ends.
Enjoy!
This post contains affiliate links, which I may be compensated for when you make a purchase. That means if you click on any link and buy from the linked websites, I will receive a small percentage of the value of your order. The amount you pay is not changed. Thank you for all your support in clicking the links in my blog!! You all are so amazing!! ~Nadia
The yarn provided for this pattern is courtesy of Red Heart Yarns
Head to the beach with this boho-inspired swimsuit cover-up! Not heading to the beach? Why not wear this Sand-n-Sea Beach Tunic over a tank top with Jean cut-offs or over your favorite sundress! Really you can NOT go wrong with this top! Next time you head to the water, you will want to have this stylish cover-up as part of you beach wardrobe.
The chains and fringe give this fabulous piece a free flowing look that is perfect for the warm summer!!
Also check out my Sassy Summer Bikini!! You can make the entire ensemble – bikini and coverup using Willow Yarns! Now rush over to their website and fill up those online shopping carts with these perfect summer fibers!
My dad will continue to be the videographer, editor, and photographer for our videos when I move away.
Support YARNutopia today so we can continue to bring you clear, quality crochet tutorials even after I move into my new home!
There will be an added expense of more travel and hopefully this won’t deter our ability to provide consistent videos on a weekly basis.
Watch this video tutorial to learn how to make this tunic:
**You can always contact me via Facebook if you have any problems with the pattern. I am happy to help if you have any questions along the way.
***You can sell anything you make from my patterns, please just link back to my website YARNutopia.com. Thank you!
Teacher: Nadia Fuad
Video and Editing: Fuad Azmat (My Daddy)
Share your work on Facebook!
Add me on Snapchat: YARNutopia
Follow me on Instagram
Visit My Ravelry Store and add this to your Favorites!
Follow me on Twitter: @YARNutopia
Enjoy this video and subscribe to my channel on YouTube for more tutorials on how to crochet!
Leave a comment, and share with your friends!
Designed by Nadia Fuad You *may* sell items made from my pattern, but please reference my website YARNutopia.com.
Please do not copy, sell, and/or post this pattern and claim it as your own.
NOTES:
-Use a smaller hook to make these smaller
-Use a bigger hook to make these bigger
-Watch the FULL introduction of the video tutorial for frequently asked questions and watch the full video for tips on how to make this smaller or bigger.
-This tunic measures 32 inches wide and 23 inches long. See video tutorial to learn how to make this larger.
Special stitches:
Ch(s): chain(s)
YO: Yarn Over
St(s): Stitch(es)
Sl st: slip stitch
SC: Single Crochet
DC: Double Crochet
Pattern:
If you have any confusion or difficulty with reading this pattern, please watch the video tutorial to have visual instructions.
Tunic:
Front Panel and Back Panel: (These instructions are for ONE panel, make 2 exactly the same–See video tutorial for visual instructions)
Ch 142 or any multiple of 20 + 2 Row 1: DC in 3rd Ch from hook and next 19 chs, *Ch 20, Sk 20 chs, DC in next 20 chs, repeat from * across ending with DC in last 20 chs, ch 2, turn.
Row 2: DC in first 20 sts, *Ch 20, Sk ch 20 sp, DC in next 20 sts, repeat from * across, ending with DC in last 20 sts, Ch 2, turn.
Rows 3-50: Repeat Row 2 (you can go beyond Row 50 if you want to make yours longer)
Assembly Step:
Make 2 of these panels exactly the same way. Once the front panel and back panel are made, sew the shoulders and up the sides leaving space for arm-holes (see video tutorial for specific instructions on how to sew this closed)
Add fringe to the sides and around the arm holes. Weave in loose ends.
Enjoy!!
This post contains affiliate links, which I may be compensated for when you make a purchase. That means if you click on any link and buy from the linked websites, I will receive a small percentage of the value of your order. The amount you pay is not changed. Thank you for all your support in clicking the links in my blog!! You all are so amazing!! ~Nadia
The yarn provided for this pattern is courtesy of Willow Yarns
Life is busy and there is never enough time in the day for most of us. Between jobs, family, appointments, and obligations, most of us are left with less and less time in a day for enjoyment. Crochet projects get started and set aside forgotten. Oftentimes, we take on a project in hopes to complete it by a specific deadline – a wedding, birthday, or holiday. It is in this time of hustle and bustle, a little time management can go a long way! Let me show you how!
Here are some of my tips to help maximize the time you have and make the day as productive as possible.
Set your goals. Now let’s plan a way to support and reach those goals!
Prioritize your day/week/month: When we begin a project, most of us have more than just the project deadline ahead of us. Know what time frame you are working with and determine the other activities you need to juggle simultaneously with these projects. Getting a planner is a great way to keep yourself organized. Several apps can be useful or I use a planner like this one here.One glance at the week ahead can give me an idea of how I can plan out my projects around other things I am juggling in life. Work and work related activities, appointments, family activities, and plans with friends-it is all right there in my planner!
Another great tip is to invest in a white board! I have one and write my daily “to do list.” My white board is near my office where I spend most of my time. I see it nearly all day long. When I get busy, it is hard to remember everything I have to do, so seeing it RIGHT in front of me every time I walk past is a great way to keep me on task! Once I complete a task, I erase it. I LOVE seeing those “to-dos” disappear every day!
Always plan ahead: Know what is necessary to reach these goals and be sure to have your project supplies available. How many times have you started a project and then ran out of supplies and needed something and now you have to stop working or put your project off until you have what you need. Plan it out, write a list, and shop for supplies, double check.
Get rid of things that distract you. Are you drawn in by social media and realize that you just spent 45 minutes with time sunk on Facebook or Instagram? Ummm me neither haha! But for those that get distracted by social media, television, or even the birds on the feeders outside the window, remove those distractions NOW! I am NOT saying permanently, NO-keep your bird feeders filled with birds!! I am saying this; Set a timer for 20 minutes or an hour (or the allotted time you’re planning on working on your project) now, put your phone in the other room, shut off TV if it is a distraction, close the curtains-do what you need to do in order to have that one hour free and clear to work. Sometimes, I only have time to set my timer for 20 minutes and push myself just to concentrate for that 20 minutes, shut my mind off to everything else and get to work! I try to capitalize on those timed sessions! Remember to have your supplies all available before getting started.
Sometimes you have to just say NO. We all want to be the kind of person that can do it all. However, sometimes that is not possible, and there comes a time that to be the most productive in our own lives we have to say NO to things. Not everything, just the things that bog our schedules down to the point where there is no time for enjoyment. It’s ok-give yourself permission to say NO and tell yourself it is ok!
Last on our list is TAKE CARE OF YOU!! No matter how much you want to finish a project, no project is worth going bonkers stressing over it! There might not be enough time in a day. It is ok! Look at your week and plan it out in days-Tuesday/Thursday or Monday/Wednesday projects, or maybe just weekend projects. Whatever you have time for, don’t put extra pressure on yourself that you HAVE to get it done NOW even on a deadline. Pace yourself, plan ahead, and give yourself permission to relax. I promise, with some effective time management, you can accomplish your goals!
Now that you have some great tips, you will have much more time to do what you love!
This post contains affiliate links, which I may be compensated for when you make a purchase. That means if you click on any link and buy from the linked websites, I will receive a small percentage of the value of your order. The amount you pay is not changed. Thank you for all your support in clicking the links in my blog!! You all are so amazing!! ~Nadia
I tried a new project that is simple enough for the beginner and fun for the seasoned crocheter! The Star Ring Rattle is perfect for any baby nursery, gift, or layette!
My dad will continue to be the videographer, editor, and photographer for our videos when I move away.
Support YARNutopia today so we can continue to bring you clear, quality crochet tutorials even after I move into my new home!
There will be an added expense of more travel and hopefully this won’t deter our ability to provide consistent videos on a weekly basis.
Watch this video tutorial to learn how to make this project:
**You can always contact me via Facebook if you have any problems with the pattern. I am happy to help if you have any questions along the way.
***You can sell anything you make from my patterns, please just link back to my website YARNutopia.com. Thank you!
Teacher: Nadia Fuad
Video and Editing: Fuad Azmat (My Daddy)
Share your work on Facebook!
Add me on Snapchat: YARNutopia
Follow me on Instagram
Visit My Ravelry Store and add this to your Favorites!
Follow me on Twitter: @YARNutopia
Enjoy this video and subscribe to my channel on YouTube for more tutorials on how to crochet!
Leave a comment, and share with your friends!
Designed by Nadia Fuad You *may* sell items made from my pattern, but please reference my website YARNutopia.com.
Please do not copy, sell, and/or post this pattern and claim it as your own.
NOTES:
-Use a smaller hook to make these smaller
-Use a bigger hook to make these bigger
-Watch the FULL introduction of the video tutorial for frequently asked questions and watch the full video for tips on how to make this smaller or bigger.
Special stitches:
Ch(s): chain(s)
YO: Yarn Over
St(s): Stitch(es)
Sl st: slip stitch
SC: Single Crochet
HDC: Half Double Crochet
DC: Double Crochet
SC2TOG: Single Crochet Decrease
SC3TOG: Single Crochet 3 Stitches Together
Pattern:
If you have any confusion or difficulty with reading this pattern, please watch the video tutorial to have visual instructions.
Star: (MAKE 2)
Ch 2 (or start with magic ring) Rnd 1: 9 SC in 2nd Ch from hook, Sl st to first SC, Ch 1, TURN.
Rnd 2: 2 SC in each st around, sl st to first SC, Ch 1, TURN. (18 sts)
Rnd 3: [2 SC in next st, SC in next st] 9 times, sl st to first SC, Ch 1, TURN. (27)
Rnd 4: [2 SC in next st, SC in next 2 sts] 9 times, sl st to first SC, Ch 1, TURN. (36)
Rnd 5: [2 SC in next st, SC in next 3 sts] 9 times, sl st to first SC, Ch 1, TURN. (45)
Now you will be making the points of the star, you will be working in rows. (See video tutorial for visual instructions)
Row 1: SC in 9 sts, leave the rest unworked, ch 1, turn. (9)
Row 2: SC in each of the 9 sts across, ch 1, turn. (9)
Row 3: SC2TOG, SC in next 5 sts, SC2TOG, ch 1, turn. (7)
Row 4: SC in each of the 7 sts across, ch 1, turn. (7)
Row 5: SC2TOG, SC in next 3 sts, SC2TOG, ch 1, turn. (5)
Row 6: SC in each of the 5 sts across, ch 1, turn. (5)
Row 7: SC2TOG, SC in next st, SC2TOG, ch 1, turn. (3)
Row 8: SC in each of the 3 sts across, ch 1, turn. (3)
Row 9: SC3TOG, ch 1. DO NOT TURN
Continue to Sl st down the side of the point back to Round 5 of the circle
Repeat Rows 1-9 of the point starting in the very next st.
Repeat this until you have all 5 points made.
On the first star, fasten off.
on the second star, DO NOT fasten off
Assembly step:
SC around both stars attaching them together (See video tutorial for visual instructions).
Before Fully closing the star, be sure to add stuffing and the rattle inside.
Strap:
With another color, Start with long tail before you make your slip knot to start this section.
Ch 6 Row 1: SC in 2nd Ch from hook and across, ch 1, turn. (5)
Rows 2-20: SC in each st across, ch 1, turn. (5)
When you finish row 20, Fasten off with long tail for sewing.
Assembly:
Wrap the strap around the teething ring and sew it together
Sew the other side of the strap to the star. Weave in all ends.
Enjoy!!
This post contains affiliate links, which I may be compensated for when you make a purchase. That means if you click on any link and buy from the linked websites, I will receive a small percentage of the value of your order. The amount you pay is not changed. Thank you for all your support in clicking the links in my blog!! You all are so amazing!! ~Nadia
The yarn provided for this pattern is courtesy of Red Heart Yarns
Using the Fair Isle crochet stitch, I created these knee high socks!! This design makes the contrasting color look like mini hearts!! These socks are so incredibly warm and fashionable! I have made socks working from the cuff down to the toes, but this sock is created starting from the toes and working its way up the leg! These fun socks can be made in all sorts of color combinations! Go wild with your imagination! Enjoy this fun pattern!
Follow along with this video tutorial to learn how to make these socks:
My dad will continue to be the videographer, editor, and photographer for our videos.
Support YARNutopia today so we can continue to bring you clear, quality crochet tutorials even after I move into my new home!
There will be an added expense of more travel and hopefully this won’t deter our ability to provide consistent videos on a weekly basis.
Pattern:
Designed by Nadia Fuad
Questions? Leave a Comment! You may sell items made from my pattern, but please reference my website YARNutopia.com. Please do not copy, sell, and/or post this pattern and claim it as your own.
NOTES:
-These socks are worked from the bottom up.
-You can use any worsted weight or double knitting type of yarn. Go to YARNSUB.com and type in Amore and all the substitutions that are equal to this type of yarn will show up.
-These socks measure–Sole: 10 inches (24 cm), Length from Toe to Cuff: 21.5 inches (54 cm), Length of leg part only–cuff to heel: 13.5 inches (35 cm)
-These socks will fit a size 6-9 American Woman’s Shoe Size foot. The video tutorial explains how to make these larger or smaller with very few simple steps. Please watch the entire video tutorial to learn how to do this for other sizes.
-To make these smaller or larger, just make sure your increases are all in a multiple of 4 (I explain this in the video tutorial)
-The CH 2 or CH 1 at the beginning of a round does NOT count as a stitch. Sl st to the beginning stitch of that round to go onto the next round.
-The majority of these socks are worked in continuous rounds. Mark your rounds with a stitch marker for each round so you do not lose your spot.
-Work over the top of your previous color strand when making the fair isle stitching
-If you see any mistakes in the pattern, please leave a comment to this post and I will fix any errors.
-Work INTO the stitch, and NOT at the top of the stitch (video tutorial shows this method)
-SEW IN YOUR LOOSE ENDS AS YOU GO! YOU WILL THANK YOURSELF LATER.
Ch: chain St(s): Stitch(es) Sl st: slip stitch SC: Single Crochet DC: Double Crochet FPDC: Front Post Double Crochet BPDC: Back Post Double Crochet SC2TOG: Single Crochet Decrease
Socks:
The video tutorial demonstrates the Left Sock Only. Right Sock instructions are written with the left sock pattern below.
Work in continuous rounds throughout this pattern.
Work over the top of your yarn strands when you change color.
Work INTO the stitch, NOT at the top of the stitch (see video tutorial for visual instructions)
Both Socks:
Starting with Red
Ch 11
Rnd 1: SC in 2nd ch from hook and across, put 3 SC in last Ch, continue working on opposite side of foundation chain, SC across, put 2 SC in last st. (21 sts)
Rnd 2: SC in 10 sts, 2 SC in next st, SC in 10 sts, 2 SC in last st. (23)
Place stitch markers on each side of the sock, this is where you will put increase stitches. Rnd 3: SC in each stitch until you get to a marked stitch, put 2 SC in the marked St.
Rnds 4-11: Repeat Round 3 until you have 41 stitches (you will increase each round by 2 stitches)
After Round 11, if you have more or less than 41 stitches, just be sure you have a multiple of 4+1 (example: 40 is a multiple of 4, plus 1 = 41 sts)
If you end up having to do more rounds, it’s ok, just go onto the instructions for round 12 next.
Rnd 12: SC in each st around (change color after last stitch to go onto Round 13) (41 sts)
Rnd 13: Change color to Chamomile, SC in each st around. (41 sts)
From now on, I will refer to Rooibos as “Red” and Chamomile as “White” in this written pattern
Rnd 14: With White, SC2TOG, SC in next 2 sts, *Change color, SC with Red, Change color, SC in 3 sts with White, repeat from * around. (40 sts)
At this point, you should have a multiple of 4 stitches around (if you do not have 40 stitches, be sure to have a multiple of 4)
Rnd 15: With White, SC in each st around. (40 sts)
Rnd 16: With White, SC in 1 st, *change color to Red, SC in 1 st, Change color to White, SC in next 3 sts, repeat from * around ending with SC in last 2 sts with White.
Rnd 17: With White, SC in each st around. (40 sts)
Rnd 18: With White, SC in next 3 sts, *Change color to Red, SC in 1 st, Change color to white, SC in next 3 sts, repeat from * around ending with one st in Red on the last st.
Rnds 19-43: Repeat Rounds 15-18 as many times as you need to get the length of the top of the foot you need. END ON A REPEAT OF ROW 15 before moving onto the next section. If you do more or less rows, that is ok, FASTEN OFF when you are done with this part and jump to the instructions for the leg part next. You will create the heel hole after you have the length you need in this section.
If any of this is confusing in writing, please view the video tutorial for clear instructions.
Heel Hole and Leg part:
Mark 20 sts on the TOP side of the sock (see video tutorial to see where top side is)
These instructions start at 56 minutes and 40 seconds into the video tutorial.
Right Foot: Heel Hole and Leg:
Rnd 1: Start in a stitch that is up 1 and over to the left 1 of a red stitch from the previous round (see video tutorial for specific location) In that stitch, attach your yarn and do the fair isle stitching (also known as: the established pattern) across 20 sts, end with a white stitch, Chain 18 loosely with White, skip 20 sts, continue to work in continuous rounds and go onto round 2 next.
Rnd 2: With White, SC in each st and each ch around. (38 sts)
Rnd 3: With White, SC in next 3 sts, *Change color to Red, SC in 1 st, Change color to white, SC in next 3 sts, repeat from * around ending with one st in Red on the last st. (if this does not line up with your fair isle stitches, just do the fair isle design as established, just keep note of what you started this round with and ended with because you will be repeating this round in the future)
Rnd 4: With White, SC in each st around.
Rnd 5: Fair Isle Stitches: With White, SC in 1 st, *change color to Red, SC in 1 st, Change color to White, SC in next 3 sts, repeat from * around ending with SC in last 2 sts with White.
Rnd 6: With White, SC in each st around AND put an EXTRA stitch in the last st. (increase made) (39 sts)
Rnds 7-10: repeat Rounds 3-6 one time.
Rnd 11: With White, SC in next 3 sts, *Change color to Red, SC in 1 st, Change color to white, SC in next 3 sts, repeat from * around.
Rnd 12: With White, SC in each st around AND put an EXTRA stitch in the last st. (increase made) (39 sts)
Rnd 13: With White, SC in 1 st, *change color to Red, SC in 1 st, Change color to White, SC in next 3 sts, repeat from * around.
Rnd 14: With White, SC in each st around AND put an EXTRA stitch in the last st. (increase made) (39 sts)
Since the increase is made, the ends of your rounds will turn out differently each time. Start your rounds EXACTLY THE SAME as instructed. See video tutorial for explanation.
Rnds 15-35: Repeat Rounds 11-14 for however long you need to so this part fits around your calf of your leg. I had 52 sts at the end of Round 35. You will need to end on a repeat of Round 11 before going onto the next round.
If you need to repeat this part more or less, just be sure your stitch count is a multiple of 4.
Rnd 36: With White, SC in each st and each ch around. (do not increase any more)
Rnd 37: Repeat Round 11
Rnd 38: With White, SC in each st and each ch around.
Rnd 39: Repeat Round 13
Left Foot Heel Hole and Leg:
Rnd 1: Start in a stitch that is up 1 and over to the left 1 of a red stitch from the previous round (see video tutorial for specific location) In that stitch, attach your yarn and SC in that stitch, Chain 18 loosely, Sk 20 sts, SC in NEXT st working the fair isle stitches on the rest of the sts on this round.
Rnd 2: With White, SC in each st and each ch around. (38 sts)
Rnd 3: With White, SC in first 2 sts, *Change color to Red, SC in next st, Change color to White, SC in next 3 sts, repeat from * around.
(When doing Round 3, you MAY have to add another stitch in somewhere to make the fair isle stitches line up correctly, if you do not, that’s ok, but if you do, that is also ok–nobody will notice, just use your judgement on if your fair isle stitches are lining up)
Rnd 4: With White, SC in each st and each ch around.
Rnd 5: With White, SC in first 4 sts, *Change color to Red, SC in next st, Change color to White, SC in next 3 sts, repeat from * around. (38 sts)
Rnd 6: With White, SC in each st around AND put an EXTRA stitch in the last st. (increase made) (39 sts)
Rnds 7-10: repeat Rounds 3-6 one time.
Rnd 11: With White, SC in first 2 sts, *Change color to Red, SC in next st, Change color to White, SC in next 3 sts, repeat from * around.
Rnd 12: With White, SC in each st around AND put an EXTRA stitch in the last st. (increase made) (40 sts)
Rnd 13: With White, SC in first 4 sts, *Change color to Red, SC in next st, Change color to White, SC in next 3 sts, repeat from * around.
Rnd 14: With White, SC in each st around AND put an EXTRA stitch in the last st. (increase made) (41 sts)
Rnds 15-35: Repeat Rounds 11-14 for however long you need to so this part fits around your calf of your leg. I had 52 sts at the end of Round 35. You will need to end on a repeat of Round 11 before going onto the next round.
If you need to repeat this part more or less, just be sure your stitch count is a multiple of 4.
Rnd 36: With White, SC in each st and each ch around. (do not increase any more)
Rnd 37: Repeat Round 11
Rnd 38: With White, SC in each st and each ch around.
Rnd 39: Repeat Round 13
BOTH SOCKS:
Rounds 40-86: Repeat Rounds 36-39 on the sock you are working on. End on a repeat of round 36 or 38 (plain SC with White Row)
You can continue this repeat until you want to make the cuff–For shorter legs, end earlier, for longer legs, continue the repeat.
Fasten off after you are done with the length and ready to make the cuff.
Next, go onto making the cuff.
Cuff:
Both Socks:
Attach Red to any stitch on back of sock.
Work in the top of the stitches on this part, not IN the stitch like you were for the fair isle design. Rnd 1: Ch 2 (does not count as anything), DC in same st and each st around, sl st to first DC. Rnd 2: Ch 2, FPDC on first St, *BPDC on next st, FPDC on next st, repeat from * around, sl st to first FPDC. Rnds 3-4: Repeat Round 2
Fasten off. Weave in ends.
Heel:
Both Socks
With Red
Attach yarn on bottom sole side in center (see video tutorial for specific location) Rnd 1: Ch 1, SC 38 sts evenly around the Heel Hole, sl st to first SC.
Rnd 2: Ch 1, SC in first 7 sts, SC2TOG, SC in next st, SC2TOG, SC in 14 sts, SC2TOG, SC in next st, SC2TOG, SC in last 7 sts, sl st to first st. (34 sts)
Rnd 3: Ch 1, SC in each st around, sl st to first st. (34)
Rnd 4: Ch 1, SC in first 6 sts, SC2TOG, SC in next st, SC2TOG, SC in 12 sts, SC2TOG, SC in next st, SC2TOG, SC in last 6 sts, sl st to first st. (30 sts)
Rnd 5: Ch 1, SC in first 5 sts, SC2TOG, SC in next st, SC2TOG, SC in 10 sts, SC2TOG, SC in next st, SC2TOG, SC in last 5 sts, sl st to first st. (26 sts)
Rnd 6: Ch 1, SC in first 4 sts, SC2TOG, SC in next st, SC2TOG, SC in 8 sts, SC2TOG, SC in next st, SC2TOG, SC in last 4 sts, sl st to first st. (22 sts)
Rnd 7: Ch 1, SC in first 3 sts, SC2TOG, SC in next st, SC2TOG, SC in 6 sts, SC2TOG, SC in next st, SC2TOG, SC in last 3 sts, sl st to first st. (18 sts)
Rnd 8: Ch 1, SC in first 2 sts, SC2TOG, SC in next st, SC2TOG, SC in 4 sts, SC2TOG, SC in next st, SC2TOG, SC in last 2 sts, sl st to first st. (14 sts)
Fasten off with long tail for sewing
Assembly Step:
Turn sock inside out, Sew heel hole closed. Fasten off, weave in all ends.
Enjoy!
***You can always contact me via Facebook if you have any problems with the pattern. I am happy to help if you have any questions along the way.
Enjoy this video and subscribe to my channel on YouTube for more tutorials on how to crochet!
Leave a comment, and share with your friends!
This post contains affiliate links, which means if you click on the link and buy from the linked websites, I will receive a small percentage of the value of your order. The amount you pay is not changed.
This post contains affiliate links, which I may be compensated for when you make a purchase. That means if you click on any link and buy from the linked websites, I will receive a small percentage of the value of your order. The amount you pay is not changed. Thank you for all your support in clicking the links in my blog!! You all are so amazing!! ~Nadia
The yarn provided for this pattern is courtesy of Red Heart Yarns
Summer season is around the corner. Time to start getting that wardrobe ready. Here is a cute little addition for baby’s layette. These baby hikers can be made in any color and added to any outfit for just the right touch!
My dad will continue to be the videographer, editor, and photographer for our videos when I move away.
Support YARNutopia today so we can continue to bring you clear, quality crochet tutorials even after I move into my new home!
There will be an added expense of more travel and hopefully this won’t deter our ability to provide consistent videos on a weekly basis.
Watch this video tutorial to learn how to make these sandals:
**You can always contact me via Facebook if you have any problems with the pattern. I am happy to help if you have any questions along the way.
***You can sell anything you make from my patterns, please just link back to my website YARNutopia.com. Thank you!
Teacher: Nadia Fuad
Video and Editing: Fuad Azmat (My Daddy)
Share your work on Facebook!
Add me on Snapchat: YARNutopia
Follow me on Instagram
Visit My Ravelry Store and add this to your Favorites!
Follow me on Twitter: @YARNutopia
Enjoy this video and subscribe to my channel on YouTube for more tutorials on how to crochet!
Leave a comment, and share with your friends!
Designed by Nadia Fuad You *may* sell items made from my pattern, but please reference my website YARNutopia.com.
Please do not copy, sell, and/or post this pattern and claim it as your own.
NOTES:
-Use a smaller hook to make these smaller
-Use a bigger hook to make these bigger
-Watch the FULL introduction of the video tutorial for frequently asked questions and watch the full video for tips on how to make this smaller or bigger.
-These booties will fit up to a 6 month old baby.
Special stitches:
Ch(s): chain(s)
YO: Yarn Over
St(s): Stitch(es)
Sl st: slip stitch
SC: Single Crochet
HDC: Half Double Crochet
DC: Double Crochet
FSC: Foundation Single Crochet
Pattern:
If you have any confusion or difficulty with reading this pattern, please watch the video tutorial to have visual instructions.
Sandal: (MAKE 2)
Inner Sole:
With Bluie:
Chain 10 Rnd 1: 2sc into 2nd ch from hook. Sc in next 5 st. Hdc in next 2. 8Dc in last ch. Working on other side, hdc in next 2, sc in next 5, 2 sc in last stitch where beginning 2 sc are. Don’t join. (26 sts) Rnd 2: 2 sc in 1st st from last row, 2 sc in next. Sc 7, hdc in next, 2hdc in each of the next 6 stitches, hdc in next, Sc 7, 2 sc in last 2 stitches. Do not join – (36 sts) Rnd 3: Sc in next 2 stitches, 2 sc in next. Sc10, 2sc in next 2 stitches, sc in next 6, 2 sc in next 2 stitches. Sc 10, 2sc in next. Sc in last 2 stitches. Sl st to next st (42 sts) Fasten off, Weave in ends.
Outer Sole:
Same as Inner sole, but DO NOT fasten off. Go to Assembly Step Next.
Assembly Step:
Slip Stitch Inner and Outer sole together (See video tutorial for visual instructions)
Fasten off, weave in ends.
Front Toe Strap:
Count 10 sts evenly on the front toe of the sole. Work in BLO of the Inner Sole and the back Loop of the Slip Sts you created when attaching the two pieces (see video tutorial for visual instructions)
Row 1: Attach Yarn to first st, Ch 1, HDC 10 sts evenly across front of toe, ch 1, turn. (10) Row 2: HDC2TOG, HDC in 6 sts, HDC2TOG, ch 1, turn. (8) Row 3: HDC2TOG, HDC in 4 sts, HDC2TOG, ch 1, turn. (6) Row 4: HDC2TOG, HDC in 2 sts, HDC2TOG, ch 1, turn. (4) Rows 5-10: HDC across, ch 1, turn. (4)
Fasten off with a long tail for sewing.
Side Straps:
See video tutorial for location on where to put these straps. (Also see photos)
Attach yarn to side (where ankle would be) Row 1: Ch 1, HDC in 4 sts leaving the rest unworked, Ch 1, turn. Rows 2-6: HDC across, Ch 1, turn.
Fasten off with long tail for sewing.
Opposite Side Strap:
Do the same exact thing as the first side strap, just on the opposite side.
(See video tutorial for visual location)
Gray Straps:
Strap 1: FSC 11 sts (Start with long tail and fasten off with long tail for sewing)
Strap 2: FSC 15 sts (Start with long tail and fasten off with long tail for sewing)
Strap 3: FSC 22 sts (start with short tail and fasten off with short tail and sew in your ends to hide them)
Assembly Step:
Sew gray straps to sole of sandal (weave Strap 1 and 2 through the front toe piece)
Add Strap 3 and sew the front toe piece and side strap piece down OVER the top of Strap 3.
I show exact locations and visual instructions for this section in the video tutorial.
Add a button to Strap 3.
Weave in all ends.
Enjoy!!
This post contains affiliate links, which I may be compensated for when you make a purchase. That means if you click on any link and buy from the linked websites, I will receive a small percentage of the value of your order. The amount you pay is not changed. Thank you for all your support in clicking the links in my blog!! You all are so amazing!! ~Nadia
The yarn provided for this pattern is courtesy of Red Heart Yarns
Groundhog Day came with the promise of spring, but with the way the Wisconsin weather has been, you would never know! So it is time to think spring with my new Think Spring Cowl! This lightweight beauty was created using this elegant yarn by Willow Yarns. Verbena was the perfect fiber for this piece with it’s variegated colorway and delicate softness. Even as the temperatures begin to warm up, this on-the-go cowl will be perfect into the cool days of early spring!
My dad will continue to be the videographer, editor, and photographer for our videos when I move away.
Support YARNutopia today so we can continue to bring you clear, quality crochet tutorials even after I move into my new home!
There will be an added expense of more travel and hopefully this won’t deter our ability to provide consistent videos on a weekly basis.
Watch this video tutorial to learn how to make this cowl:
**You can always contact me via Facebook if you have any problems with the pattern. I am happy to help if you have any questions along the way.
***You can sell anything you make from my patterns, please just link back to my website YARNutopia.com. Thank you!
Teacher: Nadia Fuad
Video and Editing: Fuad Azmat (My Daddy)
Share your work on Facebook!
Add me on Snapchat: YARNutopia
Follow me on Instagram
Visit My Ravelry Store and add this to your Favorites!
Follow me on Twitter: @YARNutopia
Enjoy this video and subscribe to my channel on YouTube for more tutorials on how to crochet!
Leave a comment, and share with your friends!
Designed by Nadia Fuad You *may* sell items made from my pattern, but please reference my website YARNutopia.com.
Please do not copy, sell, and/or post this pattern and claim it as your own.
NOTES:
-Use a smaller hook to make these smaller
-Use a bigger hook to make these bigger
-Watch the FULL introduction of the video tutorial for frequently asked questions and watch the full video for tips on how to make this smaller or bigger.
-This scarf is 54 inches (137 cm) long without folding. It’s about 8 inches (20 cm) wide.
Special stitches:
Ch(s): chain(s)
YO: Yarn Over
St(s): Stitch(es)
Sl st: slip stitch
SC: Single Crochet
HDC: Half Double Crochet
DC: Double Crochet
Puff Stitch: [Yarn Over, Insert Hook into space, Yarn Over, Pull through] 4 times. Yarn Over, pull through 8 loops on your hook, Yarn Over, pull through 2 loops on your hook. Puff made.
V-Stitch: [Double Crochet, Chain 2, Double Crochet] in the same stitch.
Pattern:
If you have any confusion or difficulty with reading this pattern, please watch the video tutorial to have visual instructions.
Cowl:
Ch 46 or any multiple of 6+4 Row 1: DC in 4th Ch and each ch across, turn. (44 sts)
Row 2: Ch 2 (counts as a stitch), Sk the next 3 sts, V-Stitch in the next st, *Ch 2, Sk 2 sts, SC in next st, Ch 2, Sk 2 sts, V-Stitch in the next st, Repeat from * across, ending with Ch 2, SC in last Ch 3 stitch, turn. (7 V-Stitches made)
Row 3: Ch 4 (counts as DC + Ch 1), *[Puff Stitch, Ch 2, Puff Stitch, Ch 2, Puff Stitch] in next V-Stitch, Ch 1, repeat from * across, ending with Ch 1, DC in 2nd ch of Ch 2 Stitch, turn. (21 Puff stitches made)
Row 4: Ch 4 (counts as DC + Ch 1), * [DC in next Ch 2 sp, Ch 1] 2 times, DC in next Ch 1 sp, Ch 1, Repeat from * across ending with Ch 1, DC in 3rd Ch of beginning Ch 4 st, turn. (23 sts)
Row 5: Ch 4, DC in 1st Ch 1 sp, *DC in next DC st, DC in next Ch 1 sp, Repeat from * across ending with DC in 3rd Ch of Ch 4 st, turn. (44 sts)
If your Row 5 has an extra stitch, just be sure to make 44 sts evenly across this row. (see video tutorial for visual instructions)
Rows 6-108: Repeat Rows 2-5 as many times as you want to make this as long as you want. If you are making this into a cowl, end on a repeat of Row 4.
Assembly Step:
Sew ends together to make infinity scarf style. Weave in all ends.
Enjoy!!
This post contains affiliate links, which I may be compensated for when you make a purchase. That means if you click on any link and buy from the linked websites, I will receive a small percentage of the value of your order. The amount you pay is not changed. Thank you for all your support in clicking the links in my blog!! You all are so amazing!! ~Nadia
The yarn provided for this pattern is courtesy of Willow Yarns
Another year of *playful* Punny Valentine’s have come to an end! These have been truly *otter* this world, and I hope they left you like you are *swimming* in love and happiness! I always try to do my best *otter-wise* it defeats the purpose of doing these. No time to get *laid back* over these projects! No way! Especially since I do this to express how I feel about my significant *otter,* Nate! So, if you are so inclined, *paddle* your *tail* over to my blog later this afternoon to find this free pattern just for you!! Happy Valentine’s Day, EVERYONE! Thank you for being *OTTER-LY* amazing. Now I am going back to listening to Adele, you know the song “Hello, from the *otter* side,” yeah, that’s the one! 😉 Ok, now I’m getting *otter* here!
Follow along with this video tutorial to learn how to make this project:
My dad will continue to be the videographer, editor, and photographer for our videos when I move away.
Support YARNutopia today so we can continue to bring you clear, quality crochet tutorials even after I move into my new home!
There will be an added expense of more travel and hopefully this won’t deter our ability to provide consistent videos on a weekly basis.
Teacher: Nadia Fuad
Video and Editing: Fuad Azmat (My Daddy)
Share your work on Facebook!
Add me on Snapchat: YARNutopia
Follow me on Instagram
Visit My Ravelry Store and add this to your Favorites!
Follow me on Twitter: @YARNutopia
Enjoy this video and subscribe to my channel on YouTube for more tutorials on how to crochet!
Leave a comment, and share with your friends!
Pattern:
Designed by Nadia Fuad You *may* sell items made from my pattern, but please reference my website YARNutopia.com.
Please do not copy, sell, and/or post this pattern and claim it as your own.
NOTES:
-Use a smaller hook to make these smaller
-Use a bigger hook to make these bigger
Special stitches:
Ch(s): chain(s)
YO: Yarn Over
BLO: Back Loop Only
FLO: Front Loop Only
St(s): Stitch(es)
Sl st: slip stitch
SK: Skip
SC: Single Crochet
SC2TOG: Single Crochet Decrease
HDC: Half Double Crochet
DC: Double Crochet
Pattern:
If you have any confusion or difficulty with reading this pattern, please watch the video tutorial to have visual instructions.
Body Work in continuous rounds
With Cafe Latte
Ch 2 Rnd 1: 6 SC in 2nd ch from hook. (6) Rnd 2: 2 SC in each st around. (12) Rnd 3: [2 SC in next st, SC in next st] 6 times. (18) Rnd 4: [2 SC in next st, SC in next 2 sts] 6 times. (24) Rnd 5: [2 SC in next st, SC in next 3 sts] 6 times. (30) Rnd 6: [2 SC in next st, SC in next 4 sts] 6 times. (36) Rnds 7-25: SC in each st around. (36)
Do not fasten off, continue working the first leg. Rnd 26: SC in 6 sts, SC in the last 6 sts of Rnd 25 (See video tutorial for visual instructions) (12 sts) Rnds 27-30: SC in each st around. (12) Rnd 31: [SC2TOG] 6 times. (6)
SC first and 4th sts together. Fasten off, weave in end.
Go back to Round 25, and skip 6 sts from leg just made.
Attach yarn to next st
Ch 1 Rnd 26: SC in 12 sts. (12)
Work in continuous rounds Rnds 27-30: SC in each st around. (12) Rnd 31: [SC2TOG] 6 times. (6)
SC first and 4th sts together. Fasten off, weave in end.
Second leg made.
Leave the middle hole open until the very end.
Go onto making the embellishments first.
Ears:
Make 2 in Cafe Latte
Ch 2 Rnd 1: 6 SC in 2nd ch from hook. (6) Rnd 2: [2 SC in next st, SC in next 2 sts] 2 times. (8) Rnds 3-4: SC in each st around. (8)
Fasten off with long tail for sewing.
Assembly:
Flatten and sew ears to top of main piece, weave in ends.
Arms:
Make 2
Work in continuous rounds
With Cafe Latte
Ch 2 Rnd 1: 6 SC in 2nd ch from hook. (6) Rnd 2: 2 SC in each st around. (12) Rnds 3-6: SC in each st around. (12)
Fasten off with long tail for sewing.
Assembly:
Stuff arms and sew to each side of main piece. Weave in all ends.
Tail:
Work in continuous rounds
With Cafe Latte
Ch 2 Rnd 1: 6 SC in 2nd ch from hook. (6)
Rnd 2: SC in each st around. (6)
Rnd 3: [2 SC in next st, SC in next st] 3 times. (9)
Rnd 4: [2 SC in next st, SC in next 2 sts] 3 times. (12)
Rnd 5: [2 SC in next st, SC in next st] 6 times. (18)
Rnds 6-8: SC in each st around. (18)
Rnd 9: [SC2TOG, SC in next st] 6 times. (12)
Rnds 10-14: SC in each st around. (12)
Rnd 15: [SC2TOG] 6 times. (6)
Rnd 16: SC in each st around. (6)
Fasten off with long tail for sewing.
Assembly:
Flatten tail and sew to the backside of the otter body.
Tummy:
With Warm Brown
Work in continuous rounds
Ch 2 Rnd 1: 6 SC in 2nd ch from hook. (6) Rnd 2: 2 SC in each st around. (12) Rnd 3: [2 SC in next st, SC in next st] 6 times. (18) Rnd 4: [2 SC in next st, SC in next 2 sts] 6 times. (24) Rnd 5: [2 SC in next st, SC in next 3 sts] 6 times. (30)
Fasten off with long tail for sewing.
Face:
With Warm Brown
Ch 2 Rnd 1: 6 SC in 2nd Ch from hook, Sl st to first SC. (6) Rnd 2: Ch 3 (Counts as DC), DC in same st, [HDC, SC] in next st, [SC, HDC] in next st, 2 DC in next st, [HDC, SC] in next st, [SC, HDC] in last st, sl st to ch 3 st. Rnd 3: Ch 1, 2 HDC in first st and next st, HDC in next 4 sts, 2 HDC in next 2 sts, HDC in last 4 sts, sl st to first HDC. (16) Rnd 4: Ch 1, 2 HDC in first 4 sts, HDC in next 4 sts, 2 HDC in next 4 sts, HDC in last 4 sts, sl st to first HDC. (24)
Fasten off with long tail for sewing.
Assembly:
Embroider eyes, nose and mouth of the face piece. Sew face piece and tummy piece to body of otter.
Weave in all ends.
Once all your pieces are attached to the otter body, stuff the body from the center bottom that was opened.
Sew up the bottom hole (See video tutorial for visual instructions)
Weave in all ends.
Enjoy!!
This post contains affiliate links, which I may be compensated for when you make a purchase. That means if you click on any link and buy from the linked websites, I will receive a small percentage of the value of your order. The amount you pay is not changed. Thank you for all your support in clicking the links in my blog!! You all are so amazing!! ~Nadia
The yarn provided for this pattern is courtesy of Red Heart Yarns
I’m “grape-ful” that we are about to wind down another year of puns! Everyone has done a “grape” job with sharing even more puns and projects along the way. I think we all did a whole “bunch” for “raisin” awareness how punny Valentine’s Day can be. I was a bit “crushed” and practically let out a little “wine” when I was struggling with ideas for this segment. Now, I am “raisin” the roof as we near the finish line! I believe this year we kept “raisin” the bar with these “grape” punny ideas! Together we make a “grape” bunch!
Follow along with this video tutorial to learn how to make this project:
My dad will continue to be the videographer, editor, and photographer for our videos when I move away.
Support YARNutopia today so we can continue to bring you clear, quality crochet tutorials even after I move into my new home!
There will be an added expense of more travel and hopefully this won’t deter our ability to provide consistent videos on a weekly basis.
Teacher: Nadia Fuad
Video and Editing: Fuad Azmat (My Daddy)
Share your work on Facebook!
Add me on Snapchat: YARNutopia
Follow me on Instagram
Visit My Ravelry Store and add this to your Favorites!
Follow me on Twitter: @YARNutopia
Enjoy this video and subscribe to my channel on YouTube for more tutorials on how to crochet!
Leave a comment, and share with your friends!
Pattern:
Designed by Nadia Fuad You *may* sell items made from my pattern, but please reference my website YARNutopia.com.
Please do not copy, sell, and/or post this pattern and claim it as your own.
NOTES:
-Use a smaller hook to make these smaller
-Use a bigger hook to make these bigger
Special stitches:
Ch(s): chain(s)
YO: Yarn Over
BLO: Back Loop Only
FLO: Front Loop Only
St(s): Stitch(es)
Sl st: slip stitch
SK: Skip
SC: Single Crochet
HDC: Half Double Crochet
DC: Double Crochet
Pattern:
If you have any confusion or difficulty with reading this pattern, please watch the video tutorial to have visual instructions.
Grape: With Dark Orchid
Work in continuous rounds.
Ch 2 Rnd 1: 6 SC in 2nd Ch from hook. (6) Rnd 2: 2 SC in each st around. (12) Rnds 3-5: SC in each st around. (12) Rnd 6: [SC2TOG] 6 times. (6)
SC first and 4th sts together.
Fasten off.
Make as many grapes as you’d like! I made 9 in my bunch!
Vine:
With Warm Brown
Ch 18
Row 1: SC in 2nd ch from hook and next 7 chs, Ch 6, SC in 2nd Ch from hook and next 4 chs, continue on main foundation chain, SC in the rest of the chs (there should be 9 chs to work in), Fasten off.
Leaf:
With Green
Ch 7 Row 1: Sl st in 2nd ch from hook, SC in next, HDC in next, DC in next, HDC in next, SC in last, ch 2, continue to work on the opposite side of the foundation chain, SC in the same ch as your last SC, HDC in next st, DC in next st, HDC in next st, SC in next st, Sl st in last. Fasten off with long tail for sewing.
Assembly:
Sew grapes and leaves to vine. See video tutorial for visual instructions
Weave in all ends.
Enjoy!!
This post contains affiliate links, which I may be compensated for when you make a purchase. That means if you click on any link and buy from the linked websites, I will receive a small percentage of the value of your order. The amount you pay is not changed. Thank you for all your support in clicking the links in my blog!! You all are so amazing!! ~Nadia
The yarn provided for this pattern is courtesy of Red Heart Yarns
Today, I am happy as a *clam!* I am about to *open up* to all of you and share with you how much you are all *chowder* this world! When I face a new project or new pun, I think “Nadia, the creative world is your *oyster!*” I am not trying to dispense huge *pearls* of wisdom here. No, it would be a *clam-ity* if I started doing that! Instead I will put my heart and hand *mussels* to better use and make great projects for y’all! And *shucks!* maybe you like a few! I am trying to do as many fun and fashionable projects before my baby arrives. You know, the whole *clam* before the storm idea…anyway, I better *clam* down and get to work! I will just put on some hits by the *Wu-Tang Clam* and get started! Happy Hooking Everyone! I really hope none of you have to *pull apart* your projects today!
Follow along with this video tutorial to learn how to make this clam:
My dad will continue to be the videographer, editor, and photographer for our videos when I move away.
Support YARNutopia today so we can continue to bring you clear, quality crochet tutorials even after I move into my new home!
There will be an added expense of more travel and hopefully this won’t deter our ability to provide consistent videos on a weekly basis.
Teacher: Nadia Fuad
Video and Editing: Fuad Azmat (My Daddy)
Share your work on Facebook!
Add me on Snapchat: YARNutopia
Follow me on Instagram
Visit My Ravelry Store and add this to your Favorites!
Follow me on Twitter: @YARNutopia
Enjoy this video and subscribe to my channel on YouTube for more tutorials on how to crochet!
Leave a comment, and share with your friends!
Pattern:
Designed by Nadia Fuad You *may* sell items made from my pattern, but please reference my website YARNutopia.com.
Please do not copy, sell, and/or post this pattern and claim it as your own.
NOTES:
-Use a smaller hook to make these smaller
-Use a bigger hook to make these bigger
Special stitches:
Ch(s): chain(s)
YO: Yarn Over
BLO: Back Loop Only
FLO: Front Loop Only
St(s): Stitch(es)
Sl st: slip stitch
SK: Skip
SC: Single Crochet
HDC: Half Double Crochet
DC: Double Crochet
Pattern:
If you have any confusion or difficulty with reading this pattern, please watch the video tutorial to have visual instructions.
Shell
Make 2 with Aran
Work in continuous rounds
Ch 2 Rnd 1: 6 SC in 2nd ch from hook. (6)
Rnd 2: 2 SC in each st around. (12)
Rnd 3: [2SC in next st, SC in next st] 6 times. (18)
Rnd 4: [2 SC in next st, SC in next 2 sts] 6 times. (24)
Rnd 5: [2 SC in next st, SC in next 3 sts] 6 times. (30)
Rnd 6: [2 SC in next st, SC in next 4 sts] 6 times. (36)
Rnd 7: Sl st in next st, Ch 1, HDC in same st and next 7 sts, ch 2, sl st in same st as last HDC st, Sl st loosely in next 6 sts, Sk 1 st, 5 DC in next st, Sk 2 sts, SC in next st, Sk 2 sts, 5 DC in next st, Sk 2 sts, SC in next st, Sk 2 sts, 5 DC in next st, Sk 2 sts, Sl st in last 6 sts.
Fasten off the first one with long tail for sewing. Fasten off second one with short tail and weave that one in.
Assembly:
Surface Crochet lines for dimension on the outside of each shell.
Sew the backside of your clam shells together, wind up a mini ball of yarn to use as a pearl. Set inside the clam.
Weave in all ends.
Enjoy!!
This post contains affiliate links, which I may be compensated for when you make a purchase. That means if you click on any link and buy from the linked websites, I will receive a small percentage of the value of your order. The amount you pay is not changed. Thank you for all your support in clicking the links in my blog!! You all are so amazing!! ~Nadia
The yarn provided for this pattern is courtesy of Red Heart Yarns
Wouldn’t it be awesome to have more “arms” to crochet? I think it would be “ink-redible,” and I am not “squidding!” I would be well “armed” to take on any project and could “octopi” my time more efficiently! I would “squeeze” a lot more projects into my schedule and would “sea” a boost in productivity! I would be “kraken” down every day! I wouldn’t be a “sucker” and make each day “i-tentacle.” No. I would change it up so I “squidn’t” get bored. That way when Valentine’s Day “floats” by, I can “seas” the day, wrap my “arms” around my sweetie, and have time to “cuttle” with the one who “octopis” my heart.
Follow along with this video tutorial to learn how to make this keychain:
My dad will continue to be the videographer, editor, and photographer for our videos when I move away.
Support YARNutopia today so we can continue to bring you clear, quality crochet tutorials even after I move into my new home!
There will be an added expense of more travel and hopefully this won’t deter our ability to provide consistent videos on a weekly basis.
Teacher: Nadia Fuad
Video and Editing: Fuad Azmat (My Daddy)
Share your work on Facebook!
Add me on Snapchat: YARNutopia
Follow me on Instagram
Visit My Ravelry Store and add this to your Favorites!
Follow me on Twitter: @YARNutopia
Enjoy this video and subscribe to my channel on YouTube for more tutorials on how to crochet!
Leave a comment, and share with your friends!
Pattern:
Designed by Nadia Fuad You *may* sell items made from my pattern, but please reference my website YARNutopia.com.
Please do not copy, sell, and/or post this pattern and claim it as your own.
NOTES:
-Use a smaller hook to make these smaller
-Use a bigger hook to make these bigger
Special stitches:
Ch(s): chain(s)
YO: Yarn Over
BLO: Back Loop Only
FLO: Front Loop Only
St(s): Stitch(es)
Sl st: slip stitch
SK: Skip
SC: Single Crochet
HDC: Half Double Crochet
DC: Double Crochet
Pattern:
If you have any confusion or difficulty with reading this pattern, please watch the video tutorial to have visual instructions.
Top Body part of Octopus
Work in continuous rounds and in the BLO
Ch 2
Rnd 1: 6 SC in 2nd ch from hook. (6)
Rnd 2: 2 SC in each st around. (12)
Rnd 3: [2 SC in next st, SC in next st] 6 times. (18)
Rnd 4: [2 SC in next st, SC in next 2 sts] 6 times. (24)
Rnds 5-7: SC in each st around. (24)
Rnd 8: [SC2TOG, SC in next 2 sts] 6 times. (18)
Rnd 9: [SC2TOG, SC in next st] 6 times. (12)
At this point, embroider a face if you’d like and also stuff your piece before going onto the last round.
Rnd 10: [SC2TOG] 6 times. (6)
SC 1st and 4th sts together
Fasten off, weave in ends.
Assembly:
Attach yarn to a FRONT LOOP of round 8 of your body, Ch 2, 3 DC in each stitch around working in the FLO, sl st to first DC. Fasten off, weave in ends.
Tentacles: Make 8 or as many as you’d like
Ch 23
Row 1: 2 DC in 4th Ch from hook, 3 DC in next ch and each ch across (your piece will start to spiral)
Fasten off with long tail for sewing.
Assembly step:
Sew tentacles to the bottom of the body, Attach the key ring
Weave in all ends.
Enjoy!!
This post contains affiliate links, which I may be compensated for when you make a purchase. That means if you click on any link and buy from the linked websites, I will receive a small percentage of the value of your order. The amount you pay is not changed. Thank you for all your support in clicking the links in my blog!! You all are so amazing!! ~Nadia
The yarn provided for this pattern is courtesy of Red Heart Yarns
I have a *sweet* new project *fresh* off the hook! I just love it *tid-bits!!* This Pineapple Jar Cozy started out to be a *pine* in my neck, and I started to *pine* away for an easier project! I was feeling a bit *crushed,* but in the end, this piece turned out so *pine!* Now that I have finished I can live *pineapple-y* ever after! Put it on your desk! I guarantee others will say “Damn, that’s *pine*” Stay tuned for this pattern! I will *tropic* like it’s hot right on my blog today! Check out the pattern below!!
Follow along with this video tutorial to learn how to make this jar cozy:
My dad will continue to be the videographer, editor, and photographer for our videos when I move away.
Support YARNutopia today so we can continue to bring you clear, quality crochet tutorials even after I move into my new home!
There will be an added expense of more travel and hopefully this won’t deter our ability to provide consistent videos on a weekly basis.
Teacher: Nadia Fuad
Video and Editing: Fuad Azmat (My Daddy)
Share your work on Facebook!
Add me on Snapchat: YARNutopia
Follow me on Instagram
Visit My Ravelry Store and add this to your Favorites!
Follow me on Twitter: @YARNutopia
Enjoy this video and subscribe to my channel on YouTube for more tutorials on how to crochet!
Leave a comment, and share with your friends!
Pattern:
Designed by Nadia Fuad You *may* sell items made from my pattern, but please reference my website YARNutopia.com.
Please do not copy, sell, and/or post this pattern and claim it as your own.
NOTES:
-Use a smaller hook to make these smaller
-Use a bigger hook to make these bigger
Special stitches:
Ch(s): chain(s)
YO: Yarn Over
BLO: Back Loop Only
FLO: Front Loop Only
St(s): Stitch(es)
Sl st: slip stitch
SK: Skip
SC: Single Crochet
HDC: Half Double Crochet
DC: Double Crochet
TR: Treble Crochet
FPTR: Front Post Treble Crochet
FPTR2TOG: Front Post Treble Crochet 2 Together
Pattern:
If you have any confusion or difficulty with reading this pattern, please watch the video tutorial to have visual instructions.
Pineapple:
With Mimosa Yellow
Ch 38 or any multiple of 4+2 Row 1: SC in 2nd ch from hook and across, attach to the first SC of the round making a large ring. (38)
You will now be working in rounds for the rest of the pattern
Round 2: Ch 2 (does not count as a st), DC in each st around, sl st to first DC. Do not turn.
Rnd 3: Ch 1, FPTR on 2nd SC from Row 1, SC in next 3 sts on Round 2, FPTR2TOG on 2nd St from Row 1 AND 4th St on Row 1, (See video tutorial for visual instructions), *SC in next 3 sts on Round 2, FPTR2TOG on same st as previous FP stitch, and the next 4th stitch, repeat from * around, ending with FPTR where your previous FP stitch is, and as you’re finishing the stitch, attach to the very first FPTR stitch. (See video tutorial for visual instructions)
Rnd 4: Ch 2, DC in each st around (skip working in the very first FPTR stitch). Sl st to first DC st. (36 sts around)
Rnd 5: Ch 1, SC in first 2 sts, *FPTR2TOG on the FPTR2TOG sts from Round 3 (See video tutorial on how to make them the diagonal look), SC in next 3 sts, repeat from * around ending with SC in last st, sl st to first SC.
Rnd 6: Ch 2, DC in each st around, sl st to first DC. (36 sts)
Rnd 7: Ch 1, *FPTR2TOG on the FPTR2TOG sts from Round 5, SC in next 3 sts, repeat from * around, ending with SC in last 3 sts, Sl st to first FP stitch.
Rnd 8: Ch 2, DC in each st around, Sl st to first DC. (36 sts)
Rnds 9-12: Repeat Rounds 5-8
Rnds 13-15: Repeat Rounds 5-7.
Fasten off and weave in ends.
Leaves:
With Polo
Make 3 or 5 leaves
Ch 13 Round 1: Sl st in 2nd ch from hook, SC in next, HDC in next 2 chs, DC in next 4 chs, HDC in next 2 chs, SC in next ch, Sl st in last ch, Ch 2, continue to work on the opposite side of your foundation chain, sl st into last ch again, SC in next st, HDC in next 2 sts, DC in next 4 sts, HDC in next 2 sts, SC in next st, Sl st in last st. Fasten off with long tail for sewing.
Assembly step:
Sew the leaves to the pineapple. Add a jar or mug and enjoy!!
Weave in all ends.
Enjoy!!
This post contains affiliate links, which I may be compensated for when you make a purchase. That means if you click on any link and buy from the linked websites, I will receive a small percentage of the value of your order. The amount you pay is not changed. Thank you for all your support in clicking the links in my blog!! You all are so amazing!! ~Nadia
The yarn provided for this pattern is courtesy of Red Heart Yarns
I’ve been a little “terra-fried” to try another year of Valentine Puns. I was so “eggs-cited” to give it a “fry,” but at the last minute I “scrambled” to come up with some funny, punny projects. So, I sat down with an “egg-spresso” and got to work on seven new puns that are pretty “egg-cellent” if you ask me! I hope these are “eggs-actly” what you are looking for this Valentine’s season! I love making up these ridiculous “yolks” and I hope they “crack” you up as much as they do for me! Ok, Ok, “omelette” this slide by for now and I “shell” put the puns to rest. I am sure you all are “shell-abrating” today’s stream of punny-ness is over!
Follow along with this video tutorial to learn how to make this egg:
My dad will continue to be the videographer, editor, and photographer for our videos when I move away.
Support YARNutopia today so we can continue to bring you clear, quality crochet tutorials even after I move into my new home!
There will be an added expense of more travel and hopefully this won’t deter our ability to provide consistent videos on a weekly basis.
Teacher: Nadia Fuad
Video and Editing: Fuad Azmat (My Daddy)
Share your work on Facebook!
Add me on Snapchat: YARNutopia
Follow me on Instagram
Visit My Ravelry Store and add this to your Favorites!
Follow me on Twitter: @YARNutopia
Enjoy this video and subscribe to my channel on YouTube for more tutorials on how to crochet!
Leave a comment, and share with your friends!
Pattern:
Designed by Nadia Fuad You *may* sell items made from my pattern, but please reference my website YARNutopia.com.
Please do not copy, sell, and/or post this pattern and claim it as your own.
NOTES:
-Use a smaller hook to make these smaller
-Use a bigger hook to make these bigger
Special stitches:
Ch(s): chain(s)
YO: Yarn Over
BLO: Back Loop Only
FLO: Front Loop Only
St(s): Stitch(es)
Sl st: slip stitch
SK: Skip
SC: Single Crochet
SC2TOG: Single Crochet Decrease
Pattern:
If you have any confusion or difficulty with reading this pattern, please watch the video tutorial to have visual instructions.
Egg:
Work in continuous rounds
With Aran
Ch 2 Rnd 1: 6 SC in 2nd Ch from hook. (6)
Rnd 2: 2 SC in each st around. (12)
Rnd 3: [SC in next st, 2 SC in next st, SC in next 2 sts, 2 SC in next st] 2 times, SC in next st, 2 SC in last st. (17)
Rnd 4: [2 SC innext st, SC in next 3 sts] 4 times, SC in last st. (21)
Rnd 5: [2 SC in next st, SC in next 6 sts] 3 times. (24)
Rnd 6: [2 SC in next st, SC in next 7 sts] 3 times. (27)
Rnd 7: [2 SC in next st, SC in next 8 sts] 3 times. (30)
Rnd 8: [2 SC in next st, SC in next 14 sts] 2 times. (32)
Rnd 9: 2 SC in next st, SC in the rest of the sts around. (33)
Rnd 10: Repeat Round 9. (34)
Rnds 11-13: SC in each st around. (34)
Rnd 14: [SC2TOG, SC in 15 sts] 2 times. (32)
Rnd 15: SC2TOG, SC in next 8 sts, [SC2TOG, SC in next 9 sts] 2 times. (29)
Rnd 16: SC2TOG, SC in next 7 sts, [SC2TOG, SC in next 8 sts] 2 times. (26)
Rnd 17: SC2TOG, SC in next 5 sts, [SC2TOG, SC in next 4 sts] 2 times. (22)
Rnd 18: [SC2TOG, SC in next 4 sts, SC2TOG, SC in next 3 sts] 2 times. (18)
Stuff the egg and move onto the next round
Rnd 19: [SC2TOG, SC in next st] 6 times. (12)
Stuff your egg one last time.
Rnd 20: [SC2TOG] 6 times. (6)
SC first and 4th sts together.
Fasten off, weave in ends.
Assembly step:
Embroider eyes and mouth and a crack with black yarn (See video tutorial for visual instructions)
Weave in all ends.
Enjoy!!
This post contains affiliate links, which I may be compensated for when you make a purchase. That means if you click on any link and buy from the linked websites, I will receive a small percentage of the value of your order. The amount you pay is not changed. Thank you for all your support in clicking the links in my blog!! You all are so amazing!! ~Nadia
The yarn provided for this pattern is courtesy of Red Heart Yarns
I have a sweet, brand new niece to crochet things for! Congratulations to my brother and sister-in-law!! ❤️ Girl things, boy things, we have it all covered in this family! Check out the tutorial for these super simple booties and make bunches of them today!!
Follow along with this video tutorial to learn how to make these booties:
My dad will continue to be the videographer, editor, and photographer for our videos when I move away.
Support YARNutopia today so we can continue to bring you clear, quality crochet tutorials even after I move into my new home!
There will be an added expense of more travel and hopefully this won’t deter our ability to provide consistent videos on a weekly basis.
***You can sell anything you make from my patterns, please just link back to my website YARNutopia.com. Thank you!
Teacher: Nadia Fuad
Video and Editing: Fuad Azmat (My Daddy)
Share your work on Facebook!
Add me on Snapchat: YARNutopia
Follow me on Instagram
Visit My Ravelry Store and add this to your Favorites!
Follow me on Twitter: @YARNutopia
Enjoy this video and subscribe to my channel on YouTube for more tutorials on how to crochet!
Leave a comment, and share with your friends!
Designed by Nadia Fuad
You may sell items made from my pattern, but please reference my website YARNutopia.com.
Please do not copy, sell, and/or post this pattern and claim it as your own.
NOTES:
-To make this smaller or bigger, use a smaller or bigger hook size. I do not have stitch counts to make these larger or smaller though. Sorry!!
-These booties will fit a baby that is up to 3 months old
-These measure 6 inches long (13 cm)
Special stitches:
Ch(s): chain(s)
St(s): Stitch(es)
Sl st: slip stitch
SC: Single Crochet
BLO: Back Loop Only
HDC: Half-Double Crochet
DC: Double Crochet
Pattern: Make 2
With Main Color:
Ch 21
Row 1: HDC in 2nd Ch from hook and across, turn. (20 sts)
Rows 2-12: Ch 1, Working in the 3rd loop across (see video tutorial for visual instructions on where 3rd loop is). HDC across, turn. (20)
Fasten off.
For left foot, attach yarn to bottom right corner (working up the side for this next part)
For right foot, attach yarn on row 6 on the left side of your work (working down the side for this next part)
(See video tutorial for specific location of where to attach your yarn)
Row 1 of toe: SC 10 sts along the side over the first 6 rows of your work, ch 1, turn. (10)
Rows 2-21: Work in BLO, SC across, ch 1, turn. (10)
Change color every other row if you want the toe to be striped–the video tutorial shows how to change color.
Fasten off with long tail for sewing.
Assembly Step:
Fold toe over to the other side and sew up to halfway of the first piece.
Fold the piece and cinch the top of the toe with yarn and close the top. (See video tutorial for visual instruction)
Sew bottom sole part.
Fold the cuff down and tack it down if you’d like.
(I know this part is super hard to explain in writing, so the video tutorial will help you a lot!)
Make a pom and sew it to the top of the bootie (optional)
Enjoy!
This post contains affiliate links, which I may be compensated for when you make a purchase. That means if you click on any link and buy from the linked websites, I will receive a small percentage of the value of your order. The amount you pay is not changed. Thank you for all your support in clicking the links in my blog!! You all are so amazing!! ~Nadia
The yarn provided for this pattern is courtesy of Red Heart Yarns
The Owl Be Warm Hat is such a fabulous hat for your winter wardrobe!! Use Hygge Yarn from Red Heart Yarns to add mounds of texture to this fluffy piece! Change things up with this hat to make it uniquely your own–Eye color, Pom Poms, and yarn color can give this owl different characteristics! Even if you don’t want the owl look, you can create a plain hat with poms and crocodile stitch earflaps and still have a wonderful hat! This hat is sure to be a real “hoot” in a crowd!!
My dad will continue to be the videographer, editor, and photographer for our videos when I move away.
Support YARNutopia today so we can continue to bring you clear, quality crochet tutorials even after I move into my new home!
There will be an added expense of more travel and hopefully this won’t deter our ability to provide consistent videos on a weekly basis.
Follow along with this video tutorial to learn how to make this hat:
Teacher: Nadia Fuad
Video and Editing: Fuad Azmat (My Daddy)
Share your work on Facebook!
Add me on Snapchat: YARNutopia
Follow me on Instagram
Visit My Ravelry Store and add this to your Favorites!
Follow me on Twitter: @YARNutopia
Enjoy this video and subscribe to my channel on YouTube for more tutorials on how to crochet!
Leave a comment, and share with your friends!
Pattern:
Designed by Nadia Fuad You *may* sell items made from my pattern, but please reference my website YARNutopia.com.
Please do not copy, sell, and/or post this pattern and claim it as your own.
NOTES:
-Use a smaller hook to make these smaller
-Use a bigger hook to make these bigger
-Watch the FULL introduction of the video tutorial for frequently asked questions
-The hat i demonstrate in the video tutorial is 8 inches long and 22 inches circumference.
-We are making all the pieces separate and then sewing them together
-Make more or less rows to make this shorter or longer to fit different sizes.
-For teen size, make your foundation chain of 25 chains
-For a child size, make your foundation chain of 23 chains
-For a baby size, make your foundation chain of 21 chains
-Follow this link to some information about making hats measure the size you need them to be.
Special stitches:
Ch(s): chain(s)
YO: Yarn Over
St(s): Stitch(es)
Sl st: slip stitch
SK: Skip
SC: Single Crochet
HDC: Half Double Crochet
DC: Double Crochet
FPDC: Front Post Double Crochet
Pattern:
If you have any confusion or difficulty with reading this pattern, please watch the video tutorial to have visual instructions.
Hat shell:
With Hygge in Pearl
Chain 32 (or any amount that will fit half of the head circumference) Rnd 1: DC in 3rd ch and across, put 3 DC in last ch, continue to work on opposite side of foundation chain, DC across and put 2 DC in last st, sl st to first DC. (62 sts)
Rnd 2: Ch 2 (does not count as anything here and throughout), DC in each st around. (62)
Rnds 3-12: Repeat Rnd 2
Fasten off, weave in ends.
Ear Flaps: (Make 2)
With Hygge in Pearl
Ch 7 Row 1: 2DC in 5th chain from hook, *Chain 1, DC in the last Ch, Chain, Turn.
Row 2: Chain 1, *5 DC around the next DC, Ch 2, work 5 Front Post DC up the post of 2nd DC, Slip Stitch into the next DC, turn. (1 crocodile stitch made)
Row 3: Ch up 3 (counts as DC), DC in same spot as chain up 3 stitch, *Chain 1, DC in eye of crocodile stitch, Chain 1, 2 DC in last slip stitch (which is the ch 1 from previous row), Turn.
Row 4: Ch 3 (counts as DC of first crocodile stitch), 4 DC around first DC, Ch 2, work 5 Front Post DC up the post of the 2nd DC, Slip stitch to next DC, 5 DC around next DC, Ch 2, work 5 Front Post DC up the post of the last DC, turn.
Row 5: Ch up 3 (counts as DC), DC in same spot as chain up 3 stitch, Chain 1, DC in eye of crocodile stitch, Chain 1, 2 DC in next slip stitch, Chain 1, DC in eye of crocodile stitch, Chain 1, 2 DC in the end of the last crocodile stitch, turn.
Row 6: Ch 3 (counts as DC of first crocodile stitch), 4 DC around first DC, Ch 2, work 5 Front Post DC up the post of the 2nd DC, Slip stitch to next DC, 5 DC around next DC, Ch 2, work 5 Front Post DC up the post of the last DC, Slip stitch to next DC, 5 DC around next DC, Ch 2, work 5 Front Post DC up the post of the last DC, turn.
Row 7: Ch up 3 (counts as DC), DC in same spot as chain up 3 stitch, Chain 1, DC in eye of crocodile stitch, Chain 1, 2 DC in next slip stitch, Chain 1, DC in eye of crocodile stitch, Chain 1, 2 DC in next sl st, ch 1, DC in eye of crocodile st, ch 1, 2 DC in the end of the last crocodile stitch, Turn.
Row 8: Ch 3 (counts as DC of first crocodile stitch), 4 DC around first DC, Ch 2, work 5 Front Post DC up the post of the 2nd DC, Slip stitch to next DC, 5 DC around next DC, Ch 2, work 5 Front Post DC up the post of the last DC, Slip stitch to next DC, 5 DC around next DC, Ch 2, work 5 Front Post DC up the post of the next DC, Sl st to next DC, 5 DC around next DC, Ch 2, work 5 Front Post DC up the post of the last DC. Fasten off with long tail for sewing.
Back of Hat Feathers:
(Make the backside feathers using the same exact concept as the ear flaps but make 14 rows total)
See video tutorial for visual instructions.
Beak:
With Super Saver in Warm Brown
Ch 2 Row 1: SC in 2nd ch from hook, Ch 1, turn. (1)
Row 2: 3 SC in stitch, Ch 1, turn. (3)
Row 3: 2 SC in 1st st, SC in last 2 sts, ch 1, turn. (4)
Row 4: Repeat Row 3
Row 5: Repeat Row 3
Continue to SC down the diagonal side of the beak and up the other diagonal side of the beak. Fasten off with a long tail for sewing when you reach the top of the beak.
Eyes: Make 2
With Chic Sheep in Stiletto
Ch 2 (or start with magic ring)
Rnd 1: 6 SC in 2nd ch from hook, sl st to first SC. (6)
Rnd 2: 2 SC in each st around. (12)
Fasten off and change color to Hygge in Aloe
Rnd 3: Attach new yarn to any stitch, Ch 1, [2 SC in next St, SC in next st] 6 times, Sl st to first SC. Fasten off. (18)
Change color to Chic Sheep Linen
Rnd 4: Attach new yarn to any stitch, Ch 1, [2 SC in next st SC in next 2 sts] 6 times, sl st to first SC. (24)
Rnd 5: Ch 1, [2 SC in next st, SC in next 3 sts] 6 times, sl st to first SC, fasten off with long tail for sewing. (30)
Eyelids:
With Hygge in Linen
Make 2
Ch 13 Row 1: Sl st in 2nd ch from hook, SC in next, HDC in next 2 chs, DC in next 4 chs, HDC in next 2 chs, SC in next ch, Sl st in last ch, Ch 1, turn.
Row 2: Sl st in first st, SC in next, HDC in next 2 sts, DC in next 4 sts, HDC in next 2 sts, SC in next st, Sl st in last st. Fasten off with long tail for sewing.
Assembly step:
Sew backside feathers on the back of your hat, Sew the earflaps to each side of your hat, Sew eyes, eyelids, and beak to front of hat, Surface Single Crochet eyebrows to your hat (see video tutorial for visual instructions), Add 2 fur poms to the top corners of your hat, Add braids to the ear flaps of your hat. Weave in all ends.
This post contains affiliate links, which I may be compensated for when you make a purchase. That means if you click on any link and buy from the linked websites, I will receive a small percentage of the value of your order. The amount you pay is not changed. Thank you for all your support in clicking the links in my blog!! You all are so amazing!! ~Nadia
The yarn provided for this pattern is courtesy of Red Heart Yarns
Well, the time has come to start stocking up on a few nice essentials for baby! I made the Wiggles and Giggles Baby Blanket as the first piece in my baby’s layette! This design uses the double crochets to make a zig-zag design that creates beautiful rich texture. It also creates a completely different profile on the other side making this a fantastic reversible blanket and one that is sure to be treasured for years to come!
Follow along with this video tutorial to learn how to make this blanket:
My dad will continue to be the videographer, editor, and photographer for our videos when I move away.
Support YARNutopia today so we can continue to bring you clear, quality crochet tutorials even after I move into my new home!
There will be an added expense of more travel and hopefully this won’t deter our ability to provide consistent videos on a weekly basis.
Teacher: Nadia Fuad
Video and Editing: Fuad Azmat (My Daddy)
Share your work on Facebook!
Add me on Snapchat: YARNutopia
Follow me on Instagram
Visit My Ravelry Store and add this to your Favorites!
Follow me on Twitter: @YARNutopia
Enjoy this video and subscribe to my channel on YouTube for more tutorials on how to crochet!
Leave a comment, and share with your friends!
Pattern:
Designed by Nadia Fuad You *may* sell items made from my pattern, but please reference my website YARNutopia.com.
Please do not copy, sell, and/or post this pattern and claim it as your own.
NOTES:
-Use a smaller hook to make these smaller
-Use a bigger hook to make these bigger
-This blanket is 36 inches wide and long but you can continue the repeat to make it as big as you want.
Special stitches:
Ch(s): chain(s)
YO: Yarn Over
BLO: Back Loop Only
St(s): Stitch(es)
RS: Right Side
WS: Wrong Side (Back Side)
Sl st: slip stitch
SK: Skip
SC: Single Crochet
DC: Double Crochet
Pattern:
If you have any confusion or difficulty with reading this pattern, please watch the video tutorial to have visual instructions.
Blanket:
Ch 133 or any multiple of 3+1
Row 1 (RS): DC in 5th ch from hook and next ch, Go back to the chain next to your first stitch, DC in that ch, (See video tutorial for visual instructions), This will be a diagonal stitch over the 2 DC you made, *Sk next ch and DC in next 2 chs, DC in sk’d ch, repeat from * across until 1 ch remains, DC in last ch. Turn.
Row 2 (WS): Ch 3 (Counts as a DC here and throughout), *Sk next st, DC in next 2 sts, turn work around to see the RS, DC in sk’d st, Turn work back to WS, repeat from * across until 1 st remains, DC in last st, turn.
Row 3 (RS): Ch 3, *Sk next st, DC in next 2 sts, DC in sk’d st working in front of the 2 DC’s you just made, repeat from * across until 1 st remains, DC in last st.
Rows 4-54: Repeat Rows 2 and 3 for however long you want then go onto the border
(Scroll down to see border instructions)
Do not fasten off
Border: Round 1: Looking at RS of your work, SC around with your main color putting 3 SC in corners, sl st to first st.
Fasten off main color and change color
Round 2: Attach new color and SC around putting 3 SC in each corner, Sl st to first SC and Fasten off.
Round 3: Attach main color to any corner SC, Ch 3, [DC, Ch, 2, 2 DC] in same st, Ch 4, Turn work, Sl st in beg. Ch 3 st, Turn Work, Ch 1, 7 DC in ch 4 sp you just created, *DC in next 4 sts on Round 2 of the border, Ch 4, Turn work, Sl st in 1st DC of 4 DC grouping, Turn work, Ch 1, 7 DC in ch 4 sp you just created, repeat from * around putting [2DC, Ch 2, 2 DC] in corner and making your wave over the corner. Sl st to first corner when you get back around. Fasten off.
(It was very hard for me to explain Round 3 in writing, so I highly recommend seeing this in the video tutorial provided on YouTube)
Weave in all ends.
Enjoy!!
This post contains affiliate links, which I may be compensated for when you make a purchase. That means if you click on any link and buy from the linked websites, I will receive a small percentage of the value of your order. The amount you pay is not changed. Thank you for all your support in clicking the links in my blog!! You all are so amazing!! ~Nadia
The yarn provided for this pattern is courtesy of Red Heart Yarns
Here are all the 12 Days of Christmas projects compiled in a one stop blog post! You can click the image or the link above it to view the video tutorial and written pattern for each project. Enjoy and happy holidays!! ~Nadia
On the LAST of our 12 Days of Christmas project I present to you this lovely wreath! Using a simple leaf design, dress up a door wreath for the holiday or ANY time of the year! This lovely home decor accent is the perfect way to greet your guests this holiday season! Happy, Happy Holidays EVERYONE! May you find plenty of projects to keep your hooks busy in the days ahead! Love and warm fiber hugs to all!
Follow along with this video tutorial to learn how to make the leaves:
My dad will continue to be the videographer, editor, and photographer for our videos when I move away.
Support YARNutopia today so we can continue to bring you clear, quality crochet tutorials even after I move into my new home!
There will be an added expense of more travel and hopefully this won’t deter our ability to provide consistent videos on a weekly basis.
**You can always contact me via Facebook if you have any problems with the pattern. I am happy to help if you have any questions along the way.
***You can sell anything you make from my patterns, please just link back to my website YARNutopia.com. Thank you!
Teacher: Nadia Fuad
Video and Editing: Fuad Azmat (My Daddy)
Share your work on Facebook!
Add me on Snapchat: YARNutopia
Follow me on Instagram
Visit My Ravelry Store and add this to your Favorites!
Follow me on Twitter: @YARNutopia
Enjoy this video and subscribe to my channel on YouTube for more tutorials on how to crochet!
Leave a comment, and share with your friends!
Pattern:
Designed by Nadia Fuad You *may* sell items made from my pattern, but please reference my website YARNutopia.com.
Please do not copy, sell, and/or post this pattern and claim it as your own.
NOTES:
-Use a larger hook to make this larger.
-Work in the BLO of this whole pattern
Special stitches:
Ch(s): chain(s)
YO: Yarn Over
BLO: Back Loop Only
St(s): Stitch(es)
Sl st: slip stitch
SK: Skip
SC: Single Crochet
HDC: Half Double Crochet
DC: Double Crochet
TR: Treble Crochet
Pattern:
If you have any confusion or difficulty with reading this pattern, please watch the video tutorial to have visual instructions.
Leaf
Make as many as you’d like!
Ch 13 Rnd 1: Sl st in 2nd ch from hook, SC in next ch, HDC in next ch, DC in next ch, TR in next 4 chs, DC in next ch, HDC in next ch, SC in next ch, Sl st in last ch, Continue working on opposite side of the foundation ch, Ch 1, Sl st back into the last ch, SC in next st, HDC in next st, DC in next st, TR in next 4 sts, DC in next st, HDC in next st, SC in next st, Sl st in last st. Do not fasten off.
Rnd 2: Work in a continuous round. SC in each st around working AROUND the floral wire so the edge of your leaf has the wire inside the stitches.
See video tutorial for visual instructions.
Fasten off and weave in ends.
Cut the wire and hide it behind the leaf.
Assembly:
Glue all the leaves to your wreath. Be careful with the Hot Glue Gun.
Enjoy!!
This post contains affiliate links, which I may be compensated for when you make a purchase. That means if you click on any link and buy from the linked websites, I will receive a small percentage of the value of your order. The amount you pay is not changed. Thank you for all your support in clicking the links in my blog!! You all are so amazing!! ~Nadia
The yarn provided for this pattern is courtesy of Red Heart Yarns
A mitten gift card holder is a perfect way to showcase your gift for those hard to buy for people on your list! This 11th Day of Christmas projects is easy and fun and will add just the right personal touch.
Follow along with this video tutorial to learn how to make this cute mitten:
My dad will continue to be the videographer, editor, and photographer for our videos when I move away.
Support YARNutopia today so we can continue to bring you clear, quality crochet tutorials even after I move into my new home!
There will be an added expense of more travel and hopefully this won’t deter our ability to provide consistent videos on a weekly basis.
**You can always contact me via Facebook if you have any problems with the pattern. I am happy to help if you have any questions along the way.
***You can sell anything you make from my patterns, please just link back to my website YARNutopia.com. Thank you!
Teacher: Nadia Fuad
Video and Editing: Fuad Azmat (My Daddy)
Share your work on Facebook!
Add me on Snapchat: YARNutopia
Follow me on Instagram
Visit My Ravelry Store and add this to your Favorites!
Follow me on Twitter: @YARNutopia
Enjoy this video and subscribe to my channel on YouTube for more tutorials on how to crochet!
Leave a comment, and share with your friends!
Pattern:
Designed by Nadia Fuad You *may* sell items made from my pattern, but please reference my website YARNutopia.com.
Please do not copy, sell, and/or post this pattern and claim it as your own.
NOTES:
-Use a larger hook to make this larger.
-Work in the BLO of this whole pattern
Special stitches:
Ch(s): chain(s)
YO: Yarn Over
BLO: Back Loop Only
St(s): Stitch(es)
Sl st: slip stitch
SK: Skip
SC: Single Crochet
SC2TOG: Single Crochet Decrease
Pattern:
If you have any confusion or difficulty with reading this pattern, please watch the video tutorial to have visual instructions.
Mitten
With Red
Ch 30 Rnd 1: SC in 1st ch (this forms a large ring), SC in each ch around. (30 sts)
Work in continuous rounds and in BLO Rnds 2-7: SC in each st around Rnd 8: Ch 3, Sk 3 sts, SC in the rest of the sts around. Rnd 9: SC in each of the next 3 chs and in each st around. (30 sts) Rnds 10-12: SC in each st around. Rnd 13: [SC2TOG, SC in next 3 sts] 6 times. (24 sts) Rnd 14: [SC2TOG, SC in next 2 sts] 6 times. (18 sts) Rnd 15: [SC2TOG, SC in next st] 6 times. (12 sts) Rnd 16: [SC2TOG] 6 times. (6)
Fasten off. Weave in ends.
Thumb:
Attach Red to any stitch around the thumb hole Rnd 1: SC 8 sts evenly around the thumb hole. Rnds 2-3: SC around Rnd 4: [SC2TOG] 4 times.
Fasten off. Weave in ends.
Mitten Cuff:
Work on opposite side of foundation chain row. (See video tutorial for visual instructions)
With white Rnds 1-2: SC in each st around.
Fasten off, weave in ends.
Assembly:
Be sure all ends are hidden. Insert a gift card into the mitten. Adorn a gift box with this topper or add it to a card!
Enjoy!!
This post contains affiliate links, which I may be compensated for when you make a purchase. That means if you click on any link and buy from the linked websites, I will receive a small percentage of the value of your order. The amount you pay is not changed. Thank you for all your support in clicking the links in my blog!! You all are so amazing!! ~Nadia
The yarn provided for this pattern is courtesy of Red Heart Yarns
On the 10th day of Christmas my true love gave to me….Flowers! Haha! I made a holiday headband using the same flower design I used in my bridal bouquets for my wedding earlier this year! I used a small bead detail to adorn the center for the perfect touch! Don’t need a headband? Don’t worry, this flower design is perfect for so many other projects!
Follow along with this video tutorial to learn how to make the flowers and leaves:
My dad will continue to be the videographer, editor, and photographer for our videos when I move away.
Support YARNutopia today so we can continue to bring you clear, quality crochet tutorials even after I move into my new home!
There will be an added expense of more travel and hopefully this won’t deter our ability to provide consistent videos on a weekly basis.
**You can always contact me via Facebook if you have any problems with the pattern. I am happy to help if you have any questions along the way.
***You can sell anything you make from my patterns, please just link back to my website YARNutopia.com. Thank you!
Teacher: Nadia Fuad
Video and Editing: Fuad Azmat (My Daddy)
Share your work on Facebook!
Add me on Snapchat: YARNutopia
Follow me on Instagram
Visit My Ravelry Store and add this to your Favorites!
Follow me on Twitter: @YARNutopia
Enjoy this video and subscribe to my channel on YouTube for more tutorials on how to crochet!
Leave a comment, and share with your friends!
Pattern:
Designed by Nadia Fuad You *may* sell items made from my pattern, but please reference my website YARNutopia.com.
Please do not copy, sell, and/or post this pattern and claim it as your own.
Special stitches:
Ch(s): chain(s)
YO: Yarn Over
BLO: Back Loop Only
St(s): Stitch(es)
Sl st: slip stitch
SK: Skip
SC: Single Crochet
DC: Double Crochet
HDC: Half Double Crochet
TR: Treble Crochet
Pattern:
If you have any confusion or difficulty with reading this pattern, please watch the video tutorial to have visual instructions.
Flower
Ch 64 or any multiple of 3+4
Row 1: DC in 4th ch from hook, *Sk 2 chs, [DC, Ch 2, DC] in the next ch, repeat from * across, ending with [DC, CH 2, DC] in last ch, turn.
Row 2: Sl st into ch 2 sp, Ch 3, [DC, Ch 2, DC] in same sp, *Ch 2, [2 DC, Ch 2, 2 DC] in next ch 2 sp, repeat from * across ending with [2 DC, Ch 2, 2 DC] in last ch 2 sp, turn.
Row 3: 10 DC in first Ch 2 sp, *SC in next Ch 2 sp, 10 DC in next ch 2 sp, repeat from * across, ending with SC in last st.
Fasten off with long tail for sewing.
Assembly:
Roll strip into flower and sew it all up in the back. Weave in all ends. (See video tutorial for visual instructions)
Leaf:
Ch 15 Round 1: Sl st in 2nd ch from hook, SC in next, HDC in next, DC in next, TR in next, DTR in next 4 chs, TR in next, DC in next, HDC in next, SC in next, Sl st in last, ch 1, work on opposite side of foundation chain, Sl st back into the last ch, SC in next stitch, HDC in next, DC in next, TR in next, DTR in next 4 sts, TR in next, DC in next, HDC in next, SC in next, Sl st in last.
Rnd 2: SC in each st around working around floral wire to stiffen the edge of the leaf.
Fasten off, weave in ends. Cut the wire and bend it to the back.
See video tutorial on how to create the headband look.
Enjoy!!
This post contains affiliate links, which I may be compensated for when you make a purchase. That means if you click on any link and buy from the linked websites, I will receive a small percentage of the value of your order. The amount you pay is not changed. Thank you for all your support in clicking the links in my blog!! You all are so amazing!! ~Nadia
The yarn provided for this pattern is courtesy of Red Heart Yarns
Day 9 is here!! With it brings us this Poinsettia with Pearls! It’s a perfect lampshade ornament or dress up that tree! No matter which way you choose, you can’t go wrong with this lovely accent piece. Oooohhh…another idea–make several and cascade them down a stairway banister! So many options!!
Follow along with this video tutorial to learn how to make this project:
My dad will continue to be the videographer, editor, and photographer for our videos when I move away.
Support YARNutopia today so we can continue to bring you clear, quality crochet tutorials even after I move into my new home!
There will be an added expense of more travel and hopefully this won’t deter our ability to provide consistent videos on a weekly basis.
**You can always contact me via Facebook if you have any problems with the pattern. I am happy to help if you have any questions along the way.
***You can sell anything you make from my patterns, please just link back to my website YARNutopia.com. Thank you!
Teacher: Nadia Fuad
Video and Editing: Fuad Azmat (My Daddy)
Share your work on Facebook!
Add me on Snapchat: YARNutopia
Follow me on Instagram
Visit My Ravelry Store and add this to your Favorites!
Follow me on Twitter: @YARNutopia
Enjoy this video and subscribe to my channel on YouTube for more tutorials on how to crochet!
Leave a comment, and share with your friends!
Pattern:
Designed by Nadia Fuad You *may* sell items made from my pattern, but please reference my website YARNutopia.com.
Please do not copy, sell, and/or post this pattern and claim it as your own.
Special stitches:
Ch(s): chain(s)
YO: Yarn Over
BLO: Back Loop Only
St(s): Stitch(es)
Sl st: slip stitch
SK: Skip
SC: Single Crochet
DC: Double Crochet
HDC: Half Double Crochet
TR: Treble Crochet
Pattern:
If you have any confusion or difficulty with reading this pattern, please watch the video tutorial to have visual instructions.
Large Petal
Make 7 in white
Make 3 in Teal
Ch 13 Rnd 1: Sl st in 2nd ch from hook, SC in next 2 Chs, HDC in next 2 Chs, DC in next 4 chs, HDC in next Ch, SC in next, Sl st in last, Ch 1, Work on opposite side of Foundation Row, Sl st into the same st as your last sl st, SC in next st, HDC in next st, DC in next 4 sts, HDC in next 2 sts, SC in next 2 sts, Sl st in last, do not slip stitch in next st, work in continuous rounds.
Rnd 2: Ch 1, Sl st in sl st, SC in next 2 sts, HDC in next 2, DC in next 4 sts, HDC in next, SC in next, Sl st in next sl st, CH 1, Sk next ch 1 sp, Sl st in next sl st, SC in next st, HDC in next st, DC in next 4 sts, HDC in next 2 sts, SC in next 2 sts, Sl st in last, sl st into ch 1 sp, Fasten off with long tail for sewing.
Small Petal
Make 3 in White
Ch 13 Rnd 1: Sl st in 2nd ch from hook, SC in next 2 Chs, HDC in next 2 Chs, DC in next 4 chs, HDC in next Ch, SC in next, Sl st in last, Ch 1, Work on opposite side of Foundation Row, Sl st into the same st as your last sl st, SC in next st, HDC in next st, DC in next 4 sts, HDC in next 2 sts, SC in next 2 sts, Sl st in last. Fasten off with long tail for sewing.
Assembly:
Sew all the petals together using the video tutorial as a guide. Sew pearly beads to the center or glue them.
Attach a pin to the back to put it on a lamp shade or tape on the back to add it to a gift top! Put them in your Christmas tree for added decoration!
Enjoy!!
This post contains affiliate links, which I may be compensated for when you make a purchase. That means if you click on any link and buy from the linked websites, I will receive a small percentage of the value of your order. The amount you pay is not changed. Thank you for all your support in clicking the links in my blog!! You all are so amazing!! ~Nadia
The yarn provided for this pattern is courtesy of Red Heart Yarns
Holiday Garland is the next project on our 12 Days of Christmas journey!
Watch this video tutorial to learn how to make this garland:
My dad will continue to be the videographer, editor, and photographer for our videos when I move away.
Support YARNutopia today so we can continue to bring you clear, quality crochet tutorials even after I move into my new home!
There will be an added expense of more travel and hopefully this won’t deter our ability to provide consistent videos on a weekly basis.
**You can always contact me via Facebook if you have any problems with the pattern. I am happy to help if you have any questions along the way.
***You can sell anything you make from my patterns, please just link back to my website YARNutopia.com. Thank you!
Teacher: Nadia Fuad
Video and Editing: Fuad Azmat (My Daddy)
Share your work on Facebook!
Add me on Snapchat: YARNutopia
Follow me on Instagram
Visit My Ravelry Store and add this to your Favorites!
Follow me on Twitter: @YARNutopia
Enjoy this video and subscribe to my channel on YouTube for more tutorials on how to crochet!
Leave a comment, and share with your friends!
Pattern:
Designed by Nadia Fuad You *may* sell items made from my pattern, but please reference my website YARNutopia.com.
Please do not copy, sell, and/or post this pattern and claim it as your own.
Special stitches:
Ch(s): chain(s)
YO: Yarn Over
BLO: Back Loop Only
St(s): Stitch(es)
Sl st: slip stitch
SK: Skip
SC: Single Crochet
DC: Double Crochet
HDC: Half Double Crochet
TR: Treble Crochet
Pattern:
If you have any confusion or difficulty with reading this pattern, please watch the video tutorial to have visual instructions.
Candy Cane
Work in continuous rounds and in BLO
Start With White,
Ch 2 Rnd 1: 6 SC in 2nd Ch from hook Rnd 2: SC in next st, change color after this st to Red, SC in next 7 sts Rnd 3, Change color to white, SC in next 7 sts Rnd 4: Change color to Red, SC in next 7 sts
(Add pipe cleaner at or near round 9 and continue working) Rnds 5-18: Repeat Rounds 3 and 4 Rnd 19: [SC2TOG] 3 times.
Fasten off. Weave in ends. Bend to make it look like a candy cane.
Peppermint Candy: (Make 2)
With White
Ch 3 Rnd 1: 10 DC in 3rd Ch from hook, sl st to first DC Rnd 2: Ch 2, DC in same st, change color to Red, DC in same st, *Change color to white, DC in next st, Change color to Red, DC in same st as last st, repeat from * around. After last Red st, change back to white and Sl st to first DC.
Fasten off first one with long tail. Fasten off second one with short tail.
Assembly:
Sew Peppermint pieces together. Hide yarn ends on the inside.
Make a bunch of each piece and make some poms and add it all to a long braid or rope for garland!
Enjoy!!
This post contains affiliate links, which I may be compensated for when you make a purchase. That means if you click on any link and buy from the linked websites, I will receive a small percentage of the value of your order. The amount you pay is not changed. Thank you for all your support in clicking the links in my blog!! You all are so amazing!! ~Nadia
The yarn provided for this pattern is courtesy of Red Heart Yarns
Represent the pets this Christmas with this sweet Paw Print Ornament! Make one today and have a “PAWSOME” holiday!!
Watch this video tutorial to learn how to make this project:
My dad will continue to be the videographer, editor, and photographer for our videos when I move away.
Support YARNutopia today so we can continue to bring you clear, quality crochet tutorials even after I move into my new home!
There will be an added expense of more travel and hopefully this won’t deter our ability to provide consistent videos on a weekly basis.
**You can always contact me via Facebook if you have any problems with the pattern. I am happy to help if you have any questions along the way.
***You can sell anything you make from my patterns, please just link back to my website YARNutopia.com. Thank you!
Teacher: Nadia Fuad
Video and Editing: Fuad Azmat (My Daddy)
Share your work on Facebook!
Add me on Snapchat: YARNutopia
Follow me on Instagram
Visit My Ravelry Store and add this to your Favorites!
Follow me on Twitter: @YARNutopia
Enjoy this video and subscribe to my channel on YouTube for more tutorials on how to crochet!
Leave a comment, and share with your friends!
Pattern:
Designed by Nadia Fuad You *may* sell items made from my pattern, but please reference my website YARNutopia.com.
Please do not copy, sell, and/or post this pattern and claim it as your own.
Special stitches:
Ch(s): chain(s)
YO: Yarn Over
BLO: Back Loop Only
St(s): Stitch(es)
Sl st: slip stitch
SK: Skip
SC: Single Crochet
DC: Double Crochet
HDC: Half Double Crochet
TR: Treble Crochet
Pattern:
If you have any confusion or difficulty with reading this pattern, please watch the video tutorial to have visual instructions.
Paw
Using Buff, Make 2
Ch 3 Rnd 1: 9 DC in 3rd ch from hook, sl st to first DC. Rnd 2: Ch 2 (does not count as anything), 2 DC in each st around, sl st to first DC. (18) Rnd 3: Ch 2, [2 DC in next st, DC in next] 9 times, sl st to first DC. (27) Rnd 4: *Sk 1 st, [DC, 5 TR, DC] in next st, Sk 1 st, SC in next st, repeat from * until you have 4 toes, then, after 4th toe is made, Sk 1 st, [SC in 3 sts, 2 SC in next] 3 times. Do not sl st to beginning, continue to work in continuous round. Rnd 5: [SC in next, 2 SC in next, HDC in next, 2 HDC in next, HDC in next, 2 SC in next, SC in next, sl st in next] 4 times, after 4th toe then [SC in next 5 sts, 2 SC in next st] 3 times.
Fasten off your first one with a long tail for sewing. Fasten off your second one with a short tail.
Inner Paw Pad
With Aruba Sea
Ch 3 Rnd 1: 15 DC in 3rd Ch from hook, sl st to first DC. Rnd 2: Ch 3, DC in same st, TR in next, 2 TR in next st, TR in next st, DC in next st, 2 DC in next st, DC in next st, 3 TR in next st, DC in next st, 2 DC in next st, DC in next st, TR in next, 2 TR in next, TR in next, DC in last, Ch 3, sl st to center. Fasten off with long tail for sewing
Toe pads: Make 4 in Aruba Sea
Ch 2 Rnd 1: [3SC, 4HDC, 3 SC] in 2nd ch from hook. Sl st to first st.
Fasten off with long tail for sewing.
Assembly:
Sew the paw toe pads and inner foot pad to the paw, then sew the front and back paw together and stuff it. Add a loop to the top for an ornament! Weave in all ends!
Enjoy!!
This post contains affiliate links, which I may be compensated for when you make a purchase. That means if you click on any link and buy from the linked websites, I will receive a small percentage of the value of your order. The amount you pay is not changed. Thank you for all your support in clicking the links in my blog!! You all are so amazing!! ~Nadia
The yarn provided for this pattern is courtesy of Red Heart Yarns
Time for tea! ☕ This tea cozy is the perfect way to dress up your service set and keep the chill away on a blustery morning.
Follow along with this video tutorial to learn how to make this teapot cozy:
My dad will continue to be the videographer, editor, and photographer for our videos when I move away.
Support YARNutopia today so we can continue to bring you clear, quality crochet tutorials even after I move into my new home!
There will be an added expense of more travel and hopefully this won’t deter our ability to provide consistent videos on a weekly basis.
**You can always contact me via Facebook if you have any problems with the pattern. I am happy to help if you have any questions along the way.
***You can sell anything you make from my patterns, please just link back to my website YARNutopia.com. Thank you!
Teacher: Nadia Fuad
Video and Editing: Fuad Azmat (My Daddy)
Share your work on Facebook!
Add me on Snapchat: YARNutopia
Follow me on Instagram
Visit My Ravelry Store and add this to your Favorites!
Follow me on Twitter: @YARNutopia
Enjoy this video and subscribe to my channel on YouTube for more tutorials on how to crochet!
Leave a comment, and share with your friends!
Pattern:
Designed by Nadia Fuad You *may* sell items made from my pattern, but please reference my website YARNutopia.com.
Please do not copy, sell, and/or post this pattern and claim it as your own.
Special stitches:
Ch(s): chain(s)
YO: Yarn Over
BLO: Back Loop Only
St(s): Stitch(es)
Sl st: slip stitch
SK: Skip
SC: Single Crochet
DC: Double Crochet
BPDC: Back Post Double Crochet
HDC: Half Double Crochet
BPHDC: Back Post Half Double Crochet
Puff Stitch: [YO, insert hook, YO pull through] 3 times, YO pull through all 7 loops on the hook
Pattern:
If you have any confusion or difficulty with reading this pattern, please watch the video tutorial to have visual instructions.
Teapot Cozy
Start with green
Ch 12, sl st to first ch to form a ring Rnd 1: Ch 1, SC in each ch around, sl st to first SC. (12) Rnd 2: Ch 1, Work in BLO, SC in each st around, sl st to first SC. (12)
Fasten off and change color
With Aran (off-white) Rnd 3: Ch 1, [Puff stitch, Ch 1, Puff stitch, Ch 1] in each st around, sl st to first Puff st. (24) Rnd 4: Sl st into ch 1 sp, Ch 1, 2 HDC in same sp, 1 HDC in next ch 1 sp, *2 HDC in next ch 1 sp, HDC in next ch 1 sp, repeat from * around, sl st to first HDC. (36)
Fasten off and change color
With Red Rnd 5: Ch 1, BPHDC on each st around, sl st to first BPHDC. (36) Rnd 6: Ch 1, [Puff Stitch, Ch 2] in each st around, sl st to first Puff St. (36)
Fasten off and change color
With Aran (off white) Rnd 7: Attach yarn to any ch 2 sp, Ch 1, HDC in each Ch 2 sp, sl st to first HDC. (36)
Now you will work in rows Row 8: With Aran still, Ch 1, Puff Stitch in same st, Ch 1, [Puff Stitch, Ch 1] in next 17 sts, leave the rest of the sts unworked, do not turn your work. (you should have 18 puff sts)
Fasten off and change color
With Jade Row 9: Attach to first Puff Stitch, HDC in first Puff Stitch, HDXC in next ch sp, 2 HDC in each ch sp to the end, 2 HDC in last ch sp and 2 HDC in last puff st. (Be sure to have 36 sts at the end of this row) Turn your work. Row 10: Ch 1, HDC across, turn. (36)
Fasten off and change color
With Green Row 11: Ch 1, HDC in 1st st, BPHDC in each st until last st, HDC in last st, Turn. Row 12: Ch 1, HDC across, turn.
Fasten off and change color
With Aran (off white) Row 13: Ch 1, Work in BLO, HDC in each st across, turn. Row 14: Ch 1, HDC2TOG, HDC in each st until 2 sts remain, HDC2TOG, turn.
Fasten off and change color
With Red Row 15: Ch 1, HDC2TOG, HDC in each st until 2 sts remain, HDC2TOG, turn. Row 16: Ch 1, *HDC2TOG, HDC in next 3 sts, repeat from * across ending with HDC2TOG on last 2 sts, turn.
Fasten off and change color
With Green Row 17: Ch 1, *HDC2TOG, HDC in next 2 sts, repeat from * across ending with HDC2TOG on last 2 sts, turn. Row 18: HDC in each st across.
Fasten off.
Other half of teapot cozy
Attach yarn to unworked st on Rnd 7, repeat rows 8-18 for the other half of the teapot cozy
Assembly: Crochet a button hole loop after your last row on the second half of your teapot cozy by chaining 6 and sl st back into last st.
Sew front of your teapot cozy closed around the spout
Sew button to opposite of the button hole loop
See video tutorial for full visual instructions.
Weave in all ends.
Enjoy!!
This post contains affiliate links, which I may be compensated for when you make a purchase. That means if you click on any link and buy from the linked websites, I will receive a small percentage of the value of your order. The amount you pay is not changed. Thank you for all your support in clicking the links in my blog!! You all are so amazing!! ~Nadia
The yarn provided for this pattern is courtesy of Red Heart Yarns
Using basic crochet skills and a few buttons, you can make this simple greeting card in time for the holidays! This is the 5th project for our 12 Days of Christmas project!
Follow along with this video tutorial to learn how to make this greeting card:
My dad will continue to be the videographer, editor, and photographer for our videos when I move away.
Support YARNutopia today so we can continue to bring you clear, quality crochet tutorials even after I move into my new home!
There will be an added expense of more travel and hopefully this won’t deter our ability to provide consistent videos on a weekly basis.
**You can always contact me via Facebook if you have any problems with the pattern. I am happy to help if you have any questions along the way.
***You can sell anything you make from my patterns, please just link back to my website YARNutopia.com. Thank you!
Teacher: Nadia Fuad
Video and Editing: Fuad Azmat (My Daddy)
Share your work on Facebook!
Add me on Snapchat: YARNutopia
Follow me on Instagram
Visit My Ravelry Store and add this to your Favorites!
Follow me on Twitter: @YARNutopia
Enjoy this video and subscribe to my channel on YouTube for more tutorials on how to crochet!
Leave a comment, and share with your friends!
Pattern:
Designed by Nadia Fuad You *may* sell items made from my pattern, but please reference my website YARNutopia.com.
Please do not copy, sell, and/or post this pattern and claim it as your own.
NOTES:
-Use a larger hook to make this larger.
-You can use any size greeting card.
Special stitches:
Ch(s): chain(s)
YO: Yarn Over
BLO: Back Loop Only
St(s): Stitch(es)
Sl st: slip stitch
SK: Skip
SC: Single Crochet
Pattern:
If you have any confusion or difficulty with reading this pattern, please watch the video tutorial to have visual instructions.
Circles
Ch 2 Rnd 1: 6 SC in 2nd Ch from hook, Sl st to first st. Fasten off.
Weave in ends.
Assembly: Make 6 green circles, and 3 red circles. Add 3 green buttons and 3 red buttons. Glue it in a triangle shape on the front of your greeting card. (See video tutorial for visual instructions)
Add a square of brown felt to the bottom center of the tree and tacky glue it down.
Enjoy!!
This post contains affiliate links, which I may be compensated for when you make a purchase. That means if you click on any link and buy from the linked websites, I will receive a small percentage of the value of your order. The amount you pay is not changed. Thank you for all your support in clicking the links in my blog!! You all are so amazing!! ~Nadia
The yarn provided for this pattern is courtesy of Red Heart Yarns
Spice up your holiday with a bough of Mistletoe! Hang this among your Christmas decor as a sign of love and friendship. This project is Day 4 of our 12 Days of Christmas projects! December is already flying by!
Follow along with this video tutorial to learn how to make this simple project:
My dad will continue to be the videographer, editor, and photographer for our videos when I move away.
Support YARNutopia today so we can continue to bring you clear, quality crochet tutorials even after I move into my new home!
There will be an added expense of more travel and hopefully this won’t deter our ability to provide consistent videos on a weekly basis.
**You can always contact me via Facebook if you have any problems with the pattern. I am happy to help if you have any questions along the way.
***You can sell anything you make from my patterns, please just link back to my website YARNutopia.com. Thank you!
Teacher: Nadia Fuad
Video and Editing: Fuad Azmat (My Daddy)
Share your work on Facebook!
Add me on Snapchat: YARNutopia
Follow me on Instagram
Visit My Ravelry Store and add this to your Favorites!
Follow me on Twitter: @YARNutopia
Enjoy this video and subscribe to my channel on YouTube for more tutorials on how to crochet!
Leave a comment, and share with your friends!
Pattern:
Designed by Nadia Fuad You *may* sell items made from my pattern, but please reference my website YARNutopia.com.
Please do not copy, sell, and/or post this pattern and claim it as your own.
Special stitches:
Ch(s): chain(s)
YO: Yarn Over
BLO: Back Loop Only
St(s): Stitch(es)
Sl st: slip stitch
SK: Skip
FDC: Foundation Double Crochet
Pattern:
If you have any confusion or difficulty with reading this pattern, please watch the video tutorial to have visual instructions.
Mistletoe:
Ch 3 Foundation Double Crochet 150
Fasten off.
Assembly: Make 4 loops with the long foundation row and sew it at the top. Add a ribbon bow and sew on some pearly beads. (See video tutorial for visual instructions)
Weave in all ends.
Enjoy!!
This post contains affiliate links, which I may be compensated for when you make a purchase. That means if you click on any link and buy from the linked websites, I will receive a small percentage of the value of your order. The amount you pay is not changed. Thank you for all your support in clicking the links in my blog!! You all are so amazing!! ~Nadia
The yarn provided for this pattern is courtesy of Red Heart Yarns
Here’s a great holiday project gift idea for many people on your list. This Vintage Inspired Santa Bottle Topper is a perfect adornment for any bottle. Whether it’s a bottle of fine olive oil, wine or other beverages, bath/spa products or more, this little guy is the best accessory to dress that gift up! What a nice alternative for the traditional bow when topping off your package.
Follow along with this video tutorial to learn how to make this bottle topper:
My dad will continue to be the videographer, editor, and photographer for our videos when I move away.
Support YARNutopia today so we can continue to bring you clear, quality crochet tutorials even after I move into my new home!
There will be an added expense of more travel and hopefully this won’t deter our ability to provide consistent videos on a weekly basis.
**You can always contact me via Facebook if you have any problems with the pattern. I am happy to help if you have any questions along the way.
***You can sell anything you make from my patterns, please just link back to my website YARNutopia.com. Thank you!
Teacher: Nadia Fuad
Video and Editing: Fuad Azmat (My Daddy)
Share your work on Facebook!
Add me on Snapchat: YARNutopia
Follow me on Instagram
Visit My Ravelry Store and add this to your Favorites!
Follow me on Twitter: @YARNutopia
Enjoy this video and subscribe to my channel on YouTube for more tutorials on how to crochet!
Leave a comment, and share with your friends!
Pattern:
Designed by Nadia Fuad You *may* sell items made from my pattern, but please reference my website YARNutopia.com.
Please do not copy, sell, and/or post this pattern and claim it as your own.
NOTES:
-Use a larger hook to make this larger.
-This will fit any standard sized bottle top
Special stitches:
Ch(s): chain(s)
YO: Yarn Over
BLO: Back Loop Only
St(s): Stitch(es)
Sl st: slip stitch
SK: Skip
SC: Single Crochet
Pattern:
If you have any confusion or difficulty with reading this pattern, please watch the video tutorial to have visual instructions.
Hat:
With Amore Yarn
Ch 2
Rnd 1: Work in continuous rounds and in BLO throughout Hat Part, 4 SC in 2nd ch from hook. (4)
Rnd 2: SC in each st around. (4)
Rnd 3: 2 SC in next st, SC in the rest of the sts on the round. (5)
Rnds 4-8: SC in each st around. (5)
(insert pipe cleaner early on in this part because it is difficult to add later in this pattern)
Rnd 9: Repeat Round 3. (6)
Rnds 10-15: SC in each st around. (6)
Rnd 16: Repeat Round 3. (7)
Rnds 17-20: SC in each st around. (7)
Rnd 21: Repeat Round 3. (8)
Rnds 22-23: SC in each st around. (8)
Rnd 24: Repeat Round 3. (9)
Rnds 25-26: SC in each st around. (9)
Rnd 27: Repeat Round 3. (10)
Rnds 28-29: SC in each st around. (10)
Rnd 30: Repeat Round 3. (11)
Rnds 31-32: SC in each st around. (11)
Rnd 33: Repeat Round 3. (12)
Rnds 34-35: SC in each st around. (12)
Rnd 36: [2 SC in next st, SC in next st] 6 times. (18)
Rnd 37: SC in each st around.
Rnd 38: [2 SC in next st, SC in next 2 sts] 6 times. (24)
Rnds 39-41: SC in each st around. (24)
Rnd 42: [SC2TOG, SC in next 2 sts] 6 times. (18)
Fasten off.
Weave in ends.
Use a pen or your crochet hook and twist the top of the hat to curl it around. (See video tutorial for visual instructions)
Nose: With buff, work in continuous rounds and in BLO
Ch 2 Rnd 1: 6 SC in 2nd ch from hook. (6) Rnd 2: 2 SC in each st around. (12) Rnd 3: SC in each st around. (12)
Fasten off with long tail for sewing.
Assembly: Add Hygge Yarn as the beard in the front of the hat (see video tutorial for attachment method). Fray out all the Hygge Yarn to make a fuller beard. Trim to make it look uniform.
Sew nose to center of hat at top of beard. (See video tutorial for placement.
Weave in all ends.
Enjoy!!
This post contains affiliate links, which I may be compensated for when you make a purchase. That means if you click on any link and buy from the linked websites, I will receive a small percentage of the value of your order. The amount you pay is not changed. Thank you for all your support in clicking the links in my blog!! You all are so amazing!! ~Nadia
The yarn provided for this pattern is courtesy of Red Heart Yarns
It’s December! We are beginning our 12 Days of Christmas project! Wisconsin is in for a major snowstorm tonight! Time to grab your hook and get going on this adorable Polar Bear Cup Cozy! It’s perfect for dressing up all your hot beverages! Pair these with a gift card and they make fantastic stocking stuffers. So let’s get cozy and make some today!
Follow along with this video tutorial to learn how to make this project:
My dad will continue to be the videographer, editor, and photographer for our videos when I move away.
Support YARNutopia today so we can continue to bring you clear, quality crochet tutorials even after I move into my new home!
There will be an added expense of more travel and hopefully this won’t deter our ability to provide consistent videos on a weekly basis.
**You can always contact me via Facebook if you have any problems with the pattern. I am happy to help if you have any questions along the way.
***You can sell anything you make from my patterns, please just link back to my website YARNutopia.com. Thank you!
Teacher: Nadia Fuad
Video and Editing: Fuad Azmat (My Daddy)
Share your work on Facebook!
Add me on Snapchat: YARNutopia
Follow me on Instagram
Visit My Ravelry Store and add this to your Favorites!
Follow me on Twitter: @YARNutopia
Enjoy this video and subscribe to my channel on YouTube for more tutorials on how to crochet!
Leave a comment, and share with your friends!
Pattern:
Designed by Nadia Fuad You *may* sell items made from my pattern, but please reference my website YARNutopia.com.
Please do not copy, sell, and/or post this pattern and claim it as your own.
NOTES:
-Use a larger hook to make this larger.
-This mug cozy is for a standard sized travel mug
-Use different colors for a teddy bear design or a black bear design!
Special stitches:
Ch(s): chain(s)
YO: Yarn Over
BLO: Back Loop Only
St(s): Stitch(es)
Sl st: slip stitch
SK: Skip
SC: Single Crochet
Pattern:
If you have any confusion or difficulty with reading this pattern, please watch the video tutorial to have visual instructions.
Cup Cozy
With White and G sized hook
Ch 34 or any even number that will fit around your mug.
Work in continuous rounds. Rnd 1: SC in 1st ch to form a ring, *Ch 1, Sk 1 ch, SC in next ch, repeat from * around. Rnd 2: * SC in ch 1 sp, Ch 1 Sk st, repeat from * around. Rnds 3-14: Repeat Round 2
Fasten off, weave in ends.
Ears: MAKE 2
Ch 2
Work in continuous rounds and in BLO Rnd 1: 8 SC in 2nd ch from hook. (8) Rnds 2-4: SC in each st around. (8)
Fasten off with long tail for sewing
Assembly:
Sew Ears to Top of Cup Cozy
Eyes: Make 2 with Black
Ch 2 Rnd 1: 4 SC in 2nd ch from hook. Sl st to first SC.
Fasten off with long tail for sewing.
Behind Nose: Using Dusty Grey
Work in Continuous Rounds and in BLO
Ch 2 Rnd 1: 6 SC in 2nd ch from hook. (6) Rnd 2: 2 SC in each st around. (12) Rnd 3: [2 SC in next st, SC in next st] 6 times. (18)
Fasten off with long tail for sewing.
Nose: With black
Ch 2 Rnd 1: 4 SC in 2nd ch from hook. Sl st to first SC.
Fasten off with long tail for sewing.
Assembly: Sew eyes, back of nose, and nose to cup cozy. See video tutorial for visual instructions.
Lastly, Embroider the mouth below the nose.
Weave in all ends.
Enjoy!!
This post contains affiliate links, which I may be compensated for when you make a purchase. That means if you click on any link and buy from the linked websites, I will receive a small percentage of the value of your order. The amount you pay is not changed. Thank you for all your support in clicking the links in my blog!! You all are so amazing!! ~Nadia
The yarn provided for this pattern is courtesy of Red Heart Yarns
Everyone loves a touch of homemade at the holidays. Why not add those touches to your greeting cards and add a gift card for those “hard to buy for” friends or family on your list!! Try this fun bow greeting card and add a gift card in the front of it!! Enjoy!!
Follow along with this video tutorial to learn how to make this project:
My dad will continue to be the videographer, editor, and photographer for our videos when I move away.
Support YARNutopia today so we can continue to bring you clear, quality crochet tutorials even after I move into my new home!
There will be an added expense of more travel and hopefully this won’t deter our ability to provide consistent videos on a weekly basis.
Enjoy this video and subscribe to my channel on YouTube for more tutorials on how to crochet!
Leave a comment, and share with your friends!
Pattern:
Designed by Nadia Fuad
Questions? Leave a comment! You may sell items made from my pattern, but please reference my name and Etsy Shop (YARNutopia). Please do not copy and post this pattern and claim it as your own.
-You can make this using a bigger crochet hook if your tension is tighter
Special Stitches:
Ch: chain
St(s): Stitch(es)
Sl st: slip stitch
SC: Single Crochet
BLO: Back Loop Only
Bow:
Ch 25
Rnd 1: SC in first chain (creating ring), SC in each ch around. Continue working in continuous rounds and in the BLO
Rnds 2-5: SC in each st around working in BLO.
Fasten off with long tail.
Assembly: Wrap yarn around center of bow leaving a strand free to sew to the band.
Band:
Ch 6
Row 1: HDC in 2nd Ch from hook and across, ch 1, turn.
Rows 2-27: HDC across, ch 1, turn. (Continue this until the band fits around the front flap of your greeting card)
Fasten off with long tail after last row.
Assembly: Sew first and last rows of band together. Sew bow to band. Slide onto the front of the greeting card. Place a fun gift card in the inside flap fo the card! Enjoy!!
Enjoy!!
This post contains affiliate links, which I may be compensated for when you make a purchase. That means if you click on any link and buy from the linked websites, I will receive a small percentage of the value of your order. The amount you pay is not changed. Thank you for all your support in clicking the links in my blog!! You all are so amazing!! ~Nadia
It’s the time of year to prepare for the holidays. Thanksgiving, Christmas, The New Year! We are not limited to only this time to Give Thanks,, but it is a time to deeply reflect on the gratitude we feel for all we have. Here is my Give Thanks Bunting Banner Wreath. An extremely simple pattern that results in a wonderful holiday decor! Change this for any holiday or occasion! Change the colors or the words to reflect your taste and love for the season! Enjoy!
Follow along with this video tutorial to learn how to make this wreath craft project:
My dad will continue to be the videographer, editor, and photographer for our videos when I move away.
Support YARNutopia today so we can continue to bring you clear, quality crochet tutorials even after I move into my new home!
There will be an added expense of more travel and hopefully this won’t deter our ability to provide consistent videos on a weekly basis.
**You can always contact me via Facebook if you have any problems with the pattern. I am happy to help if you have any questions along the way.
Designed by Nadia Fuad
You may sell items made from my pattern, but please reference my website YARNutopia.com.
Please do not copy, sell, and/or post this pattern and claim it as your own.
NOTES:
-You can use any type of yarn for this project. Gauge is not important.
-Use a smaller hook to make your triangles smaller, use a larger hook to make them bigger
Special stitches:
Ch(s): chain(s)
YO: Yarn Over
St(s): Stitch(es)
Sl st: slip stitch
SC: Single Crochet
DC: Double Crochet
Surface Crochet (See video tutorial for visual instructions)
Pattern:
Triangles: MAKE 10 TRIANGLES
Ch 2
Round 1: [3 HDC in 2nd Ch from hook, Ch 2] 3 times, sl st to first HDC. Do not turn.
Round 2: *HDC in each st until ch 2 corner sp, [3 HDC, Ch 2, 3 HDC] in corner, repeat from * around, Sl st to first HDC. Do not turn.
Round 3: Repeat Round 2
Fasten off. Weave in all ends
Assembly:
Paint the letters black, Hot glue the letters to the upside down triangles. Weave the Jute Twine through the triangles and wrap each end around the wreath. See video tutorial for visual instructions on this full craft project.
Enjoy!
This post contains affiliate links, which I may be compensated for when you make a purchase. That means if you click on any link and buy from the linked websites, I will receive a small percentage of the value of your order. The amount you pay is not changed. Thank you for all your support in clicking the links in my blog!! You all are so amazing!! ~Nadia
There are a variety of fiber textures that I used to create this eclectic boho-inspired poncho! I decided to create this free-flowing Patchouli Poncho that just begs you to get outdoors on a beautiful day and feel the sunshine pour down upon you! I used my Sublime Light Granny Square from the 365 Days of Granny Squares for the border design, and it was just the right touch for this avant-garde piece! This project is coming to you just in time for the holidays! Get ready to make one for yourself or for someone you love!
Watch this video tutorial to learn how to make this poncho:
Watch this video tutorial for the granny square used in this poncho pattern:
My dad will continue to be the videographer, editor, and photographer for our videos when I move away.
Support YARNutopia today so we can continue to bring you clear, quality crochet tutorials even after I move into my new home!
There will be an added expense of more travel and hopefully this won’t deter our ability to provide consistent videos on a weekly basis.
Teacher: Nadia Fuad
Video and Editing: Fuad Azmat (My Daddy)
Share your work on Facebook!
Add me on Snapchat: YARNutopia
Follow me on Instagram
Visit My Ravelry Store and add this to your Favorites!
Follow me on Twitter: @YARNutopia
Enjoy this video and subscribe to my channel on YouTube for more tutorials on how to crochet!
Leave a comment, and share with your friends!
Pattern:
Designed by Nadia Fuad You *may* sell items made from my pattern, but please reference my website YARNutopia.com.
Please do not copy, sell, and/or post this pattern and claim it as your own.
NOTES:
-Use a smaller hook to make this smaller
-Use a bigger hook to make this bigger
-This poncho is approximately 40 inches long
-This poncho takes approximately 1800 yards of yarn
-I used many different types of yarn and colors but you can use less or more if you want
-I used a size 4 medium yarn, you can use any worsted weight or DK yarn
-This poncho is worked from the top down
-I would recommend any type of yarn for this project.
Special stitches:
Ch(s): chain(s)
YO: Yarn Over
BLO: Back Loop Only
St(s): Stitch(es)
Sl st: slip stitch
SK: Skip
SC: Single Crochet
HDC: Half Double Crochet
DC: Double Crochet
Pattern:
If you have any confusion or difficulty with reading this pattern, please watch the video tutorial to have visual instructions.
With Colorscapes in the color Rome,
Ch 114 or any even number that will wrap around your neck loosely
Row 1: SC in 4th ch from hook, *Ch 1, Sk 1 Ch, SC in next ch, repeat from * across ending with SC in last ch, turn.
Row 2: Ch 2, SC in the next Ch 1 sp, *Ch 1, SC in the next ch 1 sp, repeat from * across, ending with SC in the ch sp at the start of Row 1, turn.
Rows 3- 35: Repeat Row 2
Row 36: Ch 2, SC in the next Ch 1 sp, *Ch 1, SC in the next ch 1 sp, repeat from * until you have 16 SC sts, leave the rest of the row unworked. Turn.
Rows 37-80: Repeat Row 2 on this shorter section. (This is creating the “over one shoulder” side)
After Row 80, fasten off with long tail for sewing.
Fold the piece as shown in the video tutorial here and continue to work on the opposite end of the foundation row working down the piece.
Attach Italian Story Ombra Yarn in the color Mare
Once your piece is folded and sewn together like a poncho, then Attach new yarn to the first stitch of your foundation row
Row 1 of New color: (if this gets confusing please watch the video tutorial at minute 22 into the video): Ch 2, SC in the next Ch 1 sp, *Ch 1, SC in the next ch 1 sp, repeat from * across, ending with SC in the ch sp at the start of previous row, turn. (continuing the Moss Stitch)
Rows 2-10: Ch 2, SC in the next Ch 1 sp, *Ch 1, SC in the next ch 1 sp, repeat from * across, ending with SC in the ch sp at the start of previous row, turn.
After Row 10, fasten off, weave in ends.
Change color to With Love in the color Mango
Rows 11-12: Ch 2, SC in the next Ch 1 sp, *Ch 1, SC in the next ch 1 sp, repeat from * across, ending with SC in the ch sp at the start of previous row, turn.
Change Color to Super Saver in the color Gold
Rows 13-14: Ch 2, SC in the next Ch 1 sp, *Ch 1, SC in the next ch 1 sp, repeat from * across, ending with SC in the ch sp at the start of previous row, turn.
Change color to With Love in the color Mango
Rows 15-16: Ch 2, SC in the next Ch 1 sp, *Ch 1, SC in the next ch 1 sp, repeat from * across, ending with SC in the ch sp at the start of previous row, turn.
Change Color to Super Saver in the color Gold
Rows 17-18: Ch 2, SC in the next Ch 1 sp, *Ch 1, SC in the next ch 1 sp, repeat from * across, ending with SC in the ch sp at the start of previous row, turn.
Change color to With Love in the color Mango
Rows 19-20: Ch 2, SC in the next Ch 1 sp, *Ch 1, SC in the next ch 1 sp, repeat from * across, ending with SC in the ch sp at the start of previous row1, turn.
Change Color to Super Saver in the color Gold
Rows 21-22: Ch 2, SC in the next Ch 1 sp, *Ch 1, SC in the next ch 1 sp, repeat from * across, ending with SC in the ch sp at the start of previous row, turn.
Change color to With Love in the color Mango
Rows 23-24: Ch 2, SC in the next Ch 1 sp, *Ch 1, SC in the next ch 1 sp, repeat from * across, ending with SC in the ch sp at the start of previous row, turn.
Change Color to Super Saver in the color Gold
Rows 25-26: Ch 2, SC in the next Ch 1 sp, *Ch 1, SC in the next ch 1 sp, repeat from * across, ending with SC in the ch sp at the start of previous row, turn.
Change color to With Love in the color Mango
Rows 27-28: Ch 2, SC in the next Ch 1 sp, *Ch 1, SC in the next ch 1 sp, repeat from * across, ending with SC in the ch sp at the start of previous row, turn.
After Row 28, fasten off and weave in ends.
Work on the side that has been unworked this whole time. (See video tutorial at time 31 minutes)
Row 1: Attach Italian Story Ombra in the color Mare to the corner, continue the moss stitch across which is Ch 2, SC in the next Ch 1 sp, *Ch 1, SC in the next ch 1 sp, repeat from * across, ending with SC in the ch sp at the start of previous row, turn.
Rows 2-14: Ch 2, SC in the next Ch 1 sp, *Ch 1, SC in the next ch 1 sp, repeat from * across, ending with SC in the ch sp at the start of previous row, turn.
After Row 14, fasten off
The next step you need to do is mark 28 stitches in from Row 14 of the last section you crocheted on both sides of the poncho. (See video tutorial at minute 36 if this is confusing)
Attach Colorscapes Yarn to the ch sp after the stitch marker
Row 1: Ch 2, SC in the next Ch 1 sp, *Ch 1, SC in the next ch 1 sp, repeat from * across, ending with SC in the ch sp at the start of previous row until you get to the stitch marker on the opposite side. Leave the rest of the stitches unworked. Turn.
Rows 2-14: Ch 2, SC in the next Ch 1 sp, *Ch 1, SC in the next ch 1 sp, repeat from * across, ending with SC in the ch sp at the start of previous row, turn.
After Row 14, Fasten off.
You will now work along the edge of the Colorscapes section you just crocheted.
If you need assistance in the video tutorial, this part is explained at 41 minutes into the video.
Attach Italian Story Ombra
Rows 1-10: Ch 2, SC in the next Ch 1 sp, *Ch 1, SC in the next ch 1 sp, repeat from * across, ending with SC in the ch sp at the start of previous row, turn.
Fasten off after Row 10
Change color to With Love in the color Mango
Rows 11-12: Ch 2, SC in the next Ch 1 sp, *Ch 1, SC in the next ch 1 sp, repeat from * across, ending with SC in the ch sp at the start of previous row, turn.
Change Color to Super Saver in the color Gold
Rows 13-14: Ch 2, SC in the next Ch 1 sp, *Ch 1, SC in the next ch 1 sp, repeat from * across, ending with SC in the ch sp at the start of previous row, turn.
Change color to With Love in the color Mango
Rows 15-16: Ch 2, SC in the next Ch 1 sp, *Ch 1, SC in the next ch 1 sp, repeat from * across, ending with SC in the ch sp at the start of previous row, turn.
Change Color to Super Saver in the color Gold
Rows 17-18: Ch 2, SC in the next Ch 1 sp, *Ch 1, SC in the next ch 1 sp, repeat from * across, ending with SC in the ch sp at the start of previous row, turn.
Change color to With Love in the color Mango
Rows 19-20: Ch 2, SC in the next Ch 1 sp, *Ch 1, SC in the next ch 1 sp, repeat from * across, ending with SC in the ch sp at the start of previous row1, turn.
Change Color to Super Saver in the color Gold
Rows 21-22: Ch 2, SC in the next Ch 1 sp, *Ch 1, SC in the next ch 1 sp, repeat from * across, ending with SC in the ch sp at the start of previous row, turn.
Change color to With Love in the color Mango
Rows 23-24: Ch 2, SC in the next Ch 1 sp, *Ch 1, SC in the next ch 1 sp, repeat from * across, ending with SC in the ch sp at the start of previous row, turn.
Change Color to Super Saver in the color Gold
Rows 25-26: Ch 2, SC in the next Ch 1 sp, *Ch 1, SC in the next ch 1 sp, repeat from * across, ending with SC in the ch sp at the start of previous row, turn.
Change color to With Love in the color Mango
Rows 27-28: Ch 2, SC in the next Ch 1 sp, *Ch 1, SC in the next ch 1 sp, repeat from * across, ending with SC in the ch sp at the start of previous row, turn.
After Row 28, fasten off and weave in ends.
**Assembly Step: Sew this little flap to the poncho and do the same thing for the opposite side of the poncho.**
Make your 14 Granny Squares and sew them to the border of your poncho. See video tutorial at 55 minutes in the video for visual instructions on sewing the granny squares together and to the poncho.
Neck of poncho:
Work in continuous rounds, attach Colorscape yarn to the back of the poncho along the neckline, Ch 2, SC in the next Ch 1 sp, *Ch 1, SC in the next ch 1 sp, repeat from * around
Round 2-10: Repeat the previous round.
Fasten off after round 10.
Weave in ends.
Assembly:
Weave in all ends.
Add fringe to the bottom of the poncho, add a long drawstring braid to the neck of your poncho.
Enjoy!!
This post contains affiliate links, which I may be compensated for when you make a purchase. That means if you click on any link and buy from the linked websites, I will receive a small percentage of the value of your order. The amount you pay is not changed. Thank you for all your support in clicking the links in my blog!! You all are so amazing!! ~Nadia
The yarn provided for this pattern is courtesy of Red Heart Yarns
The Spider Web Wrap is ready for you to spin up on your hooks!! You will be able to make this quick and easy project faster than anyone can say Trick-or-Treat!
Using all double crochet stitches we will make the wrap first, then add the lines that section off each corner using surface crochet stitches.
Follow along with this video tutorial to learn how to make this wrap:
My dad will continue to be the videographer, editor, and photographer for our videos when I move away.
Support YARNutopia today so we can continue to bring you clear, quality crochet tutorials even after I move into my new home!
There will be an added expense of more travel and hopefully this won’t deter our ability to provide consistent videos on a weekly basis.
**You can always contact me via Facebook if you have any problems with the pattern. I am happy to help if you have any questions along the way.
Designed by Nadia Fuad
You may sell items made from my pattern, but please reference my website YARNutopia.com.
Please do not copy, sell, and/or post this pattern and claim it as your own.
NOTES:
-This is worked from the top down
-The measurements are: approx. 50 inches across and about 25 inches long. You can make this bigger or smaller if you want since it is a repeat pattern.
-You can use any type of yarn for this project. Gauge is not important.
Special stitches:
Ch(s): chain(s)
YO: Yarn Over
St(s): Stitch(es)
Sl st: slip stitch
SC: Single Crochet
DC: Double Crochet
Surface Crochet (See video tutorial for visual instructions)
Pattern:
Ch 3
Row 1: 3 DC in 3rd ch from hook, [Ch 2, 3 DC in same ch] 4 times. Turn. (15 sts)
Row 2: Ch 2 (does not count as a st), 2 DC in first st, *DC in each st until next ch 2 sp, [DC, Ch 2, DC] in ch 2 sp repeat from * until one st remains, put 2 DC in last st. Turn.
Rows 3-36: Repeat Row 2 until your piece is as long as you want it to be. Change color for rows 6, 12, 18, 24, 30 and 36.
Your last row should be a row of white.
Assembly:
SC along the edge of the wrap
Add surface crochet lines in each chain 2 space of each corner. (See video tutorial on how to do this step)
Weave in all ends.
Enjoy!
This post contains affiliate links, which I may be compensated for when you make a purchase. That means if you click on any link and buy from the linked websites, I will receive a small percentage of the value of your order. The amount you pay is not changed. Thank you for all your support in clicking the links in my blog!! You all are so amazing!! ~Nadia
How about some Vampire Bat Booties forrrr your little one? Do you vant to make a pair forrrr Halloveen?? Mwuahaha 🦇
These baby bootie slippers are so fun for any bat lover or Halloween costume!
Follow along with this video tutorial to learn how to make these booties:
Support YARNutopia today so we can continue to bring you clear, quality crochet tutorials
“Designed by Nadia Fuad You *may* sell items made from my pattern, but please reference my website YARNutopia.com.
Please do not copy, sell, and/or post this pattern and claim it as your own.
-This project uses less than 100 yards of yarn.
-Use a smaller hook to make these smaller
-Use a bigger hook to make these bigger
-Watch the FULL video tutorial for visual instructions for each row and tips on how to make this smaller and bigger.
-Weave in all the ends as you go so you don’t have to weave them all in at the very end.
-If the instructions above are confusing, please message me on Facebook, and I will answer any questions you may have. Please be specific in your questions. Thank you!!
-The measurements for these booties are 5 inches (13 cm) long and will fit a 6 month old baby. (find other sole measurements here)
-Use a basic Slipper or Bootie pattern in any size and then follow along with the embellishments of this pattern to make these in any size. I do not have stitch counts for larger sizes in this pattern.
-I found a great pattern by HodgePodge Crochet for adult sizes on the slipper! Find it here! Then follow along with the Embellishments of my pattern for the bat face design!
Special stitches used:
Ch(s): chain(s)
YO: Yarn Over
St(s): Stitch(es)
BLO: Back Loops Only
Sl st: slip stitch
SC: Single Crochet
HDC: Half Double Crochet
SC2TOG: Single crochet decrease
DC2TOG: Double Crochet Decrease
DC3TOG: Double Crochet 3 Stitches together
DC: Double Crochet
Pattern:
If you have any confusion or difficulty with reading this pattern, please watch the video tutorial to have visual instructions.
Booties: Make 2 With Stiletto and an I-5.50mm crochet hook
Chain 12 Rnd 1: 2 DC in 2nd ch from hook, DC in next 9 chs, 4 DC in last ch, continue working on opposite side of foundation chain, DC in 9 sts, 2 DC in last st, Sl st to first DC. Do not turn. (26 sts)
Rnd 2: Ch 1, 2 DC in first st, DC in next 11 sts, 2 DC in each of the next 2 sts, DC in 11 sts, 2 DC in last st, sl st to first DC. Do not turn. (30 sts)
Rnd 3: Work in BLO, DC in each st around, sl st to first DC, sl st to first st. (30 sts)
Rnd 4: Ch 1, work in both loops, DC in first 4 sts, [FPDC on next st, DC in next 2 sts] 3 times, [DC2TOG] 2 times, [DC in next 2 sts, FPDC on next st] 3 times, DC in last 4 sts, sl st to first DC. (28 sts)
Rnd 5: Ch 1, DC in first 4 sts, [FPDC on next st, DC in next 2 sts] 2 times, [DC2TOG] 3 times, [FPDC on next st, DC in next 2 sts] 3 times, DC in last 2 sts, sl st to first DC. (24 sts)
Rnd 6: Ch 1, DC in first 4 sts, [FPDC on next st, DC in next 2 sts] 2 times, FPDC on next st, DC3TOG, [FPDC on next st, DC in next 2 sts] 3 times, DC in last 2 sts, sl st to first DC. (23 sts)
Fasten off Stiletto and attach Suede to first st.
Rnd 7: With Suede and H-5.00mm crochet hook, Ch 1, SC in each st around, sl st to first SC. Fasten off. Weave in all ends.
Booties made. (Be sure to make 2 booties!)
Bat Face:
With H-5.00mm crochet hook and Suede
Work in continuous rounds
Ch 2,
Rnd 1: 6 SC in 2nd ch from hook. (6 sts)
Rnd 2: 2 SC in each st around. (12 sts)
Rnd 3: [2 SC in next st, SC in next st] 6 times. (18)
Rnd 4: [2SC in next st, SC in next 2 sts] 3 times, Ch 5, SC in 2nd ch from hook, HDC in next ch, DC in last 2 chs, Sk next st on round, SC in next 4 sts, Ch 5, SC in 2nd ch from hook, HDC in next ch, DC in last 2 chs, Sk next st on round, SC in next 2 sts, 2 SC in last st, sl st to next st.
Fasten off with long tail for sewing.
Inner Ears:
Make 2 wih Mai Tai and H-5.00mm crochet hook
Ch 4 Row 1: SC in 2nd ch from hook, HDC in next ch, DC in last ch.
Fasten off with long tail for sewing.
Eyes:
Make 2 with Mai Tai and H-5.00mm crochet hook
Ch 2
Rnd 1: 8 SC in 2nd ch from hook. Fasten off with long tail for sewing.
Make a French Knot with Black yarn for the pupil of the eye. (See video tutorial for visual instructions)
Mouth:
With Sunset and H-5.00mm crochet hook
Ch 2
Rnd 1: 6 SC in 2nd ch from hook, sl st to first st, ch 1.
Rnd 2: [SC, HDC] in first st, [HDC, SC] in next, SC in next st, [SC, HDC] in next st, [HDC, SC] in next st, SC in last st, sl st to first SC.
Fasten off with long tail for sewing.
Wrap the Suede colored yarn around the mouth (as seen in photos)
Teeth:
Make 2 with Linen and H-5.00mm crochet hook
Ch 4
Row 1: Sl st in 2nd ch from hook, SC in next, HDC in last ch.
Fasten off with long tail for sewing.
Assembly Step:
See video tutorial on placements of pieces and sew everything on face and to the bootie slippers. Be sure to make everything again for the second bootie slipper!
Enjoy!!
This post contains affiliate links, which means if you click on the link and buy from the linked websites, I will receive a small percentage of the value of your order. The amount you pay is not changed.
The yarn provided for this pattern is courtesy of Red Heart Yarns
This is the last piece I crocheted to finalize our Halloween Costumes this year! Check out the famous Green Wig as part of Nate’s Halloween Costume! You can make this in all different colors and make it your own!! Enjoy!!
Here is the full costume ensemble for our Halloween 2018 celebration!!
Follow along with this video tutorial to learn how to make this project:
My dad will continue to be the videographer, editor, and photographer for our videos when I move away.
Support YARNutopia today so we can continue to bring you clear, quality crochet tutorials even after I move into my new home!
There will be an added expense of more travel and hopefully this won’t deter our ability to provide consistent videos on a weekly basis.
Pattern:
Designed by Nadia Fuad
Questions? Leave a comment!
You may sell items made from my pattern, but please reference my name and Etsy Shop (YARNutopia).
Please do not copy and post this pattern and claim it as your own.
NOTES:
-This hat will fit any teen/adult size
-Use a smaller crochet hook to make this smaller, and use a larger crochet hook to make these bigger
-This hat is made in 2 pieces, then sewn together
-Turn your work after every row
Special Stitches Used in this pattern:
Ch: chain
St(s): Stitch/stitches
Sl st: slip stitch
SC: Single Crochet
Sk: Skip
Sk’d: Skipped
Hat: MAKE 2
Ch 2 Round 1: 9 SC in 2nd ch from the hook, sl st to first SC, Ch 1, turn. (9) Round 2: 2 SC in each st around, sl st to first SC, Ch 1, Turn. (18) Round 3: [2 SC in next st, SC in next st] 9 times, sl st to first SC, Ch 1, turn. (27) Round 4: [2 SC in next st, SC in next 2 sts] 9 times, sl st to first SC, Ch 1, turn. (36) Round 5: [2 SC in next st, SC in next 3 sts] 9 times, sl st to first SC, Ch 1, turn. (45) Round 6: [2 SC in next st, SC in next 4 sts] 9 times, sl st to first SC, Ch 1, turn. (54) Round 7: [2 SC in next st, SC in next 8 sts] 6 times, sl st to first SC, Ch 1, turn. (60) Round 8: [2 SC in next st, SC in next 9 sts] 6 times, sl st to first SC, Ch 1, turn. (66) Round 9: [2 SC in next st, SC in next 10 sts] 6 times, sl st to first SC, Ch 1, turn. (72) Rounds 10-25: SC in each st around, Sl st to first SC, ch 1, turn. (72)
You will now be working in rows: Row 26: SC in 52 sts (leaving 20 sts unworked), Ch 1, turn. (52) Rows 27-48: SC in each st across, ch 1, turn. (52)
Fasten off after row 48.
When you have both hats made, stuff them and sew them together AFTER you make the front “bangs” part.
Front “Bangs” part:
Ch 16 Row 1: SC in 2nd ch from hook and across, ch 1 turn. (15) Rows 2-13: SC in each st across, Ch 1, turn. (15) Row 14: SC2TOG, SC in each st until there are 2 sts left, SC2TOG, ch 1, turn. (13) Rows 15-16: SC in each st across, ch 1, turn. (13) Row 17: SC in 6 sts, Sk next st, SC in last 6 sts, ch 1, turn. (12) Row 18: SC in 4 sts, [SC2TOG] twice, SC in last 4 sts, ch 1, turn. (10) Row 19: SC in 3 sts, [SC2TOG] Twice, SC in last 3 sts, Ch 1, turn. (8) Row 20: SC in 2 sts, [SC2TOG] Twice, SC in last 2 sts, ch 1, turn. (6) Row 21: SC in 1 st, [SC2TOG] twice, SC in last st, ch 1, turn. (4) Row 22: [SC2TOG] Twice, Ch 1, turn. (2) Row 23: [SC2TOG]
Fasten off with long tail for sewing.
Curly top:
Ch 7 Row 1: SC in 2nd ch and across. (6)
Fasten off with long tail for sewing.
Assembly:
Sew Curly top to row 23 of the Front “bangs” part.
Start sewing the front Bangs to top layer hat, but also wrap A LOT of yarn around the bottom half of the bangs to make the “combed back” look.
(See video tutorial and photos for visual guide)
Sew the rest of the bangs to the top layer hat.
Stuff the rest of the hat and sew it all closed.
Curl up the bottom of the hat and tack it down with stitches around the back.
See video tutorial for visual instructions.
Weave in all ends.
Enjoy!!!!!!
BONUS PATTERNS:
Collar:
Neck: Change color every 4 rows
Ch 16 Row 1: SC in 2nd ch from hook and next 4 chs, HDC in next 5 chs, DC in last 5 chs, turn. (15) Row 2: Ch 2 (does NOT count as anything) DC in 5 sts, HDC in 5 sts, SC in last 5 sts, ch 1, turn. Row 3: SC in 5 sts, HDC in 5 sts, DC in last 5 sts, turn. Rows 4-?: Repeat Rows 2 and 3 (if you want to make this larger or smaller, just repeat these 2 rows until your piece fits around your neck)
Fasten off, Sew closed.
Wristers
Change color ever 3 rows
Ch 16
Row 1: SC in 4th ch from hook, *ch 1, sk 1, SC in next ch, repeat from * across, turn.
Row 2: Ch 2, SC in ch 1 sp, *Ch 1, SC in next ch 1 sp, repeat from * across, turn.
Rows 3-?: Repeat Row 2 until your piece fits around your wrist.
Fasten off with long tail. Sew closed.
Bow Tie Nadia is Wearing:
Ch 12
Row 1: DC in 4th Ch and Across, (10 sts)
Rows 2-? Ch 2 (does not count as anything), DC in each st across, turn. (10)
Make your tie as long as you need to fit around your neck and tie in a bow without choking.
Fasten off, weave in all ends.
Enjoy!!
Each year I try to create costumes more epic than the one’s before. This year will be AWESOME!
Enjoy this video and subscribe to my channel on YouTube for more tutorials on how to crochet!
Leave a comment, and share with your friends!
This post contains affiliate links, which I may be compensated for when you make a purchase. That means if you click on any link and buy from the linked websites, I will receive a small percentage of the value of your order. The amount you pay is not changed. Thank you for all your support in clicking the links in my blog!! You all are so amazing!! ~Nadia
Each year I try to create costumes more epic than the one’s before. This year will be AWESOME!
As I create a series of patterns, each one released leading up to Halloween, they reveal clues to what Nate and I plan to wear!
Follow along with this video tutorial to learn how to make this project:
My dad will continue to be the videographer, editor, and photographer for our videos when I move away.
Support YARNutopia today so we can continue to bring you clear, quality crochet tutorials even after I move into my new home!
There will be an added expense of more travel and hopefully this won’t deter our ability to provide consistent videos on a weekly basis.
Pattern:
Designed by Nadia Fuad
Questions? Leave a comment!
You may sell items made from my pattern, but please reference my name and Etsy Shop (YARNutopia).
Please do not copy and post this pattern and claim it as your own.
NOTES:
-The cardigan I made measures Medium/Large. Front Panels Length: 25 inches long, Length of back piece: 33 inches long, Waist around: 46 inches around, Sleeve Length: 23 inches long, Upper Sleeve Width: 20 inches around, Sleeve Width Lower Part: 18 inches around, Middle of sleeve width 10 inches around, Collar height: 2 inches
-Use a smaller crochet hook to make this smaller, and use a larger crochet hook to make these bigger
-This Cardigan is worked from the bottom up, first the backside, then the 2 front panels, then the sleeves, then the collar and last the embellishments are added.
-The chain 2 at the beginning of each row does NOT count as a stitch. Do not work into it.
Special Stitches Used in this pattern:
Ch: chain
St(s): Stitch/stitches
Sl st: slip stitch
FDC: Foundation Double Crochet
SC: Single Crochet
DC: Double Crochet
Sk: Skip
Sk’d: Skipped
Cardigan:
Back Side:
Pointed Backside Tails–MAKE 2
Ch 2
Row 1: 3 SC in 2nd Ch from hook, Ch 1, turn. (3)
Row 2: SC in each st across, ch 1, turn. (3)
Row 3: 2 SC in each st across, ch 1, turn. (6)
Row 4: SC in each st across, ch 1, turn. (6)
Row 5: 2 SC in 1st st, SC in each st until 1 st is left, 2 SC in last st, Ch 1, turn. (8)
Row 6: SC in each st across, Ch 1, turn. (8)
Rows 7-33: Repeat Rows 5 and 6 ending with a repeat of Row 5 (36 sts)
(Continue these 2 rows until the piece is half of your back measurement, my back is 20 inches across, so ending on Row 33 for me was 10 inches across) Once you have your piece as wide as you need it go onto the next row instructions.
Rows 34-49: SC in each st across, ch 1, turn. (36 sts)
For first piece, Fasten off, for second piece, DO NOT fasten off, go onto the next row and attach the two pieces to continue up the back.
Row 50: On the piece that you did not fasten off, SC in each st across, continue to SC in each st on the first piece you fastened off, ch 1, turn. (72 sts)
Rows 51-93: SC in each st across, ch 1, turn.
Make this as long as you need it to get up to your armpit. (See video tutorial for visual instructions)
Row 94: SC2TOG, SC in each st until 2 sts remain, SC2TOG, ch 1, turn.
Rows 95-99: Repeat Row 94. (I had 60 sts at the end of this section)
Rows 100-130: SC in each st across, Ch 1, turn
After Row 130, continue to SC around the entire piece to clean up the edges.
Fasten off with long tail for sewing.
Front Panels: MAKE 2
Row 1: FDC 40 or Chain 42 and DC in 4th Ch and across (or have any even number on your first row), Turn. (40 sts)
Row 2: Ch 2 (does not count as anything), *Sk 1 st, DC in next st, DC in Sk’d st, repeat from * across, turn.
Rows 3-22: Repeat Row 2
(you can continue to make this longer if you want, just to your armpit section–see video tutorial for visual instructions)
Row 23: Ch 2, DC2TOG, *Sk 1 st, DC in next, DC in Sk’d st, repeat from * until 2 sts remain, DC2TOG, turn.
Row 24: Ch 2, DC3TOG, *Sk 1 st, DC in next st, DC in Sk’d st, repeat from * until 3 sts remain, DC3TOG, turn.
Rows 25-28: Repeat Row 24 until there are 22 sts across
Row 29: Ch 2, DC in 1st st, *Sk 1 st, DC in next st, DC in sk’d st, repeat from * across until 1 st remains, DC in last st, turn.
Rows 30-42: Repeat Row 29
After Row 42, continue to SC around entire piece.
Assembly:
Sew Front panels to back panel. The video tutorial is very helpful for this part.
Once your front panels are attached to your back panel, continue to make the sleeves.
Sleeves:
Attach yarn to armpit of the arm hole Round 1: Ch 2, DC 72 sts or any even number around the arm hole, sl st to first st, turn.
Round 2: Ch 2, Sk 2 sts, DC in next st, DC in ONE of the sk’d sts leaving the other one unworked, [Sk next st, DC in next, DC in sk’d st] repeat these Criss-Cross sts until halfway around the armhole (top of shoulder), Sk 2 sts, DC in next, DC in ONE of the sk’d sts leaving the other one unworked, [Sk next st, DC in next, DC in sk’d st] repeat these Criss-Cross sts until the end of the round, sl st to beginning DC, turn.
Round 3: Ch 2, Sk 3 sts, DC in next DC in ONE of the sk’d sts, [Sk next st, DC in next, DC in sk’d st] repeat these Criss-Cross sts until halfway around the armhole (top of shoulder), Sk 3 sts, DC in next, DC in ONE of the sk’d sts leaving the other ones unworked, [Sk next st, DC in next, DC in sk’d st] repeat these Criss-Cross sts until the end of the round, sl st to beginning DC, turn.
Rounds 4-12: Repeat Round 3
Rounds 13-21: Ch 2, *Sk next st, DC in next st, DC in sk’d st, repeat from * around, sl st to first st, turn.
If you do not want belled out sleeves, continue this concept until your sleeve is as long as you want it, otherwise, continue onto the instructions for the next round to make your sleeves wider.
Round 22: Ch 2, Sk next st, DC in next, DC in sk’d st, *DC in next st, DC in previous stitch, repeat from * around, sl st to first DC, turn. (there will be 2 DC in each st using the criss-cross stitch method. (See video tutorial for visual instructions)
Rounds 23-35: Ch 2, *Sk next st, DC in next st, DC in sk’d st, repeat from * around, sl st to first st, turn.
Fasten off, weave in ends.
Do the same thing for the second sleeve.
Collar:
Attach yarn at top of collar area Row 1: Ch 1, SC across collar, ch 1, turn.
Row 2: SC across, ch 1, turn.
Rows 3-20: Repeat Row 2
Fasten off with a long tail for sewing
Assembly:
-Fold Collar down, Sew it in half to the neck. (See video tutorial for visual instructions) -SC with your accent color around entire cardigan from one side of the collar, down the front, around the back, and then back up to the other side of the collar. (See video tutorial for visual instructions)
-Sew on all your embellishments. See photos for guide
Fasten off, weave in all ends. Enjoy!
***You can always contact me if you have any problems with the pattern. I am happy to help if you have any questions along the way.
Enjoy this video and subscribe to my channel on YouTube for more tutorials on how to crochet!
Leave a comment, and share with your friends!
This post contains affiliate links, which I may be compensated for when you make a purchase. That means if you click on any link and buy from the linked websites, I will receive a small percentage of the value of your order. The amount you pay is not changed. Thank you for all your support in clicking the links in my blog!! You all are so amazing!! ~Nadia
Each year I try to create costumes more epic than the one’s before. This year will be AWESOME!
As I create a series of patterns, each one released leading up to Halloween, they reveal clues to what Nate and I plan to wear!
Follow along with this video tutorial to learn how to make this project:
My dad will continue to be the videographer, editor, and photographer for our videos when I move away.
Support YARNutopia today so we can continue to bring you clear, quality crochet tutorials even after I move into my new home!
There will be an added expense of more travel and hopefully this won’t deter our ability to provide consistent videos on a weekly basis.
Pattern:
Designed by Nadia Fuad
Questions? Leave a comment!
You may sell items made from my pattern, but please reference my name and Etsy Shop (YARNutopia).
Please do not copy and post this pattern and claim it as your own.
NOTES:
-The pants that I made measure: Length (Waist to ankle): 35 inches, Waist: 32 inches around, Hips around: 40 inches, Ankles around: 12 inches, Strap length: 36 inches, Strap width: 2 Inches
-This project goes off measurements, so you can make as many stitches as you want that fits around your body.
-Use a smaller crochet hook to make this smaller, and use a larger crochet hook to make these bigger
-These pants are made from the bottom up and are seamed on the inseam and then worked in rounds to make the top part of the pants.
-Turn your work every time it says “TURN”
-The chain 2 at the beginning of each row does NOT count as a stitch. Do not work into it.
Special Stitches Used in this pattern:
Ch: chain
St(s): Stitch/stitches
Sl st: slip stitch
FDC: Foundation Double Crochet
SC: Single Crochet
HDC: Half Double Crochet
DC: Double Crochet
FPDC: Front Post Double Crochet
BPDC: Back Post Double Crochet
Pants:
Row 1: FDC 37 sts or any odd number that will fit around your calf of your leg, ch 2, turn.
Row 2: DC in 1st st, *FPDC in next st, DC in next st, repeat from * across, ending with DC in last st, turn.
Row 3: Ch 2 (does not count as anything), DC in 1st st, *BPDC in next st, DC in next st, Repeat from * across, ending with DC in last st, turn.
Row 4: Repeat Row 2
Row 5: Ch 1 (does not count as anything), HDC in each st across, turn.
Row 6: Ch 1, 2 HDC in 1st st, HDC in each st until 1 st remains, 2 HDC in last st, turn. (39 sts)
Row 7: Work in 3rd Loop of the HDC sts (see video tutorial for visual instructions), Ch 1, 2 HDC in 1st st, HDC in each st until 1 st remains, 2 HDC in last st, turn. (41 sts)
Row 8: Work into the top of the stitches on this row (see video tutorial for visual instructions), Repeat Row 6. (43 sts)
Row 9: Repeat Row 7
Rows 10-26: Repeat Rows 8 & 9 until your piece fits around your thigh comfortably, then go onto the next row. (79 sts)
Row 27: Work in 3rd loop of the HDC sts, Ch 1, HDC across, turn. (79 sts)
Row 28: Work into the top of the sts in this row, Ch 1, HDC across, turn.
Rows 29-56: Repeat Rows 27 & 28 until your piece is as long as you want it for attaching to the other leg and the height that will fit around your thigh.
Fasten off with a long tail for sewing.
Make 1 more leg just like the one you just made.
Sew your two legs inseams together (Sew your pieces inside out)
Assembly:
To sew your pieces together and closed, see video tutorial for visual instructions
You will need to skip sewing the top 8 rows for the inseam and sew those together to each others leg. Then you can go onto making the hips/waist part of the pants next.
Continue working at the top of the pants “in the round” next
Mark 2 sts in the front and 2 sts in the back of your pants (those stitches will be your “Decrease” stitches)
Round 57: Working inside out, work in the 3rd loop of the HDC sts, Ch 1, HDC2TOG on the first 2 sts, HDC in each st until halfway around, HDC2TOG, HDC in the rest of the sts around, Sl st to first st, TURN.
Round 58: Ch 1, HDC2TOG on the first 2 sts, HDC in each st until halfway around, HDC2TOG, HDC in the rest of the sts around, Sl st to first st, TURN.
Rounds 59-79: Repeat Rounds 57 & 58 until your piece is fitting around your waist, then go onto the next rounds
Turn your piece right side out if you haven’t already and continue with the waistband.
Round 80: Ch 2 (does not count as anything), DC in each st around. DO NOT TURN, Sl st to first st of the round.
Round 81: Ch 2, FPDC on first st, *DC on next st, FPDC on next st, repeat from * around, sl st to first st of the round.
Rounds 82-85: Repeat Round 81.
Fasten off and weave in all ends.
Straps:
Ch 112 or any amount that you need that will fit over the shoulder to the waistband
Row 1: DC in 3rd ch from hook and across, turn.
Row 2: Ch 2, DC in first 2 sts, Ch 1, sk 1 st, DC in the rest of the sts across, turn.
Row 3: Ch 2, DC in each st across, DC in button hole and the last 2 sts.
Fasten off and weave in ends.
Assembly:
Sew Straps to pants and sew buttons to pants.
Enjoy this video and subscribe to my channel on YouTube for more tutorials on how to crochet!
Leave a comment, and share with your friends!
This post contains affiliate links, which I may be compensated for when you make a purchase. That means if you click on any link and buy from the linked websites, I will receive a small percentage of the value of your order. The amount you pay is not changed. Thank you for all your support in clicking the links in my blog!! You all are so amazing!! ~Nadia
Finger knitting a chunky throw blanket is easier than you think! Follow along with me when I make this beautiful Fluffy Hugs Blanket!
In this video tutorial I teach how to make this blanket with no tools but your fingers!! Make this super chunky knit blanket and snuggle up in a bulky throw!!
There is no written pattern for this as you only need to pull up loops with your fingers to make this blanket! See it in the video tutorial!!
Follow along with this video tutorial to learn how to make this blanket:
Support YARNutopia today so we can continue to bring you clear, quality crochet tutorials
**You can always contact me via Facebook if you have any problems with the pattern. I am happy to help if you have any questions along the way.
***You can definitely sell anything you make from my patterns, please just link back to my website YARNutopia.com. Thank you!
Teacher: Nadia Fuad
Video and Editing: Fuad Azmat (My Daddy)
Share your work on Facebook!
Add me on Snapchat: YARNutopia
Follow me on Instagram
Visit My Ravelry Store and add this to your Favorites!
Follow me on Twitter: @YARNutopia
Enjoy this video and subscribe to my channel on YouTube for more tutorials on how to crochet!
Leave a comment, and share with your friends!
Pattern:
Designed by Nadia Fuad You *may* sell items made from my pattern, but please reference my website YARNutopia.com.
Please do not copy, sell, and/or post this pattern and claim it as your own.
NOTES:
-Watch the FULL introduction of the video tutorial for frequently asked questions and watch the full video for tips on how to make these smaller or bigger.
-You will need 310 Yards of this yarn for this whole project.
-You can use any type of Bulky or Jumbo yarn to make this blanket. I would recommend using 2 or 3 strands of bulky yarn together to crochet the same thickness as my blanket. You can add as many strands of yarn to your likeness to make a super chunky blanket!! Have fun with it!
-Different Afghan Sizes can be found in the middle of this page here.
This post contains affiliate links, which means if you click on the link and buy from the linked websites, I will receive a small percentage of the value of your order. The amount you pay is not changed.
The yarn provided for this pattern is courtesy of Red Heart Yarns
Ooh la la everyone! It’s that time of year in the northern hemisphere! Get out your hooks for the latest fall fashion Chic Twist Headwrap!! Using only ONE SKEIN of Chic Sheep Yarn by Marly Bird you can make this fun fall accessory! In fact, you can make two! If you ever planned to try the Chic Sheep, now is the time to do it! I love this yarn so much!! Check out a few of my other projects where I’ve used this yarn:
Follow along with this video tutorial to learn how to make this headband:
My dad will continue to be the videographer, editor, and photographer for our videos when I move away.
Support YARNutopia today so we can continue to bring you clear, quality crochet tutorials even after I move into my new home!
There will be an added expense of more travel and hopefully this won’t deter our ability to provide consistent videos on a weekly basis.
Teacher: Nadia Fuad
Video and Editing: Fuad Azmat (My Daddy)
Share your work on Facebook!
Add me on Snapchat: YARNutopia
Follow me on Instagram
Visit My Ravelry Store and add this to your Favorites!
Follow me on Twitter: @YARNutopia
Enjoy this video and subscribe to my channel on YouTube for more tutorials on how to crochet!
Leave a comment, and share with your friends!
Pattern:
Designed by Nadia Fuad You *may* sell items made from my pattern, but please reference my website YARNutopia.com.
Please do not copy, sell, and/or post this pattern and claim it as your own.
NOTES:
-Use a smaller hook to make these smaller
-Use a bigger hook to make these bigger
-Watch the FULL introduction of the video tutorial for frequently asked questions and watch the full video for tips on how to make this project smaller or bigger.
Special stitches:
Ch(s): chain(s)
YO: Yarn Over
St(s): Stitch(es)
Sl st: slip stitch
SC: Single Crochet
HDC: Half Double Crochet
BLO: Back Loop Only
FLO: Front Loop Only
Pattern:
If you have any confusion or difficulty with reading this pattern, please watch the video tutorial to have visual instructions.
Ch 165 or any amount that wraps around your head twice Row 1: Sl st in 2nd ch from hook and in each ch across, ch 1, turn. (164 sl sts)
Row 2: Work in FLO, HDC in each st across, ch 1, turn. (164 HDC sts)
Row 3: Work in BLO, Sl st in each st across, ch 1, turn. (164 sl sts)
Row 4: Repeat Row 2
Row 5: Repeat Row 3
Row 6: Repeat Row 2.
Fasten off with long tail for sewing.
Assembly step:
Twist Headband around head and cross over and pull both ends up and around to the back of the head. (See video tutorial on how to do the twist with visual instructions)
Sew the ends together in the back of the head.
Sew the opening in the middle of the headband all the way across.
See video tutorial on where exactly to sew closed.
Weave in all ends.
Enjoy!!
This post contains affiliate links, which I may be compensated for when you make a purchase. That means if you click on any link and buy from the linked websites, I will receive a small percentage of the value of your order. The amount you pay is not changed. Thank you for all your support in clicking the links in my blog!! You all are so amazing!! ~Nadia
Hello Everybody! I just wanted to “lolli-POP” into your news feed to share our next installment of our Halloween Costumes!! I’m a “Sucker” for swirls and vibrant colors! These Candy Swirl Pillows are such a “Sweet Treat” to add to any room of the house!!
See the Lolli-PoPs in the background of our Halloween Costume reveal:
Each year I try to create costumes more epic than the one’s before. This year will be AWESOME!
As I create a series of patterns, each one released leading up to Halloween, they reveal clues to what Nate and I plan to wear!
Follow along with this video tutorial to learn how to make this pillow:
My dad will continue to be the videographer, editor, and photographer for our videos when I move away.
Support YARNutopia today so we can continue to bring you clear, quality crochet tutorials even after I move into my new home!
There will be an added expense of more travel and hopefully this won’t deter our ability to provide consistent videos on a weekly basis.
Pattern:
Designed by Nadia Fuad
Questions? Leave a comment!
You may sell items made from my pattern, but please reference my name and Etsy Shop (YARNutopia).
Please do not copy and post this pattern and claim it as your own.
NOTES:
-This pillow is worked in continuous rounds. Mark your rounds as you go.
-This pillow can be made bigger or smaller by doing more rounds of the repeat or less rounds.
-I used a 16 inch pillow round, but you can stuff it with stuffing or use a smaller pillow insert.
Special Stitches Used in this pattern:
Ch: chain
St(s): Stitch/stitches
Sl st: slip stitch
SC: Single Crochet
HDC: Half Double Crochet
DC: Double Crochet
Pillow:
Round 1: With Color 1, [1 SC, 1 HDC, 2 DC] into the 2nd ch from the hook, pull up a long loop so it doesn’t unravel when you’re working with the next yarn, with color 2, [1 SC, 1 HDC, 2 DC] into same chain as the first color, pull up a long loop, with color 3, [1 SC, 1 HDC, 2 DC] into same chain as the first color. (12 sts)
Rnd 2: Begin working with color 1 again. [In the next color, put 2DC in each of the next 4 sts.] repeat for the next 2 colors. (24 sts)
Rnd 3: Continue to change color for each color change section (See video tutorial for visual instructions), [2 DC in next st, DC in next st] 12 times. (36 sts)
Rnd 4: [2 DC in next st, DC in next 2 sts] 12 times. (48 sts)
Rnd 5: [2 DC in next st, DC in next 3 st] 12 times. (60 sts)
Rnd 6: [2 DC in next st, DC in next 4 st] 12 times. (72 sts)
Rnd 7: [2 DC in next st, DC in next 5 st] 12 times. (84 sts)
Rnd 8: [2 DC in next st, DC in next 6 st] 12 times. (96 sts)
Rnd 9: [2 DC in next st, DC in next 7 st] 12 times. (108 sts)
Rnd 10: [2 DC in next st, DC in next 8 st] 12 times. (120 sts)
Rnd 11: [2 DC in next st, DC in next 9 st] 12 times. (132 sts)
Rnd 12: [2 DC in next st, DC in next 10 st] 12 times. (144 sts)
Rnd 13: [2 DC in next st, DC in next 11 st] 12 times. (156 sts)
When you finish Round 13, for each color HDC in next st, SC in next st, Sl st in next 2 sts, fasten off.
On your first circle piece, fasten off with short tails. For your second piece, fasten off 2 colors with short tails and the 3rd color with a long tail for sewing. (See video tutorial for fasten off method instructions)
Assembly:
Sew the 2 pieces together using the whip stitch and inside out, then when you have 1/3 left of your work, flip it right side out and stuff with the pillow. Then sew the rest of the pillow closed. (See video tutorial for visual instructions)
Enjoy this video and subscribe to my channel on YouTube for more tutorials on how to crochet!
Leave a comment, and share with your friends!
This post contains affiliate links, which I may be compensated for when you make a purchase. That means if you click on any link and buy from the linked websites, I will receive a small percentage of the value of your order. The amount you pay is not changed. Thank you for all your support in clicking the links in my blog!! You all are so amazing!! ~Nadia
Hygge (/ˈhjuːɡə/ HEW-gə or /ˈhuːɡə/ HOO-gə) is a Danish and Norwegian word for a mood of coziness and comfort with feelings of wellness and contentment. That is exactly what this Soft Hygge Beanie Hat is—cozy and comfortable! Using the Tunisian Simple Stitch and new Hygge Yarn from Red Heart Yarns, this design can be worked up in less than 2 hours!
Follow along with this video tutorial to learn how to make this hat:
My dad will continue to be the videographer, editor, and photographer for our videos when I move away.
Support YARNutopia today so we can continue to bring you clear, quality crochet tutorials even after I move into my new home!
There will be an added expense of more travel and hopefully this won’t deter our ability to provide consistent videos on a weekly basis.
Pattern:
Designed by Nadia Fuad
Questions? Leave a comment!
You may sell items made from my pattern, but please reference my name and Etsy Shop (YARNutopia).
Please do not copy and post this pattern and claim it as your own.
NOTES:
-This hat is worked in continuous rounds from the bottom up.
-The yarn I used in the main part of the hat is a bulky size 5 yarn. The bow is made with a worsted weight size 4 medium yarn.
-You can make more or less rows to fit the length you need.
-You can find a size chart for different sized measurements toward the bottom half of this page here.
Also see this size chart here:
Special Stitches Used in this pattern:
Ch: chain
St: Stitch
Sl st: slip stitch
SC: Single Crochet
BLO: Back Loop Only
YO: Yarn Over
TSS: Tunisian Simple Stitch
TSS2TOG: Tunisian Simple Stitch Decrease
Hat
With K-6.50 Crochet Hook and Bulky Yarn Row 1: FSC 48 sts (for larger sizes FSC 54 sts. For smaller sizes, FSC 42 sts or 36 sts) — see video tutorial on how to do FSC.
Bring first stitch around to form a ring and continue the rest of the hat with Long Afghan Hook
Round 2: Work in BLO of round 1, TSS all the way around pulling up a loop in each st, then turning the work around and pulling your other ball of working yarn through. (See video tutorial for visual instructions)
Rounds 3-15: (work in continuous rounds) Continue working TSS stitches until you get the length you need (2 inches less than the length of the hat you are making), you can do more or less rows. If you want to make this a slouchy hat, do more rounds.
Scroll down to see the decrease.
If you made a larger size: [TSS in 7 sts, TSS2TOG in next] 6 times. (48 sts) (then go onto the next row)
Round 16: If you had 48 sts, continue with this row: [TSS in 6 sts, TSS2TOG in next] 6 times. (42 sts)
if you made smaller sizes, use the following rows as a guide to decrease your rounds.
Round 17: [TSS in 5 sts, TSS2TOG in next] 6 times. (36 sts)
Round 18: [TSS in 4 sts, TSS2TOG in next] 6 times. (30 sts)
Rnd 19: [TSS in 3 sts, TSS2TOG in next] 6 times. (24 sts)
Rnd 20: [TSS in 2 sts, TSS2TOG in next] 6 times. (18 sts)
Rnd 21: [TSS in next st, TSS2TOG in next] 6 times. (12 sts)
Bow:
With G-4.25mm crochet hook and Amore yarn (worsted weight yarn)
Ch 48
Bring first chain to hook to make a ring Rnd 1: SC in first chain and each ch around. (48 sts) Rnds 2-15: SC in each st around.
Fasten off with long tail.
Center of bow:
Ch 14 Row 1: SC in 2nd ch and across, ch 1, turn. (13 sts) Rows 2-3: SC in each st across, ch 1, turn.
Fasten off with long tail after row 3.
Assembly step:
Sew Center of bow to Bow. Sew Bow to Hat. See video tutorial for visual instructions.
Make Large Pom and sew to top of hat.
Fasten off, weave in all ends. Enjoy!
***You can always contact me if you have any problems with the pattern. I am happy to help if you have any questions along the way.
Enjoy this video and subscribe to my channel on YouTube for more tutorials on how to crochet!
Leave a comment, and share with your friends!
This post contains affiliate links, which I may be compensated for when you make a purchase. That means if you click on any link and buy from the linked websites, I will receive a small percentage of the value of your order. The amount you pay is not changed. Thank you for all your support in clicking the links in my blog!! You all are so amazing!! ~Nadia
A Pelerine Collar is a cape-like collar that goes to the shoulder or covers the shoulder. Such collars were popular in the 1830s and part of popular fashion. My spin off an old idea has me creating my very own crochet style pelerine collar in a more modern fashion statement.
Dress up a plain or simple top with this unique accessory that will have you loving this vintage inspired look.
Follow along with this video tutorial to learn how to make this collar:
My dad will continue to be the videographer, editor, and photographer for our videos when I move away.
Support YARNutopia today so we can continue to bring you clear, quality crochet tutorials even after I move into my new home!
There will be an added expense of more travel and hopefully this won’t deter our ability to provide consistent videos on a weekly basis.
Pattern:
Designed by Nadia Fuad
Questions? Leave a comment!
You may sell items made from my pattern, but please reference my name and Etsy Shop (YARNutopia).
Please do not copy and post this pattern and claim it as your own.
NOTES:
-This collar is worked in rows and then rounds.
-The yarn I used is a worsted weight size 4 medium yarn. I did not have the label but in the materials section of this pattern I did link the actual yarn I used.
-You can make more or less rows to fit around your neck
-I highly recommend blocking this collar after you make it.
Special Stitches Used in this pattern:
Ch: chain
St: Stitch
Sl st: slip stitch
SC: Single Crochet
BLO: Back Loop Only
YO: Yarn Over
HDC: Half Double Crochet
DC: Double Crochet
Cluster: [YO, insert hook, YO, pull through, YO pull through 2 loops on your hook] 3 times, YO pull through all loops on your hook. Cluster made.
Collar:
Neck: Work in BLO
Ch 16 Row 1: SC in 2nd ch from hook and next 4 chs, HDC in next 5 chs, DC in last 5 chs, turn. (15) Row 2: Ch 2 (does NOT count as anything) DC in 5 sts, HDC in 5 sts, SC in last 5 sts, ch 1, turn. Row 3: SC in 5 sts, HDC in 5 sts, DC in last 5 sts, turn. Rows 4-?: Repeat Rows 2 and 3 (if you want to make this larger or smaller, just repeat these 2 rows until your piece fits around your neck. I ended on row 32 or 33. End on a repeat of Row 3.
Next you will work in rounds. Do not attach the piece (you will sew on buttons later) (scroll down for more instructions)
Round 1: SC 80 sts evenly around the side of the piece (See video tutorial for visual instructions), Sl st to first stitch. Your piece should be closed (like it’s going to slip over your head).
Round 2: Ch 4 (counts as DC + ch 1), *[DC, Ch 1] in next st, repeat from * around entire piece. End with ch 1, sl st to 3rd ch of beginning ch 4.
Rnd 3: Sl st into ch 1 sp, Ch 1, [Cluster, Ch 2, Cluster] in same sp (this should be the very center back of your piece), *[Ch 1, Cluster in next ch sp] 19 times, ch 1, [Cluster, Ch 2, Cluster] in next ch sp, repeat from * around ending with ch 1 and sl st to first cluster.
Rnd 4: Sl st into ch 2 sp, [2 SC, ch 2, 2 SC] in ch 2 sp, *SC in each cluster AND in each ch 1 sp until next corner, [2 SC, ch 2, 2 SC] in next ch 2 sp, repeat from * around, ending with sc in last ch sp, sl st to first st.
Rnd 5: Sl st into corner ch 2 sp, Ch 3, sl st back into the ch 2 sp, *Ch 3, sk 2 sts, sl st in next st, repeat from * until next corner sl st into corner, ch 3, sl st back into corner ch 2 sp, repeat from * around, sl st to first ch of beg. ch 3.
Assembly: Sew buttons to top of the collar. Block this piece.
Fasten off, weave in all ends. Enjoy!
***You can always contact me if you have any problems with the pattern. I am happy to help if you have any questions along the way.
Enjoy this video and subscribe to my channel on YouTube for more tutorials on how to crochet!
Leave a comment, and share with your friends!
This post contains affiliate links, which I may be compensated for when you make a purchase. That means if you click on any link and buy from the linked websites, I will receive a small percentage of the value of your order. The amount you pay is not changed. Thank you for all your support in clicking the links in my blog!! You all are so amazing!! ~Nadia


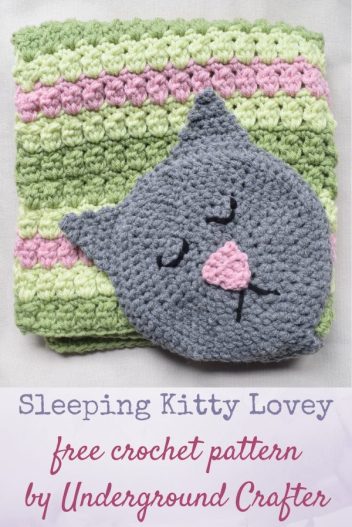


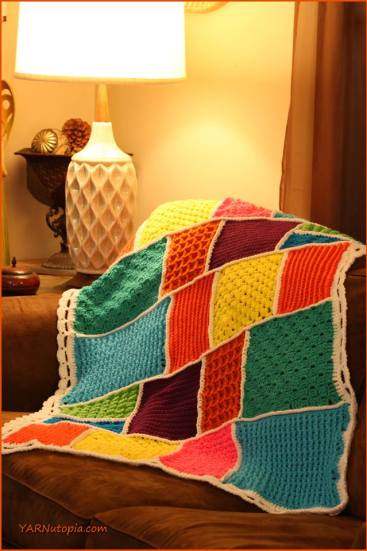


